CY-VHD9500U - Portable DVD Player PANASONIC - Free user manual and instructions
Find the device manual for free CY-VHD9500U PANASONIC in PDF.

| Product Type | Portable DVD Player |
| Brand | Panasonic |
| Model | CY-VHD9500U |
| Screen Size | 7 inches |
| Display Type | TFT LCD |
| Supported Disc Formats | DVD, DVD-R/RW, CD, CD-R/RW, VCD |
| Playback Functions | Repeat, A-B Repeat, Zoom, Subtitle, Audio Selection |
| Battery Type | Rechargeable Lithium-Ion |
| Battery Life | Approx. 3 hours |
| Power Input | AC 100-240V (50/60Hz), DC 12V Car Adapter |
| Dimensions (W x H x D) | 200 x 160 x 40 mm |
| Weight | Approx. 0.9 kg |
| Connectivity | AV Output, Headphone Jack, DC Input, AV Input |
| Special Features | Swivel Screen, Anti-Skip Protection, Remote Control |
| Safety Features | Auto Power Off, Overcharge Protection |
| Maintenance | Clean lens with blower, avoid direct sunlight |
| Accessories Included | Remote Control, AC Adapter, Car Adapter, AV Cables, Manual |
Frequently Asked Questions - CY-VHD9500U PANASONIC
User questions about CY-VHD9500U PANASONIC
0 question about this device. Answer the ones you know or ask your own.
Ask a new question about this device
Download the instructions for your Portable DVD Player in PDF format for free! Find your manual CY-VHD9500U - PANASONIC and take your electronic device back in hand. On this page are published all the documents necessary for the use of your device. CY-VHD9500U by PANASONIC.
USER MANUAL CY-VHD9500U PANASONIC
| Item Diagram Q'ty | ||
| Remote Control Unit(YEFX9995179) |  | 1 |
| IR Wireless Headphones(YEFX9992629) |  | 2 |
| Lithium Battery for Remote Control Unit | [YSXY] | 1 |
| Batteries for IR Wireless Headphones |  | 4 |
| Instruction Kit | ||
| Operating Instructions(YEFM284227) | 1 | |
| Installation Instructions(YEFM293246) | 1 | |
| Warranty Card, etc. | 1 set | |
| Power Connector(Main unit side)(YAJ024C100ZA) | 1 | |
| Power Connector(Vehicle side)(YAJ024C104ZA) | 1 | |
Note:
- The number in parenthesis underneath each accessory part name is the part number for maintenance and service.
- Accessories and their parts numbers are subject to modification without prior notice due to improvements.
| Item Diagram Qty | ||
| Paper Template(YEFM991521) | 1 | |
| Under Cover(YEFX9995134) |  | 1 |
| Slide Plate (upper)(YEFG013018) |  | 1 |
| Slide Plate (lower)(YEFG013017) |  | 1 |
| Base Plate(YEFG013016) |  | 1 |
| Space Washer (A)(YEFL02806) | 6 | |
| Space Washer (B)(YEFL02807) | 6 | |
| Space Washer (C)(YEFL02808) | 6 | |
| Space Washer (D)(YEFL02809) | 6 | |
| Screw (YEJS03250) | 12 | |
| Screw (YEJS05100) | 6 | |
| Screw (YEFJ05101) | 6 | |
| Nuts (YEJN01122) | 12 | |
| Push Nuts (YEJN03100) | 6 | |
| Spring Washer (XWA5BFZ) | 6 | |
| Flat Washer (XWE5E10FZ) | 6 | |
| Screw (for resin)(XTB3+10GFX) | 6 | |
| Cord Clamp(SHR4C102) | 2 | |
| Magic tape ("Velcro")(YFS014C089ZA)(YFS014C090ZA) | 1 pair | |
| Wiping Cloth(YEFX9991793) | 1 | |
Contents
Safety Information ...... Page 2 Notes on Use ...... 10 Installation Guide ...... 12
Features....13
System Upgrade 14
Discs/Cards that can be Played Back 15
Accessories....44
Name of Controls 46
Monitor Position Adjustment....50
Remote Control Unit Preparation....51
IR Wireless Headphones Preparation 52
General....54
Playing Discs (Disc General/DVD video/Video CD)....56
Playing Discs (DVD video/Video CD) 58
Playing Discs (CD/MP3) 60
VTR (Game etc.) 64
Playing SD Cards 66
Display (SCREEN) Settings....76
Other (USER) Settings 78
DVD video Settings 80
Aspect Ratio 84
Replacing the Bulb of the Dome Light....85
Troubleshooting....86
Notes on Discs/Cards 94
Language Code List 96
DefinitionofTerms....97
After-sales Service for Products....98
Specifications....100

This indicates an operation which can be performed using the main unit only.

This indicates an operation which can be performed using the remote control unit only.
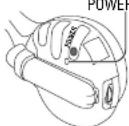
Name of Controls
Main Unit
II/▶ (Except SD mode)
- Pause (page 57, 60).
- Playback (page 57, 60).
SRC (Source) (POWER)
• Switches the power to on/off
(page 54).
When the main power
is on: blue
• Changes the source (page 54).
Dome light switch
DOOR: Dome light is
on when door is
opened.
OFF: Dome light is off.
ON: Dome light is on.
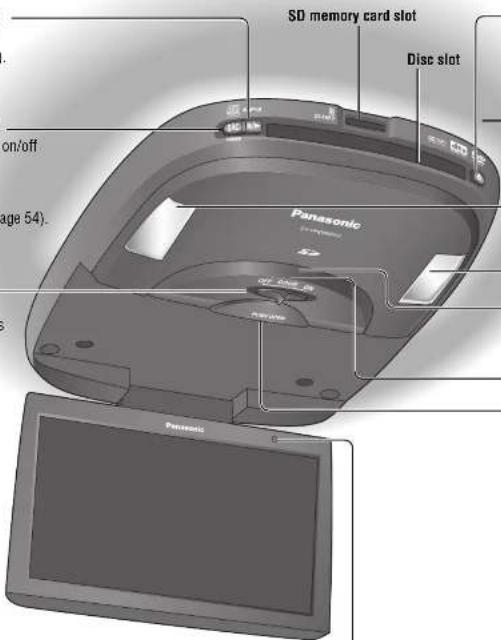
▲ (Eject)
Ejects the disc (page 56).
When a disc is in the main unit: blue
Blue ceiling reflected illumination
- Blue ceiling reflected illumination can be set to OFF (page 78).
Dome light (page 85)
Infrared transmitter
Used to transmit audio to IR wireless
headphones (page 52).
Remote control sensor
Display release button
(PUSH OPEN)
(page 50)
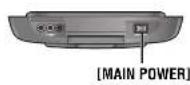
Main Unit (rear)
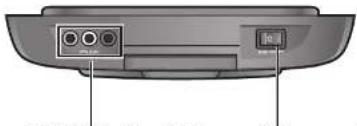
natural_image
Back view of a device showing two ports and a control panel (no text or symbols visible)Audio/video input terminal 2
[VTR(2)-IN] (VTR2)
Used to connect a game player or other device.
Main power switch
[MAIN POWER]
Turn the power off when the main unit is not going to be used for a prolonged period.

ON

OFF
Name of Controls (continued)
Remote Control Unit
Aim the remote control at the remote control sensor of the main unit and operate it.
![STOP ■ (STOP) ● Stops playback (page 57, 60). POWER SRC (Source) (POWER) ● Switches the power to on/off (page 54). ● Changes the source (page 54). TRACK / SEARCH ◀◀ ▶▶ (TRACK/SEARCH) ● Goes to beginning (page 57, 60). ● Fast forward/fast reverse (page 57, 60). ● Slow playback [▶▶] (page 57). MENU ● Shows the menu screen (page 76, 78). RETURN RET (RETURN) ● Returns to the previous display (page 58). ● Inputs the number again (page 58). ● Displays the video CD's menu (page 58). 1 SUBTITLE ● Switches the subtitle language (page 59). 2 AUDIO ● Switches the audio language (page 59). ● Switches between stereo or monaural sound (page 59). 3 ANGLE ● Switches the angle (page 59). 4 RANDOM ● Random playback (page 60). 5 SCAN ● Scan playback (page 61). 6 REPEAT ● Repeat playback (page 57, 60). 0 to 9 ● Selects an item on the menu (page 58). ● Selects a title/chapter/track/folder/file (page 58, 61). 1 to 7 ● Selects each setting menu (page 80). 0 ● Finish the setting (page 81). POWER SRC STOP PUASE II PLAY ▶ PLAY ▶ (PAUSE) ● Pause (page 57, 60). PLAY ▶ (PLAY) ● Playback (page 57, 60). [∧] [<] [√] [∧][∨]](/content/2026/05/1065556/images/9ffc70266271515c9c212639038a55c819a371482d3f25f1defbc96f208c3f78.jpg)
Monitor Position Adjustment
Open the Display Unit
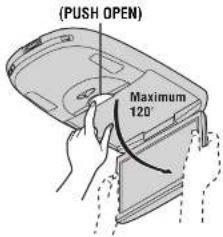
① Push the display release button (PUSH OPEN) until the display is unlocked.
(Press the button with one hand while holding the display with the other.)
② Open the display unit by both hands until a comfortable viewing angle is reached.
Close the Display Unit
Move the display unit by both hands until the display release button is locked.
Note:
- Always use both hands to open or close the display unit.
- Always check that the display release button is locked after closing the display unit.
- If the display unit cannot be locked, be sure to consult your dealer and remedy the situation.
Display Unit Lateral Angle Adjustment
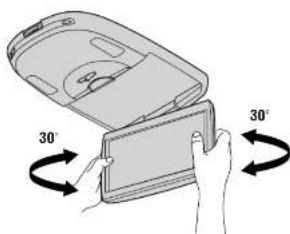
You can swivel it to the left and right, 30° each way.
Hold the display unit by the non-slip part in the upper half of it and adjust its lateral angle.
CY-VHD9500U
Remote Control Unit Preparation
Battery Installation
① Remove the battery holder.
With the remote control unit placed on a flat surface:
① Stick your thumbnail into the groove, and push the holder in the direction of the arrow, and at the same time
② Pull it out in the direction of the arrow using a tough pointed object.
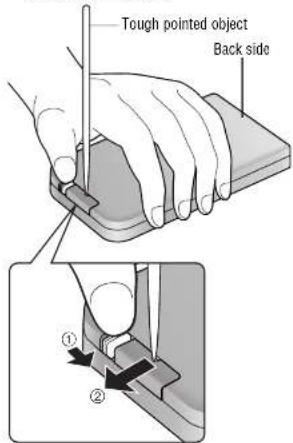
② Install the battery on the battery holder.
Set a new battery properly with its (+) side facing up as shown in the figure.
③ Insert the battery holder back into its original position.
Lithium battery (supplied)
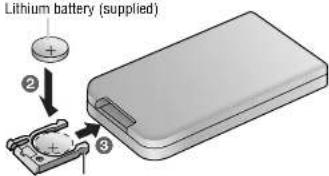
Battery holder
Battery Notes
- Battery type: Panasonic lithium battery (CR2025/1F) (supplied)
● Battery life: Approximately 6 months under normal use (at room temperature)
Caution:
- Improper use of the battery may cause overheating, an explosion or ignition, resulting in injury or a fire. Battery leakage may damage the product.
- Do not expose the remote control unit to direct sunlight.
- Do not recharge, disassemble, deform or heat the battery.
- Do not put the battery in fire or water.
- Immediately replace used up battery.
- Obey local ordinances when disposing of the battery.
Note:
- To ensure that the remote control unit is not lost or misplaced, use the accessory magic tape ("Velcro") to secure it at a safe place.
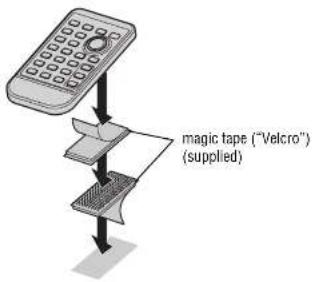
- Remove all oil, water, surfaces where the magic tapes are to be attached.
CY-VHD9500U
IR Wireless Headphones Preparation
Battery Installation (Inserting/Replacing the Batteries)
1

① Open the battery holder cover.
As shown in the figure, use the tool such as a slot-head screwdriver to disengage the bottom part of the battery holder cover, and then use your fingers to lift the top part free.
②

② Insert the battery.
Insert the battery in the correct direction, making sure that its positive and negative ends match the same symbols in the battery holder.
③
③ Replace the cover.
The cover is fixed in place with a click.
Note:
- One battery is required for the left and another for the right side of each headphone.
Battery Notes
Battery information:
● Battery type: Manganese R03, AAA, UM-4 dry cells (supplied)
- Battery life: Approximately 18 hours of continuous operation under normal use (at room temperature)
| Battery life POWER indicator | |
| When operation is possible | Lights up green. |
| When the battery needs to be replaced | Dims or falls to light. |
To check the remaining battery strength:
The POWER indicator on the right hand earpiece (R) dims or fails to light when the batteries are weak. Noise and interference also increase.
Change the batteries if any of these occur.
POWER indicator
(Right side)
Caution:
◆ Improper use of the battery may cause
overheating, an explosion or ignition, resulting in injury or a fire. Battery leakage may damage the product.
- Do not expose the IR wireless headphones to direct sunlight.
- Do not mix old and new batteries.
- Do not use alkaline dry cells. (There is the danger of liquid leakage.)
- Do not recharge, disassemble, deform or heat the battery.
- Do not put the battery in fire or water.
- Immediately replace used up battery
- Obey local ordinances when disposing of the battery.
How to Use the IR Wireless Headphones
Operations (Power and Volume)
POWER button
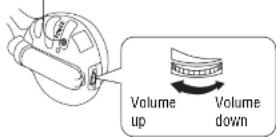
(Before wearing headphones)
① Turn the volume on the headphones all the way down.
② Press the POWER button.
• The POWER indicator lights up.
③ Turn the volume up slowly until you can hear the sound comfortably and clearly, and without distortion.
After Use
Press the POWER button to switch off.
Note:
- Refer to "When Listening with IR Wireless Headphones" (page 10).
The Use of Range
These headphones use infrared rays for operation. Use them within the range shown in the figure.
Plane view:
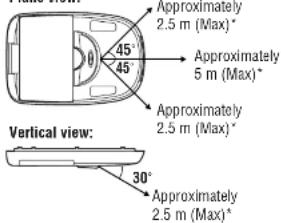
* Conditions: The batteries must be fully charged and in their normal status, room temperature must be the temperature, and there must be no obstructions between the main unit and IR wireless headphones.
Infrared receiving port
Note:
- Depending on the vehicle model and amount of charge remaining in headphone batteries, the actual range of use may be less than what is given in the figures above.
- If no infrared signals are received from the main unit for more than one minute after the headphones power has been turned on, the headphones power will be automatically turned off (auto power function).
General
![[SRC] (Source) (POWER)](/content/2026/05/1065556/images/0d83deaae659782c4a046f657bebd5fa073ddacfe9599136b6a61b3f018ce11c.jpg)
![[SRC] (Source) (POWER) POWER STOP PULSE PLAY 1 2 3 NICK PULSE SET 100000000000000000000000000000000000000000000000000000000000000000000000000000000 PULSE SET 1 2 3 NICK PULSE SET 10000000000000000000000000000000000000000000000 PULSE SET 1 2 3 NICK PULSE SET 1 2 3 NICK PULSE SET 1 2 3 NICK PULSE SET 1 2 3 NICK PULSE SET 1 2 3 NICK PULSE SET 1 2 3 NICK PULSE SET 1 2 3 NICK PULSE SET 1 2 3 NICK PULSE SET 1 2 3 NICK PULSE NET 1 2 3 NICK PULSE NET 1 2 3 NICK PULSE NET 1 2 3 NICK PULSE NET 1 2 3 NICK PULSE NET 1 2 3 NICK PULSE NET 1 2 3 NICK PULSE NET 1 2 3 NICK PULSE NET 1 2 3 NICK PULSE NET 1 6 9 NICK PULSE NET 1 6 9 NICK PULSE NET 1 6 9 NICK PULSE NET 1 6 9 NICK PULSE NET 1 6 9 NICK PULSE NET 1 6 9 NICK PULSE NET 1 6 9 NICK PULSE NET 1 6 9 NICK PULSE NET 1 6 9 NICK N/A ASPECT 9 SIME TELIANDER](/content/2026/05/1065556/images/7da2420f595a786bc5e98da647ff9266f1162bafbbdc1042b011ad3c47c83e9a.jpg)
CY-VHD9500U
Power
Preparation
① Turn your car's ignition key to the ACC or ON position.

② Switch [MAIN POWER] to ON. (page 47)
ON: Press [SRC] (Source) (POWER).

default: VTR1
OFF: Press and hold [SRC] (Source)
(POWER) for more than 2 seconds.
Perform the following adjustments to suit your personal preference.
• Monitor position adjustment (page 50)
- Dimmer (page 76)
- Contrast (page 76)
- Brightness (page 76)
- Color depth (page 76)
- Tint (page 76)
Note:
- Turn the MAIN POWER switch off when the unit is not going to be used for a prolonged period.
Source
Press [SRC] (Source) (POWER).
![PANASONIC CY-VHD9500U - Press [SRC] (Source) (POWER). - 1](/content/2026/05/1065556/images/5ba81eb7e6fc21863ae7b9c7d290f433bc56ba7ef712c90c785a87af612a2814.jpg)
Source (continued)
Example:
DVD video mode (OSD on, see below)
Current operation mode
(Loading, Ejecl, Play, Pause, Stop, etc.)
When "⊗" is displayed:
The operation is prohibited by the unit or disc.
Volume
When listening to sound through the accessory IR wireless headphones
Adjust the volume on the IR wireless headphones (page 53).
When listening to sound from speakers through an external device
Adjust the volume using the control on the external device which is connected. For further details, refer to the instructions for the external device (page 14).
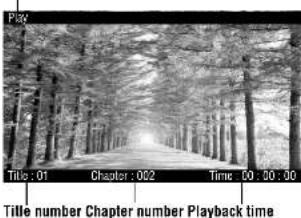
OSD (On-Screen Display)
| DVD video/ Video CD | Example OSD ON Play 165.20 Clogos 102 Time:30:00:00 | (During playback) Press [OSD]. | Example OSD OFF Play |
| CD | Example Play CD/MP3 PLAYER MODE Track: 201 Time: 00:00:01 | Example Play Title : BEST SELECTION* Track 01 : LOVE* Antal : ABC* Track 001 Time: 30:00:01 | |
| MP3 | Example Example Play CD/MP3 PLAYER MODE Fold: 0.72 File: 0.72 Time: 00:30:35 | Play Radio : BEST SELECTION File : Love LDO log Album : DIST SELLCTION File : DOVE Aldal : ASO Fold: 0.72 File: 0.72 Time: 00:00:05 |
** No CD-Text" appears for discs without CD-TEXT.
*** No Text" appears for discs without ID3.
CY-VHD9500U