KIH 433-3B - Cooker Kernau - Free user manual and instructions
Find the device manual for free KIH 433-3B Kernau in PDF.

| Product Type | Freestanding Cooker |
| Brand | Kernau |
| Model | KIH 433-3B |
| Dimensions (H x W x D) | 85 cm x 60 cm x 60 cm |
| Weight | Approximately 55 kg |
| Power Supply | Gas (hob) + Electric 230V (oven) |
| Hob Type | Gas burners (4 burners) |
| Oven Type | Electric fan-assisted oven |
| Oven Capacity | Approximately 65 liters |
| Functions | Grill, bake, defrost, fan-assisted cooking |
| Control Type | Knobs for hob and oven |
| Cleaning | Enamel oven interior for easy cleaning |
| Safety Features | Flame failure device on gas burners, child lock |
| Energy Class | A+ |
| Spare Parts Availability | Service parts available for at least 10 years |
| Warranty | 2 years manufacturer warranty |
Frequently Asked Questions - KIH 433-3B Kernau
User questions about KIH 433-3B Kernau
0 question about this device. Answer the ones you know or ask your own.
Ask a new question about this device
Download the instructions for your Cooker in PDF format for free! Find your manual KIH 433-3B - Kernau and take your electronic device back in hand. On this page are published all the documents necessary for the use of your device. KIH 433-3B by Kernau.
USER MANUAL KIH 433-3B Kernau
natural_image
Pure geometric lines and symbols without any text, numbers, or labelsSZANOWNY KLIENCIE,
natural_image
Pure graphical icons including square, plus, clock, and directional indicators on dark background (no text or symbols)ROZDZIAŁ 7. WYBÓR WŁAŚCIWYCH NACZYŃ KUCHENNYCH

UWAGA
natural_image
Simple line drawing of a cooking pot with a U-shaped magnet (no text or symbols)natural_image
Three identical cooking pots with crossed-out X marks, no text or symbols presentnatural_image
Four identical cooking pots with crossed-out X marks, shown in sequence (no text or symbols)ROZDZIAŁ 8. UŻYWANIE PŁYTY INDUKCYJNEJ
ABY ROZPOCZĄĆ GOTOWANIE
natural_image
Simple line drawing of a hand pointing upward with a numbered circle (no text or symbols)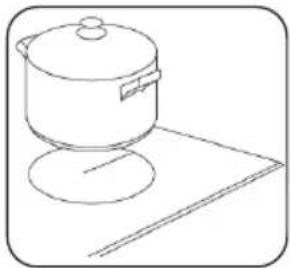
natural_image
Line drawing of a cooking pot on a stand (no text or symbols)JEŚLI NA WYŚWIETLACZU MIGA SYMBOL. ≧ □ ≲ NA PRZEMIAN Z USTAWIENIEM CIEPŁA
Oznacza to, że:
| L(mm) | W(mm) | H(mm) | D(mm) | A(mm) | B(mm) | X(mm) |
| 440 | 510 | 60 | 55 | 430 | 490 | 50 mini |
N (niebieski/szary)
L (brązowy/czarny)
(Zielony/żółty)

natural_image
Symbol of a trash bin crossed with a diagonal line, representing waste sorting or restriction (no text present)
KERNAU
INSTRUCTION MANUAL / INSTALLIATION MANUAL
INDUCTION HOB
KIH 433-3B
natural_image
Pure geometric lines and symbols without any text, numbers, or labelsThank you for choosing this product.
This User Manual contains important safety information and instructions on the operation and maintenance of your appliance. Please take the time to read this User Manual before using your appliance and keep this book for future reference.
| Icon | Caption | Description |
 | Warning | Risk of serious injury or death |
 | Risk of electric shock | Dangerous voltage |
 | Fire | Risk of fire / flammable materials |
 | Attention | Risk of injury or material damage |
 | Important/Note | Information on correct operation of the system |
 | Read the instructions | |
 | Hot surface | |
CONTENTS
CHAPTER 1. Safety warnings....23
CHAPTER 2. Product overview....25
CHAPTER 3. User interface....25
Heating zone power....26
CHAPTER 4. A word on Induction Cooking ....27
CHAPTER 5. Before using your new induction hob....27
CHAPTER 6. Using the Touch Controls....27
CHAPTER 7. Choosing the right cookware....28
CHAPTER 8. Using your induction hob....29
To start cooking....29
If the display flashes alternately with the heat setting....29
When you have finished cooking....29
Using the Boost function....30
Using Child Lock Function 30
Over-temperature protection 30
Detection of small articles....30
Auto shutdown protection 30
Using the Timer....31
Using the Timer as a Minute Minder....31
Setting the Timer to turn one or more cooking zones off....31
CHAPTER 9. Failure display and inspection....32
CHAPTER 10. Installation ....33
Selection of installation equipment 33
Before you install the hob, make sure that....34
When you have installed the hob, make sure that....34
Before locating the fixing brackets....35
Locating the fixing brackets 35
Connecting the hob to the mains power supply....36
CHAPTER 11. Disposal of used equipment ....37
CHAPTER 1. SAFETY WARNINGS
Your safety is important to us. Please read this information before using your cooktop.

WARNING
The appliance is not to be used by persons (including children) with reduced physical, sensory or mental capabilities, or lack of experience and knowledge, unless they have been given supervision or instruction. Children being supervised not to play with the appliance.

WARNING
If the surface is cracked, switch off the appliance to avoid the possibility of electric shock, for hob surfaces of glass-ceramic or similar material which protect live parts.

WARNING
A steam cleaner is not be used.

WARNING
Metallic objects such as knives, forks, spoons and lids should not be placed on the hob surface since they can get hot.

WARNING
After use, switch off the hob element by its control and do not rely on the pan detector.

WARNING
That the appliance is not intended to be operated by means of external timer or separated remote-control system.

DANGER OF FIRE
Do not store items on the cooking surfaces.

CAUTION
The cooking process has to be supervised. A short term cooking process has to be supervised continuously.

WARNING
Unattended cooking on a hob with fat or oil can be dangerous and may result in a fire.

WARNING
If the supply cord is damaged, it must be replaced by the manufacturer, its service agent or similar qualified persons in order to avoid a hazard.

WARNING
This appliance can be used by children aged from 8 years and above and persons with reduced physical, sensory or mental capabilities or lack of experience and knowledge if they have been given supervision or instruction concerning use of the appliance in a safe way and understand the hazards involved. Children shall not play with the appliance. Cleaning and user maintenance shall not be made by children without supervision.

WARNING
The appliance and its accessible parts become hot during use.

WARNING
Care should be taken to avoid touching heating elements.

WARNING
Children less than 8 years of age shall be kept away unless continuously supervised.

WARNING
Unattended cooking on a hob with fat or oil can be dangerous and may result in fire.

WARNING
NEVER try to extinguish a fire with water, but switch off the appliance and then cover flame e.g. with a lid or a fire blanket.

ATTENTION
The cooking process has to be supervised. A short term cooking process has to be supervised continuously.
WARNING / FIRE
Danger of fire: do not store items on the cooking surfaces.

WARNING
Use only hob guards designed by the manufacturer of the cooking appliance or indicated by the manufacturer of the appliance in the instructions for use as suitable or hob guards incorporated in the appliance. The use of inappropriate guards can cause accidents.

WARNING
Power cord can't accessible after installation.
Congratulations on the purchase of your new Induction Hob.
We recommend that you spend some time to read this Instruction / Installation Manual in order to fully understand how to install correctly and operate it. For installation, please read the installation section. Read all the safety instructions carefully before use and keep this Instruction / Installation Manual for future reference.
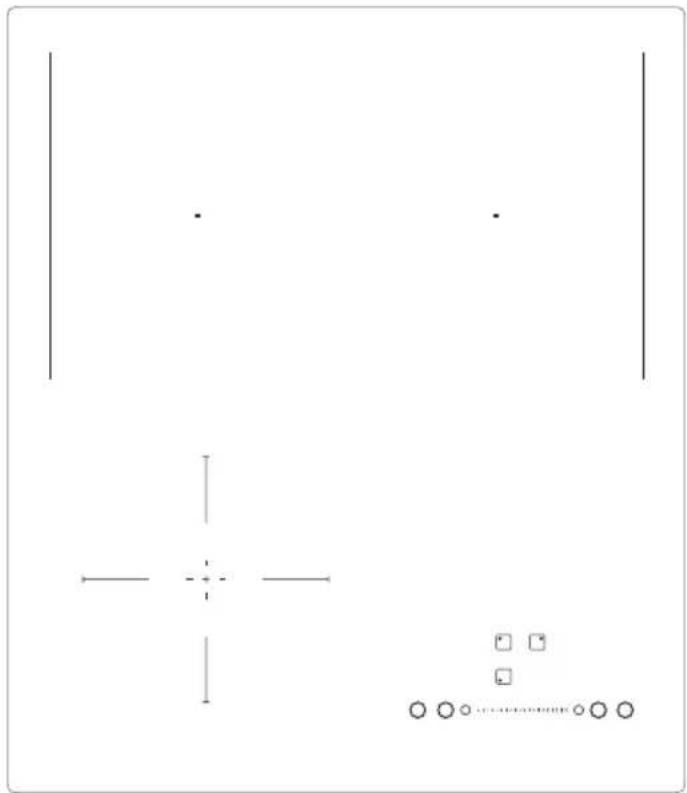
CHAPTER 2. PRODUCT OVERVIEW
Top view
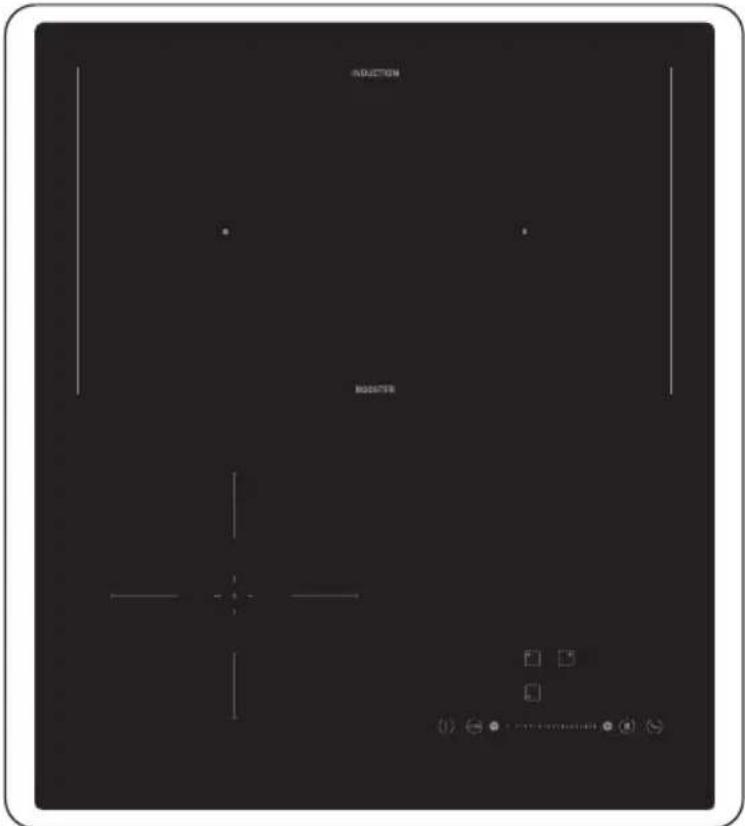
CHAPTER 3. USER INTERFACE
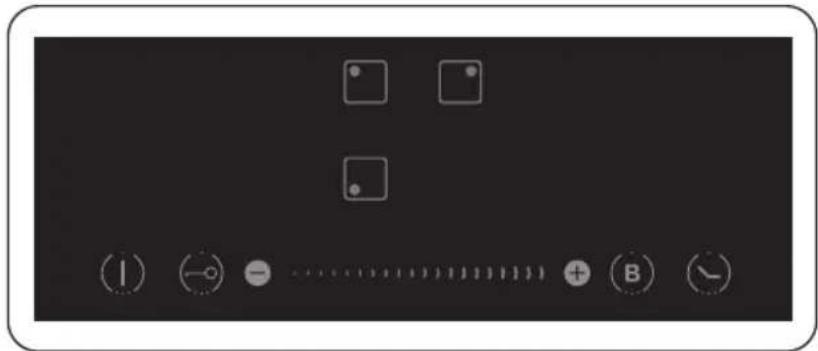
| Reference | Description | |
| A |  | Zone select key |
| B |  | Child lock key |
| C |  | ON / OFF key |
| D |  | Power / Timer regulating key |
| E |  | Boost control key |
| F |  | Timer key |
HEATING ZONE POWER
| Heating Zone | Max. Power (220-240V ~ 50/60 Hz) |
 | 1200/1500W |
 | 2000/2800W |
 | 1500/2000W |
| TOTAL POWER | 5100W (230V~) |
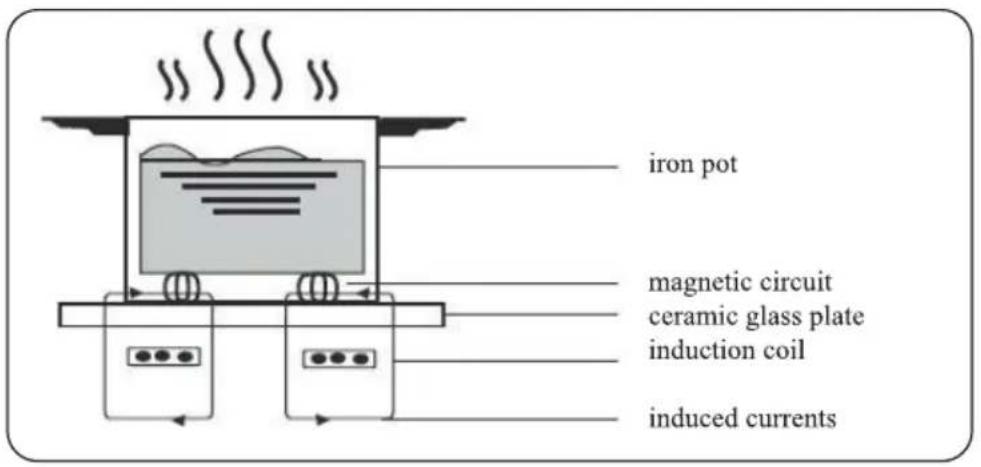
CHAPTER 4. A WORD ON INDUCTION COOKING
Induction cooking is a safe, advanced, efficient, and economical cooking technology. It works by electromagnetic vibrations generating heat directly in the pan, rather than indirectly through heating the glass surface. The glass becomes hot only because the pan eventually warms it up.
CHAPTER 5. BEFORE USING YOUR NEW INDUCTION HOB
- Read this guide, taking special note of the 'Safety warnings' section.
- Remove any protective film that may still be on your Induction hob.
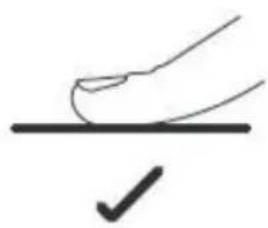
CHAPTER 6. USING THE TOUCH CONTROLS
• The controls respond to touch, so you don't need to apply any pressure.
• Use the ball of your finger, not its tip.
• You will hear a beep each time a touch is registered.
• Make sure the controls are always clean, dry, and that there is no object (e.g. a utensil or a cloth) covering them. Even a thin film of water may make the controls difficult to operate.
natural_image
Simple line drawing of a hand pressing a button on a horizontal line with a checkmark below (no text or symbols)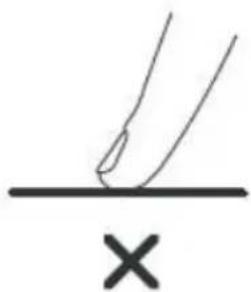
natural_image
Simple line drawing of a hand pressing a mark on a horizontal line with an 'X' below (no text or symbols)CHAPTER 7. CHOOSING THE RIGHT COOKWARE

ATTENTION
Only use cookware with a base suitable for induction cooking. Look for the induction symbol on the packaging or on the bottom of the pan.
• You can check whether your cookware is suitable by carrying out a magnet test. Move a magnet towards the base of the pan. If it is attracted, the pan is suitable for induction.
• If you do not have a magnet:
- Put some water in the pan you want to check.
- If U does not flash in the display and the water is heating, the pan is suitable.
• Cookware made from the following materials is not suitable: pure stainless steel, aluminum or copper without a magnetic base, glass, wood, porcelain, ceramic, and earthenware.
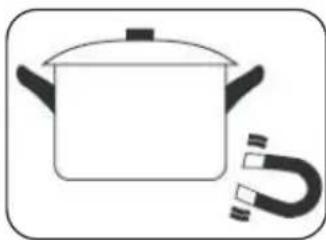
natural_image
Simple line drawing of a cooking pot with a U-shaped magnet attached (no text or symbols)Do not use cookware with jagged edges or a curved base.
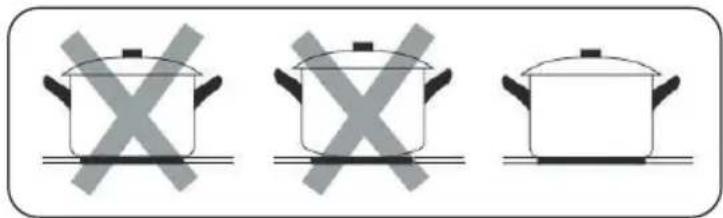
natural_image
Three identical cooking pots with crossed-out X marks, placed horizontally on a line (no text or symbols)Make sure that the base of your pan is smooth, sits flat against the glass, and is the same size as the cooking zone. Use pans whose diameter is as large as the graphic of the zone selected. Using a pot a slightly wider energy will be used at its maximum efficiency. If you use smaller pot efficiency could be less than expected. Pot less than 140 mm could be undetected by the hob. Always centre your pan on the cooking zone.
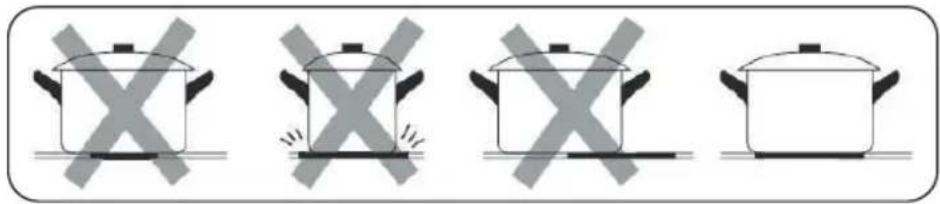
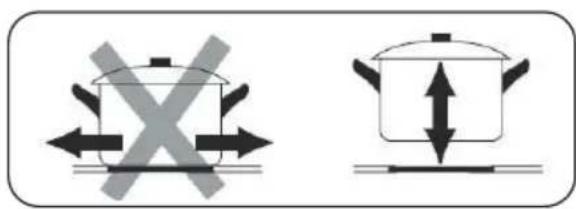
natural_image
Four identical cooking pots with crossed-out X marks, no text or symbols presentAlways lift pans off the Induction hob – do not slide, or they may scratch the glass.
CHAPTER 8. USING YOUR INDUCTION HOB
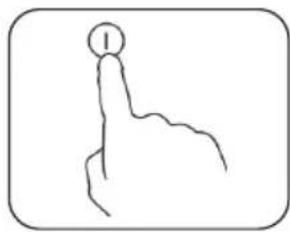
TO START COOKING
- Touch the ON/OFF key (A) for 3 seconds. After power on, the buzzer beeps once, all displays show “-”, indicating that the induction hob has entered the state of standby mode.
- Place a suitable pan on the cooking zone that you wish to use.
• Make sure the bottom of the pan and the surface Of the cooking zone are clean and dry.
-
According to the heating zone where the pan is placed, select a relevant zone select key by pressing “○” key (A). The symbol 0. selected will stay fully it.
-
Select the power level by pressing the "+"key ⏻ or "-"key ⊕
-
The power level will start at 5. Pressing the “+” will count up the power levels from 5 to 9 in numerical order. Pressing the “-” key will take the power straight from 9 to 0.
-
If you don't choose a heat setting within 1 minute, the induction hob will automatically switch off. You will need to start again at step 1.
• You can modify the heat setting at any time during cooking.
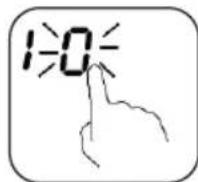
IF THE DISPLAY FLASHES ≧ ⊥ ≲ ALTERNATELY WITH THE HEAT SETTING
This means that:
• You have not placed a pan on the correct cooking zone or,
• the pan you're using is not suitable for induction cooking or,
• the pan is too small or not properly centred on the cooking zone.
No heating takes place unless there is a suitable pan on the cooking zone. The display will automatically turn off after 1 minutes if no suitable pan is placed on it.
WHEN YOU HAVE FINISHED COOKING
- Select the cooking zone (A)
- Press the “-” key will decrease the power to “0” level.

NOTE:
'H' will show which cooking zone is hot to touch. It will disappear when the surface has cooled down to a safe temperature. It can also be used as an energy saving function if you want to heat further pans, use the hotplate that is still hot.
USING FREEZONE FUNCTION
You can activate/deactivate the freezone in the upper zone by pressing and holding the upper left and upper right zone buttons simultaneously for 3 seconds. (☐☐)
natural_image
Simple line drawing of a hand pointing upward with a circular mark on the index finger (no text or symbols)
natural_image
Line drawing of a cooking pot on a stand (no text or symbols)USING THE BOOST FUNCTION
Activated the boost function
- Select the heating zone by touching the zone select key (A).
- Touching the boost control key(E), the zone indicator show "P." and the power reach Max.

Cancel the Boost function
- Touching the relevant zone select key(A) that you wish to cancel.
- Touching the slider regulating key(D) to cancel the Boostfunction, then the cooking zone will revert to level 9.
• The function can work in any cooking zone.
• The cooking zone returns to level 9 after 5 minutes.
USING CHILD LOCK FUNCTION
• You can lock the controls to prevent unintended use (for example children accidentally turning the cooking zones on).
• When the controls are locked, all the controls except the OFF control are disabled.
To lock the controls
Touch the keylock control

for 3 seconds. The timer indicator will show "Lo"
To unlock the controls
- Make sure the Induction hob is turned on.
- Touch and hold the keylock control for a while
- You can now start using your Induction hob.

ATTENTION
When the hob is in the lock mode, all the controls are disable expect OFF, you can always turn the hob off with the OFF control in an emergency, but you shall unlock the hob first in the next operation.
OVER-TEMPERATURE PROTECTION
A temperature sensor equipped can monitor the temperature inside the Induction hob. When an excessive temperature is monitored, the Induction hob will stop operation automatically.
DETECTION OF SMALL ARTICLES
When an unsuitable size or non-magnetic pan (e.g. aluminium), or some other small item (e.g. knife, fork, key) has been left on the hob, the hob automatically go on to standby in 1 minute. The fan will keep cooking down the induction hob for a further 1 minute.
AUTO SHUTDOWN PROTECTION
Auto shut down is a safety protection function for your induction hob. It shut down automatically if ever you forget to turn off your cooking. The default working times for various power levels are shown in the below table:
| Power level | 1~3 | 4~6 | 7~8 | 9 |
| Default working timer (min) | 360 | 180 | 120 | 90 |

ATTENTION
When the pot is removed, the induction hob can stop heating immediately and the hob automatically switch off after 2 minute.

ATTENTION
People with a heart pace maker should consult with their doctor before using this unit.
USING THE TIMER
You can use the timer in two different ways:
• You can use it as a minute minder. In this case, the timer will not turn any cooking zone off when the set time is up.
• You can set it to turn one cooking zone off after the set time is up.
• You can set the timer for up to 99 minutes.
USING THE TIMER AS A MINUTE MINDER
If you are not selecting any cooking zone
- Make sure the cooktop is turned on.

NOTE
You can use the minute minder even if you're not selecting any cooking zone.
- Touch the Timer key(F). The minder indicator will start flashing "10", and you can set the timer at this point.
- Using the “+” or ”-” buttons, you can realize the setting of timing from 1 to 99 minutes. Hint: Touch the “-” or ”+” control of the timer once to decrease or increase by 1 minute. Touch and hold the “-” or ”+” control of the timer to decrease or increase by 10 minutes. Touching the “-” and ”+” together, the timer is cancelled, and the. timer indicator will turn off.
-
When the time is set, it will begin to count down immediately. The display will show the remaining time.
-
Buzzer will bips for 30 seconds and the timer indicator will turn off when the setting time finished.

NOTE
Minute minder only work at normal model.
SETTING THE TIMER TO TURN ONE OR MORE COOKING ZONES OFF
If the timer is set on one zone:
- Select the relevant cooking zone which is working by touching the zone select key (A)

-
Press the Timer key(F), the minder indicator will start flashing "10", and you can set the timer at this point.
-
Using the “+” or “-” buttons, you can realize the setting of timing from 1 to 99 minutes. Hint: Touch the “-” or “+” control of the timer once to decrease or increase by 1 minute. Touch and hold the “-” or “+” control of the timer to decrease or increase by 10 minutes. Touching the “-” and “+” together, the timer is cancelled, and the. timer indicator will turn off.
-
When the time is set, it will begin to count down immediately. The display will show the remaining time and the timer indicator flash for 5 seconds.

NOTE
The red dot next to power level indicator will illuminate indicating that zone is selected.

ATTENTION
The red dot next to power level indicator will illuminate indicating that zone is selected.
- When cooking timer expires, the corresponding cooking zone will be switch off automatically. Other cooking zone will keep operating if they are turned on previously.
- When using "the timer as an alarm" and "the timer to switch off the zones" together, the display will show the remaining time of alarm as first priority. Press cooking zone to show the remaining time of switch off timer.
CHAPTER 9. FAILURE DISPLAY AND INSPECTION
If an abnormality comes up, the induction hob will enter the protective state automatically and display corresponding protective codes::
| Error message | Possible cause | What to do |
| ∪ | No pot or pot not suitable | Replace the pot |
| ERO3 | Water or pot on the glass over the control | Clean the user interface |
| F1E | The connection between the display board and the left mainboard is fail (the cooking zone which indicator showing 'E') | 1. Connection cable not correctly plugged or defective;2. Replace the Mainboard |
| F3E | Coil temperature sensor failure. (the cooking zone which indicator showing 'E') | Replace the coil sensor |
| F4E | Mainboard temperature sensor failure (the cooking zone which indicator showing 'E') | Replace the mainboard |
| E1E | Temperature sensor of the ceramic glass plate is high | Please restart after the induction hob cools down |
| E2E | Temperature sensor of the IGBT is high | Please restart after the induction hob cools down |
| E3E | Abnormal supply voltage (too high) | Please inspect whether power supply is normal; Power on after the power supply is normal |
| E4E | Abnormal supply voltage (too low) | Please inspect whether power supply is normal; Power on after the power supply is normal |
| E5E | Temperature sensor failure (the cooking zone which indicator showing ‘E’) | Connection cable not correctly plugged or assemble defective |
The above are the judgement and inspection of common failures. Please do not disassemble the unit by yourself to avoid any dangers and damages to the induction hob and please contact the supplier.
CHAPTER 10. INSTALLATION
SELECTION OF INSTALLATION EQUIPMENT
Cut out the work surface according to the sizes shown in the drawing. For the purpose of installation and use, a minimum of 5 cm space shall be preserved around the hole.
Be sure the thickness of the work surface is at least 30mm . Please select heat-resistant work surface material to avoid larger deformation caused by the heat radiation from the hotplate. As shown below:
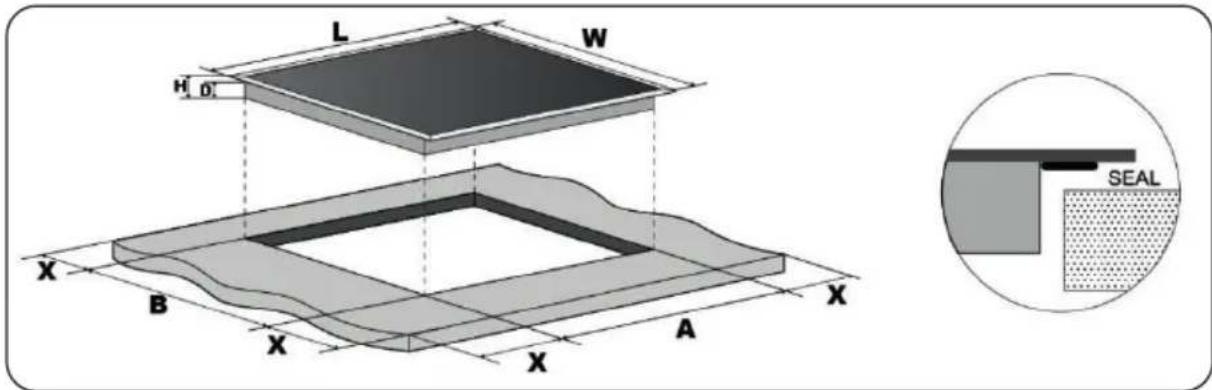
| L(mm) | W(mm) | H(mm) | D(mm) | A(mm) | B(mm) | X(mm) |
| 440 | 510 | 60 | 55 | 430 | 490 | 50 mini |
Under any circumstances, make sure the Induction cooker hob is well ventilated and the air inlet and outlet are not blocked. Ensure the induction cooker hob is in good work state. As shown below

NOTE
The safety distance between the hotplate and the cupboard above the hotplate should be at least 760 mm.
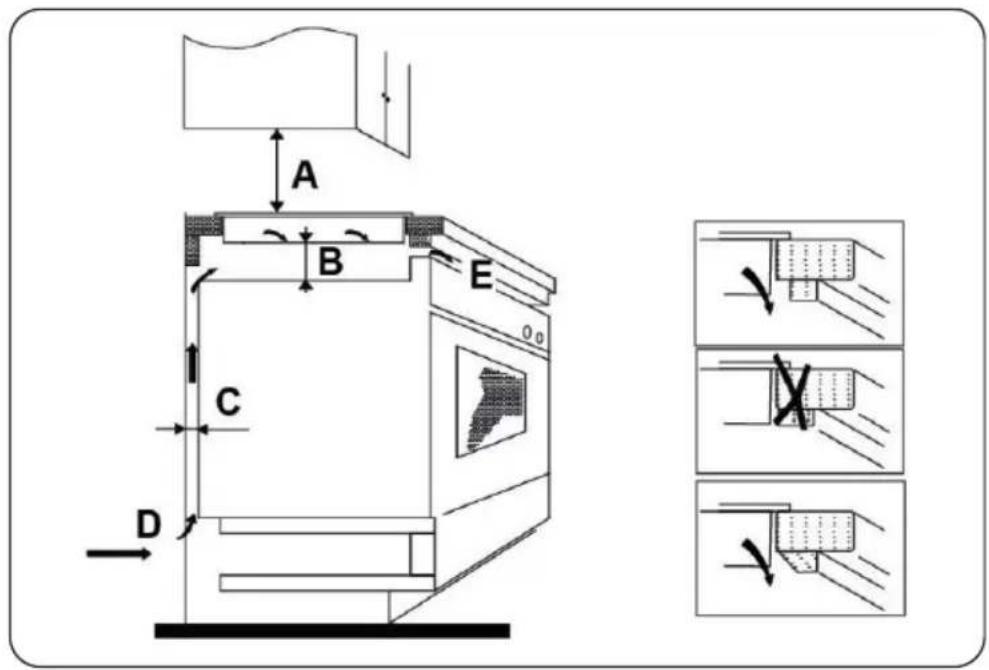
• the work surface is square and level, and no structural members interfere with space requirements
• the work surface is made of a heat-resistant material
• if the hob is installed above an oven, the oven has a built-in cooling fan
• the installation will comply with all clearance requirements and applicable standards and regulations
• a suitable isolating switch providing full disconnection from the mains power supply is incorporated in the permanent wiring, mounted and positioned to comply with the local wiring rules and regulations.
The isolation switch must be of an approved type and provide a 3 mm air gap contact separation in all poles (or in all active [phase] conductors if the local wiring rules allow for this variation of the requirements)
• the isolating switch will be easily accessible to the customer with the hob installed
• you consult local building authorities and by-laws if in doubt regarding installation
- you use hest-resistant and easy-to-clean finishes (such as ceramic tiles) for the wall surfaces surrounding the hob.
WHEN YOU HAVE INSTALLED THE HOB, MAKE SURE THAT
• the power supply cable is not accessible through cupboard doors or drawers
• there is adequate flow of fresh air from outside the cabinetry to the base of the hob
• if the hob is installed above a drawer or cupboard space, a thermal protection barrier is installed below the base of the hob to avoid touching the bottom of the hob
• the isolating switch is easily accessible by the customer
BEFORE LOCATING THE FIXING BRACKETS
The unit should be placed on a stable, smooth surface (use the packaging). Do not apply force onto the controls protruding from the hob.
LOCATING THE FIXING BRACKETS
- The unit should be placed on a stable, smooth surface (use the packaging). Do not apply force onto the controls protruding from the hob.
![fig. 1 [01] 01 [04] x1](/content/2026/05/1065462/images/69a89ee8495bdc9fddd3a3ee903ae1743e2fe741b96ae5816a5eecb62f00ef25.jpg)
Stretch out the supplied seal along the underside edge of the hob, ensuring the ends overlap.
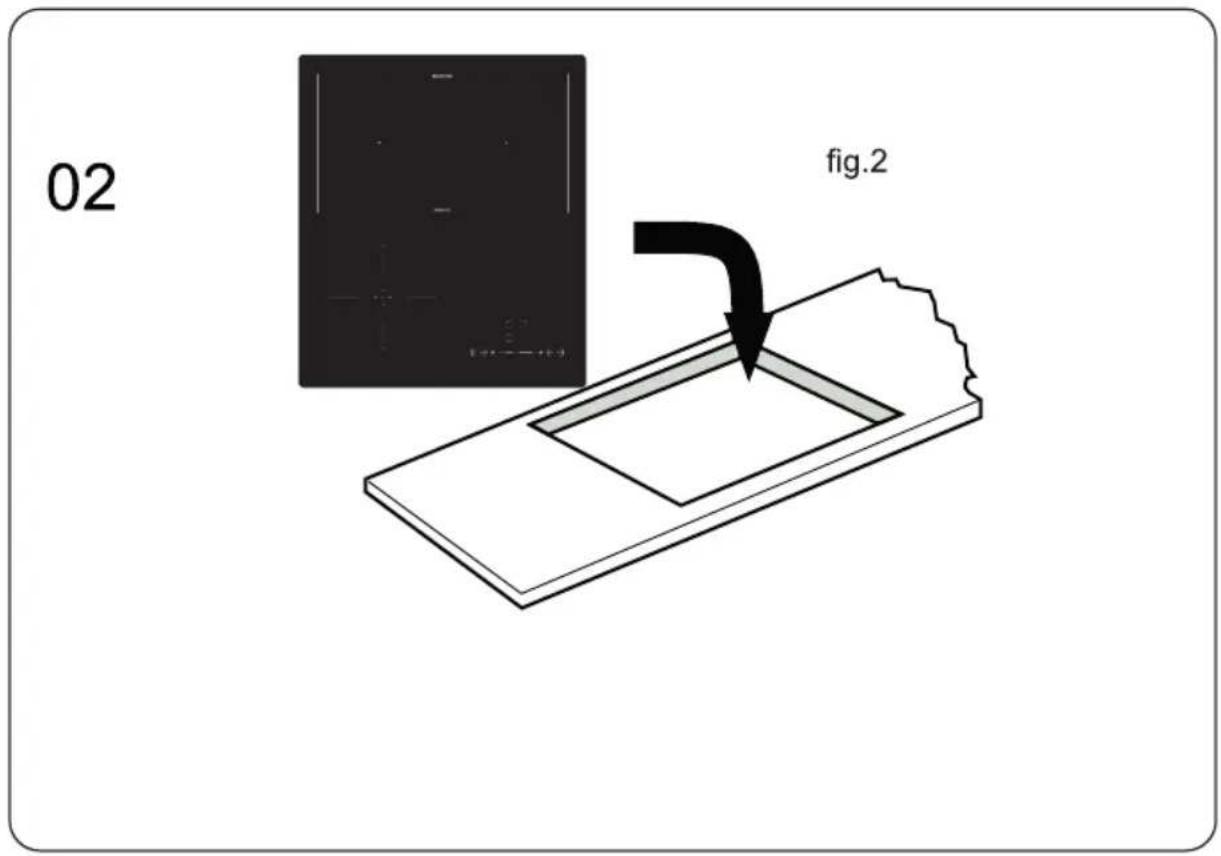
Do not use adhesive to fix the hob into the worktop.
Once the seal is fitted position the hob into the cutout in the worktop. Apply gentle downwards pressure onto the hob to push it into the worktop ensuring a good seal around the outer edge.

CAUTIONS
- The induction hotplate must be installed by qualified personnel or technicians. We have professionals at your service. Please never conduct the operation by yourself.
- The hob will not be installed directly above a dishwasher, fridge, freezer, washing machine or clothes dryer, as the humidity may damage the hob electronics.
- The induction hotplate shall be installed such that better heat radiation can be ensured to enhance its reliability.
- The wall and induced heating zone above the table surface shall withstand heat.
- To avoid any damage, the sandwich layer and adhesive must be resistant to heat.
CONNECTING THE HOB TO THE MAINS POWER SUPPLY

ATTENTION
This hob must be connected to the mains power supply only by a suitably qualified person. Before connecting the hob to the mains power supply, check that:
- the domestic wiring system is suitable for the power drawn by the hob
- the voltage corresponds to the value given in the rating plate
- the power supply cable sections can withstand the load specified on the rating plate.
To connect the hob to the mains power supply, do not use adapters, reducers, or branching devices, as they can cause overheating and fire.
The power supply cable must not touch any hot parts and must be positioned so that its temperature will not exceed 75^ C at any point.

ATTENTION
Check with an electrician whether the domestic wiring system is suitable without alterations. Any alterations must only be made by a qualified electrician.
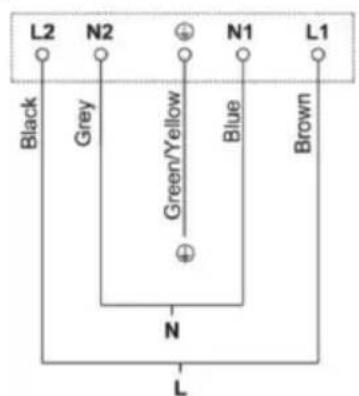
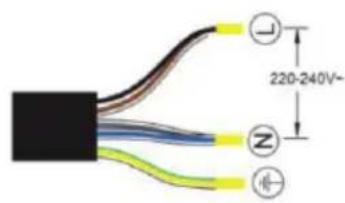
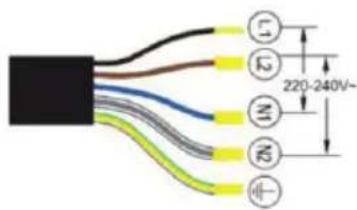
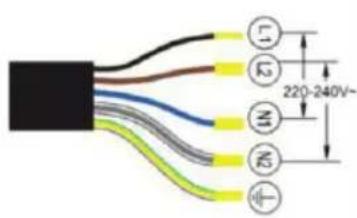
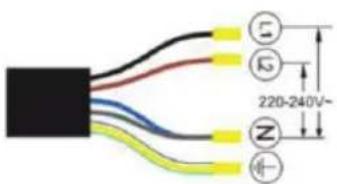
N (Blue/Grey)
L (Brown/Black)
(Green/Yellow)
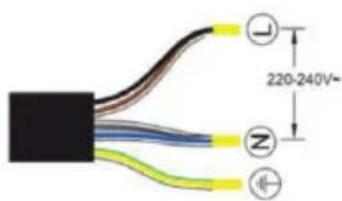
• If the cable is damaged or to be replaced, the operation must be carried out the by after-sale agent with dedicated tools to avoid any accidents.
• If the appliance is being connected directly to the mains an omnipolar circuit-breaker must be installed with a minimum opening of 3 mm between contacts.
- The installer must ensure that the correct electrical connection has been made and that it is compliant with safety regulations.
• The cable must not be bent or compressed.
• The cable must be checked regularly and replaced by authorised technicians only.
CHAPTER 11. DISPOSAL OF USED EQUIPMENT
This device has been designed and manufactured of high-quality reusable materials and components.
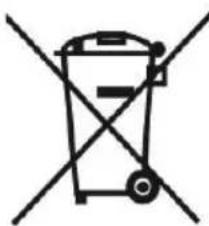
The symbol of the crossed waste container placed on the product (Fig. A) means that the product is subject to selective collection in accordance with the provisions of Directive 2012/19/EU of the European Parliament and of the Council. a crossed-out wheelie bin symbol (Fig. B) placed on the product means that the product contains batteries that are subject to separate collection in accordance with the provisions of Directive 2006/66/EC of the European Parliament and of the Council. Such marking informs that electrical and electronic equipment and batteries (if any) must not be disposed of with other household waste after the period of use.
The user is obliged to return waste equipment and batteries (if any) to collection points for waste electrical and electronic equipment and batteries (if any). Collectors of such waste, including waste equipment collectors, treatment plants, distributors (shops), municipal waste separate collection points (municipal units), and other entities specified by law form an appropriate system to return this kind of equipment.
Correct disposal of waste equipment and batteries (if any) allows avoiding consequences that may be harmful to health and the environment, caused by the possible presence of hazardous components in the equipment and batteries, and inappropriate storage and processing of such equipment and batteries. Households play an important role in contributing to the reuse and recovery, including recycling, of waste equipment. At this stage, attitudes are formed, affecting the common good, which is a clean natural environment.
Moreover, households are one of the largest users of small equipment and the rational management thereof at this stage affects the recovery of secondary raw materials. Penalties may be imposed in accordance with national legislation for improper disposal of this product. If the device has a lock, please remove it for the safety of all persons who may later come into contact with the device. Some refrigerators and freezers contain insulation material and CFC refrigerant. Therefore, be careful not to pollute the environment when you dispose of your old refrigerator.

Fig. A
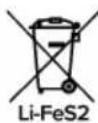
Fig. B
natural_image
Symbol of a trash bin crossed out by two crossed lines (no text or numbers present)
KERNAU
natural_image
Pure geometric lines and symbols without any text, numbers, or labelsnatural_image
Simple line drawing of a hand pressing a checkmark on a horizontal line (no text or symbols)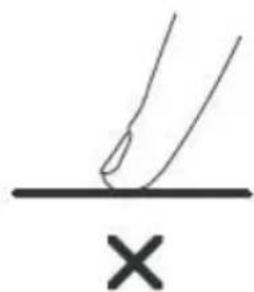
natural_image
Simple line drawing of a hand pressing a surface with an 'X' symbol below (no text or labels)natural_image
Simple line drawing of a cooking pot with a U-shaped magnet (no text or symbols)natural_image
Three identical cooking pots with crossed X marks, no text or symbols presentnatural_image
Four identical cooking pots with crossed-out X marks, shown in sequence (no text or symbols)natural_image
Simple line drawing of a hand pointing upward with a circular mark on the index finger (no text or symbols)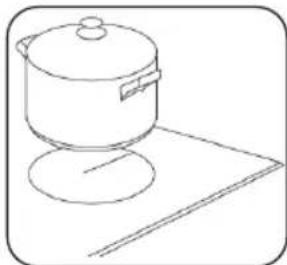
natural_image
Line drawing of a cooking pot on a stand (no text or symbols)| L (MM) | W (MM) | H (MM) | D (MM) | A (MM) | B (MM) | X (MM) |
| 440 | 510 | 60 | 55 | 430 | 490 | 50mihi |
natural_image
Symbol of a trash bin crossed with diagonal lines, representing waste sorting or restriction (no text present)
Notatki:
Notatki:
Notatki:
KERNAU
Serwis Kernau
PL: +48 22 243 70 00
Pn 8:00 - 17:00
Wt-Pt 9:00 - 17:00
serwis@kernau.com
In order to protect your electricity system this product has designed with power limitation system. The whole hob can take in charge a maximum of 5100W. Because of having power limitation feature, each hob can work individually at maximum power, however all heaters can not perform at the same time with all their maximum power. All zones can work at the same time with limited 5100W. Consequently, the hob automatically reduces the heating level and user can not set the boost power in some working condition because of maximum output power by allowing a according to not exceeding of 5100W. It means that to be able to set any zone to desired power level, it may required the decrease to other zones power levels. If your electricity system is available to adjust you may follow the power limitation adjustment instruction in below.
Power Limitation Adjustment Instruction (1.5/2.3/2.8/3.5/3.7/4.5/5.1kW)
Make sure the hob is switched off, it is possible to set the required power level by running the following points in within 60 seconds:
| Step | Operate Control Panel | Display |
| 1 | The hob must be switched off to set the limitation. [IMAGE]Press ON/OFF key for 3 seconds | 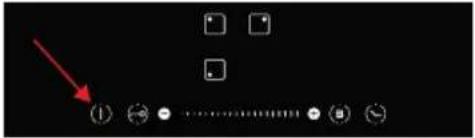 |
| 2 | Press the zone control button and the timer button simultaneously for 3 seconds. |  |
| 3 | The 2nd zone and 3rd zone displays show the factory settings of the limitation value of the product (if 3500w, the 2nd zone display shows 3 /____/ 3rd zone display shows 5) |  |
| 4 | 2. and 3. zone buttons are used to set the desired limitation (for example 1.5/2.3/2.8/3.5/3.7/4.5/5.1kW) | 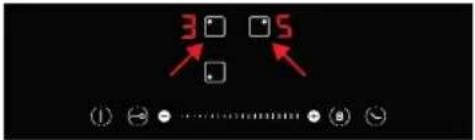  |
| 5 | The desired value is confirmed with the timer button. The hob switches off. |  |