MT-TT249R - Turntable MONSTER - Free user manual and instructions
Find the device manual for free MT-TT249R MONSTER in PDF.

| Product Type | Belt-drive Turntable |
| Brand | Monster |
| Model | MT-TT249R |
| Dimensions (W x D x H) | 420 x 360 x 130 mm |
| Weight | 4.5 kg |
| Power Supply | AC 100-240V, 50/60Hz |
| Power Consumption | 15 W |
| Speed Settings | 33 1/3, 45 RPM |
| Platter Material | Aluminum |
| Tonearm | Straight, balanced |
| Cartridge | Moving Magnet (MM) |
| Outputs | RCA (phono line), USB |
| Playback Functions | Auto-stop, pitch control |
| Built-in Amplifier | Yes (switchable phono/line) |
| Headphone Jack | 3.5mm |
| Remote Control | Included |
| Cleaning and Maintenance | Use anti-static cloth for dust; clean stylus with brush |
| Safety Features | Auto shut-off, non-slip feet |
| Spare Parts Available | Stylus, belts, platter mat |
| Warranty | 1 year |
Frequently Asked Questions - MT-TT249R MONSTER
User questions about MT-TT249R MONSTER
0 question about this device. Answer the ones you know or ask your own.
Ask a new question about this device
Download the instructions for your Turntable in PDF format for free! Find your manual MT-TT249R - MONSTER and take your electronic device back in hand. On this page are published all the documents necessary for the use of your device. MT-TT249R by MONSTER.
USER MANUAL MT-TT249R MONSTER
natural_image
Red circular flip-flop with black and orange disc, placed on a red base with red buttons and a transparent open lid (no visible text or symbols)MODEL: MT-TT249R
User Manual

Welcome
Premium connectivity that fuels modern lifestyle and empowers innovation.
A better everyday experience through amazing products.
The user manual will provide everything you need to know about using your new product.
All our products are produced and tested to stringent standards of performance and safety, and are pleased to provide a 2 Year Warranty with your purchase.
We hope you enjoy your purchase.
MONSTER™
Always Lead. Never Follow.™
Contents
Welcome 2
Product Overview 4
Controls and Connections 8
Operation 10
Bluetooth 13
Troubleshooting 14
Specifications 15
Compliance and Responsible Disposal 16
Product Overview
What's in the box:
A. Vinyl Turntable
B. Adaptor for 45RPM records
C. AC Adaptor
D. Felt Slip Mat
E. Warranty Certificate
F. General Safety Warnings
G. User Manual

text_image
Collection of icons and labels including a CD, plug, document, and information, with lettered labels A–G.Important Tips
- Place the turntable on a level surface.
- Place the turntable away from any source that may generate heat or vibrations.
- Make sure there is enough space around the turntable for airflow. Leave at least 10cm clearance around the product.
- Unplug the turntable before cleaning it.
- Clean using a dry cloth only - do not use water or chemicals.
- Only use the provided power supply.
- Keep liquid, children and pets away from the turntable at all times.
- Repack in its original packaging when transporting the turntable.
Before first use
- Unpack the product but keep all packaging materials until you have made sure your new product is undamaged and in good working order. Plastic wrapping can be a suffocation hazard for babies and young children, so ensure all packaging materials are out of their reach.
- Unwind the cord to its full length and inspect it for damage. Do not use the product if the product or its cord have been damaged or are not working properly. In case of damage, contact our after sales support line for advice on examination or repair or return of the damaged product.
- Read this manual to familiarise yourself with all the parts and operating principles of the product.
- Do not connect the unit to the mains power socket before checking the mains voltage and before all other connections have been made.
Connect to power

Make sure the turntable is switched off at the power outlet until you have finished connecting your cables.

natural_image
Illustration of a mechanical device with a power outlet connected to a cable, featuring three red and white circular ports (no text or symbols)- Connect the DC plug into the DC IN power jack of the turntable.
- Plug in the adaptor into the AC power outlet.

Don't forget to plug in the turntable to the power outlet. Leave the power switched off until installation is finished.
Controls and Connections
Product Overview
text_image
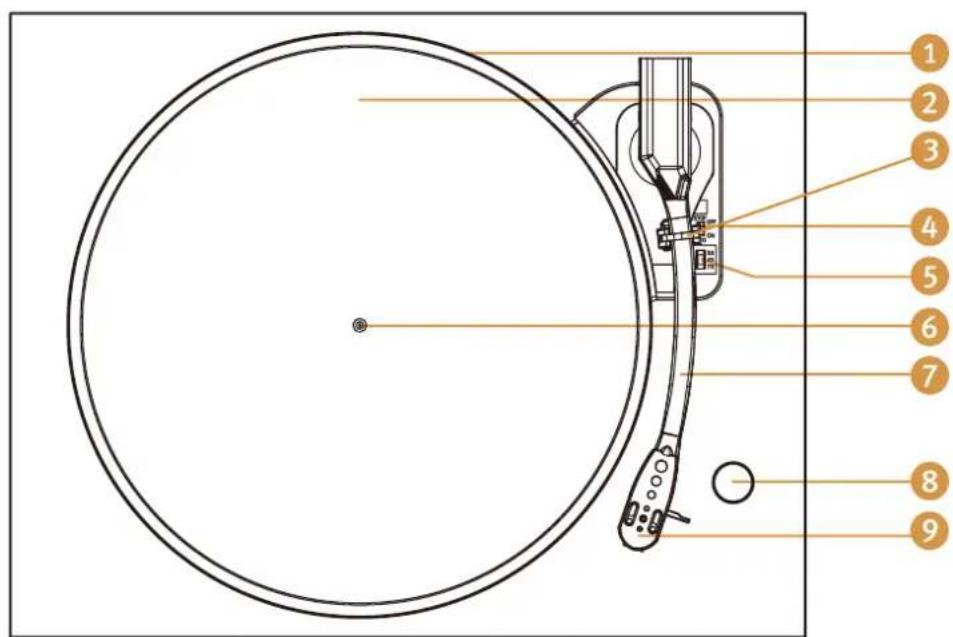
Diagram of a radio receiver with numbered parts labeled for identificationTOP VIEW
- Turntable platter
- Felt mat
- Turntable arm lock
- Auto stop control switch (Applies on most 33RPM vinyl records)
- Speed selection switch
- Turntable shaft
- Turntable arm
- Phono/BT Out Mode knob
- Stylus Cartridge
text_image
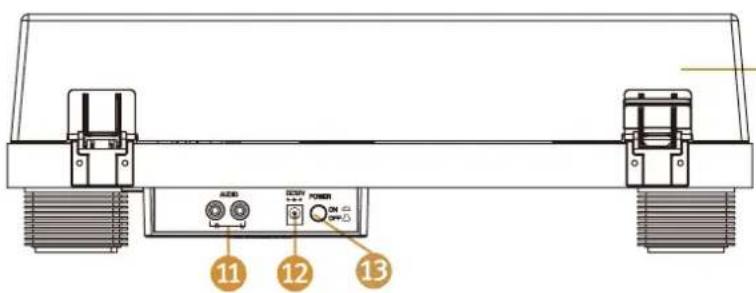
11 12 13BACK VIEW
- Acrylic dust cover
- RCA Output Jack
- Power Adaptor Jack
- Power On and Off Knob
Operation
Power On and Mode selection
- Flick the On/Off switch to turn the turntable on.
- Once you place the tonearm on the vinyl, the turntable will switch to vinyl mode and Bluetooth ^® mode will automatically be disabled. Place the tonearm back to the arm rest to switch back to Bluetooth ^® mode. When the tonearm is back in the arm rest, use the Mode knob to switch between Phono, and Bluetooth mode.
Playing a Record
- Place a record on the turntable platter and select the correct playing speed: 33, 45, 78 RPM (according to the vinyl being played).
- Remove the stylus guard and unlock the tone arm lock. Push the lift lever upward to raise the tone arm and then gently move the tone arm to the desired position over the record. The platter will begin to spin when the tone arm is moved toward the record.
- Push the lift lever forward to lower the tone arm slowly onto the desired position on the record and begin playing the record.
- When you have finished playing the record, push the lift lever backward to raise the tone arm and gently move it back to its rest.
- When you have finished playing records, engage the tone arm lock to protect it from accidental movement. Flick the On/Off switch to turn the turntable off. Unplug it from the power supply if you are not going to use it for a while.
- Note: when playing a record for the first time, you will need to remove the rubber ring on the cartridge.
Connect to an External Amplifier using the Line Out Port
- Use a RCA audio cable to connect to the RCA output at the back of the turntable, and then connect to the your external amplifier.
NOTE: The RCA Jacks are not designed to be connected directly to the passive/unpowered speakers. If connected to the passive speakers, the volume level will be very low.
Replacing the Stylus Needle
natural_image
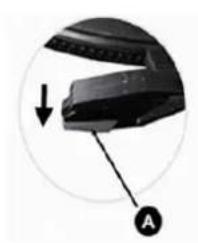
Close-up of a black electronic device with a circular arrow and labeled point A (no text or symbols on the device itself)
text_image
C B Guide Pins (inside)Removing the needle from the cartridge
- Place a screwdriver at the tip of the stylus and push downward as shown in direction "A"
- Remove the stylus by pulling the stylus forward and pushing downward
Installing the Stylus
- Hold the tip of the styuus and insert the stylus by pressing as shown in direction "B"
- Push the stylus upward as in direction "C" until the stylus locks into the tip position
Tips to better performance
- When opening or closing the turntable cover, handle it gently, moving it either at the center or equally from both sides.
- Do not touch the stylus tip with your fingers; avoid bumping the stylus on the turntable mat or on the edge of the record.
- Clean the stylus tip frequently, using a soft brush with a back-to-front motion only.
- If you use a stylus cleaning fluid, use it very sparingly.
- Wipe the dust cover and turntable housing gently with a soft cloth. Clean the unit only with a dry, clean cloth. Do not use liquid or aerosol cleaners.
- Never apply harsh chemicals or solvents to any part of the turntable system.
- Prior to moving the turntable, always unplug it from the AC power outlet and fasten the tone arm on the tone arm rest with the vinyl twist-tie.
Bluetooth®
You can listen to tracks from a media device if connected to the unit via Bluetooth® wireless technology.
Pairing Bluetooth ^® Devices
- Turn the mode selection knob to BT OUT. The indicator light will flash blue.
- The first time you use your Bluetooth ^® device with the turntable, you will need to pair them with one another.
- Activate Bluetooth ^® on your compatible device, and set it to search for compatible devices.
- Your turnrable will automatically connect to your audio device once they are both in pairing mode.
- When pairing is complete, the indicator light will stop flashing.
- To disconnect the turntable from your Bluetooth device, turn off the Bluetooth function of your Bluetooth device or turn the unit to PHONO mode.

The operational range between this turntable and a Bluetooth ^® device is approximately 10 metres (without any object between the Bluetooth ^® enabled device and the unit). Any obstacle between the devices can reduce the operational range.
Before you connect a Bluetooth® enabled device to this unit, ensure you know the device's capabilities. Compatibility with all Bluetooth® devices is not guaranteed.
If the signal strength is weak, your Bluetooth ^® receiver may disconnect, but it will re-enter pairing mode automatically.

Your device will also be disconnected when your device is moved beyond the operational range. If you want to reconnect your device, place it within the operational range.
If the connection is lost, follow the instructions (left) to pair your device to the player again.
Troubleshooting
If you have problems with the turntable, check below for advice. If you don't find a solution here, contact After Sales Support on 1300 886 649.
| Problem Solution | |
| No power | · Ensure that the power adaptor is properly connected.· Ensure that there is power at the AC outlet. |
| No sound | · Check that the turntable is in the correct mode. If in Bluetooth ^ mode, check the Bluetooth ^ source device to make sure that it's not muted or stopped playing.· Check that the volume of the external amplifier is not muted/increase the volume. |
| The vinyl record will not play | · Check that it is in the correct mode· Make sure you have selected the correct speed (33, 45, 78rpm).· Check whether the vinyl has already played to the end. |
For Technical and Warranty Support
1300 886 649
monster@tempo.org
monsterproducts.com.au
Distributed by Tempo (Aust) Pty Ltd,
PO BOX 6097, North Sydney NSW 2059
Specifications
| Power Input 12V 0.2A | --- | |
| Power Consumption | 24W | |
| Dimensions (Turntable) | 424 x 135 x 345mm (W x H x D) | |
| Stylus Cartridge Ceramic | Cartridge | |
| Vinyl Records | Speed | Supports playback speed33 / 45 / 78 RPM |
| Record size support | 7" = 17.7cm10" = 25.5cm SP12" = 30cm LP | |
Use only with < SW1200200-F03 > supply unit
The Bluetooth® word mark and logos are registered trademarks owned by Bluetooth SIG, Inc., and any use of such marks by Hands (IP) Holdings Pty Ltd is under license. Other trademarks and trade names are those of their respective owners.
Compliance and Responsible Disposal

Packaging
The packaging of your product has been selected from environmentally friendly materials and can usually be recycled. Please ensure these are disposed of correctly. Plastic wrapping can be a suffocation hazard for babies and young children, please ensure all packaging materials are out of reach and are safely disposed of. Please recycle these materials rather than throwing them away.
Product
At the end of its working life, do not throw this product out with your household rubbish. An environmentally friendly method of disposal will ensure that valuable raw materials can be recycled. Electrical and electronic items contain materials and substances which, if handled or disposed of incorrectly, could potentially be hazardous to the environment and human health.
Compliance
This product complies with the Australian Safety Standard AS/NZS 62368.1 to ensure the safety of the product.
