
HCC65CXS - Loudspeaker Hifonics - Free user manual and instructions
Find the device manual for free HCC65CXS Hifonics in PDF.


| Brand | Hifonics |
| Model | HCC65CXS |
| Type | Car Audio Component Speaker |
| Speaker Size | 6.5 inches (165 mm) |
| Power Handling (RMS) | 70 Watts |
| Power Handling (Peak) | 210 Watts |
| Impedance | 4 Ohms |
| Sensitivity | 92 dB |
| Frequency Response | 45 Hz - 25 kHz |
| Mounting Depth | 2.1 inches (53 mm) |
| Cone Material | Polypropylene with Rubber Surround |
| Tweeter Type | 1-inch Silk Dome Neodymium |
| Crossover | External 2-way Crossover Included |
| Weight | 2.8 lbs (1.27 kg) per pair |
| Dimensions (per speaker) | 6.7 x 6.7 x 2.5 inches (170 x 170 x 63 mm) |
| Recommended Amplifier Power | 20-100 Watts RMS per channel |
| Installation | Includes mounting hardware and grilles |
| Warranty | 1 Year Limited |
| Certifications | CE, RoHS |
Frequently Asked Questions - HCC65CXS Hifonics
User questions about HCC65CXS Hifonics
0 question about this device. Answer the ones you know or ask your own.
Ask a new question about this device
Download the instructions for your Loudspeaker in PDF format for free! Find your manual HCC65CXS - Hifonics and take your electronic device back in hand. On this page are published all the documents necessary for the use of your device. HCC65CXS by Hifonics.
USER MANUAL HCC65CXS Hifonics
Congratulations on your choice of a Hifonics speaker. This “Quick Start Installation” guide is meant to help you “hook up” and play music. For more detailed information on system setting, speaker and subwoofer configuration, and full specifications by model, visit the website at Hifonics.com

CAUTION

Always consider consulting a professional audio installer before installing new speakers. Many car manufacturers locate speakers behind interior panels that require special tools to remove those panels to access the speakers. Some panels will be screwed in, some will use plastic fasteners, many will have both. Be careful and take your time. If you are using the speaker wire supplied with your new speakers make sure that you run the speaker wires through the factory boot. Do not let speaker wire make contact with metal edges of doors or other access holes.
Speaker Dimensions
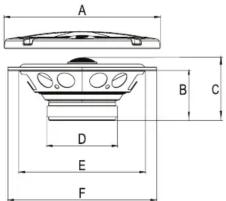
| A B C | D E F | |||||
| HCC35CX | N/A 1.53/ | '39mm 2.12"/'44mm 2.75"/'70mm 3.11"/'79mm 3.42"/'87mm | ||||
| HCC4CX | N/A 1.85/ | '47mm 2.44"/'62mm 2.99"/'76mm 3.46"/'88mm 4.01"/'102mm | ||||
| HCC46CX | N/A 1.73/ | '44mm 2.28"/'68mm 2.99"/'76mm | 3.46" x 5.59"/88 x 142mm | 3.85" x 6.02"/98 x 153mm | ||
| HCC525CX | 6.26"/159mm | 2.2"/56mm 2.6"/3"/67mm 3.38"/86mm 4.52"/ | 15mm 5.11"/ | 30mm | ||
| HCC5768CX | N/A 2.28/ | '58mm 2.67"/'68mm 3.38"/86mm | 5" x 7.12"/127 x 181mm | 5.47" x 7.51"/139 x 191mm | ||
| HCC65CXS | 7.13"/181mm | 1.88"/48mm 2.5"/59"/66mm 3.38"/86mm 5.51"/ | 140mm 6.49"/ | 165mm | ||
| HCC65CX | 7.13"/181mm | 2.2"/56mm 2.3"/5"/70mm 3.38"/86mm 5.55"/ | 41mm 6.57"/ | 67mm | ||
| HCC65C | 7.13"/181mm | 2.2"/56mm 2.4"/8"/63mm 3.38"/86mm 5.55"/ | 41mm 6.57"/ | 67mm | ||
| HCC69CX | 7.08" x 10.39"/180 x 264mm | 3.11"/79mm | 3.54"/90mm 4.3"/33"/110mm | 5.94" x 8.66"/151 x 220mm | 6.49" x 9.21"/165 x 234mm | |
Before you start
It's a good idea to confirm that you have purchased the correct size speakers to fit your vehicle. If you have any reservations about being able to complete the installation yourself, we recommend contacting a professional. The removal of interior panels can be tricky and may require special tools. Be careful as you go.
Factory Speaker Removal

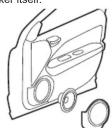
Access and remove factory door speakers
Most modern vehicles have speakers that are mounted directly to the structure of the door. Access is achieved by the removal of the door panel. Some vehicles may only require the removal of a small panel around the speaker itself.


Access and removal of rear factory speakers
Most rear speakers are accessed from within the trunk. Some may require the removal of the rear package tray. Hatchbacks and SUV's will usually require the removal of a side panel.

natural_image
Line drawing of a car interior showing the rear compartment and side compartments (no text or symbols)
Fit and Wiring
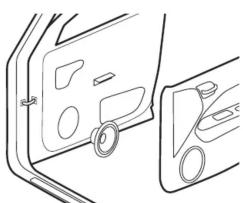
Once the factory speakers are removed, check the fit and determine if there is enough depth clearance for the new speaker. A good way to do this is to roll the window down and back up while holding the speaker in place. If you decide to run wires, make sure to use factory harness boots and grommets where ever possible.
natural_image
Line drawing of a car door and side panel showing interior components (no text or symbols)Coax installation

Factory location behind door panel
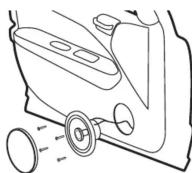
Once you are sure the speaker fits and has adequate clearance, connect the positive and negative wires to the proper terminals. Securely screw the speaker into place. Replace door panel.

natural_image
Diagram showing a car interior with dashboard and steering wheel (no text or symbols)
Factory location behind small panel
Once you are sure the speaker fits and has adequate clearance, connect the positive and negative wires to the proper terminals. Securely screw the speaker into place. Replace speaker cover panel.


Custom location
Some vehicles may not have a door speaker location. While it is possible to install the speakers in this situation, it is more difficult. Consider using a professional for custom installations.

Rear factory locations
Mount the speakers in same way that the factory speaker was mounted. Attach the positive and negative wires to the proper terminals. Make sure any wires are secured properly.
natural_image
Line drawing of a car interior showing the seat, dashboard, and steering wheel (no text or symbols)Component installation

Factory location
behind door panel
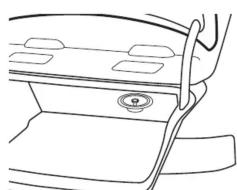
Vehicles that have premium sound systems will often have separate tweeters in a dash or door location. Try to use this location for mounting the component tweeter if possible.


Custom location
If there is not a suitable factory location for woofer or tweeter to be mounted, custom mounting may be necessary. Before making any permanent changes to your vehicle make sure there is adequate mounting depth.
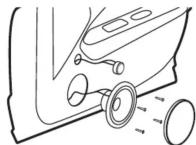

Tweeter mounting
There are two primary ways the tweeter can be mounted. Surface and Flush mounting. The flush mount configuration is shown here.
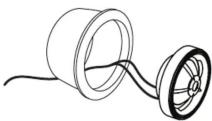

Crossover wiring
The crossover is necessary for the proper operation of the component speaker system. Secure the crossover to a surface that is free of interference from window mechanisms and excessive moisture.
Visit Hifonics.com
The information contained within this document is intended to offer some basic guidelines for a few of the most common installations. More complex audio systems should be installed by a competent professional. Additional installation information available at www.maxxsonics.com
WARRANTY
Maxxsonics, LLC. Warrants this product, to the original consumer purchaser, to be free from defects in material and workmanship for a period of one (1) year from the date of purchase. Maxxsonics, LLC. Will, at it's discretion, repair or replace defective products during the warranty period. Components that prove to be defective in materials and workmanship under proper installation and use must be returned to the original authorized Maxxsonics, LLC. retailer from where it was purchased. A photocopy of the original receipt must accompany the product being sold with the same property. The sale price is \$500,000. For example, Maxxsonics, LLC. This warranty is limited to defective parts and specifically excludes any incidental or consequential damages connected therewith. To view the full warranty, please visit the website.
Hifonics products are designed and engineered in the USA by
MAXXSONICS
HF HCC Speakers QSG 01 - rev 1
HIFONICS
Quick Start
Installation Guide

natural_image
Two black HIFONICS speakers with mesh cover, shown from front and side views (no text or symbols on the speaker itself)HCC35CX HCC5768CX
HCC4CX HCC65CXS
HCC46CX HCC65C
HCC525CX HCC65CX
HCC69CX
Congratulations on your choice of a Hifonics amplifier. This “Quick Start Installation” guide is meant to help you “hook up” and play music. For more detailed information, on system setting, speaker and, subwoofer configuration and full specifications by model visit the website, http://hifonics.com/manuals.html


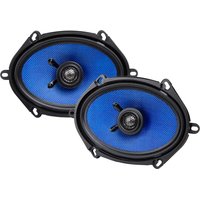


Brand : Hifonics
Model : HCC65CXS
Category : Loudspeaker