CVO-435DB - Deep fryer Imarflex - Free user manual and instructions
Find the device manual for free CVO-435DB Imarflex in PDF.

User questions about CVO-435DB Imarflex
0 question about this device. Answer the ones you know or ask your own.
Ask a new question about this device
Download the instructions for your Deep fryer in PDF format for free! Find your manual CVO-435DB - Imarflex and take your electronic device back in hand. On this page are published all the documents necessary for the use of your device. CVO-435DB by Imarflex.
USER MANUAL CVO-435DB Imarflex

Rapid Air Circulation Technology
• Detachable Non-stick
Oil Tray & Frying Basket
- Cord Storage
• Up to 60-minute Timer
3.0L
CAPACITY
1300W
POWER
UNIT DIMENSION : 378x279x314mm
When using electrical appliances, basic safety precautions should always be followed, including the following:
- Read all instructions carefully.
- Before using the unit, check if the voltage indicated corresponds with the convenience outlet (230Va.c.).
- Do not use any appliance with a damage cord or plug. If the cord is damaged it should be replaced with the same type and size or bring the unit to the nearest Imarflex Authorized Service Center.
- Do not use the two-way socket with another appliance.
- Place the Turbo Fryer on a dry, stable surface.
- Do not place on or near gas stove, electric burner or in a heated oven.
- Keep curtains, furniture, flammable materials, etc. away from the unit and from the convenience outlet where the unit is plugged.
- Do not move the unit while cooking is in progress.
- Children should be supervised to ensure that they do not play with the appliance.
- This appliance is not intended for use by persons (including children) with reduced physical, sensory or mental capabilities, or lack of experience and knowledge, unless they have been given supervision or instruction concerning use of the appliances by a person responsible for their safety.
- Do not cover the air inlet and outlet opening while the appliance is operating.
- Do not pour oil into the frying pan that may cause fire hazard.
- CAUTION: Never leave the unit unattended while cooking.
- Keep the unit in a dry and cool place.
- For household use only; not intended for any business purposes.
- Save this instruction for future reference.
DESCRIPTION OF PARTS:
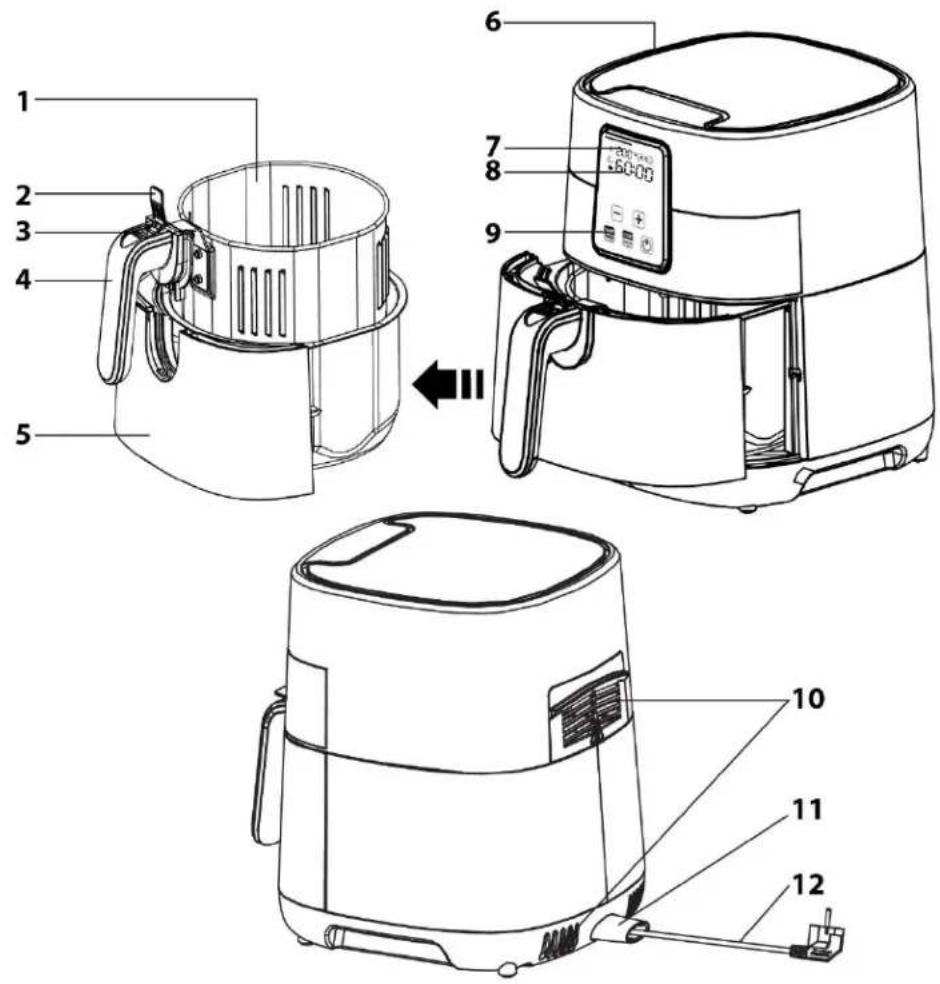
text_image
Technical diagram of an air fryer with numbered parts and a digital display showing temperature reading.| No. | Description | No. | Description |
| 1 | Frying Basket | 7 | Digital Temperature |
| 2 | Button Cover | 8 | Digital Timer |
| 3 | Detaching Button | 9 | Digital Control Panel |
| 4 | Frying Basket Handle | 10 | Air Outlet Opening |
| 5 | Frying Pan | 11 | Power Cord Storage Box |
| 6 | Air Inlet Opening | 12 | Power Cord |
CONTROL PANEL:
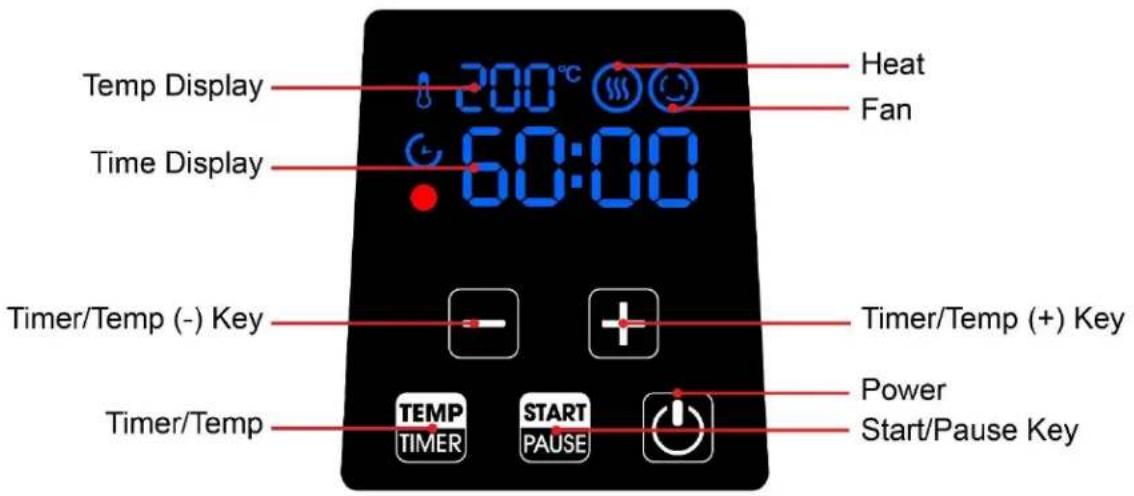
text_image
Temp Display 200°C 60:00 Time Display Heat Fan Timer/Temp (-) Key Timer/Temp (+) Key Timer/Temp TEMP START Start/Pause Key TIMER PAUSEFOR INITIAL USE:
- Remove the POP sticker.
- Clean the frying basket and frying pan thoroughly with hot water, detergent and non-abrasive sponge.
- To remove the frying basket from the frying pan; open the button cover then press the basket release button and pull the frying basket upward Note: Frying pan and basket are dishwasher safe.
- Wipe the appliance with wet cloth.
• Note: Do not immerse the turbo fryer body in water - After cleaning, return the frying basket into the frying pan.
- Make sure that frying basket is securely lock. Click will be heard once properly locked
- Kindly make sure that the button cover is placed in downward position over the basket release button to prevent accidental frying basket release.
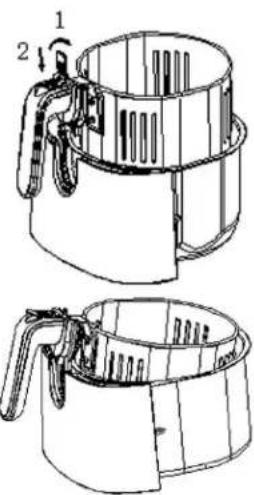
text_image
Technical diagram of a mechanical device with labeled parts 1 and 2, showing internal structure and assembly.HOW TO USE:
- Place the unit on a flat surface.
- Plug the unit into a convenience outlet. Power light indicator will light up.
-
Press 'Power icon' key for 3 seconds and beep sound will be heard and 180°C temperature and 15:00 time will appear on the display.
-
Preheat the unit for 5 minutes at maximum temperature. Press 'START/PAUSE' key once. Heat and fan icons will light up indication that the unit start heating up.
-
Temperature Setting: Press 'TEMP/TIME' key once. The temperature display will start flashing. Press "-" or "+" key to adjust the temperature. It can be adjusted from 80°C to 200°C.
- Timer Setting: Press 'TEMP/TIME' key twice, the timer display will start flashing. Press “-” or “+” key to adjust the timer. It can be adjusted from 1:00 to 60:00 minutes
-
Pause Function: Press 'START/PAUSE' key to pause. The timer will stop and heat icon will disappear indication that the unit is in pause.
-
After preheat, remove the frying pan by pulling the basket handle.
Note: Do not push the basket release button when removing the frying pan to avoid any injuries.
- Place the food into the frying basket.
Note:
- To ensure proper cooking and air circulation, do not fill the unit more than 2/3 full.
-
Maximum frying capacity of fresh vegetable is 3 cups. Do not exceed with the maximum capacity.
-
Place the frying pan inside the unit body.
Note: Make sure that the frying basket is fully closed. The unit will not work if the frying basket is not properly attached to the unit.
- Select the desired time and temperature.
- For better cooking result, open the frying pan halfway of its cooking time then shake the food inside the frying basket
-
After cooking cycle, beep sound will be heard and flashing 0:00 will appear on the display and the unit will turn off automatically.
-
Unplug the unit after every use.
COOKING CHART:
| MENU | CAPACITY (Grams) | TEMP. (°C) | TIME (Minutes) | ACTION |
| Potato & Fries | ||||
| Thin Frozen Fries | 300-400 | 200 | 18-25 | Shake |
| Thick Frozen Fries | 300-400 | 200 | 20-25 | Shake |
| Potato Gratin | 500 | 200 | 20-25 | Shake |
| Meat & Poultry | ||||
| Steak | 100-500 | 180 | 10-20 | - |
| Porkchop | 100-500 | 180 | 10-20 | - |
| Hamburger | 100-500 | 180 | 10-20 | - |
| Sausage Roll | 100-500 | 200 | 13-15 | - |
| Drumstick | 100-500 | 180 | 25-30 | - |
| Chicken Breast | 100-500 | 180 | 15-20 | - |
| Snack | ||||
| Spring Roll | 100-400 | 200 | 8-10 | Shake |
| Frozen Chicken Nuggets | 100-500 | 200 | 10-15 | Shake |
| Frozen Fish Fingers | 100-400 | 200 | 6-10 | - |
| Frozen Bread Crumb Cheese Snack | 100-400 | 180 | 8-10 | - |
| Stuffed Vegetables | 100-400 | 160 | 10 | - |
| Baking | ||||
| Cake | 300 | 160 | 20-25 | - |
| Quiche | 400 | 180 | 20-22 | - |
| Muffins | 300 | 200 | 15-18 | - |
| Sweet Snacks | 400 | 160 | 20 | - |
CLEANING AND MAINTENANCE:
Unplug and wait until the unit cool down before moving or cleaning the unit.
Wipe the body of the turbo fryer with moist cloth.
Clean the frying pan and frying basket with hot water and liquid detergent.
Do not use abrasive materials to avoid scratches.
TROUBLESHOOTING:
| PROBLEM | POSSIBLE CAUSE | RECOMMENDATION |
| Unit not working | The unit is not plugged in | Plug the unit into a convenience outlet |
| Timer is not set | Set the desired timer and press Start/Pause key | |
| Food not completely cooked | The amount of food inside the basket are too many | Put smaller batch of ingredients inside the basket. |
| Set temperature is too low | Refer temperature into the cooking chart | |
| Set time is too short | Refer time into the cooking chart | |
| Food was cooked unevenly | Some foods need to shake half way through cooking time | Refer action to be taken into the cooking chart |
| Frying Pan cannot slide into the unit properly | Too much ingredients in the basket | Do not fill the basket beyond the max capacity |
| Frying basket not properly attached to the frying pan | Properly place the frying basket to the frying pan | |
| Smoke comes out of the unit | Cooking greasy ingredients | It is normal to have a smoke when cooking a greasy ingredient |
| French fries were cooked unevenly | Wrong potato type | Use fresh potato and it should be firm while cooking |
| Potatoes are not rinse properly before cooking | Rinse the potatoes properly | |
| French fries are not crispy | Crispiness depends on the amount of oil and water in the fries | Potato must be dry before putting oil on it |
| Cut the potato smaller for a crispier result |
REMINDER: Please do not forget to fill up and send the warranty card with receipt to our email address imarflexfb@evergoodinc.com
Distributed By: Xelframe Enterprises Inc.
Unit 711 IPI Buendia Tower Condo 501, Gil Puyat Ave., Pasay
Made in China