MPIE480B - Baking appliance MISTRAL - Free user manual and instructions
Find the device manual for free MPIE480B MISTRAL in PDF.

User questions about MPIE480B MISTRAL
0 question about this device. Answer the ones you know or ask your own.
Ask a new question about this device
Download the instructions for your Baking appliance in PDF format for free! Find your manual MPIE480B - MISTRAL and take your electronic device back in hand. On this page are published all the documents necessary for the use of your device. MPIE480B by MISTRAL.
USER MANUAL MPIE480B MISTRAL
natural_image
Black-and-white photo of a microwave oven with four circular cavities and four flat-topped pastries (no text or symbols visible)Instruction Manual
Model: MPIE480B
Important Safeguards
When using electrical appliances, in order to reduce the risk of fire, electric shock and/or injury, these basic safety precautions should always be followed:
For Your Safety
Read all instructions carefully, even if you feel you are quite familiar with the appliance.
- To protect against the risk of electric shock, DO NOT IMMERSE any part of this appliance in water or any other liquid.
- This appliance is not intended for use by persons (including children) with reduced physical, sensory and mental capabilities, or lack of experience and knowledge, unless they have been given supervision or instruction concerning use of the appliance by a person responsible for their safety.
• Children should be supervised to ensure that they do not play with the appliance. - Never leave an appliance unattended when in use.
- Switch off and remove the plug from the power outlet before cleaning or when not in use. To unplug, grasp the plug and remove it from the power outlet. Never pull the power cord.
- Do not misuse the power cord. Never carry the appliance by the power cord.
- The appliance should always be operated on a dry, level, heat-resistant surface. Do not operate the appliance on sinks, draining boards, uneven or inclined surfaces.
- When using this appliance, always ensure that there is sufficient air space above and on all sides for air circulation.
• Always place the appliance on an insulated hot pad or heat resistant surface. - Warning: This appliance gets very hot during use, do not touch the hot surfaces. Severe burns may result from misuse. Avoid contact with steam that may be emitted from the food while it is cooking.
-
Do not attempt to repair, disassemble or modify the appliance. There are no user-serviceable parts.
-
Do not allow the power cord to hang over the edge of a table or counter, or touch hot surfaces.
- Do not use outdoors. Store indoors in a dry location.
• Do not use with an extension lead. - Do not operate any appliance with a damaged power cord or plug. Do not operate if the appliance malfunctions or if it has been dropped or damaged in any way.
- Do not operate the appliance beneath curtains, or within the vicinity of any flammable materials.
- Do not operate this appliance on or near any hot surfaces (such as a gas or electric burner).
- Never use harsh, abrasive, caustic or oven cleaners to clean this appliance. Allow to cool before cleaning.
- Do not reach for an appliance that has fallen into water. Switch off at the power outlet and unplug immediately.
- Do not use this product for anything other than its intended use. This product is intended for household use only, it is not for commercial use.
- The appliances are not intended to be operated by means of an external timer or separate remote-control system.
Warning
If the power cord is damaged, the power cord must be replaced by the manufacturer, its service agent or similarly qualified persons in order to avoid a hazard.
This product has not been designed for any uses other than those specified in this booklet.

CAUTION: HOT SURFACES.
The surfaces are liable to get hot during use, do not touch.
Save These Instructions
Features of Your 4 Pie Maker

text_image
Cool Touch Handle Non-stick Cooking Plates Pastry Cutter Power On Indicator Light Ready Indicator Light CAUTION: HOT SURFACEGetting to Know Your 4 Pie Maker
Congratulations on the purchase of your new Pie Maker.
Before first using your new Pie Maker, it is most important that you read and follow the instructions in this use and care booklet, even if you feel you are familiar with this type of appliance.
Your attention is drawn particularly to the section dealing with IMPORTANT SAFEGUARDS. Find a safe and convenient place to keep this booklet handy for future reference.
This appliance has been designed to operate from a standard domestic power outlet. It is not intended for industrial or commercial use.
Before First Use
Carefully unpack the Pie Maker and remove all packaging materials. Wipe the body of the Pie Maker with a soft damp sponge.
When using your Pie Maker for the first time, 'condition' the non-stick surface of each of the cooking areas with a thin coating of cooking oil or shortening applied with a paper towel or similar.
Note: To prolong the life of the non-stick surface and to ensure optimum results, it is very important to "condition" the non-stick surface before the first use. Heat the Pie Maker, pour a thin coating of vegetable oil, then turn off and unplug. While warm, rub the oil in well using a thick wad of paper towels.
Use extreme care to avoid contact with the surface.
Do not immerse in water or any other liquid whilst power is turned on.
Do not use any abrasive cleaners as they may scratch the surface.
Your appliance is now ready for use.
How to Use
- Plug the power cord into a power outlet and switch power on at the wall outlet.
- The red power indicating light will be on. Pre-heat the pie maker for 3-5 minutes until the temperature reaches the desired temperature, the green indicator light illuminates, the appliance is ready for use.
Note: When using your Pie Maker for the first time, a small amount of light smoke may be emitted. This is due to initial heating of the elements and is normal.
- Cutting the pastry.
Use the special pie cutter provided to cut the pastry tops and bases for your pies. The small cutter is for the top and the large cutter is for the base. See Figure1.
To cut your pastry pieces, position the cutter on a flat sheet of pastry and cut by pressing down into the pastry. Ensure the cut is smooth around the edges.

natural_image
Two empty white circles on a white background, no text or symbols present.figure 1
Note: For best results, frozen pastry should be used as soon as it is just thawed.
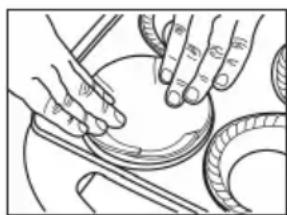
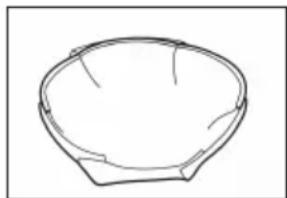
- Gently place the pastry base in the preheated pie maker. Be careful as the pie maker will be hot. Quickly overlap the pastry slits to ensure they join properly until a pastry base is formed. See figure 2 and figure 3.
natural_image
Illustration of hands using a tool to work on a circular object, no text or symbols presentfigure2
natural_image
Line drawing of a bowl-shaped object with no text or symbolsfigure3
Caution: Only touch the pastry as the pie maker will be very hot.
Adding the filling.
Any ingredients you have in your kitchen, left-overs and canned food make tempting pie fillings.
Pre-cook your pie fillings, particularly if using fresh meat or vegetables. Ingredients such as fruit and canned food can be used without pre-cooking.
Ensure all ingredients are cut into small and even pieces to allow them to heat through.
Spoon your pre-cooked, cooled filling into the pastry base. Do not overfill.
Note: Do not use liquid ingredients such as sauces, gravies and custards on their own or in large amounts as they will overflow and make the pastry soggy.
Always combine with solid ingredients. Also do not use hot fillings as the pastry base will become soggy.
Caution: Do not overfill your pie cases or have excess liquid ingredients (sauces, gravies, custards). This will result in overflow from the pie maker. Pie filling is hot and can scald.
- Cooking the pies.
Place the pastry tops over the filling and close the lid. the cooking time will be approximately 6-15 minutes if the appliance has been pre-heated for 3-5 minutes. If you prefer extra browning, we recommend you cook for an extra 2-4 minutes.
Caution: During cooking, open the pie maker slowly and carefully, as excess pie filling may overflow and can scald.
Carefully wipe off oil after each batch of pies, prior to making your next batch. This will improve the cooking quality and prevent excess oil.
Tip: Fruit or vegetable fillings won't take as long to heat and cook through as meat fillings. If planning to freeze, only cook pies for the minimum cooking time. Allow to cool on wire racks before freezing in airtight bags.
Note: During cooking you may notice awhistling sound. This is due to steam escaping from the pies.
-
After use, turn the power off at the power outlet and unplug the pie maker from the main power supply.
-
Use a plastic or wooden spatula to remove the pie so as to not damage the non-stick plates. Do not scratch the cooking surface. Do not use metal utensils.
Note: It is normal for a large volume of steam to escape from the sides of the Pie Maker while in use. Contact with steam can cause severe burns, please exercise extreme caution when operating and opening.
Note: The green indicator light will cycle on and off throughout the cooking process, indicating that the correct temperature is being maintained.
Helpful Hints and Tips
- For best results allow the Pie Maker to preheat for 3-5 minutes before adding ingredients.
- Use an olive oil spray to coat the cooking surface before adding ingredients to allow easy turning of your Pies.
- Do not use metal utensils as these will damage the non-stick cooking surface.
- Do not use short cut pastry for the pie top. We recommend using a puff pastry for the pie top. You can find Puff Pastry sheets in the freezer section of your local supermarket or you can make your own dough.
- Pre-made pie dough can be found in the refrigerated section of your supermarket, usually where the refrigerated cookie dough and biscuits are located.
- For pre-made pie crust, unroll onto a piece of baking paper. use the special pie cutter provided to cut the pastry tops and bases for your pies. the small cutter is for the top and the large cutter is for the base. to cut your pastry pieces, position the cutter on a flat sheet of pastry and cut by pressing down into the pastry. Ensure the cut is smooth around the edges.
- You can store unused pie crust in the freezer by simply using baking paper in-between layers and storing in a plastic freezer bag. Remove any excess air from the bag before freezing.
- Ensure that your pie contains a sufficient amount of filling. If too little filling, the top of the pie will not make contact with the heating plate and will not brown as well. Too much filling ingredients may cause your pie to overflow during the cooking process and prevent the top and bottom pastry from sealing. As a general rule, fillings for pies should be 3/4 full.
- Do not use raw fruit fillings or proteins for pies. Since most pies in your Pie Maker are cooked within 15 minutes, this is not sufficient time to cook fillings. Always precook ingredients before adding them to the pie maker. You can find pre-made pie filling ingredients in the canned fruit section of your local supermarket, or see the recipe section of this manual to make your own!
Care and Cleaning
Do not put the appliance in a dishwasher.
Before cleaning your appliance, turn the power off at the power outlet. Remove the plug from the power outlet and allow the unit to cool completely.
To Clean the Cooking Plate
As the cooking plate is coated with a non-stick coating, little cleaning is required. Wipe over the cooking plates with a damp cloth.
Do not use abrasive creams, steel wool or scouring pads.
To remove baked food, allow the cooking plate to cool completely then wipe it with a damp cloth.
Never immerse your appliance completely in water or other liquids.
Keep the element connection away from any liquids. Dry with a dry towel.
Note: Always ensure the non-stick plate is completely dry before storing away.
To clean the exterior, wipe with a damp cloth and polish with a soft and dry cloth.
Hints for Care and Use of Non-stick Surface
- To avoid scratching the non-stick surface, do not stack any objects on your Pie Maker.
- Use only nylon, plastic or wooden utensils with care to avoid scratching the non-stick surface. Never cut food on the cooking plate.
- Remove stubborn stains with a non-abrasive scouring pad and mild dish washing liquid. DO NOT USE STEEL WOOL.
Recipes
This pie maker will help you bake four individual pies without much fuss. You can use it with store-bought or homemade pastry, and with any sweet or savoury fillings. So get baking and enjoy your pies!
Some of the pie filling recipes on the following pages are enough for six to eight individual. The pies can easily be frozen and then reheated in the pie maker in approximately 30 minutes, or in 8-12 minutes if defrosted. If you intend to freeze your pies, do not let the crusts brown too much, let the pies cool completely and place them in a freezer bag for freezing.
For all the recipe suggestions in this section:
• Prepare your pie crusts and place the bases in the pie moulds. (We suggest shortcrust pastry for the bases and puff pastry for the tops.)
- Spoon the cooled filling into the moulds until 3/4 full (about half a cup).
- Place the pie tops on the filling. Brush egg mixture on pie covers. Close the lid and lock the handles.
- Cook your pies until golden brown. This will take between 6 and 15 minutes, depending on the type of pastry, your desired level of browning and the filling – stewed fruit fillings generally take a little less time than meat-based fillings.
- When the pies are cooked to your liking, unplug the pie maker from the wall outlet. Carefully remove the pies from the moulds by using a non-metallic (silicone, nylon or wooden) spatula.
Homemade Shortcrust Pastry
Ingredients
85g butter(cubed)
170g plain flour
Pinch of salt
3 tbsp cold water
Method
- Sift the flour and salt into a large mixing bowl, add the butter and, using your hands, rub the flour and butter together.
- Add the water and work the dough with your hands. Gently pack it together.
- Press the dough roughly into the shape you want to roll it out to, wrap it in cling film and leave it in the fridge for at least half an hour before use.
Variations
- For savoury, herbed shortcrust pastry, add 1 tbsp of finely chopped fresh herbs or 1 tsp of dried herbs to the flour.
- For spiced shortcrust pastry, add 1 tsp of ground spice (such as cinnamon or ginger) to the flour.
Apple Pie Filling
Ingredients
8 Granny Smith apples
Juice of 1 lemon
50g unsalted butter
100g caster sugar
1 tsp ground cinnamon
14 tsp ground cloves
Method
- Peel, core and dice the apples and toss them immediately with the lemon juice to prevent them from discolouring.
- Heat the butter and sugar in a frypan over medium heat. When the butter has melted, add the apples and spices and stir to coat.
- Cook the apples, stirring occasionally, for 10 minutes on low heat, or until the apples have softened. Set aside to cool.
Spinach & Feta Cheese Pie Filling
Ingredients
1 tsp butter
1 onion, finely chopped
1 garlic clove, finely chopped
2 bags fresh baby spinach
1 cup feta cheese, crumbled
4 tbsp pine nuts, toasted
Salt and pepper to taste
Method
- In a large frypan over medium heat, melt the butter. Add onions and garlic and cook until softened.
• Add the spinach and stir until wilted. - Remove from the heat and add the cheese and pine nuts.
• Season with salt and pepper. Set aside to cool.
Beef and Mushroom Pie Filling
Ingredients
1 tbsp olive oil
500g chuck steak, cut into 1.5cm cubes
1 small brown onion, chopped finely
100g small button mushrooms
2 tsp plain flour
400g can chopped Italian tomatoes
1/4 cup beef stock
1 tsp Italian herbs or seasoning
Salt and pepper to taste
Method
• Cook meat in frypan in batches until browned. Transfer to a plate.
- Add onion and mushroom to dish and cook for 3 minutes.
• Add flour, stirring until well combined.
- Add tomatoes and stock, stirring continuously until mixture comes to the boil.
• Return beef to pan with herbs or seasoning.
- Season with salt and pepper. Set aside to cool.
Cherry Pie Filling
Ingredients
580g frozen pitted cherries
1 tbsp lemon juice
14 cup raw sugar
12 tsp ground cinnamon
2 tbsp cornflour
Method
- Combine cherries, lemon juice, cinnamon and sugar in a medium saucepan over medium heat. Cook, stirring, for 5 minutes or until the cherries have thawed and the sugar is dissolved.
- Blend cornflour with 2 tbsp cold water in a small bowl. Stir into the cherry mixture and cook, stirring, for 2 to 3 minutes or until the mixture boils and thickens. Set aside to cool.
Chicken and Leek Pie Filling
Ingredients
1 tbsp olive oil
1 small leek, trimmed, thinly sliced
350g chicken breast or thigh fillets, cut into 1.5cm cubes
1 tbsp plain flour
Salt and pepper to taste
Method
- Heat olive oil in a non-stick frying pan over medium heat.
- Add leek and cook, stirring frequently, for 3 minutes or until soft.
- Add chicken and cook for an additional 4 minutes or until cooked through.
• Stir through flour until well combined.
• Gradually add cream, stirring constantly, until mixture comes to the boil. Remove from heat. - Season with salt and pepper. Set aside to cool.
Bacon & Potato Quiches
Ingredients
110g smoked bacon, chopped and cooked
80g gruyere (or cheddar) cheese
100g potatoes, cooked and diced
30g parmesan cheese
4 eggs, beaten
4 tbsp double cream
1 small onion
2 tbsp parsley, finely chopped
Salt and pepper to taste
Method
• Preheat the pie maker.
- Mix all ingredients, leaving a little cheese aside, until well combined.
- Place a cut-out sheet of shortcrust pastry in each of the pie maker moulds, add the filling and top with the reserved cheese.
- Close the lid and cook for 8 to 10 minutes, or until the filling is set and the pastry is browned around the edges.
NOTE: If the filling is not quite set, unplug the pie maker and leave the quiches to stand for a further 2 minutes with the lid closed.
Cupcakes
Ingredients
14 cup unsalted butter, softened
1½ tsp baking powder
2/3 cup sugar 12 tsp salt
2 large eggwhites
1/8 tsp almond extract
1 1/3 cups plain flour
1 tsp vanilla extract
12 cup milk
14 cup shortening
Method
- Mix and cream the butter, shortening, baking powder, sugar, salt and extracts for about 5 minutes, or until light and fluffy.
• Add the eggwhites and beat well. - Add the flour and milk and mix until just smooth.
- Pour the batter into each of the moulds until 2/3 full. Close and latch the lid.
- Bake for about 8-10 minutes, then open the lid and insert a skewer into one of the cupcakes to check whether they are done. If the skewer comes out with a streak of shiny batter on it, unplug the pie maker, close the lid and let it stand for 5 more minutes, then retest for doneness.
- When the skewer comes out clean, remove the cupcakes from the moulds using a non-metallic spatula.
- Let the cupcakes cool before serving, or before icing the tops.
Specifications:
Supply Voltage: 220-240V \~ 50Hz
Power Consumption: 1400W
NOTE: As a result of continual improvements, the design and specifications of the product within may differ slightly from the unit illustrated on the packaging.

Gerard Sourcing & Manufacturing
GSM International Ltd.
GSM International Ltd has a policy of continual improvement throughout the product range. As such the unit contained within may differ slightly from the unit illustrated on the pack.
MADE IN CHINA for GSM International Ltd. Mistral is a registered trademark of GSM International Ltd.