TE-DGH - Rear Camera iBEAM - Free user manual and instructions
Find the device manual for free TE-DGH iBEAM in PDF.

User questions about TE-DGH iBEAM
0 question about this device. Answer the ones you know or ask your own.
Ask a new question about this device
Download the instructions for your Rear Camera in PDF format for free! Find your manual TE-DGH - iBEAM and take your electronic device back in hand. On this page are published all the documents necessary for the use of your device. TE-DGH by iBEAM.
USER MANUAL TE-DGH iBEAM
text_image
iBEAM VEHICLE SAFETY SYSTEMSTE-DGH/TE-DGHC (CMOS)
RAM 1500 (2009-2017)
RAM 2500 (2010-2017)
Replacement Tailgate Handle with Camera
Removal and Installation Instructions
Tools Needed: T30 torx bit, ratchet, 8mm socket.
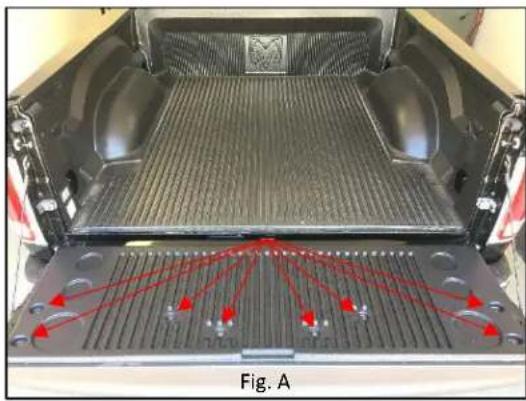
- Start by lowering the tailgate and remove the (8) T30 torx screws from the bed liner, remove liner (Fig. A), remove access panel (Fig. B), and place aside.
- Now that you have access to the handle assembly, disconnect harness running to lock actuator and unclip (2) latch rods. (Fig. C)
- Next, remove (2) 8mm nuts located below latch connectors, then slide latch assembly aside. (Fig. C)
- Gently remove handle by lifting the handle from the outside and slowly working it out.
- Now that the handle is out of the tailgate, you will have to swap the locking mechanism out of the old handle to the new one.
- Start by removing the (2) 8mm screws from locking mechanism, and then remove mechanism from handle. (Fig. D)
- Now place the locking mechanism in the new handle and secure it with the factory 8mm screws.
natural_image
Top-down view of a pickup truck backrest with red arrows pointing to structural components (no text or symbols visible)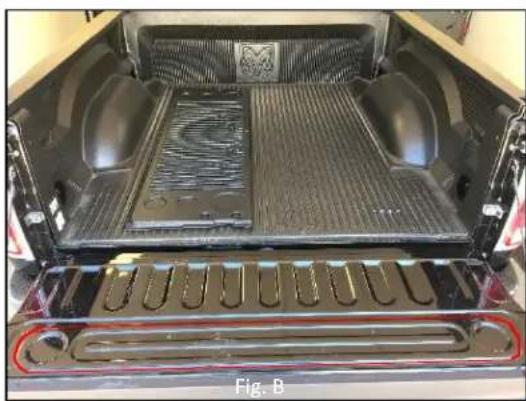
natural_image
Interior view of a pickup truck showing the backrest tray, vented seating, and structural components (no visible text or symbols)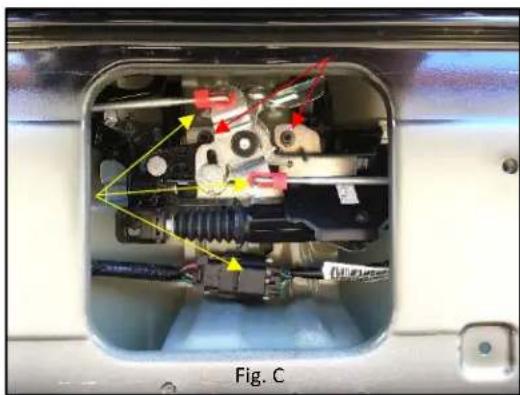
natural_image
Internal view of a mechanical device with visible internal components and colored arrows indicating motion or flow (no text or symbols)-
Next, remove taillight and splice the red power wire from the camera's harness into the reverse light's 12v positive wire. This will trigger the camera to turn on when vehicle is placed in reverse. Attach the black ground wire to a metal non-painted surface.
-
Wires can now be fully routed from the tailgate to the cab of the truck and to a video source, securing every 16". The Yellow RCA will plug into the input of your video source; the Red wire goes to the rear camera input trigger wire on your video source.
NOTE: Test to make sure video is working before securing new handle.
NOTE: If desired, parking lines can be removed by cutting the green loop wire.
- Now gently reinsert new tailgate handle and route cable trough tailgate.
NOTE: Avoid pinching cable running to camera
-
Realign the handle's post with latch assembly opening mechanism and reattach 8mm nuts to secure handle in tailgate.
-
Reconnect harness to lock actuator and reattach latch rods, then reattach the tailgate's access panel and bed liner cover to complete your install.

text_image
iBEAM VEHICLE SAFETY SYSTEMS1.800.221.0932 www.iBeamUSA.com 460 Walker Street, Holly Hill, FL 32117

natural_image
Mechanical component with red arrows pointing to features, labeled Fig. D (no readable text or symbols)
natural_image
Front view of a car's rear window showing the emblem of a donkey (no visible text or symbols)| Sensor | CMOS 1⁄4 sensor |
| Resolution | 400 TV Lines |
| Field of view | Diagonal 185°, Horizontal 150°, Vertical 110° |
| Illumination | .01 Lux |
| IP rating | IP69 |
| Parking Lines | Defeatable |
| Extension cable | 26' |
| TV system | NTSC |
| Working Temp | -20°C ~ 70°C |
| Warranty | 3 years |