
TE-CTM45 - Dash cam iBEAM - Free user manual and instructions
Find the device manual for free TE-CTM45 iBEAM in PDF.


| Product Type | Dash Cam |
| Brand | iBEAM |
| Model | TE-CTM45 |
| Dimensions (approx.) | 90 x 55 x 35 mm |
| Weight | 80 g |
| Power Source | 12V car charger; built-in rechargeable battery |
| Video Resolution | Full HD 1080p |
| Viewing Angle | 170° wide angle |
| Loop Recording | Yes, overwrites oldest files |
| G-Sensor | Built-in for impact detection |
| Parking Mode | Motion detection when parked (requires hardwire kit) |
| Night Vision | Enhanced with low-light sensor |
| Storage Support | MicroSD up to 32 GB (Class 10 recommended) |
| Display | 2.0 inch LCD screen |
| Mounting Type | Suction cup or adhesive mount |
| Connectivity | USB port for file transfer |
| Operating Temperature | -10°C to 60°C |
| Maintenance | Clean lens with soft cloth; avoid moisture |
| Safety | Do not use in extreme heat; keep away from airbags |
| Spare Parts Available | Mount, cable, suction cup, replacement battery |
| Repairability | Battery and mount replaceable by user |
| General Information | Designed for reliable driving recording |
Frequently Asked Questions - TE-CTM45 iBEAM
User questions about TE-CTM45 iBEAM
0 question about this device. Answer the ones you know or ask your own.
Ask a new question about this device
Download the instructions for your Dash cam in PDF format for free! Find your manual TE-CTM45 - iBEAM and take your electronic device back in hand. On this page are published all the documents necessary for the use of your device. TE-CTM45 by iBEAM.
USER MANUAL TE-CTM45 iBEAM
natural_image
Icon of a red 'i' with Wi-Fi signal waves above, next to a black 'ID' symbol (no text or numbers present)BEAM
VEHICLE SAFETY SYSTEMS
TE-CTM45 User Manual
1. Mirror

2. OE Brackets

TE-M01
Genuine bracket for Toyota series, Honda, Hyundai, GM, Ford

TE-M02
Genuine bracket for Hands

TE-M03
Genuine bracket for Most VII, Audi, Subaru, Peugeot, Nissan

TE-M06
Over bracket for Universal

TE-M07
Genuine bracket for Hyundai, Kia

TE-M08
genuine bracket for Ford Ranger, Dodge
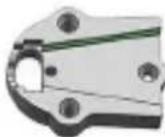
TE-M09
Genuine bracket for Fiat

TE-M11
Genuine bracket for Renault, Mercedes
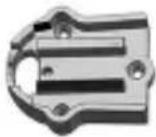
TE-M12
Genuine bracket for Toyota Corolla
3. Specification
| Screen size | 4.5 inch |
| Display screen | Frameless TFT LCD panel |
| Brightness | Ultra high brightness 1700cdm |
| Display resolution | 480(H)xRGBx272(V) |
| Display mode | 16:9 / 4:3 |
| Power consumption | 4W |
| Working voltage | DC10-15V |
| Video input | AV1, AV2 (reverse camera) |
| Signal system | PAL / AUTO / NTSC |
4. Operation
(1) The screen only works when it has video signal going into it. When AV1 input receives signal, the screen turns on to AV1. When the signal is removed, the screen turns off.
(2) When AV2 receives video signal, the screen powers on and switches to AV 2, regardless of whether there is signal going into AV1. When signal is removed from AV2, either the screen will switch to AV1 if there is signal present there or switch off there is no signal.
(3) The screen can adjust its brightness according to the ambient light condition. When ambient light is strong, the screen will be brighter. Similarly, the screen will decrease its brightness to protect your eyesight and so it isn't too bright while driving when the ambient light is low.
5. General Instruction
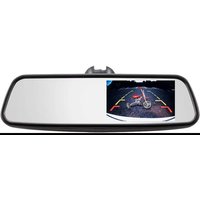
This rear view mirror monitor is designed for car rear view purpose, which can work with a reversing camera (NTSC or PAL) to show the real-time image behind your car. When the reverse gear is engaged, the rear view system automatically starts to work, and when the monitor is powered off, the mirror functions just like a normal rear view mirror as the monitor is hidden and almost invisible.
6. Compass & Temperature
Temperature Setup
Included are 2 thermistors, an In and a Out. Run the In thermistor to a location on the interior of the vehicle that is exposed to the main cabin, and run the Out thermistor to a protected location on the exterior of the vehicle. Choose locations for both thermistors that are not in direct sunlight.
The temperature display will alternate between inside and outside readings.
Compass Setup
Before the compass can be used it must be calibrated. Make sure the video source is active on the monitor, this can be done by powering up the camera. A long button press enters the compass calibration. Next, drive the car in one full circle to calibrate. Another long button press will end the calibration. If the calibration failed, repeat the operation.
When the compass is on, it will indicate the driving direction with 8 different directions (E, SE, S, SW, W, NW, N, NE)
7. Shortcuts
When on AV1 Source
Short Button Press: On / Off screen
When on AV2 Source
Short Button Press: On / Off Compass Display
IMPORTANT If you are having difficulties with the installation of this product, please call our Tech Support line at 1-800-253-TECH. Before doing so, look over the instructions a second time, and make sure the installation was performed exactly as the instructions are stated. Please have the vehicle apart and ready to perform troubleshooting steps before calling.

KNOWLEDGE IS POWER
Enhance your installation and fabrication skills by enrolling in the most recognized and respected mobile electronics school in our industry. Log onto www.installerinstitute.com or call 800-354-6782 for more information and take steps toward a better tomorrow.

Metra recommends MECP certified technicians
rev.2/26/2019
Attention
When connecting with power cable, please make sure not to mistake the positive and negative pole, otherwise the fuse will blow immediately for security protection. If it happens, please replace the blown fuse with a new one with same specification, after connecting properly to the right pole. Don't randomly increase the current rating of the fuse, and NEVER use metal wire as a substitute.


- BEAM
- Mirror
- OE Brackets
- Specification
- Operation
- General Instruction
- Compass & Temperature
- Temperature Setup
- Compass Setup
- Shortcuts
- IMPORTANT If you are having difficulties with the installation of this product, please call our Tech Support line at 1-800-253-TECH. Before doing so, look over the instructions a second time, and make sure the installation was performed exactly as the instructions are stated. Please have the vehicle apart and ready to perform troubleshooting steps before calling.
- KNOWLEDGE IS POWER
- Metra recommends MECP certified technicians
- Attention
Brand : iBEAM
Model : TE-CTM45
Category : Dash cam