
FA8600 - Ventilateur domestique SUNBEAM - Free user manual and instructions
Find the device manual for free FA8600 SUNBEAM in PDF.


| Product Type | Pedestal Fan |
| Model | FA8600 |
| Brand | Sunbeam |
| Fan Size | 40 cm (16 inches) |
| Blade Material | Plastic |
| Number of Blades | 3 |
| Grille Material | Metal |
| Power Supply | AC 230-240V, 50Hz |
| Speed Settings | 3 (Low, Medium, High) |
| Oscillation | 70° wide angle |
| Timer | 1, 2, or 4 hours |
| Wind Modes | Nature (random breeze), Sleep (decreasing speed) |
| Remote Control | Yes, 8m range |
| Height Adjustment | Yes, with locking clip (up to approx. 130 cm) |
| Tilt Adjustment | 4 vertical positions, 3 horizontal |
| Base Type | Solid base with locking nut |
| Net Weight | Approx. 5 kg |
| Warranty | 2 years replacement or repair |
| Country of Origin | Made in China |
| Certifications | CE, RoHS (compliant) |
Frequently Asked Questions - FA8600 SUNBEAM
User questions about FA8600 SUNBEAM
0 question about this device. Answer the ones you know or ask your own.
Ask a new question about this device
Download the instructions for your Ventilateur domestique in PDF format for free! Find your manual FA8600 - SUNBEAM and take your electronic device back in hand. On this page are published all the documents necessary for the use of your device. FA8600 by SUNBEAM.
USER MANUAL FA8600 SUNBEAM
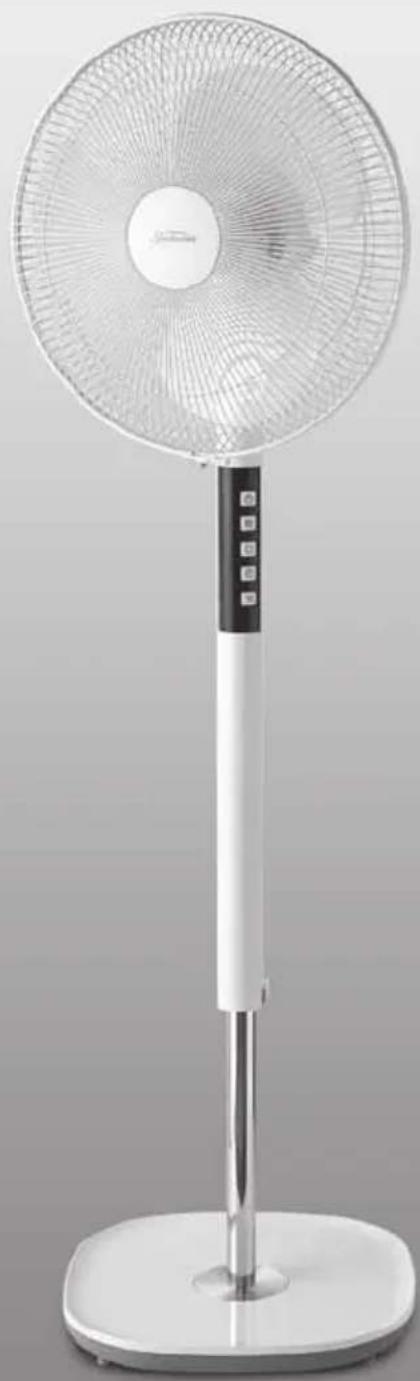
Sunbeam Pedestal Fan with Remote Control
Instruction Booklet
FA8600 40cm Pedestal Fan
Please read these instructions carefully and retain for future reference.
natural_image
Modern white outdoor fan with a circular top and black handle, standing on a stand (no visible text or symbols)Sunbeam's Safety Precautions
Sunbeam is very safety conscious when designing and manufacturing consumer products, but it is essential that the product user also exercise care when using an electrical appliance. Listed below are important precautions for the safe use of an electrical appliance.
- Read carefully and save all the instructions provided with an appliance.
- Always turn the power off at the power outlet before you insert or remove a plug. Remove by grasping the plug - do not pull on the cord.
- Turn the power off and remove the plug when the appliance is not in use and before cleaning.
- Do not use your appliance with an extension cord unless this cord has been checked and tested by a qualified technician or service person.
- Always use your appliance from a power outlet of the voltage (A.C. only) marked on the appliance.
- This appliance is not intended for use by persons (including children) with reduced physical, sensory or mental capabilities, or lack of experience and knowledge, unless they have been given supervision or instruction concerning use of the appliance by a person responsible for their safety.
- Children should be supervised to ensure that they do not play with the appliance.
- The temperature of accessible surfaces may be high when the appliance is operating.
-
Never leave an appliance unattended while in use.
-
Do not use an appliance for any purpose other than its intended use.
- Do not place an appliance on or near a hot gas flame, electric element or on a heated oven.
- Do not place on top of any other appliance.
- Do not let the power cord of an appliance hang over the edge of a table or bench top or touch any hot surface.
- Do not operate any electrical appliance with a damaged cord or after the appliance has been damaged in any manner. If damage is suspected, return the appliance to the nearest Sunbeam Appointed Service Centre for examination, repair or adjustment.
- For additional protection, Sunbeam recommend the use of a residual current device (RCD) with a tripping current not exceeding 30mA in the electrical circuit supplying power to your appliances.
- Do not immerse the appliance in water or any other liquid unless recommended.
- Appliances are not intended to be operated by means of an external timer or separate remote control system.
- This appliance is intended to be used in household and similar applications such as: staff kitchen areas in shops, offices and other working environments; farm houses; by clients in hotels, motels and other residential type environments; bed and breakfast type environments.
If you have any concerns regarding the performance and use of your appliance, please visit www.sunbeam.com.au or contact the Sunbeam Consumer Service Line. Ensure the above safety precautions are understood.
Safety Precautions For Your Pedestal Fan
- Do not use outdoors.
- Do not run the cord of the fan under carpeting. Do not cover the cord with throw rugs, runners or other floor coverings. Arrange the cord away from traffic areas so that it will not be tripped over.
- Do not use this fan in the immediate surrounds of a bath, shower, laundry area or swimming pool.
- Be sure the fan is placed on a dry, even surface. Do not use on soft surfaces, such as beds.
- When operating with the oscillation function, do not place the fan in a position that may restrict or impede its movement.
- Keep your fan away from heat sources, corrosive gases and avoid direct sunlight.
- This fan is only to be used with the base fitted and in good condition.
-
Disconnect the power plug before dismantling, assembling or before cleaning.
• Always unplug the fan when not in use. -
The fan must not be used if the guards are damaged in any way.
- Do not insert or allow foreign objects to enter any ventilation or exhaust openings as this may cause electric shock or fire, or damage to the fan.
- Never insert fingers or any other objects through the guards whenever the power plug is connected, especially while running.
- Avoid touching moving parts of the fan.
- Do not attempt to move your fan whilst it is operating. If your fan needs to be moved, please ensure that it is turned off and you use the carry handle on top of the pedestal.
- When disposing of the fan at the end of its useful life, follow local regulations.
- Do not coil the power cord too tightly around the motor housing, as this may damage the cord.
Locating Your Pedestal Fan
-
Always locate your fan on a level surface.
-
Your pedestal fan should be located in a dry, cool, well ventilated location. Keep your fan away from heat sources, corrosive gases and avoid direct sunlight.
-
Do not attempt to move your pedestal fan whilst it is operating. If your fan needs to be moved, please ensure that it is turned off and you use the carry handle on top of the fan.
Features Of Your Sunbeam Pedestal Fan
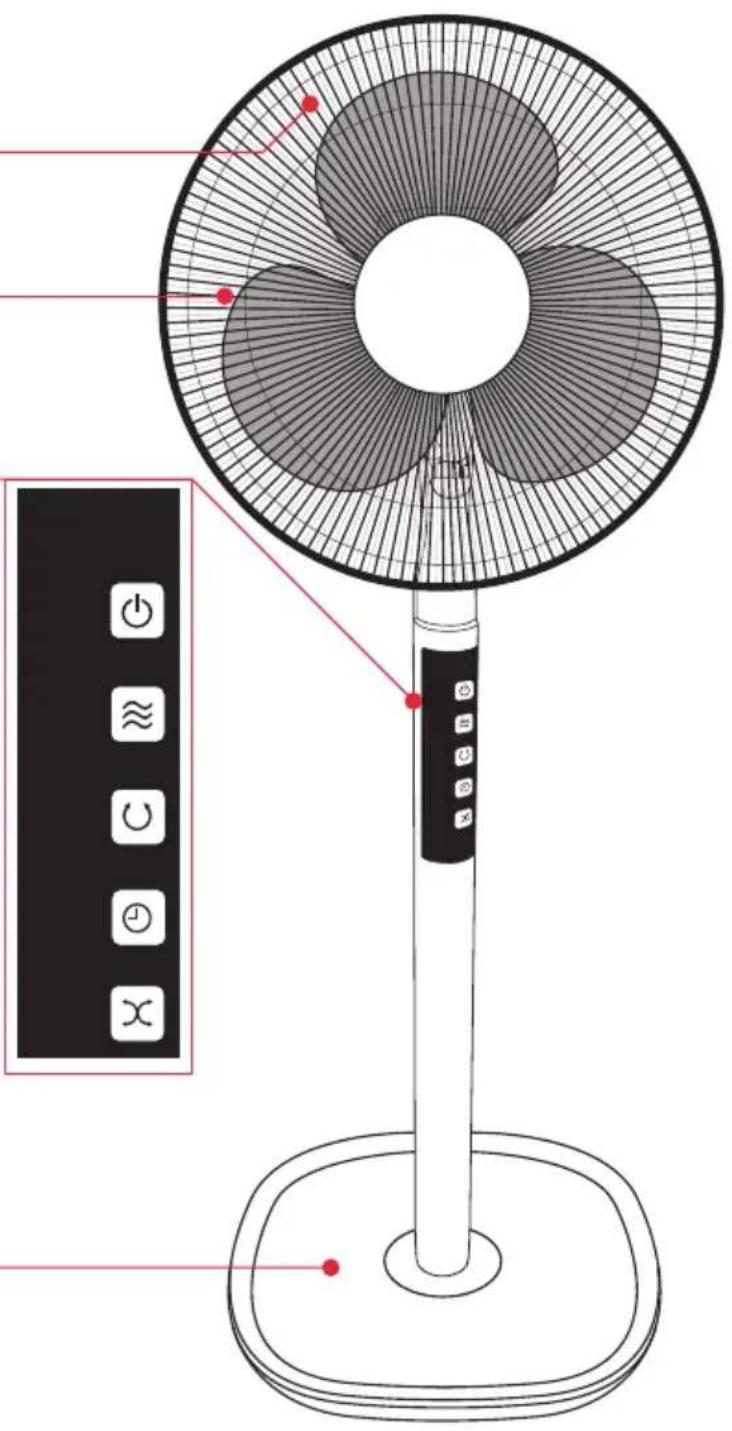
Metal Grille
Easily assembled, 50cm secure grille.
Plastic Fan Blades
3 blades to effectively move the air about your room.
Control Panel
Simply press the on/off button to turn the unit on. Use the other buttons to select wind mode, timer, speed and oscillation functions.
Solid Base
Makes your pedestal fan stable and secure.
Parts Identification
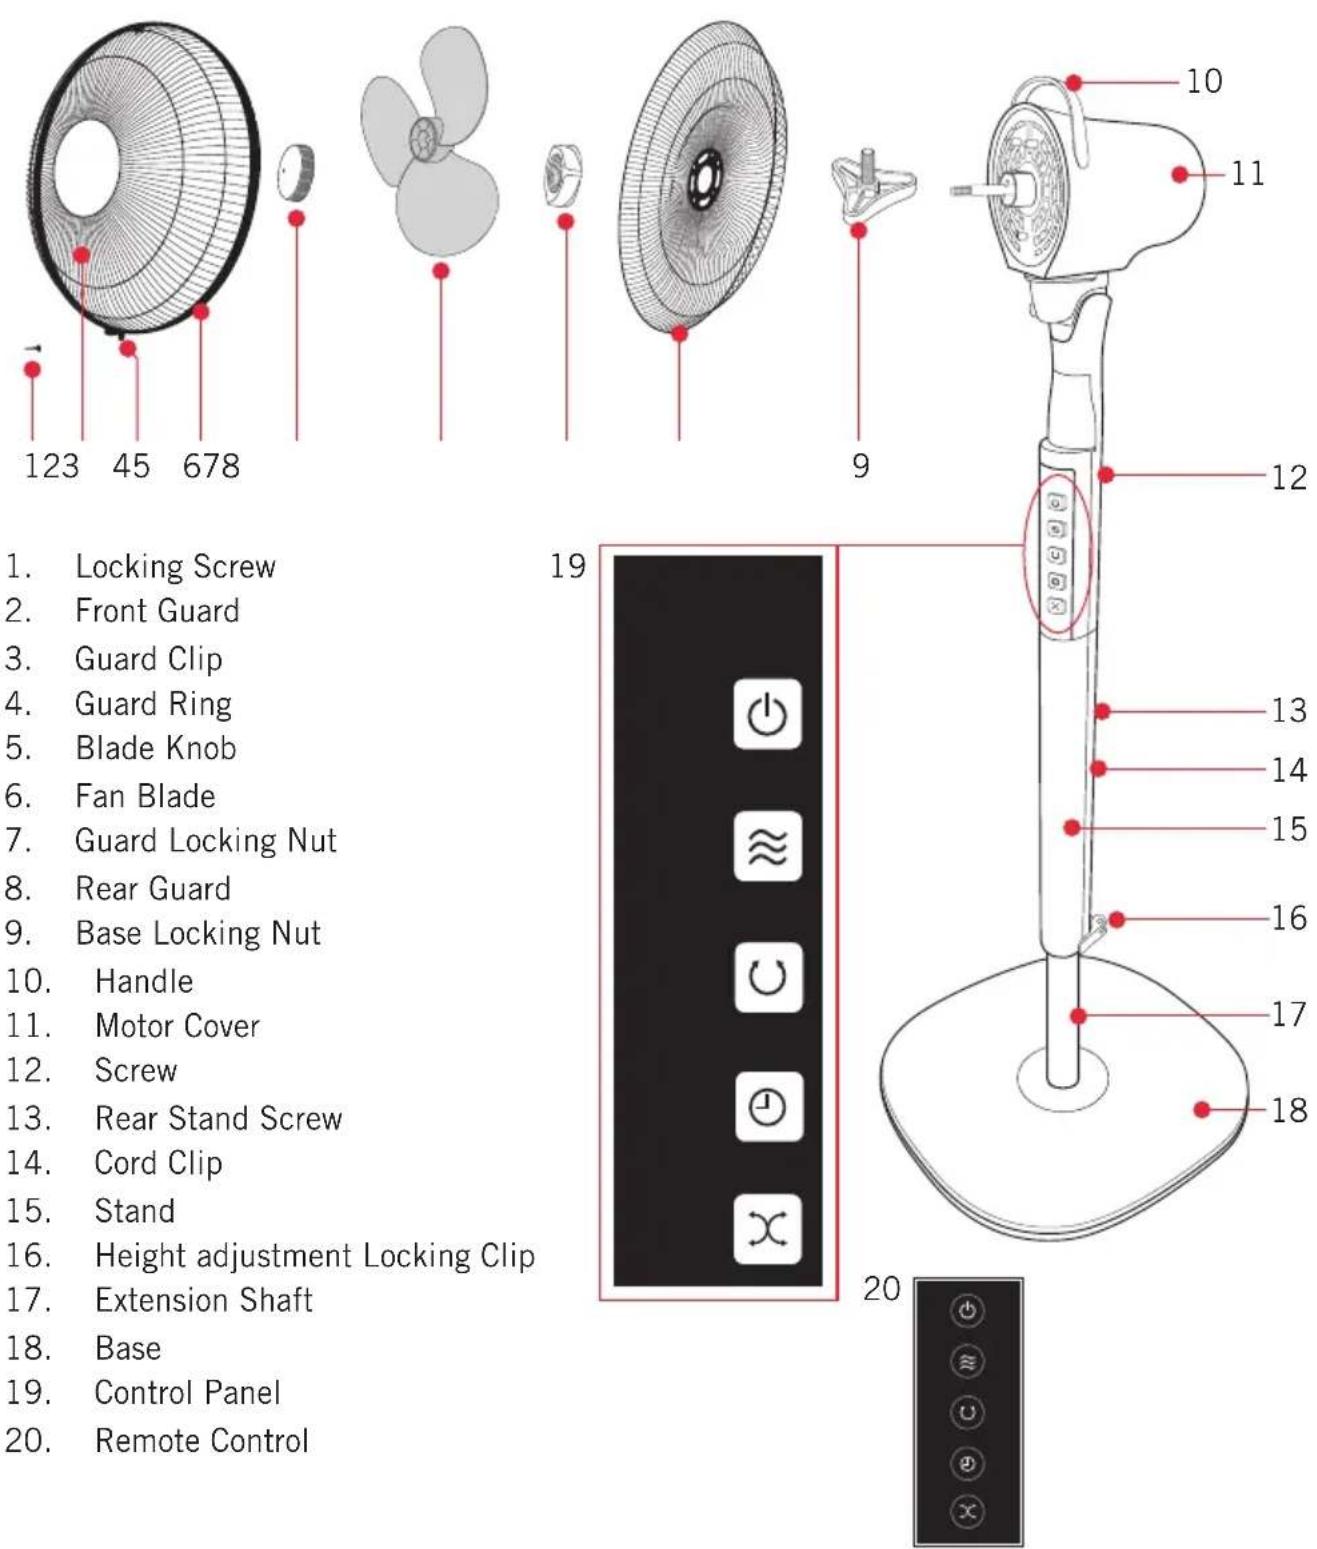
- Locking Screw
- Front Guard
- Guard Clip
- Guard Ring
- Blade Knob
- Fan Blade
- Guard Locking Nut
- Rear Guard
- Base Locking Nut
- Handle
- Motor Cover
- Screw
- Rear Stand Screw
- Cord Clip
- Stand
- Extension Shaft
- Base
- Control Panel
-
Remote Control
-
Height adjustment Locking Clip
Assembling Your Pedestal Fan
- Unpack all the components from the box.
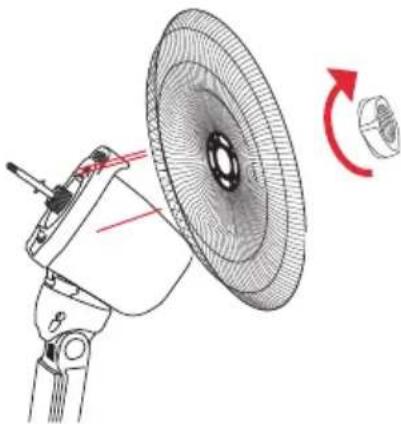
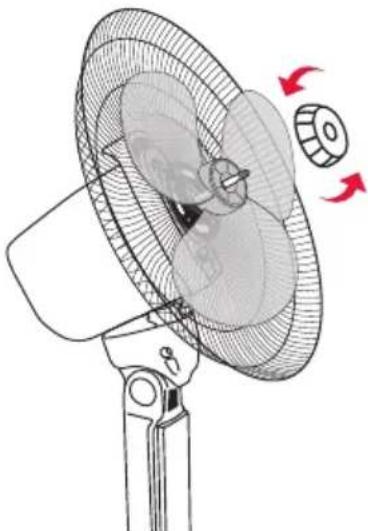
- Unfasten the interlocking nut and blade knob from the front of the motor (See Figure 2) and place to one side.
natural_image
Technical line drawing of a mechanical device with a circular component and red rotation arrow (no text or symbols)Figure 1
- Attach the rear fan blade grill and ensure it is in the correct orientation with the "UP" and the two holes aligned at the top (See Figure 1). Firmly screw on the interlocking nut.
- Mount the fan blade onto the motor shaft; and fasten the blade knob firmly by turning in an anti-clockwise direction. See Figure 2.
natural_image
Diagram of a fan with blades and blades, showing airflow direction (no text or symbols)Figure 2
- Open the front guard clip and attach the fan blade grill with the "UP" word (which appears on the inside of the grill), the Sunbeam logo should be straight. Push the round edges of the grill firmly together with the back grill and lock the clip. Using a Phillips head screwdriver, tighten the screw provided. See Figure 3.
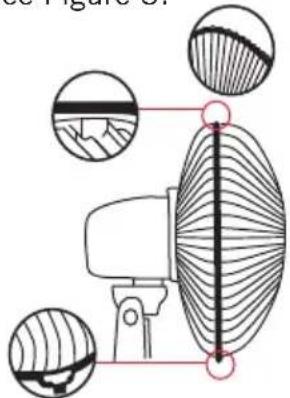
Figure 3
Connecting The Stand base, extension shaft, upper shaft and base locking nut
- Locate the base locking nut.
-
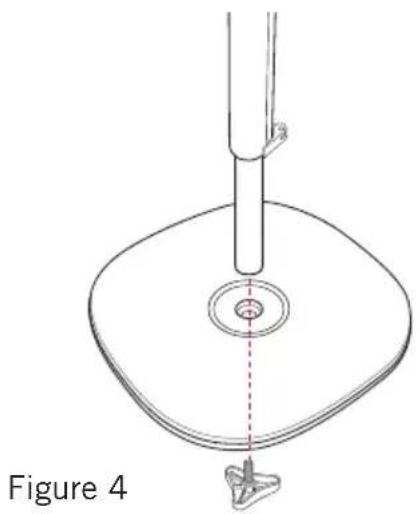
Insert the lower extension shaft firmly into the base and attach the moulded securing knob to the underside of the base and tighten. (Refer Figure 4).
-
Insert the upper shaft into the extension shaft and secure with the rear stand. Screw using a flat head screw driver.
natural_image
Technical line drawing of a mechanical component with a central shaft and base, labeled Figure 4 (no text or symbols on the diagram itself)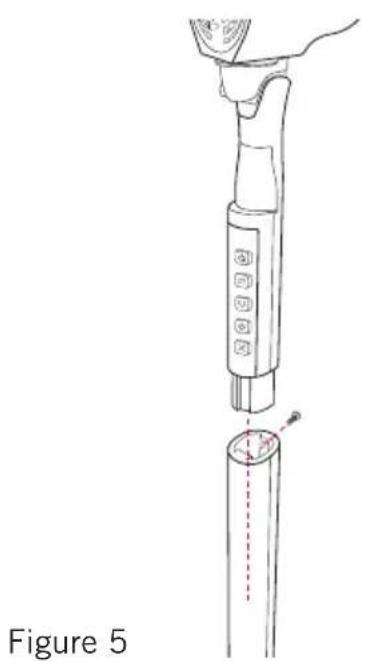
natural_image
Line drawing of a medical or laboratory device with a vertical shaft and a hand holding the top part, labeled 'Figure 5' (no text or symbols on the diagram itself)Remote Control
Remote control
Operates within 8 metres of the Pedestal Fan.
Fan speed button
Choose from 3 speed settings, low medium or high.
Wind Mode
You have a choice of 2 Nature or Sleep airflow types.
When used in nature mode, the fan speed is randomly adjusted, giving the feeling of a natural breeze.
When set to Sleep Mode the fan speed decreases after 30 minutes from high to medium, then medium to low.
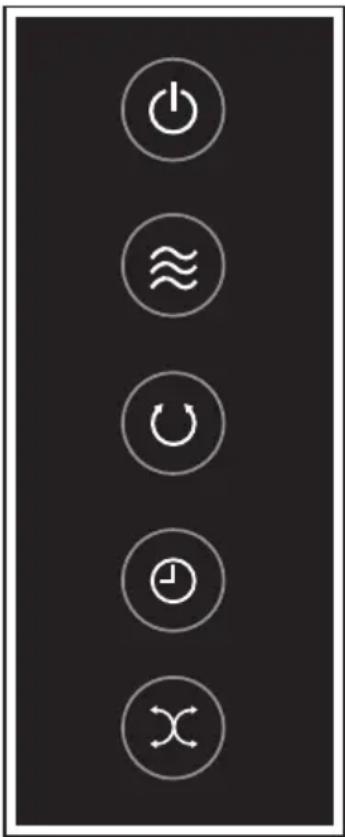
Oscillation
Your pedestal fan oscillates 70^ , distributing cool air throughout the room.
Preset/Timer
The preset timer allows you to set your pedestal fan to turn off after 1, 2 or 4 hours.
Using the remote control
- Point the remote towards the control panel on the front of the pedestal to operate.
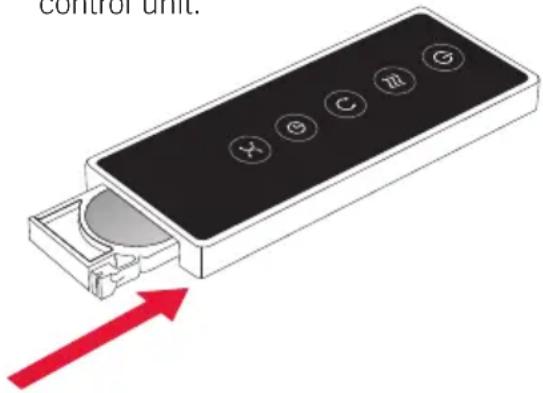
Inserting or changing the batteries
- Slide battery tray at the base of the unit.
- Insert the button cell battery provided with your pedestal fan.
- Slide battery tray into the base of the remote control unit.
Using Your Pedestal Fan
- Place the pedestal fan on a flat level surface
- Adjust the height by unlocking the height adjustment clip on the lower shaft. Raise the shaft to your selected height and engage the clip to lock into place. Insert the plug into a 230/240 V power outlet and turn the power on.
Note: Only adjust the height when the fan is switched off.
- Press the on/off button on the fan or the remote control. The fan will start at low speed.
Selecting a fan speed
- To select a fan speed simply press the 'speed' button on either the fan or remote control repeatedly to select the desired speed from the 3 settings available.
The LED lights indicate the selected speed setting.
Note: If you will not be using the fan for a length of time, it is advisable to turn the power off at the wall socket and unplug the power cord.
Oscillation
Press the oscillation button to turn on.
To turn oscillation off, press the oscillation button again.
Tilting Head
4 position vertical
3 position horizontal
Timer
Pre-set to turn off
To pre-set the timer to turn the fan off, press the timer button to switch to timer mode. Press the 1, 2 or 4 hours timer button to select. When this set time is reached, the fan will switch OFF automatically.
Operations
1. ON/OFF

Press this symbol to control the fan power on or off. Touch one time, fan shows power on, for one more time, the fan is power off.
2. Wind Speed

Press this symbol to control the wind speed. Press one time show the low speed , press two times shows the medium speed ≈ , press three times shows the high speed. ≈ press more times, wind, speed circulates as this sequence.
3. OSC

This just turns oscillation on or off with each press.
Care and Cleaning
- Ensure that your pedestal fan is switched off and disconnected from the power outlet before cleaning.
-
Carefully wipe your fan using a clean soft cloth. Do not use abrasive cleaners or brushes to clean the fan as these will scratch and damage the surface
-
Take care that excessive dust does not build up in or around the motor body. Use a dry soft brush or vacuum cleaner to remove it.
- Do not allow the motor or other electrical components to be exposed to water.
- Always store your fan in a cool dry place when not in use, preferably in the original box.
2 Year Warranty
This Sunbeam product is covered by a 2 year replacement or repair warranty, which is in addition to your rights under the Australian Consumer Law (if your product was purchased in Australia) or New Zealand Consumer Guarantees Act (if your product was purchased in New Zealand).
Should you experience any difficulties with your product during the warranty period, please contact our customer service line for advice on 1300 881 861 in Australia, or 0800 786 232 in New Zealand.
Alternatively, you can send a written claim to Sunbeam to:
Australia
Units 5 & 6, 13 Lord Street
Botany NSW 2019 Australia
New Zealand
26 Vestey Drive
Mt Wellington, Auckland New Zealand
Upon receipt of your claim, Sunbeam will seek to resolve your difficulties or, if the product is defective, advise you on how to obtain a replacement or refund.
To assist us in managing warranty claims, we recommend you register your product as soon as practicable after purchase by creating a MySunbeam account on our website and send a copy of your original receipt to Sunbeam.
In order to make a claim under our warranty, you must have the original proof of purchase documentation for the product and present it when requested.
Should your product develop any defect within 2 years of purchase because of faulty materials or workmanship, we will replace or repair it, at our discretion, free of charge. A product presented for repair may be replaced by a refurbished product of the same type rather than being repaired. Refurbished parts may be used to repair the product.
Our replacement or repair warranty only applies where a defect arises as a result of faulty material or workmanship during the warranty period. Your warranty does not cover misuse or negligent handling (including damage caused by failing to use the product in accordance with this instruction booklet), accidental damage, or normal wear and tear.
Your warranty does not:
• cover freight or any other costs incurred in making a claim, consumable items, accessories that by their nature and limited lifespan require periodic renewal (such as filters and seals) or any consequential loss or damage; or
• cover damage caused by:
- power surges, power dips, voltage supply problems, or use of the product on incorrect voltage;
- servicing or modification of the product other than by Sunbeam or an authorised Sunbeam service centre;
- use of the product with other accessories, attachments, product supplies, parts or devices that do not conform to Sunbeam specifications; or
- exposure of the product to abnormally corrosive conditions; or
- extend beyond 3 months if the product is used in commercial, industrial, educational or rental applications.
The benefits given to you by our warranty are in addition to other rights and remedies under law in relation to the product.
In Australia our goods come with guarantees that cannot be excluded under the Australian Consumer Law. You are entitled to a replacement or refund for a major failure and for compensation for any other foreseeable loss or damage. You are also entitled to have the goods repaired or replaced if the goods fail to be of acceptable quality and the failure does not amount to a major failure.
Our goods also come with guarantees that cannot be excluded under the New Zealand Consumer Guarantees Act.
If your warranty claim is not accepted, we will inform you and if requested to do so by you, repair the product provided you pay the usual charges for such repair. You will also be responsible for all freight and other costs.
Should your product require repair or service after the warranty period, contact your nearest Sunbeam service centre. For a complete list of Sunbeam's service centres, visit our website or call our customer service line for advice on 1300 881 861 in Australia, or 0800 786 232 in New Zealand.
Need help with your appliance?
Contact our customer service team or visit our website for information and tips on getting the most from your appliance.
In Australia
Visit www.sunbeam.com.au
Or call 1300 881 861
In New Zealand
Visit www.sunbeam.co.nz
Or call 0800 786 232
is a registered trademark.
Made in China.
Due to minor changes in design or otherwise,
the product may differ from the one shown in this leaflet.
© Copyright. Sunbeam Corporation Limited 2012.
ABN 45 000 006 771
Units 5 & 6, 13 Lord Street
Botany NSW 2019 Australia
Unit 3, Building D
26 Vestey Drive
Mt Wellington Auckland
New Zealand
Sunbeam Corporation is a division of GUD Holdings Ltd.


- Sunbeam Pedestal Fan with Remote Control
- Sunbeam's Safety Precautions
- Safety Precautions For Your Pedestal Fan
- Locating Your Pedestal Fan
- Features Of Your Sunbeam Pedestal Fan
- Metal Grille
- Plastic Fan Blades
- Control Panel
- Solid Base
- Parts Identification
- Assembling Your Pedestal Fan
- Connecting The Stand base, extension shaft, upper shaft and base locking nut
- Remote Control
- Fan speed button
- Wind Mode
- Oscillation
- Preset/Timer
- Using the remote control
- Inserting or changing the batteries
- Using Your Pedestal Fan
- Selecting a fan speed
- Tilting Head
- Timer
- Pre-set to turn off
- Operations
- ON/OFF
- Wind Speed
- OSC
- Care and Cleaning
- Year Warranty
- Australia
- New Zealand
- Need help with your appliance?
- In Australia
- In New Zealand
- is a registered trademark.
Brand : SUNBEAM
Model : FA8600
Category : Ventilateur domestique