
DCP-L5652DN - Fax BROTHER - Free user manual and instructions
Find the device manual for free DCP-L5652DN BROTHER in PDF.

| Product Type | Mass Deployment Tool for Brother devices |
| Supported Operating Systems | Windows 10 (32-bit and 64-bit), Windows 11 (64-bit), Windows Server 2012 or later (64-bit) |
| Additional Software Required | .NET Framework 4.8 or later |
| Interfaces | Graphical User Interface (GUI) and Command Line Interface (CLI) |
| Main Functions | Manage multiple devices, deploy settings, backup settings, activate solutions, send files, change passwords |
| Supported File Formats | JSON, DPK, EDPK, PJL, DJF, PRN, PCLF, PJLF, CSV |
| Deployment Profile Format | CSV file containing device information and settings file paths |
| Password Management | Set default login password and change existing password; supports password encryption via DKEY files |
| Backup Functionality | Retrieve settings from devices and save as EDPK files; option to exclude device-specific settings |
| Solution Activation | Send license files (license codes) to activate custom software solutions on target devices |
| CLI Commands | send, read, apply, mapply, retrieve, activate, setpassword, msetpassword, pack, unpack, exportprofile, applyup, confirmup, listactivefunc, listfilter, dkeycreate, convertsetting |
| Device Discovery | Network discovery via IP broadcast, unicast, agent broadcast; USB-connected devices supported |
| Network Settings Configuration | SNMP v1/v2c/v3, proxy settings configurable via GUI |
| Compatible Devices | Brother HL, DCP, MFC printers, scanners; network-connected and USB-connected |
| Security Features | Encrypted deployment profiles (ZIP with password), EDPK encryption, DKEY files for password storage |
| Logging | Application log for error tracking; CLI logs to file |
| EULA | Requires acceptance of End-user License Agreement; can be accepted via CLI with --agree option |
| Version Updates | Check for software updates via GUI; schema conversion tool available |
| Intended Users | Pre-sales/post-sales engineers, installation engineers, channel engineers, IT administrators |
Frequently Asked Questions - DCP-L5652DN BROTHER
User questions about DCP-L5652DN BROTHER
0 question about this device. Answer the ones you know or ask your own.
Ask a new question about this device
Download the instructions for your Fax in PDF format for free! Find your manual DCP-L5652DN - BROTHER and take your electronic device back in hand. On this page are published all the documents necessary for the use of your device. DCP-L5652DN by BROTHER.
USER MANUAL DCP-L5652DN BROTHER
Mass Deployment Tool
User's Guide
Copyright
© 2022 Brother Industries, Ltd. All rights reserved.
Information in this document is subject to change without notice. The software described in this document is furnished under a license agreement. The software may be used or copied only in accordance with the terms of those agreements. No part of this publication can be reproduced in any form or by any means without prior written permission of Brother Industries, Ltd.
Trademark
Brother is either a trademark or a registered trademark of Brother Industries, Ltd.
Any trade names and product names of companies appearing on Brother products, related documents and any other materials are all trademarks or registered trademarks of those respective companies.
Important Notes
- The screens or images in this User's Guide are for illustration purposes only and may differ from those of the actual products.
- The contents of this document and the specifications of this product are subject to change without notice.
Table of Contents
1 Introduction.... 1
1.1 Overview ...... 1
1.2 System Requirements 2
1.3 Preparation.... 2
2 Main Functions of the Mass Deployment Tool (GUI).... 3
2.1 Update the Device List .... 3
2.2 Check Device Notifications.... 5
2.3 Use Deployment Profiles.... 6
2.3.1 Import Deployment Profiles 6
2.3.2 Export Deployment Profiles 7
2.4 Open the Setting File Editor 7
2.5 Send Files 7
2.6 Back Up Settings....9
2.7 Set Password 10
3 Additional Functions of the Mass Deployment Tool (GUI).... 12
3.1 Application Settings.... 12
3.1.1 Configure the Network Settings 12
3.1.2 Configure the Device Discovery Settings.... 13
3.1.3 Link the Mass Deployment Tool to BRAmin Professional 4.... 13
3.1.4 Application Information 13
3.2 Activate Solutions.... 14
4 Command Line Interface (CLI) 15
4.1 Use CLI in the Mass Deployment Tool.... 15
4.2 Commands and Options.... 16
4.2.1 Commands 16
4.2.2 Device Identifiers 22
4.2.3 Options 23
4.2.4 Deployment Profile 25
4.2.5 Deploy Key File 27
4.2.6 Create the ETKN File.... 28
5 Create Settings Files 29
5.1 Settings Files 29
5.2 JSON Files 29
5.3 Create JSON Files 30
6 Setting File Editor 31
7 Troubleshooting.... 34
Appendix.... 36
1 Introduction
1.1 Overview
The Mass Deployment Tool provides a configuration interface to help you manage a variety of Brother device settings, and allows users to install and manage multiple USB-connected or network-connected devices, without having to install any additional software. The tool has two independent interfaces:
• Graphical User Interface (GUI)
• Command Line Interface (CLI)
The main functions of this tool are:
- Manage multiple devices using a deployment profile that consists of device information or settings
- Deploy settings files to the target devices
• Retrieve settings from target devices

If you are also using BRAAdmin Professional 4, you can link the Mass Deployment Tool to BRAAdmin Professional 4 and use its device information and application settings:
- During the first launch of the Mass Deployment Tool
- In the Mass Deployment Tool's Application settings > Operation mode
For more information, see 3.1 Application Settings.
The intended users of this tool are:
• Pre-sales and post-sales engineers
• Installation engineers who install devices in customer environments
• Channel engineers who manage customer devices remotely
- IT administrators at end-user companies with their own device administration systems
1.2 System Requirements
| Operating Systems | Windows 10 (32-bit and 64-bit)Windows 11 (64-bit)Windows Server 2012 or later (64-bit) |
| Additional Software .NET Framework 4.8 or later | |
1.3 Preparation
- Download the latest version of the Mass Deployment Tool from the Brother support website at support.brother.com.
- Copy the contents of the downloaded file into the folder you want.

Make sure you know which schema file is supported by your Brother model. For a list of available schema files and applicable models, double-click the README.url file in the "Schema" folder to open the README website. You will need this information later.
- To run the tool, do one of the following:
- For the Graphical User Interface (GUI)
Double-click the MassDeploymentTool.exe file in the "MassDeploymentTool" folder.
For BRAdmin Professional 4 users
- To link the Mass Deployment Tool to BRAadmin and use its device information and application settings, select Import the device list database and application settings from BRAadmin Professional 4. in the dialog box that appears when you first launch the Mass Deployment Tool. To link it later, go to Application settings > Operation mode.
- If your BRAmin application is password-protected, you must type the password.
• For the Command Line Interface (CLI)
At your Command Prompt, run the settingcmd.exe file in the "SettingCommand" folder.

We recommend changing the default login password to protect your machine from unauthorized access and to use the Mass Deployment Tool securely.
For more information about changing your password, see 2.7 Set Password.
2 Main Functions of the Mass Deployment Tool (GUI)
Use the Mass Deployment Tool's Graphical User Interface (GUI) to:
- Prepare and manage deployment profiles for multiple Brother devices.
- Deploy settings or send instructions to multiple Brother devices using deployment profiles.
- Change the Mass Deployment Tool's settings.
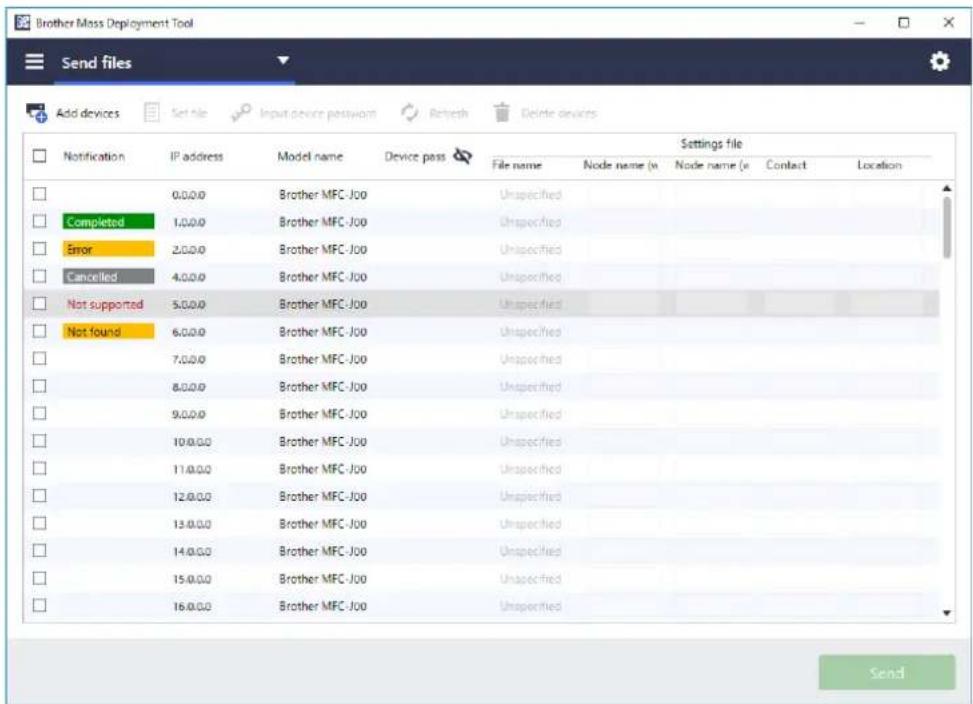
2.1 Update the Device List
No devices are displayed upon startup. Search for target devices first, and then add them to the list:
- Click the Add devices button to display the list of devices on the Add devices screen.
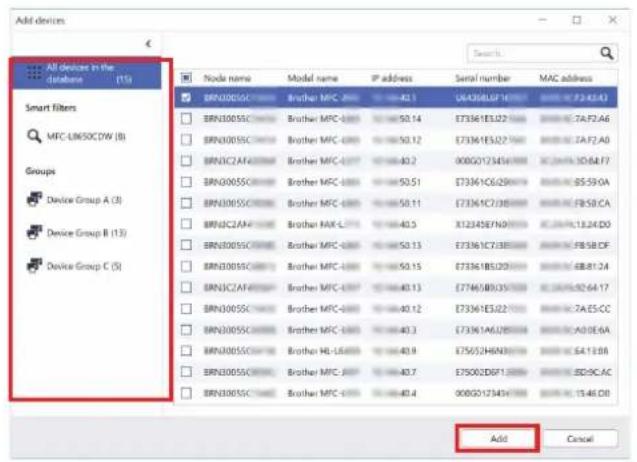
If you are using the BRAadmin database, its Device list appears with Smart filters (containing the devices that meet your filtering criteria) and Groups (containing the devices you specified) in the left pane. For more information about Smart filters, see the BRAadmin Professional 4 User's Guide.
Without using the BRAdmin database Using the BRAdmin database
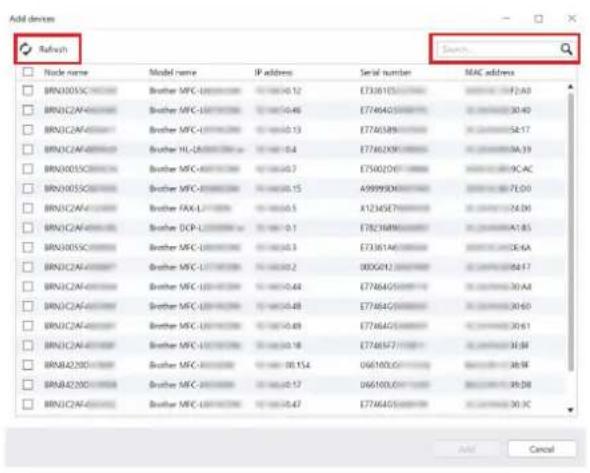
- Type a keyword in the search box or click the Refresh button, if needed.
(The Refresh button is not available if you are using the BRAadmin database.) - Select the check boxes of the devices you want to add. If you are using the BRAmin database, you can also select the target Smart filter or Group in the left pane.
- Click the Add button. The list of devices you selected appears in the tool's main window.
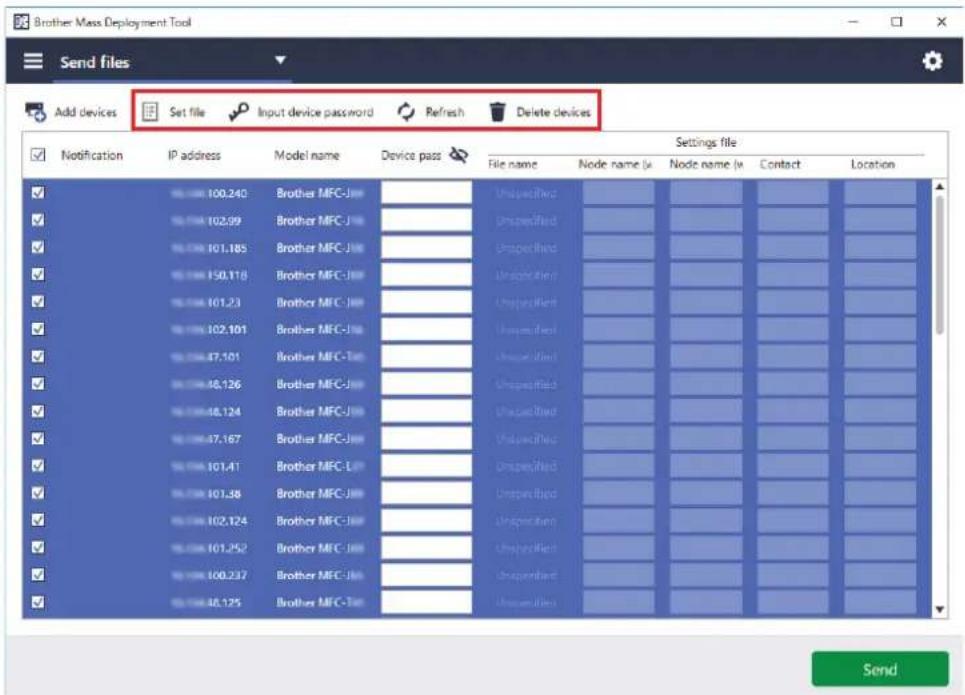
The following functions are available in the tool's main window.
- Select the Setting File
Select one or more devices, click the Set file button, and then select the file you want.
- Enter a Password for Password-Protected Devices
Select one or more devices that use the same password, click the Input device password button, type the password, and then click OK.
- Refresh the Device List
Select one or more devices and then click the Refresh button.
- Delete Devices from the Device List
Select one or more devices and click the Delete devices button.
- Sort the Device List
Click the column heading containing the sort criteria you want.

To select multiple devices, press and hold the Shift or Ctrl key on your keyboard, and left-click the devices you want.
2.2 Check Device Notifications
The Notification column of the Device List notifies you of the results of the last-performed task of the listed devices.
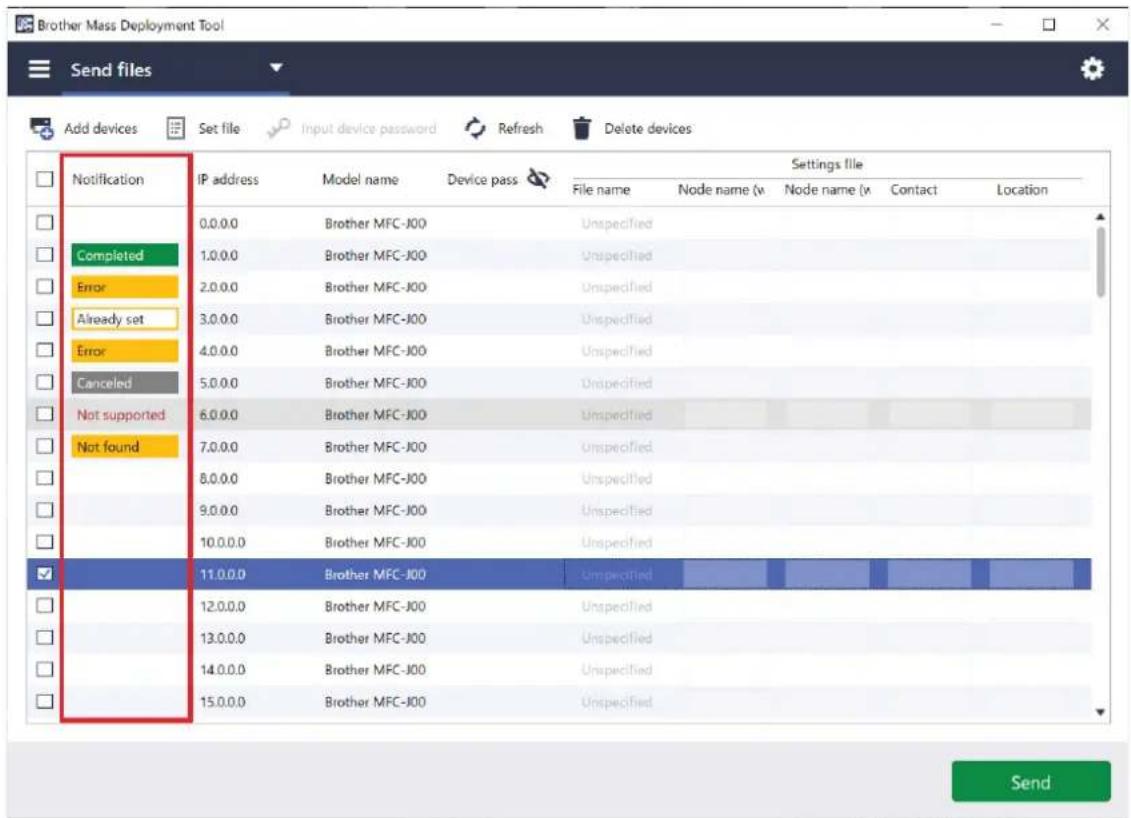
The following notifications are available:
| Not found | This device was offline when the deployment profile was imported into the tool. Check the device's connection status.(For more information, see 2.3.1 Import Deployment Profiles.) |
| Completed | This device completed the last-performed task successfully. |
| Error | This device did not complete the last-performed task successfully. See the log details, and perform the function again if needed.To check the log, click >Information >click the Open button under Application log:. |
| Not supported This device does not support this function. | |
| Cancelled The last-performed function has been cancelled in this device. | |
| Already set The default login password has already been changed. | |
| Solution not supported/already activated | All the last-performed functions have been enabled. * |
| Partially complete The last-performed functions have been partially activated. * | |
| Solution not supported | The last-performed function has not been activated as it is not supported. * |
| (blank) There are no notifications for this device. | |
* Available only for Activate Solutions. For more information, see 3.2 Activate Solutions.
2.3 Use Deployment Profiles
Deployment profiles contain paths to settings files, such as JSON files, and let you assign specific settings files to multiple Brother devices. This feature allows you to:
- Import deployment profiles to restore specific settings files for specific devices.
- Export and save deployment profiles to let others use them to import settings from multiple Brother devices and then send them to other devices.

Deployment profiles contain only the relative paths for settings files. To pass a set of deployment profiles and settings files to others, you must copy both the deployment profile and any necessary settings files to ensure that the relative path is correct.
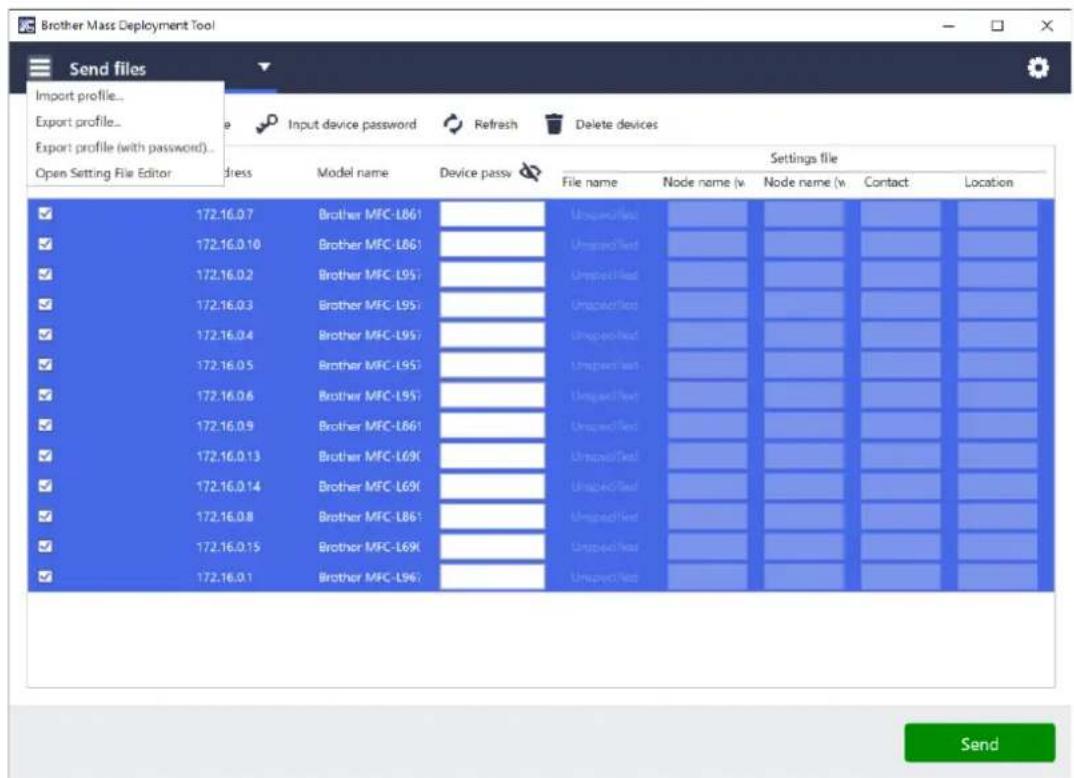
2.3.1 Import Deployment Profiles
Import customized deployments and use them to manage multiple devices.
- Click in the upper left and select Import profile...
- Select the CSV file or the encrypted ZIP archive you want.
- The tool imports the selected file and deploys the profiles it contains.
- Make sure the device list contains all the devices you want. Add more devices if needed.
2.3.2 Export Deployment Profiles
Create and export customized deployments and use them to manage multiple devices.
- Make sure the device list contains all the devices you want. Add more devices if needed.
- Click ☐ and select Export profile..., or Export profile (with password)...

If you select Export Profile... and any of the target devices is password-protected, the tool notifies you that the profile will be saved without encryption.
Click OK to continue, or click Cancel to go back and select Export profile (with password)...
- Select the destination folder, enter the file name, and then click the Save button. If prompted, enter the password and click the OK button.
- The tool exports the file and saves it in CSV format.
2.4 Open the Setting File Editor
Adjust the backed-up setting files.
- Click ☐ and select Open Setting File Editor.

To launch the Setting File Editor successfully, make sure both MassDeploymentTool.exe and SettingFileEditor.exe have not been moved from the installation folder. For more information, see 6 Setting File Editor.
2.5 Send Files
To send specific files (PJL, DJF, PRN files) or to deploy settings files (DPK, EDPK, JSON files) for managing multiple target devices, do the following:
(For more information about creating settings files, see 5.3 Create JSON Files.)
- Make sure the device list contains all the devices you want.
- Select Send files from the drop-down list.
- Set the file you want to send to the target devices:
a) Click the Set file button, or right-click one of the target devices and select Set file.
b) Select the file you want and click the Open button.
(When you select a file from a USB flash drive, or if you select an EDPK file, you must enter the password for the file.)
The selected file is set, and the name of the file appears in the File name column.

While a settings file (JSON, DPK, or EDPK) is set and its details appear on the Send files screen, you can enter or edit the information in the text boxes of the Node name (wired), Node name (wireless), Contact, or Location column.
- Click the Send button in the lower right corner of the screen.

Alternatively, you can use a USB flash drive to deploy settings to a device.
- Rename your file: "write_xxxx.edpk", where xxxx is your original file's name. The EDPK file password and the device password must be the same.
- Copy it onto a USB flash drive.
- Insert the USB flash drive into the Brother device's USB port.
- HL/DCP/MFC devices
a Select Direct Print.
b The USB flash drive details appear. Select the "write_xxx.edpk" file.
c * For monochrome devices: Press Start.
* For color devices: Press either Black Start or Color Start.
- Scanners
a Select Program Update.
b The USB flash drive details appear. Select the "write_xxx.edpk" file.
-
Your selected settings will be applied to the device. The output log file will be automatically created.
-
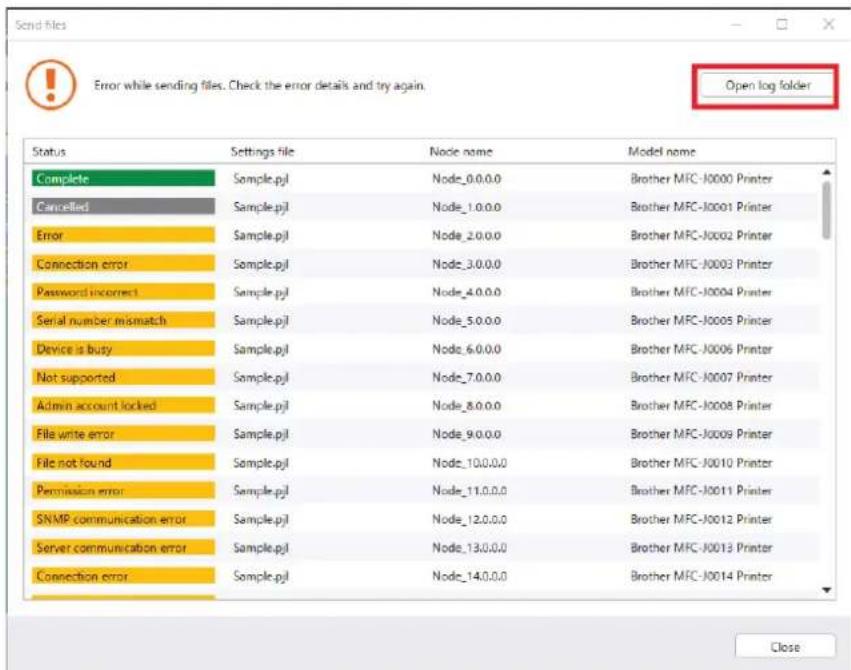
The Send files dialog box shows the sending progress.
To stop this operation, click the Stop button.
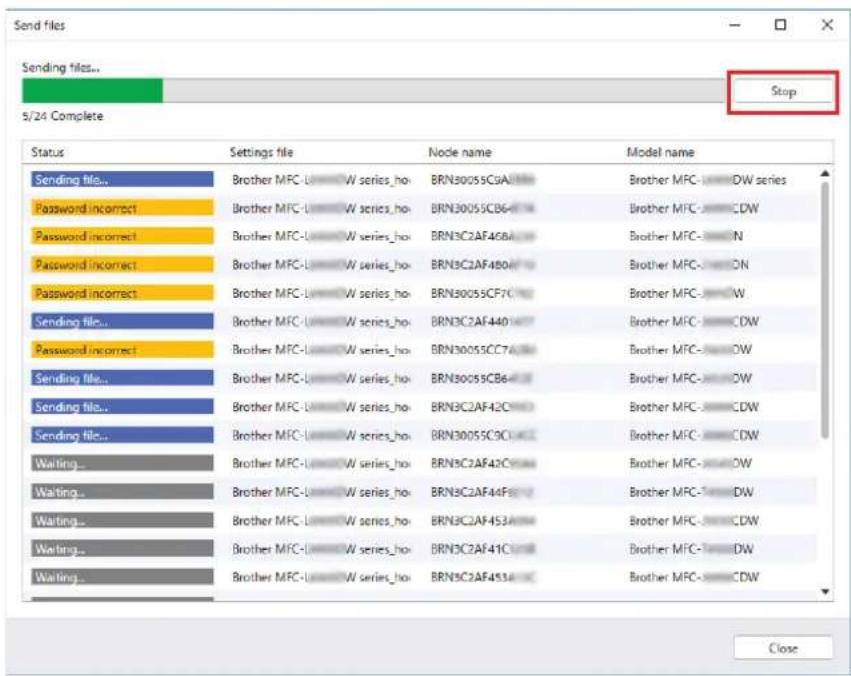
- When completed, the summary results appear.
If unsuccessful, the error status is also listed in the results. Click the Open log folder button, check the log details, and try again.
2.6 Back Up Settings
You can retrieve Brother device settings to back them up and use them later for applying the same settings to a different device.
- Make sure the device list contains all the devices you want.
- Select Back up settings from the drop-down list on the upper left.
- The Back up settings screen appears. The devices whose settings cannot be retrieved are shown as "Not supported".
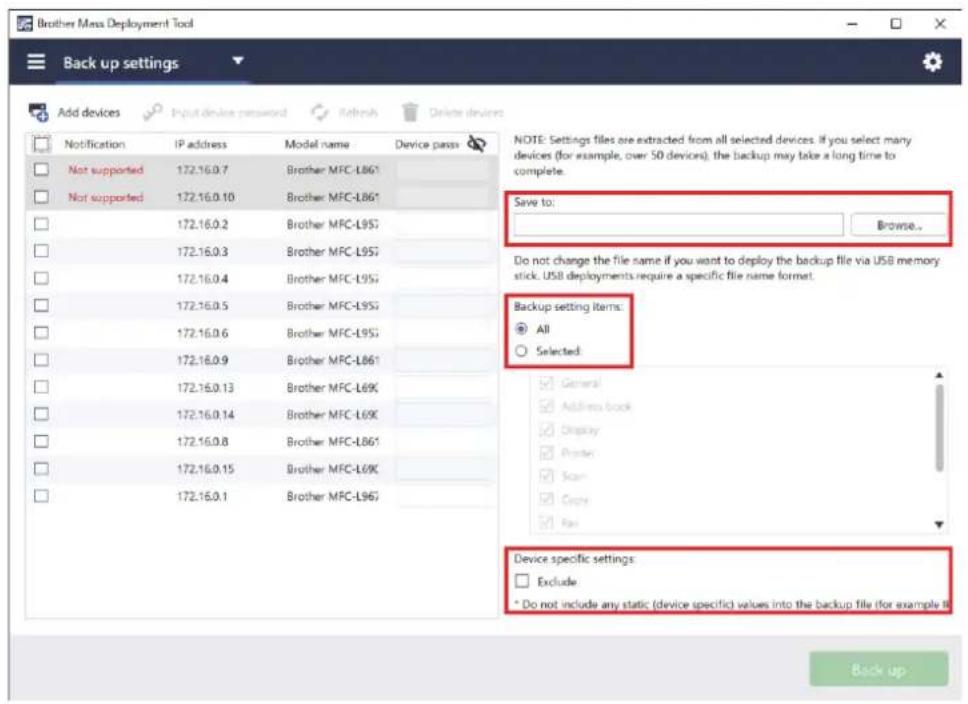
-
Enter the device password in the Device password column, if needed.
-
Enter the path into the Save to: field or click the Browse... button to select the destination folder of the backed-up settings file.
-
In the Backup setting items: field, select either All or Selected: to specify the necessary items.
-
Select the Exclude check box to not include the device-specific settings, such as the IP address, node name, in the backed-up file if needed.

To remove the device-specific setting items, you can also use the Setting File Editor. For more information, see 6 Setting File Editor.
- Click the Back up button.

Alternatively, you can use a USB flash drive to back up device settings.
- Prepare an EDPK file that contains the settings you want to back up. For instructions on how to create an EDPK file, see 5 Create Settings Files.
- Rename your file: "read_xxxx.edpk", where xxxx is your original file's name. The EDPK file password and the device password must be the same.
- Copy the renamed file onto a USB flash drive.
- Insert the USB flash drive into the Brother device's USB port.
- HL/DCP/MFC devices
a Select Direct Print.
b The USB flash drive details appear. Select the "read_xxx.edpk" file.
c * For monochrome devices: Press Start.
* For color devices: Press either Black Start or Color Start.
- Scanners
a Select Program Update.
b The USB flash drive details appear. Select the "read_xxx.edpk" file.
-
The settings you want will be extracted from the device and saved as a new file in the following format: [settings file name]_[model name]_[serial number][index].edpk The output log file will be automatically created.
-
The Back up Settings dialog box shows the backup progress.
To stop this operation, click the Stop button.
- When completed, the summary results appear.
To check the destination folder of the backup file, click the Open folder button.
If unsuccessful, the error status is also listed in the results. Click the Open log folder button, check the backup log details, and then try again.
2.7 Set Password
![Brother Mass Deployment Tool Password settings Add devices Input device password Refresh Delete devices Notification IP address Model name Device pass 172. Brother MFC- 172. Brother MFC- 172. Brother MFC- 172. Brother MFC- 172. Brother MFC- 172. Brother MFC- 172. Brother MFC- 172. Brother MFC- 172. Brother MFC- 172. Brother MFC- 172. Brother MFC- 172. Brother MFC- Pro Set a password for unconfigured devices Change device password New password: Confirm new password: The new password must be between 8 and 32 characters. To maintain a high level of security, the password should contain at least three of the following: • Uppercase letter [A-Z] • Lowercase letter [a-z] • Number digit [0-9] • Special character: I*#$%&()'+,-/;<=>?@{H}^_())~ Passwords should not be based on a dictionary word. Passwords should not contain any personal information. Your password cannot contain: • Three or more letters in alphabetical order • Three or more numbers in ascending or descending order](/content/2026/05/1060926/images/df4567e2c098a8f00e328e40c8d8245fb48cfa66a3bae898651a3c278b075a3e.jpg)
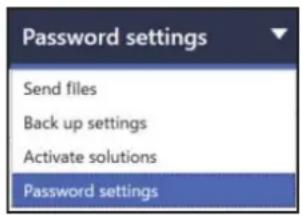
To change your default login password or current password.
-
Select Password settings from the drop-down list on the upper left.
-
Do one of the following:
- Change the default login password
a) Select the target devices in the list, and then select the Set a password for unconfigured devices radio button.
b) Type the password you want in the New password: and Confirm new password: fields.
c) Click Apply.
- Change the current password
a) Select the target devices in the list, and then select the Change device password radio button.
b) Click Input device password and type the current password in the Password: field.
OR
Type the current password directly in the Device password field in the list.
c) Type the new password in the New password: and Confirm new password: fields.
d) Click Apply.

- When you select the Set a password for unconfigured devices menu, the Input device password button and the Device password fields are disabled.
-
Avoid using the following passwords as your administrator password:
-
access
- initpass
- The “ Pwd” located on the back of your machine
- It can also be used with USB-connected devices.
- The Password settings dialog box shows the password setting progress. To stop this operation, click the Stop button.
- When completed, the summary results appear. If unsuccessful, the error status is also listed in the results. Click the Open log folder button, check the password setting result log details, and then try again.
3 Additional Functions of the Mass Deployment Tool (GUI)
Additional advanced functions are available to help you manage your devices.
3.1 Application Settings
Click in the top bar to configure the tool's settings.
3.1.1 Configure the Network Settings
To configure the device's Network settings, do the following:
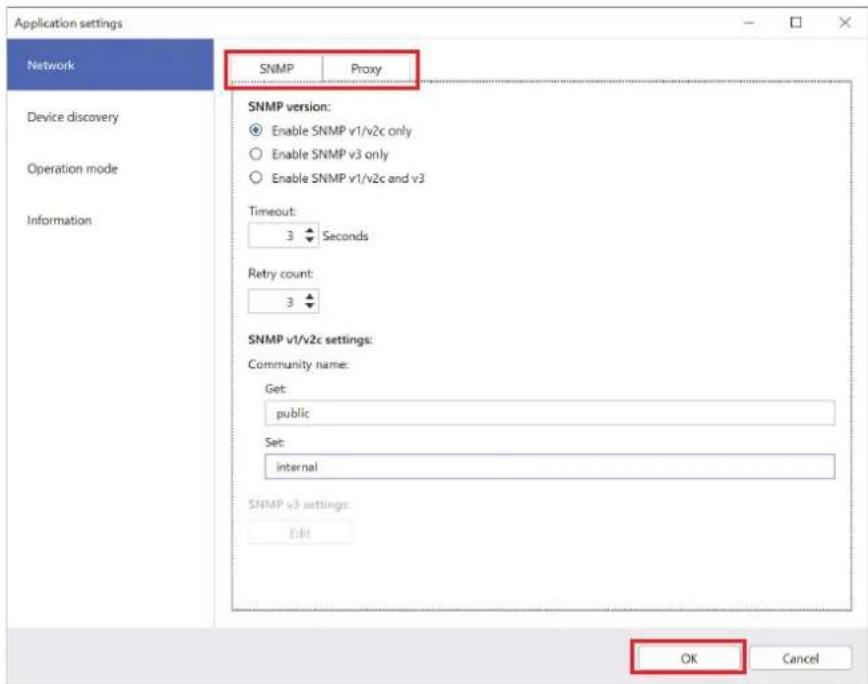
- Click Network.
- Click the SNMP tab.
- Select the settings you want.
- (Optional) Click the Proxy tab and configure proxy settings.
- The default setting is Auto.
- If you select Manual:, specify the items in the Server name:, Port:, User name:, and Password: fields.
- When finished, click the OK button.
3.1.2 Configure the Device Discovery Settings
To discover the target devices you want, configure the Device discovery settings below:
To search for devices on your network
- Select Device discovery.
- Select the IP broadcast: check box or the IP unicast: check box in the Network: tab.
- Click to add a new address.
- When finished, click the OK button.
To search for devices on a different local network
- Select Device discovery.
- Select the Agent broadcast: check box.
The Agent Broadcast feature uses the software called BRAgent. BRAgent runs on a computer on a different LAN from your computer, discovers devices, and then passes the discovery results to your Mass Deployment Tool.
- Click + to enter the Agent's IP address: or Agent's node name: field, and then click the OK button.
- Specify the Agent server port.
- When finished, click the OK button.
To search for USB-connected devices
- Select the USB: check box.
- Click the OK button.

- To edit the specified setting items, select the item and click .
- To delete the specified setting items, select the item and click .
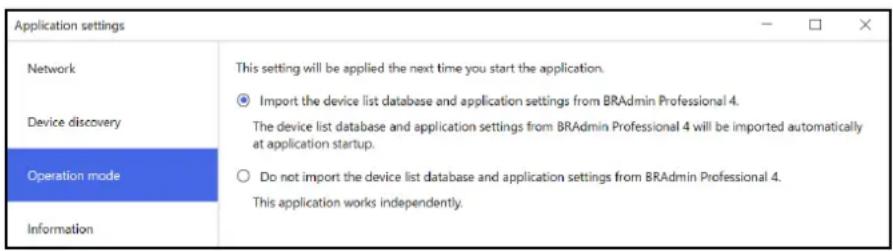
3.1.3 Link the Mass Deployment Tool to BRAadmin Professional 4
From the main screen, go to Application settings > Operation mode, and select Import the device list database and application settings from BRAdmin Professional 4 to link the Mass Deployment Tool to BRAdmin and use its device information and application settings. When this setting is enabled, you cannot change the Network and Device discovery settings from the Mass Deployment Tool.
3.1.4 Application Information
The following Mass Deployment Tool information is available:
- To check the tool's Application log in the case of errors, click the Open button from the Application log: menu.
- To view the version information, click the Version button from the About this application: menu.
- To check the application version, click the Check for software updates button. You can update the software if a newer version is available.
- To check the license information, click the License button.
3.2 Activate Solutions
You can send license files to activate custom software solutions on the target devices.
A valid license file is necessary for this task. A license file can contain many activation codes, allowing solutions to be activated on many devices simultaneously. If you do not have one, contact your local Brother office.
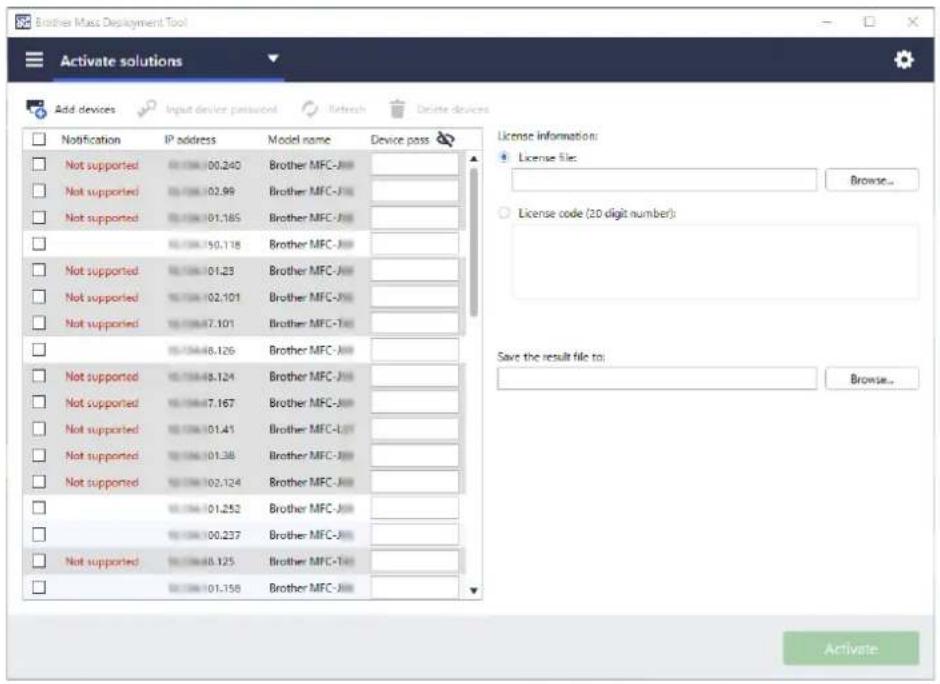
- Make sure the device list contains all the devices you want.
- Select Activate solutions from the drop-down list in the top bar.
- The Activate solutions screen appears. The devices you cannot send the license to are shown as "Not supported".
- Enter the device password in the Device password column, if needed.
- Do one of the following:
- If you have a license file: Select the License file: radio button, and then type the file name in the field below, or click the Browse... button to select the license file.
- If you have license codes: Select the License code (20 digit number): radio button, and then type the license codes in the field below.
Multiple codes can be entered, one license code per line.
- Click the Browse... button next to the Save the result file to: field and specify where to save the result file. You can also copy and paste folder paths into this field.
- Click the Activate button.
- The Activate solutions dialog box shows the activation progress. You can also stop the operation by clicking the Stop button.
- When completed, the summary results appear. If unsuccessful, the error status is also listed in the results. Click the Open log folder button, check the log details, and then try again.
4 Command Line Interface (CLI)
The tool's Command Line Interface (CLI) allows you to configure devices remotely using the Command Prompt. The CLI automatically converts settings files to an appropriate format and sends them to the device you want. It then retrieves the settings data and verifies whether the settings have been applied correctly.
4.1 Use CLI in the Mass Deployment Tool
To use the tool's CLI, you must run the Command Prompt in Windows, and then enter the correct commands and options to execute specific instructions. The CLI uses the following syntax:
settingcmd.exe command option option
Where:
Command: performs a specific task and displays the result
Option: modifies the operation of a command
Examples
Applying settings files:
settingcmd.exe apply --ip IP_address --file your_file_name.json --password your_password
Retrieving settings files:
settingcmd.exe retrieve --ip IP_address --file your_file_name.json --output your_file_name.edpk --password your_password

Only English can be used in the Command Line Interface.
The Settingcmd.exe file is stored in the "SettingCommand" folder.
4.2 Commands and Options
4.2.1 Commands
The following commands can be combined with one or more options to perform specific device configuration tasks.
| Command Option Description | |
| send Either “Device identifier”*or “profile” is required.1Device identifierRequired:fileOptional:passwordprofileRequired:resultOptional:profilepasswordcsvdelimAvailable in both, if needed:networksettingpathdkeypassworddkeyfilelogcommunitynamesetcommunitynameget* For more information, see4.2.2 Device Identifiers. | Allows you to send the specified file to the device. PRN, PJL, DJF, PJLF, and PCLF files are supported.PJFL and PCLF are filter files used by filter functions supported by some devices.Example:settingcmd.exe send --ip IP_address--file your_file_name.prnsettingcmd.exe send --profileyour_profile_name.csv --resultyour_filename.csvConfirm the result for each device in the results file (CSV).The results file contains all items in your deployment profile along with the following items:- Result- Detail- Start time- Finish time |
| read Required:Device identifierfileOptional:outputpasswordnetworksettingpathdkeypassworddkeyfilelogcommunitynamesetcommunitynameget | Allows you to send the specified file to the device and to read the response. Only PJL files are supported.Example:settingcmd.exe read --ip IP_address--file your_file_name.pjl--output our_file_name.txt |
| Command Option | Description | |
| (m)apply“mapply” command must use “profile”. | Either “Device identifier” or “profile” is required.1Device identifierRequired:fileOptional:passwordskipvalidateprofileRequired:resultOptional:profilepasswordcsvdelimcreatefileonlyoutputdir (*)Available in both, if needed:schemapjltableenumtableforcepjlforcenativeignorepjerrorskipverifynetworksettingpathdkeypassworddkeyfilelogcommunitynamesetcommunitynamegetforcehttps*If you use “--createfileonly”,you must also use “--outputdir”. | Allows you to send and apply the specified settings file and confirms the result. JSON, DPK, and EDPK files are supported.If the “mapply” command is used with the “--outputdir” option, the tool will save each device's intermediate files to the designated folder.If the “mapply” command is used with both the “--createfileonly” and the “--outputdir” options, the tool will only save each device's intermediate files to the designated folder and will not apply the files to each device.Example:settingcmd.exe apply --ip IP_address --file your_file_name.json --password your_passwordsettingcmd.exe mapply --profileyour_profile_name.csv --resultyour_filename.csvConfirm the result for each device in the results file (CSV).The results file contains all items in your deployment profile along with the following items:- Result- Detail- Start time- Finish time-(Optional) Output: If you use the “(m)apply” command with the “--outputdir” option, the path for saving the intermediate file appears here. |
| retrieve Required: | Device identifieroutputOptional:filepasswordnetworksettingpathlogcommunitynamesetcommunitynamegetforcehttps | Allows you to retrieve specific settings data from the specified device.The tool sends a request to the specified target device and stores the retrieved settings data, which includes all the settings in the JSON schema based on the specified file path.To download only specific settings, use the “--file” option to specify the settings file that includes the items you want.Example:settingcmd.exe retrieve --ip IP_address--file your_file_name.json--output your_file_name.edpk--password your_password |
| activate Either “Device identifier” or “profile” is required.1Device identifierRequired:networksettingpathactivateresultlicensecodeOptional:passwordprofileRequired:networksettingpathactivateresultOptional:profilepasswordcsvdelimAvailable in both, if needed:dkeypassworddkeyfilelogcommunitynamesetcommunitynameget | Allows you to activate a custom software solution for the specified target device.Example:settingcmd.exe activate --ip IP_address--networksettingpath (network communications settings file name)--licensecode your_license_code--activateresult your_result_pathsettingcmd.exe activate --profileyour_profile_name.csv --networksettingpath (network communications settings file name)--activateresult your_result_path | |
| (m)setpassword “msetpassword” command must use “profile”. | Either “Device identifier” or “profile” is required.1Device identifierOptional:newpasswordprofileRequired:resultOptional:profilepasswordcsvdelimAvailable in both, if needed:networksettingpathdkeypassworddkeyfilelogcommunitynamesetcommunitynameget | Allows you to change the administrator password from the default login password to a different password.Example:settingcmd.exe setpassword --ip IP_address--newpassword your_new_passwordsettingcmd.exe msetpassword --profileyour_profile_name.csv --resultyour_filename.csvConfirm the result for each device in the results file (CSV). The results file contains all items in your deployment profile along with the following items:- Result- Detail- Start time- Finish time |
| pack Required: | outputpackfilesOptional:passwordlog | Creates a settings package file from JSON settings files and their resource files. If you use the “—password” option, the package file will be encrypted.Example:settingcmd.exe pack --packfilesyour_file_name.jsonyour_file_name.xmlyour_file_name_2.xml--output your_file_name.edpk--password your_password |
| unpack Required: | fileunpackdirOptional:passwordlog | Extracts the settings file from the specified settings package file. If the package file is password-protected, it is decrypted with the password specified by the “--password” option and the setting file is extracted.Example:settingcmd.exe unpack --file your_file_name.edpk--unpackdir your_output_folder--password your_password |
| convertsetting Required: | sourcedestinationOptional:passwordversion | Converts schema files created in an earlier version to a format compatible with the specified version.If you do not specify the version, the tool uses the latest one.Example:settingcmd.exe convertsetting --source your_file_name --destination your_file_name--version schema_revision_version_number |
| license Displays the license information about Open Source Software. | ||
| version Displays the tool's version information. | Example:settingcmd.exe license | |
| eula Optional: | agree | An agreement to the EULA (End-user license agreement) is required to use this tool. When the tool is run for the first time, the user will be prompted to agree to the EULA.By running the “eula” command, the tool will display the EULA confirmation message. If commands other than “eula” are included, this tool will instruct you to run it with the “eula” command first.If the “eula” command is used with the “--agree” option, the tool will automatically accept the EULA without displaying any prompt. (This option is intended for silent execution of this tool.)Example:settingcmd.exe eula --agree |
| (m)listactivefunc “mlistactivefunc” command must use “profile”. | Either “Device identifier” or “profile” is required.1Device identifierprofileRequired:resultOptional:profilepasswordcsvdelimAvailable in both, if needed:networksettingpathlogcommunitynamesetcommunitynameget | Displays all solutions enabled for the specified device.Example:settingcmd.exe listactivefunc --ip IP_address--result your_filename.csvsettingcmd.exe mlistactivefunc --profileyour_profile_name.csv --resultyour_filename.csv --networksettingpath(network communications settings file name)Confirm the result for each device in the results file (CSV).The results file contains all items in your deployment profile along with the following items:- Result- Detail- Start time- Finish time |
| exportprofile Required:outputOptional:fileprofilepasswordnetworksettingpathlogcsvdelim | Search for target devices and generate the discovery results as a deployment profile. The search criteria can be specified with an export profile settings file (TXT).The settings for each section in the export profile settings file are as follows:[ip]: IP Address or IP Address Range[nodename]: Node Name[mac]: MAC Address[serial_number]: Serial NumberIf either [ip] or [nodename] is specified, devices are searched for in IP unicast. If [ip] or [nodename] is not specified, the devices are searched for in IP broadcast.If either [mac] or [serial_number] is specified, devices that do not match them are removed from the search results.Output:Screen display (Standard output)If the devices specified by [nodename], [mac],[serial_number] are not found, the number of devices that match the search criteria and notfound_list file (TXT) path are displayed.Deployment profile (CSV file)Output file name specified after the “--output” option.If the “--password” option is specified, zip the file with the specified password.notfound_list.txtOutput to the same folder as the file specified after the “--output” option.Generate only those factors that do not match the search results among all factors in the specified section.Example:settingcmd.exe exportprofile --fileexport_profile_settings.txt --outputresult_profile.csv | |
| applyup Required: | profileresultOptional:networksettingpathdkeypassworddkeyfilelogcommunitynamesetcommunitynamegetprofilepasswordcsvdelim | Allows you to register the target devices specified using a deployment profile for Microsoft Universal Print. When you set Microsoft Universal Print registration, the device connects to the Microsoft Azure Portal and registers itself for Microsoft Universal Print. The deployment profile must contain the path to the ETKN file and its password.Only ETKN files are supported.For more information about creating the ETKN file, see4.2.6 Create the ETKN File.After registration, assign the printer permissions and share the printer in Azure Active Directory (Azure AD). You can also use the Azure API commands to assign printer permissions and share the printers. Firmware Application ID must be allowed once per tenant in Azure AD. For more information, see Microsoft's website.Example:settingcmd.exe applyup --profile your profile_name.csv --result your_filename.csv--csvdelim semicolonConfirm the result for each device in the results file (CSV).The results file contains all items in your deployment profile along with the following items:- Result- Detail- Start time- Finish time |
| confirmup Required: | profileresultOptional:networksettingpathlogcommunitynamesetcommunitynamegetprofilepasswordcsvdelim | Allows you to confirm the Microsoft Universal Print registration status for each device using the deployment profile.Example:settingcmd.exe confirmup --profile your profile_name.csv --result your_filename.csv--csvdelim semicolonConfirm the result for each device in the results file (CSV).The results file contains all items in your deployment profile along with the following items:- Result- Detail- Start time- Finish time |
| dkeycreate Required: | outputdevicepassworddkeypasswordOptional:edpkpassword | Creates a DKEY file that contains the device password and the password for the package file (EDPK).The DKEY file is encrypted with the DKEY password.Example:settingcmd.exe dkeycreate --devicepassword initpass --edpkpassword your_password--dkeypassword your_password --output our_file_name.dkey |
| listfilter Either “Device identifier” or “profile” is required.1Device identifierprofileRequired:resultOptional:profilepasswordcsvdelimAvailable in both, if needed:networksettingpathcommunitynamesetcommunitynameget | Allows you to display the registered filter names for the specified device.Example:settingcmd.exe listfilter --ip IP_address --networksettingpath (network communications settings file name)settingcmd.exe listfilter --profileyour_profile_name.csv --networksettingpath (network communications settings file name)Confirm the result for each device in the results file (CSV).The results file contains all items in your deployment profile along with the following items:- Result- Detail- Start time- Finish time | |
^1 The “Device identifier” option can only run on a single device, while the “--profile” option can run on multiple devices, or a single device.
The results appear as follows:
- If execution is successful: "Result: Success"
- If executions fails: "Error and error details"

If a solution is not supported, the activation status reads "LsSolutionNotSupported".
4.2.2 Device Identifiers
Device identifiers specify the device you want to send the commands to.
| Device Identifier Description | |
| --ip address | The IP address of the target device (Network-connected devices only). |
| --mac address | The MAC address of the target device (Network-connected devices only). |
| --node name | The node name of the target device (Network-connected devices only). |
| --usb Specifying a USB-connected device (Multiple USB-connected devices not supported). | |
| --model name | The model name of the target device (USB-connected devices only). |
| --serial number | The serial number of the target device (Network-connected devices only). |
4.2.3 Options
Options can be used together with commands to modify their operation. See each command description in section 4.2.1 Commands to learn which options you can use.
| Option Description | |
| --file filename Specify the file you want to use. | |
| --output filename | Specify the path to save the acquired settings file. |
| --password password | Specify the administrator password for the target device. |
| --newpassword password | Specify a new administrator password for the target device. |
| --schema filename Specify an external JSON schema file. | |
| --pjltable filename Specify an external PJL conversion table. | |
| --enumtable filename | Specify an external Enum conversion table. |
| --forcepjl Force a PJL-based configuration. | |
| --forcenative Force a JSON-based configuration. | |
| --ignorepjerror | Skip PJL conversion warnings even if no conversion definition is stated in the PJL conversion table. |
| --skipvalidate Skip verifying the validity for the settings using schema file before sending setting file. | |
| --skipverify | Skip verifying if the settings are applied to printer correctly after applying settings. |
| --packfiles filename filename filename | Specify the files you want to pack (separated with spaces or commas). |
| --unpackdir destination | Specify the path to extract the package contents to. |
| --log filename | Specify the path to the log output file. |
| --communitynameget community name | Community name set in “GET” in SNMP communication. |
| --communitynameset community name | Community name set in “SET” in SNMP communication. |
| --agree Specify the agreement to EULA. | |
| --networksettingpath networksettingpath | Specify the reference destination to the external file that contains the network communication settings (SNMP v3, proxy). Use the setting.INI file as an external file after you configure the network settings by using the GUI. |
| --source filename | Specify the file before conversion using the “convertsetting” command. |
| --destination filename | Specify the destination for saving the file after conversion using the “convertsetting” command. |
| --version Specify the version after conversion using the “convertsetting” command. | |
| --licensecode license code | Specify a 20-digit license code to activate a custom software solution. |
| --activateresult activate result folder path | Specify the destination for saving the activation results of the “activate” command. |
| --forcehttps | Force the https communication. |
| --profile | Specify the deployment profile's file path.The relative path to the settingcmd.exe is also supported.The devices in the file are network connection only. |
| --csvdelim Specify one of the following as a CSV delimiter: | |
| --createfileonly | Create the intermediate file without applying it to the target device when using the “(m)apply” command.If you use this option, you must also use the “--outputdir” option. |
| --result Specify the path for saving | the executing result. |
| --outputdir Specify the output path | for the files created when executing the command. |
| --devicepassword password | Specify the device password to include in the DKEY file. |
| --edpkpassword password | Specify the EDPK file password to include in the DKEY file. |
| --dkeypassword password | Specify the DKEY file encryption and decryption password. |
| --dkeyfile filename Specify the path | to save the DKEY file. |
| --profilepassword password | Specify the password for the zipped deployment profile. |
4.2.4 Deployment Profile
A deployment profile contains device information, setting files, and the unique setting value for each device, if needed.
The first line of a deployment profile file (CSV) must list the following items (these can be in any order):
○ Required item △ Optional item – Unsupported item
| Item | send | (m)apply | applyup | activate | (m)setpassword | (m)listactivefunc | confirmup | listfilter |
| Model Name – | ||||||||
| Serial Number | ||||||||
| Interface (USB/ NETWORK_IPV4) | – | |||||||
| MAC Address/ Vendor ID | ||||||||
| Node Name/ Product ID | ^1 | |||||||
| IP Address | ^1 | |||||||
| Protected by password | – | |||||||
| Password | ^3 | – | ||||||
| Json Schema – | ||||||||
| File Path | ^4 | – | ||||||
| Package Password | – ^2 | – | ||||||
| Json File – | ||||||||
| Extra LAN Node Name | – | |||||||
| Extra WLAN Node Name | – | |||||||
| Extra Location – | ||||||||
| Extra Contact – | ||||||||
| New Password – | ^3 | – | ||||||
| User Defined Value | – | – | ||||||
1 You must specify the target device's IP Address or Node Name to discover the device.
2 Required with the specified EDPK in the File Path. When a Deploy KEY file is specified, the "Package Password" is not required.
3 When a Deploy KEY file is specified, the "New Password" or "Password" is not required.
4 If the license file is not the same for all lines, an error will occur.
Deployment Item Definitions:
| Item Definition | |
| Serial Number | The serial number of the device.If the number you type into this field does not match the serial number identified using the IP Address or Node Name, the “Serial number mismatch error” occurs. |
| Interface (USB/ NETWORK_IPV4) | Connection Interface.This is generated by the “exportprofile” command, and is ignored if you use any command other than the “exportprofile” command with a profile that contains this item.Its value is “USB” or “NETWORK_IPV4”. |
| MAC Address/Vendor ID | MAC address (Network connected devices) or Vendor ID (USB connected devices).This is generated by the “exportprofile” command, and is ignored if you use any command other than the “exportprofile” command with a profile that contains this item. |
| IP Address The device's | IP Address. |
| Node Name/Product ID | The device's Node Name (Network connected devices) or Product ID (USB connected devices). |
| Protected by password | If a password is set on the devices.Its value is “TRUE” or “FALSE”. |
| Password The device administrator password. | |
| File Path The file's path (relative or absolute). | |
| Json Schema | The version of the device's JSON schema.Its value is a number. |
| Package Password | The password for the file specified in the File Path. |
| Json File | If the file specified in the File Path is a setting file (JSON, DPK, EDPK).Its value is “TRUE” or “FALSE”. |
| Extra LAN Node Name/ Extra WLAN Node Name/Extra Location/ Extra Contact | The value to rewrite the node name (LAN/WLAN/Location/Contact) in the JSON file. |
| New Password The new device administrator password. | |
| User Defined Value | You can define a unique value for a certain device by using your own item in “#XXXXXXXX#” format. Any characters except “#” can be used in XXXXXX.This allows you to set different values for each device within a single profile.This also applies to the “--createfileonly” option. |

Any items that are neither required nor optional are ignored and do not result in an error.
Examples of files used by the mapply command:
- Deployment profile
A CSV file containing the following information:
IP Address, Serial Number, Password, File Path, Package Password, #CONTACT#, #LOCATION#, #AUTO_POWER_OFF#
10.1.2.146,E75868F7F173334,initpass,C:\tmp\brother.edpk,package1,Brother A,5F,hour8
10.1.4.146,A99999A7H000511,initpass,C:\tmp\brother.edpk,package1,Brother B,4F,hour4
10.1.7.179,C25312A1G553212,initpass,C:\tmp\brother.edpk,package1,Brother C,3F,off

Delimiter (“,”) in the above example you can specify a using the “--csvdelim” option.
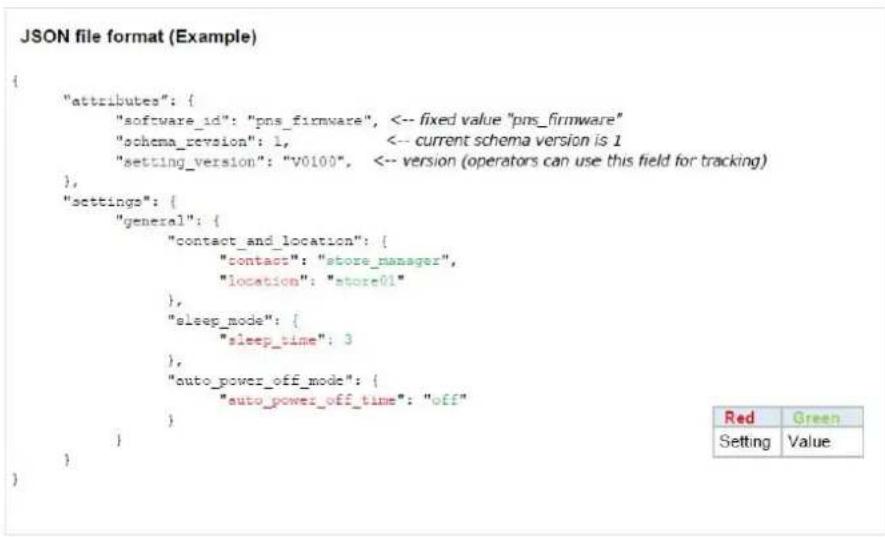
- Setting file
A JSON file located in C:\tmp\brother.edpk:
{
    "attributes": {
    "software_id": "pns_firmware",
    "setting_version": "",
    "schema_revision": 4
    },
    "settings": {
    "general": {
    "contact_and_location": {
    "contact": "#CONTACT#",
    "location": "#LOCATION#"
    },
    "auto_power_off_mode": {
    "auto_power_off_time": "#AUTO_POWER_OFF#"
    }
    }
    }
}
- Intermediate file
The 00001_10.1.2.146.json file for the device 10.1.2.146, where 00001 is the line number in your CSV file where the target device is listed with one subtracted (five digits, zero padding):
{
    "attributes": {
    "software_id": "pns_firmware",
    "setting_version": "",
    "schema_revision": 4
    },
    "settings": {
    "general": {
    "contact_and_location": {
    "contact": "Brother A",
    "location": "5F"
    },
    "auto_power_off_mode": {
    "auto_power_off_time": "hour8"
    }
    }
}
4.2.5 Deploy Key File
A Deploy KEY file (DKEY file) is used for encrypting and using passwords related to device settings.
DKEY file contains the encrypted device password and the EDPK file password (the EDPK file password is optional).
When you use each command with the "--dkeyfile" option:
- The device password in the DKEY file is passed to the target device.
- If the “--password” option is specified at the same time, it will be ignored.
- For "apply" and "mapply" commands:
- If an EDPK file is specified, the EDPK file password in the DKEY file is used to derypt the EDPK file.
- Password and package password in deployment profile specified in “--profile” option are ignored.
- For "setpassword" and "msetpassword" commands:
- The device password in the DKEY file is used to set on the target device as the new device password.
- New password in the deployment profile that is specified with the “--profile” option will be ignored.
4.2.6 Create the ETKN File
Create an ETKN file from the Microsoft Azure portal, using the UniversalPrintTokenGenerator.exe file.
At your Command Prompt, run the UniversalPrintTokenGenerator.exe file in the
"UniversalPrintTokenGenerator" folder.
The ETKN file is encrypted with the password specified in the "--filepass" option and saved to the file specified in the "--output" option. You can specify if you want to sign out of the Microsoft Azure Portal after getting the token.
Example:
UniversalPrintTokenGenerator.exe --output your_file_name.edpk --filepass your_file_password --signout
| Option Description | |
| Required:• output File path to save the ETKN file acquired from Microsoft Azure.• filepass The password for the ETKN file to save. | |
| Optional:• signup Sign out after running this command. |

- The ETKN files generated expires after one hour. To extend the deadline, see Microsoft's website.
- Make sure permission is granted for UniversalPrintTokenGenerator.exe in the Microsoft Azure AD.
• One of the following permissions (in the Microsoft Azure AD) is required to generate the ETKN file: - Global administrator
- Printer administrator
- Printer technician
5 Create Settings Files
Refer to this section when creating settings files used by this tool.
5.1 Settings Files
The settings files are model-independent. If a customer replaces an existing device, settings files may be reused if they are compatible with the new device. The tool uses the following file types and extensions to store device settings:
- JSON Files
JSON (JavaScript Object Notation) files allow you to configure device settings without having to understand PCL or PJL commands. For more information, see 5.2 JSON Files and 5.3 Create JSON Files.
- Package Files
Package files can include a JSON-based settings file and any required external resources.
| Package File Type Encryption | |
| DPK No | |
| EDPK Yes |
- Settings Files
Settings files consist of one or more JSON-based settings.
5.2 JSON Files
JSON (JavaScript Object Notation) files are used to configure device settings. JSON is an open standard that allows you to specify your own settings using a JSON editor, without having to understand PCL or PJL commands.
- For more information about JSON, see http://www.json.org/.
- For more information about JSON schema file structure and setting types, see http://json-schema.org/.

The structure of JSON settings files and the placement of individual setting entries are described in JSON schema files. For example, the "sleep_time" setting must be located at
\$.settings.general.sleep_mode.sleep_time and will accept only numerical values.
There are three ways to create and edit JSON settings files:
| Method Description | |
| Using text editors | Edit the settings files you want in a text editor. We recommend using JSON-supported text editors such as Notepad++, because they allow for greater control when viewing, editing, and formatting JSON files. |
| Using JSON-schema supported JSON editors | Edit settings files using a third-party editor that supports JSON-schemas. The interface of such editors allows changing setting values based on a schema-defined structure. |
| Using scripts/programs | Create settings files using scripts or other software. You can construct a JSON file from scratch, or parse the base JSON file and then modify its setting values. |
5.3 Create JSON Files
Any JSON-supported text editor can be used to create and edit settings files. To use JSON settings files, you need a JSON schema file containing all the configurable elements on Brother devices.
- Prepare the JSON schema file.
Default schema files can be found in the "Schema" folder in the Mass Deployment Tool's folder on your computer.

Before you proceed, make sure you have the correct schema file for your model. For a list of available schema files and applicable models, double-click the README.url file in the "Schema" folder to open the README website. You will need this information later.
- Edit the JSON settings file in a text editor file.
- You can now use the Mass Deployment Tool to apply the settings remotely or use a USB flash drive to apply the settings on the device.
Creating and editing settings files using an online JSON editor (example)
- In your web browser, go to http://www.jeremydorn.com/json-editor/.
- Open the Brother JSON schema file in a text editor file and copy and paste its contents into the "Schema" field on the web page.
The attributes section appears at the top of the page.
- Scroll down to the settings section, and select "object" from the general drop-down list.
The General settings options appear.
- Select "object" from the contact_and_location drop-down list.
- Enter the contact and location details you want.
- Scroll up to the JSON Output area at the top of the page, and then click the Update Form button.
- The updated code appears in the preview field. Copy the JSON output and paste it into the text editor.
- Use the Mass Deployment Tool to apply the settings remotely or use a USB flash drive to apply the settings on the device.
6 Setting File Editor
Use the Setting File Editor to:
- Remove all device-specific settings from the settings file (.json, .dpk, .edpk) at once, or remove only unnecessary device settings, and save them.
- Create the setting files (.json, .dpk, .edpk) and profiles (.csv) necessary to run the Mapply command.
- Add dynamic (Mapply) keywords to the settings file (.json, .dpk, .edpk) and save them.
- Use an existing profile or create a new profile (.csv) with a field for the dynamic (Mapply) keywords added to the currently open setting file.
- Open the Setting File Editor.

- Double-click SettingFileEditor.exe in the "MassDeploymentTool" folder.
OR
Select Open Setting File Editor on the Mass Deployment Tool's interface.
- When using the Setting File Editor for the first time after installation, launch the Mass Deployment Tool first.
-
To open the settings file, do one of the following:
-
Click the File menu and then select Open file.
- Click the Open file button in the center of the screen, and then click the settings file.
-
Navigate to the folder with the settings file, and then drag and drop the settings file directly into the designated area.
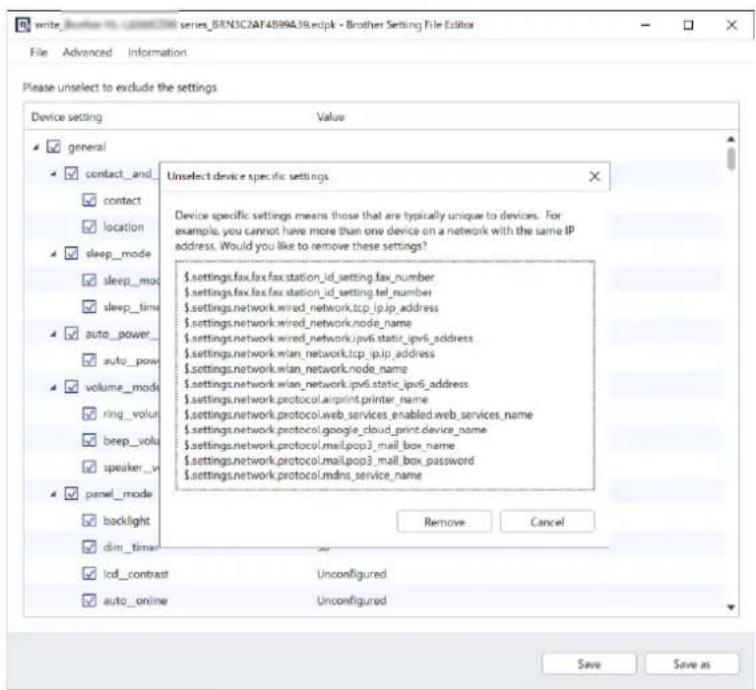
-
A dialog box appears, to confirm if you want to remove the device-specific settings.
Click Remove to deselect all the settings listed in the dialog box, if required.
4. Do one of the following:
a) Remove items from the settings tree.
After saving the settings file, the deselected items are deleted from the file and are no longer displayed on the settings tree.
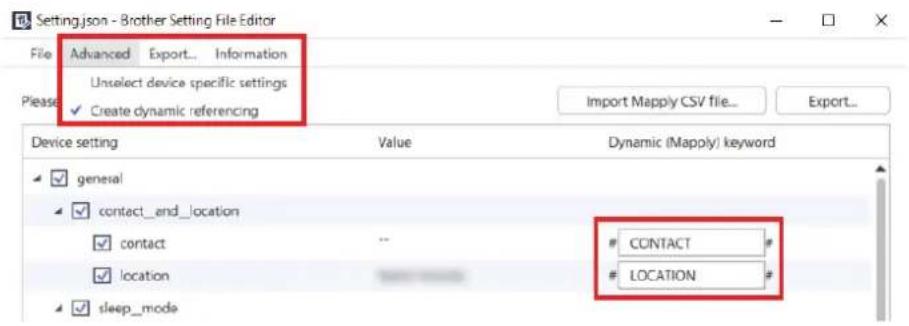
b) Use dynamic (Mapply) keywords.
Change or add a value in the settings file to a dynamic (mapply) keyword by selecting Create dynamic referencing in the Advanced menu.
Type the keyword in the Dynamic (Mapply) keyword field.
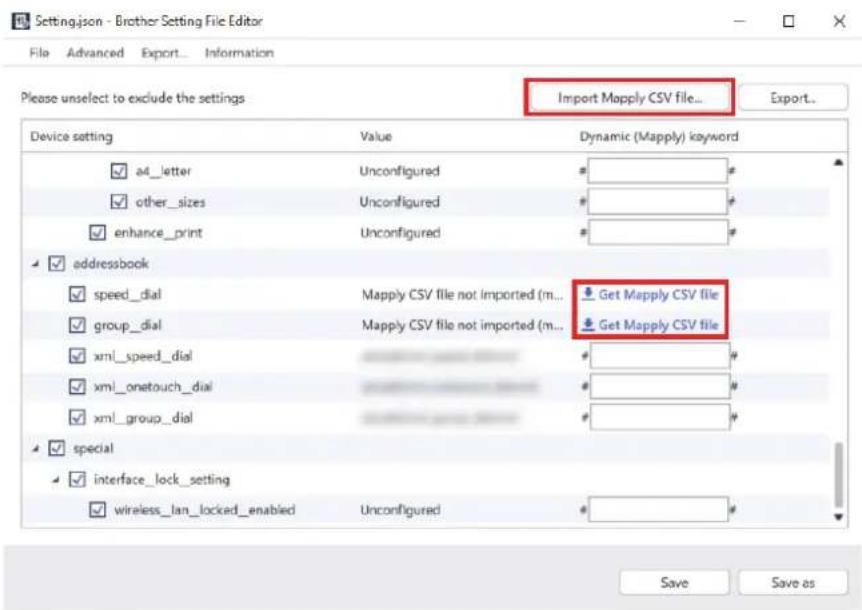
c) Set a dynamic (Mapply) keyword for keys in an array.
- Click the Get Mapply CSV file button to download the Mapply CSV template.
- Edit the downloaded Mapply CSV template and add the dynamic keyword.
- Import the Mapply CSV file that you have created.
Click Import Mapply CSV file... button, and then click Save.
d) Export dynamic keywords using the Export... menu or the Export... button in the upper right corner of the screen.
- Select Apply dynamic (Mapply) keywords to the deployment profile to add the dynamic keywords to an existing deployment profile (CSV or ZIP file).
- Select Create a new deployment (Mapply) profile template to create a new deployment profile (CSV file).

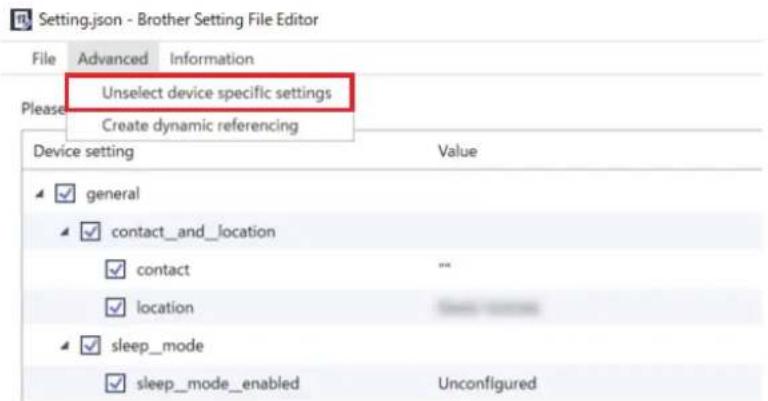
- Remove all device-specific settings at once by selecting Unselect device specific settings in the Advanced menu.
- A settings file with the Mapply keywords can be used only with the "mapply" command. For more information, see 4.2 Commands and Options.
- The Export... menu and button appear when Create dynamic referencing is selected. For more information about deployment profiles, see 4.2.4 Deployment Profile.
7 Troubleshooting
If you have any problems using the Mass Deployment Tool, check the table below. If the problem persists, contact your local Brother office's technical support team.
| Error Solution | |
| Admin account locked | The admin password for the target device was entered incorrectly too many times. Wait until the password lock of the target device is released. |
| Already activated The function you want to activate on the device has already been activated. | |
| Already set | The device password has already been changed from the default login password. Make sure that the password is the default login password. |
| Cannot convert to PJL | Make sure you use a PJL conversion table compatible with the input data. |
| Cannot convert to Setting file | Make sure you use a PJL conversion table compatible with the settings file you want. |
| Connection error | Make sure the target device is connected and available to transfer the data. |
| Deploy results mismatch | One or more settings in the settings file have not been applied. Check the log file for more information. |
| Device internal error Reboot the target device and try again. | |
| Device is busy Wait until the target device finishes its current job. | |
| File not found Make sure you specify the file path correctly, and then try again. | |
| File write error | Make sure that there is enough space in the destination folder, or that the files in the destination folder can be overwritten. |
| Firmware Update required | The schema version of the target device is older than the schema version of the JSON settings file. Update the device's firmware. |
| Internal error Make sure all settings are correct and then try again. | |
| Invalid deploy setting file | Make sure the content and structure of the settings file are correct, and then try again. |
| Invalid file error Make sure you select the correct DJF file or the correct target device. | |
| License error Make sure you enter the correct license code (20 digits). | |
| New version schema required | The schema version of the JSON settings file is older than the schema version of the target device. Execute the “convertsetting” command in the tool's Command Line Interface (CLI). |
| Not supported | Make sure all the target devices support the function/command you want, or select the target devices that support that function/command. |
| Partially complete | Some of the deployed solutions have been activated, and some are either already activated or not supported by the target devices. Check the CSV file stored at the path specified in Save the result file to: on the Activate solutions screen for more information. |
| Password incorrect Make sure you enter the correct password. | |
| Permission error | Make sure you have the permission to access the specified folder or output folder. |
| Serial number mismatch | When specifying the device identifier, make sure you specify the serial number that matches the serial number of the target device. |
| Server communication error | Make sure your network connection is active so that you can update the tool to the latest version. |
| Session timeout | This activation session has expired after more than 24 hours of inactivity. Try to activate the solution or function you want again. |
| SNMP communication error | Make sure you specify the SNMP settings correctly. |
| SNMP v3 security error | Make sure your SNMP settings are correct. Try again when the target device is unlocked. |
| Solution not supported | Make sure the target devices support the solutions you want to deploy. |
| Solution not supported/already activated | Some of the deployed solutions are either not supported or are already activated. Check the CSV file stored at the path specified inSave the result file to:on theActivate solutionsscreen for more information. |
| Unauthorized access error | The license code was entered incorrectly too many times.Wait until the lock of the license server is released.Make sure your license code is in the correct format (20 digits) and has not been used yet. |
Appendix
The exit codes provided by the Mass Deployment Tool (CLI) allow you to identify deployment errors.
GUI/CLI Errors
For more information and help, see section 7 Troubleshooting.
| GUI: Error CLI: Exit Code Description | ||
| Admin account locked 80009 | The administrator password for the target device was entered incorrectly too many times. | |
| Already activated 80023 The device has already been changed. | ||
| Already set 80054 The password has already been changed. | ||
| Cannot convert to PJL 80030 Cannot convert the setting file to the PJL file. | ||
| Cannot convert to Setting file 80031 Cannot convert the PJL file to the setting file. | ||
| Connection error 80015 Connection error. | ||
| Deploy results mismatch 80032 The setting file deployment results do not match. | ||
| Device internal error 80035 Device internal error. | ||
| Device is busy 80007 Device is busy. | ||
| File not found | 80011 | File not found. |
| File write error | 80010 File write error. | |
| Firmware Update required | 80033 Firmware update required. | |
| Internal error | 80052 Internal error in the application. | |
| Invalid deploy setting file | 80029 Invalid deploy setting file. | |
| Invalid file error | 80026 Invalid file error. | |
| License error | 80022 License error. | |
| New version schema required | 80034 New version schema required. | |
| Not supported | 80008 Not supported. | |
| Package password incorrect | 80071 Incorrect package password. | |
| Partially complete | 80067 | The license activation is only partially complete. |
| Password incorrect | 80005 Incorrect password. | |
| Permission error | 80012 Access denied. | |
| Serial number mismatch | 80006 | The serial number entered does not match the serial number identified. |
| Server communication error | 80014 Server communication error. | |
| Session timeout | 80021 Session timeout. | |
| SNMP communication error | 80013 SNMP communication error. | |
| SNMP v3 security error | 80055 SNMP v3 security error. | |
| Solution not supported | 80068 Not all features are supported by this license. | |
| Unauthorized access error | 80020 | The maximum number of password attempts has been exceeded. |
| Universal Print Internal error | 80203 Microsoft Universal Print Internal error. | |
| Universal Print Internal error – Length excess | 80205 The token size exceeds the limit. | |
| Universal Print Internal error – Unready | 80201 | The device is not yet ready to register for Microsoft Universal Print. |
| Universal Print Internal error – Unsupported | 80204 The device is not supported by Microsoft Universal Print. | |
| Universal Print Registration Refused | 80202 | The device is unable to register for Microsoft Universal Print. |
| Initial Password Error 80071 | You must change the default password to change the device settings. | |
| Initial Password Reboot Error 80083 | Failed to reboot after resetting back to the default password. | |
CLI Errors
| Exit Code Description | |
| 70001 Agreement to the EULA is required. | |
| 70002 Failed to convert due to the wrong file or version. | |
| 70003 Failed to create the package. | |
| 70004 Failed to extract the package. | |
| 70007 Failed to read the network setting file. | |
| 70009 Invalid parameter. | |
| 70010 | Failed to execute the functions using the deployment profile in one or more devices. |
| 70011 Wrong deployment profile. | |
| 70012 Wrong delimiter. | |
| 70013 The new administrator password has fewer than eight characters. | |
| 70014 The new administrator password is weak. | |
| 70015 Failed to decrypt the DKEY file. | |
| 70016 Failed to decrypt the deployment profile. | |
| 70017 Failed to apply filter. | |
Universal Print Token Generator Errors
| Exit Code Description | |
| 70001 Incorrect user account. | |
| 70004 “--output” option is not specified. | |
| 70005 “--filepass” option is not specified. | |
| 70006 Failed to save the ETKN file. | |
| 70007 Connection error | |
| 70008 Session timeout | |
| 70009 Not authenticated by the Microsoft Azure AD. | |
| 70010 Invalid parameter. | |
| 70011 Internal error | |
| 70012 The account does not have permission to register printers. |
brother
- Mass Deployment Tool
- Copyright
- Trademark
- Important Notes
- Table of Contents
- Introduction.... 1
- Main Functions of the Mass Deployment Tool (GUI).... 3
- Additional Functions of the Mass Deployment Tool (GUI).... 12
- Command Line Interface (CLI) 15
- Create Settings Files 29
- Setting File Editor 31
- Troubleshooting.... 34
- Appendix.... 36
- Introduction
- Overview
- System Requirements
- Preparation
- Main Functions of the Mass Deployment Tool (GUI)
- Update the Device List
- - Select the Setting File
- - Enter a Password for Password-Protected Devices
- - Refresh the Device List
- - Delete Devices from the Device List
- - Sort the Device List
- Check Device Notifications
- Use Deployment Profiles
- Import Deployment Profiles
- Export Deployment Profiles
- Open the Setting File Editor
- Send Files
- Back Up Settings
- Set Password
- d) Click Apply.
- Additional Functions of the Mass Deployment Tool (GUI)
- Application Settings
- Configure the Network Settings
- Configure the Device Discovery Settings
- To search for devices on your network
- To search for devices on a different local network
- To search for USB-connected devices
- Link the Mass Deployment Tool to BRAadmin Professional 4
- Application Information
- Activate Solutions
- Command Line Interface (CLI)
- Use CLI in the Mass Deployment Tool
- Examples
- Commands and Options
- Commands
- Device Identifiers
- Options
- Deployment Profile
- - Deployment profile
- - Setting file
- - Intermediate file
- Deploy Key File
- Create the ETKN File
- Example:
- Create Settings Files
- Settings Files
- JSON Files
- Create JSON Files
- Creating and editing settings files using an online JSON editor (example)
- Setting File Editor
- Do one of the following:
- CONTACT #
- LOCATION
- Troubleshooting
- Appendix
- GUI/CLI Errors
- brother
Brand : BROTHER
Model : DCP-L5652DN
Category : Fax