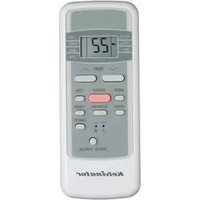
KSE70CRA - Air Conditioning KELVINATOR - Free user manual and instructions
Find the device manual for free KSE70CRA KELVINATOR in PDF.


| Product Type | Split-type Room Air Conditioner |
| Model | KSE70CRA |
| Brand | Kelvinator |
| Cooling Capacity | Approx. 7.0 kW (based on model number) |
| Heating Capacity | Reverse cycle (heat pump) – approx. 7.0 kW |
| Indoor Unit Dimensions (W x H x D) | Approx. 900 x 300 x 200 mm (estimate) |
| Outdoor Unit Dimensions | Approx. 800 x 600 x 300 mm (estimate) |
| Indoor Unit Weight | Approx. 12 kg (estimate) |
| Outdoor Unit Weight | Approx. 40 kg (estimate) |
| Power Supply | 220-240 V, 50 Hz, single phase (estimated) |
| Refrigerant | R410A (typical for this era, not specified in manual) |
| Operating Modes | Auto, Cool, Dry, Heat (reverse cycle), Fan only |
| Fan Speeds | Auto, Low, Med, High |
| Timer | ON/OFF timer, up to 24 hours |
| Economy Mode | Yes - gradual temperature adjustment for energy saving |
| Air Filter | Washable, clean every 2 weeks; optional HEPA and deodorization net |
| Airflow Direction | Vertical louvre (auto swing via remote), horizontal louvre (manual) |
| Remote Control | Infrared, 2x AAA batteries, range up to 8 m |
| Manual Operation | Auto/Cool button on indoor unit (for testing or without remote) |
| Display Panel | POWER, AUTO, DEFROST, TIMER indicators; temperature display |
| Safety Features | Auto-restart after power failure (select models), compressor 3-min delay, anti-cold air for heating |
| Defrost Function | Automatic defrost cycle in heating mode |
| Protection | POWER indicator flashes 5 times/sec if fault detected |
| Cleaning | Front panel removable; use soft cloth; no water on electrical parts |
| Installation | Must be performed by authorized personnel per national wiring standards |
Frequently Asked Questions - KSE70CRA KELVINATOR
User questions about KSE70CRA KELVINATOR
0 question about this device. Answer the ones you know or ask your own.
Ask a new question about this device
Download the instructions for your Air Conditioning in PDF format for free! Find your manual KSE70CRA - KELVINATOR and take your electronic device back in hand. On this page are published all the documents necessary for the use of your device. KSE70CRA by KELVINATOR.
USER MANUAL KSE70CRA KELVINATOR
Before using your air conditioner, please read this manual carefully and keep it for future reference.
SPLIT-TYPE ROOM AIR CONDITIONER
USER'S MANUAL

natural_image
Line drawing of a Kelvin air conditioner unit with control panel (no text or symbols on the device itself)Prior to installation, this air-conditioning unit must be submitted for approval by the utility service which provides electricity.
CONTENTS
- Safety precautions....2
- Using the remote control....5
- Parts identification....14
- Manual operation....14
- Optimal operation ....15
- Cleaning and maintenance....15
- How the air conditioner works....17
- Operating tips....17
- Troubleshooting tips....19
Read This Manual
Inside you will find many helpful hints on how to use and maintain your air conditioner properly. Just a little preventative care on your part can save you a great deal of time and money over the life of your air conditioner. You'll find many answers to common problems in the chart of troubleshooting tips. If you review the chart of Troubleshooting Tips first, you may not need to call for service.

CAUTION
- Contact an authorised service technician for repair or maintenance of this unit.
- Contact the installer for installation of this unit.
- The air conditioner is not intended for use by young children or infirmed persons without supervision.
- Young children should be supervised to ensure that they do not play with the air conditioner.
- If the power cord is to be replaced, replacement work shall be performed by authorised personnel only.
- Installation work must be performed in accordance with the national wiring standards by authorised personnel only.
• Take care not to catch fingers on the fan when adjusting vertical louvres.
IMPORTANT NOTES:
- Do not operate unit with horizontal louvre in closed position.
- Do not operate unit without the air filter.
Safety Precautions
To prevent injury to the user or other people and property damage, the following instructions must be followed.
Incorrect operation due to ignoring of instructions may cause harm or damage. The seriousness is classified by the following indications.
| WARNING | This symbol indicates the possibility of death or serious injury. |
| CAUTION | This symbol indicates the possibility of injury or damage to property. |
■ Meanings of symbols used in this manual are as shown below.
| Never do this. | |
| Always do this. |

WARNING
① Plug in power plug properly.
- Otherwise, it may cause electric shock or fire due to excess heat generation.
Do not operate or stop the unit by inserting or pulling out the power plug.
- It may cause electric shock or fire due to heat generation.
Do not damage or use an unspecified power cord.
- It may cause electric shock or fire.
- If the power cord is damaged, it must be replaced by the manufacturer or an authorised service center or a similarly qualified person in order to avoid a hazard.
① Do not modify power cord length or share the outlet with other appliances.
- It may cause electric shock or fire due to heat generation.
Do not operate with wet hands or in damp environment.
- It may cause electric shock.
Do not direct airflow at room occupants only.
● This could damage your health.
① Always ensure effective earthing.
- No earthing may cause electric shock.
Do not allow water to run into electric parts.
- It may cause failure of machine or electric shock.
Always install circuit breaker and a dedicated power circuit.
- Incorrect installation may cause fire and electric shock.
① Unplug the unit if strange sounds, smell or smoke comes from it.
- It may cause fire and electric shock.
Do not use the socket if it is loose or damaged.
- It may cause fire and electric shock.
Do not open the unit during operation.
- It may cause electric shock.
① Keep firearms away.
- It may cause fire.
Do not use the power cord close to heating appliances.
- It may cause fire and electric shock.
Do not use the power cord near flammable gas or combustibles, such as gasoline, benzene, thinner, etc.
- It may cause an explosion or fire.
①Ventilate room before operating air conditioner if there is a gas leakage from another appliance.
- It may cause explosion, fire and burns.
Do not disassemble or modify unit.
- It may cause failure and electric shock.
If water enters the unit, turn the unit off at the power outlet and switch off the circuit breaker. Isolate supply by taking the power-plUG out and contact a qualified service technician.
Use caution when unpacking and installing. Sharp edges could cause injury.
- It contains contaminants and could make you sick.
Do not drink water drained from air conditioner.
- Operation without filters may cause failure.
# Always insert the filters securely. Clean filter once every two weeks.
- It may cause failure of product or fire.
① Turn off the main power switch when not using the unit for a long time.
- Do not use this air conditioner to preserve precision devices, food, pets, plants, and art objects. It may cause deterioration of quality, etc.
Do not use for special purposes.
• An oxygen storage may occur.
① Ventilate the room well when used together with a stove, etc.
● There is danger of fire or electric shock.
Do not place heavy object on the power cord and take care so that the cord is not compressed.
- If bracket is damaged, there is concern of damage due to falling off unit.
③ Ensure that the installation bracket of the outdoor appearance is not damaged due to prolonged exposure.
● Failure to do so may cause electric shock and damage.
① Hold the plug by the head of the power plug when taking it out.
● This could injure the pet or plant.
Do not put a pet or house plant where it will be exposed to direct air flow.
- Water may enter the unit and degrade the insulation. It may cause an electric shock.
Do not clean the air condiener with water.
its surface.
● Appearance may be deteriorated due to change of product color or scratching of
Do not use strong detergent such as wax or thinner. Use a soft cloth for cleaning.
- It may cause failure of appearance or accident.
Do not place obstacles around air-inlets or inside of air-outlet.
● Operation with windows opened may cause wetting of indoor and soaking of house-hold furniture.
Stop operation and close the window in storm or hurricane.
- Do not clean unit when power is on as it may cause fire and electric shock, it may cause an injury.
When the unit is to be cleaned, switch off, and turn off the circuit breaker.
- It may cause an injury.
When the air filter is to be removed, do not touch the metal parts of the unit.
CAUTION

Safety Precautions
Prior to Operation
Preparing for operation
- Contact an installation specialist for installation.
- Plug in the power plug properly.
- Do not use a damaged or non-standard power cord.
- Do not share the same outlet with other appliances.
- Do not use an extension cord.
- Do not start/stop operation by plugging/unplugging the power cord.
Usage
- Exposure to direct airflow for an extended period of time could be hazardous to your health. Do not expose occupants, pets, or plants to direct airflow for extended periods of time.
- Due to the possibility of oxygen deficiency, ventilate the room when used together with stoves or other heating devices.
- Do not use this air conditioner for non-specified special purposes (e.g. Preserving precision devices, food, pets, plants, and art objects). Usage in such a manner could harm such property.
Cleaning and maintenance
- Do not touch the metal parts of the unit when removing the filter. Injuries can occur when handling sharp metal edges.
- Do not use water to clean inside the air conditioner. Exposure to water can destroy the insulation, leading to possible electric shock.
- When cleaning the unit, first make sure that the power and circuit breaker are turned off.
Service
For repair and maintenance, contact your authorised service dealer.
Operating Temperature
| COOLING MODE | HEATING MODE | ||||||
| INDOOR | OUTDOOR | INDOOR | OUTDOOR | ||||
| MAX. | MIN. | MAX. | MIN. | MAX. | MIN. | MAX. | MIN. |
| 32°C | 17°C | 35°C | 18°C | 30°C | 17°C | 24°C | -5°C |
Note: Optimum performance will be achieved within these operating temperatures.
Using the remote control
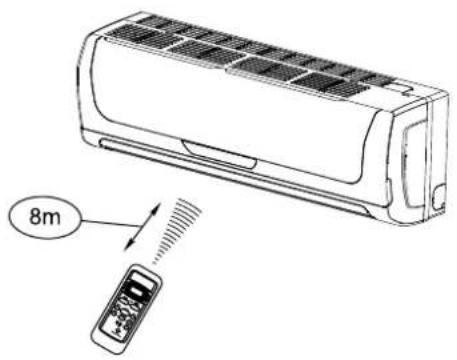
Location of the remote control
- Keep the remote control where its signals can reach the receiver of the indoor unit. (a distance of 8m is allowed).
- When you select the timer operation, the remote control automatically transmits a signal to the indoor unit at the specified time.
- If you keep the remote controller in a position that hinders proper signal transmission, a time lag of up to 15 minutes may occur.
CAUTION
- The air conditioner will not operate if curtains, doors or other materials block the signals from the remote control to the indoor unit.
- Prevent any liquid from falling into the remote control. Do not expose the remote control to direct sunlight or heat.
- If the infrared signal receiver on the indoor unit is exposed to direct sunlight, the air conditioner may not function properly. Use curtains to shade the receiver from direct sunlight.
- If other electrical appliances react to the remote control either move these appliances or consult your local dealer.
Replacing batteries
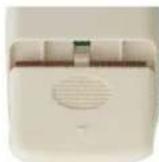
The remote control uses two alkaline dry batteries (2 x AAA 1.5Volt). Do not use rechargeable batteries.
(1) Slide the cover of the battery compartment (on the rear of the remote control) off, then replace the old batteries with new ones, as detailed inside of battery compartment. Making sure that the (+) and (-) of the battery are installed correctly.
(2) Slide the battery compartment cover back on.
↓
Slide out
NOTES
- When replacing batteries, do not use old batteries or different type batteries otherwise it may cause the remote control to malfunction.
- If you do not use the remote control for more than a few weeks, remove the batteries otherwise battery leakage may damage the remote control.
- The average battery life during normal use is approximately six months.
- Replace the batteries when there is no receiving beep from the indoor unit or if the transmission indicator on the remote control fails to light.
Features of remote control

Note: The remote control detailed above may vary from the one that is supplied with the unit.
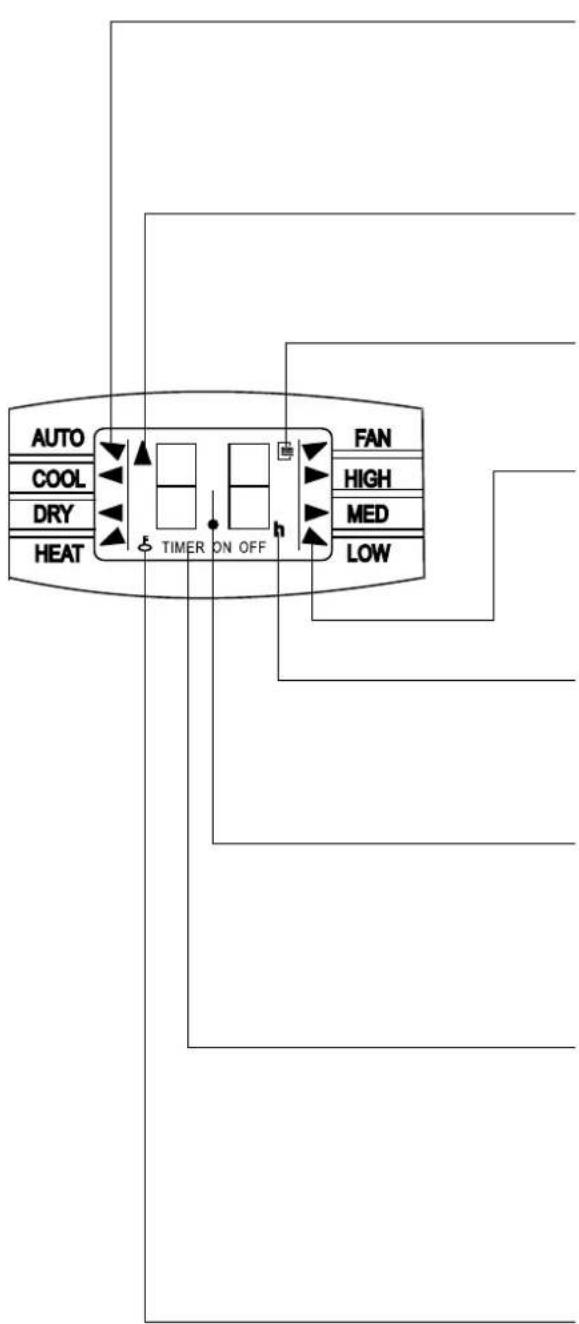
Indicators on remote control
flowchart
graph TD
    A["AUTO"] --> B["COOL"]
    A --> C["DRY"]
    A --> D["HEAT"]
    B --> E["TIMER"]
    C --> E
    D --> E
    E --> F["ON OFF"]
    F --> G["FAN"]
    F --> H["HIGH"]
    F --> I["MED"]
    F --> J["LOW"]
Mode display
Indicates the current operation mode. Including AUTO, COOL, DRY, HEAT (Not applicable to cooling only models), FAN only (Refer to note below) and back to AUTO.
Transmission Indicator
The transmission indicator is displayed when remote control transmits signals to the indoor unit.
ON/OFF display
Displayed by pressing the ON/OFF button. Press the ON/OFF button again to remove.
FAN speed display
Indicates the selected fan speed, "LOW", "MED" and "HIGH". If there is no indication, the "AUTO" is selected. In "AUTO" and "DRY" mode, the fan speed is fixed on "AUTO".
Hour display
When setting the Timer ON or OFF or ON/OFF, the signal "h" will be displayed in this area to indicate the hours selected.
Temperature and Timer Display
This area displays the setting temperature in operation.
When the Timer ON/OFF function is set, it will display the setting of the Timer.
TIMER ON/OFF display
This area displays the settings of TIMER. If only the TIMER ON is set, it will display TIMER ON. If only the TIMER OFF is set, it will display TIMER OFF. And if both TIMER ON and OFF operations are set, it will display TIMER ON OFF which indicates that both the TIMER ON and TIMER OFF are set.
Lock display
Displayed by pressing the recessed LOCK button. Press the LOCK button again to remove.
Note: When there is a triangle directed to the "FAN" printed on top right, it means that the FAN only mode is selected.
Using the remote control
AUTOMATIC OPERATION

When you set the air conditioner in AUTO mode, it will automatically select cooling, heating (Reverse cycle models only), or fan only operation depending on what temperature you have selected and the room temperature.
Once you select the operating mode, the operating conditions are saved in the unit's microprocessor memory.
Thereafter, the air conditioner will start operating under the same conditions when you simply press the ON/OFF button of the remote controller.
E.g. Next time you turn the unit on it will start in AUTO mode at the previously selected temperature setting.
Start
Ensure unit is plugged in and power is available.
The OPERATION indicator on the display panel of the indoor unit starts flashing.
- MODE select button
Press to select AUTO.
- Temperature button (TEMP.)
Set the desired temperature. Normally, set between 21°C and 28°C
- ON/OFF button
Press the ON/OFF button to start the air conditioner.
The OPERATION indicator on the display panel of the indoor unit lights. The operating mode is selected in accordance with the room temperature and the unit starts after approximately 3 minutes.
Stop
ON/OFF button
Press the ON/OFF button again to stop the air conditioner.
Note: The horizontal louvre will return to the closed position after the unit is stopped.
If the AUTO mode is not suitable, you can select the desired conditions manually.
When you select the AUTO mode, you do not have to set the fan speed. The FAN speed display will show AUTO and the fan speed will be automatically controlled.
Ensure unit is plugged in and power is available.
The OPERATION indicator on the display panel of the indoor unit starts flashing.
- MODE select button Press to select COOL, HEAT (Reverse cycle models only), or FAN only.
-
Temperature button (TEMP.) Set the desired temperature, relative to the room temperature. Select cooling if the room temperature is 21° C or higher Select heating if the room temperature is 22° C or lower
-
FAN button Press to select fan speed "AUTO", "LOW", "MED" or "HIGH". Notes: Fan speed cannot be adjusted when the unit is in "AUTO" or "DRY" mode. When "AUTO" speed is selected, there is no indication of fan speed.
-
ON/OFF button Press the ON/OFF button to start the air conditioner. The OPERATION indicator on the display panel of the indoor unit illuminates. The operating mode is selected in accordance with the room temperature and operation starts after approximately 3 minutes (If you select FAN only mode, the unit will start immediately).
Stop
ON/OFF button
Press the ON/OFF button again to stop the air conditioner.
- The FAN only mode does not control temperature. Therefore, only perform steps 1,3 and 4 to select this mode.
DRYING OPERATION

Start
Ensure unit is plugged in and power is available.
The OPERATION indicator on the display panel of the indoor unit starts flashing.
- MODE select button Press to select DRY.
- Temperature button (TEMP.) Press the TEMP button to set the desired temperature. The fan will run under LOW speed while the indicator on remote control displays "AUTO".
- ON/OFF button Press the ON/OFF button to start the air conditioner. The OPERATION indicator on the display panel of the indoor unit lights, and operation starts after approximately 3 minutes.
Stop
ON/OFF button
Press the ON/OFF button again to stop the air conditioner.
TIMER OPERATION
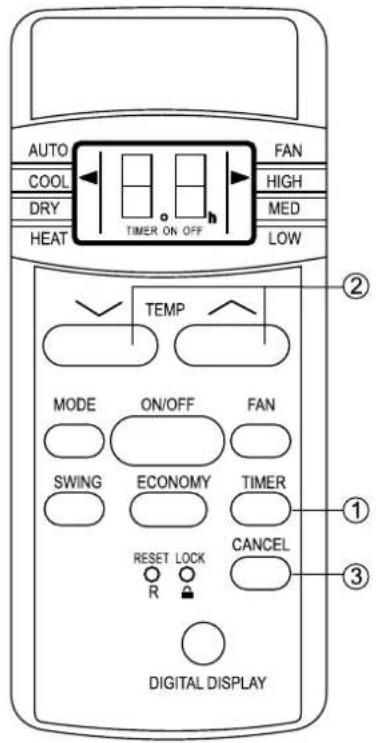
1. TIMER button
- To select Timer ON, press the TIMER button once. Press the CANCEL button to skip the Timer ON function. To select Timer OFF, press the TIMER button again.
2. Timer adjustment (TEMP button)
While still in timer mode, press the TEMP buttons either up/down to set the desired time:
^ Forward in time
√ Backward in time
• Each time you press the up/down button the time moves forward or backward by half an hour between 0.5 and 10 hours and by one hour between 10 and 24 hours.
- After setting the timer for TIMER ON and/or TIMER OFF, the Timer signal will be automatically sent to the indoor unit one and a half seconds after setting. The remote will display temperature setting three and a half seconds after setting. Check that the TIMER indicator on the display panel of the indoor unit is illuminated.
3. CANCEL button
Press the CANCEL button to cancel all timer settings.
Changing settings
Perform step 3 then steps 1 and 2 to change the settings.
CAUTION
- When you select the timer operation, the remote control automatically transmits the timer signal to the indoor unit for the specified time. Therefore, keep the remote control in a location where it can transmit the signal to the indoor unit properly.
- The effective operation time set by the remote control for the timer function is limited to the following settings, 0.5, 1.0, 1.5, 2.0, 2.5, 3.0, 3.5, 4.0, 4.5, 5.0, 5.5, 6.0, 6.5, 7.0, 7.5, 8.0, 8.5, 9.0, 9.5, 10, 11, 12, 13, 14, 15, 16, 17, 18, 19, 20, 21, 22, 23, 24. Every time you press the TEMP up/down buttons in timer mode, the Timer set time will alter to a lower or higher time. When the time is 0.5, and you press the down button, the timer will move to 24. If the set time is 24 and you press the up button, the timer will move to 0.5.
EXAMPLE OF TIMER SETTING
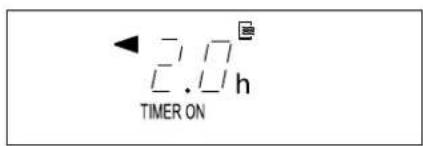

TIMER ON
(Timer Start Operation)
The TIMER ON function is useful when you want the unit to turn on automatically. For example, before you return home. The air conditioner will automatically start operating at the set time.
Example:
To start the air conditioner in 2 hours.
- Press the TIMER button once.
- Use the TEMP up/down button to display 2.0h on the TIMER ON display of the remote control.
- Wait for the remote control to display the setting temperature.


flowchart
graph TD
    A["Start"] --> B["Off"]
    B --> C["Set"]
    C --> D["2 hours later after setting"]
    D --> E["5 hours later after setting"]
TIMER OFF
(Timer Stop Operation)
The TIMER OFF function is useful when you want the unit to turn off automatically. For example, after you go to bed.
The air conditioner will stop automatically at the set time.
Example:
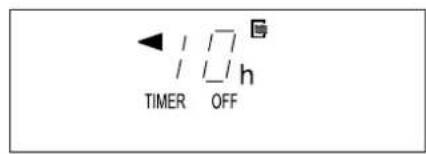
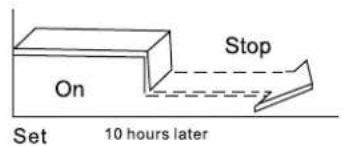
To stop the air conditioner in 10 hours.
- Press the TIMER button once, the remote will display TIMER ON and the former Timer ON set time. Press CANCEL to cancel the Timer ON setting (the time will display 0.0h). Press the TIMER button again to enter TIMER OFF setting.
- Use the TEMP up/down button to display 10h on the TIMER OFF display of the remote control.
- Wait for the remote control to display the setting temperature.
COMBINED TIMER
(Setting both ON and OFF timers simultaneously)
(On → Stop → Start operation)
This function is useful when you want to stop the air conditioner. For example, after you go to bed, and start it again in the morning when you wake up or when you return home.
Example:
To stop the air conditioner 2 hours after setting and start it again 10 hours after setting.
- Press the TIMER button.
- Use the TEMP up/down button to display 10h on the TIMER ON display.
- Press the TIMER button again.
- Use the TEMP up/down button to display 2.0h on the TIMER OFF display.
- Wait for the remote control to display the setting temperature.
(Off → Start → Stop operation)
This function is useful when you want to start the air conditioner. For example, before you wake up and stop it after you leave the house.
Example:
To start the air conditioner 2 hours after setting, and stop it 5 hours after setting.
- Press the TIMER button.
- Use the TEMP up/down button to display 2.0h on the TIMER ON display.
- Press the TIMER button again.
- Use the TEMP up/down button to display 5.0h on the TIMER OFF display.
- Wait for the remote control to display the setting temperature.
Notes:
- The timer setting (TIMER ON or TIMER OFF) that in sequence occurs directly after the set time will be activated first.
- If the same time is set for both TIMER ON and TIMER OFF settings, no timer operation is performed. The air conditioner may stop operating, either immediately or after approximately 10 minutes.
- Press the CANCEL button to cancel all TIMER settings.
ECONOMY BUTTON FUNCTION
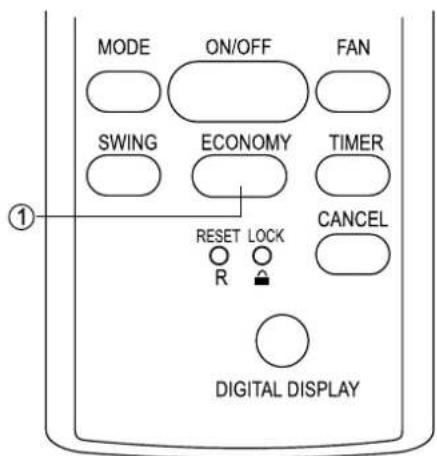
When you press the ECONOMY button, the economic running function will be activated.
In the Cooling mode, the cooling temperature set point will increase 1° C per hour for 2 hours after the mode is selected.
After 2 hours, the set point will continue at this temperature and the fan motor will be set to LOW speed.
In the Heating mode, the heating temperature set point will decrease 1° C per hour for 2 hours after the mode is selected.
After 2 hours, the set point will continue at this temperature and the fan Motor will be set to LOW speed.
In the Auto mode, the set temperature will increase or decrease 1°C per hour according to the running mode at the time for 2 hours after ECONOMY mode is selected. After 2 hours, the set point will continue at that temperature and the fan motor will be set to LOW speed.
Using the "ECONOMY" mode will reduce noise and create a comfortable sleeping environment.
RESET AND LOCK BUTTON FUNCTION

- When you press the recessed LOCK button (button 1), all current settings are locked in and the remote control does not accept any operation except that of the LOCK.
Use the lock mode when you want to prevent settings from being changed accidentally.
Press the LOCK button again when you want to cancel the LOCK mode.
A lock symbol will appear on the bottom right hand side of the remote control display when the LOCK function is activated.
- When you press the recessed RESET button (button 2), all current settings are cancelled and return to original factory settings.
DIGITAL DISPLAY BUTTON FUNCTION

When you press the DIGITAL button, the setting temperature display on indoor unit will be shut off.
Press the button again and the display will be activated. This function is useful when you want to shut down the display when you are sleeping.
ADJUSTING AIR FLOW DIRECTION


- Adjust the air flow direction properly otherwise, it might cause discomfort or cause uneven room temperatures.
- Adjust the horizontal louvre using the remote control.
- Adjust the vertical louvre manually.
Adjusting the Vertical Air Flow Direction (up - down)
The air conditioner automatically adjusts the vertical air flow direction in accordance with the operating mode.
To set the vertical air flow direction
Perform this function while the unit is in operation.
Press the SWING button on the remote control to move the louvre, and press it again to stop the louvre in the desired position.
- Adjust the vertical air flow direction to the desired direction.
- When starting operation, the vertical air flow is automatically set as per earlier setting.
To set the horizontal air flow direction (left - right)
Adjust the vertical louvre manually using the lever on the left or right side of the vertical louvre arm (Depending on model). Take care not to catch fingers on the fan, horizontal louvre or to damage vertical louvres.
When the air conditioner is in operation and the horizontal louvre is in a specific position, move the lever at left (or right, depending on model) end of the air outlet to the desired position.
To automatically swing the air flow direction (up - down)
Perform this function while the air conditioner is in operation.
Press the SWING button on the remote control.
- To stop the function, press the SWING button again.
- Press SWING button again to lock louvre in desired position.

natural_image
Cartoon illustration of a smiling air conditioner with arms and legs, standing on an upward arrow (no text or symbols)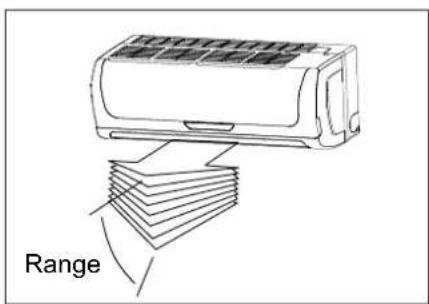
CAUTION
- The SWING buttons will be disabled when the air conditioner is not in operation.
- Do not operate the air conditioner for long periods with the air flow direction set downward in cooling or dry mode. Otherwise, condensation may occur on the surface of the horizontal louvre causing moisture to drop on to the floor or on furnishings.
- Do not move the horizontal louvre manually. Always use the SWING button. If you move this louvre manually, it may malfunction during operation. If the louvre malfunctions, stop the air conditioner once and restart it.
- When the air conditioner is started immediately after it has been stopped, the horizontal louvre might not move for approximately 10 seconds.
- Open angle of the horizontal louvre should not be set too small, as COOLING or HEATING performance may be impaired due to too restricted air flow area.
- Do not operate unit with horizontal louvre in closed position.
- When the air conditioner is connected to power (initial power), the horizontal louvre may generate a sound for 10 seconds, this is a normal operation.
• Take care not to catch fingers on the fan when adjusting vertical louvres.
Parts identification

Indoor unit

Indoor unit
- Front panel
- Air inlet
- Air filter (Behind front panel)
- Air outlet
- Horizontal louvre
- Vertical louvre
- Display
- Remote controller signal receiver
- Remote controller
- Control panel
Indoor Unit Display Panel
- POWER indicator
- AUTO indicator
- DEFROST indicator
- TIMER indicator
Outdoor unit
- Connecting pipe, cable, drain hose
- Air inlet (side and rear)
- Air outlet
Note: POWER Indicator flashes rapidly (5 times per second) when protection feature is activated.
Manual operation
Manual operation can be used temporarily in case you can't find the remote control or its batteries are exhausted.
- Open and lift the front panel up to an angle until it remains fixed with a clicking sound.
- Press the Auto/Cool button until the AUTO lamp illuminates, the unit will work in "AUTO" mode (the setting temperature is locked on 24° C).
- Return the front panel to its original position.
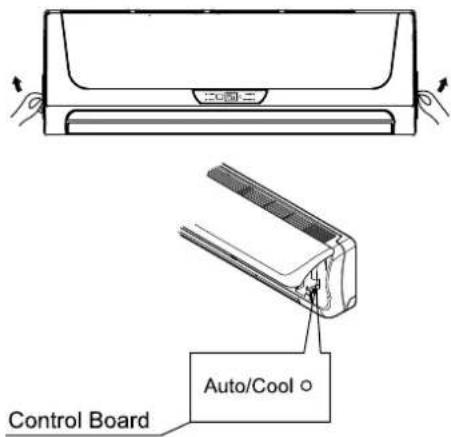
CAUTION:
Once you push the Auto/Cool button, the operation mode is shifted in an order as follows: AUTO, COOL, OFF. Push the button until the POWER indicator flashes rapidly (five times per second), the unit now is operating in forced COOL mode. This is used for testing purposes only. When the POWER indicator goes off, the air conditioner is OFF. To restore the remote control operation, use the remote control directly.
Optimal operation
To achieve Optimal performance, please note the following:
- Adjust the air flow direction correctly so that air is not flowing directly on to people. - Adjust the temperature to achieve the highest comfort level. Do not adjust the unit to excessive temperature levels.
- Close doors and windows on COOL or HEAT (reverse cycle model only) modes, or performance may be reduced.
- Use TIMER ON button on the remote control to select a time you want to start your air conditioner.
- Do not put any object near air inlet or air outlet, as the efficiency of the air conditioner may be reduced and the air conditioner may stop running.
- Clean the air filter frequently, otherwise cooling or heating performance may be reduced.
- Do not operate unit with horizontal louvre in closed position.
Cleaning and maintenance
WARNING: Be sure to stop the air conditioner and disconnect the power supply for your safety during cleaning of the unit.

Cleaning the indoor unit
- Use a dry cloth.
- A cloth dampened with cold water may be used if the indoor unit is very dirty.
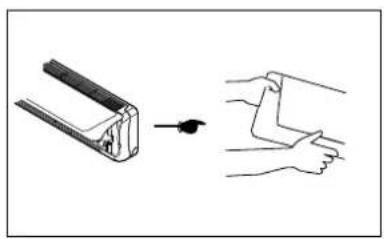
- The front panel of the indoor unit can be removed and cleaned with water. Then wipe it with a dry cloth.

Caution
- Do not use detergent or other chemical products during cleaning. Further, do not put these products near the indoor unit.
- Do not use benzine, thinner, polishing powder or other similar solvent to clean the unit.
natural_image
Diagram showing a hand holding a wrist with an arrow indicating motion (no text or symbols)


Cleaning the air filter

A clogged air filter will reduce cooling efficiency. Clean it frequently.
- Lift the indoor unit panel up to an angle until it stops with a clicking sound. Lift the air filter slightly from its centre bulge and then pull it down and out.
- Take out the light activated deodorization net (left) and the HEPA net (right) if applicable.
- Bask the light activated deodorization net in the sun for 6 to 8 hours.
- Dirty light activated deodorization net and HEPA net can't be cleaned using water. Clean using a vacuum cleaner or replace.
- Clean the air filter with a vacuum cleaner or water, airing it out of direct sunlight before re-installing.
- Install the light activated deodorization net into the left filter and HEPA net into the right air filter if applicable.
- Close the panel after the air filter is correctly installed.

MAINTENANCE
Check if the air inlet or outlet is blocked after the air conditioner has not been used for a long time. If yes, clean them.
Perform the following if the air conditioner is not going to be used for a long time:
- Select FAN only mode let the indoor fan run for a while to dry the inside of the unit.
- Disconnect the power supply and remove batteries from the remote control.
- Check components of the outdoor unit periodically. Contact a local dealer or a customer service centre if the unit requires servicing.
Note: Before you clean the air conditioner, be sure to switch the unit off and disconnect the power supply.
HOW THE AIR CONDITIONER WORKS
AUTO OPERATION
- When you set the air conditioner in AUTO mode, it will automatically select cooling, heating (reverse cycle models only), or fan only mode depending on what temperature you have selected and the room temperature.
- The air conditioner will control room temperature automatically at the temperature point set by you.
- If the AUTO mode is unsuitable, you can select desired conditions manually.
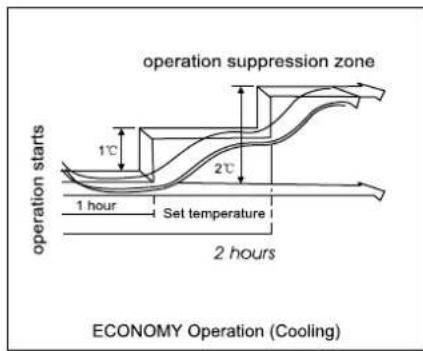
ECONOMY OPERATION
ECONOMY can be selected during cooling, heating (reverse cycle models only), or AUTO operation. For example, the air conditioner will start the following operation in Cooling mode. The fan speed will be automatically controlled. Operation suppression zone is activated where capacity is kept to the minimum, overcooling is prevented by raising the temperature setting by 1°C after 1 hour and by 2°C after 2 hours of operation. The room temperature is thus regulated between the operation suppression zone and the set temperature (Dependant on the outdoor temperature). Note: Refer to page 12 for Heating and Auto operation.

DRY OPERATION
- The DRY mode will automatically select the drying operation based on the difference between the set temperature and the actual room temperature.
- The temperature is regulated while dehumidifying by repeatedly turning on and off the cooling operation or fan only. The fan speed indicator will display AUTO and low speed will be used.
Operation tips
The following events may occur during normal operation.
-
Protection of the air conditioner.
-
Compressor protection The compressor can't restart for 3 minutes after it stops.
- Anti-cold air (Reverse cycle models only) The unit is designed not to blow cold air on HEAT mode, when the indoor heat exchanger is in one of the following three situations and the set temperature has not been reached.
A) When heating has just started.
B) Defrosting.
C) Low temperature heating.
The indoor or outdoor fan stop running when defrosting (Reverse cycle models only).
• Defrosting (Reverse cycle models only)
Frost may be generated on the outdoor unit during heat cycle when outdoor temperature is low and humidity is high resulting in lower heating efficiency of the air conditioner.
During this condition the air conditioner will stop heating operation and start defrosting automatically.
The time to defrost may vary from 4 to 10 minutes according to the outdoor temperature and the amount of frost buildup on the outdoor unit.
-
A white mist coming out from the indoor unit
-
A white mist may generate due to a large temperature difference between air inlet and air outlet on COOL mode in an indoor environment that has a high relative humidity.
-
A white mist may generate due to moisture generated from defrosting process when the air conditioner restarts in HEAT mode operation after defrosting.
-
Low noise of the air conditioner
-
You may hear a low hissing sound when the compressor is running or has just stopped running. This sound is the sound of the refrigerant flowing or coming to a stop.
- You may also hear a low "squeak" sound when the compressor is running or has just stopped running. This is caused by heat expansion and cold contraction of the plastic parts in the unit when the temperature is changing.
-
A noise may be heard due to the louvre returning to its original position when power is first turned on.
-
Dust is blown out from the indoor unit.
This is a normal condition when the air conditioner has not been used for a long time or during first use of the unit.
- A peculiar smell comes out from the indoor unit.
This is caused by the indoor unit giving off smells permeated from building material, from furniture or smoke.
- The air conditioner turns to FAN only mode from COOL or HEAT (reverse cycle models only) mode.
When indoor temperature reaches the temperature setting on the air conditioner, the compressor will stop automatically, and the air conditioner turns to FAN only mode. The compressor will start again when the indoor temperature rises on COOL mode or falls on HEAT mode (reverse cycle models only) to the set point.
-
Dripping water may generate on the surface of the indoor unit when cooling in a high relatively humidity (relative humidity higher than 80%). Adjust the horizontal louvre to the maximum air outlet position and select HIGH fan speed.
-
Heating mode (Reverse cycle models only)
The air conditioner draws in heat from the outdoor unit and releases it via the indoor unit during heating operation. When the outdoor temperature falls, heat drawn in by the air conditioner decreases accordingly. At the same time, heat loading of the air conditioner increases due to larger difference between indoor and outdoor temperature. If a comfortable temperature can't be achieved by the air conditioner, we suggest you use a supplementary heating device.
- Auto-restart function
Power failure during operation will stop the unit completely.
For the unit without Auto-restart feature, when the power restores, the POWER indicator on the indoor unit starts flashing. To restart the operation, push the ON/OFF button on the remote control. For the unit with Auto-restart feature, when the power restores, the unit restarts automatically with all the previous settings preserved by the memory function.
Troubleshooting tips
Malfunctions and Solutions
| Stop the air conditioner immediately if one of the following faults occur. Disconnect the power and contact the nearest customer service centre. | |
| Trouble | RUNNING indicator or other indicators flash rapidly (5 times every second) and this flash can't be fixed by unplugging the power, and then plugging it in again. |
| Fuse blows frequently or circuit breaker trips frequently. | |
| Objects or water penetrate the air conditioner. | |
| The remote controller won't work or works abnormally. | |
| Other abnormal situations. | |
| Malfunctions | Cause | What should be done? |
| Unit does not start | Power cut | Wait for power to be restored. |
| Unit may have become unplugged. | Check that plug is securely in wall receptacle. | |
| Circuit breaker tripped/ fuse blown | Reset or replace the fuse. | |
| Battery in Remote controller may have been exhausted. | Replace the battery. | |
| The time you have set with timer is incorrect. | Wait or cancel timer setting. | |
| Unit not cooling or heating (Reverse cycle models only) room very well while air flowing out from the air conditioner | Inappropriate temperature setting. | Set temperature correctly. For detailed method please refer to "Using remote control" section. |
| Air filter is blocked. | Clean the air filter. | |
| Doors or Windows are open. | Close the doors or windows. | |
| Air inlet or outlet of indoor or outdoor unit has been blocked. | Clear obstructions away first, then restart the unit. | |
| Compressor 3 minutes protection has been activated. | Wait. | |
| If the trouble has not been corrected, please contact a local dealer or the nearest customer service centre. Be sure to inform them of the detailed malfunctions and unit model. | ||
Notes: Do not attempt to repair the unit yourself.
Always consult an authorised service provider.
- SPLIT-TYPE ROOM AIR CONDITIONER
- USER'S MANUAL
- CONTENTS
- Read This Manual
- CAUTION
- IMPORTANT NOTES:
- Safety Precautions
- WARNING
- Prior to Operation
- Preparing for operation
- Usage
- Cleaning and maintenance
- Service
- Using the remote control
- Replacing batteries
- NOTES
- Features of remote control
- Indicators on remote control
- Mode display
- Transmission Indicator
- ON/OFF display
- FAN speed display
- Hour display
- Temperature and Timer Display
- TIMER ON/OFF display
- Lock display
- AUTOMATIC OPERATION
- Start
- Stop
- DRYING OPERATION
- TIMER OPERATION
- TIMER button
- Timer adjustment (TEMP button)
- CANCEL button
- Changing settings
- EXAMPLE OF TIMER SETTING
- TIMER ON
- (Timer Start Operation)
- Example:
- TIMER OFF
- COMBINED TIMER
- Notes:
- ECONOMY BUTTON FUNCTION
- RESET AND LOCK BUTTON FUNCTION
- DIGITAL DISPLAY BUTTON FUNCTION
- ADJUSTING AIR FLOW DIRECTION
- Adjusting the Vertical Air Flow Direction (up - down)
- To set the vertical air flow direction
- To set the horizontal air flow direction (left - right)
- To automatically swing the air flow direction (up - down)
- Parts identification
- Indoor unit
- Indoor Unit Display Panel
- Outdoor unit
- Manual operation
- CAUTION:
- Optimal operation
- Cleaning the indoor unit
- Cleaning the air filter
- MAINTENANCE
- HOW THE AIR CONDITIONER WORKS
- AUTO OPERATION
- ECONOMY OPERATION
- DRY OPERATION
- Operation tips
- Troubleshooting tips
- Malfunctions and Solutions
Brand : KELVINATOR
Model : KSE70CRA
Category : Air Conditioning