
GC-B157PMAV - Refrigerator LG - Free user manual and instructions
Find the device manual for free GC-B157PMAV LG in PDF.


| Product Type | Side-by-Side Refrigerator |
| Model | GC-B157PMAV |
| Brand | LG |
| Total Capacity | 740 liters (approx.) |
| Freezer Capacity | 260 liters (approx.) |
| Fridge Capacity | 480 liters (approx.) |
| Dimensions (W x H x D) | 912 x 1790 x 730 mm (approx.) |
| Weight | 110 kg (approx.) |
| Energy Class | A++ (estimated) |
| Annual Energy Consumption | 380 kWh (approx.) |
| Power Supply | 220-240 V, 50 Hz |
| Refrigerant | R600a |
| Defrost Type | No Frost (Frost Free) |
| Cooling System | Multi Air Flow |
| Ice & Water Dispenser | Yes, external |
| Display Type | LED touch control |
| Noise Level | 42 dB (approx.) |
| Cleaning | Wipe with soft cloth; avoid abrasive cleaners |
| Safety Features | Child lock, door alarm, overload protection |
| Spare Parts Availability | Authorized service centers; check LG website |
| Warranty | 2 years (parts and labor) |
| Manual Languages | EN, KK, RU |
Frequently Asked Questions - GC-B157PMAV LG
User questions about GC-B157PMAV LG
0 question about this device. Answer the ones you know or ask your own.
Ask a new question about this device
Download the instructions for your Refrigerator in PDF format for free! Find your manual GC-B157PMAV - LG and take your electronic device back in hand. On this page are published all the documents necessary for the use of your device. GC-B157PMAV by LG.
USER MANUAL GC-B157PMAV LG
| - Pa | 3мер (мм) |
| A | 910 |
| B | 1 |
| C | 643 |
| D | 550 |
| E | 562 |
| F | 643 |
| G | 1 |
| H | 1 |
NOTE
WARNING!
WARNING!
NOTE
WARNING!

InstaView Door-in-Door model.

① Fridge
⚠️ WARNING!

① Additional door*1
① LED lamp
① Fridge
Removing/Reinstalling the Panels
TROUBLESHOOTING
Before beginning installation, read these instructions carefully. This will simplify installation and ensure that the product is installed correctly and safely. Leave these instructions near the product after installation for future reference.
ENGLISH
TABLE OF CONTENTS
This manual may contain images or content that may be different from the model you purchased.
This manual is subject to revision by the manufacturer.
SAFETY INSTRUCTIONS
READ ALL INSTRUCTIONS BEFORE USE....3
WARNING....3
CAUTION ....8
INSTALLATION
Before Installation ....11
Removing the Fridge and Freezer Door....12
Levelling and Door Alignment....13
Turning on the Power....14
Moving the Appliance for Relocation 14
OPERATION
Before Use 15
Product Features....17
Control Panel 21
InstaView....22
Door in Door....23
Drawer....23
Shelf 24
Icemaker 25
Door Basket 26
MAINTENANCE
Cleaning 27
TROUBLESHOOTING
Before Calling for Service....29
APPENDIX
Information....34
SAFETY INSTRUCTIONS
READ ALL INSTRUCTIONS BEFORE USE
The following safety guidelines are intended to prevent unforeseen risks or damage from unsafe or incorrect operation of the appliance. The guidelines are separated into 'WARNING' and 'CAUTION' as described below.
Safety Messages

This symbol is displayed to indicate matters and operations that can cause risk. Read the part with this symbol carefully and follow the instructions in order to avoid risk.

WARNING
This indicates that the failure to follow the instructions can cause serious injury or death.

CAUTION
This indicates that the failure to follow the instructions can cause the minor injury or damage to the product.
WARNING
WARNING
To reduce the risk of explosion, fire, death, electric shock, injury or scalding to persons when using this product, follow basic precautions, including the following:
Technical Safety
- This appliance is not intended for use by persons (including children) with reduced physical, sensory or mental capabilities, or lack of experience and knowledge, unless they have been given supervision or instruction concerning use of the appliance by a person
responsible for their safety. Children should be supervised to ensure that they do not play with the appliance.
- This appliance is intended to be used in household and similar applications such as:
- staff kitchen areas in shops, offices and other working environments;
- farm houses and by clients in hotels, motels and other residential type environments;
- bed and breakfast type environments;
- catering and similar non-retail applications.

This symbol alerts you to flammable materials that can ignite and cause a fire if you do not take care.
- This appliance contains a small amount of isobutane refrigerant (R600a), but it is also combustible. When transporting and installing the appliance, care should be taken to ensure that no parts of the refrigerating circuit are damaged.
- The refrigerant and insulation blowing gas used in the appliance require special disposal procedures. Consult with service agent or a similarly qualified person before disposing of them.
- Do not damage the refrigerant circuit.
- If the power cord is damaged or the hole of the outlet socket is loose, do not use the power cord and contact an authorized service centre.
- Do not locate multiple portable outlet sockets or portable power supplies at the rear of the appliance.
- Securely plug the power plug into the outlet socket after completely removing any moisture and dust.
- Never unplug the appliance by pulling on the power cable. Always grip the power plug firmly and pull straight out from the outlet socket.
- Keep ventilation openings, in the appliance enclosure or in the built-in structure, clear of obstruction.
- Do not store explosive substances such as aerosol cans with a flammable propellant in this appliance.
- Do not tilt the appliance to pull or push it when transporting.
- When positioning the appliance, ensure the supply cord is not trapped or damaged.
- Do not use mechanical devices or other means to accelerate the defrosting process.
- Do not use a hair drier to dry the inside of the appliance or place a candle inside to remove the odours.
- Do not use electrical appliances inside the refrigerator.
- Make sure not to get a body part such as a hand or foot stuck while moving the appliance.
- Disconnect the power cord before cleaning the appliance interior or exterior.
- Do not spray water or inflammable substances (toothpaste, alcohol, thinner, benzene, flammable liquid, abrasive, etc.) over the interior or exterior of the appliance to clean it.
- Do not clean the appliance with brushes, cloths or sponges with rough surfaces or which are made of metallic material.
- Only qualified service personnel from LG Electronics service centre should disassemble, repair, or modify the appliance. Contact an LG Electronics customer information centre if you move and install the appliance in a different location.
Risk of Fire and Flammable Materials
- If a leak is detected, avoid any naked flames or potential sources of ignition and air the room in which the appliance is standing for several minutes. In order to avoid the creation of a flammable gas air mixture if a leak in the refrigerating circuit occurs, the size of the room in which the appliance is used should correspond to the amount of refrigerant used. The room must be 1 m² in size for every 8 g of R600a refrigerant inside the appliance.
- Refrigerant leaking out of the pipes could ignite or cause an explosion.
- The amount of refrigerant in your particular appliance is shown on the identification plate inside the appliance.
Installation
- This appliance should only be transported by two or more people holding the appliance securely.
• Install the appliance on a firm and level floor.
- Do not install the appliance in a damp and dusty place. Do not install or store the appliance in any outdoor area, or any area that is subject to weathering conditions such as direct sunlight, wind, rain, or temperatures below freezing.
- Do not place the appliance in direct sunlight or expose it to the heat from heating appliances such as stoves or heaters.
- Be careful not to expose the rear of the appliance when installing.
• Install the appliance in a place where it is easy to unplug the power plug of the appliance.
- Be careful not to let the appliance door fall during assembly or disassembly.
- Be careful not to pinch, crush, or damage the power cable during assembly or disassembly of the appliance door.
- Be careful not to point the power plug up or let the appliance lean against the power plug.
- Do not connect a plug adapter or other accessories to the power plug.
- Do not modify or extend the power cable.
- Ensure that the outlet socket is properly grounded, and that the earth pin on the power cord is not damaged or removed from the power plug. For more details on grounding, inquire at an LG Electronics customer information centre.
- This appliance is equipped with a power cord having an equipment-grounding conductor and a grounding power plug. The power plug must be plugged into an appropriate outlet socket that is installed and grounded in accordance with all local codes and ordinances.
- Never start up an appliance showing any signs of damage. If in doubt, consult your dealer.
- Dispose of all packaging materials (such as plastic bags and styrofoam) away from children. The packaging materials can cause suffocation.
- Do not plug the appliance into a multi socket adapter which does not have a power cable (mounted).
- The appliance should be connected to a dedicated power line which is separately fused.
- Do not use a multi socket outlet which is not properly grounded (portable). In case of using a properly-grounded multi socket outlet (portable), use the multi socket outlet with the current capacity of the power cord rating or higher and use the multi socket outlet only for the appliance.
Operation
- Do not use the appliance for any purpose (storage of medical or experimental materials or shipping) other than any domestic household food storage use.
- If water penetrates electrical parts of the appliance, disconnect power plug and contact an LG Electronics customer information centre.
- Unplug the power plug during a severe thunderstorm or lightening or when not in use for a long period of time.
- Do not touch the power plug or the appliance controls with wet hands.
- Do not bend the power cable excessively or place a heavy object on it.
- Immediately unplug the power plug and contact an LG Electronics customer information centre if you detect a strange sound, odour, or smoke coming from the appliance.
- Do not place hands or metallic objects inside the area emitting the cold air, cover or heat releasing grille on the back.
- Do not apply excessive force or impact to the back cover of the appliance.
- Be careful of nearby children when you open or close the appliance door. The door may bump the child and cause injury.
- Avoid the danger of children getting trapped inside the appliance. A child trapped inside the appliance can cause suffocation.
- Do not put animals, such as pets into the appliance.
- Do not place heavy or fragile objects, containers filled with liquid, combustible substances, flammable objects (such as candles, lamps, etc.), or heating devices (such as stoves, heaters, etc.) on the appliance.
- Do not place any electronic appliance (such as heater and mobile phone) inside the appliance.
- If there is a gas leakage (isobutane, propane, natural gas, etc.), do not touch the appliance or power plug and ventilate the area immediately. This appliance uses a refrigerant gas (isobutane, R600a). Although it uses a small amount of the gas, it is still combustible gas. Gas leakage during appliance transport, installation or operation can cause fire, explosion or injury if sparks are caused.
- Do not use or store flammable or combustible substances (ether, benzene, alcohol, chemical, LPG, combustible spray, insecticide, air freshener, cosmetics, etc.) near the appliance.
Disposal
- When discarding the appliance, remove the door gasket while leaving the shelves and baskets in place and keep children away from the appliance.
CAUTION

CAUTION
To reduce the risk of minor injury to persons, malfunction, or damage to the product or property when using this product, follow basic precautions, including the following:
Installation
• After unpacking, check the appliance for any damage that may have occurred during transit. - Wait for at least 3 to 4 hours in order to ensure the refrigerant circuit is fully efficient.
Operation
- Do not touch frozen food or the metal parts in the freezer compartment with wet or damp hands. It may cause frostbite.
- Do not place glass containers, bottles or cans (especially those containing carbonated drinks) in the freezer compartment, shelves or ice bin that will be exposed to temperatures below freezing.
- The tempered glass on the front side of the appliance door or the shelves can be damaged by an impact. If it is broken, do not touch it with hands.
- Do not hang from the appliance doors, storage room, shelf or climb up into it.
- Do not store an excessive amount of water bottles or containers for side dishes on the door baskets.
- Do not open or close the appliance door with excessive force.
- If the hinge of the appliance door is damaged or operates improperly, stop using the appliance and contact an authorized service centre.
- Prevent animals from nibbling on the power cable or water hose.
- Never eat frozen foods immediately after they have been taken out in the freezer compartment.
- Make sure not to get a hand or foot stuck upon opening or closing the appliance door or door in door.
Maintenance
- This appliance is equipped with maintenance-free LED interior light. Do not remove cover or LED lamp in any attempt to repair or change it. Contact an LG Electronics customer information centre.
- Do not clean glass shelves or covers with warm water when they are cold. They may shatter if exposed to sudden temperature changes.
- Do not insert the shelves upside down. The shelves may fall.
- To remove frost from the appliance, contact an LG Electronics customer information centre.
- Dispose of the ice inside the ice bin in the freezer compartment during an extended power outage.
INSTALLATION
Before Installation
Dimensions and Clearances
Too small of a distance from adjacent items may result in the degradation of freezing capability and increased electricity costs. Allow over 50 mm of clearance between the back of the appliance and the wall when installing the appliance.

| - Size (mm) | |
| A | 910 |
| B | 1 |
| C | 643 |
| D | 550 |
| E | 562 |
| F | 643 |
| G | 1 |
| H | 1 |
NOTE
- You can determine what type of appliance it is by looking at the label inside the appliance.
Ambient Temperature
- The appliance is designed to operate within a limited range of ambient temperatures, depending on the climate zone.
- The internal temperatures could be affected by the location of the appliance, the ambient temperature, the frequency of door opening and so on. • The climate class can be found on the rating label.
| Climate Class Ambient Temperature Range °C | |
| SN (Extended Temperate) | +10 - +32 |
| N (Temperate) +16 - +32 | |
| ST (Subtropical) +16 - +38 / +18 - +38** | |
| T (Tropical) +10 - +43* / +16 - +43 / +18 - +43** | |
* Australia, India, Kenya 7** Argentina 8
6
NOTE
- The appliances rated from SN to T are intended to be used at an ambient temperature between 10 °C and 43 °C.
0 9 7
Accessories 9 1
*1 This feature is only available on some models.
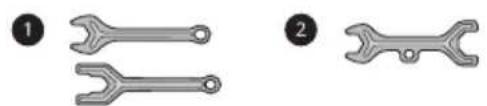
① Spanner A*1 ② Spanner B*1
Removing the Fridge and Freezer Door
If your entrance door is too narrow for the appliance to pass through, remove the appliance doors and pass the appliance laterally.

WARNING
- Disconnect the power cord, house fuse or circuit breaker before installing, removing the doors, or cleaning the appliance. Failure to follow these instructions may result in death, fire or electric shock.
Removing the Freezer Door
1 Remove the hinge cover ①.

2 Disconnect the wire harness ②. Remove the grounding screw ③. Remove the three bolts ④ using a socket wrench and lift off the top hinge. Set parts aside.

CAUTION
When lifting the hinge free of the latch, be careful that the door does not fall forward. It is recommended that two or more people carry out the door removal and refitting.
recommended that two or more people carry out the door removal and refitting.
3 Lift the freezer door until it is free of the bottom hinge assembly.
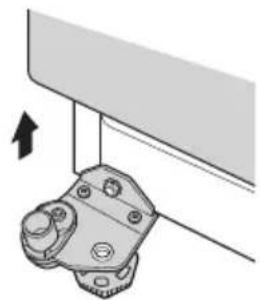
CAUTION
Place the door on a non-scratching surface with the inner side facing up.
Removing the Fridge Door
The steps to remove the fridge door are similar to the freezer door, so you could just follow the steps above to remove the fridge door.
CAUTION
- When lifting the hinge free of the hinge lever latch, be careful that the door does not fall forward. It is recommended that two or more people carry out the door removal and refitting.
- Place the door on a non-scratching surface with the inner side facing up.
NOTE
The number of wire harnesses may vary depending on the model.
Refitting the Fridge and Freezer Door
Refit the doors in the reverse sequence of their removal once the appliance has been passed through all access doors.

CAUTION
• Install the fridge door first.
Levelling and Door Alignment
Before Beginning
When the appliance doors appear to be uneven, follow the instructions below to align the doors.
NOTE
- The spanner may differ depending on the model. You will be provided with either spanner type A or B.
- Spanner Type A
![graph TD A["1"] --> B["2"] C["3"] --> B["2"]](/content/2026/05/1059543/images/394d4949efc1a7d28b1309c2b63348b07decdc5ee7d602a47f5327e4b59cd14b.jpg)
- Spanner Type B
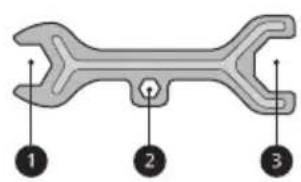
Levelling the Appliance
The appliance has two front levelling legs. Adjust the legs to alter the tilt from front to back or side to side. If the appliance seems unsteady, or the doors do not close easily, adjust the appliance's tilt using the instructions below.
Use the spanner ① to adjust the height by turning the levelling leg to the left to raise it or to the right to lower it.

NOTE
- Leveling the doors may not be possible when the floor is not leveled, or is of weak or poor construction.
- The refrigerator is heavy and should be installed on a rigid and solid surface.
- Some timber flooring may cause levelling difficulties if it flexes excessively.
- The rollers, which are not castors, should be used only for forward or backward movement. Moving the refrigerator sideways may damage your floor and the rollers.
Door Alignment for Freezer and Fridge Door
If the door of the appliance is not level, adjust the difference in the height of the appliance door.

1. Open the door and use the spanner ① to loosen the keeper nut by turning it to the left.

CAUTION
- Do not adjust the height of the appliance door more than 3 mm.
NOTE
- Leveling the doors may not be possible when the floor is not leveled, or is of weak or poor construction.
- The refrigerator is heavy and should be installed on a rigid and solid surface.
- Some timber flooring may cause levelling difficulties if it flexes excessively.
Turning on the Power
Connecting the Appliance
After installing the appliance, connect the power plug into the outlet socket. Do not double up with other appliances on the same outlet.
NOTE
• After connecting the power supply cord (or plug) to the outlet, wait 3 or 4 hours before you put food into the appliance. If you add food before the appliance has cooled completely, your food may spoil. - To turn off the appliance, disconnect the power plug from the socket outlet.
Moving the Appliance for Relocation
Preparing for Relocation
1. Remove all food from inside the appliance. 2. Pull the power plug out, insert and fix it into the power plug hook at the rear or on top of the appliance. 3. Tape parts such as shelves and the door handle to prevent them from falling off while moving the appliance. 4. Move the appliance with more than two people carefully. When transporting the appliance over a long distance, keep the appliance upright. 5. After installing the appliance, connect the power plug into a mains outlet socket and switch it on.
OPERATION
Before Use
Notes for Operation
- Users should keep in mind that frost can form if the door is not closed completely or if the humidity is high during the summer.
- Ensure there is sufficient space between food stored on the shelf or door basket to allow the door to close completely.
- Opening the door for long periods can cause a significant increase of the temperature in the compartments of the appliance.
- If the refrigerating appliance is left empty for long periods, switch off, defrost, clean, dry, and leave the door open to prevent mould developing within the appliance.
Door Open Alarm
The alarm sounds 3 times in 30 second intervals if the door is left open or not completely closed for 1 minute.
NOTE
- Contact the LG Electronics customer information centre if the alarm sound continues even after closing all doors.
Failure Detection
The appliance can automatically detect problems during operation.
NOTE
- If a problem is detected, the appliance may not operate and an error code is displayed even when any button is pressed.
- If an error code is indicated on the display, do not turn off the power. Immediately contact the LG Electronics customer information centre and report the error code. If you turn off the power,
the repair technician from our information centre may have difficulty finding the problem.
Suggestion for Energy Saving
- For the most efficient use of energy, make sure that door bins, drawers and shelves are assembled properly.
- Ensure there is sufficient space between stored foods. This allows cold air to be circulated evenly and lowers electricity bills.
- Store hot food only after it has cooled in order to prevent dew or frost.
- When storing food in the freezer compartment, set the freezer temperature lower than the temperature indicated on the food.
- Do not set the temperature of the appliance lower than needed.
- Do not put food near the temperature sensor of the fridge compartment. Keep a distance of at least 3 cm from the sensor.
- Note that a temperature rise after defrosting has a permissible range in the appliance specifications. If you wish to minimise the impact on the food storage due to a temperature rise, seal or wrap the stored food in several layers.
- The automatic defrosting system in the appliance ensures that the compartment remains free of ice buildup under normal operating conditions.
Storing Foods Effectively
- Food may freeze or spoil if stored at the wrong temperature. Set the refrigerator to the correct temperature for the food being stored.
- Store frozen food or refrigerated food inside sealed containers.
- Check the expiration date and label (storage instructions) before storing food in the appliance.
- Do not store food for a long period of time if it spoils easily at a low temperature.
- Do not place unfrozen food in direct contact with food that is already frozen. It may be necessary to reduce the quantity to be frozen if freezing every day is anticipated.
- Place the refrigerated food or frozen food in each fridge or freezer compartment immediately after purchasing.
- Store raw meat and fish in suitable containers in the refrigerator, so that it is not in contact with or drip onto other food.
- Refrigerated foods and other food items can be stored on top of the vegetable drawer.
- Avoid refreezing any food which has been completely thawed. Freezing any food which has been completely thawed again will lower its taste and nutrition.
- Do not overfill the appliance. Cold air cannot circulate properly if the appliance is overfilled.
- Cool hot food before storing. If too much hot food is placed inside, the internal temperature of the appliance can increase and negatively affect other foods stored in the appliance.
- If you set an excessively low temperature for food, it may become frozen. Do not set a temperature lower than the required temperature for the food to be stored correctly.
- If there are chill compartments in the appliance, do not store vegetables and fruits with higher moisture content in the chill compartments as they may freeze due to the lower temperature.
- In the event of a blackout, call the electricity company and ask how long it is going to last.
- You should avoid door openings while the power is off.
- When the power supply gets back to normal, check the condition of the food.
Maximum Freezing Capacity
- Super Freeze must be switched on for 24 hours before fresh products are placed in the freezer compartment.
- To get better air circulation, insert all inner parts like baskets, drawers, and shelves.
NOTE
- The maximum freezing capacity of your appliance is stated on the rating label inside the fridge compartment.
- To have the maximum freezing capacity, we recommend that you set the freezer temperature to the coldest temperature setting.
Freezing the Maximum Amount of Food
If large quantities of food are to be stored, all the freezer drawers should be taken out of the appliance and the food should be stacked directly on the freezer shelves in the freezer compartment.

CAUTION
• To remove the drawers, first remove the food from drawers and then pull out the drawers carefully. Not doing so could cause injury or damage to the drawers.
NOTE
- The shape of each drawer may be different, insert in the right position.
Product Features
The appearance or components of the appliance may differ from model to model.
Exterior
*1 This feature is only available on some models.
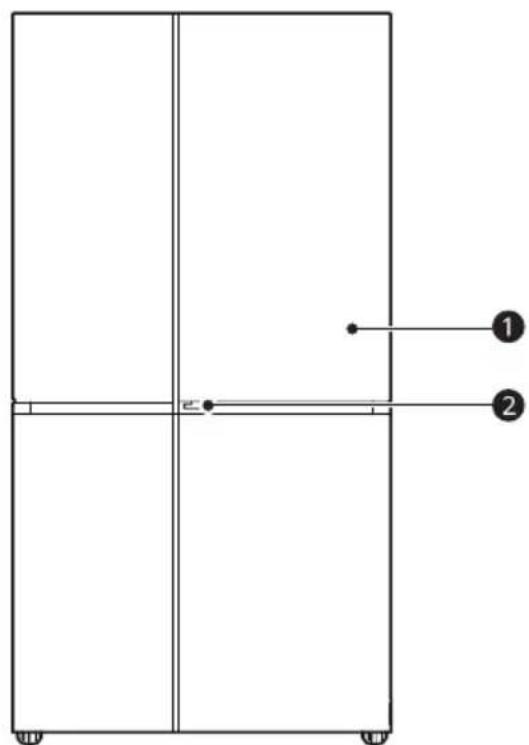

① Door in Door *1
This is a convenient storage area for frequently-used items that require easy access.
② Door in Door Lever*1
Opens Door-in-Door.
③ InstaView Door in Door *1
The InstaView Door-in-Door compartment allows for easy access to commonly used food items.
Interior
*1 This feature is only available on some models.
Door in Door Model:

InstaView Door in Door Model:

① LED Lamp
The LED lamps inside the appliance light up when you open the door.
② Temperature Sensor *1
This sensor senses the temperature of the fridge compartment.
- Maintain the distance between the sensor and food to accurately sense the temperature.
③ Freezer Shelf
Stores frozen food such as meat, fish, and ice cream.
- To freeze food items quickly, store the food on the left side of the top shelf. If you need to store more food, store it on the shelves in order starting from the top shelf. Food items will freeze most quickly in the zone.
④ Icemaker *1
This is where ice is manually produced and stored.
⑤ Freezer Drawer *1
Stores frozen food for longer storage.
⑥ Freezer Door Basket
Stores small packages of frozen food. Do not store ice cream or food which will be stored for a long period of time.
⑦ Fridge Shelf
Stores refrigerated foods and fresh foods.
- Stores the foods with higher moisture content at the front of the shelf.
- The shelf height can be adjusted by inserting the shelf in another groove of different height.
- The actual number of shelves will differ from model to model.
⑧ Bottle Rack *1
Stores containers and tall bottles using the bottle rack.
CAUTION
- Do not store short bottles or containers. The items may fall and cause an injury or appliance damage.
⑨ Snack Drawer *1
Stores containers and tall bottles using the bottle rack.
10 Door in Door Compartment *1
Stores commonly used food items such as beverages and snacks.
⑪ Fridge Door Basket
Stores small packages of refrigerated foods, drinks and sauce containers.
12 Fridge Drawer
Stores fruits and vegetables to keep fresh for as long as possible.
⑬ Egg Box *1
Stores eggs.
- Do not use it as the ice bin or place it on the shelf on top of the fridge or the vegetable drawer.
14 Bottom Drawer Cover
This is the bottom drawer cover.
CAUTION
- Do not store any items at the front of the bottom shelf. The items may fall and cause an injury or appliance damage.
15 Air Filter*1
Reduces odours inside the fridge compartment.
Control Panel
The actual control panel may differ from model to model.
Control Panel and Functions
*1 This feature is only available on some models.

① Fridge
Press this button repeatedly to select a desired temperature between 2 °C and 8 °C.
• The default fridge temperature is 5 °C.
NOTE
- The actual inner temperature varies depending on the food status, as the indicated setting temperature is a target temperature, not actual temperature within the appliance.
② Freezer
Press this button repeatedly to select a desired temperature between -24 °C and -15 °C.
• The default freezer temperature is -18 °C.
③ Mode
Press this button to select the desired mode between Super Freeze (5) and Artificial Intelligence (6). The mode will be selected if no button is pressed for 10 seconds.
- Super Freeze (5): This function can quickly freeze a large amount of ice or frozen foods.
- When the function is activated, the temperature of the freezer is automatically switched to -24 °C.
- The function automatically shuts off after 52 hours and reverts back to the previous setting.
- Artificial Intelligence (6): When the function is selected, the temperature of the appliance is automatically adjusted.
- When the function is activated, the temperature of the fridge is automatically switched to 5 °C and the freezer to -18 °C.
4 Lock
The lock function disables every other button on the display.
- To lock the control panel buttons, press and hold the Lock button for 3 seconds until indicator light turns on and the function is activated.
- To disable the function, press and hold the Lock button for 3 seconds until the indicator light turns off and the function is deactivated.
NOTE
- The displayed temperature is the target temperature, not the actual temperature inside the appliance.
- The actual temperature inside the appliance depends on the following factors: room temperature, the amount of food, how often the doors are opened, and where the appliance is placed. Set the temperatures considering these factors.
- The control panel automatically turns off for energy saving.
- When the appliance is in energy saving mode, the display remains off until a door is opened or a button is pressed. Once on, the display stays on for 20 seconds.
- If your finger or skin touches the control panel while cleaning it, the button function may operate.
- This appliance incorporates an earth connection for functional purposes only.
InstaView
This feature is only available on some models.
Using the InstaView Door in Door
The InstaView Door in Door lets you see if you're running low on frequently used items like
beverages and snacks, without opening the fridge door.

1. Knock twice on the glass to turn the LED light inside the Door in Door on or off.
2. The LED light turns off automatically after ten seconds.
CAUTION
- Do not open the appliance door while the Door-in-Door is open, and do not open the Door-in-Door while the appliance door is open. The Door-in-Door may be struck by the edge of the appliance and damaged.
NOTE
- The InstaView Door-in-Door function is disabled for 2 seconds after closing the left or right freezer door, and is momentarily disabled while the ice dispenser is in use.
- Knock near the center of the glass. Knocking near the edges of the glass may not activate the InstaView Door-in-Door function.
- Knock hard enough so that the knocking sound is audible.
- The InstaView Door-in-Door function may activate if a loud noise occurs near the refrigerator.
- Clean the glass door with a dry cloth. To remove stubborn stains, slightly moisten a clean cloth with lukewarm water or a glass cleaner. Do not spray glass cleaner directly onto the glass door.
Door-in-Door
This feature is only available on some models.
Using the Door-in-Door
Pull the lever at the bottom of the door upwards until the Door-in-Door opens.
There is plenty of storage space inside the Door-in-Door and its surrounding baskets, allowing you to store food in an organized manner.

CAUTION
- Do not open the appliance door while the Door-in-Door is open, and do not open the Door-in-Door while the appliance door is open. The Door-in-Door may be struck by the edge of the appliance and damaged.
Drawer
CAUTION
• Always empty the drawers before removing them, and use both hands when removing and refitting them. • Make sure that the fridge doors are fully open before removing and refitting the drawers.
Using the Vegetable Drawer
This feature is only available on some models. The humidity in the vegetable crisper drawer can be controlled by sliding the lever in either direction.
- If moved to the left side, the air guide will be open and allow air to circulate through the drawer for reduced humidity.
- If moved to the right side, the air guide will be closed and will maintain any humidity that is currently in the crisper drawer.
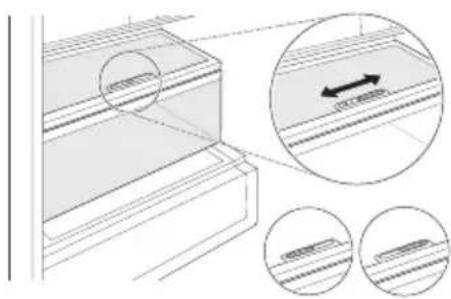
Removing/Refitting Drawers
1 Remove the contents of the drawer. Hold the handle of the vegetable drawers and gently pull them out. 2 Lift the vegetable drawer up and remove it by pulling it out.

3 Refit the drawer in the reverse order of the removal process.
CAUTION
• Always empty the drawers before removing them, and use both hands when removing and refitting them. • Make sure that the fridge doors are fully open before removing and assembling the drawers.
Shelf
CAUTION
• Glass shelves are heavy. Use special care when removing them. - Do not clean glass shelves with warm water while they are cold. Shelves may break if exposed to sudden temperature changes or impact.
Removing/Refitting the Shelf
1. Tilt up the front of the shelf and then lift the shelf straight up. 2. Pull the shelf out.

3. Mount them in the reverse order of the removal process.
CAUTION
• Glass shelves are heavy. Use special care when removing them. - Do not clean glass shelves with warm water while they are cold. Shelves may break if exposed to sudden temperature changes or impact. • Make sure that shelves are level from one side to the other. Failure to do so may result in the shelf falling or food spilling.
Icemaker
Before Using the Icemaker

WARNING
- Fill with potable water only into icemaker or dispenser water tank.
NOTE
- The icemaker produces ice normally once approximately 48 hours have passed after the appliance is initially installed.
- If half-frozen ice is put into the ice storage bin, it will cause the exiting ice cubes to lump together. It takes about 4 hours at -20 °C for ice production.
- If the freezer door is frequently opened, warm air enters the freezer compartment. It may take a longer time to freeze ice.
- Be careful not to twist the ice maker with force since it can break.
- Do not freeze the ice in the ice storage bin. This could break it and cause appliance damage or injury.
Using the Icemaker
*1 This feature is only available on some models.
Icemaker Type A*1
1 Hold the handle of the ice tray and pull it out.

2 Fill the ice tray with potable water up to the water line.
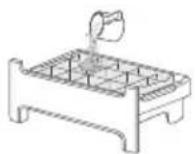
3 Place the ice tray back into its position carefully.

4 Rotate the icemaker handle clockwise.

5 Lift and remove the ice storage bin slightly.

Icemaker Type B*1
1 Fill the ice tray with potable water and place it in the freezer compartment.

2 After the water is frozen, hold the ice tray at its ends and twist gently.
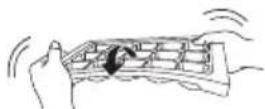
NOTE
- You can remove the icemaker or ice storage bin to create more space inside the freezer if you do not use it.
Door Basket
Removing/Refitting the Door Basket
1 Hold both edges of the basket and remove it by lifting it upward.

2 Refit the door baskets in the reverse order of the removal process.
MAINTENANCE
Cleaning
General Cleaning Tips
- Performing manual defrosting, maintenance or cleaning of the appliance while food is stored in the freezer can raise the temperature of the food and reduce its storage life.
- Regularly clean any surfaces that can come in contact with food.
- When cleaning the inside or outside of the appliance, do not wipe it with a rough brush, toothpaste, or flammable materials. Do not use cleaning agents containing flammable substances. This may cause discolouration or damage to the appliance.
- Flammable substances: alcohol (ethanol, methanol, isopropyl alcohol, isobutyl alcohol, etc.), thinner, bleach, benzene, flammable liquid, abrasive, etc.
- After cleaning, check if the power cable is damaged.
Cleaning the Exterior
- When cleaning the outside air vents of the appliance by means of vacuuming, then the power cord should be unplugged from the outlet to avoid any static discharge that can damage the electronics or cause an electric shock. Regular cleaning of the rear and side ventilation covers is recommended to maintain reliable and economical operation of the unit.
- Keep the air vents on the exterior of the appliance clean. Blocked air vents can cause fire or appliance damage.
- For the appliance exterior, use a clean sponge or soft cloth and a mild detergent in warm water. Do not use abrasive or harsh cleaners. Dry thoroughly with a soft cloth. Do not use contaminated cloths when cleaning the stainless steel doors. Always use a dedicated cloth and wipe in the same direction as the grain. This helps reduce surface staining and tarnishing.
Cleaning the Interior
- When removing a shelf or drawer from inside the appliance, remove all stored foods from the shelf or drawer to prevent injury or damage to the appliance. Otherwise, injury may occur due to the weight of stored foods.
- Detach the shelves and drawers and clean them with water, and then dry them sufficiently, before replacing them.
- Regularly wipe the door gaskets with a wet soft towel.
- Door basket spills and stains should be cleaned as they can compromise storage ability of the basket and could even be damaged.
- Never clean the shelves or containers in the dishwasher. The parts may become deformed due to the heat.
- The automatic defrosting system in the appliance ensures that the compartment remains free of ice buildup under normal operating conditions. Users do not need to defrost it manually.
Cleaning the Condenser Cover
Use a vacuum cleaner with a brush to clean the condenser cover and vents. Do not remove the panel covering the condenser coil area.
We recommend that this be done every 12 months to maintain operating efficiency.

TROUBLESHOOTING
Before Calling for Service
Cooling
| Symptoms Possible Cause & Solution | |
| There is no refrigeration or freezing. | Is there a power interruption?Check the power of other appliances. |
| Check the power of other appliances.Plug the power plug in the outlet properly. | |
| A fuse in your home may be blown or the circuit breaker tripped. Or the appliance is connected to a GFCI (Ground Fault Circuit Interrupter) outlet, and the outlet's circuit breaker has tripped.Check the main electrical box and replace the fuse or reset the circuit breaker. Do not increase fuse capacity. If the problem is a circuit overload, have it corrected by a qualified electrician.Reset the circuit breaker on the GFCI. If the problem persists, contact an electrician. | |
| There is poor refrigeration or freezing. | Is the fridge or freezer temperature set to its warmest setting?Set the fridge or freezer temperature to a colder setting. |
| Is the appliance in direct sunlight, or is it near a heat generating object such as cooking oven or heater?Check the installation area and reinstall it away from heat generating objects. | |
| Did you store hot food without cooling it first?Cool the hot food first before putting it in the fridge or freezer compartment. | |
| Did you put in too much food?Maintain an appropriate space between food. | |
| Are the appliance doors completely closed?Completely close the door and make sure that stored food is not obstructing in the door. | |
| Is there enough space around the appliance?Adjust the installation position to make enough space around the appliance. | |
| The appliance contains a bad smell. | Is the fridge or freezer temperature set to 'Warm'?Set the fridge or freezer temperature to a colder setting. |
| The appliance contains a bad smell. | Did you put in food with a strong smell?• Store foods with strong smells in sealed containers. |
| Vegetables or fruit may have spoiled in the drawer.• Throw away rotten vegetables and clean the vegetable drawer. Do not store vegetables too long in the vegetable drawer. | |
Condensation & Frost
| Symptoms Possible Cause & Solution | |
| There is condensation inside the appliance or on the bottom of the vegetable drawer cover. | Did you store hot food without cooling it first?Cool the hot food first before putting it inside the fridge or freezer. |
| Did you leave the appliance door open?Although the condensation will disappear soon after you close the appliance door, you can wipe it with a dry cloth. | |
| Do you open and close the appliance door too frequently?Condensation can form due to the temperature difference from the outside. Wipe out the dampness with a dry cloth. | |
| Did you put warm or moist food inside without sealing it in a container?Store food in a covered or sealed container. | |
| Frost has formed in the freezer compartment. | Doors may not be closed properly.Check if the food item inside the appliance is blocking the door and make sure that the door is tightly closed. |
| Did you store hot food without cooling it first?Cool the hot food first before putting it in the fridge or freezer compartment. | |
| Is the air entry or exit of the freezer compartment blocked?Make sure that air entry or exit is not blocked so that the air can circulate inside. | |
| Is the freezer compartment overfilled?Maintain an appropriate space between items. | |
| Frost or condensation has formed inside or outside the appliance. | Did you open and close the appliance door frequently or is the appliance door improperly closed?Frosts or condensation can form if the outside air penetrates inside the appliance. |
| Symptoms Possible | Cause & Solution |
| Frost or condensation has formed inside or outside the appliance. | Is the installation environment humid?Condensation can appear on the exterior of the appliance if the installation area is too humid or on a humid day such as a rainy day. Wipe off any moisture with a dry cloth. |
| The side or front of the appliance is warm. | There are anti condensation pipes fitted to these areas of the appliance to reduce condensation forming from around the door area.The heat releasing pipe to prevent condensation is installed on the front and side of the appliance. You may feel it particularly hot right after the appliance is installed or during the summer. You can be assured that this is not a problem and is quite normal. |
| There is water inside or outside of the appliance. | Is there water leakage around the appliance?Check if the water has leaked from a sink or another place. |
| Is there water on the bottom of the appliance?Check if the water is from the thawed frozen food or a broken or dropped container. | |
Parts & Features
| Symptoms Possible | Cause & Solution |
| The appliance door is not closed tightly. | Is the appliance leaning forward?Adjust the front feet to raise the front side slightly. |
| Were the shelves properly assembled?Refit the shelves if needed. | |
| Did you close the door with excessive force?If you apply too much force or speed when closing the door, it may remain briefly open before closing. Make sure that you do not slam the door closed. Close the door gently. | |
| It is difficult to open the appliance door. | Did you open the door right after you closed it?If you try to open the appliance door within one minute after you closed it, you may have difficulties because of the pressure inside the appliance. Try to open the appliance door again in a few minutes so that the internal pressure stabilizes. |
| The inside lamp in the appliance does not turn on. | Lamp failureClose the door and re-open. If the lamp does not turn on, please contact the LG Electronics customer information centre. Do not attempt removal of the lamp. |
Noises
| Symptoms Possible Cause & Solution | ||
| The appliance is noisy and generates abnormal sounds. | Is the appliance installed on a weak floor or improperly levelled?• Install the appliance on a solid and flat area. | |
| Does the rear of the appliance touch the wall?• Adjust the installation position to allow enough clearance around the appliance. | ||
| Are objects scattered behind the appliance?• Remove the scattered objects from behind the appliance. | ||
| Is there an object on top of the appliance?• Remove the object on top of the appliance. | ||
| Clicking noises The defrost control will click when the automatic defrost cycle begins and ends. The thermostat control (or appliance control on some models) will also click when cycling on and off.• Normal Operation | ||
| Rattling noises Rattling | noises may come from the flow of appliance, the water line on the back of the unit (for plumbed models only), or items stored on top of or around the appliance.• Normal Operation | |
| Appliance is not resting evenly on the floor.• Floor is weak or uneven or levelling legs need to be adjusted. See the Door Alignment section. | ||
| Appliance with linear compressor was moved while operating.• Normal operation. If the compressor does not stop rattling after three minutes, turn the power to the appliance off and then on again. | ||
| Whooshing noises Evaporator fan motor is circulating air through the fridge and freezer compartments.• Normal Operation | ||
| Air is being forced over the condenser by the condenser fan.• Normal Operation | ||
| Gurgling noises Appliance flowing through the cooling system.• Normal Operation | ||
| Popping noises Contraction and expansion of the inside walls due to changes in temperature.• Normal Operation | ||
| Symptoms Possible | Cause & Solution | |
| Vibrating If the side or back | ack of the appliance is touching a cabinet or wall, some of the normal vibrations may make an audible sound.To eliminate the noise, make sure that the sides and back do not make any contact with any wall or cabinet. | |
APPENDIX
Information
Product Information
| Trademark LG Electronics | ||
| Model | GC-B157PGAV / GC-B157PMAV | |
| Refrigerator Category 7 (Fridge-freezer) | ||
| Rated voltage and frequency | 220 V ~ 50 Hz | |
| Energy efficiency class A+ | ||
| Annual energy consumption XYZ [kWh per year], based on the results of a standard test within 24 hours. Actual power consumption will vary depending on usage and location. | 433 | |
| Net volume of the refrigerator compartment, [l] 335 | ||
| Net volume of the freezer compartment, [l] |  | 174 |
 | - | |
| Temperature of other chambers (>14°C) - | ||
| Fridge without frost Fresh Food, Frozen Food | ||
| The temperature rise time [h] | 6 | |
| Freezing ability [kg / 24h] 11 | ||
| Climate class | SN,N,ST,T | |
| This appliance is intended to be used at ambient temperature between 10 °C and 43 °C. | ||
| Corrected sound power level, dBA 43 | ||
| Floor / Built-in Free standing | ||
- You can see the month and year of manufacture on the label inside the refrigerator.
- If the rated voltage is set to 220-240 V, the energy efficiency test is performed at 220 V.
Memo

LG
Life's Good
- NOTE
- WARNING
- ① FRIDGE
- ⚠️ WARNING
- REMOVING/REINSTALLING THE PANELS
- TROUBLESHOOTING
- TABLE OF CONTENTS
- SAFETY INSTRUCTIONS
- INSTALLATION
- OPERATION
- MAINTENANCE
- APPENDIX
- READ ALL INSTRUCTIONS BEFORE USE
- SAFETY MESSAGES
- CAUTION
- TECHNICAL SAFETY
- RISK OF FIRE AND FLAMMABLE MATERIALS
- DISPOSAL
- BEFORE INSTALLATION
- DIMENSIONS AND CLEARANCES
- AMBIENT TEMPERATURE
- REMOVING THE FRIDGE AND FREEZER DOOR
- REMOVING THE FREEZER DOOR
- REMOVE THE HINGE COVER ①
- DISCONNECT THE WIRE HARNESS ②. REMOVE THE GROUNDING SCREW ③. REMOVE THE THREE BOLTS ④ USING A SOCKET WRENCH AND LIFT OFF THE TOP HINGE. SET PARTS ASIDE
- LIFT THE FREEZER DOOR UNTIL IT IS FREE OF THE BOTTOM HINGE ASSEMBLY
- REMOVING THE FRIDGE DOOR
- REFITTING THE FRIDGE AND FREEZER DOOR
- LEVELLING AND DOOR ALIGNMENT
- BEFORE BEGINNING
- LEVELLING THE APPLIANCE
- DOOR ALIGNMENT FOR FREEZER AND FRIDGE DOOR
- TURNING ON THE POWER
- CONNECTING THE APPLIANCE
- MOVING THE APPLIANCE FOR RELOCATION
- PREPARING FOR RELOCATION
- BEFORE USE
- NOTES FOR OPERATION
- DOOR OPEN ALARM
- FAILURE DETECTION
- SUGGESTION FOR ENERGY SAVING
- STORING FOODS EFFECTIVELY
- MAXIMUM FREEZING CAPACITY
- FREEZING THE MAXIMUM AMOUNT OF FOOD
- PRODUCT FEATURES
- EXTERIOR
- INTERIOR
- ① LED LAMP
- ② TEMPERATURE SENSOR
- ③ FREEZER SHELF
- ④ ICEMAKER
- ⑤ FREEZER DRAWER
- ⑥ FREEZER DOOR BASKET
- ⑦ FRIDGE SHELF
- ⑧ BOTTLE RACK
- ⑨ SNACK DRAWER
- DOOR IN DOOR COMPARTMENT
- ⑪ FRIDGE DOOR BASKET
- FRIDGE DRAWER
- ⑬ EGG BOX
- BOTTOM DRAWER COVER
- AIR FILTER
- CONTROL PANEL
- CONTROL PANEL AND FUNCTIONS
- ② FREEZER
- ③ MODE
- LOCK
- INSTAVIEW
- USING THE INSTAVIEW DOOR IN DOOR
- DOOR-IN-DOOR
- USING THE DOOR-IN-DOOR
- DRAWER
- USING THE VEGETABLE DRAWER
- REMOVING/REFITTING DRAWERS
- SHELF
- REMOVING/REFITTING THE SHELF
- ICEMAKER
- BEFORE USING THE ICEMAKER
- USING THE ICEMAKER
- ICEMAKER TYPE A
- ICEMAKER TYPE B
- DOOR BASKET
- REMOVING/REFITTING THE DOOR BASKET
- CLEANING
- GENERAL CLEANING TIPS
- CLEANING THE EXTERIOR
- CLEANING THE INTERIOR
- CLEANING THE CONDENSER COVER
- BEFORE CALLING FOR SERVICE
- INFORMATION
- MEMO
- LG
Brand : LG
Model : GC-B157PMAV
Category : Refrigerator