MN-32QSB-B1-B - Monitor NZXT - Free user manual and instructions
Find the device manual for free MN-32QSB-B1-B NZXT in PDF.

User questions about MN-32QSB-B1-B NZXT
0 question about this device. Answer the ones you know or ask your own.
Ask a new question about this device
Download the instructions for your Monitor in PDF format for free! Find your manual MN-32QSB-B1-B - NZXT and take your electronic device back in hand. On this page are published all the documents necessary for the use of your device. MN-32QSB-B1-B by NZXT.
USER MANUAL MN-32QSB-B1-B NZXT
natural_image
Line drawing of a computer monitor with a stand and labeled 'NZXT' (no additional text or symbols)CANVAS 32Q CURVED
32" QHD (2560X1440) 165HZ CURVED GAMING MONITOR
TABLE OF CONTENTS
VERSION 1.1
-
PREFACE 02
-
MONITOR OSD (ON-SCREEN DISPLAY) 25
-
GETTING STARTED 05
-
CAM SOFTWARE SETUP .... 30
-
INSTALLATION 12
-
APPENDIX A-1
1. PREFACE
CANVAS 32Q CURVED

A. Copyright ^® NZXT, Inc. All Rights Reserved.
This manual including all illustrations and screen captures, is protected under international copyright laws, with all rights reserved. Neither this manual, nor any of the material contained herein, may be reproduced without written consent of the author.
B. Disclaimer
The information in this document is subject to change without notice. The manufacturer makes no representations or warranties with respect to the contents hereof and specifically disclaims any implied warranties of merchantability or fitness for any particular purpose. The manufacturer reserves the right to revise this publication and to make changes from time to time in the content hereof without obligation of the manufacturer to notify any person of such revision or changes.
C. Trademark Recognition
Product names used in this manual are the properties of their respective owners and are acknowledged.
D. Safety Precautions
Follow these safety precautions when setting up the monitor:
- Keep this User Manual with the package for future reference.
- Read the safety instructions carefully and thoroughly before using this product
- Setup the device on a reliable flat surface.
- To prevent fire or shock hazard, keep this device away from humidity and high temperature. Do not leave the device in an unconditioned environment with a storage temperature above 60°C or below -20°C, may cause damage to the device. Maximum operating temperature of the device is around 40°C.
- Make sure that the power voltage is within its safety range and has been adjusted properly to the value of 100-240V before connecting the device to the power outlet. Do not disable the protective earth pin from the plug. The device must be connected to an earthed mains socket-outlet. Do not place anything on the power cord and avoid the power cord from being stepped on.
1. PREFACE
CANVAS 32Q CURVED

- Always disconnect the power cord or switch the wall socket off if the device would be left unused for a certain time to achieve zero energy consumption.
- The ventilator on the device is used for air convection and to prevent the device from overheating. Do not cover the ventilator.
- When cleaning the device, be sure to remove the power plug. Use a piece of soft cloth rather than industrial chemicals to clean the device. Never pour any liquid into the opening; that could damage the device or cause electric shock.
• Always keep strong magnetic or electrical objects away from the device. - It is recommended to take a 10 minute break for every 30 minutes of screen time.
- It is not recommended for children under 2 years of age to have any screen time. For children 2 years and over, screen time should be limited to less than one hour per day.
- Refer servicing to qualified personnel only. If any of the following situations arises, get the device checked by service personnel:
• The power cord or plug is damaged.
• Liquid has penetrated into the device.
• The device has been exposed to moisture. - The device does not work well or you can not get it to work according to the user's manual.
• The device has dropped and damaged.
• The device has obvious signs of breakage.
E. Safety Instructions
Read through the following Safety Precautions before using the monitor:
- Make sure that the power voltage is within its safety range and has been adjusted properly to the value of 100\~240V before connecting the device to the power outlet. Do not disable the protective earth pin from the plug. The device must be connected to an earthed mains socket-outlet.
- Only use the accessories that are provided with the monitor or recommended by the manufacturer.
• Always keep strong magnetic or electrical objects away from the device. - Keep the plastic packaging bag for the product in a place that cannot be reached by children.
- Do not touch the plug with wet hands, it may cause electric shock.
- Place the monitor in a stable and well-ventilated place.
1. PREFACE
CANVAS 32Q CURVED

- Do not place the monitor near any heat sources such as electric radiators or direct sunlight.
- The holes or openings on the monitor are for ventilation. Do not cover or block the ventilation holes with any objects.
- Do not use the monitor near water, drinks, or all types of liquids. Failure to do so may result in electric shock or damage to the monitor.
- Make sure to unplug the monitor from the power outlet before cleaning or removal.
- The screen surface is easy to be scratched, avoid touching the surface with any hard or sharp object.
- Use a soft lint-free cloth instead of a tissue to clean the screen. You may use a glass cleaner to clean the monitor if required. However, never spray the cleaner directly onto the screen.
- Always disconnect the power cord or switch the wall socket off if the device would be left unused for a certain time to achieve zero energy consumption.
- Do not attempt to disassemble or repair the monitor yourself.
F. Stability Hazard Instructions
The product may fall, causing serious personal injury or death. To prevent injury, this product must be securely attached to the floor/wall in accordance with the installation instructions.
- Please use stands or installation methods recommended by the manufacturer of the product set.
- Lay this device on a reliable flat surface before setting it up.
- To prevent the monitor from tipping over, secure the monitor to a desk, wall or fixed object with an anti-tip fastener that helps to properly support the monitor and keep it safe in place.
- Please route cords and cables connected to your product so they cannot be tripped over, pulled or grabbed.
2. GETTING STARTED
CANVAS 32Q CURVED

2.1 Getting Started....06 2.2 Monitor Overview ....09
2.2 Package Contents....07 2.3 Monitor Rear I/O Ports....11
2.1 GETTING STARTED
CANVAS 32Q CURVED

Caution - It is recommended to wear a grounding strap attached to a grounded device to avoid damage from static electricity.

NOTE
Do not use any sharp objects on the monitor.
2.2 PACKAGE CONTENTS-MONITOR PANEL
CANVAS 32Q CURVED

A. Monitor Panel
x1

natural_image
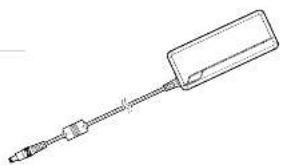
Simple line drawing of a rectangular frame with no text, numbers, or symbolsB. Power Cable
x1

C. Power Adapter
x1
natural_image
Line drawing of a mechanical tool or connector with a rectangular body and multiple pins (no text or symbols)D. HDMI Cable
x1
E. DisplayPort Cable
×1
F. USB C / DP Alt
x1
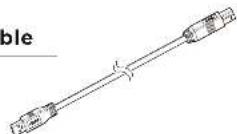
G. USB Type B to USB Type A Cable
x1

natural_image
Two identical line drawings of a USB cable with connectors (no text or symbols)
2.2 PACKAGE CONTENTS-MONITOR STAND
CANVAS 32Q CURVED

H. Stand
×1

J. Cable Management Clip
x1

I. Stand Base
×1

2.3 MONITOR OVERVIEW
CANVAS 32Q CURVED

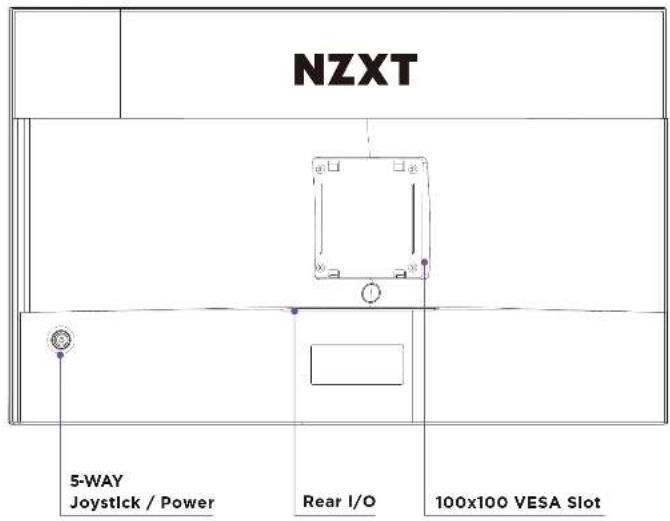
A MONITOR PANEL
text_image
NZXT 5-WAY Joystick / Power Rear I/O 100x100 VESA Slot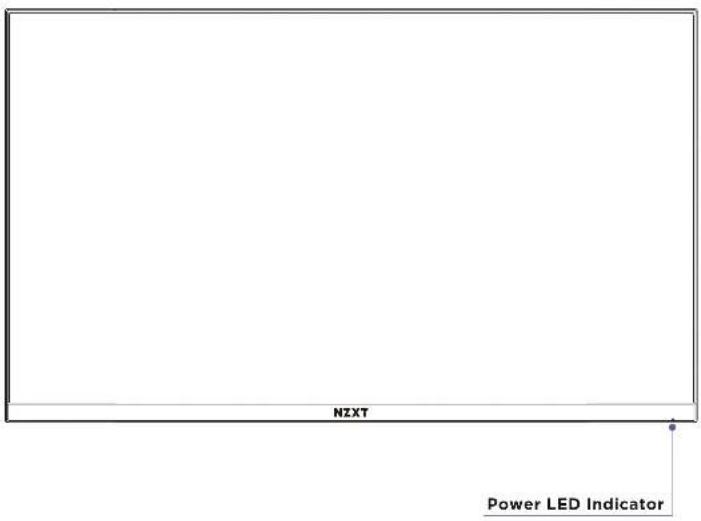
text_image
HZXT Power LED Indicator2.3 MONITOR OVERVIEW
CANVAS 32Q CURVED

B MONITOR STAND

text_image
Cable Management Points Cable Management Slot2.4 MONITOR REAR I/O PORTS
CANVAS 32Q CURVED

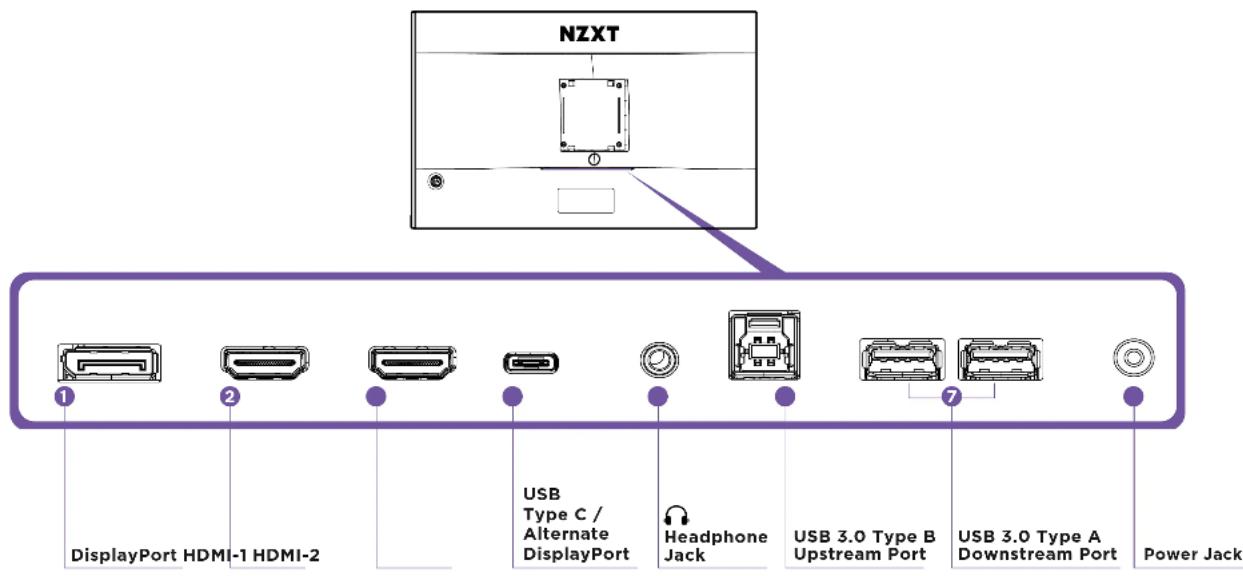
text_image
NZXT 1 2 DisplayPort HDMI-1 HDMI-2 USB Type C / Alternate DisplayPort Headphone Jack 7 USB 3.0 Type B Upstream Port USB 3.0 Type A Downstream Port Power Jack3. INSTALLATION
CANVAS 32Q CURVED

3.1 Monitor Stand Installation....13
3.4 Cable Clip Installation 23
3.2 Adjusting the Monitor Orientation....17
3.5 Monitor Stand Quick Release 24
3.3 Connecting the Monitor to PC....18
3.1 MONITOR STAND INSTALLATION
CANVAS 32Q CURVED


NOTE
* Place the monitor on a soft, protected surface to avoid scratching the display panel.
* The holes for installing the stand can also be used for 100x100 VESA compatible mounts.
STEP 1
Carefully hold the base and Insert base to the neck with the guiding structure.
STEP 2
Tighten the attached thumb screw to secure the base.

text_image
Technical diagram showing assembly of a mechanical component with labeled parts and a magnified inset detail view.3.1 MONITOR STAND INSTALLATION
CANVAS 32Q CURVED

STEP 3
Align and fit the top of the stand to the slot in the rear of the monitor.
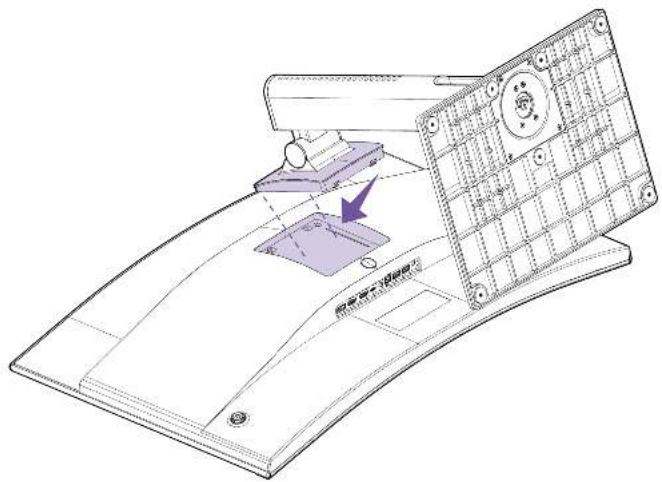
text_image
Technical diagram of a mechanical device with labeled components and a purple arrow indicating a specific part.3.1 MONITOR STAND INSTALLATION
CANVAS 32Q CURVED

STEP 4
Push down to latch the quick-release mount and lock stand into place. You should hear a clicking sound once it is locked in place.
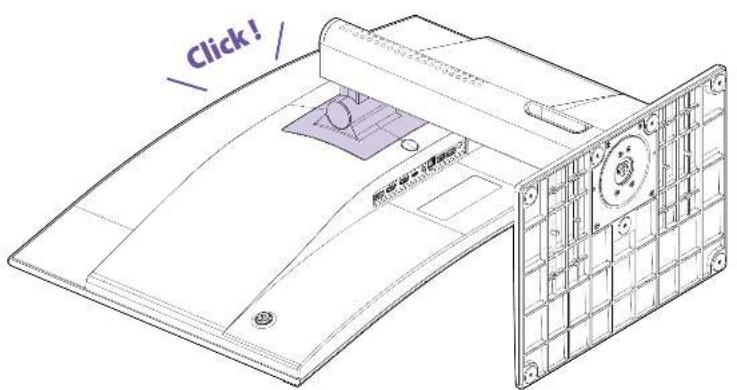
text_image
Click !3.1 MONITOR STAND INSTALLATION
CANVAS 32Q CURVED

STEP 5
Carefully lift up the monitor with two hands. Do not use one hand to hold the unit.

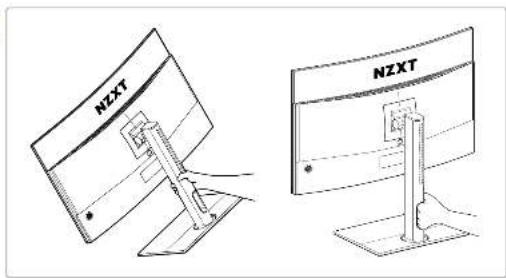
text_image
NZXT NZXT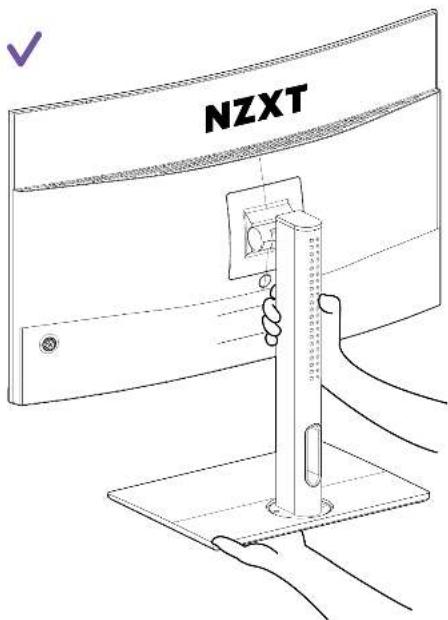
text_image
NZXT3.2 ADJUSTING THE MONITOR ORIENTATION
CANVAS 32Q CURVED

To maximize viewing comfort, this monitor includes tilt, swivel, height, and pivot adjustments.
HEIGHT
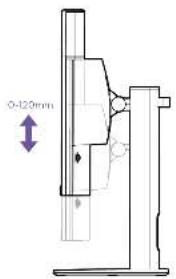
text_image
0-120mm- Caution - To avoid injury during height adjustment, be careful when placing your hand behind the panel or around the stand.
- Caution - Take extra care to ensure your hand does not get stuck in the height adjustment area. This could injure your hand.

TILT

natural_image
Simple line drawing of a mechanical device with a lever and angle annotation (no text or symbols)SWIVEL

natural_image
Diagram showing two views of a curved structural component with internal details, no text or symbols present.3.3 CONNECTING THE MONITOR TO PC
CANVAS 32Q CURVED

STEP 1
Make sure your PC is powered off.
STEP 2
Connect the included HDMI/DisplayPort cable from the monitor to your computer.
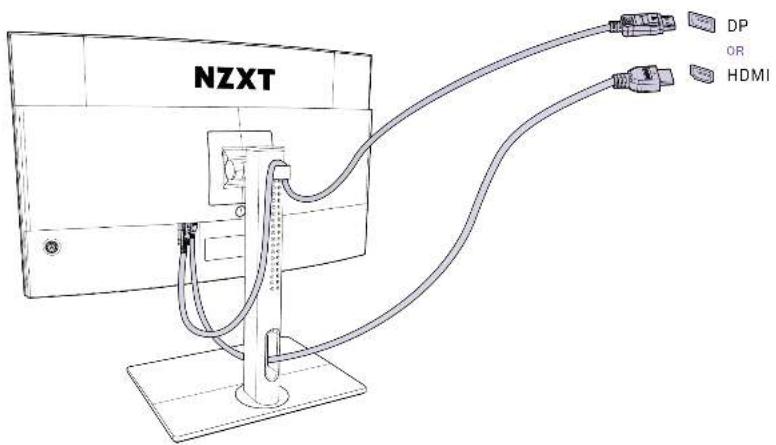
text_image
NZXT DP OR HDMI3.3 CONNECTING THE MONITOR TO PC
CANVAS 32Q CURVED

STEP 3
Connect the monitor power adapter to the power cord.
STEP 4
Connect the power adapter to the monitor power jack.
STEP 5
Plug the power cord into an electrical outlet.
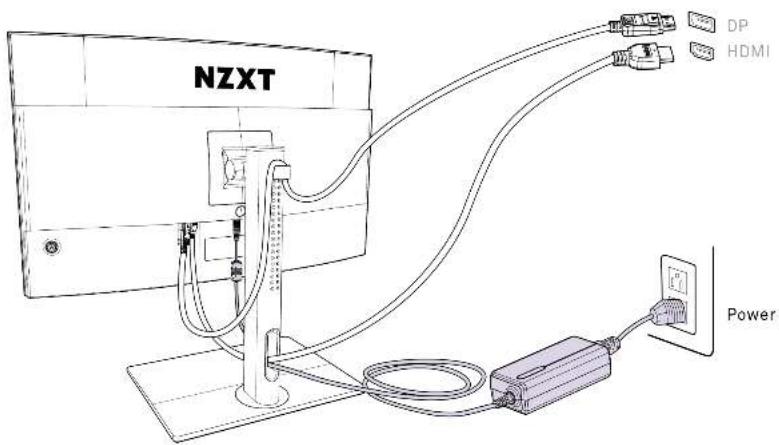
text_image
NZXT DP HDMI Power3.3 CONNECTING THE MONITOR TO PC
CANVAS 32Q CURVED

STEP 6
For CAM software connection, use the included USB Type A to B converter cable, connect the Type B connector to the monitor I/O and Type A to your PC.
Download and install NZXT CAM from nzxt.com/camapp
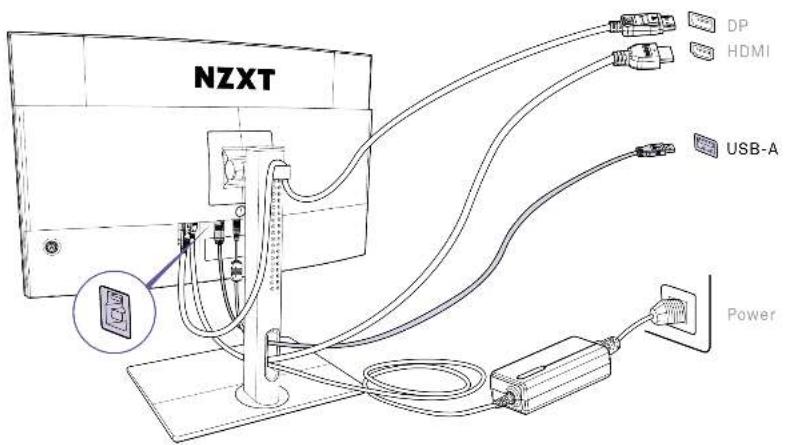
text_image
NZXT DP HDMI USB-A Power3.3 CONNECTING THE MONITOR TO PC
CANVAS 32Q CURVED

STEP 7
For cable management, use included cable clip and/or cable slot to route cables behind the monitor and desk.

text_image
NZXT DP HDMI Type-C USB-A Power3.3 CONNECTING THE MONITOR TO PC
CANVAS 32Q CURVED

STEP 8
Turn on the monitor.
STEP 9
Power on the computer and monitor will automatically detect signal source(s).

text_image
NZXT DP HDMI Type-C USB-A Power3.4 CABLE CLIP INSTALLATION
CANVAS 32Q CURVED

Inserting cable clip into neck back side.

text_image
Cable Management Clip3.5 MONITOR STAND QUICK RELEASE
CANVAS 32Q CURVED

Press down the quick-release button and tilt back the monitor panel.

text_image
n and tilt back Quick-Release Button
natural_image
Line drawing of a curved monitor mounted on a stand with a purple arrow indicating the left side (no text or symbols present)4. MONITOR OSD (ON-SCREEN DISPLAY) SETUP
CANVAS 32Q CURVED

4.1 5-Way Joystick Control Instructions....26
4.2 OSD Menu Introduction....27
4.1 5-WAY JOYSTICK CONTROL INSTRUCTIONS
CANVAS 32Q CURVED

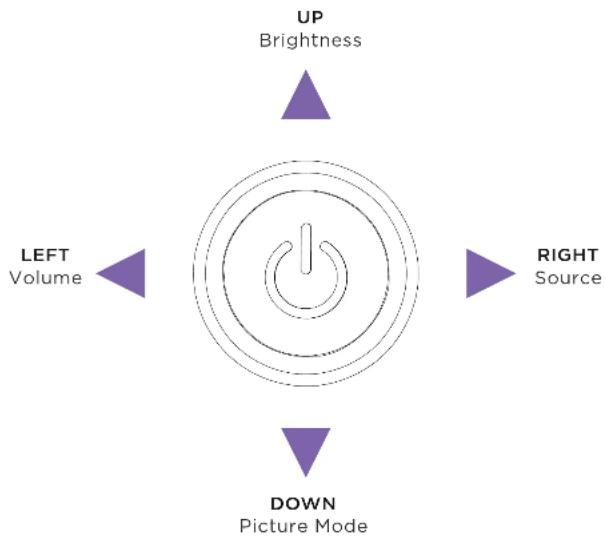
The monitor comes with a 5-way joystick for power and multi-directional control that navigates the monitor OSD (On-Screen Display) Menu.
POWER ON/OFF - Hold for 3s
SELECT - Press down
QUICK ACCESS
RIGHT - Source
LEFT - Volume
UP - Brightness
DOWN - Picture Mode
flowchart
graph TD
    A["UP Brightness"] --> B["Power Pin"]
    C["LEFT Volume"] --> B
    D["RIGHT Source"] --> B
    E["DOWN Picture Mode"] --> B
4.2 OSD MENU INTRODUCTION
CANVAS 32Q CURVED

PICTURE
| 1st Level Menu 2nd Level Menu 3rd Level Menu Description | |||
| Picture | Picture Mode | Standard | |
| FPS | |||
| RTS | |||
| RPG | |||
| Racing | |||
| Cinema | |||
| Professional | |||
| Night | |||
| HDR | |||
| Brightness 0-100% | Brightness can be adjusted in any Mode | ||
| Contrast 0-100% | Contrast can be adjusted in any Mode | ||
| Sharpness 0-100% | - Sharpness can be adjusted in any Mode- This improves clarity and details of images | ||
| Color Temperature | Cool / Normal / Warm | ||
| Customization | R(0-100)G(0-100)B(0-100) | ||
| Gamma Off / 2.0 / 2.2 / 2.4 | |||
| Saturation 0-10 | |||
| Response Time Normal / Fast / Fastest | |||
| Refresh Rate Off / Upper Right / Upper Left | |||
| MPRT On / Off | |||
| Low Blue Light 0-10 | - Low Blue Light protects your eyes against monitor blue light. When enabled, the screen color temperature is adjusted to a more yellow light.- Adjust Low Blue Light in any Mode.- When Reader Mode is On, Low Blue Light will be automatically turned ON. | ||
| Black Equalizer | 0-10 | ||
| Aspect Ratio | Auto / 4:3 / 16:9 | ||
4.2 OSD MENU INTRODUCTION
CANVAS 32Q CURVED

OSD SETTINGS
| 1st Level Menu | 2nd Level Menu | 3rd Level Menu | Description |
| OSD Settings | Language | Chinese (Traditional) / English / French / German / Italian / Spanish / Korean / Japanese / Russian / Portuguese | - Default Language is English.- Users can use the Up or Down button to switch to different languages. Center Button to apply new selection.- Language is an independent setting. Users' own language setting will override factory default. When the user sets Reset to Yes, Language will not be changed. |
| OSD Transparency | 0% / 20% / 40% / 60% / 80% | Adjust OSD Transparency in any Mode | |
| OSD TimeOut | 10-60 sec | Adjust OSD TimeOut in any Mode |
SYSTEM SETTINGS
| 1st Level Menu 2nd Level Menu 3rd Level Menu Description | |||
| System Settings | Free Sync On / Off | - Default is OFF. FreeSync is a united switch; if HDMI is set to OFF, each input source will also be set to OFF.- Only DisplayPort can enable G-Sync compatibility for NVIDIA graphics cards. | |
| LED On / Off | Default is ON. Controls LED indicator light on or off | ||
| Source Detection Auto / Manual | Automatically or manually switching between input sources. | ||
| Mute On / Off Default is OFF. Controls 3.5mm audio jack on/off | |||
| Volume 0-100 Default is 50. Controls 3.5mm audio jack volume | |||
| Reset All On / Off Reset or restore settings to original OSD Default in any Mode. | |||
4.2 OSD MENU INTRODUCTION
CANVAS 32Q CURVED

INPUT SOURCE
| 1st Level Menu 2nd Level Menu 3rd Level Menu Description | |
| Input Source | HDMI 1 |
| HDMI 2 | |
| DisplayPort | |
| Type C | |
MONITOR INFORMATION
- Source 2. Resolution 3. Refresh Rate 4. FreeSync Premium 5. HDR 6. FW Version
5. CAM SOFTWARE SETUP
CANVAS 32Q CURVED

5.1 Download CAM 31
5.2 CAM Introduction 32
NZXT CAM
Download and install NZXT CAM from nzxt.com/camapp.
Descargue e instale NZXT CAM en nzxt.com/camapp.
NZXT CAM allows users to turn their PC gaming setup into a synchronous and fully immersive ecosystem. This cohesive and intuitive software is built for PC monitoring, customization, and performance tweaking. With NZXT CAM, users can adjust Canvas monitor settings directly, using custom profiles that can sync to certain games or time of day.
6. APPENDIX
CANVAS 32Q CURVED

6.1 SPECIFICATIONS......A-2
6.2 Troubleshooting (FAQ)....A-3
6.3 Supported Timing List....A-4
6.4 NZXT Global Warranty Policy....A-5
6.5 Support and Service....A-11
6.6 Regulatory Notices......A-14
6.7 Battery Information.....A-15
6.8 WEEE Statement A-16
6.9 Revision History....A-20
6.1 SPECIFICATIONS
CANVAS 32Q CURVED

| MODEL NZXT CANVAS 32Q GAMING MONITOR | |
| PANEL SIZE 31.5" | |
| ASPECT RATIO 16:9 | |
| FLAT / CURVED CURVED R1500 | |
| MAX. RESOLUTION QHD 2560 x 1440 | |
| LCM BRIGHTNESS (TYP.) 300 CD/M 2 | |
| BEZEL TYPE BORDERLESS | |
| ACTIVE DISPLAY AREA (H*V) | 697.344(H)x 392.256(V) |
| COLOR GAMUT | DCI-P3 89%, RGB 99% |
| VIEW ANGLE (H/V) | 178° / 178° (TYP.) |
| DISPLAY COLORS | 16.7M |
| RESPONSE TIME | 1MS (GTG) |
| ADAPTIVE SYNC. | AMD FREESYNC PREMIUM |
| PANEL REFRESH RATE | 16.5HZ |
| HDR | HDR 10 |
| VIDEO INPUT | 2 x HDMI 2.01 x DP 1.2 |
| USB PORTS | 2 x USB 3.0 TYPE A1 x USB 3.0 TYPE B1 x USB TYPE C (DISPLAYPORT ALT) |
| HEADPHONE OUT | 3.5MM x 1 |
| POWER TYPE | EXTERNAL ADAPTER |
| ADAPTER POWER INPUT | 100-240VAC, 50-60HZ,1.5A MAX |
| ADAPTER POWER OUTPUT | 19V --- 4.74 A |
| CHASSIS COLORS | BLACK / WHITE |
| POWER SAVING MODE | 0.5W |
| POWER OFF MODE | 0.3W |
| VESA COMPATIBILITY | 100 x 100 mmSCREW TYPE: M4 x 15 mm |
| TILT ADJUSTMENT | -5°-20° |
| SWIVEL ADJUSTMENT | 20°--20° |
| HEIGHT ADJUSTMENT | 0-120mm |
| DIMENSION WITH STAND (WXHXD) | 710.5mm x 605.7mm x 262mm |
| DIMENSION WITHOUT STAND (WXHXD) | 710.5mm x 423.3mm x 112.5mm |
| BOX DIMENSION (WXHXD) | 840mm x 560mm x 215mm |
| NET WEIGHT (PANEL ONLY) | 5.35kg |
| NET WEIGHT (STAND ONLY) | 3.2kg |
| VOLTAGE RATING | 19VDC 4.74A |
| OPERATION TEMPERATURE | OPERATING:TEMPERATURE: 0°C TO 40°CHUMIDITY: 20% TO 90%, NON-CONDENSINGALTITUDE: 0 - 5000M |
| STORAGETEMPERATURE: -20°C TO 60°CHUMIDITY: 10% TO 90%, NON-CONDENSING |
6.2 TROUBLESHOOTING (FAQ)
CANVAS 32Q CURVED

| Problem Possible Solution | |
| Power LED is not ON | - Check if the adapter or power cord is correctly and firmly connected or out.- If the screen is working without power LED on, check MENU > Other Setting > LED, make sure it is turned to ON. |
| The power LED light is on but there is no screen image | - Check if the operating system had entered sleep or power save mode. Press the joystick or move the mouse to wake it up.- Check if the signal cable (HDMI/DisplayPort/Type-C) is well connected, and confirm another end of the output cable has been firmly connected to the computer input port (graphics card). Unplug and plug 2-terminals again to ensure all pins aren't bent.- Replace signal cable (HDMI/DisplayPort/Type-C) to take a cross-test- Check MENU > Input Source, and switch to the correct source.- Connect monitor to the other computers (PC/Notebook) to confirm whether it is normal- Reset the monitor, MENU > Other Setting > Reset All. |
| Screen image is too light or dark | - Check and set MENU > Image > Brightness, the larger value means lighter. |
| Screen image bounces or a wave pattern is present in the image | - Check and set MENU > Image > Sharpness.- Check MENU > Image > Response time and switch Normal/Fast/Fastest mode.- Check MENU > Image > MPRT and switch OFF/ON.- Check MENU > Other Setting > FreeSync Premium and switch OFF/ON and check if the abnormal display disappeared. |
| Screen image has color defects (white does not look white) | - Check MENU > Image > Color Temperature and switch Cool/Normal/Warm.- Check and set Color Temperature > Customization > R/G/B.- If it still does not look "white" enough, reset the monitor, MENU > Other Setting > Reset All, and try the above actions again. |
| Setting and changing display refresh rate | - Default display refresh rate setting is 60Hz- To change display refresh rate settings:Right click on Windows desktopSelect "Display Settings" from the drop downScroll down and select "Advanced Display Settings"Select the display to view or change the settings for itSelect Refresh Rate setting• Note - To use display in portrait mode, follow above steps to change display refresh rate settings prior to changing display orientation to portrait mode. You will not be able to change the refresh rate settings while in portrait mode. |
6.3 SUPPORTED TIMING LIST
CANVAS 32Q CURVED

| Standard Resolution HDMI 1 HDMI 2 DisplayPort Type C | |||||
| VGA | 640x480@60Hz | ☑ | ☑ | ☑ | ☑ |
| 640x480@67Hz | ☑ | ☑ | ☑ | ☑ | |
| 640x480@72Hz | ☑ | ☑ | ☑ | ☑ | |
| 640x480@75Hz | ☑ | ☑ | ☑ | ☑ | |
| Dos-Mode | 720x480@60Hz | ☑ | ☑ | ☑ | ☑ |
| 720x576@50Hz | ☑ | ☑ | ☑ | ☑ | |
| SVGA | 800x600@56Hz | ☑ | ☑ | ☑ | ☑ |
| 800x600@60Hz | ☑ | ☑ | ☑ | ☑ | |
| 800x600@72Hz | ☑ | ☑ | ☑ | ☑ | |
| 800x600@75Hz | ☑ | ☑ | ☑ | ☑ | |
| XGA | 1024x768@60Hz | ☑ | ☑ | ☑ | ☑ |
| 1024x768@70Hz | ☑ | ☑ | ☑ | ☑ | |
| 1024x768@75Hz | ☑ | ☑ | ☑ | ☑ | |
| SXGA | 1280x768@60Hz | ☑ | ☑ | ☑ | ☑ |
| 1280x768@75Hz | ☑ | ☑ | ☑ | ☑ | |
| WXGA+ 1440x900@60Hz | ☑ | ☑ | ☑ | ☑ | |
| WSXGA+ 1680x1050@60Hz | ☑ | ☑ | ☑ | ☑ | |
| Full HD | 1920x1080@60Hz | ☑ | ☑ | ☑ | ☑ |
| 1920x1080@85Hz | ☐ | ☐ | ☐ | ☐ | |
| 1920x1080@120Hz | ☐ | ☐ | ☐ | ☐ | |
| Standard Resolution HDMI 1 HDMI 2 DisplayPort Type C | |||||
| Full HD | 1920x1080@144Hz | ☐ | ☐ | ☐ | ☐ |
| 1920x1080@165Hz | ☑ | ☑ | ☑ | ☑ | |
| QHD | 2560x1440@60Hz | ☑ | ☑ | ☑ | ☑ |
| 2560x1440@85Hz | ☐ | ☐ | ☐ | ☐ | |
| 2560x1440@120Hz | ☑ | ☑ | ☑ | ☑ | |
| 2560x1440@144Hz | ☑ | ☑ | ☐ | ☐ | |
| 2560x1440@165Hz | ☐ | ☐ | ☑ | ☑ | |
| Video Timing Resolution | 480P@60Hz | ☑ | ☑ | ☑ | ☑ |
| 576P@50Hz | ☑ | ☑ | ☑ | ☑ | |
| 720P@50Hz | ☑ | ☑ | ☑ | ☑ | |
| 720P@60Hz | ☑ | ☑ | ☑ | ☑ | |
| 720P@100Hz | ☑ | ☑ | ☑ | ☑ | |
| 720P@120Hz | ☑ | ☑ | ☑ | ☑ | |
| 1080i | ☐ | ☐ | ☐ | ☐ | |
| 1080P@50Hz | ☑ | ☑ | ☑ | ☑ | |
| 1080P@60Hz | ☑ | ☑ | ☑ | ☑ | |
| 1080P@100Hz | ☑ | ☑ | ☑ | ☑ | |
| 1080P@120Hz | ☑ | ☑ | ☑ | ☑ | |
| 2160P@30Hz | ☑ | ☑ | ☑ | ☑ | |
| 2160P@60Hz | ☑ | ☑ | ☑ | ☑ | |
6.4 NZXT GLOBAL WARRANTY POLICY
CANVAS 32Q CURVED

This NZXT Global Warranty Policy governs the sale of products by NZXT to you.
I. WARRANTY LENGTH
Any replacement product will be covered under warranty for the remainder of the warranty period or thirty days, whichever is longer. Proof of purchase is required for warranty service.
II. WHO IS PROTECTED
The Warranty covers only NZXT products purchased by the original consumer.
NEW NZXT PRODUCT WARRANTY LENGTH FOR PARTS
Computer Cases 2 Years
Temperature Meters 2 Years
Fans 2 Years
Lighting 2 Years
Accessories 2 Years
Kraken M Coolers
Headset/Headphone
Headset/Headphone Storage
Mixer
Motherboards
Gold Power Supply
Bronze Power Supply
Kraken X/Z Coolers
Mini ITX Case with PSU, AIO, and Riser Card
Monitors 3 Years
3-year warranty on case, riser card, and AIO. 10-year warranty on PSU.
REFURBISHED NZXT PRODUCT
All NZXT Certified Refurbished Products
WARRANTY LENGTH FOR PARTS
1 Years
III. WHAT IS AND IS NOT COVERED
Please note that our warranty is not an unconditional guarantee. If the product, in NZXT's reasonable opinion, malfunctions within the warranty period, NZXT will provide you at its sole discretion with a repaired or replacement product, either new or refurbished, with a similar function that is equal or greater in value depending on supply.
Our warranty does not cover the following:
- any product or serial number/warranty sticker modification applied without permission from NZXT;
- any damage that is not a manufacturing defect;
- damage, deterioration or malfunction resulting from: accident, abuse, misuse, neglect, fire, water, lightning, or other acts of nature, unauthorized product modification or failure to follow instructions included with the product;
- improper installation, unauthorized alterations or modifications, or repair or attempted repair by anyone not authorized by NZXT;
- shipping or transport damage (claims must be made with the carrier);
• normal wear and tear.
NZXT does not warrant that this product will meet your requirements. It is your responsibility to determine the suitability of this product for your purpose. For NZXT Store orders, we cover two way return shipping for all exchanges and returns. For all other authorized dealers, NZXT Support does not cover return shipping and only covers one way shipping from NZXT back to the end user for exchanges. Two way expedited shipping is provided for all PSUs covered under the Less Than Three program, indiscriminate of purchase location, provided the location is an approved NZXT reseller.
IV. EXCLUSION OF DAMAGES (DISCLAIMER)
NZXT's sole obligation and liability under this warranty is limited to the repair or replacement of a defective product with either a new or refurbished product with a similar function that is equal or greater in value at our option. NZXT shall not, in any event, be liable for any incidental or consequential damage, including but not limited to damages resulting from interruption of service and loss of data, business, or for liability in tort relating to this product or resulting from its use or possession.
6.4 NZXT GLOBAL WARRANTY POLICY
CANVAS 32Q CURVED

V. LIMITATIONS OF IMPLIED WARRANTYEST
Here are no other warranties, expressed or implied, including but not limited to those of merchantability or fitness for a particular purpose. The duration of implied warranties is limited to the warranty length specified in Paragraph I.
VI. TO OBTAIN TECHNICAL SUPPORT
If you have already referenced your product owner's manual and still need help, you may contact us by phone at +1 (800) 228-9395, by email at service@nzxt.com, or visit the NZXT Support site at nzxt.com/customer-support.
VII. HOW TO OBTAIN A WARRANTY SERVICE FROM NZXT
To receive a warranty service for your product when purchased directly from NZXT, you must submit a request via the NZXT Support site outlining the problem. If a technician deems the product defective or requiring testing, you will be required to provide a copy of your proof of purchase, which will enable you to submit a Return Merchandise Authorization "RMA" request.
Once approved, you'll receive an RMA number, upon which you will be asked to ship the defective item back to NZXT with the RMA number clearly marked or labelled on the package. NZXT recommends that appropriate measures are taken to safeguard the product from damage during shipping.
VIII. APPLICABLE LAW AND ADDITIONAL LEGAL RIGHTS FOR CONSUMERS
This warranty gives you specific legal rights. These conditions are governed and construed in accordance with the laws of California (with exception of its conflict of law provisions), and the application of the United Nations Convention of Contracts for the International Sale of Goods is expressly excluded. The non-exclusive jurisdiction of the courts of California is agreed, which means that you may bring a claim to enforce your consumer protection rights in connection with this Global Warranty in the country which you have your habitual residence where you may have additional rights. These rights may vary.
For original consumers who are covered by consumer protection laws or regulations in their country, state, or province of purchase or, if different, their country, state, or province of residence, the benefits conferred by this warranty are in addition to all rights and remedies conveyed by such consumer protection laws and regulations. To the extent that liability under such consumer laws can be limited, NZXT's liability is limited, and its sole option, to repair or replacement, either new or refurbished, with a similar function that is equal or greater in value depending on supply.
In the United Kingdom:
- For NZXT products sold to customers in the UK, during the expected lifespan of your product your legal rights entitle you to the following:
Up to 30 days: if your goods are faulty, then you can get an immediate refund.
Up to six months: if your goods can't be repaired or replaced, then you're entitled to a full refund, in most cases.
Up to six years: if your goods do not last a reasonable length of time you may be entitled to some money back.
- If the person seeking to rely on the guarantee is not the original consumer, the NZXT Warranty will cover the product in relation to that person provided that they are able to provide proof of the transfer of the benefit of the guarantee from the original consumer.
- The implied warranties under the Consumer Rights Act 2015 says that your goods must be as described, fit for all purposes for which such goods are usually supplied, and of satisfactory quality.
In the EU:
- If you are a consumer and have your habitual residence in the EU, you additionally enjoy the protection afforded to you by provisions that cannot be derogated from by agreement by virtue of the law where you have your habitual residence.
IX. WARRANTY SERVICE FROM RESELLERS
In the event that a warranty service is sought, you must provide proof of purchase (store receipt or invoice) in order to receive the service and if deemed necessary, repair or replacement product.
In North America:
Within the first 60 days after purchase, please return your product (or for power supplies installed within our enclosures, just the failed power supply) to your dealer or reseller for a replacement. If the product is still within warranty and you can no longer return it to your dealer, please contact NZXT Customer Support (see above) for assistance and instructions. NZXT will not accept returns without prior approval and an RMA number.
In Europe:
Within the first year after purchase, please return your product (or for power supplies installed within our enclosures, just the failed power supply) to your dealer or reseller for a replacement. If the product is still within warranty and you can no longer return it to your dealer, please contact NZXT Customer Support (see above) for assistance and instructions. NZXT will not accept returns without prior approval.
In Australasia:
Within the first two years after purchase, please return your product (or for power supplies installed within our enclosures, just the failed power supply) to your dealer or reseller for a replacement. If the product is still within warranty and you can no longer return it to your dealer, please contact NZXT Customer Support (see above) for assistance and instructions. NZXT will not accept returns without prior approval.
The cost of shipping will be borne at the first instance by you; however, if the purchased item is defective, NZXT will reimburse reasonable postage or transportation of costs.
Outside North America, Europe, and Australasia:
If your product needs to be returned within the warranty period, please contact the retailer or distributor from whom you purchased the product.
6.4 NZXT GLOBAL WARRANTY POLICY
CANVAS 32Q CURVED

X. NZXT.COM STORE RETURNS/EXCHANGE POLICY
Eligible products under this NZXT Warranty qualify for a full refund or exchange only with an authorized RMA number and if the item is returned to the NZXT.com store inventory within 30 days of purchase. Returns are not allowed beyond 30 days of the purchase date. The NZXT.com Store reserves the right to deny any return or exchange. Refunds will be credited to the original method of payment. To initiate a return, simply submit a request via NZXT support site.
NZXT, Inc./ 15736 E Valley Blvd, City of Industry, CA 91744, USA
NZXT Europe GmbH/ Industriering Ost 66 | 47906 Kempen | Germany +1 (800) 228-9395 / service@nzxt.com / NZXT.com
Visit nzxt.com/warranty and support.nzxt.com for information on warranty coverage and service.
Visite el sitio Web nzxt.com/warranty y support.nzxt.com para obtener información sobre la cobertura y el servicio de la garantía.
Visitez nzxt.com/warranty et support.nzxt.com pour les informations de la couverture de la garantie et du service.
Informationen zu Geltungsbereich und Service der Garantie finden Sie unter support.nzxt.com und nzxt.com/warranty.
Visitare il sito nzxt.com/warranty e support.nzxt.com per informazioni sulla copertura e sul servizio della garanzia.
Visite nzxt.com/warranty e support.nzxt.com para obter informações sobre a cobertura da garantia e assistência.
Подробную информацию об условиях гарантийного обслуживания см. на веб-сайте nzxt.com/warranty и support.nzxt.com.
제품 보증 범위와 서비스 정보를 확인하시러면 nzxt.com/warranty 또는 support.nzxt.com을 방문해 주시기 바랍니다.
保証範囲およびサービスに関する情報については、support.nzxt.comとnzxt.com/warrantyにアクセスしてください。
请造访 nzxt.com/warranty 和 support.nzxt.com 了解保修范围和服务的信息。
請訪問 nzxt.com/warranty 和 support.nzxt.com 了解產品保固範圍和更多服務訊息。
SUPPORT AND SERVICE
If you have any questions or problems with the NZXT product you purchased, please don't hesitate to contact us using our support system. support.nzxt.com
Please include a detailed explanation of your problem and your proof of purchase. For comments and suggestions, you can e-mail our design team, designer@nzxt.com. Lastly we would like to thank you for your support by purchasing this product.
For more information about NZXT, please visit us online. NZXT Website: NZXT.com
SOPORTE Y SERVICIO
This device complies with the requirements set out in the Council Directive on the Approximation of the Laws of the Member States relating to Electromagnetic Compatibility (2014/30/EU), Low-voltage Directive (2014/35/EU), ErP Directive (2009/125/EC) and RoHS directive (2011/65/EU). This product has been tested and found to comply with the harmonized standards for Information Technology Equipment published under Directives of the Official Journal of the European Union.
FCC COMPLIANCE STATEMENT
This device complies with Part 15 of the FCC Rules, Subpart B, Unintentional Radiators.
Operation is subject to the following two conditions: (1) This device may not cause harmful interference, and (2) this device must accept any interference received, including interference that may cause undesired operation.
CANADIAN DEPARTMENT OF COMMUNICATIONS STATEMENT
This digital apparatus does not exceed the Class B limits for radio noise emissions from digital apparatus set out in the Radio Interference Regulations of the Canadian Department of Communications. This class B digital apparatus complies with Canadian ICES-003.
Under the European Union ("EU") Directive on Waste Electrical and Electronic Equipment, Directive 2012/19/EU, products of "electrical and electronic equipment" cannot be discarded as municipal waste anymore and manufacturers of covered electronic equipment will be obligated to take back such products at the end of their useful life.
6.7 BATTERY INFORMATION
CANVAS 32Q CURVED


EUROPEAN UNION
Batteries, battery packs, and accumulators should not be disposed of as unsorted household waste. Please use the public collection system to return, recycle, or treat them in compliance with the local regulations.

TAIWAN
For better environmental protection, waste batteries should be collected separately for recycling or special disposal.

CALIFORNIA, USA
The button cell battery may contain perchlorate material and requires special handling when recycled or disposed of in California. For further information please visit: http://www.dtsc.ca.gov/hazardouswaste/perchlorate

CAUTION
- There is a risk of explosion, if battery is incorrectly replaced. Replace with the same or equivalent type recommended by the manufacturer.
6.8 WEEE (WASTE ELECTRICAL AND ELECTRONIC EQUIPMENT) STATEMENT
CANVAS 32Q CURVED

ENGLISH
To protect the global environment and as an environmentalist, NZXT must remind you that...
Under the European ("EU") Directive on Waste Electrical and Electronic Equipment, Directive 2012/19/EU, effective February 14, 2014, products of "electrical and electronic equipment" cannot be discarded as municipal wastes, and manufacturers of covered electronics must take back such products at the end of their useful life. NZXT will comply with the product take back requirements at the end-of-life of NZXT products that are sold within the EU. You can return these products to local collection points.