IZ-9017 - Heating Izzy - Free user manual and instructions
Find the device manual for free IZ-9017 Izzy in PDF.

| Product Type | Portable Heater |
| Brand | Izzy |
| Model | IZ-9017 |
| Power Supply | 220-240 V ~ 50/60 Hz |
| Power Consumption | 1500 W |
| Dimensions (W x H x D) | 20 x 25 x 15 cm |
| Weight | 1.5 kg |
| Heating Type | Fan-forced ceramic |
| Temperature Control | Adjustable thermostat |
| Power Levels | 2 (low / high) |
| Oscillation | Yes, 70° |
| Safety Features | Overheat protection, tip-over switch |
| Noise Level | ~45 dB |
| Recommended Room Size | Up to 20 m² |
| Filter | Washable dust filter |
| Cleaning Instructions | Unplug and wipe with a dry cloth; wash filter monthly |
| Spare Parts | Filter (optional), no other consumables |
| Repairability | No user-serviceable parts; contact authorized service |
Frequently Asked Questions - IZ-9017 Izzy
User questions about IZ-9017 Izzy
0 question about this device. Answer the ones you know or ask your own.
Ask a new question about this device
Download the instructions for your Heating in PDF format for free! Find your manual IZ-9017 - Izzy and take your electronic device back in hand. On this page are published all the documents necessary for the use of your device. IZ-9017 by Izzy.
USER MANUAL IZ-9017 Izzy
"This product is only suitable for well insulated spaces or occasional use."
natural_image
Black outdoor heater with 'izzy' branding and control panel, no visible text or symbols on the device itselftext_image
Technical diagram of a portable electronic device with labeled components and internal structure detailsnatural_image
Technical line drawing of a mechanical component with two mounting brackets and a textured base (no text or symbols)Thank you for having chosen an appliance from the IZZY range.
Safety interlocks


Please read these instructions carefully before using the appliance and save them for future reference. Please keep the sales receipt for guarantee purposes (pls see below “Guarantee and Customer Service”) Any use which does not conform to the instructions will absolve IZZY from any liability.
- Before connecting the appliance, check if the voltage indicated on the appliance, corresponds with the mains voltage in your home.
• Always plug your device into an outlet that is earthed. Failure to comply with this requirement may result in electric shock and possible serious injury.
- Never leave the appliance unattended when in operation.
- Close supervision is necessary when your appliance is being us near children. Ensure that they do not play with the appliance.
- This appliance is not intended for use by people with reduced physical sensory or mental capabilities, children or those with lack of experience and knowledge, unless they have been given supervision or instruction concerning use of the appliance by a person responsible for their safety
- Disconnect the power cord from the supply mains:
- When you do not use the appliance
- Before assembling or disassembling
- Before cleaning and maintenance operations
- Before you move the appliance
- Always turn the power button to "O" position before plugging it in or disconnecting it from the socket.
- Never use the appliance for any other use than indicated.
• The device is intended for indoor use. Do not use the device outdoors.
- Do not use the appliance in the bathroom, in the shower or ne swimming pool.
- Do not operate or place the device or parts in places of high humidity or where it may get wet. Do not immerse the appliance in water or any
other liquid.
- Do not store the appliance outdoors.
- The device is intended only for domestic use. Any other use will cancel the warranty.
- Check the power cord periodically for possible damages. If the power cord or the plug of the appliance has been damaged, do not use the appliance and contact an authorized BENRUBI Service Center.
- Do not disassemble or replace the power cord.
- Make sure that the power cord does not come into contact with the hot parts of the appliance.
- To prevent the power cord from overheating, the power cord should be placed in the of the back of the appliance and in the front body.
- Do not let the power cord of the appliance hang over the edge of a table or bench top or where a child could grab it. Do not let the power cord to touch any hot surface.
Warning: The ventilators become hot during operation.
- Do not cover the appliance. There is a risk of overheating.
- Do not place the device near objects that are sensitive to temperature and in areas with heavy dust.
- Do not place the device in places where objects may fall.
- Make sure that the power cord is not clamped from any object (e.g. furniture). Never push the power cord and never place it under carpets or floor mats where there is a risk of clicking it. Keep the power cord in a place where there is no danger of stumbling.
- Do not use extending cord, it might cause fire due to overheating.
- Do not plug other high-power electrical appliances into the same power outlet.
- Do not place the appliance directly under the socket.
- Before use, place the appliance on a stable, flat, dry surface. Do not place the device on areas where it may fall.
- Do not leave the appliance in operation when you are not at home. Make sure it is switched off and always unplug the power cord.
• Always keep the appliance within 1.5m at least from furniture, pillows, beds, papers, clothes, curtains etc.
Caution: Do not use the appliance on carpets or rugs.
- Do not use the appliance in leaking rooms or other flammable material such as varnish or glue.
- Do not place fabrics/clothes on the appliance to dry or for any other reason.
- Always keep air ventilators free of any objects at least 1 meter apart.
Caution: To avoid any risk, do not place foreign objects, for example pencils, etc. in the grilles/ventilators of the appliance when it is connected to the socket and when it is in operation.
Caution: Never put your fingers between the grilles of the appliance when it is connected to the socket and when it is operation.
- Always keep the device clean. Before cleaning, always unplug the appliance.
- Any fault in the connection, cancels the warranty.
- Do not use the device and its accessories for other than the appropriate or recommended use by the manufacturer.
- Never use highly corrosive or abrasive cleaning agents.
- This appliance is not intended to be operated by means of an external timer or separate remote-control system.
- Never leave the power cable wrapped during use. Unwind it completely.
- Never turn the device off or on from the power cord.
- Never pull the cord to disconnect the appliance from the electric supply. Instead grasp the plug and pull it to disconnect.
- Do not move the appliance when it is in operation.
- Do not touch the appliance with wet or damp hands.
- If the appliance does get wet, immediately remove the power cord from the wall outlet and contact one of the authorized BENRUBI servic centers.
- In case of a possible damage, do not attempt to repair the appliance by yourself. Please contact one of the authorized BENRUBI service centers. Any repair made by an unauthorized BENRUBI Service Center CANCELS THE GUARANTEE.
- Any misuse of the device cancels the warranty.
- Only use original spare parts.
- The appliance conforms to EU directive 2014/30/EU on Electromagnetic Compatibility, the 2014/35/EU Low Voltage Directive, the 2011/65/EU RoHS Directive, and the directive 2009/125/ EC for eco design.
SAVE THESE INSTRUCTIONS
Parts of the Appliance
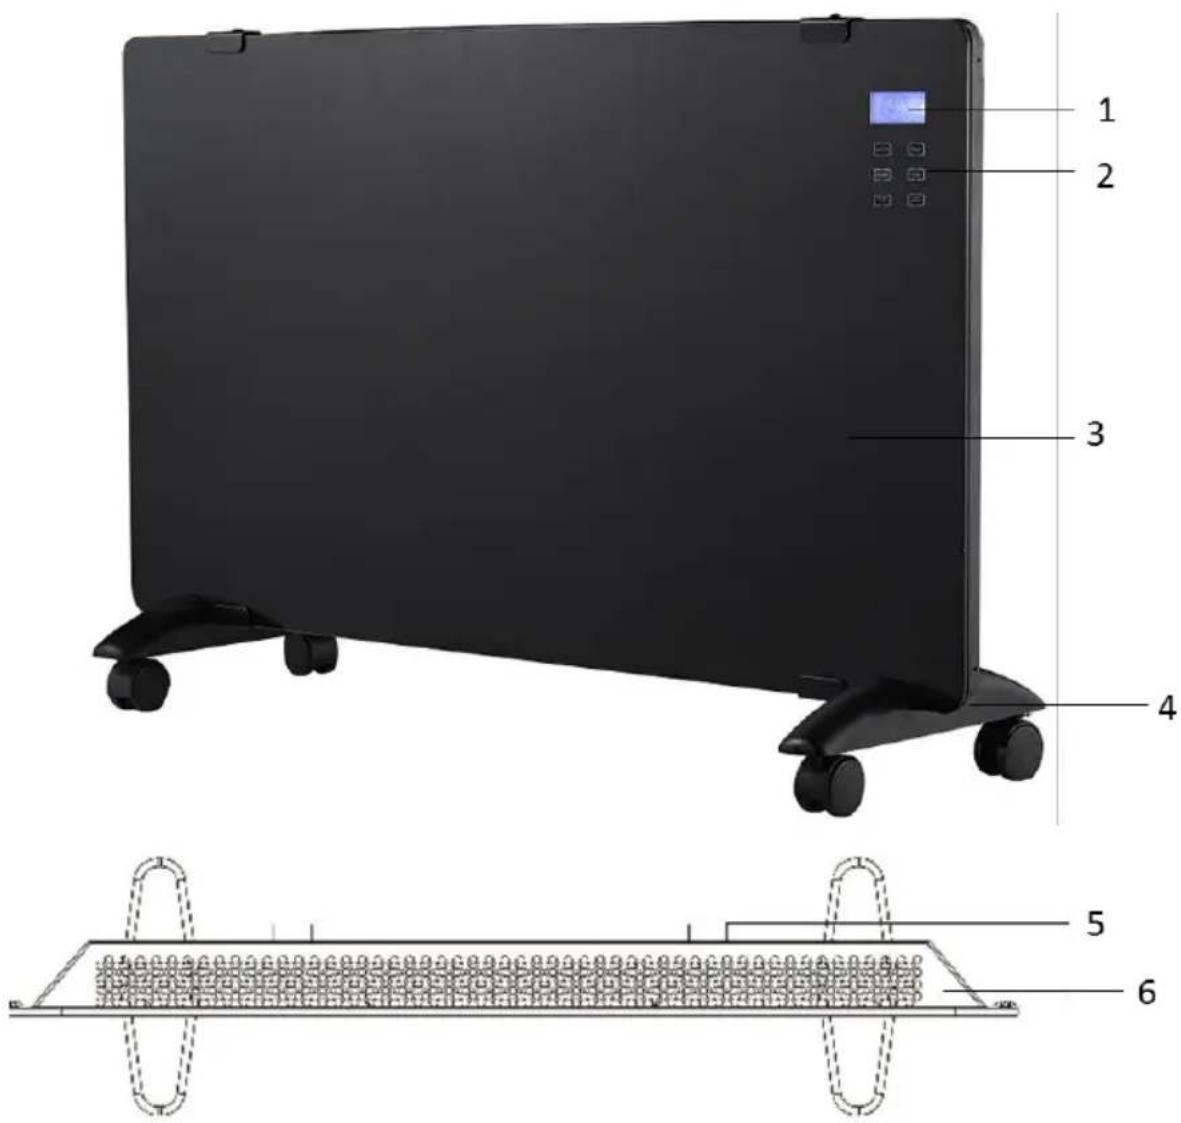
text_image
Technical diagram of a portable electric heater with labeled components and internal structure- Function display "LCD"
- Function panel
- Panel
- Base with wheels
- Wall mounting
- Air outlet
Display

text_image
1 2 3 4 5 6 7 8 9 10 11 12 13 14 15 88:00 Prog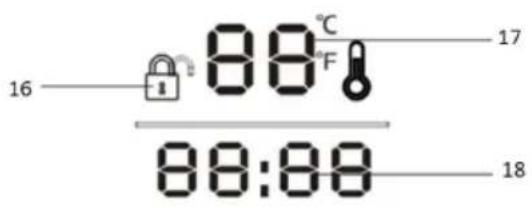
text_image
16 88°C F 17 88:88 18- Program setting
- Programmed time display
- Comfort function
- Economy function
- Anti-frost function
- Window sensor
- Heating function
- Weekly program
- Time setting
- Key lock indicator
- Room temperature display
- Time display
Control panel
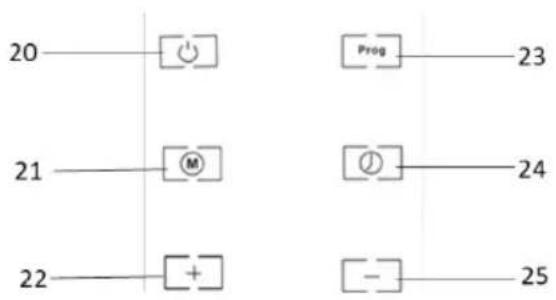
text_image
20 21 22 Prog 23 24 25- Power button "
- Mode button “”M
- Setting button "☐-☐"
- Weekly programming button "Prog
- Time/Timer setting button " ”
- Setting button “+”
Remote control

text_image
26 27 28 29 30 31- Power button "
- Mode button "
- "Open Window" button
- Timer button
- Setting button
- Setting button


Assembly
Floor assembly

natural_image
Technical line drawing of a mechanical component with two protruding brackets and a textured base (no text or symbols)- Turn the appliance upside-down.
- Position the base at the bottom of the appliance so as the holes in the base are aligned with the holes in the appliance.
- Tighten the screws provided on the package.
- Fasten the wheels to the base positions.
- After the assembly is completed, turn the appliance upwards. The appliance is ready for use.
Wall mounted
CAUTION: Make sure the appliance is at least 15cm from the floor and 50cm from the ceiling.
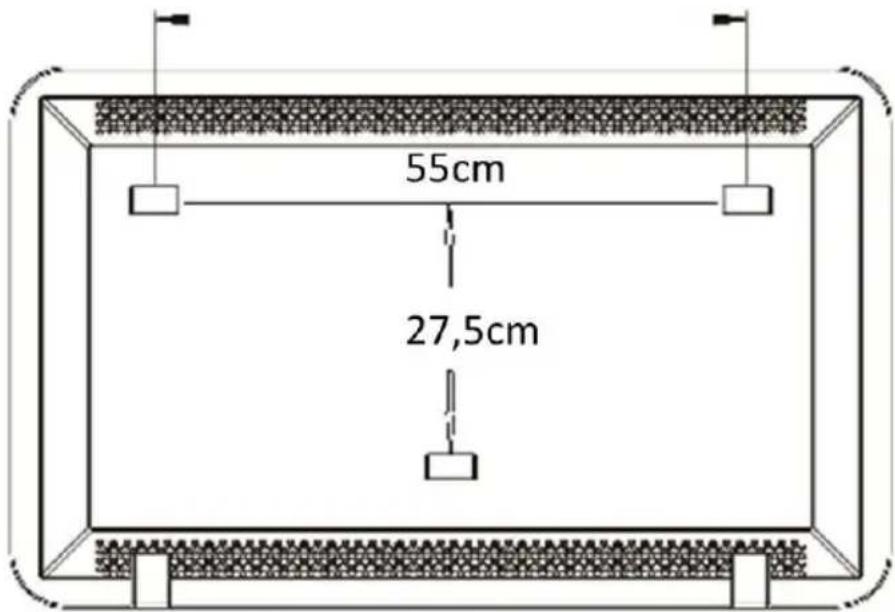
text_image
55cm 27,5cmNote: Before drilling holes in the wall, make sure that no cables or other conductors pass through the wall.
- Drill two holes in the wall (55cm apart).
- Insert the hooks provided in the package (8 mm in diameter and 40 mm deep) into the holes then use a screwdriver to tighten the screws with the hooks. The screws should protrude 6mm from the hook head.
- Hang the appliance. The appliance is ready for use.
Using the Appliance (Control Panel)
- Before operating the appliance, check for any damage, wear, or breakage to the resistor or power cord.
- Place the appliance on a stable, flat, dry surface or on the wall.
- Plug in the appliance.
- Press the power switch (6) on the side of the device. The switch will turn on and a "beep" will sound.
- Press the power button " (20). The screen (1) will turn on
Note: On the screen the default time 12:30 on Sunday/7 will be displayed and the default temperature 20°C.
-
Set the current time and day (see section "Time and day setting").
-
Press the “”(21) button to select the desired mode. The indications (10, 11 or 12) will appear on the screen respectively. To activate the “open window” function, press the “”(21) button for 3 seconds. To deactivate the “open window” function, press the “”(21) button for 3 seconds.
Note: When the "open window" function is activated and the ambient temperature drops by 5°C within 10 minutes, the appliance will enter standby mode and stop heating.
- To adjust the temperature, press the button “[+]” (22) or “[-]” (25) to the desired temperature. The range of the temperature is: 10°C -49°C. After adjusting the temperature, wait 5 seconds for the current ambient temperature to appear on the display.
- Before unplugging the appliance, make sure you have pressed the “” (20) and the power switch (6) to “O” position.
- Unplug the appliance when not in use.
Note:
- The device has an automatic closing system in case of falling or tilting.
Anti-Frost Mode
- In this mode, when the ambient temperature is less than 5^ , the appliance will automatically switch on the low speed heating until the ambient temperature reaches 9^ . When the temperature reaches 9^ , the appliance will enter standby mode.
- To activate the anti-frost mode, press the “M” (21) button till the indication (12) will appear on the screen (1).
- To deactivate the anti-frost mode, press the “M” (21) button till the preferred mode indication (10 or 11) will appear on the screen (1).
Time & Day Setting
- Press the “”(24) button for 3 seconds. The hour will flash.
- Press the “”(22) or “”(25) buttons to set the hour.
- Press the “”(24) button for 3 seconds. The minutes will flash.
- Press the “☐”(22) or “”(25) buttons to set the minutes.
- After setting the time, press the “” (24) button for 3 seconds. The day “7” will flash.
- Press the “☐(22) or “” (25) buttons to set the current day. Numbers 1-7 correspond to the days of the week (Monday (1) to Sunday (7).
- After setting the current time and day, wait for 5 seconds or press “☐” (21) button for confirmation.
Note: You can set the time only by using the control panel and not the remote control.
Key-Lock Function for Children
- To activate the key lock function, press the “[+]” (22) and “[-]” (25) buttons simultaneously for
3 seconds. The lock indication (17) will appear on the screen (1). - To deactivate the key lock function, press the “[+]” (22) and “[-]” (25) buttons simultaneously
for 3 seconds. The unlock indication ⏻(17) will appear on the screen (1).
Note: The key lock function is performed only from the control panel and not from the remote-control.
Using the Appliance (Remote-Control)
- Before operating the appliance, check for any damage, wear, or breakage to the resistor or power cord.
- Place the appliance on a stable, flat, dry surface or on the wall.
- Plug in the appliance.
- Press the power switch (6) on the side of the device. The switch will turn on and a "beep" will sound.
- Press the power button “”(20). The screen (1) will turn on
Note: On the screen the default time 12:30 on Sunday/7 will be displayed and the default temperature 20°C.
-
Set the time (see section "Time and day setting").
-
Press the ☐ (27) button to select the desired mode. The indications (10, 11 or 12) will appear on the screen respectively. To activate the "open window" function, press the "☐ (28) button. To deactivate the "open window" function, press the "☐ (28) again.
Note: When the "open window" function is activated and the ambient temperature drops by 5°C within 10 minutes, the appliance will enter standby mode and stop heating.
- To set the temperature, press the “” (30) or “” (31) to the desired temperature. The range of the temperature is: 10^ C -49°C. After adjusting the temperature, wait 5 seconds for the current ambient temperature to appear on the display.
- Before unplugging the appliance, make sure you have pressed the “” (26) and the power switch (6) to “O” position.
- Unplug the appliance when not in use.
Week-Setting Operation
- To set the weekly mode, you must first set the current time and day (see section "Time and da setting").
- The weekly mode setting should start from the day and time you have set.
- The week setting operation can be set only from the control panel and not from the remote-control.
-
Comfort mode, economy mode and anti-frost mode cannot be activated when you have set the week set operation.
-
Press the (23) button for 3 seconds. The (8) indication will appear on the screen.
- Press the “” (24) button and on the screen left side “7” will flash.
- Press “☐+” (22) or “☐-” (25) buttons to choose the day of the week (the numbers 1-7 correspond to the days of the week from Monday (1) to Sunday (7)).
- When you choose the day, press the “☐” (24) button and the time period will flash on the screen. You can choose up to 6 time periods in one day.
- Press the “” (24) button again and the hour display (19) will flash and the display (14) will turn on.
-
Press the “[+]” (22) or “[-]” (25) buttons to set the starting hour. Press the “☐” (24) button again and the minute display will flash on the screen. Use the “+” (22) or “” (25) buttons to adjust the minutes. Repeat to set the period ending time.
-
When you set the time, press the "button (24) again and the temperature indicator flashes on the display. Set the desired temperature by pressing “(22) or “” (25) buttons.
- Press the “”(24) button again and the selected day indicator flashes. If you want to add another period to the same day, press the “”(24) button and repeat steps 5-8 until you have finished programming the day.
- After setting the day of your choice, repeat the above procedure for the other days of the wee and the time periods that you wish the appliance to operate.
Notes:
• A total of 42 periods can be set for the 7 days.
- When setting the weekly schedule, do not switch off the appliance or unplug it.
- In the event of a power failure, the programming settings is cancelled, and the settings must be set again.
Using the Appliance (Time-Setting)
- You can set timer from 1 to 24 hours.
CAUTION: Do not leave the appliance on when you are away from home.
- Place the appliance on a stable, flat, dry surface.
- Plug in the appliance.
- Press the power switch (6) on the side of the device. The switch will turn on and a "beep" will sound.
- Press the power button “”(20). The screen (1) will turn on
Note: On the screen the default time 12:30 on Sunday/7 will be displayed and the default temperature 20°C.
- Set the current time and day (see section "Time and day setting").
- Press the “” (21) button to select the desired mode. The indications (10, 11 or 12) will appear on the screen respectively.
-
To adjust the temperature, press the button “+”(22) or “”(25) to the desired temperature. The range of the temperature is: 10°C -49°C. After adjusting the temperature, wait 5 seconds for the current ambient temperature to appear on the display.
-
Press the (24) button. The indication (16) will appear on the screen.
-
Press the (24) button repeatedly until you select the desired time.
Note: The current time will be displayed on the screen. To see the remaining time, press the key (24) once and the remaining time will flash for a few seconds. The current time will then be displayed on the screen.
-
When the selected time expires, the appliance will turn off automatically.
-
Before unplugging the appliance, make sure you have pressed the “”(20) and the power switch (6) to “O” position.
-
Unplug the appliance when not in use.
Note:
- To stop the time setting, press the (24) button consequently until “00:00” appears on the display. The indication (16) on the display will go out.
Care and Cleaning
- Before cleaning the appliance, ensure that it is disconnected from the outlet and let the body of your appliance to cool down completely.
- NEVER immerse the appliance and the electric cord into water or any other liquid.
- NEVER use metal cleaners such as wire, brush, and chemical solutions or abras cleaning materials in order to clean your appliance.
- Clean with a dry soft cloth.
Storage
• Always unplug the appliance if not in use.
- Make sure the appliance is clean and dry before storage.
- Store the appliance in a clean, dry and cool place in its packaging or in such manner so that it is protected from the dust.
- Before you use the appliance after a long time period, make sure it is clean and dry and that no objects are stuck in the openings.
- Store the appliance away from the reach of children.
Technical Characteristics
Model: Glass heater IZ-9017
Rated Voltage/Frequency: AC 220 - 240 \~ 50-60 Hz
Power: 1800W - 2000W/max2200W
Remote control: 3xAAA batteries (Included)
| Model: IZ-8017 | |||||
| Item | Symbol | Value | Unit | Item | Unit |
| Heat output | Type of heat input, for electric storage local space heaters only (select one) | ||||
| Nominal heat output | P nom | 2.0 | kW | Manual heat charge control, with integrated thermostat | No |
| Minimum heat output (indicative) | P min | 1.0 | kW | Manual heat charge control with room and/or outdoor temperature feedback | No |
| Maximum continuous heat output | P max, c | 2.0 | kW | Electronic heat charge control with room and/or outdoor temperature feedback | No |
| Auxiliary electricity consumption | Fan assisted heat output | No | |||
| At nominal heat output | elmax | 2.0 | kW | Type of heat output/room temperature control (select one) | |
| At minimum heat output | elmin | 1.0 | kW | Single stage heat output and no room temperature control | No |
| In standby mode | eISB | 0,001 | kW | Two or more manual stages, no room temperature control | No |
| with mechanical thermostat room temperature control | No | ||||
| with electronic room temperature control | No | ||||
| electronic room temperature control plus day timer | No | ||||
| electronic room temperature control plus week timer | Yes | ||||
| Other control options (multiple selections possible) | |||||
| room temperature control, with presence detection | No | ||||
| room temperature control, with open window detection | Yes | ||||
| with distance control option | No | ||||
| with adaptive control option | No | ||||
| with working time limitation | Yes | ||||
| with black bulb sensor | Yes | ||||
| Remark:This product is only suitable for well insulated spaces or occasional use. | |||||
Safe Appliance Disposal

At the end of its working life, the product must not be disposed of as urban waste. It must be taken to a special local authority differentiated waste collection centre or to a dealer providing this service. Disposing of a household device separately avoids possible negative consequences for the environment and health deriving from inappropriate disposal and enables the constituent materials to be recovered to obtain significant savings in energy and resources.
As a reminder of the need to dispose of household devices separately, the product is marked with a crossed-out wheeled dustbin.
Guarantee & Customer Service
- BENRUBI Company guarantees its products for any manufacturing defect or defective materials for a period of two (2) years from the date of purchase or delivery by present purchase receipt. If your product malfunctions or you find any defects, please revert to the retail location you have purchased it from or contact an authorized BENRUBI Service Centre. To find the nearest authorized BENRUBI Service Centre, visit our website www.benrubi.gr. It is in the discretion of BENRUBI Company to replace or repair the defective product.
- The warranty does not cover damages resulting from normal wear, breakage, improper installation or maintenance of the product, mishandling, abnormal working conditions, failure to implement the instructions, conversion or repair of the product by an unauthorized technician who does not belong to the BENRUBI Service Centers.
Also, the warranty does not cover the following indicative factors:
• Stains, discoloration or scratches.
• Burns due to exposure to heat or flame.
- Damage from thermal shock (sudden temperature change or change of voltage).
FOR MORE INFORMATION PLEASE CONTACT:
(NEW) H. BENRUBI & FILS SA
27 Aghiou Thoma str, GR15124, Maroussi – Athens, Tel.: 210 6156400
e-mail: benrubi-sda@benrubi.gr