RCM-354B - Fridge Milectric - Free user manual and instructions
Find the device manual for free RCM-354B Milectric in PDF.

User questions about RCM-354B Milectric
0 question about this device. Answer the ones you know or ask your own.
Ask a new question about this device
Download the instructions for your Fridge in PDF format for free! Find your manual RCM-354B - Milectric and take your electronic device back in hand. On this page are published all the documents necessary for the use of your device. RCM-354B by Milectric.
USER MANUAL RCM-354B Milectric
natural_image
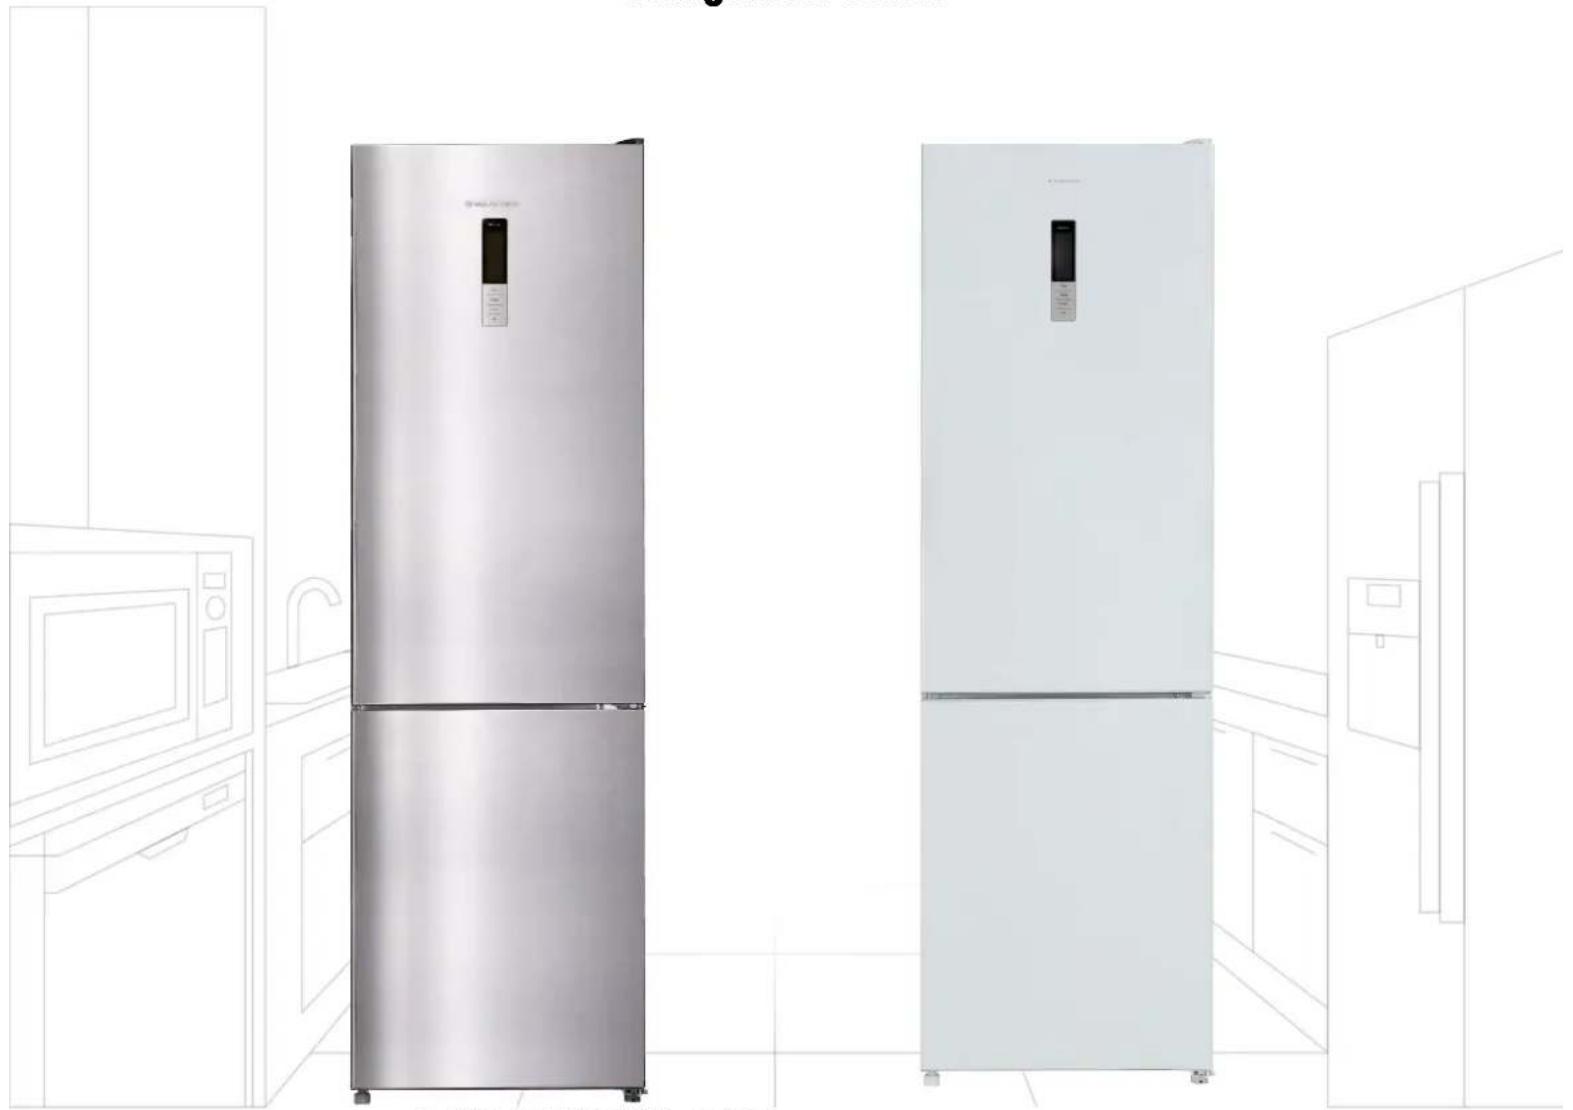
Line drawing of two stainless steel refrigerators in a kitchen setting, one with a digital display and the other with a control panel (no text or symbols)RCM-355XRCM-354B
ean: 8445639000304 ean: 8445639000397
natural_image
Two stylized human figures pulling a gray diamond shape (no text or symbols)- Ubicación
natural_image
Two gray rectangular panels with checkmark and cross symbols, no text or labels present- Instalación
natural_image
Symbol of a trash bin crossed with a diagonal line and a horizontal bar below (no text or labels)
natural_image
Close-up of a metallic mechanical component with a triangular top and base, against a clear sky (no text or symbols visible)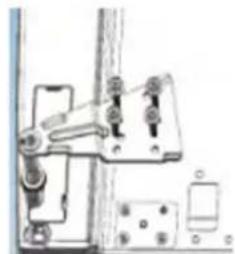
natural_image
Mechanical assembly diagram showing clamping mechanism with no visible text or symbols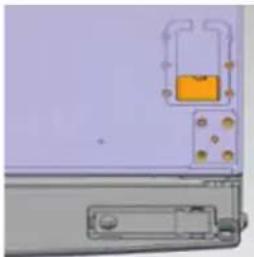
natural_image
Close-up of a mechanical component with orange highlighted area and mounting holes (no visible text or symbols)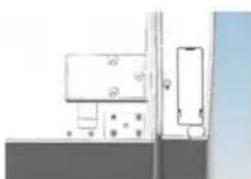
natural_image
Pure electrical circuit lines without any symbols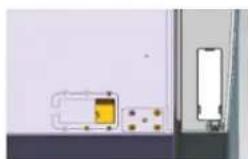
natural_image
Close-up of a wall-mounted electronic component with a small yellow component and a white rectangular element on the right side (no visible text or symbols)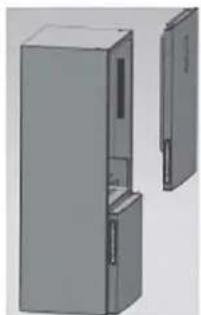
natural_image
3D rendering of a refrigerator with front and side views (no text or symbols)natural_image
Pure electrical circuit lines without any symbolsnatural_image
Pure electrical circuit lines without any symbolsnatural_image
Diagram of two horizontal cylindrical objects with internal connectors and a connecting line, no text or symbols presentnatural_image
Two identical gray metal components with holes and mounting holes, connected by an arrow indicating transformation (no text or symbols)natural_image
Line drawing of two stainless steel refrigerators in a kitchen setting, one with a digital display and the other with a control panel (no text or symbols)RCM-355XRCM-354B
ean: 8445639000304 ean: 8445639000397
Tips for special needs 22
Safety information 23
Before use 27
How to use 28
Food storage instructions 29
Cleaning and maintenance 32
Troubleshooting 33
Door reversal instructions 34
Installation & location
1. Ventilation conditions
The location you select for the installation of the appliance should be well ventilated. Do not locate the appliance near a heat source such as cookers, boilers, and avoid direct sunlight, thus ensuring the cooling effect and saving on energy consumption. Do not place it in a damp place, thus preventing it from rusting. The result of dividing the total space of the room in which the The result of dividing the total space of the room in which the appliance is installed by the amount of refrigerant charge of the appliance should not be less than 8gr/m^3 .
Note: The amount of refrigerant required for the appliance is given on the nameplate, which is attached to the inside or outside of the product.
2. Recommended space needed for heat dissipation
When the appliance is operating, heat is emitted all around the appliance. Therefore, there must be at least 30 mm of free space at the top, more than 100 mm on both sides and more than 50 mm at the back of the appliance.
Front view
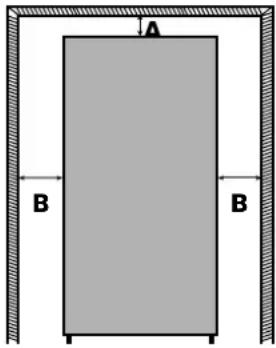
Top view Required space in mm
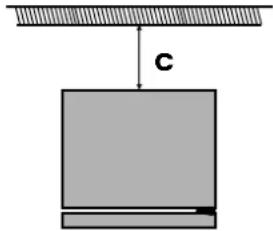
A: 30mm
B: 50mm
C: 100mm

ATTENTION! Unobstructed ventilation must be maintained around the appliance or in a built-in structure.

ATTENTION! If there are vibrations due to the appliance being in contact with the wall, move the appliance away from the wall. The installation may cause interference to surrounding telephones, radios, televisions, so try to keep the appliance as far away as possible in such a case.
3. Ground level
Place the appliance on a firm, flat floor to keep it stable, otherwise it will cause vibration and noise. When the appliance is placed on materials such as carpets, mats, PVC... The legs of the appliance should be placed on solid plates.
Recommendations for use
1. Resting time
Once the appliance is properly installed and cleaned, do not switch it on immediately. It can be switched on after more than 1 hour of rest to ensure normal operation.
2. Testing and cleaning
Confirm that all fittings inside the unit are correctly installed and wipe the interior with a soft cloth.
3. Switching on
Connect the plug to the power socket to switch on the compressor. After 1 hour, open the freezer door (if available), if the temperature inside the freezer compartment drops considerably, it indicates that the refrigeration system is working normally.
4. Food storage
Once the appliance is turned on, the internal temperature will be automatically controlled according to the user's temperature setting. Once it has cooled down completely, place the food, which usually needs 2 to 3 hours to cool down completely. In summer, when the temperature is high, it takes more than 4 hours for the food to cool down completely (try to open the appliance door as little as possible, to avoid the inside temperature to rise considerably).
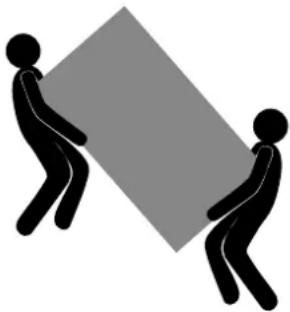
Moving the appliance
- Transport
Do not carry the appliance horizontally or upside down. Do not carry the appliance while holding the door or handle.
The appliance must be transported by lifting the bottom of the appliance.
IMPORTANT: The installation of this unit requires the intervention of several people.
natural_image
Two stick figures pulling a gray diamond shape (no text or symbols)- Location
Do not place your appliance near a heat source, e.g. cooker, boiler or radiator. Avoid direct sunlight.
- Leveling
Be sure to level your appliance using the front leveling feet.
If it is not level, the sealing performance of the appliance door gasket will be affected, or it may even cause your appliance to malfunction.
After placing the appliance in position, wait 4 hours before using it, to allow the refrigerant to settle.
- Installation
Do not cover or block vents.
If you are going to be away from home for a long period of time:

natural_image
Two gray rectangular panels with checkmark and cross symbols, no text or labels present- If the appliance will not be used for several months, turn it off first and then unplug the appliance from the electrical outlet.
- Remove all food.
- Clean and dry the interior thoroughly. To prevent mould and mildew growth and unpleasant odours, leave the door ajar: lock it or remove it if necessary.
- Keep the clean appliance in a dry, ventilated place away from heat sources and do not place heavy objects on top of it.
For your safety and to ensure correct use, before installing and using the device for the first time, please read this user manual carefully, including its tips and warnings. To avoid unnecessary errors and accidents, it is important to ensure that all persons using the device are thoroughly familiar with its operation and safety features. Keep these instructions and ensure that they remain with the device if it is moved or sold, so that all those who use it throughout its lifetime are adequately informed about the use and safety of the device.
For the safety of life and property, observe the precautions in these user instructions, as the manufacturer is not liable for damage caused by omission.
Safety of children and vulnerable people
- This appliance can be used by children aged from 8 years and above and persons with reduced physical, sensory or mental capabilities or lack of experience and knowledge if they have been given supervision or instruction concerning use of the appliance in a safe way and understand the hazards involved.
• Children up to 8 years of age can charge and discharge this appliance. - Children should be supervised to ensure that they do not play with the appliance.
- Cleaning and user maintenance shall not be made by children unless they are 8 years of age or older and supervised.
- Keep all containers away from children. There is a risk of suffocation.
- If you are discarding the appliance, pull the plug out of the socket, cut the power cord (as close to the appliance as possible) and remove the door to prevent children from getting an electric shock if it falls or closes.
- If this appliance with magnetic door seals replaces an older appliance that has a spring-loaded latch on the door or lid, make sure that the spring-loaded latch cannot be used before discarding the old appliance. This will prevent it from becoming a death trap for a child.
General safety
WARNING! Keep ventilation openings, in the appliance cabinet or built-in structure, free of obstructions.
WARNING! Do not use mechanical devices or other means to accelerate the defrosting process other than those recommended by the manufacturer.
WARNING! Do not damage the refrigerant circuit.
WARNING! Do not use other electrical appliances (such as ice cream makers) inside refrigeration appliances unless they are approved for this purpose by the manufacturer.
WARNING! Do not touch the bulb if it has been on for a long period of time as it may be very hot.
WARNING! When positioning the appliance, make sure that the power cord is not trapped or damaged.
WARNING! Do not locate multiple portable power outlets or portable power suppliers on the back of the appliance.
Do not store explosive substances such as aerosol cans with a flammable content.
- The refrigerant isobutane (R-600a) is contained within the refrigerant circuit of the appliance, a natural gas with a high level of environmental compatibility, which is nevertheless flammable.
- During transport and installation of the unit, ensure that none of the components of the refrigerant circuit are damaged.
- Drain open flames and sources of ignition.
- Ventilate the room in which the appliance is located thoroughly.
- It is dangerous to alter the specifications or modify this product in any way. Any damage to the cable may cause a short circuit, fire or electric shock.
- This appliance is intended for use in household and similar applications, such as
- Staff kitchen areas in shops, offices and other working environments;
- Hotels, motels and other residential type environments;
- Non-commercial and similar applications.
WARNING! Any electrical components (plug, power cord, compressor, etc.) must be replaced by a certified service agent or qualified service personnel.
WARNING! LThe bulb supplied with this appliance is a "special purpose lamp bulb" which
can only be used with the appliance supplied. This "special purpose lamp" cannot be used for domestic lighting.
The power cord must not be extended. Make sure that the power plug is not crushed or damaged on the back of the appliance. A crushed or damaged power plug may overheat and cause a fire.
Make sure that it can be connected to the power socket of the appliance properly.
Do not pull on the mains cable.
If the power socket is loose, do not push the power plug. There is a risk of electric shock or fire. Do not operate the appliance without the lamp.
This appliance is heavy. Care should be taken when moving it. Do not remove or touch items in the freezer compartment if your hands are wet or damp, as this may cause skin abrasions or freezer burns.
Avoid prolonged exposure of the appliance to direct sunlight.
Daily use
- Do not heat the plastic parts of the appliance.
- Do not place food products directly against the rear wall.
- Frozen food must not be refrozen once it has thawed.
- Store prepackaged frozen food in accordance with the frozen food manufacturer's instructions.
- Appliance manufacturers' storage recommendations should be strictly followed. Refer to the relevant instructions.
- Do not place carbonated soft drinks in the freezer compartment as it creates pressure in the container, which may cause it to burst and damage the appliance.
- Ice lollies may cause freezer burn if consumed directly from the appliance.
- To avoid contamination of food, follow the instructions described in this manual.
- Opening the door for prolonged periods may cause a significant temperature rise in the appliance compartments.
• Regularly clean surfaces that may come into contact with food and accessible drainage systems.
- Clean the water tanks if they have not been used for 48 h; Flush the water system connected to a water supply if no water has been drawn for 5 days.
• Before servicing, switch off the appliance and disconnect the mains plug from the mains socket.
- Do not clean the appliance with metal or sharp objects. Do not use sharp objects to remove any ice frost that may appear on the appliance. Use a plastic scraper.
- Regularly check the drain in the refrigerator for defrosted water.
- If necessary, clean the drain. If the drain is blocked, water will accumulate at the bottom of the appliance.
Installation
Important! For electrical connection, carefully follow the instructions given in the following chapters of this manual.
Unpack the appliance and check it for damage.
- Do not connect the appliance if it is damaged. Report any damage immediately to the place of purchase. In this case, keep the packaging carefully.
- It is advisable to wait at least four hours before switching on the unit to allow the oil to return to the compressor.
- There should be adequate air circulation around the appliance, as this prevents the appliance from overheating. To achieve sufficient ventilation, follow the installation instructions.
- Whenever possible, the back of the product should be against a wall to prevent access to hot components (compressor, condenser) and to avoid possible burns.
- The appliance must not be located near radiators or cookers.
- Make sure that the power plug is accessible after installation of the appliance.
Service
- Any electrical work required to service the appliance must be carried out by a qualified electrician or competent person.
- This product must be serviced by an authorised Service Centre, and only original spare parts must be used.
Energy Saving
- Do not put hot food in the appliance;
-
Do not pack food together as this prevents air circulation;
-
Make sure that food does not touch the back of the compartment(s);
- If there is a power failure, do not open the door(s);
- Do not open the door(s) frequently;
- Do not keep the door(s) open for a long time;
- Do not set the thermostat to very high temperatures;
- Some accessories, such as drawers, can be removed for larger storage volume and lower energy consumption; Do not use the thermostat in very high temperatures; Do not place the thermostat in very high temperatures.
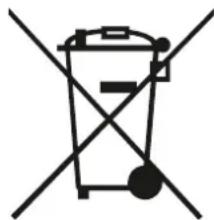
This appliance does not contain gases that could damage the ozone layer, neither in its refrigerant circuit nor in the insulation materials. The appliance must not be disposed of with municipal waste and rubbish. The insulation foam contains flammable gases. The appliance must be disposed of in accordance with the regulations of the appliance to be obtained from the local authorities. Avoid damaging the cooling unit, especially the heat exchanger. The materials used in this appliance marked with the symbol 📁 are recyclable.
natural_image
Simple line drawing of a trash bin with two crossed lines indicating no waste or prohibition (no text or symbols)This symbol on the product or on its packaging indicates that this product must not be treated as household waste. Instead, it must be taken to the appropriate collection point for the recycling of electrical and electronic equipment.
By ensuring this product is disposed of correctly, you will help prevent potential negative consequences for the environment and human health, which could otherwise be caused by inappropriate waste handling of this product.

For more detailed information about recycling of this product, please contact your local authorities, your household waste disposal service or the shop where you purchased the product.
Packing materials
Materials with the symbol 🎨 are recyclable. Dispose of the packaging in a suitable collection container for recycling.
Disposal of the appliance
- Disconnect the plug from the socket.
- Cut the power cord and discard it.
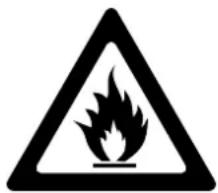

Warning! During use, service and disposal of the appliance, pay attention to this symbol, which is located on the back of the appliance (rear panel or compressor).
This symbol will be yellow or orange in colour. It is a fire hazard warning sign. There are flammable materials in the refrigerant and compressor piping. Keep away from the source of fire during use, service and disposal..
WARNING! This appliance must be grounded for safety. The power cord of this appliance is equipped with a three-prong plug which fits into a standard three-prong outlet to minimize the possibility of electric shock. Do not, under any circumstances, cut or remove the third grounding prong from the supplied power cord.
This refrigerator appliance requires a standard 220-240V, 50/60 Hz three-prong grounded outlet. This appliance is not designed for use with a power inverter.
The cord must be secured behind the appliance and must not be left exposed or dangling, This will prevent accidents and/or injury.
Never unplug the appliance by pulling on the power cord. Always grasp the plug firmly and pull it out. Do not use an extension cord with this appliance. If the power cord is too short, have a qualified electrician or serviceman install an outlet near the appliance. appliance. Use of an extension cord may adversely affect the performance of the unit.
Climate Range
Information about the climate range of the appliance is detailed on the rating plate, which is attached to the inside or outside of the appliance.
It indicates at which ambient temperature the appliance appliance is optimal.
| Climate range | Suitable ambient temperature |
| SN | From +10°C to +32°C |
| N | From +16°C to +32°C |
| ST | From +16°C to +38°C |
| T | From +16°C to +43°C |
Note: The limit values of the ambient temperature range for the climatic classes for which the appliance is designed and the internal temperatures of the appliance may be affected by factors such as the location of the appliance, the ambient temperature and the frequency of door opening. When operating in an environment other than the specified climate class (i.e., beyond the rated ambient temperature range), the appliance may not operate properly.
Note: Information on the climate range of the appliance is detailed on the rating plate, which is attached to the inside or outside of the appliance. The information about the climate range of the appliance is detailed on the rating plate, which is attached to the inside or outside of the appliance.
Freon Free
The Freon-free refrigerant (R600a) and the foamed insulation material (cyclopentane) used in the appliance are environmentally friendly. R600a is flammable and is sealed in a refrigeration system. In the event of a refrigerant leakage due to a damaged refrigerant circuit, be sure to keep the appliance away from heat sources and open windows to ventilate as quickly as possible.
Locks
If this product is equipped with a padlock, keep the key out of the reach of children. As a safety precaution, break old padlocks or latches when discarding.
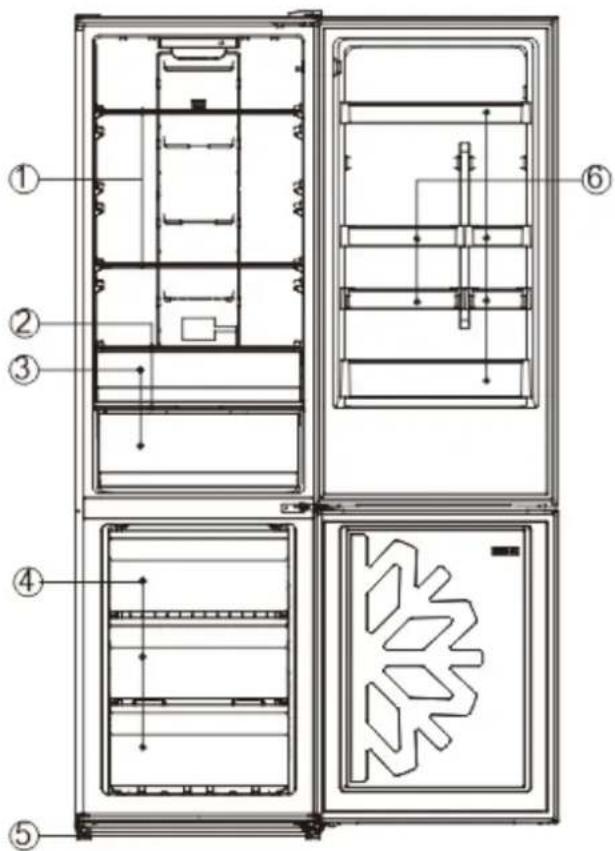
Product description
Due to technological innovations, the product description in this manual may not completely match your appliance. More detailed information corresponds to the final product.
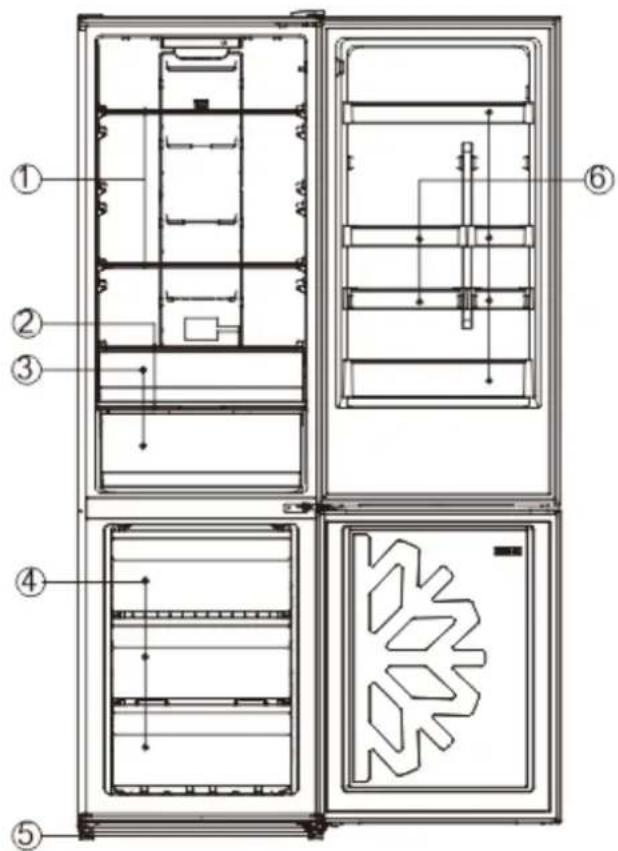
| 1 Glass shelves |
| 2 Drawer cover |
| 3 Fruit and vegetable drawer |
| 4 Freezer drawers |
| 5 Adjustable feet |
| 6 Door balconies |
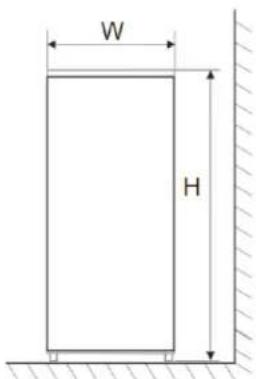
Fig. 1
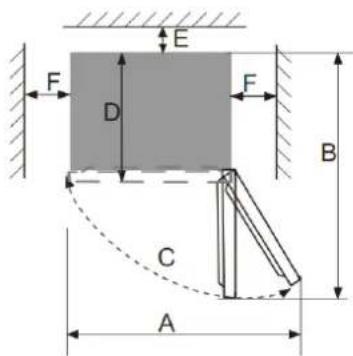
Fig. 2
| W D H A B C(°) E F | |||||||
| 595mm 6 | 35mm 20 | 00mm 966m | mm 1202mm | mm 130mm 5 | 0mm 100mm | ||
How to use
Before use
- Clean the appliance with warm water and detergent, and dry it with a cloth.
dry it with a cloth.
Note: Electrical components should be wiped with a dry cloth.
The digital display is designed on the door of the refrigerator, which is illustrated in the figure on the right.
When the refrigerator is connected to the power supply for the first time, all icons on the display will light up for 2 seconds.
If all doors are closed, the display switches off automatically if no key is pressed within 3 minutes.
When the display is off, it will light up if any door is opened or any key is pressed.
The following key operations are valid only when the keys are unlocked and illuminated on the display.
Temperature control
- Refrigerator temperature setting
Press the "Fridge" key and the fridge temperature digits will flash.
Then press the "Fridger" key to set the temperature and finally press OK to validate the previous temperature setting. The fridge temperature is set as follows. as follows:
5^ C, 6^ C, 7^ C, 8^ C, OFF, 2^ C, 3^ C, 4^ C, 5^ C;
OFF means refrigerator off, and when it takes effect, the refrigerator will stop cooling.
Note: Remove food from the refrigerator compartment before setting this function.
- Freezer temperature setting
Press the "Freezer" button, and the refrigerator temperature digits will flash.
Then press the "Freezer" button to set the temperature, and finally press OK to validate the previous temperature setting. validate the previous temperature setting.
The freezer temperature setting cycles are as follows:
-18^, -17^, -16^, -24^, -23^, -22^, -21^, -20^, -19^, -18^.
Smart eco
When the SMART ECO function is activated, the temperature of the refrigerator compartment is set to 4^ C and that of the freezer compartment to -18^ C, so that food can be stored in the best conditions while the refrigerator operates more efficiently.
Note: In this smart mode, the temperature of the fresh food compartment and the temperature of the freezer compartment are set to -18 ^ . The freezer compartment temperature is not subject to change.
Deactivating the Smart eco function
Press the Function button to select Smart ECO until the corresponding icon flashes, then press the OK button for 5 seconds to confirm. If you do not press OK within 5 seconds, the setting will be invalidated.
Exit Smart eco function
In Smart ECO mode, press the Function key to select Smart ECO until the corresponding mode flashes, then press the OK key for 5 seconds to confirm. mode flashes, then press the OK key to confirm. The Smart function will be exited.
When the Vacation or Fast Freeze or Fast Cool function is activated, the Smart ECO function will be automatically deactivated.
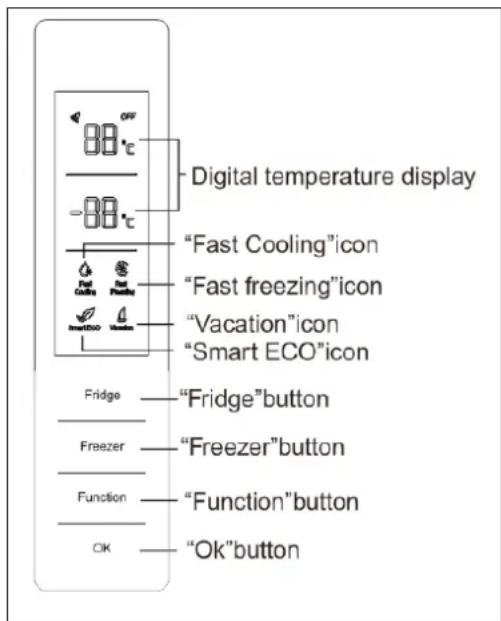
Fast Cooling
When the Fast Cooling function is enabled, the refrigerator temperature is automatically adjusted to 2^ C.
The temperature is quickly reduced so that the food remains fresh without losing its nutritional values.
Note: In Fast Cooling mode, the refrigerator temperature is not subject to any setting.
Disabling the Fast Cooling function
Press the Function key to select Fast Cooling until the corresponding icon flashes, then press the OK key for 5 seconds to confirm. If OK is not pressed within 5 seconds, the setting will be invalidated.
Exit Fast Cooling function
In Fast cooling mode, press the Function key to select Fast cooling until the corresponding mode flashes, and then press the OK key to confirm. Fast cooling function will be exited.
When the Vacation or Smart ECO function is enabled, the Smart ECO function will be disabled automatically.
Fast Freezing
When the Fast Freezing function is enabled, the freezer temperature will be set to -32^ C automatically, and after 26 hours of operation it will be deactivated. Fast cooling of the freezer temperature is beneficial to prevent the loss of nutritional values of the food and thus preserve its freshness.
Note: In fast freezing mode, the freezer temperature is not subject to any adjustment.
Disabling the Fast freezing function
Press the Function key to select Fast Freezing until the corresponding icon flashes, then press the OK key for 5 seconds to confirm. If the OK key is not pressed within 5 seconds, the setting will be invalidated.
Exit Fast freezing function
After a cumulative operating period of 26 hours, the Fast Freeze function will automatically close.
In Fast Freezing mode, press the Function key to select Fast Freezing until the corresponding icon flashes, and then press the OK key to confirm, the Fast Freezing function will be exited.
When the Smart ECO function is enabled, the Fast Freezing function will be disabled automatically.
Vacation
When the Vacation function is enabled, the temperature of the refrigerator will be set to 14^ C.
When you are away for a long time, you can set the Vacation function to keep the refrigerator running with low energy consumption, while ensuring that the fresh food compartment is free from undesirable odours and the freezer compartment operates normally.
Note: Be sure to remove all food from the fresh food compartment before setting this function. In holiday mode, the refrigerator temperature is not subject to change.
Disable the Vacation function
Press the Function key to select Vacation until the corresponding icon flashes, then press the OK key for 5 seconds to confirm. If OK is not pressed within 5 seconds, the setting will be invalidated.
Exit Vacation function
In Vacation mode, press the Function key to select Vacation until the corresponding key flashes, and then press the OK key to confirm. The Vacation function will be exited.
When the Smart or Fast Cooling function is enabled, the Vacation function will be disabled automatically.
Power off memory
In case of power failure, the refrigerator will maintain the operation status before the power failure when the power supply is restored.
Delayed start
To prevent the refrigerator compressor from being damaged in the event of a short power failure (i.e. less than 5 minutes), the compressor will not start immediately after switching on.
Overheating alarm (only after a power failure)
When the refrigerator system is on, if the freezer sensor temperature is above -10^ , the freezer zone digits flash on the display. The freezer temperature can be displayed when any key is pressed, and the display will be restored when any key is pressed again or after 10 seconds.
Door open alarm
If the refrigerator door is open for more than 3 minutes, a beep will sound continuously, which can be stopped when any key is pressed, but will be reset after 3 minutes if the door is kept open. The alarms will not be activated until the door is closed.
System fault alarm
If E0, E1, E2, EH or EC is shown on the display, it indicates a fault in the chiller. In this case, please contact the service department for an appointment.
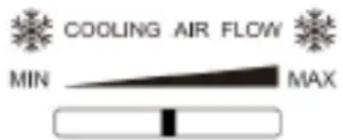
Adjusting the refrigerator's air regulation lever
The cold air entering the fresh food storage compartment will gradually increase as the air regulating lever is adjusted from MIN. to MAX. position.

Cautions for use
- The appliance may not operate steadily (there is a possibility that it may defrost or the temperature may rise too high inside) if it is placed for a prolonged period of time below the cold limit of the climatic range for which the appliance is designed.
• Information on the climate range can be found on the rating plate. - The internal temperature may be affected by factors such as the location of the appliance, ambient temperature, how often the door is opened, etc. The setting of any temperature control device may have to be varied to take these factors into account.
• Effervescent beverages should not be stored in the freezer compartment (if present).
Some products such as ice cream should not be consumed too cold, as they may cause burns from direct cold contact.
Location of food storage
Due to the circulation of cold air inside the appliance, the temperature of each area is different, so different types of food should be placed in different areas.
The refrigerator compartment is suitable for storage of food that does not need to be frozen, cooked food, beverages, eggs, some condiments that need to be kept cold, etc. The vegetable drawer (if available) is suitable for the storage of vegetables, fruits, etc. The freezer compartment is suitable for the storage of ice cream, frozen food and food that will be kept for a long time.
Use of the refrigerator compartment
- Refrigerator door shelves and balconies (if fitted): To remove a glass shelf, lift it slightly, slide it towards you and remove it from its position. To remove a door shelf, lift it slightly and remove it from its place. Avoid food coming into contact with the rear wall. When removing or placing shelves or racks, please hold them firmly and handle them with care to avoid damage.
- Vegetable box (if available): Pull out the vegetable drawer to access the food. If you are going to clean the cover of the vegetable drawer, be sure to put it back in place so that the internal temperature of the drawer is not affected, thus preventing the food inside from deteriorating.
- Vegetable drawer humidity regulator (if fitted): The humidity regulator is used to conserve the humidity inside the vegetable crisper, thus keeping the vegetables and fruits stored inside fresh. When the regulator is set to the right side, with more exposed holes, the internal humidity is kept at a low value. When the regulator is set to the left side, with fewer exposed holes, the internal humidity level of the drawer is high.
High level of humidity Low level of humidity


Storage of fruit and vegetables
In the case of appliances with a cold compartment, a statement should be made to the effect that some types of fresh fruit and vegetables are sensitive to cold and are therefore not suitable for storage in this type of compartment.
Use of the FRIDGE compartment (if available)
This is the ideal place to store meat, sausage, fish, dairy products, eggs and cooked dishes, as well as bread, pastries and bakery products.
Storing food in the refrigerator compartment
- Preferably store food that is fresh and in perfect condition. In this way, they will retain their quality and freshness for longer.
- In the case of pre-cooked products or packaged foods, pay special attention to the best-before or use-by dates indicated by the manufacturer.
- It is also advisable to wrap or cover food well before placing it in the refrigerator so that it retains its aroma, colour and flavour. This also prevents flavour transfer from one food to another or discolouration of plastic parts in the refrigerator compartment.
- Allow hot food or beverages to cool to room temperature before placing them in the refrigerator compartment.
Note: Do not obstruct or block the air outlet openings with foodstuffs to allow free circulation of air. Food placed in the vicinity of the air outlet openings may freeze as a result of the cold air coming out of the air outlet openings.
WARNING! Depending on the air circulation inside the refrigerator compartment, different cooling zones are created in the refrigerator compartment:
- The coldest areas are located in front of the air outlet openings. Store the most delicate foods (fish, sausages, meat) in the coldest zones.
- The least cold zone is located in the upper part of the back door. It is advisable to store cured cheese and butter, for example, in this zone. In this way the aged cheese can release its aroma and the butter will be easier to spread on bread.
Use of the FREEZER (if available)
The freezer compartment is suitable for storing deep-frozen products, preparing and storing ice cubes and freezing fresh food.
Note: Always make sure that the freezer door is closed and sealed completely. If it is not properly closed, food may thaw. Heavy frost build-up occurs in the freezer compartment.
Maximum freezing capacity
The indications regarding the freezing capacity in 24 hours are given on the rating plate of the appliance. The maximum freezing capacity in 24 hours is given on the rating plate of the appliance.
Pay special attention:
- When shopping, remember that it is best to buy frozen food at the last minute. Try to transport them directly home wrapped in an insulated bag. Once at home, you should immediately place them in the freezer compartment.
- Try to place large quantities of food in the top drawer, as they freeze more quickly.
- Arrange the food with sufficient space between them to ensure proper air circulation.
- Frozen products must not come into contact with fresh food.
Freeze fresh food
If you decide to freeze food yourself, use only fresh food in perfect condition. Rinse vegetables before freezing so that their flavour, aroma and colour do not deteriorate, thus preserving their nutritional value. Aubergines, courgettes and asparagus do not need to be rinsed. More details on this method can be found in any cookery book or manual that deals with aspects of freezing food.
Foods suitable for freezing:
Bread and pastries, fish and seafood, meat, vegetables, fruit, herbs, shelled eggs, dairy products such as cheese, butter and cottage cheese, cooked dishes and leftovers, e.g. soups, soups, stews, soups and gravies. such as soups, stews, cooked meat or fish, potato dishes, gratins and sweet dishes, gratins and sweet dishes.
Foods that should not be frozen:
Vegetables that are normally eaten raw, e.g. lettuce or radishes, eggs in their shells, grapes, whole apples, pears, peaches, hard-boiled eggs, yoghurt, sour milk, fresh sour cream, crème fraîche and mayonnaise.
Food packaging
Pack the food hermetically so that it does not dehydrate or lose its flavour.
- Place the food in the packaging provided for this purpose.
- Remove any air that may be present in the packaging.
- Close it hermetically.
- Mark containers, indicating contents and date of freezing.
Appropriate materials for the packaging of foodstuffs:
Plastic foil, polystyrene bags and sheets, aluminium foil, boxes and specific packaging for freezing food. These products can be found in specialised shops.
Unsuitable materials for food packaging:
Wrapping paper, parchment paper, cellophane, rubbish bags, used shopping bags.
Materials suitable for closing the packaging:
Rubber bands, plastic clips, twine, special adhesive tape for freezing. Polystyrene plastic bags or sheets can be heat-sealed with a plastic sealer.
Freezing timetable
The shelf life varies depending on the type of food frozen at a standard temperature of -18^ :
- Fish, sausage, cooked dishes, bread and pastries – up to 6 months
- Cheese, poultry and meat - up to 8 months
- Fruit and vegetables - up to 12 months
WARNING! Before cleaning, unplug the power plug first; Do not connect or disconnect the power plug with wet hands, as there is a risk of electric shock and injury. Do not spill water directly on the appliance, thus avoiding rust, electricity leakage and accidents.
Internal and external cleaning
Food residues in the interior can cause a bad smell, so it should be cleaned regularly. Infiniton brand suggests that you clean the interior at least once a month.
Remove all interior elements (shelves, drawers, etc.) and clean with a soft towel or sponge dampened with warm water. Wipe off dust accumulated on the surface of the appliance frequently.
After using detergent, be sure to rinse it with clean water and then wipe it dry with a cloth.
WARNING! Do not use bristle brushes, wire brushes, detergent, soap powder, alkaline detergent, benzene, gasoline, acid, hot water and other corrosive or soluble elements to clean the surface of the appliance, door gasket, plastic decorative parts, etc. to avoid damage. Carefully dry the door seal, clean the groove with a wooden stick wrapped with cotton thread.
What to do if there is a failure in the power supply or cooling system?
- Try to open the appliance door as little as possible, so that food can be stored safely and freshly for hours even in summer.
- If you receive the power cut warning in advance:
- Set the thermostat to the highest setting one hour in advance, so that the food is completely frozen (Do not store new food during this time!). Restore the temperature to the original setting when the power supply comes back on.
- You can also make ice in an airtight container and put it inside the appliance to extend the storage time of fresh food.
Safety checks after maintenance
• Is the power cord broken or damaged?
- Is the plug firmly inserted into the socket?
• Is the socket overheating abnormally?
Note: Electric shock and fire may occur if the power cord and plug are damaged or stained with dust. If there is any abnormality, unplug the power cord and contact the supplier.
Whenever there is a problem with the appliance, check if you can solve it by following the tables below. If the problem persists, contact customer service.
| DESCRIPTION POSSIBLE CAUSE SOLUTION | ||
| No refrigeration at all at all | ·Is the plug disconnected? ·Are the switches and fuses broken? ·Is there no electricity or has the power supply been cut off?" | ·Re-plug. ·Open the door and check if the light is on. |
| Abnormal noise. | ·Is the appliance stable? ·Does the appliance reach up to the wall? | ·Adjust the adjustable feet. ·Remove it from the wall |
| Poor cooling efficiency. | ·Do you put out hot food or too much food? ·Do you open the door frequently? ·Do you put the bag of food on the door seal? ·Does it get direct sunlight or is it near an oven or cooker? ·Is it well ventilated? ·Is the temperature too high? | ·Put food in the freezer when hot food cools down. ·Check and close the door. ·Remove the refrigerator from the heat source. ·Keep the distance between food to ensure good ventilation. ·Set the right temperature. |
| Bad smells inside. | ·Has any food spoiled? ·Do you need to clean the fridge? ·Do you wrap food with strong smells? | ·Throw away spoiled food. ·Clean the fridge. ·Pack strong-flavoured foods. |
Note: Ensure that the rubber gaskets seal tightly around the perimeter of the door before tightening the hinge screws.
- Unscrew the door hinge cover and remove the door hinge cover.
- Unplug the cable.
Unscrew the 4 screws holding the upper hinge and remove it. Remove the ground wire loop from the hinge.
Insert the cable connection into the opening at the top of the appliance Remove the door stopper and small end caps cover.
natural_image
Close-up of a metallic mechanical component with a triangular component against a clear sky (no text or symbols visible)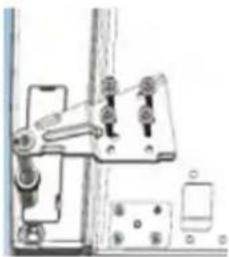
natural_image
Mechanical assembly diagram showing clamping mechanism with no visible text or symbols-
Fit the door connector and cable connection into the door opening and then fit the small end cap.
-
Loosen 1 screw as shown in the figure below, to remove the recess cover on the top of the appliance Remove the cover from the small end cover of the door and pull out the door plug and cable connection.

natural_image
Close-up of a device's front panel showing a highlighted orange component and a gray handle (no text or symbols visible)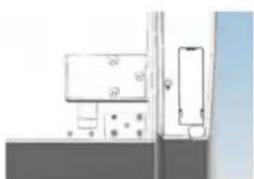
natural_image
Pure electrical circuit lines without any symbols-
Place the door socket door into the round opening opening of the door and fit the cover of the small end cap.
-
Lift the refrigerator door about 50 mm to remove it from the appliance.
-
Loosen the 3 screws holding the middle hinge and then remove it.
-
Lift the freezer door about 50 mm so that it can be removed from the refrigerator.

natural_image
Simple diagram showing a yellow rectangular object with dots on a surface, next to a white rectangular block (no text or symbols)
natural_image
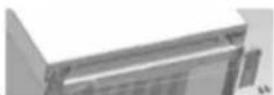
3D rendering of a refrigerator with front and side views (no text or symbols)- Remove the adjustable front brackets under the bottom hinge. Then, loosen the 4 screws holding the lower hinge and remove it from the refrigerator.

natural_image
Exterior view of a modern office building (no signage)- Install the removed parts on the opposite side of the appliance. Pull the plug from the door, as shown in the figure below, and install it in the respective position on the other side.
natural_image
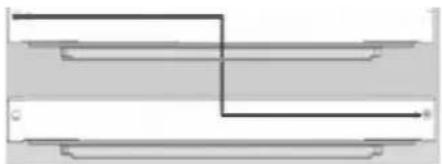
Pure electrical circuit lines without any symbols- Remove the screws from the stop, as shown in the figure below, and install it on the opposite side of the door.
natural_image
Pure diagram of two parallel horizontal bars with a central connecting line, no text or symbols present- Remove the shaft from the lower hinge stops and install it as shown in the picture below.
natural_image
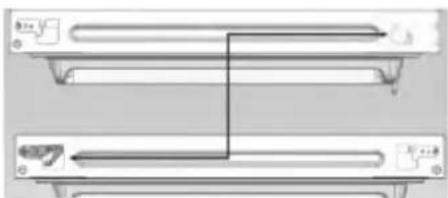
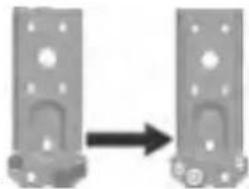
Two identical gray mechanical components with mounting holes, connected by an arrow indicating transformation (no text or symbols)- Install the doors on the opposite side.
Remove the adjustable bracket at the front, as shown below. Then, install the bottom hinge on the other side of the refrigerator and tighten the screws.

- Adjust the adjustable feet
- Position the freezer door, rotate the middle hinge 180° and then install it on the opposite side of the appliance. Secure the middle hinge with the 3 corres- ponding screws 16. Repeat the previous step for the refrigerator door.
- Install the recess cover on the opposite side of the appliance and tighten the screw.

Finally, check that the doors are correctly aligned and close properly.

MiLECTRIC
Refrigerador Combi
natural_image
Line drawing of two stainless steel refrigerators in a kitchen setting, one with a digital display and the other with a control panel (no text or symbols)RCM-355XRCM-354B
ean: 8445639000304 ean: 8445639000397
natural_image
Two stick figures pulling a gray diamond shape (no text or symbols)- Localização
natural_image
Two gray rectangular panels with checkmark and cross symbols, no text or labels present- Instalação
natural_image
Symbol of a trash bin crossed with a diagonal line and a horizontal bar below (no text or labels)
Due to technological innovations, the product description in this manual may not completely match your appliance. More detailed information corresponds to the final product.
Controlo da temperatura
Precauções de uso
natural_image
Six simple line drawings of various vegetables and fruits, including a zongzi, carrot, rose, onion, bell pepper, and mushroom (no text or symbols)