Dormakaba

E-Plex Wireless - Access Control System Dormakaba - Free user manual and instructions

Find the device manual for free E-Plex Wireless Dormakaba in PDF.

📄 2 pages English EN Download 💬 AI Question 10 questions ⚙️ Specs
Notice Dormakaba E-Plex Wireless - page 1
Pick your language and provide your email: we'll send you a specifically translated version.
Brand Dormakaba
Model E-Plex Wireless
Product Type Wireless Access Control System (Electronic Lock)
Connectivity Wireless (Zigbee/Proprietary)
Power Source Battery (4x AA alkaline, included)
Battery Life Approximately 1 year under normal use
User Capacity Up to 2000 users
Audit Trail 100,000 events
Credential Types PIN codes (4-8 digits), RFID cards/fobs (optional)
Wireless Range Up to 300 feet (90 meters) line-of-sight
Operating Temperature 14°F to 131°F (-10°C to 55°C)
Weather Resistance Indoor/outdoor (IP54 rating)
Dimensions (Exterior) 5.6 in x 3.2 in x 2.7 in (142 mm x 81 mm x 69 mm)
Dimensions (Interior) 6.5 in x 3.2 in x 2.7 in (165 mm x 81 mm x 69 mm)
Weight 3.5 lbs (1.6 kg) including batteries
Material Zinc alloy die-cast housing, hardened steel latch
Finish Options Brushed Chrome, Satin Brass, Oil-rubbed Bronze
Mounting Standard ANSI/BHMA A156.2 Series 4000 bored lock (161, 162)
Door Thickness Range 1.75 in to 2.25 in (44 mm to 57 mm)
Backset 2.75 in (70 mm) standard
Key Override Yes (mechanical key cylinder included)
Warranty Limited 2 years (parts and labor)
What's Included Lock assembly, interior and exterior escutcheons, strike plate, mounting screws, batteries, mechanical keys, installation guide
Compliance FCC, UL 294, ANSI/BHMA Grade 1
Cleaning Instructions Wipe with a soft, damp cloth; avoid abrasive cleaners or solvents

Frequently Asked Questions - E-Plex Wireless Dormakaba

How do I install the E-Plex Wireless lock?
Installation requires a standard ANSI 161/162 door prep. Follow the included template to drill holes. Mount the exterior escutcheon first, then the interior assembly, and secure with screws. Insert batteries and test operation. Detailed steps are in the manual.
How do I program user PIN codes?
Press the 'Program' button inside the lock, enter the master PIN (default 12345678), then select 'Add User'. Choose a user number and assign a 4-8 digit PIN. Follow on-screen prompts or the programming guide.
What do I do if the lock is not responding?
Check that the batteries are fresh and installed correctly. Look for low-battery indicator (beeps/flashes). If still unresponsive, perform a factory reset by removing batteries for 10 seconds and reinserting. If issue persists, contact support.
How do I change the batteries?
Remove the interior cover by sliding it down. Replace the 4 AA alkaline batteries with new ones, ensuring correct polarity. Replace the cover. The lock will resume normal operation immediately.
Can I use the lock with my existing home automation system?
The E-Plex Wireless uses a proprietary wireless protocol. It may integrate with Dormakaba's own software or third-party systems via gateway. Check compatibility with your system provider.
What is the maximum number of users?
The lock supports up to 2000 user codes. Additionally, it can store 100,000 audit trail events for tracking access.
How do I perform a factory reset?
Remove the batteries. Press and hold the 'Program' button while reinserting batteries. Continue holding for 10 seconds until the lock beeps. Release. All data will be cleared.
Is the lock weather resistant?
Yes, the E-Plex Wireless has an IP54 rating, making it suitable for outdoor use in covered locations. Avoid direct exposure to heavy rain or extreme temperatures.
Can I use RFID cards or fobs?
Optional RFID readers are available. Cards/fobs can be added as credentials. Contact Dormakaba for compatible accessories.
What if I lose the master code?
If the master code is lost, you must perform a factory reset, which erases all codes. After reset, the master code returns to default (12345678). Change it immediately for security.

User questions about E-Plex Wireless Dormakaba

0 question about this device. Answer the ones you know or ask your own.

Ask a new question about this device

The email remains private: it is only used to notify you if someone responds to your question.

No questions yet. Be the first to ask one.

Download the instructions for your Access Control System in PDF format for free! Find your manual E-Plex Wireless - Dormakaba and take your electronic device back in hand. On this page are published all the documents necessary for the use of your device. E-Plex Wireless by Dormakaba.

USER MANUAL E-Plex Wireless Dormakaba

Enable Wireless Option:

The Wireless Option can only be enabled by a Kaba Certified Access Control Dealer/Integrator.

Dormakaba E-Plex Wireless - 1

Once Enterprise Software is installed, go to System Setup and choose System Settings. In the Wireless Configuration section, "check" Enable Online Communications.

Dormakaba E-Plex Wireless - 2

The software requires a Kaba Wireless Certified Dealer ID and Kaba Wireless License Number to be entered.

System Settings Time Format User WiFi Length 12 Hour Time (40,978) 24 Hour Time Size Controls WiFi Grid (2085, 5200 Books) Print (2085, 3750 Books) Validate Wireless License Default Staff for Web Please enter your Fiji Wireless Dealer ID: Received Load Web Configurations Standard Manager Other Windows Configuration... Enable Online Consultation Windows Emergency Settings Windows Network Settings 1. 2. 3.

Dormakaba E-Plex Wireless - 4

For Emergency Passage or Lockdown to be enabled and functional at least one box must be selected for each command in the Wireless Setup screen.

Dormakaba E-Plex Wireless - 5

Select the On Line ZigBee Network menu and choose Discover Device or select the Discover Device icon located next to the Help icon. The E-Plex (ZigBee) Gateway should be connected to the host PC's USB port.
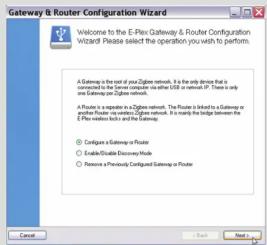
Gateway & Router Configuration Wizard Welcome to the E-Plan Gateway & Router Configuration Wizard Please select the operation you wish to perform. A Gateway is the exit of your Zigbee network. It is the only choice that it is recommended to use this remote OS or router IP. There is only one option to switch to a local network. A Router is also a separate in Zigbee network. The Router is linked to a Gateway or another router via the Zigbee network. It is mainly the bridge between the E-Plan networks blocks and the Gateway. Configure a Gateway or Router Enable a Double Economy Network Remove a Previously Connected Gateway or Router Cancel Next > close

Click Next for the Gateway and Router Configuration Wizard.

E-Plex Enterprise Software File Schedules Holidays/Vacations Door Groups Doors Access Groups Departments Users Access Assignment Reports On Line Zigbee Network System Setup Help On Line Zigbee Network Manage Discover Device Gateway & Router Configuration Wizard Configure the following device parameters. Device Type: Gateway Router MAC Address: 00.00.26.00.14.24 Device Name: ZipBee Channels All 11 12 13 14 15 16 17 18 19 20 21 22 23 24 25 TCP/IP Communication Settings Obtain an IP address automatically Use the following IP address: IP address: Submit Mask: System Information Server Name: kwelljhamas Server IP address: 127.0.0.1 Manage Doors Add a Door with the Wireless Option Manage Door Profile Add Door Door Group OS Solutions Door Name Conference Room Lock Model E-Plus 5000 Translation Windows Exchange HoldUp/Placement One Door Group Default Holdings Lock Parameters Lock Function Types Unlock Time (sec) Entry Lock Ruster Volume (L+OR, L+Load) Connection Temp Control (W+Load) Temp Shift Time (sec) Transfer Passive Mode Enabled Manual Package Duration (Min) Made in Fixed Response Enabled Total Users: 0 Remove Subnets Switch to Default to the Door Lock Location Lock Status Network Status Battery Level Last Communication available Alum receive security Display card or phone access event Save Cancel Step 1: Put a Gateway in Join On node The following list shows the available Gateways in the system: You can have ONLY ONE Gateway at a time in the Disegiving module (Join On Mode) Select the Gateway Below that is physically chosen to the selected door(s) in the Door list shown under Step 2: Gateway Name Status Network Status Company-Gateway Offline Join Mode ON Step 2: Enter the ZAC at the Lock Door Name Zigbee Access Code (ZAC) Conference Room 95.35.90.20 Supplies Area 99.96.15.16 Marketing-Doo Room 88.91.43.30 Manage Doors Add a Door with the Wireless Option Join a Wireless Lock to the E-Plex Wireless Network If all Doors did not Join On, then automatically send the Join Off command after... 10 minutes (Default) 20 minutes 1 hour 2 hours Send Join On Command to the Selected Gateway > The following list shows each B digit ZAC rmisions that must be entered at each selected locs once the Trend Join On command is sent. To node ZAC in the Door: B = B + B + ZAC / B; Note: the lock must be in factory default node with factory new Master PIN (12345678) Use the ZAC (ZigBee Access Code) Process to Configure a Wireless E-Plex Lock

E-PLEX®

Wireless™

WIRELESS IMPLEMENTATION GUIDE

KABA®

(continued)

Wireless Option: Additional Features and Functions

Dormakaba E-Plex Wireless - KABA® - 1

The Events Screen displays real-time lock and user events that occurred at the lock such as user access, passage, remote unlock, low battery, etc.

Dormakaba E-Plex Wireless - KABA® - 2

The Progress Log shows the status of lock programming and other wireless commands initiated from the host PC station.

Dormakaba E-Plex Wireless - KABA® - 3

The Control Panel (also called the Dashboard) provides a visual of the system's performance, including door status, door battery status, door state, and signal strength

Dormakaba E-Plex Wireless - KABA® - 4

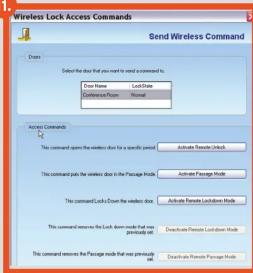
Emergency System Lockdown and Emergency Passage Command buttons for Wireless Locks.

E-Plex Enterprise Software File Schedules Holidays/Vacations Door Groups Doors Access Groups Departments Users Access Assignment Reports On Line Zigbee Network System Setup Help 7.8 Events Lock Events System Events Show All Events User Access Events Only Pause Refresh Date Time Door Name Event User 3/4/2011 11:50 AM Main Entrance Open Card Only Shelly Carter 3/4/2011 11:49 AM Main Entrance Open Card Only John Espinoza 3/4/2011 11:49 R & D Lab Warehouse Entrance Open PIN Only Robert Wilson 3/4/2011 11:47 AM Invalid Card 3/4/2011 11:43 AM Main Entrance Open Card Only Linda Gest 3/4/2011 11:41 AM R & D Lab Warehouse Entrance Open PIN Only Michael Simpson 3/4/2011 11:41 AM Maintenance Room Open PIN Only Service 10 - Temp 3/4/2011 11:38 AM Break Room Open Card Only Tricia Wilde 3/4/2011 11:37 AM Security Office Open Card Only Elizabeth White 3/4/2011 11:37 AM Production Office 1 Open PIN Only Robert Wilson 3/4/2011 11:36 AM Maintenance Room Open PIN Only Service 19 - Temp 3/4/2011 11:34 AM Conference Room A Open Card Only Kelly King 3/4/2011 11:33 AM Human Resources Open Card Only Vicky Jenson 3/4/2011 11:32 AM Supply Closet Open PIN Only Service 10 - Temp 3/4/2011 11:30 AM Production Office 2 Open Card Only Cindy James 3/4/2011 11:35 AM CEO Office Open Card Only Roger Camp 3/4/2011 11:29 AM Supply Closet Open PIN Only Service 10 - Temp 3/4/2011 11:29 AM Conference Room A Invalid Card 3/4/2011 11:29 AM Human Resources Open Card Only Kelly King 3/4/2011 11:28 AM Main Entrance Open Card Only Roger Camp 3/4/2011 11:28 AM Conference Room B Open Card Only Heather Campbell 3/4/2011 11:27 AM Security Office Open Card Only James Thomas 3/4/2011 11:25 AM Side Gate Open Card Only Jason Davis 3/4/2011 11:25 AM Main Entrance Open Card Only Carol McDonald 3/4/2011 11:24 AM Human Resources Open Card Only Keith Pratt 3/4/2011 11:24 AM Shipping Office Open Card Only Matthew Lewis 3/4/2011 11:23 AM Warehouse Entrance Open PIN Only Robert Wilson 3/4/2011 11:23 AM Main Entrance Open Card Only Tom Cook 3/4/2011 11:23 AM Supply Closet Open PIN Only Service 10 - Temp Progress Log Timestamp Command Progress Status User 3/4/2011 11:35 AM Remote Door Unlock Completed Security Office Timestamp Door / Gateway Progress Status 3/4/2011 11:35 AM Warehouse Door 100% Success Timestamp Command Progress Status User 3/4/2011 11:35 AM Remote Door Unlock Completed Security Admin Timestamp Door / Gateway Progress Status 3/4/2011 11:35 AM Server Room 100% Success Timestamp Command Progress Status User 3/4/2011 10:45 AM Remote Passage Door 100% Completed Security Office Timestamp Door / Gateway Progress Status 3/4/2011 10:45 AM Conference Room D 100% Success Timestamp Command Progress Status User 3/4/2011 10:45 AM Lock Programming 100% Completed System Admin Timestamp Door / Gateway Progress Status 3/4/2011 10:45 AM Break Room 100% Success Timestamp Command Progress Status User 3/4/2011 09:48 AM Remote Door Unlock Completed Vicky Jenson Timestamp Door / Gateway Progress Status 3/4/2011 09:48 AM Personnel Records Room 100% Success Timestamp Command Progress Status User 3/4/2011 09:48 AM Remote Door Lockdown Completed Security Office Timestamp Door / Gateway Progress Status 3/4/2011 09:48 AM Back Gate 100% Success Control Panel Door Status Door Battery Status Door State Signal Strength Emergency Open System Lockdown Normal Operation Current system emergency state is Normal Last Alarm: None M-Unit Synched

Dormakaba E-Plex Wireless - KABA® - 6

Wireless Lock Access Commands Send Wireless Command From: Select the drive that you want to send a command to: Drive Name: Load Drive Description Form: Normal Active Commands: The command expires the wireless drive for a specific period: Activate Temporary Clock The command gets the wireless drive in the Passage Node: Activate Passage Node The command Locks Down the wireless drive: Activate Passive Lockdown Node This command ensures the Lock down node that was previously used: Describe Passage Lockdown Node This command ensures the Passage node that was previously used: Describe Passive Passage Node

Send Individual Remote Unlock, Passage, and Remote Lockdown Commands

Dormakaba E-Plex Wireless - KABA® - 8

Wireless Lock Maintenance Commands Send Wireless Command: Maintenance Commands Send a key then click on or button to execute the command Switch Commands Done Name Conference Requests This command sends network back <|vision_start|> user to send a link to the back. The command returns the data at all the link is returned from the start of the link. Set Status Set Date/Time Single Lock Command This command sends a command to a specific link to communicate mail. The email will be sent to the link back. Please select a link to the link, but it is not allowed to any other link. This command, please request the link to the link. Auth Count: 100 Auth List: 0

Maintenance and Diagnostics of Wireless E-Plex Locks

Dormakaba E-Plex Wireless - KABA® - 10
For detailed information on all of these wireless features and functions, Click on Help, then Software User Guide.

Disclaimer: While reasonable efforts were made to ensure the accuracy of this document at the time of printing, Kaba assumes no liability for any errors or omissions. This information is subject to be revised without notice, and changes may be incorporated in future releases.

LIT1031 0911

Copyright © 2011 Kaba Access Control. All rights reserved.

Table of contents Click a title to access it
Manual assistant
Powered by Anthropic
Waiting for your message
Product information

Brand : Dormakaba

Model : E-Plex Wireless

Category : Access Control System