
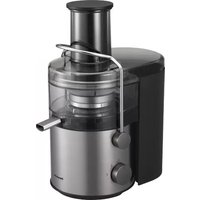
MJL500 - Juicer PANASONIC - Free user manual and instructions
Find the device manual for free MJL500 PANASONIC in PDF.

| Brand | Panasonic |
| Model | MJL500 |
| Product type | Slow juicer |
| Usage | Domestic |
| Power supply | 220-240 V, 50/60 Hz |
| Power | 150 W |
| Rotation speed | 40-60 rpm |
| Pulp container capacity | 1 L |
| Juice jug capacity | 0.5 L |
| Dimensions (L x W x H) | 25 x 20 x 35 cm |
| Weight | 3.5 kg |
| Strainer material | Stainless steel |
| Reverse function | Yes, to unclog |
| Safety lock system | Yes |
| Automatic shut-off in case of overheating | Yes |
| Cleaning | Removable parts dishwasher safe (except motor) |
| Non-slip feet | Yes |
| Included accessories | Pusher, cleaning brush, juice jug |
| Spare parts availability | Yes, via Panasonic after-sales service |
| Warranty | 2 years |
Frequently Asked Questions - MJL500 PANASONIC
User questions about MJL500 PANASONIC
0 question about this device. Answer the ones you know or ask your own.
Ask a new question about this device
Download the instructions for your Juicer in PDF format for free! Find your manual MJL500 - PANASONIC and take your electronic device back in hand. On this page are published all the documents necessary for the use of your device. MJL500 by PANASONIC.
USER MANUAL MJL500 PANASONIC
Operating Instructions
Bedienungsanleitung
Slow Juicer (Household Use)
Panasonic Test and Development Kitchen
Panasonic Consumer Electronics U.K.
A Division of Panasonic U.K. Ltd
Willoughby Road, Bracknell, Berks, RG12 8FP
Web Site: www.panasonic.co.uk
Representative in EU :
Panasonic Marketing Europe GmbH
Panasonic Testing Centre
Winsbergring 15, 22525 Hamburg, Germany
Panasonic Taiwan Co., Ltd.
Web Site: http://panasonic.net/
© Panasonic Taiwan Co., Ltd. 2015
Thank you for purchasing the Panasonic product.
- This product is intended for household use only.
- Please read these instructions carefully to use the product correctly and safely.
- Before using this product please give your special attention to "Safety Precautions" (Page GB3-8).
- Please keep this Operating Instructions for future use.
| Contents | Page |
| Safety Precautions | GB3 |
| · Important Information | GB9 |
| · Electrical Requirement (U.K only) | GB10 |
| Parts Names and Handling Instructions | GB11 |
| Before Use | |
| · Disassembly and assembly of the parts | GB12 |
| · Safety Lock | GB14 |
| · Preparations of ingredients for juicing | GB15 |
| · Preparations of ingredients for frozen dish | GB16 |
| How to Use | GB17 |
| How to Clean | GB18 |
| Troubleshooting | GB20 |
| Circuit breaker protection | GB21 |
| Replacement Parts | GB21 |
| Specifications | GB21 |
| Recipes | GB22 |
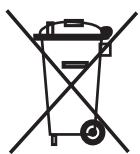

Information on Disposal for Users of Waste Electrical & Electronic Equipment (private households)
This symbol on the products and/or accompanying documents means that used electrical and electronic products should not be mixed with general household waste. For proper treatment, recovery and recycling, please take these products to designated collection points, where they will be accepted on a free of charge basis. Alternatively, in some countries you
may be able to return your products to your local retailer upon the purchase of an equivalent new product.
Disposing of this product correctly will help to save valuable resources and prevent any potential negative effects on human health and the environment which could otherwise arise from inappropriate waste handling.
Please contact your local authority for further details of your nearest designated collection point.
Penalties may be applicable for incorrect disposal of this waste, in accordance with national legislation.
For business users in the European Union
If you wish to discard electrical and electronic equipment, please contact your dealer or supplier for further information.
Information on Disposal in other Countries outside the European Union
This symbol is only valid in the European Union.
If you wish to discard this product, please contact your local authorities or dealer and ask for the correct method of disposal.
Safety Precautions
Please make sure to follow these instructions.
In order to prevent accidents or injuries to the user, other people, and damage to property, please follow the instructions below.
The following charts indicate the degree of damage caused by wrong operation.

WARNING:
Indicates serious injury or death.

CAUTION:
Indicates risk of injury or property damage.
The symbols are classified and explained as follows.

This symbol indicates prohibition.

This symbol indicates requirement that must be followed.

WARNING

- Do not damage the mains lead or mains plug.
Following actions are strictly prohibited.
Modifying, touching on or placing near heating elements, bending, twisting, pulling, pulled over sharp edges, putting heavy objects on top, bundling the mains lead and carrying the appliance by the mains lead.
(It may cause electric shock, or fire due to short circuit.)
- Do not use the appliance if the mains lead or mains plug is damaged or the mains plug is loosely connected to the household mains socket.
(It may cause electric shock, or fire due to short circuit.)
If the supply cord is damaged, it must be replaced by the manufacturer, its service agent or similarly qualified person in order to avoid a hazard.
Safety Precautions
Please make sure to follow these instructions.

WARNING

-
Do not plug or unplug the mains plug with wet hands. (It may cause electric shock.)
-
Always ensure that hands are dry before handling the mains plug or switching on the appliance.

Make sure the voltage indicated on the label of the appliance is the same as your local supply.
(It may cause electric shock or fire.)
Also avoid plugging other devices into the same household mains socket to prevent electrical over heating. However, if you are connecting a number of mains plugs, make sure the total wattage does not exceed the rated wattage of the household mains socket.
Insert the mains plug firmly.
(Otherwise it may cause electric shock and fire due to heat that may be generated around the mains plug.)
Clean the mains plug regularly.
(Dust and moisture build-up on the mains plug may cause insufficient insulation, which may cause a fire.)
Unplug the mains plug, and wipe with a dry cloth.
- Keep the mains lead out of reach of children. Do not let the mains lead hang over the edge of the table or worktop.
(It may cause burns, injury or electric shock.)

- Do not immerse the appliance in water or splash it with water.
(It may cause electric shock, or fire due to short circuit.)

WARNING

- Do not disassemble, repair or modify this appliance.
(It may cause fire, electric shock or injury.)
Consult the place of purchase or a Panasonic service centre.
- Do not allow infants and children to play with packaging material.
(It may cause suffocation.)

This appliance shall not be used by children. Keep the appliance and its cord out of reach of children. Appliances can be used by persons with reduced physical, sensory or mental capabilities or lack of experience and knowledge if they have been given supervision or instruction concerning use of the appliance in a safe way and if they understand the hazards involved.
(It may cause burns, injury or electric shock.)
Always keep the children away from the appliance.
(It may cause burns or injury.)
- Children do not realise dangers that are likely to occur because of improper use of appliances.
Safety Precautions
Please make sure to follow these instructions.

CAUTION

- Discontinue using the appliance immediately and unplug in the unlikely event that this appliance stops working properly.
(It may cause smoking, fire, electric shock or burns.)
e.g. for abnormal or breaking down
- The mains plug and the mains lead become abnormally hot.
- The mains lead is damaged or the appliance power fails.
- The main body is deformed, has visible damage or is abnormally hot.
- There is abnormal turning noise while in use.
There is unpleasant smell. - There is another abnormality or failure.
Unplug the appliance immediately and consult the place of purchase or a Panasonic service centre for inspection or repair.

- Do not use the appliance for any purpose other than those described in these instructions.
(It may cause burns or injury.)
- Panasonic will not accept any liability if the appliance is subject to improper use, or failure to comply with these instructions.
- Do not use the appliance on following places.
- On uneven surfaces, on carpet or table cloths etc. (It may cause fire or injury.)
- Places where it may be splashed with water or near a heat source. (It may cause electric shock or electrical leakage.)
- Near any open water such as bathtubs, sinks, or other containers. (It may cause electric shock or electrical leakage.)

CAUTION

- Do not insert any object in the gaps.
(It may cause electric shock.)
- Especially metal objects such as pins or wires.
- Do not hold the appliance by the mains lead.
(It may cause electric shock or injury.)
- Do not replace any parts of the appliance with the spare parts other than this appliance genuine parts.
(It may cause fire, electric shock or injury.)
- Do not operate the appliance continuously for more than 15 minutes. Rest 30 minutes (or until motor housing cools down) after 15 minutes operation.
(It may cause burns.)
- Do not put your fingers or utensils such as spoons or forks into the feeding tube while the appliance is operating. If food becomes clogged in the feeding tube, use the food pusher or another piece of fruit or vegetable to push it down.
(It may cause injury.)
- Do not leave the appliance unattended when in use.
(It may cause fire.)
When leaving it, turn the power off.
- Do not open the lid or disassemble the juicing bowl during operating.
(It may cause injury.)
- Do not use the appliance if the squeezing screw or the juicing bowl is damaged or has visible cracks.
(It may cause injury.)
Safety Precautions
Please make sure to follow these instructions.

CAUTION

- Make sure to hold the mains plug when unplugging the mains plug. Never pull on the mains lead.
(Otherwise it may cause electric shock, or fire due to short circuit.)
- Place the appliance on a firm, dry, clean flat heatproof worktop.
(It may cause injury.)
- Beware not to be tripped over or get caught in the mains lead while in use.
(Otherwise it may cause burns or injury.)
Always disconnect the appliance from the supply if it is left unattended and before assembling, disassembling or cleaning.
(It may cause injury.)
- Care shall be taken when handling and cleaning the squeezing screw and filter.
(It may cause injury.)
- When moving appliance, move the motor housing and squeezing bowl separately by holding bottom of the part with both hands after unplug.
(It may cause fire.)
Do not get hair, necklace or string of clothes close to feeding tube.
(It may cause injury due to entrainment.)
Important Information
- Do not place the juice container and pulp container in a microwave.
- Do not drop the appliance to avoid damaging the appliance.
- Do not use the appliance outdoors.
- Do not wrap the mains cord around the motor housing.
Make sure attachments are set firmly.
Make sure to clean the appliance after every use. - Do not operate appliance empty for more than 30 seconds after turned it on. (It may damage the screw.)
Insert ingredients immediately after turned on the appliance.
- Do not block the pulp spout and juice spout during operating.
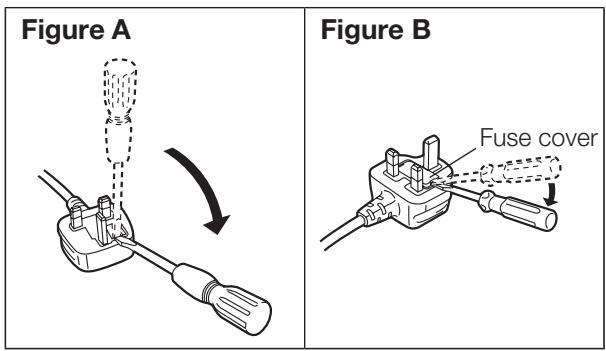
Electrical Requirement (U.K only)
FOR YOUR SAFETY PLEASE READ THE FOLLOWING TEXT CAREFULLY.
This appliance is supplied with a moulded three pin mains plug for your safety and convenience. A 13-amp fuse is fitted in this plug.
Should the fuse need to be replaced please ensure that the replacement fuse has a rating of 13-amp and that it is approved by ASTA or BSI to BS1362.
Check for the ASTA mark or the BSI mark on the body of the fuse.
If the plug contains a removable fuse cover, you must ensure that it is refitted when the fuse is replaced.
If you lose the fuse cover, the plug must not be used until a replacement cover is obtained.
A replacement fuse cover can be purchased from your local Panasonic Dealer.
If the fitted moulded plug is unsuitable for the socket outlet in your home, then the fuse should be removed and the plug cut off and disposed of safely. There is a danger of severe electrical shock if the cut off plug is inserted into any 13-amp socket.
How to replace the fuse
The location of the fuse differs according to the type of AC mains plug (figures A and B).
Confirm the AC mains plug fitted and follow the instructions below. Illustrations may differ from actual AC mains plug.
Open the fuse cover with a screwdriver and replace the fuse and close or attach the fuse cover.
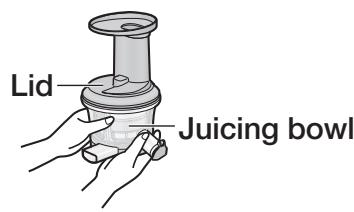
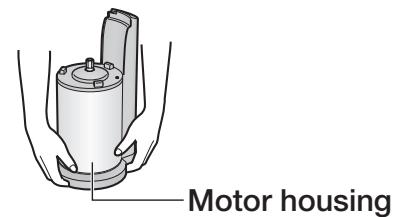
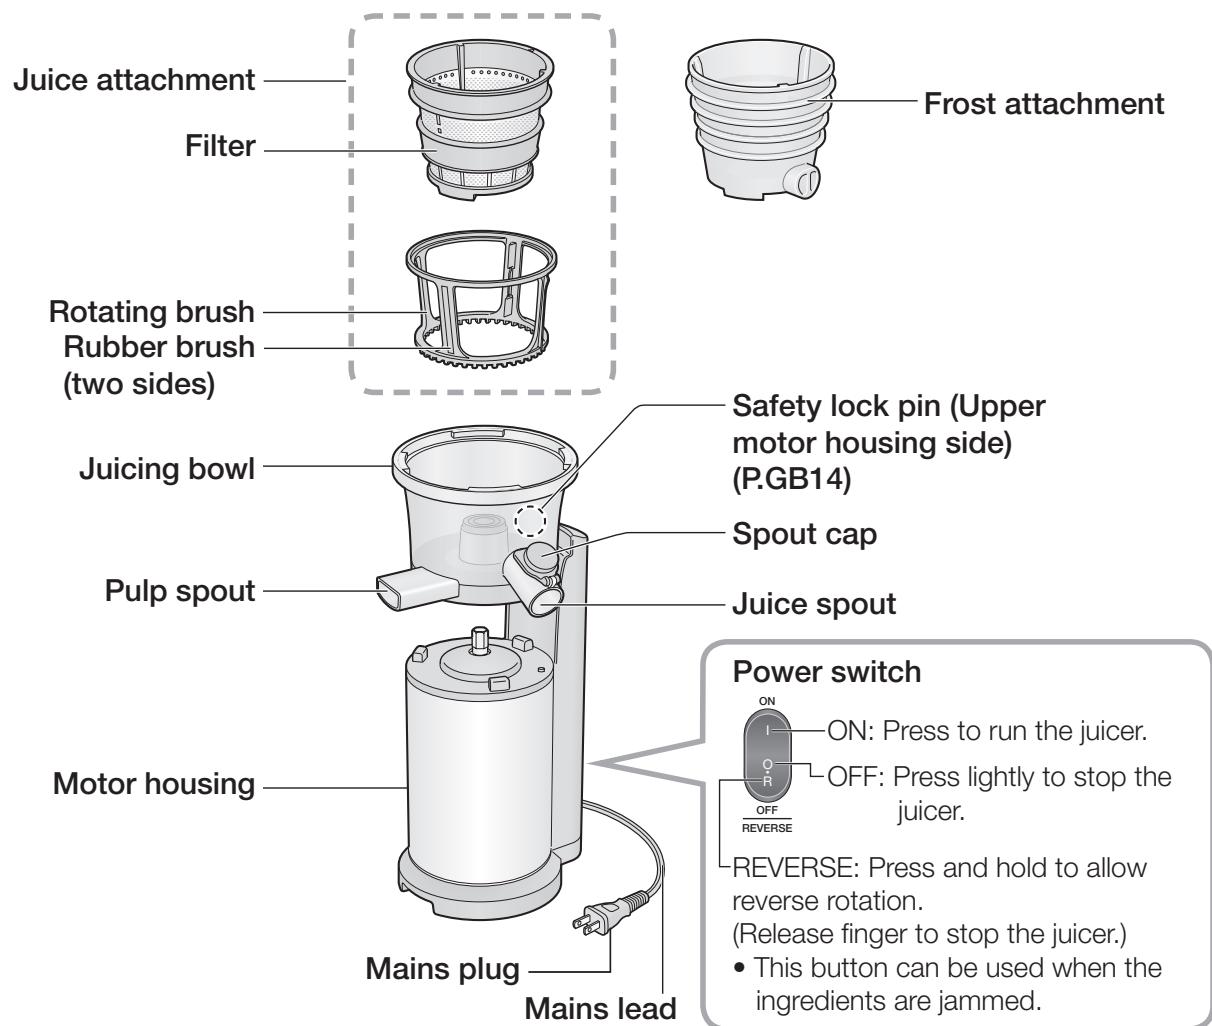
Parts Names and Handling Instructions
- Wash all the detachable parts before using the appliance for the first time or when you have not used it for a while. (P. GB18)
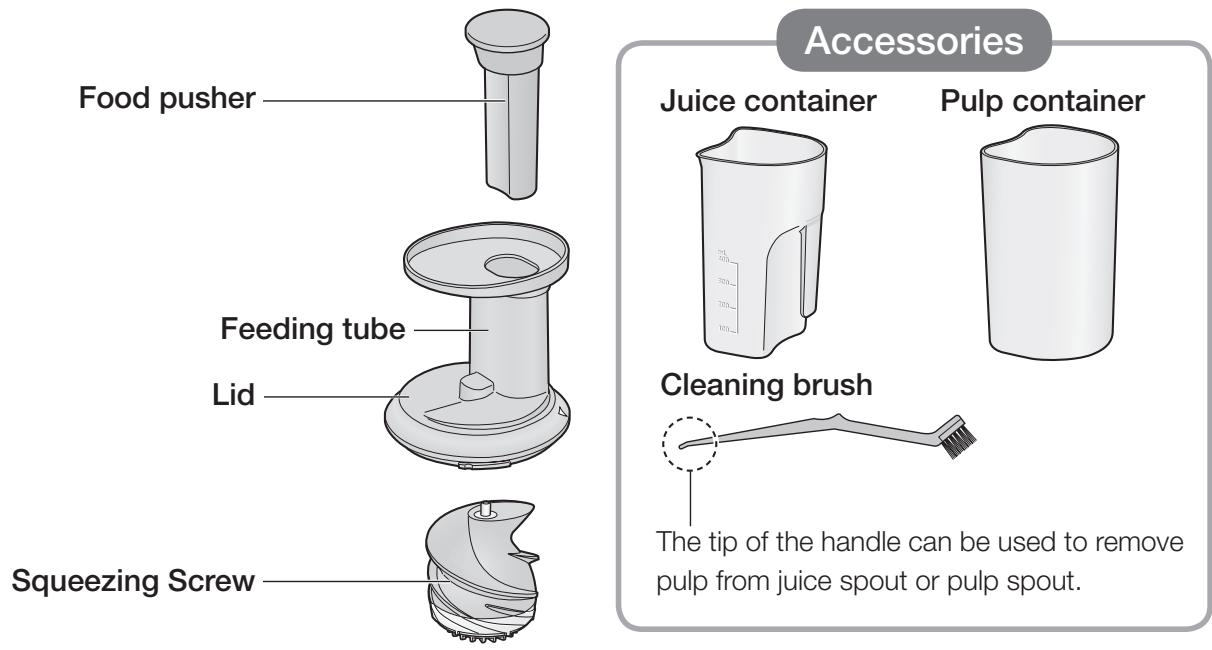
Before Use -Disassembly and assembly of the parts-
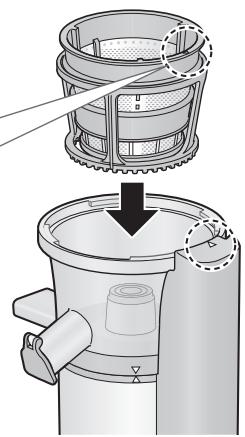
Disassembling/Assembling attachments
The following steps show how to disassemble/assemble attachments, using the juice attachment as an example.
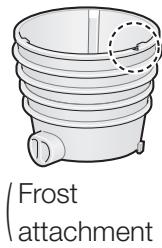
The frost attachment can be disassembled/assessed in the same method.
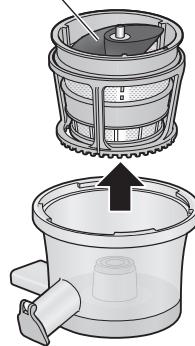
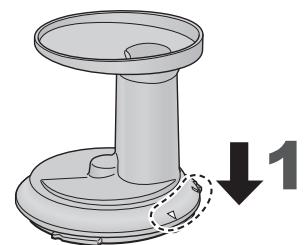
To disassemble
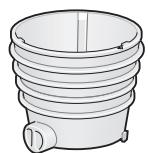
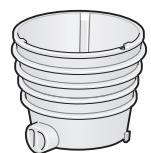
1 Remove the bowl from the motor housing.
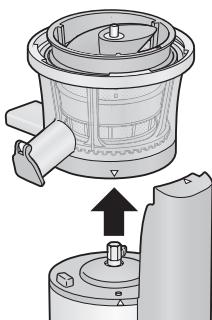
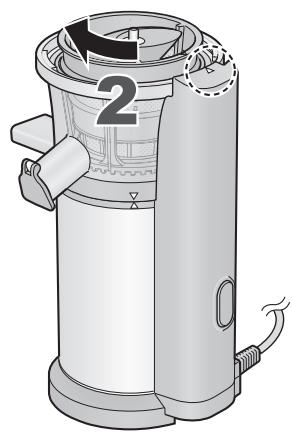
2 Remove the juice attachment.
Squeezing screw comes out with it.
Squeezing
Screw
Frost attachment
3 Remove the parts.

↑
Frost attachment
1 Make sure the gasket, rubber plug and rubber brushes are in place correctly.
Gasket is located in the juicing bowl.
Top view
Rubber plug is located outer bottom.
Outer bottom view
- Rubber brushes are located on side of the rotating brush.
See page GB19 for how to install the gasket, rubber plug and rubber brushes.
The juicer may not work properly if they are not assembled correctly.
To assemble
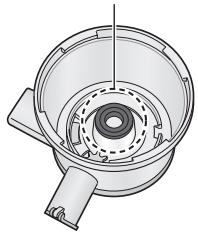
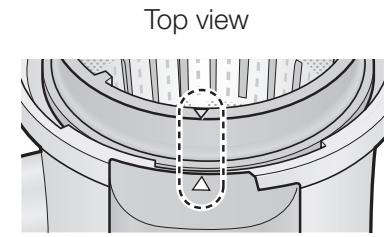
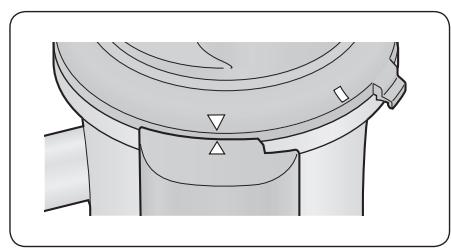
2 Set the juicing bowl on the motor housing.
Align the “ ” mark on the motor housing and the “ ” on the juicing bowl.
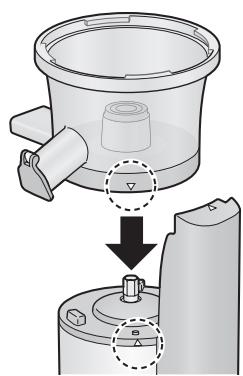
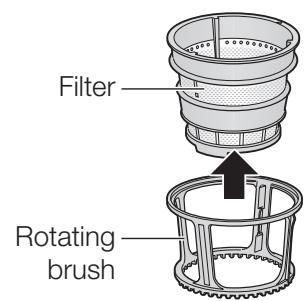
3 Attach the rotating brush and filter, then set it on the motor housing.
Align the “ ” mark on the motor housing and the “ ” mark on the juice attachment.
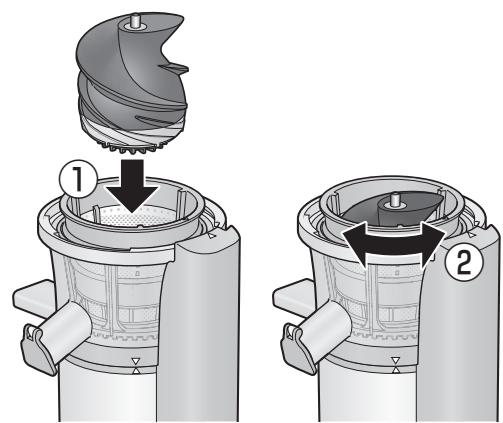
4 Mount the squeezing screw.
(1) Insert the squeezing screw into the centre.
(2)Rotate the squeezing screw and push it into the hole until it stops.
The lid cannot be closed if the squeezing screw is not pushed down sufficiently.
- Be careful not to get your finger clamped in the gap between the squeezing screw and the filter.
Before Use -Disassembly and assembly of the parts- (Continued)
Disassembling/Assembling the lid
To assemble
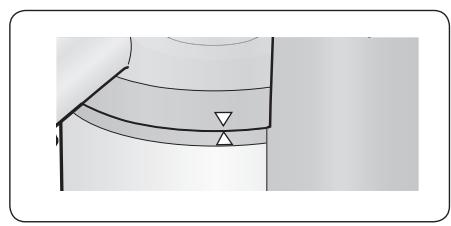
1 Align the “ ” mark on the motor housing and the “ ” mark on the hopper.
2 Turn the hopper clockwise until you hear a "click" sound.
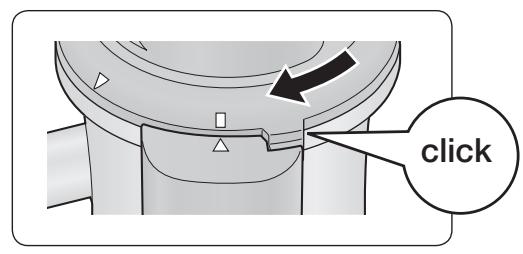
To disassemble, follow the reverse steps.
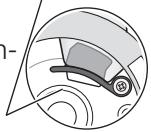
Safety lock
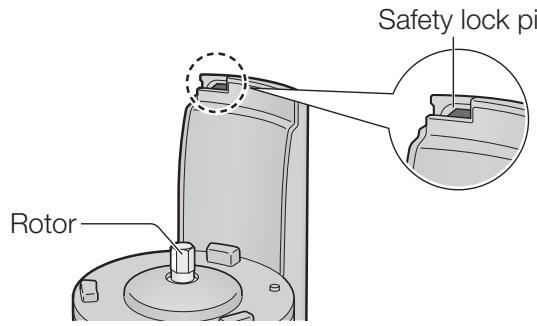
The safety lock has been designed to prevent the juicer from switching on when the parts are not properly in place. Do not push the safety lock pin with any implement, stick etc.
Before Use -Preparation of ingredients for juicing-
with juice attachment

Prohibited ingredients
Ingredients that may cause part damages
Sticky ingredients which are not squeezable
Ice and frozen ingredients
Seed of peach, plum, mango etc.
Persimmon (whose seeds cannot be removed completely)
Dry foods (soy bean, other beans, grains etc.)
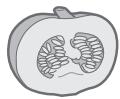
Unheated pumpkin, burdock etc.
Sugar cane
Liquor, vegetable oil, other cooking oils
Hot foods

Oily ingredients
Sesame
Walnut
Peanut etc.
Note
Oily ingredients which can be squeezed with liquid added.
Ingredient preparation
Fruit
- Peel the thick skin and remove large and/or hard seeds and stones from fruit such as pineapple, some citrus fruits, peaches, and mangoes. Leave the thin skin on apples, lemons and limes etc.
- Cut fruit into pieces that small enough to fall down into the feeding tube.
Vegetable
- Remove stem end and seeds.
- Cut vegetables into pieces that small enough to fall down into the feeding tube. (Less than 3 cm width or cubes.)
- Cut leaf vegetables into approximately 2 cm pieces or strips.
- Cut hard ingredients such as carrots into thin 2 cm wide strips.
Tips
- Use fresh fruit and vegetable.
Taste and extracting amount may vary with freshness and harvesting timing of ingredients. - When using ingredients with less moisture, add equivalent amount of liquid such as water or milk little by little.
- It is better juicing ingredients which contain a lot of flesh such as bananas, peaches or mangos with moist fruit such as apples or oranges.
- Leaf vegetable is easy to stick to the squeezing screw and/or inside of attachments or easy to jam the pulp spout. Recommend to feed them into the feeding tube with stems.
- Do not insert pulp into the feeding tube again to extracting.
Before Use -Preparations of ingredients for frozen dish
with frost attachment

Prohibited ingredients
Ice and deeply frozen ingredients.
Coffee beans, dry beans, grains etc.

Pumpkin, sweet potato etc.
(Frozen when raw or after being boiled)
Bread, rice, noodles and pasta.
Liquor, salad oil, other cooking oils.
Ingredient preparation
① Peel skin and remove large and/or hard seeds and stones etc. from ingredients such as apples, pineapples, oranges and avocado.
For citrus fruit, peel thin skin to have better texture.
For tomatoes, boil them and peel skin.
(2) Cut ingredients into pieces that small enough to fall down into the feeding tube.
(Less than 3 cm cubes.)
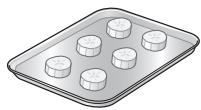
③ Freeze ingredient.
When freezing ingredients, spread them flat on an aluminum tray to avoid touching each pieces.
(4) Thaw frozen ingredients at room temperature until a fork can penetrate to centre. (approx. 5-30 minutes)
Tips
- When thawing is insufficient, ingredients are not mixed or they do not become a smooth texture.
Do not use re-frozen ingredients or ingredients which are stored in a freezer long period time. - Frozen ingredients should be use within one month.
- If frozen ingredients are used immediately after taking out from a freezer, it may cause malfunction on the appliance.
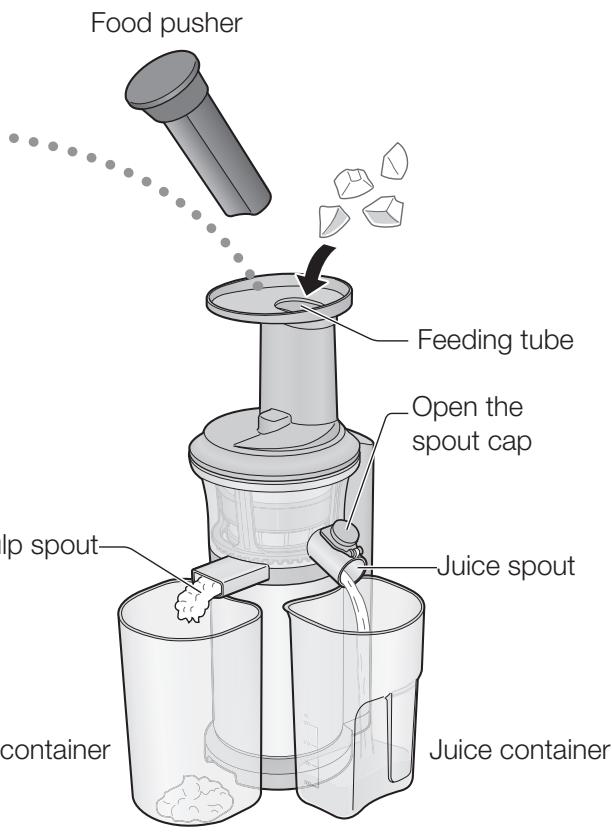
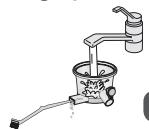
How to use
Extracting
Preparations
(1) Install parts on the motor housing and assemble the lid. (P. GB12-14)
(2) Prepare ingredients. (P. GB15-16)
③ Place containers under the juice spout and pulp spout.
- When using the frost attachment, placing the pulp container is not necessary.
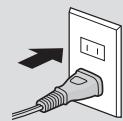
④ Insert the mains plug into a house hold mains socket.
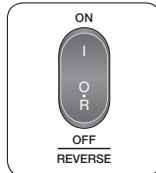
1 Press the "ON" button.
2 Feed ingredients into the feeding tube slowly and push them down by using the food pusher.
Feed ingredients little by little every approximately 5 seconds.
- When using more than one kind of ingredients, feed them little by little alternately.
- Do not force to push ingredients into the feeding tube.
In the case of jamming of ingredients or idle running, press and hold the "REVERSE" button for several seconds (P. GB11).
3 After extracting is completed, press the "OFF" button and close the spout cap.
After use
Pull out the mains plug.
Use the tip of cleaning brush to remove the pulp from juice spout and pulp spout.
Remove parts and clean them. (P. GB18-19)
Do not move the juicier by holding the lid or juicing bowl. (Falling may cause injury.)
Note
Depending on ingredients (especially hard ingredients), their pulp may mix into the juice. If pulp is disturbing your drink, strain your drink.
- When pulp is not coming out or pulp is getting accumulate back of the pulp spout and or top of the juice attachment, turn the switch off and remove them.
How to clean
Clean the appliance after every use.
Unplug before cleaning.
Do not use the following:
- Do not use benzine, thinner, alcohol, bleach, polishing powder, metal brush or nylon brush, otherwise the surface will be damaged.
- Do not clean the appliance with pointed object such as a toothpick or pin.
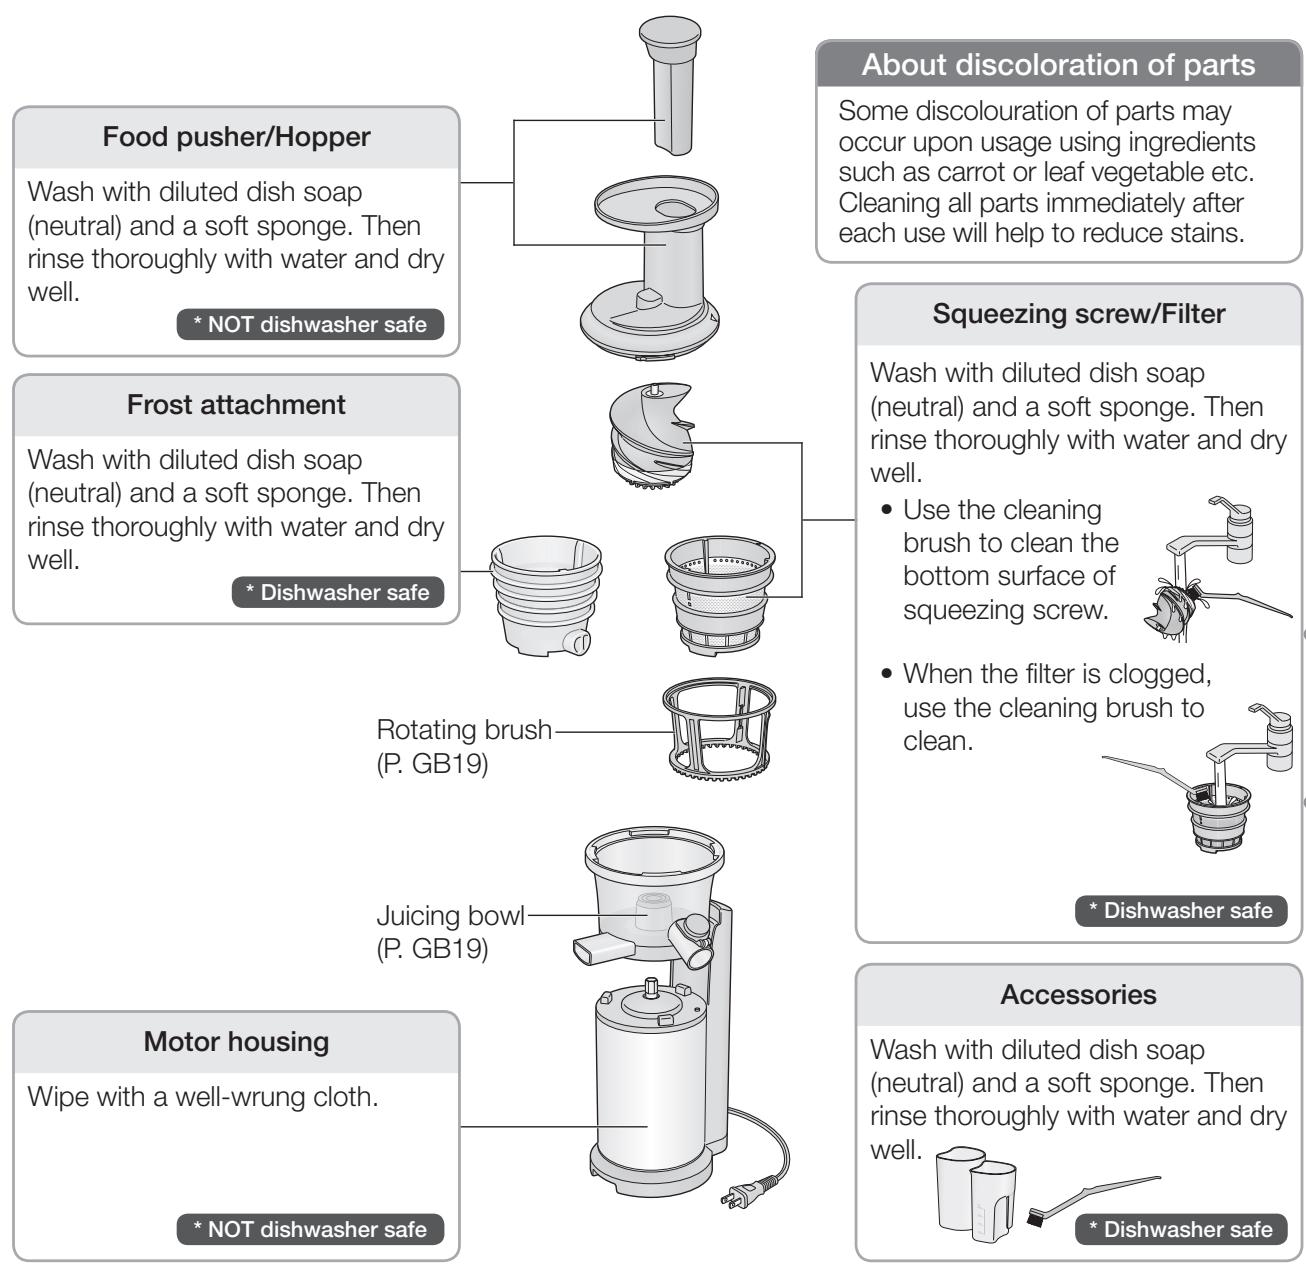
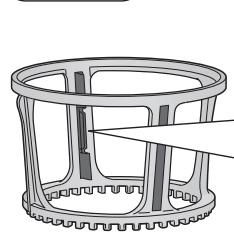
Rotating brush/Juicing bowl
Wash with diluted dish soap (neutral) and a soft sponge. Then rinse thoroughly with water and dry well.
After dry all the parts, assemble them correctly.
Use the tip of brush handle and to clean spouts of the juicing bowl. (The side surface may be scratched if you use the brush to clean it.)
* NOT dishwasher safe
To disassembling
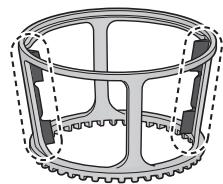
Push the rubber brush to the direction indicated by the arrow mark and take the part out from the gap.
Note ) Do not pull the rubber brush hard.

To assemble
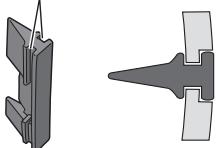
Insert the upper/lower grooves of the rubber brush into the gap and then slide it all the way up/down both ends.
- To avoid damaging the juicer, make sure the upper and lower grooves are in the correct position.
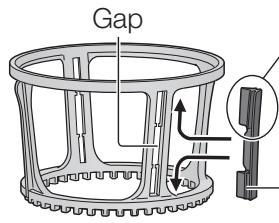
Upper (Long) Lower (Short)
Insert the groove to the projected part.
Top view
Gasket of the inner side of the juicing bowl
To disassemble
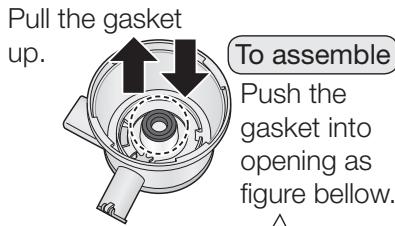
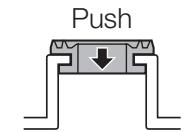
Sectional view
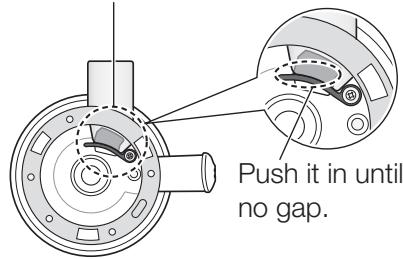
Rubber plug of outer bottom of the juicing bowl
To disassemble
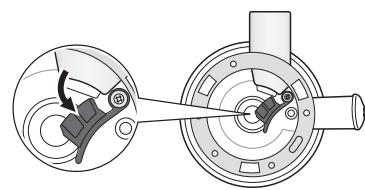
Pull the rubber plug out in the direction of the arrow.
Cannot be removed from the juicing bowl.
To assemble
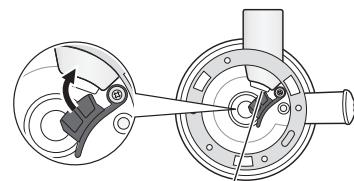
Push the rubber plug into the opening in direction of the arrow until there is no gap.
■ About the rubber brushes, gasket and rubber plug
After washing, drain off water well and then assemble them.
Do not leave them unassembled.
(There are risks of loss, choking on and swallowing of little parts by children, failure, or leakage of juice.)
Dishwasher safe parts
Before putting the parts into a dishwasher, remove residue on the parts.
- Heat may cause cracking of parts. Always place the parts away from any heater or set a low temperature of heater.
Storage
- To avoid formation of rust, dry the parts after washing.
- To avoid failure, do not place the motor housing up-side down.
To move the juicer, separate the juicing bowl from the motor housing and hold them with your both hands. (P. GB8).
Store the appliance in a place that is beyond the reach of young children.
Troubleshooting
Please check the following before contacting us for repair.
Problem
The juicer does not run after the power is switched on.

Cause and solution
Is the mains plug inserted into a household mains socket?
Insert the mains plug into a household mains socket.
Set the juicer correctly.
The hopper needs to be turned until you hear a "click" sound. If you fail to do so, the juicer will not run after the power is switched on. (P. GB14)
The circuit breaker protection is activated.
- You have used prohibited ingredients.
- The volume of ingredients is too large.
- The ingredients are too hard.
See "circuit breaker protection" (P. GB21). Remove prohibited ingredients from the juicer.
The motor housing is hot.
The operating time is longer than the rated duration.
Follow the rated duration (within 15 minutes).
To resume operation, please wait for at least 30 minutes. This allows the motor housing cool down and avoid failure due to overheating of motor.
The juicer stopped suddenly.
The hopper is open.
Switch off the power, close the lid, and start again.
The circuit breaker protection is activated.
- You have used prohibited ingredients.
- The volume of ingredients is too large.
- The ingredients are too hard.
See "Circuit breaker protection" (P. GB21). Remove prohibited ingredients from the juicer.
Clogging of pulp spout.
Switch off the power and remove residue using the tip of brush handle.
Noise during operation.
This is normal.
You may hear sound such as squeaky or cracking.
- These are the sound of ingredients being compressed. (Depending on the ingredients, the noise may be quite loud.)
- This is the sound of rotating brush contacting with filter.
Leakage of juice or frozen dish.
- Packing the gasket, rubber brushes and/or rubber plug are not assembled correctly.
Assemble them correctly. (P. GB12, 13, 19)
The bowl or motor housing shakes during operation.
This is normal.
Since the juicing bowl and motor housing are a split type, they may shake when the squeezing screw is rotating.
Do not press the lid or juicing bowl. (Doing so may result in failure of the juicer.)
Abnormal noise or vibration.
The juicing screw and attachments are not assembled correctly.
Assemble the juicing screw and attachments correctly (P. GB12-13).
Circuit breaker protection
The motor may stop running when the circuit breaker protection is activated to prevent overload of motor. If the motor stops, please take the following steps:
1 Switch off the power.
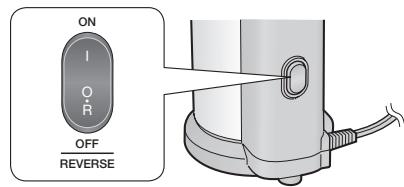
Press the "REVERSE" button to allow reverse operation for several seconds.
- If the squeezing screw fails to run after reverse operation, then it means overheat protection is activated. In this case, please unplug the mains plug and leave the juicer cool down for at least 30 minutes.
3 Switch off the power and remove ingredients from attachments.
4 Press the “ON” button. - Reduce the amount of ingredients being fed in and push them gently into feeding tube.
Replacement Parts
Filter
Part number:XXXX
Gasket
Part number:XXXX
Frost attachment
Part number:XXXX
Pulp container
Part number:XXXX
Rotating brush
Part number:XXXX
Rubber brush
Part number:XXXX
■ Juice container
Part number:XXXX
Specifications
| MJ-L500 | |
| Power supply | 220 - 240 V ~ 50 - 60 Hz |
| Power consumption | 150 W |
| Operation rating | 2 consecutive cycles of 15 min. ON, then 5 min. OFF |
| Dimensions (W · D · H) (approx.) | ●●×●●×●●cm |
| Mass (approx.) | ● . ● kg |
| Lenght of the mains lead (approx.) | 1.0 m |
Recipes
Spinach and Banana Juice
(For 2 servings)
Spinach 120g
- Banana 180 g
Apple 300g
Lemon 20 g
Blueberry and Banana frozen dish
(For 2 servings)
- Blueberry 100 g
- Banana 180 g
Carrot and Orange Juice
(For 2 servings)
- Carrot 300 g
- Banana 120 g
Orange 210g
Lemon 10g
Paprica and Tomato Juice
(For 2 servings)
Redpaprica 120g
Tomato 200g
- Banana 60 g
Lemon 10g
Apple 200g
Carrot and Apple Juice
(For 2 servings)
- Carrot 300 g
Apple 300g
Lemon 30g
Carrot and Tomato Juice
(For 2 servings)
Carrot 200g
Tomato 160g
Orange 100g
Lemon 30g
- Information on Disposal for Users of Waste Electrical & Electronic Equipment (private households)
- For business users in the European Union
- Information on Disposal in other Countries outside the European Union
- Safety Precautions
- WARNING
- - Do not damage the mains lead or mains plug.
- - Do not use the appliance if the mains lead or mains plug is damaged or the mains plug is loosely connected to the household mains socket.
- CAUTION
- - Discontinue using the appliance immediately and unplug in the unlikely event that this appliance stops working properly.
- - Do not use the appliance for any purpose other than those described in these instructions.
- - Do not use the appliance on following places.
- - Do not insert any object in the gaps.
- - Do not hold the appliance by the mains lead.
- - Do not replace any parts of the appliance with the spare parts other than this appliance genuine parts.
- - Do not operate the appliance continuously for more than 15 minutes. Rest 30 minutes (or until motor housing cools down) after 15 minutes operation.
- - Do not put your fingers or utensils such as spoons or forks into the feeding tube while the appliance is operating. If food becomes clogged in the feeding tube, use the food pusher or another piece of fruit or vegetable to push it down.
- - Do not leave the appliance unattended when in use.
- - Do not open the lid or disassemble the juicing bowl during operating.
- - Do not use the appliance if the squeezing screw or the juicing bowl is damaged or has visible cracks.
- Important Information
- Electrical Requirement (U.K only)
- FOR YOUR SAFETY PLEASE READ THE FOLLOWING TEXT CAREFULLY.
- How to replace the fuse
- Parts Names and Handling Instructions
- Before Use -Disassembly and assembly of the parts-
- Disassembling/Assembling attachments
- To disassemble
- To assemble
- Before Use -Disassembly and assembly of the parts- (Continued)
- Disassembling/Assembling the lid
- Safety lock
- Before Use -Preparation of ingredients for juicing-
- Prohibited ingredients
- Ingredients that may cause part damages
- Sticky ingredients which are not squeezable
- Oily ingredients
- Note
- Ingredient preparation
- Tips
- Before Use -Preparations of ingredients for frozen dish
- How to use
- Extracting
- Preparations
- Press the "ON" button.
- Feed ingredients into the feeding tube slowly and push them down by using the food pusher.
- After extracting is completed, press the "OFF" button and close the spout cap.
- After use
- How to clean
- Do not use the following:
- Rotating brush/Juicing bowl
- To disassembling
- Dishwasher safe parts
- Storage
- Troubleshooting
- Problem
- Cause and solution
- Circuit breaker protection
- Replacement Parts
- Specifications
- Recipes
- Spinach and Banana Juice
- Blueberry and Banana frozen dish
- Carrot and Orange Juice
- Paprica and Tomato Juice
- Carrot and Apple Juice
- Carrot and Tomato Juice
Brand : PANASONIC
Model : MJL500
Category : Juicer