S11HP - Video recorder LG - Free user manual and instructions
Find the device manual for free S11HP LG in PDF.

| Product Type | DVD/HDD Video Recorder |
| Model | S11HP |
| Brand | LG |
| Dimensions (W x H x D) | 430 x 50 x 250 mm |
| Weight | 3.0 kg |
| Power Supply | 100-240V AC, 50/60Hz |
| Power Consumption | 25 W (typical), <1 W (standby) |
| Recording Media | DVD-R/RW, DVD+R/RW, CD-R/RW, HDD (500 GB) |
| Recording Modes | XP, SP, LP, EP |
| Playback Formats | DVD Video, DVD±R/RW, CD Audio, MP3, JPEG, DivX |
| Inputs | RF Antenna, Composite (RCA), S-Video, Component (YUV), HDMI, USB |
| Outputs | HDMI, Composite (RCA), Component (YUV), Coaxial Digital Audio |
| Timer Recording | Up to 32 programs, monthly/weekly/daily |
| Editing Features | Chapter mark, playlist, title delete/rename |
| Remote Control | Yes, included |
| Language Support | English, French, Spanish, etc. |
| Cleaning | Wipe with soft dry cloth; clean disc lens with lens cleaner |
| Ventilation | Do not block vents; leave at least 10 cm clearance |
| Safety | Laser Class 1; avoid moisture; unplug during storms |
| Spare Parts | Remote control, AC power cord, batteries |
| Reparability | Refer to service manual; user-replaceable: remote batteries |
| Warranty | 1 year limited |
Frequently Asked Questions - S11HP LG
User questions about S11HP LG
0 question about this device. Answer the ones you know or ask your own.
Ask a new question about this device
Download the instructions for your Video recorder in PDF format for free! Find your manual S11HP - LG and take your electronic device back in hand. On this page are published all the documents necessary for the use of your device. S11HP by LG.
USER MANUAL S11HP LG
- HQ (High Quality) picture enhancement system that improves image sharpness and detail
● Centre tape mechanism for high quality pictures
● Full function infra-red remote control handset
● Programmable 60 channel memory with voltage synthesized tuner - EPS (Easy Programming System) - the channels will be preset and memorized automatically.
● 4 event/1 month programmable timer
● Digital Auto Tracking System
● Auto Power on, Play and Power off
● Automatic Rewind - Jet & Logic Search
- Still & Frame advance
● Real Time Counter Display - Quick Start function
Welcome to LG
Thank you for buying this LG video cassette recorder Model S11HP.
Before using your video recorder you need to be familiar with the names of some of the buttons on the remote control handset (see OPERATING THE VIDEO RECORDER, pages 4 to 6), and you need to set up the video recorder so that it can receive the TV stations in your area and so that your TV set can receive pictures from it (see page 9).
Installation
Power
This Video Recorder operates on a mains supply of 100-240V\~, 50 Hz.
Service
Never remove the cover of the video recorder. There are no user serviceable parts inside. If it does not operate properly, unplug it and contact your dealer.
Precautions
For safe operation and satisfactory performance of your video recorder, keep the following in mind when selecting a place for its installation.
● Shield it from direct sunlight and keep it away from sources of intense heat.
- Avoid dusty or humid places.
- Avoid places with insufficient ventilation for proper heat dissipation.
● Install the video recorder in a horizontal position only.
- Avoid locations subject to strong vibration.
- Do not place the video recorder near strong magnetic fields.
- Do not move the video recorder from a cold to a hot location or vice versa.
Moisture condensation
Under special conditions like moving your video recorder from a cold to a warm room, moisture condensation can build up on the head drum, one of the most crucial parts of the video recorder. In order to prevent in such case any damage to your video recorder HEAD DRUM, connect the video recorder power cord to the AC line, press the OPERATE button on and allow at least 2 hours for the video recorder to dry out.
CONDENSATION IS LIKELY TO OCCUR
WHEN:
- The video recorder is moved from a cold room to a warm room or from outdoors to inside your home.
● A cold room is heated quickly.
● The humidity is very high.
This product is manufactured to comply with the radio interference requirements of EEC directive 89/336/EEC, 93/68/EEC and 73/23/EEC.
Contents

Operating the video recorder 4-6
• The remote control handset
• How to install batteries
• The front of the video recorder
• The back of the video recorder
Installing your video recorder 7
- Connecting the video recorder to your TV
• Aerial/RF connections
• A/V connection
Setting the video cassette recorder output channel 8
Storing TV stations in the video recorder tuner 9-10
• EPS (Easy Programming System) tuning
• MPS (Manual Programming System) tuning
- Skipping stations
- Selecting stored TV stations
Time and date setting 11
Using the video recorder to play back a tape 12-13
- Loading a video cassette
• Normal playback
• Still picture playback
• Unloading a video cassette - Types of video cassette
• Accidental erasure prevention
• Cover the hole with cellophane tape
Other playback features 14
- Fast forward (FF)
- Rewind (REW)
- LOGIC search
• Picture search - CUE & REVIEW - JET search
Using the video recorder to record 15-16
• Introduction to the recording features
• To record
- Recording one TV programme while watching another
• Immediate timer (QSR)
Programming the video recorder timer 17-18
• Things to know before starting
- Recorder timer programming using the video recorder's display
- Checking and clearing the stored timer programmes
• Overlapping timer programmes
Other features 19-20
• Digital tape counter
• The memory stop facility
- Tracking controls
• Automatic playback
• Automatic memory power shut-off
• Automatic switch off
Copying (Rerecording) 21
Specifications 22
- General
- Video/Audio
Before calling for service . . . 23
• Video head cleaning
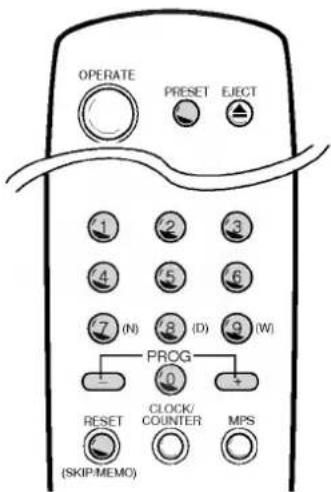
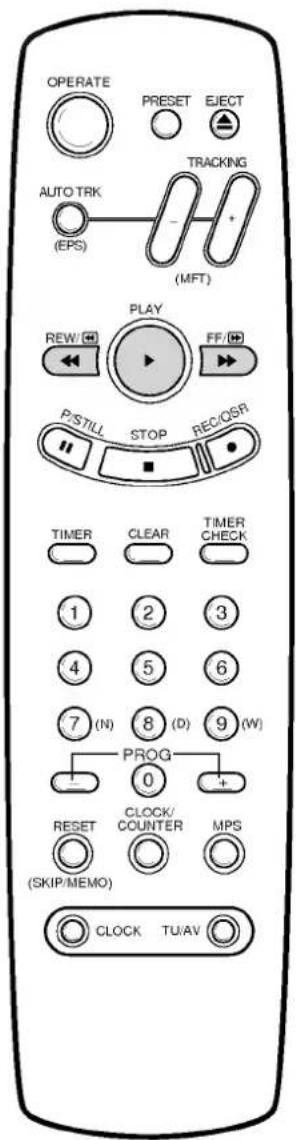
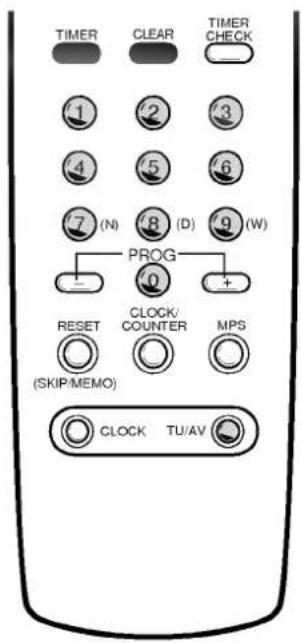
The Remote Control Handset
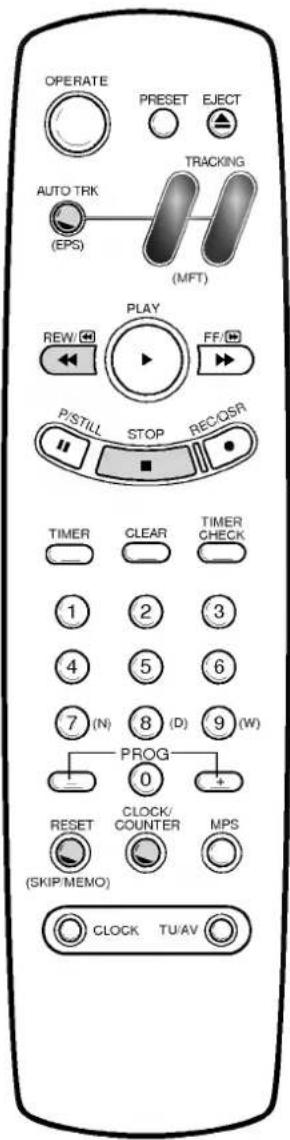
This video recorder is designed so that almost all of its functions can be controlled from the REMOTE CONTROL HANDSET. This must have a "line of sight" to the sensor on the front of the video recorder. It must be within an angle of 30 degrees either side of the centre. The maximum operating distance is about 7.5m (25 feet).
Some functions can also be controlled with the controls on the FRONT PANEL of the video recorder.
1 OPERATE
To switch the video recorder on and off.
2 AUTO TRACKING/EPS (Easy Programming System)
- To select automatic adjustment of the tracking (see p 19). - To start the station search automatically during programme preset (see p 9).
3 PLAY
To play the tape (see p 12).
4 REWIND/REVIEW
To rewind the tape (see p 14). To see reverse playback picture at high speed (see p 14).
5 STOP
To stop the tape.
6 P/STILL
Switches to still picture (see p 12), during recording to pause (see p 15).
7 CLEAR
To erase the entered information.
8 TIMER
Switch to the timer programming (see p 17-18).
9 0 - 9 NUMERIC BUTTONS
- To select the preset stations directly. - These buttons are also used for setting the clock and programming the timer.
10 PROG (+/-)
Allows you to scan through memorized channels.
11 RESET/(SKIP/MEMO)
- Used to reset the tape counter to 0:00:00. - For clearing or storing the stations during programme preset.
12 CLOCK/COUNTER
To select between Clock and Tape Counter Display (see p 19).
13 CLOCK
Used to enter the clock setting mode (see p 11).
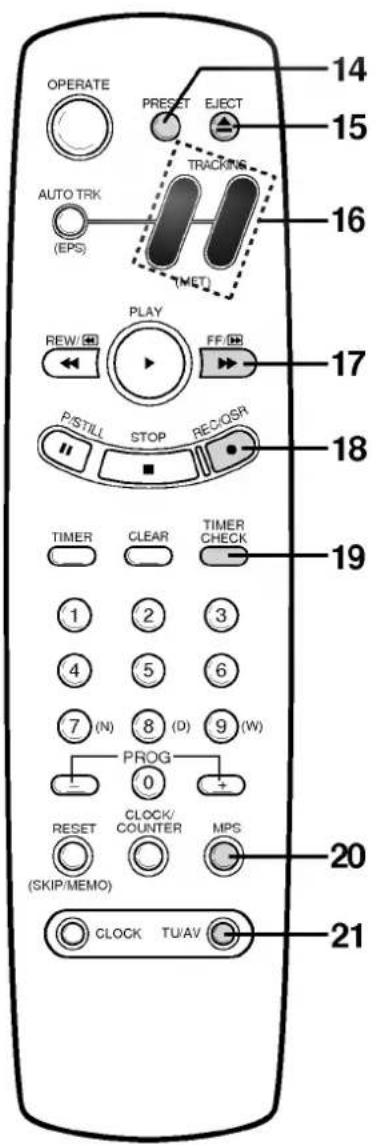
Operating the video recorder

14 PRESET
For programme searching and storing (see p 9).
15 EJECT BUTTON
To eject a tape (see p 13).
16 TRACKING/(MFT) - OR +
- For manual tracking (see p 19). - For fine tuning the station during programme presetting (see p 9).
17 FAST FORWARD/CUE
To wind the tape forward (see p 14). To see forward playback picture at high speed (see p 14).
18 REC/QSR
Used to record and set the QSR (Quick Set Recording) time (see p 16).
19 TIMER CHECK
Used to check the timer programme (see p 18).
20 MPS (Manual Programming System)
For starting the station search manually during programme preset (see p 9).
21 TU/AV
To select the input source of a recording (see p 15).
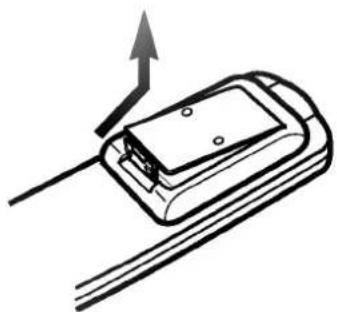
How to install batteries
The wireless remote control is powered by two "AAA" size batteries.
1 Remove the battery compartment lid. (Lift it up while pressing the tap forward.)
2 Load the new batteries with their polarities ( and ) aligned properly and replace the lid.
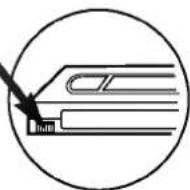
natural_image
Diagram of a device with an upward arrow indicating direction, no text or symbols presentThe front of the Video Recorder
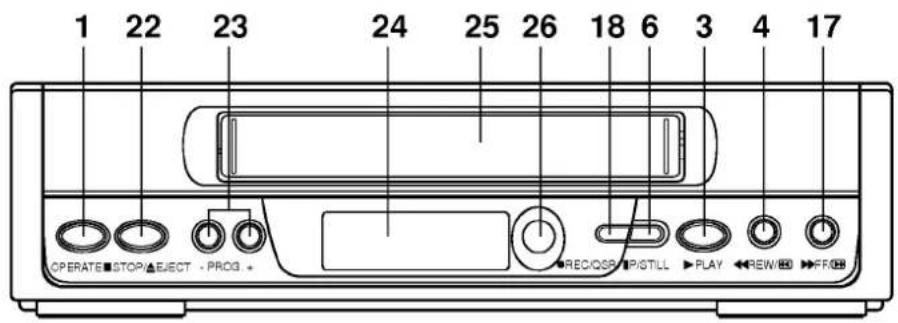
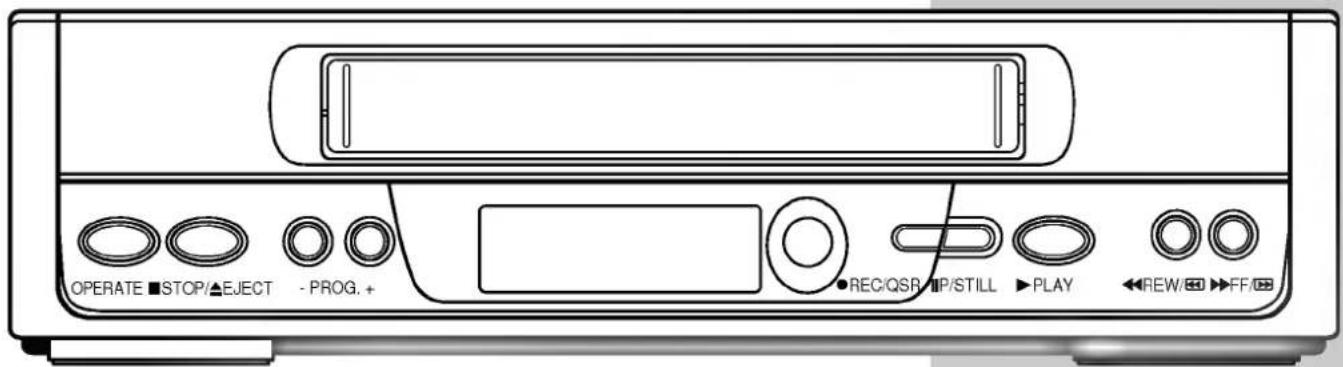
1 OPERATE BUTTON
To switch the video recorder on and off.
22 STOP/EJECT
To stop the tape, or eject it from the video recorder (see p 13).
23 CHANNEL PROGRAMME SELECTORS
(-/+)
Allows you to scan through memorized channels.
24 MULTI FUNCTION DISPLAY
Display of time, tape counter or other information about the status of the video recorder.
25 VIDEO CASSETTE COMPARTMENT
When a cassette is inserted loading is completed automatically.
26 REMOTE CONTROL SENSOR
To receive the signals from the remote control handset.
18 REC/QSR
6 P/STILL
3 PLAY
4 REWIND/REVIEW
17 FAST FORWARD/CUE
The back of the Video Recorder
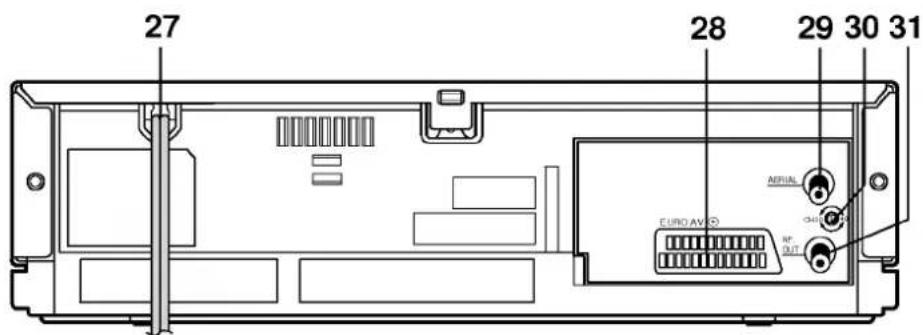
27 MAINS LEAD
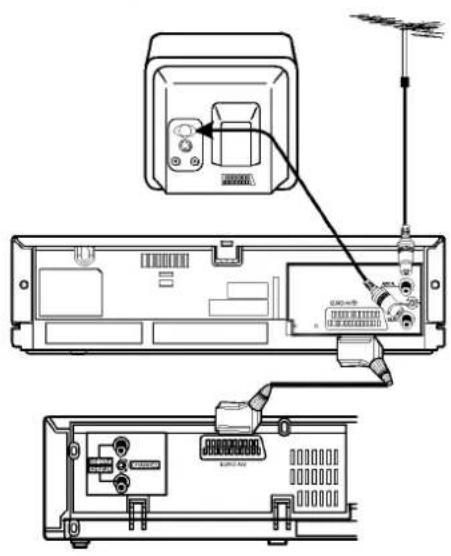
28 EURO AV
To connect the video recorder to your TV set or to another video recorder (see p 21).
For recording from EURO AV select "AU" with the TU/AV button (see p 15).
29 AERIAL INPUT
Connect the external aerial to this terminal.
30 VIDEO CHANNEL CONTROL
To select the video channel between 30 and 40 (with a screw driver) (see p 8).
31 RF. OUT
Connect this terminal to the AERIAL terminal on the back of the TV, using the coaxial RF cable (supplied).
Installing your video recorder

Important!
1 Connect the video recorder to your TV aerial and TV set. (described later on this page).
2 Set the tuner channels so that the video recorder can receive TV signals (see p.9).
When this has been done, the setting up of the video recorder is complete.
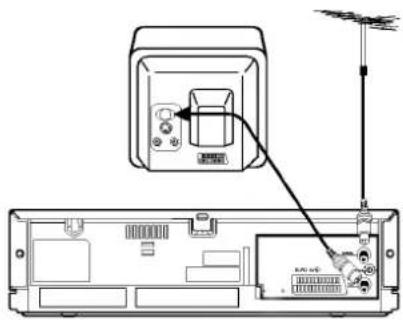
Connecting the video recorder to your TV
AERIAL/RF CONNECTIONS
1 Disconnect the aerial from your TV set and plug it into the socket marked "AERIAL" at the back of the video recorder.
2 Use the coaxial cable supplied to connect the aerial terminal on your TV set to the socket marked "RF. OUT" at the back of the video recorder.
3 Plug the video recorder into a mains wall socket.
A/V CONNECTION
This video recorder and your TV set can also be connected with a EURO SCART cable (AV cable) (Obtainable from a TV dealer). This connection ensures the highest picture/sound quality.

Setting the VCR output channel
Your TV set receives the video recorder signal like another TV station. So you have to select a programme number for the video recorder.
Take care to select this programme number, whenever you control the video recorder, or watch a recording. Only if you have selected this programme number, which we call video programme number, you will see the picture from the video recorder on the screen.
If you connect a monitor or a TV set equipped with Euro scart socket, this adjustment will not be necessary. Consult the operating instructions of your TV set.
Connect the video recorder as described in the section on Connections (see on previous page).
Setting the output channel of the video recorder
1 SETTING THE VIDEO CHANNEL WITH PLAYBACK
1 The output channel of the video recorder is preset at UHF channel 36.
2 Turn on the TV set and the video recorder.
3 Play any pre-recorded cassette tape on your video recorder.
4 Select the correct channel (36) on your TV set.
And then you will see the picture being played in video recorder.
(Note - You will need to look at the instruction manual for your TV set if you do not know how to do this.)
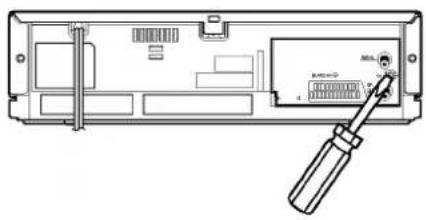
2 CHANGING THE TRANSMITTER CHANNEL
If channel 36 is already occupied at your TV set, or if the picture is distorted, you can change the transmitter channel of the video recorder.
Select an unoccupied or undistorted channel between 30 and 40 on your TV set and store it. Use a small screwdriver to turn slowly the CHANNEL control on the rear of the video recorder, until you are satisfied with the picture quality.
Storing TV stations in the video recorder tuner
Up to 60 TV stations (60 channels) can be stored in the memory of this video recorder. These can be set automatically or manually.
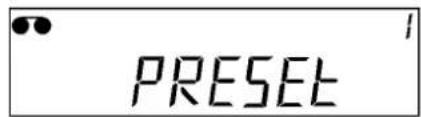
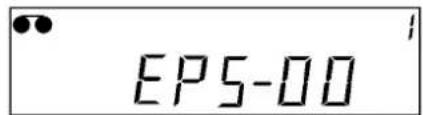
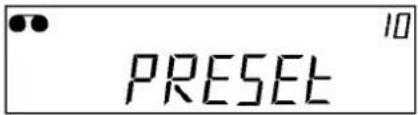
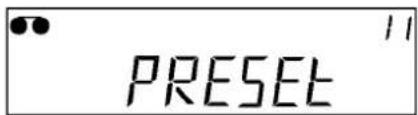
EPS (Easy Programming System) tuning
To carry out EPS tuning:
1 Turn on the TV and the video recorder (with the "OPERATE" button).
2 Press the "PRESET" button to enter the channel preset mode.
3 Press the "AUTO TRK/(EPS)" button.
When a channel is tuned, the active broadcast channel is stored in memory of the tuner automatically.
The channel position number is increased in sequence and tuning will commence for next station.
NOTE:
During the EPS tuning the display is counting up to 99 and then the set switches back to the first memorized station. EPS tuning stops when all active broadcasting stations have been searched.
4 When the auto-search is completed the set returns to the first station found automatically.
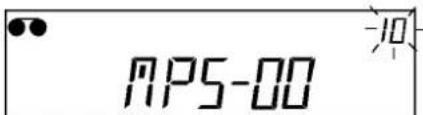
MPS (Manual Programming System) tuning
TV station can be stored manually.
To carry out MPS tuning:
1 Press the "PRESET" button to enter the program preset mode.
2 Press the "PROG" buttons (+/-) or Numeric buttons (0 to 9) to select the Position number that you want to tune.
3 Press the "MPS" button once.
Searching commences. Searching will stop when it has captured a broadcasting station.
Continue to press the "MPS" button until the desired station appears. When a program is tuned, the active broadcast channel is stored in memory of the tuner automatically.
● To set other programs, repeat the steps 2-3 above.
4 If the reception signal is weak, manual fine tuning might improve the image. Adjust the image with two buttons TRACKING/(MFT) - or + to an optimum.
5 When you have finished, press the "PRESET" button to return to the normal mode. The clock and program position number will appear on the video recorder's display.


2
3
4
2

3
5

Storing TV stations in the video recorder tuner
Skipping stations
If you want to clear a TV station from the video recorder's store you can easily do so as follows:
1 Press the "PRESET" button to enter the preset mode.
2 Press the "PROG" (-/+) buttons or Numeric buttons (0 to 9) for the Channel position to be skipped (for example, 11).
3 Press the "RESET/(SKIP/MEMO)" button. The Channel position number will flicker on the video recorder's display. The station is erased.
- If you want to restore the erased channel, press the "RESET/(SKIP/MEMO)" button once again.
● To skip other channels, repeat the steps 2-3.
4 Press the "PRESET" button to return to the normal mode.
1
2
3

4

Selecting stored TV stations
Stored TV stations can be selected in either of two ways.
1 Use the PROG (-/+) buttons to move from one station to another.
2 Enter the programme number with the Numeric buttons, to select a station directly. You can enter the stations 1 to 9 with the one digit only. The channel will be selected at once.
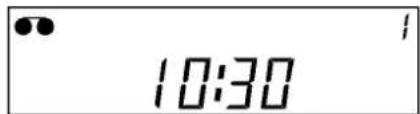
Time and date setting
Setting the video recorder's clock
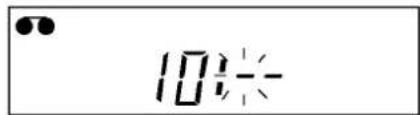
Whenever the video recorder is reconnected to the mains or after a power cut "--:" appears in the display to tell you that the clock needs resetting.
Things to know before starting
- If you have entered a wrong number by mistake, press "CLEAR" button several times to erase the wrong number. Then re-enter a correct number.
● This is a 24 hour clock.
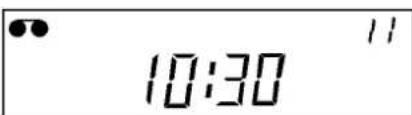
1 Press the "CLOCK" button.
Four segments will be displayed. The hour display starts flashing.
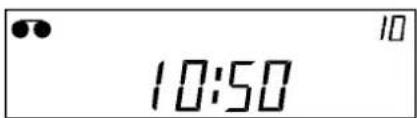
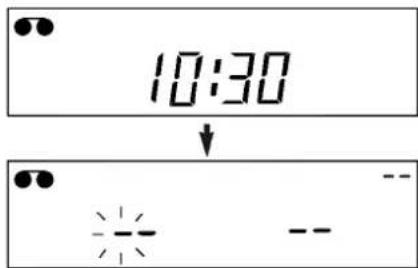
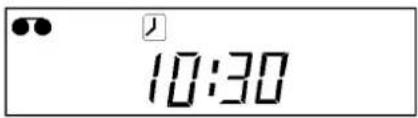
2 Press the Numeric buttons (0 to 9) to set the current hour, in our example this is 10, the minute segment starts flashing.
3 Press the Numeric buttons (0 to 9) to set the current minutes figure (30), the date prompt will then appear.
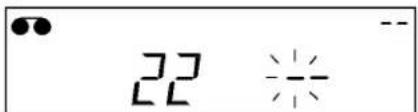
4 The flashing display to the left of the segment represents the day. Set this using the Numeric buttons, in our example 22.
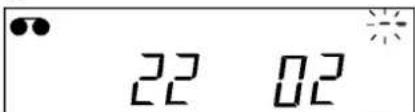
5 The next flashing prompt is for the month which you also enter using the Numeric buttons, in our example 02.
6 After entering "22 02" you are prompted for the year which starts to flash. Set this using the Numeric buttons, in our example 96.
7 Press the "CLOCK" button. At the video recorder, the set time will appear on the video recorder's display.
How to confirm the time!
Press the "CLOCK/COUNTER" button to confirm the current time. Then the day, month and year will appear on the video recorder's display.
NOTE: While timer recording mode, you can't adjust the clock.


1

natural_image
Simple diagram with a dot, starburst, and plus sign symbol (no text or labels)2
3
4
5
6
7
Using the video recorder to play back a tape
natural_image
Illustration of a hand inserting a cassette tape into a socket (no text or symbols)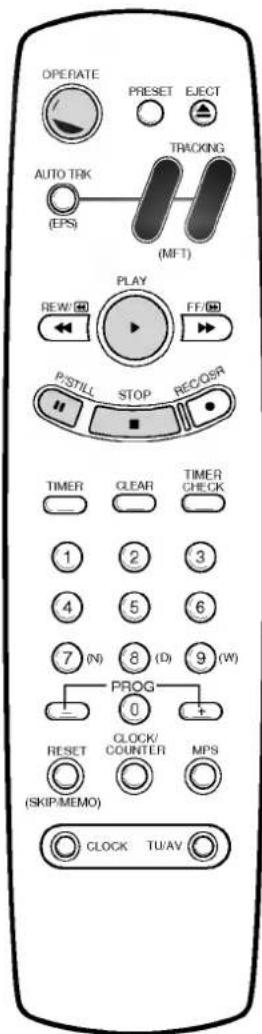
NOTE - Loading and unloading of a video cassette is only possible when the video recorder is plugged into a power source.
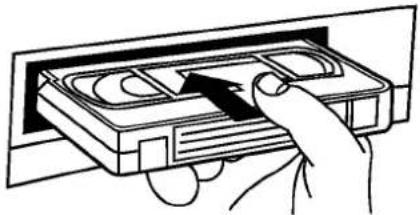
Loading a video cassette
1 Turn on your TV set and video recorder.
2 Insert the cassette into the video recorder with the window side up and the arrow pointing away from you. Do not attempt to insert a cassette which is upside down or back to front.
GENTLY PRESS THE MIDDLE OF THE TAPE.
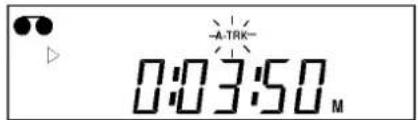
Video cassette loaded indicator - The "●" symbol is shown on the video recorder's display when there is a video cassette loaded in the video recorder.
Automatic switch - on - The video recorder is automatically switched on when a video cassette is inserted.
It is not necessary to switch on the video recorder, by pressing the "OPERATE" button, before inserting a video cassette.
Normal playback
1 Press the "PLAY" button to start playing a tape (called Normal playback). "▷" will appear video recorder's display.
Automatic playback - If the video cassette has had its safety tab removed, so that it cannot be erased, then the video recorder will automatically start playing the tape.
Automatic tracking - The video recorder will automatically adjust the tracking to give the best quality picture. A.TRK flashes on the video recorder's display while it is doing this. After finding the optimum point, the A.TRK displays on the video recorder's display.
2 Short interruptions of the playback up to 5 minutes can be made with the "P/STILL" button. Continue playback by pressing the "PLAY" button.
3 End the playback with STOP button.
- If the end of the tape is reached, the video recorder stops automatically, rewinds, stops, ejects the tape and switched off.
Still picture playback
You can playback and advance a still picture as follows:
1 Press the "P/ STILL" button during playing back. You see a still picture on the TV screen.
2 You can remove the vertical tremble with the "TRACKING/(MFT) - or +" buttons.
3 You can advance the still picture by pressing the "P/STILL" button. By repeatedly pressing this button the picture advances one frame at a time.
4 To switch off the still picture, press the "PLAY", or the "STOP" buttons.
Using the video recorder to play back a tape

Unloading a video cassette
Press the "EJECT" button, on either the handset or the front panel of the video recorder.
The cassette compartment will open and the video cassette will be partially ejected. It is not necessary to switch on the video recorder, by pressing the "OPERATE" button before ejecting a video cassette.
NOTE - It is advisable to remove a video cassette from the video recorder when not in use. Rewind and unload it.

natural_image
Illustration of a hand inserting a CD into a wall socket (no text or symbols)Types of video cassette
Use VHS tapes in this video recorder.
On SP (standard play) the maximum record and playback time is that given on the video cassette.
For example E-180 will record/play back for 180 minutes.
| VIDEO CASSETTE LENGTH | MAX. RECORD/ PLAYBACK TIME |
| E-240 | 240 Min. |
| E-180 | 180 Min. |
| E-120 | 120 Min. |
| E-60 | 60 Min. |
Accidental erasure prevention
If you do not wish to record on a tape, and hence erase what is already recorded on it, then remove the safety tab on the back edge of the video cassette.
Cover the hole with cellophane tape -
It is possible to record on a video cassette from which the safety tab has been removed by covering the hole with cellophane tape.
Refer to the instructions included with the video cassette for more information.

Other playback features
This video recorder will allow you to rapidly wind a tape forwards or backwards, visually search a cassette tape, and view individual frames on a tape.
Fast forward (FF)
Pressing the fast forward ("FF") button with the tape on stop, will rapidly wind the tape forward. "▶" will appear on the video recorder's display.
Rewind (REW)
Pressing the rewind ("REW") button with the tape on stop, will rapidly wind the tape backwards. "◀◀" will appear on the video recorder's display.
LOGIC search
If you hold down either of the search buttons ("FF" or "REW") during fast forwarding or rewinding the tape, the picture will be seen at about 7 times the normal playback speed. This enables you to see where you are on the tape. When you release the button the video recorder continues fast forward or rewind.
Picture search - CUE & REVIEW
You can also quickly carry out a visual search for a desired section on a tape using the CUE and REVIEW functions.
During playing back press either the fast forward ("FF") or rewind ("REW") button. The tape will be played forward or backwards at about 7 times the normal playback speed. When the desired point on the tape has been reached press the "PLAY" button and the video recorder will continue to play back the tape at the normal speed. Picture search will only continue for about 3 minutes, after which the video recorder will return to normal playback mode.
JET search
If during picture search you hold down either of the search buttons ("FF" or "REW") continuously the picture will be played at about 11 times the normal playback speed. When the desired point on the tape has been reached, release the search button and the video recorder will continue to playback the tape at the normal speed.
NOTE - During a visual search, jet search or still playback, the sound is muted and there will be some "noise streaks" on the picture.
Using the video recorer to record

Introduction to the recording features
There are a variety of recording modes available to you on this video recorder.
1 You may record immediately, (a programme you may be watching), by turning the video recorder both on and off (see below).
2 You may record immediately for a set period of time of up to 9 hours. This is called Quick Set Recording (QSR). The video recorder will automatically turn itself off at the end of the QSR (see p 16).
3 You may record at a later time (up to 1 month from the present) using the built-in timer. Up to 4 of these automatic recordings may be set at the same time - provided, of course, that there is sufficient time on the video cassette.
NOTE - Ensure that the safety tab has not been removed from the video cassette on which you wish to record.
To record
1 Turn on the TV set and video recorder.
2 Insert a video cassette with the window side up, and the arrow pointing away from you, or if a video cassette is already loaded turn on the video recorder by pressing the "OPERATE" button.
3 Select the programme channel with the number buttons or "PROG (-/+") buttons.
4 Press the "REC/QSR" button to start recording. "O" will appear on the video recorder's display.
5 If you want to avoid recording unwanted scenes press the "P/ STILL" button. " IIO" will appear on the video recorder's display.
To continue recording press the "P/ STILL" button again.
6 Press the "STOP" button to stop recording. "O" disappears on the video recorder's display.
NOTE - If you want to record from the EURO AV socket on the back of the video recorder, press the "TU/AV" button to the "AU" mode. "AU" will appear on the video recorder's display.
Using the video recorder to record
RECORDING ONE TV PROGRAMME WHILE WATCHING ANOTHER
You can record one programme while watching another by selecting the channel you watch on your TV set.
1 Start a recording by following steps 1 to 4 on previous page.
2 Select the TV station you want to watch with the programme channel selector on your TV set.
Immediate timer (QSR)
When making a recording you can set your video recorder to stop after a set period of time.
1 Press the "REC/QSR" button to start a recording.
2 Press the "REC/QSR" button several times until the desired recording time is shown on the video recorder's display.
Each time you press this button the QSR time will be extended by 30 minutes. The maximum time that can be set is 9 hours.
When the QSR recording have been completed, the video recorder will stop and switch itself off.
3 To cancel a QSR recording, press the "STOP" or the "OPERATE" button.
Programming the video recorder timer
The timer allows you to record broadcasts automatically. Up to 4 recordings within one month can be programmed at the same time.
Things to know before starting
- If you try to set the programme timer before setting the clock, the clock set mode appears on the video recorder's display. Set the time and date before proceeding.
● The buttons for programming the timer are on the remote control unit. - You can correct an error in the programme any time before the last step by pressing the "CLEAR" button repeatedly until the digit to be corrected flashes and then by entering the corrections.
Recorder timer programming using the Video Recorder's Display
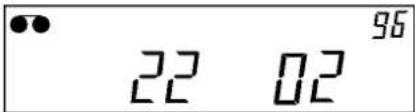
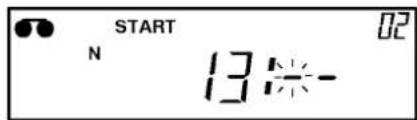
For example:
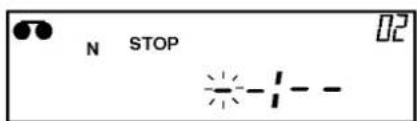
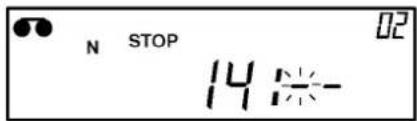
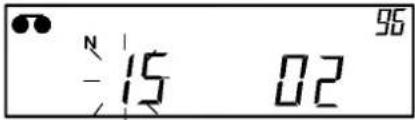
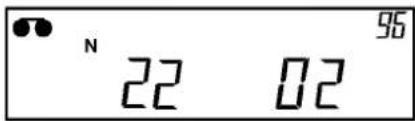
Let us assume you want to record a one hour TV broadcast starting at 13:30 on 22th February 1996 (Programme position 2). The current date is 15 February 1996. Your four possible future recording sessions are stored in memory under four different programme numbers. The session in our sample is going to be saved as programme number 1.
1 Press the "TIMER" button to initiate the timer programming procedure. The programme number will appear momentarily.
2 A flashing display will prompt you to enter the programme position.
3 Enter the programme position you want using the Numeric buttons.
NOTE:
If you want to record from the "EURO AV" socket, set the "TU/AV" button to "AU" position. "AU" indicator will appear on the video recorder's display. The display will prompt you to select the recording types.
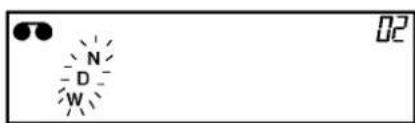
4 Select the recording type you want using the Numeric buttons. "7" for Normal, "8" for Daily, "9" for Weekly recording type.
N (Normal): One time recording of a single programme
D (Daily): For daily recordings from Monday to Friday
W (Weekly): For a weekly repeated recording
The display will prompt you to enter the recording start time. The hour display will flash.
5 Enter the hours using the Numeric buttons, (in our example, 13). The minutes display will flash.
6 Enter the minutes using the Numeric buttons, (in our example, 30). The display will prompt you to enter the recording stop time, the hour will flash.
7 Enter the hours using the Numeric buttons, (in our example, 14). The minutes display will flash.
1
2
3
5
6
7

8
9
11
1
Programming the video recorder timer
8 Enter the minutes for the stop time using the Numeric buttons, (in our example, 30). The display will prompt you to enter the date of the recording session. The current date appears.
9 Enter the day using the Numeric buttons, (in our example, 22).
10 Press the "TIMER" button to enter your programme.
11 Press the "OPERATE" button to OFF.
The Timer symbol "☐" should appear. The video recorder will turn ON itself at programmed time and record the desired programme.
Important!
Make sure you insert a cassette with a safety tab in place. If you insert a cassette without safety tab, the cassette will be ejected from the video cassette recorder.
Checking and clearing stored timer programmes
The stored timer programmes can easily be viewed on the video recorder's display, and can also be cleared if not wanted.
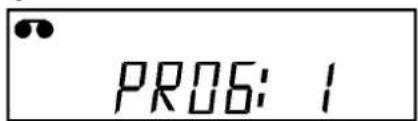
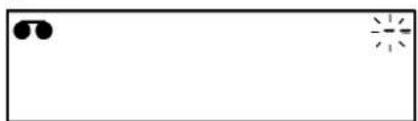
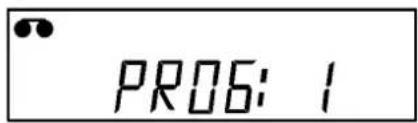
1 Switch the video recorder on and press the "TIMER CHECK" button. The video recorder will display the first of the 4 programme numbers.
2 Soon afterwards the video recorder will start to display the stored timer programme data in sequence for the first programme number to last programme number and then it will return to the normal display (clock and station's memory place) automatically.
3 If you wish to clear any of the stored timer programmes, press the "CLEAR" button when the programme number you want to clear appear during checking the stored timer programmes.

Overlapping timer programmes
When timer programmes overlap, the programme which is already recording continues to its scheduled end time. Hence the beginning of the second programme will not be recorded.
NOTE - If you wish to stop a timer recording which has already started, press the "OPERATE" button on the front of the video.
Other features
Digital Tape Counter
The Digital Tape Counter can be displayed on the video recorder's display instead of the time by repeatedly pressing the "CLOCK/COUNTER" button while a tape is loaded.
The Digital Tape Counter gives you the relative positions of recordings on the tape. If you set the counter to 0:00:00 at the beginning of a tape, you can note the counter reading at the beginning of each separate recording.
To set the counter to 0:00:00 press the "RESET/(SKIP/MEMO)" button.
The memory stop facility
Memory Stop automatically stops a tape when the tape counter is 0:00:00. This feature may be used to return the tape to a preselected position immediately after making a recording, or to repeatedly playback a portion of a tape.
1 Press the "CLOCK/COUNTER" button to set the display to the counter.
2 Before playback or recording, press the "RESET/(SKIP/MEMO)" button. The counter will read 0:00:00.
3 Begin the playback or recording.
The tape counter gives the actual time in hours, minutes and seconds.
4 Press the "STOP" button when playback or recording is complete.
5 Press the "REW" button. The tape will rewind and automatically stop when the counter returns to 0:00:00.
Tracking Controls
Tracking distortions show up as streaks or an unstable picture. This video recorder can set the tracking automatically. You can also set the tracking manually if you need to do so.
Automatic tracking - The automatic tracking adjusts the tracking to playback a tape with the optimum picture quality. As soon as you start to playback a tape the tracking will be adjusted if necessary.
A. TRK is shown on the video recorder's display.
Manual tracking - If the quality of the recording is poor, or if the tapes are damaged, the automatic tracking will not be able to work correctly. In these cases you will have to remove tracking distortions manually.
You can adjust the tracking during playback with the "TRACKING/(MFT) - or +" buttons. Press them repeatedly until the distortions have been eliminated.
You can switch on the automatic tracking again after using the manual tracking feature by pressing the "AUTO TRK/(EPS)" button. When you change a video cassette, the automatic tracking will always be switched on again.


Other features
Automatic Playback
Automatic Playback is a very convenient automatic action of this video recorder. It occurs whenever you insert into the video recorder a video cassette from which the safety tab has been removed (e.g. a video cassette which you have hired).
Automatic Playback carries out the following procedures:
It automatically switches on the video recorder's power and starts to playback the tape.
At the end of the tape, it automatically rewinds.
The tape is ejected automatically.
The video recorder switches itself off.
Automatic Memory Power Shut-Off
This feature of the video recorder enables you to initiate switching off the video recorder during tape rewind. Hence you do not have to wait until a tape has rewound before you can switch the video recorder off.
To activate Automatic Memory Power Shut Off press the "OPERATE" button during tape rewind. The tape will rewind to the beginning and the video recorder with switch itself off.
Pressing any of the control buttons (e.g. "OPERATE" or "PLAY") after setting Automatic Memory Power Shut Off will cancel it.
Automatic Switch Off
The video recorder will turn itself off after 8 minutes when not receiving a TV signal. This will occur when TV broadcasts have finished.
COPYING (RECORDING)
With this video recorder you can make recordings from an external source, such as copying from another video recorder or camcorder.
To do this you will need an EURO scart cable.
1 A second video recorder (for tape copying) should be connected to the EURO AV scart socket on the back.
2 Insert an empty cassette into this video recorder and if you are copying another tape insert it into the second video recorder.
3 Set the "AU" mode for recording video recorder with the "TU/AV" button on the remote control.
"AU" indicator will be displayed on the display.
4 Start the playback at the playing video recorder and then start the record with the REC/QSR button on the remote control or at the video recorder.
5 Short interruptions can be made with the P/STILL button on the video recorder, e.g. to cut scenes copy.
To continue recording, press this button again.
6 End copying with the STOP button and turn all devices off.
COPYRIGHT LAW
Unauthorized recordings of copyrighted television programmes, films, video cassettes and other materials infringe the right of copyright owners and be contrary to copyright laws.

Specifications
GENERAL
| Power | : 100-240V~, 50Hz. |
| Power consumption | : Approx. 18 watts |
| Video recording system | : Rotary 2 heads, helical scanning system |
| Tape speed | : 23.39 mm/sec. |
| Tape format | : Tape width 1/2" (12.7 mm high density VHS tape) |
| Maximum recording time | : 4 hours (with E-240 tape) |
| Rewind time | : Approx. 150 sec. (with E-180 tape) |
| Dimensions (W ×H ×D) | : 14.2" ×3.5" ×11.7" (360 ×88 ×297 mm) |
| Weight | : 9.7 lbs. (4.4 kg) |
| Operating temperature | : 41°F-95°F (5°C-35°C) |
| Operating humidity | : Less than 80 % |
| Timer | : 24 hours display type |
VIDEO
| Television system | : CCIR standard (625 lines, 50 fields)PAL colour signal |
| Recording format | : PAL |
| RF reception | : PAL (B/G) |
| RF OUT | : PAL G |
| Input level | : VIDEO IN (Scart type)1.0 Vp-p, 75 ohm, unbalanced |
| Output level | : VIDEO OUT (Scart type)1.0 Vp-p, 75 ohm, unbalanced |
| Signal to noise ratio | : More than 43 dB |
| RF modulator | : UHF channels 30-40 (adjustable) |
AUDIO
| Input level | : AUDIO IN (Scart type)0 dBm, more than 10 Kohm |
| Output level | : AUDIO OUT (Scart type)0dBm, less than 1 Kohm |
| Audio track | : Mono track |
| Audio frequency response | : 100 Hz-10 kHz (-6/+3) |
| Audio signal to noise ratio | : More than 43 dB |
※ Design and specifications are subject to change without notice.
Before calling for service ...
Please check to see if any problem which you may have with your video recorder is described here before taking it for service or calling a service engineer.
Problem
| No mains power to the video recorder |
| TV programmes cannot be recorded |
| A timer recording does not take place |
| AUTO PLAY does not work |
| There is no picture on playback, or it is noisy and streaky |
| The top of the playback picture is unstable |
| Video cassettes cannot be inserted |
Possible solution?
- Is the video recorder plugged into the mains?
- Is the mains supply on and switched on?
- Can you get a picture on the TV screen?
If are not the aerial and RF lead connected?
● Are the TV channels properly tuned in? - Has the safety tab been removed from the video cassette to prevent recording?
- Is OPERATE off? (Is the Timer symbol showing in the display?)
- Were the recording start and end times set correctly?
- Was the power interrupted after setting the timer?
If so the time setting will be erased and timer recordings will not take place.
● Has the safety tab been removed from the video cassette?
● Are the TV channels properly tuned in? - Try another video cassette.
- Is the TV set tuned to the RF output channel of the video recorder?
- Try a different RF output channel on the video recorder.
- Can you minimise the noise bars to an acceptable level with the "AUTO TRK/(EPS)" or "TRACKING/(MFT) - or +" buttons?
- Is the video cassette damaged? Try another one.
- Adjust the horizontal hold control on you TV set.
● Is the cassette compartment empty? - Are you trying to insert the cassette the right way round?
Video Head Cleaning
- Whenever a video cassette is inserted into or ejected from this video recorder the video head is automatically cleaned.
- Therefore additional head cleaning should not be necessary. However dirt accumulating on the head after a long period can cause the playback picture to become blurred or broken up.
- High quality video cassette tapes will not normally deposit dirt onto the video head, but old or damaged tapes might.