Sarix Enhanced IME238-1IRS - Security Camera Pelco - Free user manual and instructions
Find the device manual for free Sarix Enhanced IME238-1IRS Pelco in PDF.


| Product Type | Indoor IR Dome Security Camera |
| Model | Sarix Enhanced IME238-1IRS |
| Resolution | 2 Megapixels (1920x1080) |
| Lens | 2.8–8 mm varifocal, motorized zoom and focus |
| Infrared (IR) Illumination | Integrated IR LEDs for night vision |
| Day/Night | Mechanical IR cut filter |
| Minimum Illumination | 0.05 lux (color), 0 lux with IR on |
| Video Compression | H.265, H.264, MJPEG |
| Max Frame Rate | 30 fps at 1920x1080 |
| Pan / Tilt / Rotate | Pan: 370°, Tilt: -10° to -90°, Rotate: ±100° |
| Ingress Protection | IP66 |
| Impact Rating | IK10 (20 Joules) |
| Power Input | PoE+ (IEEE 802.3at), 12 VDC, 24 VAC |
| Power Consumption | 12 W (typical) |
| Operating Temperature | 0 °C to 50 °C (32 °F to 122 °F) |
| Dimensions (diameter x height) | 150 mm x 115 mm (approx.) |
| Weight | 1.5 kg (approx.) |
| Memory Card Slot | microSD up to 256 GB (Class 10 or UHS-I) |
| Alarm I/O | 1 alarm input, 1 alarm output (relay) |
| Audio | Built-in microphone, audio line in/out |
| Network Protocols | IPv4, IPv6, TCP, UDP, HTTP, HTTPS, RTSP, etc. |
| ONVIF Compliance | Profile S, G, T, Q |
| Mounting Options | Surface, in-ceiling (IME3ICM-E), pendant (IME3PM-E) |
| Warranty | Standard Pelco warranty (see pelco.com/warranty) |
Frequently Asked Questions - Sarix Enhanced IME238-1IRS Pelco
User questions about Sarix Enhanced IME238-1IRS Pelco
0 question about this device. Answer the ones you know or ask your own.
Ask a new question about this device
Download the instructions for your Security Camera in PDF format for free! Find your manual Sarix Enhanced IME238-1IRS - Pelco and take your electronic device back in hand. On this page are published all the documents necessary for the use of your device. Sarix Enhanced IME238-1IRS by Pelco.
USER MANUAL Sarix Enhanced IME238-1IRS Pelco
SarixEnhancedIII DomeCameras
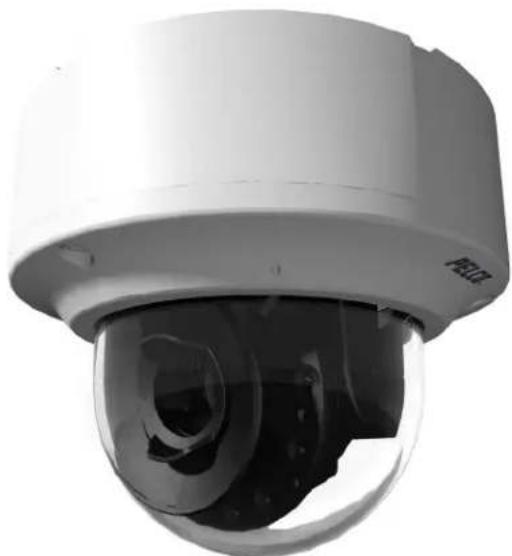
natural_image
Close-up of a white surveillance camera with a spherical lens and lens, no visible text or symbols.Dome(IMESeries)Models
C6644M(10/19)
Contents
Contents....3
Important Notices 5
Legal Notice 5
Regulatory Notices 5
Warranty Statement 5
Video Quality Caution 5
Open Source Software Notice 5
Description 8
System Model Numbers 9
Recommended mounts 9
Optional Accessories 9
Getting Started 9
Dome Camera Models....10
Supplied Parts List 10
User-Supplied Parts List 10
Product Label 10
Product Overview....11
Installing the Camera 13
Preparing the camera For Installation 13
In-Ceiling Installation: with IME3ICM-E (Not supplied) 14
Pendant Installation with IME3PM-E (Not supplied) and WMVE-SW (Not supplied) 16
Surface Mount: Installation to a wall/ceiling 17
Surface Mount Installation to an Outlet Box with IME3EBAP-E (Not Supplied) 18
Connecting the Cables....19
Ethernet Wiring Requirement for PoE+ 19
Power Wiring 19
Alarm/Relay/Audio Port 20
Positioning the Camera 21
Completing the Camera Installation 22
Accessing the Camera 23
Pelco Troubleshooting contact information 23
LEGALNOTICE
SOMEPELCOEQUIPMENTCONTAINS,ANDTHESOFTWAREENABLES,AUDIO/VISUALANDRECORDINGCAPABILITIES,THEIMPROPERUSEOF WHICHMAYSUBJECTYOUTOCIVILANDCRIMINALPENALTIES.APPLICABLELAWSREGARDINGTHEUSEOFSUCHCAPABILITIESVARY BETWEENJURISDICTIONSANDMAYREQUIRE,AMONGOTHERTHINGS,EXPRESSWRITTENCONSENTFROMRECORDEDSUBJECTS.YOU ARESOLELYRESPONSIBLEFORINSURINGSTRICTCOMPLIANCEWITHSUCHLAWSANDFORSTRICTADHERENCETOANY/ALLRIGHTSOF PRIVACYANDPERSONALTY.USEOFTHISEQUIPMENTAND/ORSOFTWAREFORILLEGALSURVEILLANCEORMONITORINGSHALLBEDEEMED UNAUTHORIZEDUSEINVIOLATIONOFTHEENDUSERSOFTWAREAGREEMENTANDRESULTINTHEIMMEDIATETERMINATIONOFYOUR LICENSERIGHTSTHEREUNDER.
REGULATORYNOTICES
This device complies with Part 15 of the FCC Rules. Operation is subject to the following two conditions: (1) this device may not cause harmful interference, and (2) this device must accept any interference received, including interference that may cause undesired operation.
RADIOANDTELEVISIONINTERFERENCE
This equipment has been tested and found to comply with the limits of a Class A digital device, pursuant to Part 15 of the FCC rules. These limits are designed to provide reasonable protection against harmful interference when the equipment is operated in a commercial environment. This equipment generates, uses, and can radiate radio frequency energy and, if not installed and used in accordance with the instruction manual, may cause harmful interference to radio communications. Operation of this equipment in a residential area is likely to cause harmful interference in which case the user will be required to correct the interference at this own expense.
Changes and Modifications not expressly approved by the manufacturer or registrant of this equipment can void your authority to operate this equipment under Federal Communications Commission's rules.
CANICES-3(A)/NMB-3(A)
KOREANCLASSAEMC
For information about Pelco's product warranty and thereto related information, refer to www.pelco.com/warranty.
VIDEOQUALITYCAUTION
FrameRateNoticeRegardingUser-SelectedOptions
Pelco systems are capable of providing high quality video for both live viewing and playback. However, the systems can be used in lower quality modes, which can degrade picture quality, to allow for a slower rate of data transfer and to reduce the amount of video data stored. The picture quality can be degraded by either lowering the resolution, reducing the picture rate, or both. A picture degraded by having a reduced resolution may result in an image that is less clear or even indiscernible. A picture degraded by reducing the picture rate has fewer frames per second, which can result in images that appear to jump or move more quickly than normal during playback. Lower frame rates may result in a key event not being recorded by the system.
Judgment as to the suitability of the products for users' purposes is solely the users' responsibility. Users shall determine the suitability of the products for their own intended application, picture rate and picture quality. In the event users intend to use the video for evidentiary purposes in a judicial proceeding or otherwise, users should consult with their attorney regarding any particular requirements for such use.
OPENSOURCESOFTWARENOTICE
This product includes certain open source or other software originated from third parties that is subject to the GNU General Public License (GPL), GNU Library/Lesser General Public License (LGPL) and different and/or additional copyright licenses, disclaimers, and notices.
The exact terms of GPL, LGPL, and some other licenses are provided to you with this product. Please refer to the exact terms of the GPL and LGPL at http://www.fsf.org (Free Software Foundation) or http://www.opensource.org (Open Source Initiative) regarding your rights under said license. You may obtain a complete corresponding machine-readable copy of the source code of such software under the GPL or LGPL by sending your request to digitalsupport@pelco.com; the subject line should read Source Code Request. You will then receive an email with a link for you to downloadthesourcecode.
This offer is valid for a period of three (3) years from the date of the distribution of this product by Pelco.
NOTE: This product is intended to be supplied by a Listed Power Adapter or DC power source marked "L.P.S." (or "Limited Power Source"), rated 12Vdc, 2A, 24Vac (50/60 Hz), 1.5A or POE 56Vdc, 0.6A, Tma = 60 degree C, and the altitude of operation = 2000m. If youneed further assistance with purchasing the powersource, please contact to PELCO, INC for further information.
Description
The Sarix Enhanced IME Series dome cameras include indoor and environmental domes. All environmental models feature a robust design that is IK10+ (50 Joules) rated and vandal resistant. The environmental models feature worry-free use in harsh environments with IP66, IP67, IP68, and Type4Xratings, and a wider range of operating temperatures. Indoormodels are rated to IK10(20Joules) and IP66.
The Sarix Enhanced Series dome camera is easy to install, offers flexible mounting options, and uses a standard Web browser for easy remote setup and administration.
The Sarix Enhanced Series dome camera easily connects to Pelco IP and hybrid systems such as VideoXpert and Digital Sentry version 7.3 (or later). The camera also conforms with ONVIF Profile S, Profile G, Profile T, and Profile Q for connection with third-party software. Pelco offers an ApplicationProgrammingInterface(API)andSoftwareDeveloper'sKit(SDK)forinterfacingwithPelco'sIPcameras.
This document describes the installation and initial setup procedures to begin operating the camera. For more information about operating your camera, refertotheoperationmanualspecifictotheproduct.
NOTE: For additional information about IME dome product documentation in English and other languages, go to www.pelco.com and navigate to the SarixEnhancedIIISerieswebsite.
SYSTEMMODELNUMBERS
| BackBoxResolutionLens | ModelNumber | Description | |
| Surface | 2MP2.8to8 | mmIME238-1ERS | SarixEnhancedEnvironmentallIRDome |
| 2MP2.8to8 | mmIME238-1IRSS | SarixEnhancedIndoorIRDome | |
| 3MP8to20 | mmIME332-1ERS | SarixEnhancedEnvironmentallIRDome | |
| 3MP8to20 | mmIME332-1IRSS | SarixEnhancedIndoorIRDome | |
| 3MP2.8to8 | mmIME338-1ERS | SarixEnhancedEnvironmentallIRDome | |
| 3MP2.8to8 | mmIME338-1IRSS | SarixEnhancedIndoorIRDome | |
| 5MP4to9m | mmIME539-1ERS | SarixEnhancedEnvironmentallIRDome | |
| 5MP4to9m | mmIME539-1IRSS | SarixEnhancedIndoorIRDome | |
| 8MP9to20 | mmIME832-1ERS | SarixEnhancedEnvironmentallIRDome4K | |
| 8MP9to20 | mmIME832-1IRSS | SarixEnhancedIndoorIRDome4K | |
| 8MP4to9m | mmIME839-1ERS | SarixEnhancedEnvironmentallIRDome4K | |
| 8MP4to9m | mmIME839-1IRSS | SarixEnhancedIndoorIRDome4K |
RECOMMENDEDMOUNTS
| MountsDescription | |
| PA101withWMVE-SW&IME3PM-EPolemountforusewithWMVE-SW&IME3PM-E | |
| IME3ICM-E | In-ceilingmount |
| IME3PM-E | Pendantmount |
| IMM-CMwithWMVE-SW&IME3PM-E | CornermountforusewithWMVE-SW&IME3PM-E |
| IME3EBAP-E | Electricalboxadapter |
| WMVE-SW | Wallmount,1.5in.NPT |
OPTIONALACCESSORIES
| Accessory | Description |
| IMELD3-0E | Smokedlowerdomeforenvironmentaldomecameras |
| IMELD3-1E | Clearlowerdomeforenvironmentaldomecameras |
| IME3LD-0 | Smokedlowerdomeforindoordomecameras |
| IME3LD-1 | Clearlowerdomeforindoordomecameras |
GETTINGSTARTED
- Before installing your device, thoroughly familiarize yourself with the information in the installation section of this manual.
- Pelco recommends connecting the device to a network that uses a Dynamic Host Configuration Protocol (DHCP) server to address devices.
- Donotuseanetworkhubwhenconfiguringthenetworksettingsforthedevice.
- Toensuresecureaccess, placethedevicebehindafirewallwhenitisconnectedtoanetwork.
SUPPLIEDPARTSLIST
QtyDescription
1Camera
1Surfacemountingtemplate
1 Installationmanual
1ChinaRoHSdocument
1Powerterminalblock
2Plasticexpansionanchors
2M4x35mmself-tappingPhillipsscrews
1TorxT20securityL-key
1Grommet
1 Important Safety Instructions document
USER-SUPPLIEDPARTSLIST
In addition to the standard tools and cables required for a video security installation, you will need to provide the following items:
QtyDescription
1Conduit(ifapplicable)
1Conduitadapters(ifapplicable)
1RJ-45connectortoterminatecables
1Cat5e(orhigher)cable
1#2Phillipsscrewdrivers
1Toolfordrilling
124-28AWG4,8or10multiconductorcableforalarmsand/oraudio(optional)and/orpower
116-20AWG2conductorcableforpower(optional)
1 Up to a 256 GB Micro SDHC or SDXC card capable of a minimum write speed of 10 MB/sec is recommended for recording HD video (optional)
PRODUCTLABEL
The product label lists the model number, serial number, and Media Access Control (MAC) address. This information might be required for setup. A product label is located on the bottom of the camera and on the side of the product box.
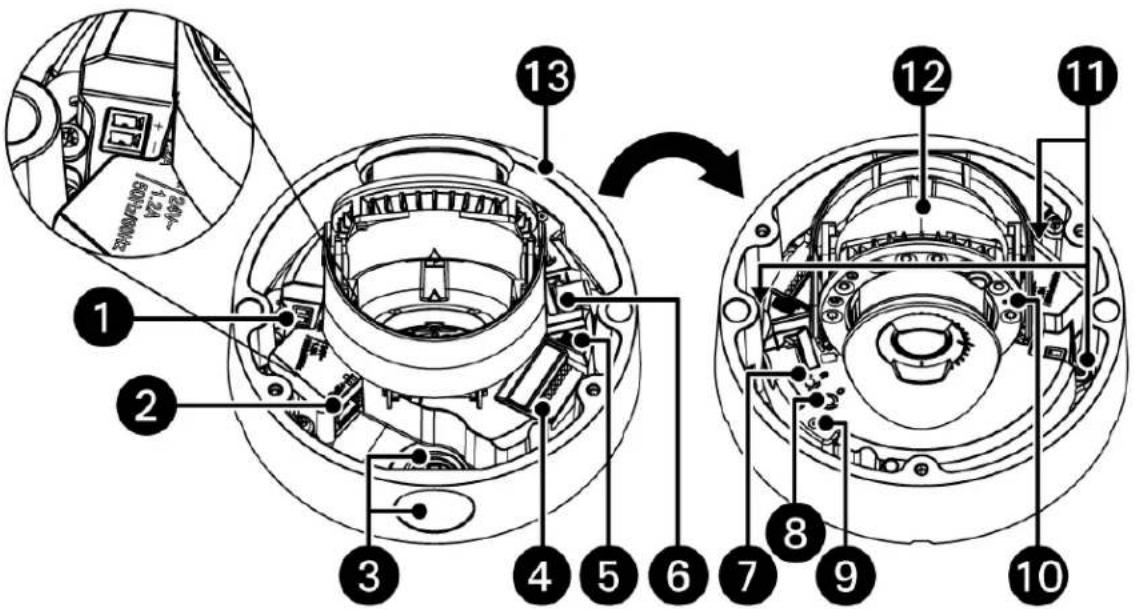
Figure1.SarixEnhancedIMESeriesDomeCamera
-
PowerConnector: Atwo-pinconnector for 12VDCor24VAC.
-
RJ-45 Network Port: Connects the camera to the IP network. also supplies power to the camera (POE+), through the same connector. (Note: To purchaseapowersupply, pleasecontactPelcoforfurtherinformation.)
a.GreenLED:Withsolidgreen,theLEDindicatesaliveconnectionisestablished.
b. Orange LED: With flashing orange, the LED indicates data is being transmitted/received between camera and switch.
-
NPT 3/4"-14: Gland/conduit connection. It is recommended to use conduit when possible for cable entry into the housing. The Sarix IME Series camera comes with two conduit openings (side and top entry). Only one entry is intended to be used. The other entry must be blocked with the conduitplug(supplied).
-
Alarm/Relay/AudioPort: Connectstoalarms, relays, and audioin/out.
-
Connector: Notused.
-
Micro SD Card Slot: Install the SD card into the card slot to store videos and snapshots. Do not remove the micro SD card when the camera is poweredon.
a. To install the microSDcard, the domecover must be taken off from the camera.
-
Reset Button: Cycles power to the camera and initiates a reset. Press and release the reset button once to reboot the camera.
-
Defaults Button: Press and hold the button for 4 seconds to restore the camera to factory default settings.
-
Microphone: Microphone for capturing sound.
-
StatusLEDIndicator:
a. Solidredformorethan5secondsindicatesthereisabootingerror.Flashinggreenindicatesbootingisnormal.
b. Flashingorange indicates a firmware update in progress.
c.LEDwillturnoffafterasuccessfulbootup.
d. Solid Amber indicate the cameraisinacold start state (warming up before fully booting).
-
Camera Module Screws: Three screws used to attach the camera module to the back box. Camera module can be removed during installation to makeiteasiertoinstalltheproductandprotectthecameraduringtheinstallationprocess(optional).
-
CameraModule: The physical main body of the camera.
-
Backbox: Bottomcameracoverenclosure.
-
LowerDome: Topcameracoverenclosure.(Notshown)
ConduitPlugOptions
It is recommended to use conduit when possible for cable entry into the housing. The Sarix IME Series camera comes with two conduit openings (side and top entry). Only one entry is intended to be used. the other entry must be blocked with the conduit plug (supplied). Alternatively, a grommet is supplied for cable entry through the top conduit opening when it is not possible to use the conduit. If using the supplied grommet, puncture a round hole(s) as needed in the grommet that is smaller than the diameter of the cable that will be passed through the grommet.
Thegrommetcanbeinstalledinthefollowingway:
- Removethelowerdome, if necessary, and pressthegrommetintothetopconduitentryhole.
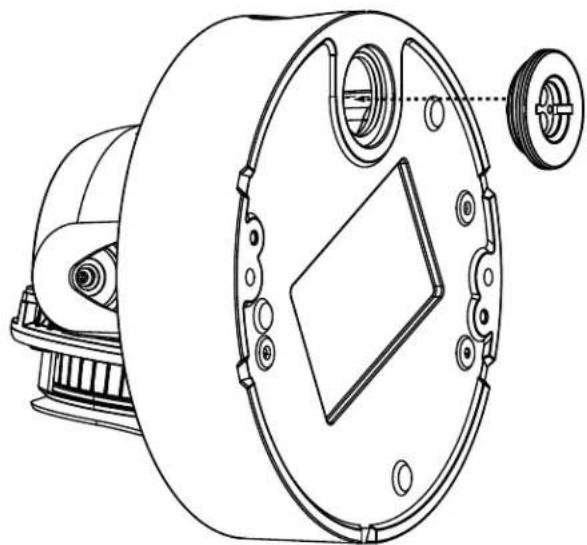
natural_image
Technical line drawing of a mechanical component with no visible text or symbolsFigure2.PressinGrommet
-
Feedan unterminated cable through the hole in the grommet.
-
Terminatethecablewiththeappropriateconnector.
INSTALLINGTHECAMERA
You can install the Sarix IME Series dome cameras to a solid surface (wall or ceiling) out of the box. Additionally, the following installation methodscanbeusedwiththecompatiblePelcomounts(notsupplied):
- Installation on a wall or a fixed ceiling. Refer to Surface Mount: Installation to a wall/ceiling or to an outlet box with IME3EBAP-E (not supplied).
• Installation in a suspended ceiling or a fixed ceiling. Refer to In-Ceiling Installation: with IME3ICM-E (not supplied).
• Installation using a pendant mount. Refer to Pendant Installation: With WMVE-SW (not supplied) and IME3PM-E (not supplied).
NOTE: The IME3EBAP-E will attach the dome camera to a single gang, double gang, or 4" square outlet box.
PREPARINGTHECAMERAFORINSTALLATION
-
Onabench, loosenthethreescrewsontheLowerDomewiththeT20securityL-Key(supplied).
-
Gently separate the Lower Dome from the backbox. (Optional) Remove the Lower Dome from the backbox by unscrewing the safety lanyard fromthebackbox.Setasideforlater:CompletingtheCameraInstallation.
NOTE:Leavetheprotectivefilmonthedometoprotectitfromscratches.
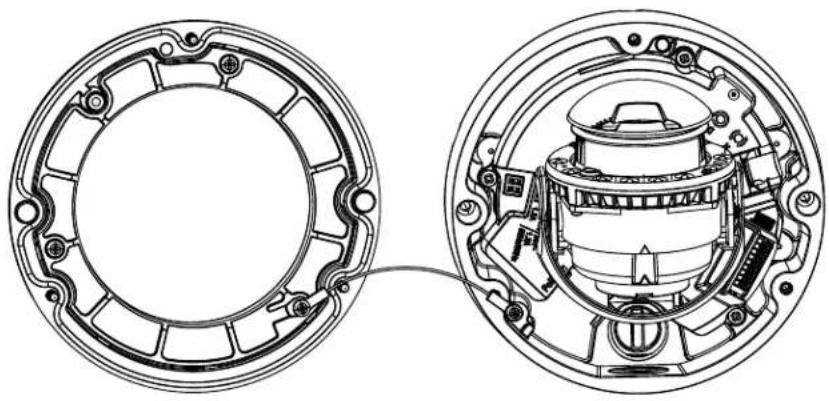
natural_image
Technical line drawing of a mechanical assembly showing two views of a circular component with internal components (no text or symbols)Figure3.SafetyLanyard
- (Optional) Remove the camera module from the backbox by loosening the three camera module screws. Set aside for later: Completing the CameralInstallation.
- Remove the foam insert from the camera module body. The foam insert is for protection during shipping and must be removed before use.
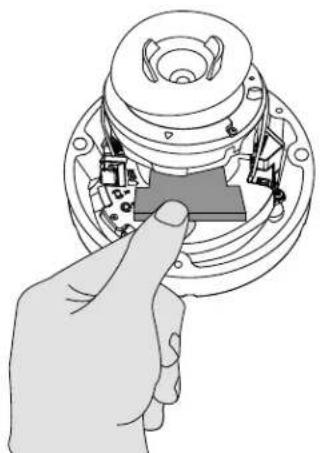
natural_image
Hand inserting a component into a speaker chamber (no text or symbols visible)Figure4.FoamInsert
IN-CEILINGINSTALLATION: WITHIME3ICM-E(NOTSUPPLIED)
PARTSLISTSUPPLIEDWITHTHEMOUNT
QtyDescription
1In-Ceilingmount
1Ceilingtemplate
2 M 4 x 8 mm Phillipsscrews
1Trimring
- Securethebackboxtothein-ceilingmountingbracketwiththeM4screws(supplied).
NOTE: When mounting the backbox, be mindful of the location of the microphone (See Figure 1) so that it is pointed towards areas of interest.
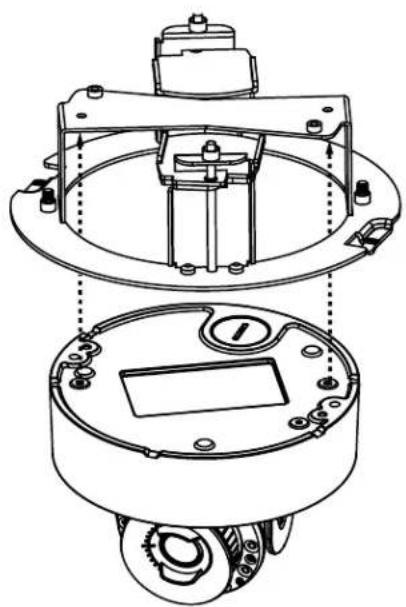
natural_image
Technical line drawing of a mechanical assembly with two views: top shows a circular component with mounting holes and internal components, bottom shows a cylindrical housing with a control panel (no text or symbols)Figure5. Attaching the BackBox to the In-Ceiling Mounting Bracket
-
Determine the mounting location in the ceiling. NOTE: In-ceiling mount can attach to a minimum surface thickness of 3/8" (0.375 inches).
-
Usethetemplatetomarktheholeontheceilingorceilingtile.
-
Cuttheholeforthecamera.
5.Pullthewiringthroughthehole.
-
Based on your needs, move the conduit plug to the side or the top to use the other hole for cable entry. Tighten the plug.
-
Install themount into the ceiling as follows:
a. Ifusingconduit(notsupplied):Feedthecablesintothebackbox, thenattachandsealtheconduittothebackbox.
b.Foldthepaddlesinsidetoclearthehole.
c.Pushthemountthroughthehole.
d. Rotatethescrewsclockwise and fasten completely to secure the bracket to the ceiling.
- Refer to Connecting the Cables, Positioning the Camera, and Completing the Camera Installation sections before proceeding.
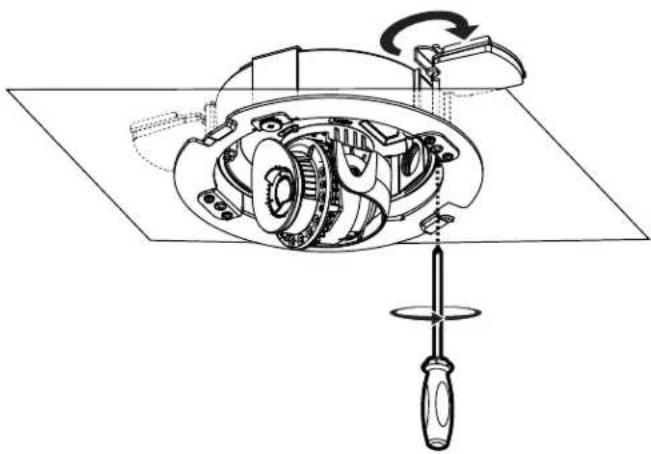
natural_image
Technical line drawing of a mechanical assembly with gears and a screwdriver (no text or symbols)Figure6. Ceiling Bracket Rotation
- Refer to Connecting the Cables, Positioning the camera, and Completing the Camera Installation sections before proceeding.
PENDANTINSTALLATIONWITHIME3PM-E(NOTSUPPLIED)ANDWMVE-SW(NOT SUPPLIED)
PARTSLISTSUPPLIEDWITHTHEMOUNT
QtyDescription
1Pendantcap
2M4x20mmPhillipsscrews
INSTALLATIONGUIDE
The pendant cap can be installed to 1-1/2" NPT pipe or a 1-1/2" NPT wall mount arm like the WMVE-SW (not supplied). Cabling should be pulled through the pipe or wall mount armpriorto attaching the pendant captoit.
- ApplygreaseorTeflontapetothependantthreads.
CAUTION: Threadsmaybesharp. Wearprotective gloves when applying Teflontapeorgrease.
- Pullthewiringthroughtheholeonthetopofthependantcap.
- Screw on the pendant cap to the pipe or WMVE-SW wall mount (refer to WMVE-SW installation manual on pelco.com for installing the wallmountarm).
- Feed the cables into the camera backbox. The supplied grommet must be used to maintain ingress protection. Refer to the Conduit Plug Section for feeding the cable through the grommet and into the backbox.
- Place the camera back box into the pendant cap. Attach the backbox to the pendant cap with the two M4x20mm screws (supplied).
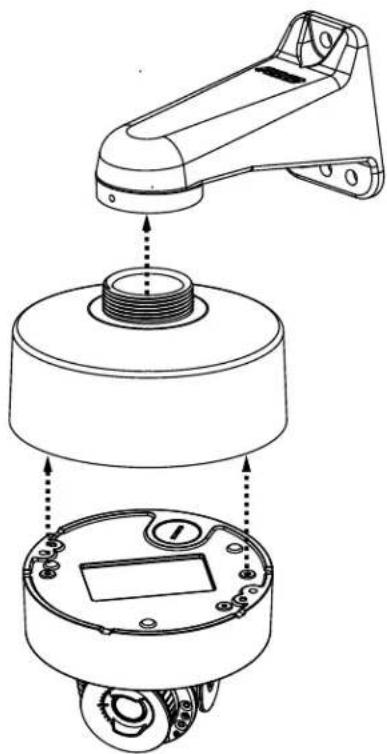
natural_image
Technical line drawing of a mechanical assembly showing a component being inserted into a housing (no text or symbols present)Figure7.DomeArmandPendant
- Refer to Connecting the Cables, Positioning the Camera, and Completing the Camera Installation sections before proceeding.
SURFACEMOUNT:INSTALLATIONTOAWALL/CEILING
- Use the supplied surface mounting template to mark the position of the mounting holes, and if using the top conduit entry, mark the cable feed-throughhole.
NOTE: If not using conduit for the top entry hole, the grommet must be used to maintain ingress protection.
NOTE: When mounting the backbox, be mindful of the location of the microphone (See Figure 1) so that it is pointed toward areas of interest.
- Attachthebackboxtothesurface:
a. Using a 1/4" drill bit, drill them mounting holes.
b. Pressintheplasticanchors(supplied) into the holes.
c. Feedthecables into the backbox:
(1) If using the side conduit entry, move the conduit plug to the top entry position, tighten completely, and then fasten the backbox to the anchors with the two M4 x 35 mm screws (supplied with the camera). Feed cables through the side conduit opening and then attach the conduit to the backbox.
(2) If using the top conduit entry, feed the cables through the hole in the surface, and then through the top conduit opening in the backbox. AttachtheconduittothebackboxandthenattachthebackboxtotheanchorswiththetwoM4x35mmscrews (suppliedwiththecamera).
- Refer to the Connecting the Cables, Positioning the Camera, and Completing the Camera Installation sections before proceeding.
SURFACEMOUNTINSTALLATIONTOANOUTLETBOXWITHIME3EBAP-E(NOT SUPPLIED)
INSTALLATIONGUIDE
PARTSLISTSUPPLIEDWITHTHEMOUNT
QtyDescription
1 Electrical Adapter Plate
2M4x16mmPhillipsscrews
28-32x1inPhillipsscrews
46-32x1inPhillipsscrews
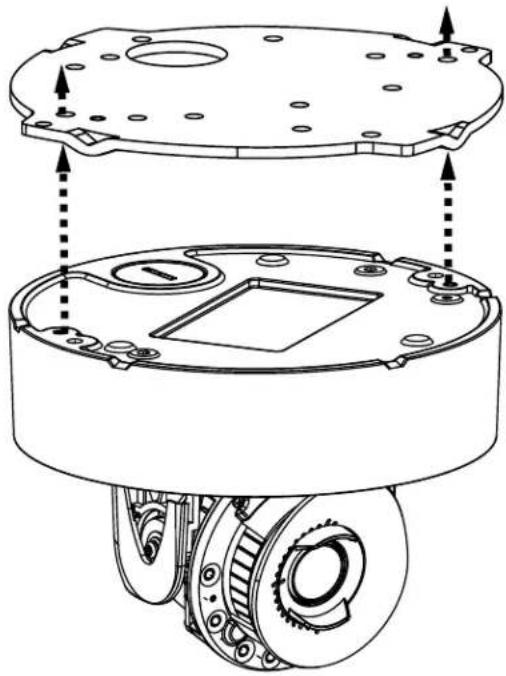
- AttachtheElectricalAdapterPlateto:
a.SingleGangElectricalBoxusingtwo6-32x1inscrews(supplied).
b. DoubleGangElectricalBoxusingfour6-32x1inscrews(supplied).
c.4"SquareOutletBoxusingtwo8-32x1inscrews(supplied).
natural_image
Technical line drawing of a mechanical assembly with mounting holes and internal gears (no text or symbols)Figure8.AdapterPlate
-
Feed the cable through the hole in the plate.
-
AttachthebackboxtotheplatewiththetwoM4x16mmscrews(suppliedwiththecamera).
-
Refer to Connecting the Cables, Positioning the Camera, and Completing the Camera Installation sections before proceeding.
If previously removed, reinstall the cameramodule by screwing it into the backbox.
Thel/Ointerfaceswillbeseenonthefrontofthecameramodule.Maketheappropriatecableconnections.
ETHERNETWIRINGREQUIREMENTFORPOE+
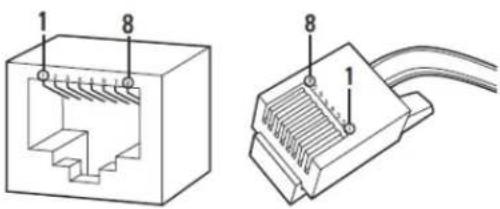
Connect a Cast5e cable or higher cable (not supplied) to the RJ-45 network connector. the 8-pin port includes video over Ethernet, and PoE+ for the camera. PoE+ injects power over the same cabling that carries the network data, eliminating the need for a separate power supply. This simplifiestheinstallationandoperationofthecamerawithoutaffectingnetworkperformance.
Figure9.PinNumbering
natural_image
Technical line drawing of two Ethernet connectors with labeled pins (no text or symbols beyond component numbers)Figure10.PinFunctions
| 1000BASE-TX | |
| PinFunction | |
| 1BI_DA+ | |
| 2BI_DA- | |
| 3BI_DB+ | |
| 4BI_DC+ | |
| 5BI_DC- | |
| 6BI_DB- | |
| 7BI_DD+ | |
| 8BI_DD- | |
POWERWIRING
To wire the connector, insert cables into the power connector (supplied). Attach the cables per Figure 1 (e.g. Pin 1 is 12 VDC or 24 VAC 1; Pin 2 is GNDor24VAC2) with asmallslotted screwdriver and then plug the adapter plug into the camera.
NOTE: 12 VDC OR 24 VAC may be used instead of PoE+ or in addition to PoE+ for power failover in case PoE+/network is temporarily lost.
| DesignationFunction | ||
| AlarmInput | AIAlarIn+ | |
| GNDGround | ||
| AlarmOutput | GNDGround | |
| AOAlarmOut+ | ||
| COMCommon | ||
| AudioIn | (HAKS) | AudiOn+ |
| AudiOn- | ||
| AudioOut | Conset | AudioOut+ |
| AudioOut- | ||
Figure11.RelayandAlarmConnections
PositioningtheCamera
- PanAdjustment: Rotatethelensbaseuntilyouaresatisfiedwiththefieldofview.
• HorizontalRotation: Rotate3Dassemblyinthelensbase. - Tilt Adjustment: Lift to open the inner liner, and tilt the camera lens to your designed angle. Restore the inner liner back to its default positionafteradjustment.
•NOTE:Limitationforthreeaxesposition:
•Panrange:370°
- Rotaterange: ±100°
- Tiltrange: -10° to -90°
• The camera field of view is set by making adjustments to zoom and focus via the Web UI. Refer to the operations manual.
- If previously removed, reattachthesafetylanyardtothebackbox.
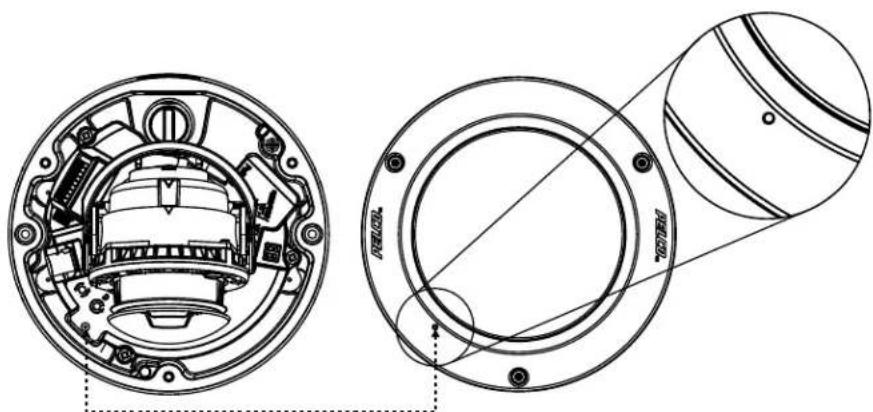
- Reattach the lower dome to the backbox by fastening the three screws. Refer to the following figures for the appropriate method to reattachthelowerdome.
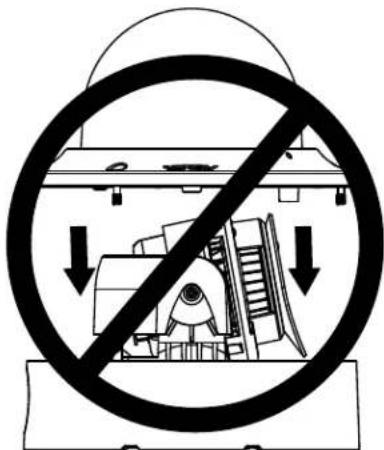
Figure12.IncorrectDomeCoverAttachmentMethod
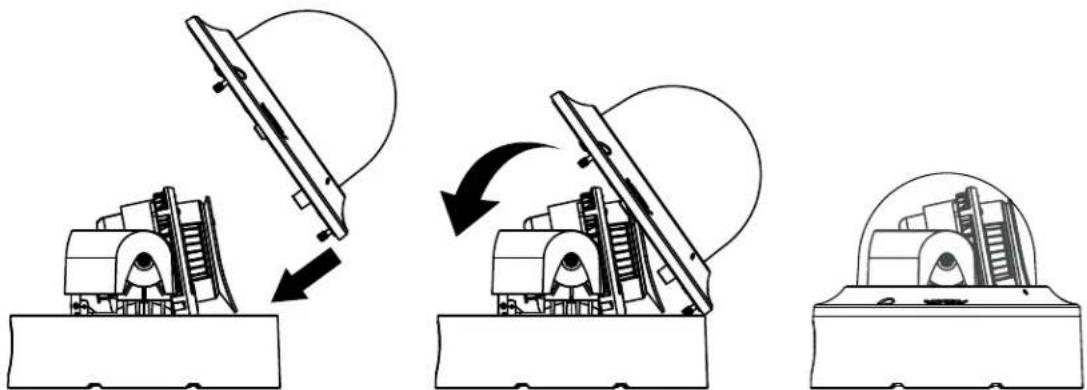
Figure13.CorrectDomeCoverAttachmentMethod
natural_image
Technical line drawing of a mechanical assembly showing internal components and cross-sections (no text or symbols)Figure14. Align Small Hole for Microphone
- Putonthetrimringandrotateitclockwisetosecurethetrimringonthebracket.
Anyone who access the camera can view live video. If you want to prevent users from viewing video without logging in, you must change the permissionsforpublicusers.
The recommended browsers for your camera are the latest version of Internet Explorer®, Microsoft™ Edge™, Google Chrome™ browser, or Mozilla®Firefox®. for supported browserversions, refertothespecificationsheet.
1.Openawebbrowser.
- Typethecamera'sIPaddress(192.168.0.20)orhostnameinyourbrowser'saddressbar,andthepressEnter.
NOTE: You can obtain your camera's IP address or access the camera using the Pelco Device Utility or VxToolbox software. If DHCP is enabled but a DHCP server is not on the network, the camera automatically assigns itself both an IPv4 link local address (169.254.x.x, where the lower two octets are random) and a 192.168.0.20 address. Additional cameras will assign themselves different IPv4 link local addresses and the next available 192.168.0xIP addresses in sequential order. For example, if three cameras are connected to a network without a DHCP server, the first camera to connect assigns itself the IP address 192.168.0.20, the second camera assigns itself 192.168.0.21, and the third camera assigns itself 192.168.0.22.
3.ClickLogin.
- If needed, type your username and password.
NOTE: For security purposes, it is recommended that you create a user account when you login to the camera for the first time.
- In its out-of-the-box configuration, the camera has no user name and password assigned. For security purposes, it is recommended that you set an administrative user name and password after initial configuration of the camera. Creation of an administrative user name changes the state of the camera to its “operational mode,” where credentials must be provided in order to change its configuration.
- There is no provision for recovering a forgotten administrator user name or password. The camera can be restored to its out-of-the-box, no-password configuration by powering down, depressing the Factory Defaults button, and holding the button down for at least four seconds whilepowerthecamerabackup.
- Ifausernameandpasswordexist,aLoginlinkappearsintheupperrightareaofyourwebbrowser.
5.ClickLogIn.
PELCOTROUBLESHOOTINGCONTACTINFORMATION
If the instructions provided fail to solve your problem, contact Pelco Product Support at 1-800-289-9100 (USA and Canada) or +1-559-292-1981 (international)forassistance.Besuretohavetheserialnumberavailablewhencalling.
Donottrytorepairtheunityyourself.Leavemaintenanceandrepairstoqualifiedtechnicalpersonnelonly.
REVISIONHISTORY
Manual#DateComments
C6644M8/19Originalversion.
Pelco, the Pelco logo, and other trademarks associated with Pelco products referred to in this publication are trademarks of Pelco, Inc. or its affiliates.
ONVIF and the ONVIF logo are trademarks of ONVIF Inc. All other product names and services are the property of their respective companies.
Productspecificationsandavailabilityaresubjecttochangewithoutnotice.
© Copyright 2019, Pelco, Inc.
All rights reserved.
PELCO™
Pelco, Inc. 625W. Alluvial Fresno, California 93711 United States
USA&CanadaTel(800)289-9100Fax(800)289-9150
InternationalTel+1(559)292-1981Fax+1(559)348-1120
www.pelco.com
- SarixEnhancedIII DomeCameras
- Contents
- LEGALNOTICE
- REGULATORYNOTICES
- RADIOANDTELEVISIONINTERFERENCE
- KOREANCLASSAEMC
- VIDEOQUALITYCAUTION
- FrameRateNoticeRegardingUser-SelectedOptions
- OPENSOURCESOFTWARENOTICE
- Description
- SYSTEMMODELNUMBERS
- RECOMMENDEDMOUNTS
- OPTIONALACCESSORIES
- GETTINGSTARTED
- SUPPLIEDPARTSLIST
- QtyDescription
- USER-SUPPLIEDPARTSLIST
- PRODUCTLABEL
- ConduitPlugOptions
- INSTALLINGTHECAMERA
- PREPARINGTHECAMERAFORINSTALLATION
- IN-CEILINGINSTALLATION: WITHIME3ICM-E(NOTSUPPLIED)
- PARTSLISTSUPPLIEDWITHTHEMOUNT
- PENDANTINSTALLATIONWITHIME3PM-E(NOTSUPPLIED)ANDWMVE-SW(NOT SUPPLIED)
- INSTALLATIONGUIDE
- SURFACEMOUNT:INSTALLATIONTOAWALL/CEILING
- SURFACEMOUNTINSTALLATIONTOANOUTLETBOXWITHIME3EBAP-E(NOT SUPPLIED)
- ETHERNETWIRINGREQUIREMENTFORPOE+
- POWERWIRING
- PositioningtheCamera
- PELCOTROUBLESHOOTINGCONTACTINFORMATION
- REVISIONHISTORY
- Manual#DateComments
- PELCO™
Brand : Pelco
Model : Sarix Enhanced IME238-1IRS
Category : Security Camera