AX-TOYCAM3 - Uncategorized Axxess - Free user manual and instructions
Find the device manual for free AX-TOYCAM3 Axxess in PDF.

User questions about AX-TOYCAM3 Axxess
0 question about this device. Answer the ones you know or ask your own.
Ask a new question about this device
Download the instructions for your Uncategorized in PDF format for free! Find your manual AX-TOYCAM3 - Axxess and take your electronic device back in hand. On this page are published all the documents necessary for the use of your device. AX-TOYCAM3 by Axxess.
USER MANUAL AX-TOYCAM3 Axxess
Installation Instructions for AX-TOYCAM3
AX-TOYCAM3 Toyota Back-Up Camera Retain/Add-On 2013-2016
FEATURES
- Retains the factory back-up camera to an aftermarket radio
- Allows an aftermarket camera to be added to the factory radio screen*
* Display and navigation model radios only
INTERFACE COMPONENTS
- AX-TOYCAM3 harness
APPLICATIONS
| SCION | Avalon | 2015-2016 | Rav-4 (after build date Nov. 2013) | 2014 | |
| FRS | 2016 | Camry | 2014-2016 | ||
| iM | 2016 | Corolla | 2014-2016 | Sienna | 2015 |
| tC | 2016 | Highlander | 2014-2016 | Sequoia | 2014-2016 |
| Prius C 2015 | Tacoma | 2014-2016 | |||
| TOYOTA | Prius V 2015 | Tundra | 2014-2016 | ||
| 4-Runner | 2014-2016 | Rav-4 | 2015-2016 | Venza | 2015-2016 |
| 4-Runner (without NAV) | 2013 | ||||
TOOLS REQUIRED
- Cutting tool • Tape • Crimping tool - Connectors (example: butt connectors, bell caps, etc.)
CAUTION! Metra recommends disconnecting the negative battery terminal before beginning any installation, unless the vehicle manufacturer recommends against so. Please check with your local Dealership for more information. All accessories, switches, climate controls panels, and especially air bag indicator lights must be connected before reconnecting the battery or cycling the ignition. Also, do not remove the factory radio with the key in the on position, or the vehicle running. It would be best to remove the key from the ignition and then wait a few seconds before removing the factory radio.

Axxess Integrate
axxessinterfaces.com
metraonline.com
REV. 1/25/16
© COPYRIGHT 2004-2016
METRA ELECTRONICS CORPORATION
Installation Instructions for AX-TOYCAM3

Connections to be made
The AX-TOYCAM3 can be connected two different ways
To retain the factory back-up camera to an aftermarket radio:
- Connect the Black wire to chassis ground.
- Connect the Yellow wire to accessory power.
- Connect the male Yellow RCA jack to the rear camera input of the aftermarket radio.
- Connect the reverse wire from the aftermarket radio, to the reverse signal in the vehicle.
- Disregard the loose Green/Purple wire, it will not be used in this application.
To allow an aftermarket camera to be added to the OEM screen:
- Connect the Black wire to the ground wire of the aftermarket camera.
- Connect the Yellow wire to battery wire of the aftermarket camera.
- Connect the female Yellow RCA jack to the aftermarket camera.
The following (2) steps are only required if a wire is not present in the factory harness.
*Except Avalon 2013-2014 and Venza 2013-2014
- If a wire is not present in pin-2 of the 28-pin connector of the factory radio, unplug the connector, then insert the metal pin of the loose Green/Purple wire into it. Connect the harness back into the radio.
- Connect the other end of the loose Green/Purple wire to the reverse wire of the vehicle.

KNOWLEDGE IS POWER
Encourage your information and submission links by enrolling in the most recognized and respected mobile electronics schools in our industry. Log onto www.bestofinstitute.com or last 06-054-0768 for more information and take crops, toward a better tomorrow.
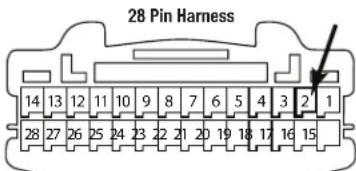
This is the wire view of the connector in the vehicle

Metra recommends MECP certified technicians

Axxess Integrate axxessinterfaces.com • metraonline.com
REV. 1/25/16
© COPYRIGHT 2004-2016 METRA ELECTRONICS CORPORATION
Móvil (Mobile Electronics
Certification Program, MEDP).

Axxess Integrate axxessinterfaces.com • metraonline.com
REV. 1/25/16
© COPYRIGHT 2004-2016 METRA ELECTRONICS CORPORATION