
QCP 6035 - Smartphone KYOCERA - Free user manual and instructions
Find the device manual for free QCP 6035 KYOCERA in PDF.

| Type de produit | Smartphone |
| Marque | Kyocera |
| Modèle | QCP 6035 |
| Système d'exploitation | Palm OS |
| Dimensions | 5.5 x 2.5 x 1.0 inches (139.7 x 63.5 x 25.4 mm) |
| Poids | 7.0 oz (198 g) |
| Écran | Couleur TFT, 160x160 pixels |
| Batterie | Lithium-ion, 1000 mAh, amovible |
| Stockage interne | 8 MB |
| Connectivité | CDMA, port série, infrarouge |
| Fonctions principales | Appels, SMS, agenda, navigateur web, messagerie instantanée |
| Entretien et nettoyage | Essuyer avec un chiffon doux et sec; ne pas utiliser de nettoyants abrasifs |
| Sécurité | Éviter l'exposition à l'eau et aux températures extrêmes; utiliser un chargeur approuvé |
| Pièces détachées et réparabilité | Batterie et coque arrière amovibles; réparation possible dans les centres agréés |
| Informations générales | Manuel d'utilisation disponible en téléchargement; assistance clientèle Kyocera |
Frequently Asked Questions - QCP 6035 KYOCERA
User questions about QCP 6035 KYOCERA
0 question about this device. Answer the ones you know or ask your own.
Ask a new question about this device
Download the instructions for your Smartphone in PDF format for free! Find your manual QCP 6035 - KYOCERA and take your electronic device back in hand. On this page are published all the documents necessary for the use of your device. QCP 6035 by KYOCERA.
USER MANUAL QCP 6035 KYOCERA

KYOCERA
The Kyocera Smartphone
Reference Guide
QCP ^TM 6035
www.kyocera-wireless.com
The Kyocera Smartphone
Reference Guide
for the QCP™ 6035 Smartphone by Kyocera

KYOCERA
10300 Campus Point Drive San Diego, California 92121 U.S.A. Visit us at www.kyocera-wireless.com For accessories, visit www.kyocera-wireless.com/store
80-B6596-2EN, Rev. A
This manual is based on the production version of the QCP™ 6035 smartphone by Kyocera. Software changes may have occurred after this printing. Kyocera reserves the right to make changes in technical and product specifications without prior notice. The products and equipment described in this documentation are manufactured under license from QUALCOMM Incorporated under one or more of the following U.S. patents:
4,901,307 5,056,109 5,099,204 5,101,501 5,103,459 5,107,225 5,109,390 5,193,094 5,228,054 5,257,283 5,265,119 5,267,261 5,267,262 5,280,472 5,283,536 5,289,527 5,307,405 5,309,474 5,337,338 5,339,046 5,341,456 5,383,219 5,392,287 5,396,516 D356,560 5,408,697 5,414,728 5,414,796 5,416,797 5,426,392 5,437,055 D361,065 5,442,322 5,442,627 5,452,473 5,461,639 5,469,115 5,469,471 5,471,497 5,475,870 5,479,475 5,483,696 5,485,486 5,487,175 5,490,165 5,497,395 5,499,280 5,504,773 5,506,865 5,509,015 5,509,035 5,511,067 5,511,073 5,513,176 5,515,177 5,517,323 5,519,761 5,528,593 5,530,928 5,533,011 5,535,239 5,539,531 5,544,196 5,544,223 5,546,459 5,548,812 5,559,881 5,559,865 5,561,618 5,564,083 5,566,000 5,566,206 5,566,357 5,568,483 5,574,773 5,574,987 D375,740 5,576,662 5,577,022 5,577,265 D375,937 5,588,043 D376,804 5,589,756 5,590,069 5,590,406 5,590,408 5,592,548 5,594,718 5,596,570 5,600,754 5,602,834 5,602,833 5,603,096 5,604,459 5,604,730 5,608,722 5,614,806 5,617,060 5,621,752 5,621,784 5,621,853 5,625,876 5,627,857 5,629,955 5,629,975 5,638,412 5,640,414 5,642,398 5,644,591 5,644,596 5,646,991 5,652,814 5,654,979 5,655,220 5,657,420 5,659,569 5,663,807 5,666,122 5,673,259 5,675,581 5,675,644 5,680,395 5,687,229 D386.186 5.689.557 5.691.974 5.692.006 5.696.468 5.697.055 5.703.902 5.704.001 5.708.448 5.710.521 5.710.758 5.710.768 5.710.784 5.713.236 5.713.236 5.713.236 5.713.236 D393.8S D393.8S D393.8S D393.8S D393.8S D393.8S D393.8S D393.8S D393.8S D393.8S D393.8S D393.8S D393.8S D3A. D3A. D3A. D3A. D3A. D3A. D3A. D3A. D3A. D3A. D3A. D3A. D3A. D3A. D3A. D3A. D3A. D3A. D3A. D3A. D3A. D3A. D3A. D3A. D3A. D3A D3A D3A D3A D3A D3A D3A D3A D3A D3A D3A D3A D3A D3A D3A D3A D3A D3A D3A D3A D3A D3A D3A D3A D3A D3A<|txt_contd|> Other patents pending.<|txt_contd|>
FCC/IC Notice
This device complies with part 15 of the FCC rules. Operation is subject to the following two conditions: (1) This device may not cause harmful interference, and (2) this device must accept any interference received, including interference that may cause undesired operation.
The exposure standard for wireless mobile phones employs a unit of measurement known as the Specific Absorption Rate, or SAR. The SAR limit set by the FCC is 1.6Watts per kilogram (W/kg). Tests for SAR are conducted using standard operating positions specified by the FCC with the phone transmitting at its highest certified power level in all tested frequency bands. Although the SAR is determined at the highest certified power level, the actual SAR level of the phone while operating can be well below the maximum value. This is because the phone is designed to operate at multiple power levels so as to use only the power required to reach the network. In general, the closer you are to a wireless base station antenna, the lower the power output.
Before a phone model is available for sale to the public, it must be tested and certified to the FCC that it does not exceed the limit established by the government-adopted requirement for safe exposure. The tests are performed in positions and locations (e.g., at the ear and worn on the body) as required by the FCC for each model. The highest SAR value for this model phone when tested for use at the ear is 1.41 W/kg and when worn on the body at the waist is 0.69 W/kg. (Body-worn measurements differ among phone models, depending upon available accessories and FCC requirements). While there may be differences between the SAR levels of various phones and at various positions, they all meet the government requirement for safe exposure. The SAR values shown above (1.41 W/kg and 0.69 W/kg) are worst case values for a Kyocera smartphone. A typical Kyocera Smartphone is 1.23 W/kg at the ear and 0.395 W/kg when worn on the body.
Warning
Use only Kyocera Wireless Corp. approved accessories with Kyocera Wireless Corp. phones. Use of any unauthorized accessories may be dangerous and will invalidate the phone warranty if said accessories cause damage or a defect to the phone.
To comply with FCC radiation exposure requirements, use of this device for body-worn operational configurations is limited to accessories tested and approved by Kyocera Wireless Corp. Other accessories used with this device for body-worn operations must not contain any metallic components and must provide at least 22.75mm separation distance including the antenna and the user's body. Other belt-clips, holsters or similar accessories that have not been tested for body-worn SAR may not comply with FCC RF exposure limit and should be avoided.
Caution
The user is cautioned that changes or modifications not expressly approved by the party responsible for compliance could void the warranty and user's authority to operate the equipment.

ACN 093 453 037
Apple and Macintosh are registered trademarks, and iMac is a trademark of Apple Computer, Inc. Kyocera is a registered trademark of Kyocera Corporation. QCP is a trademark of Kyocera Wireless Corp. Microsoft, Windows, and Windows NT are registered trademarks of Microsoft Corporation. Graffiti and HotSync are registered trademarks, and Palm and the Palm Computing platform logo are trademarks of Palm, Inc., 3COM Corporation, or its subsidiaries.
Eudora is a registered trademark of the University of Illinois Board of Trustees, licensed to QUALCOMM Incorporated. America Online and Compuserve are registered trademarks of America Online, Inc. WinFax is a registered trademark of Symantec Corporation. Other product and brand names may be trademarks or registered trademarks of their respective owners.
Copyright © 2000, 2001 Kyocera Wireless Corp. All rights reserved. Printed in the United States of America. Portions of this document are Copyright © 1998 3Com Corporation or its subsidiaries. Reprinted with permission.
80-B6596-2EN, Rev. A
Contents
Chapter 1—Introducing the Kyocera Smartphone 9
What to do first....10
Turning the phone on and off.... 12
Phone features....14
Features with the keypad closed 15
Features with the keypad open 19
Palm applications 20
Accessories for your Kyocera Smartphone. 21
Where to get more information 21
Where to go next.... 22
Chapter 2—Making and Receiving Calls ...... 23
Dialing calls on the keypad....24
Using the Dialer 25
Making a call from Speed Dial 28
Making a call from the Contacts list 30
Making a call from the Address Book....31
Redialing recent calls 32
Checking your own phone number....34
Making a conference call.... 34
Making a data connection.... 35
Answering calls.... 36
Answering calls "hands-free" 37
Ending calls 38
Adjusting sounds 39
Looking up information on your phone 42
Using power-save mode 44
Viewing the phone status bar....46
Chapter 3—Using the Organizer .... 48
Selecting applications.... 49
Entering information 51
Using application controls. 59
Using menus 59
Choosing fonts 61
Using categories 62
Attaching notes....65
Marking private entries....66
Installing applications 66
Removing applications from the phone 69
Removing the Desktop software 69
Chapter 4—Transferring Information .... 70
Installing Kyocera smartphone Desktop software 71
Synchronizing data using the sync cradle 74
Synchronizing data remotely 76
Synchronizing data using the infrared port 81
Creating a user profile 84
Modifying synchronization options 85
Customizing a conduit....87
Transferring information between Palm devices.... 88
Troubleshooting HotSync operations 90
Beaming information 91
Chapter 5—Address Book 94
Creating Address Book entries....95
Making calls from the Address Book. 96
Editing Address Book entries....98
Beaming entries to other devices 103
Deleting entries.... 104
Using Address Book menus 106
Chapter 6—Call History and the Recent Calls List .... 108
Opening lists of your recent calls.... 109
Making a call from Call History.... 110
Viewing your calls 111
Deleting calls....113
Setting up your preferences in Call History 114
Creating an expense record.... 114
Using the menus in Call History 116
Chapter 7—Date Book 119
Scheduling events in the Date Book. 120
Scheduling repeating events.... 124
Deleting an event 126
Changing the Date Book view 128
Using the Date Book menus 132
Chapter 8—Expense 134
Creating an Expense item 135
Entering or modifying receipt details 136
Printing expense reports 140
Transferring your data to an Excel spreadsheet 141
Sample expense report templates. 143
Customizing the templates 147
Using the Expense menus.... 153
Chapter 9—Memo Pad .... 155
Creating memos 156
Reviewing and editing memos.... 156
Beaming a memo 159
Deleting a memo....159
Using Memo Pad menus 160
Chapter 10—Messages .... 162
Setting up the Messages application 163
Checking your messages....164
Sending messages.... 166
Erasing messages 167
Setting preferences....169
Chapter 11—Setting Up Network Connections ...... 171
Getting started with network connections 172
Entering network settings.... 173
Creating and using service templates 180
Using service template menus 182
Troubleshooting network connections 183
Creating a login script 184
Setting a proxy server 187
Using Data/Fax mode with the wireless modem 188
Chapter 12—Setting Preferences .... 195
About preferences....196
Setting Button preferences.... 197
Setting Connection preferences 199
Using the Digitizer 203
Setting Format preferences 203
Setting General preferences....204
Setting Network preferences....206
Setting Owner preferences 206
Setting Phone preferences 206
Setting Power preferences....211
Setting Registry preferences 213
Setting ShortCuts preferences....213
Setting Sounds preferences....215
Setting Wireless preferences....218
Chapter 13—Security 220
Using Keyguard 221
Showing or hiding private entries 223
Locking the phone 224
Chapter 14—Speed Dial .... 228
Adding an entry to the Speed Dial list 229
Making calls using Speed Dial 231
Editing the Speed Dial list.... 232
Deleting entries....234
Using Speed Dial menus 235
Chapter 15-To Do List 236
Creating To Do items 237
Setting Item Details 238
Deleting a To Do item 239
Displaying your To Do list 240
Using the To Do List menus 242
Chapter 16—Voice Dial....243
Training Voice Dial.... 244
Making and answering calls with Voice Dial. 245
Chapter 17—Voice Memos 247
Recording a voice memo 248
Replaying your voice memos 250
Managing your voice memos 251
Chapter 18—Troubleshooting .... 256
Where to find help 257
Resetting the phone 258
Troubleshooting tips 260
Phone care 263
Safety information 267
Appendix A—Phone Menus 270
Making selections from flip-closed menus....271
Phone Info menu. 275
Contacts menu. 275
Recent Calls menu 275
Settings menu 276
Voice Memo menu 284
Messages menu....284
Appendix B—Glossary 285
Appendix C—End-User
Software License Agreement 291
Chapter 1
Introducing the Kyocera Smartphone
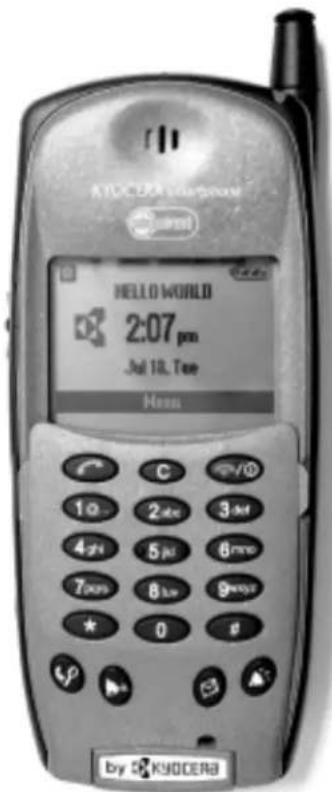
Congratulations on your purchase of the Kyocera smartphone.
Your new phone combines two leading-edge technologies, giving you the convenience of a CDMA digital phone and an electronic organizer in a single handset.
The Kyocera smartphone looks and works like other phones and electronic organizers you may already have used. But it is much more, since it is both a phone and an organizer. Because these features are completely integrated, you can use the telephone features and the organizer features together or independently. You can use the phone features with the keypad open or closed. You can use the organizer applications without turning the phone on at all.
This chapter introduces your phone and provides an overview of its features.
In this chapter
■ What to do first page 10
■ Turning the phone on and off page 12
■ Phone features page 14
■ Features with the keypad closed page 15
■ Features with the keypad open page 19
■ Palm applications page 20
■ Accessories for your Kyocera Smartphone page 21
■ Where to get more information page 21
■ Where to go next page 22
What to do first
The batteries in your phone are delivered partially charged. Before first use, you must install the main battery and fully charge it. You must also allow enough time for the internal backup battery to charge completely. You will need the following:
■ Kyocera smartphone
■ battery
■ phone power cable
■ sync cradle (optional)
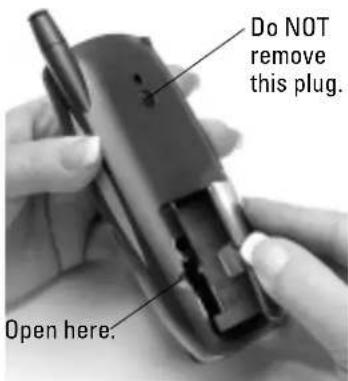
To install the battery
- Hold the phone so the keypad faces away from you.
- Open the battery compartment door on the lower back of the phone using your finger or the stylus.
- Lift off the battery compartment door.
IMPORTANT: Do not remove the circular plug on the back of your phone above the battery compartment. Improper removal of this service access plug can result in permanent damage to the phone and will void your warranty.
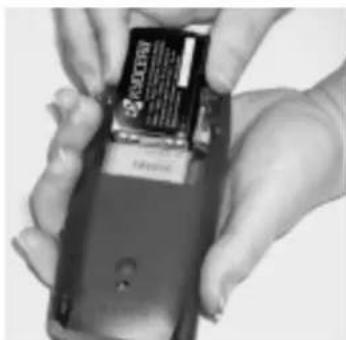
- Slide the battery into the battery compartment with the Kyocera label facing you.
The end of the battery with four copper-colored depressions goes toward the top of the phone.
- Apply gentle pressure until the battery snaps into place.
- Replace the battery cover.
natural_image
Close-up of hands holding a smartphone with a partially open card (no visible text or symbols)NOTE In addition to the main battery you just installed, your phone has an internal backup battery. During shipment, this backup battery may have become discharged. If so, the phone will not power up immediately after you install the main battery. Just connect the phone to the power cable or place it in the cradle as explained in the next section.
To charge the batteries
Both of the batteries—the main battery you just installed and the internal backup battery—are recharged when the phone is connected to power. You can charge the batteries using either the power cable or the sync cradle.
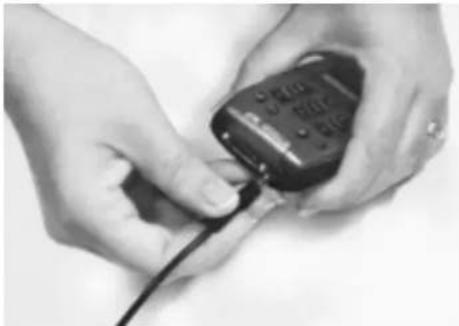
To charge the batteries using the power cable
- Insert the small round plug of the power cable into the round port on the base of the phone. Plug the other end into an AC power outlet.
The message "Phone is charging" appears on the screen. Before your first use of the phone, wait until the message "Charging is complete" appears. If the battery is completely drained, it may take 6–8 hours to charge
natural_image
Close-up of hands holding a handheld electronic device with a cable (no visible text or symbols)- Unplug the phone from the power cable.
To charge the batteries in the sync cradle
-
Place the sync cradle on a flat surface near your computer.
-
Insert the small round plug of the power cable (a) into the base of the sync cradle. Plug the other end of the cable into a power outlet.
- To attach the sync cradle to your computer, do the following:
a. Turn off the computer.
b. Plug the data cable from the sync cradle (b) into a serial communications (COM) port on your computer. The sync cradle requires a dedicated port; it cannot share a port with an internal modem, IR port, or other device.
c. Turn on the computer.
- Slide the base of the phone into the sync cradle.
The message “Phone is charging” appears on the screen. Before your first use of the phone, wait until the message “Charging is complete” appears. If the battery is completely drained, it may take 6–8 hours to charge the first time.
Once the main battery is charged, you can use the Kyocera Smartphone in the cradle or out of the cradle for all functions. Leaving the phone in the cradle when you are not using it is a convenient way to keep the battery charged.

natural_image
Line drawing of a hair iron being inserted into a machine, showing the process with no text or symbols.- If you have purchased an extra battery, you can recharge it in the cradle at the same time. Slide the battery into the rear port with the Kyocera label facing up.
The light on the sync cradle shows the status of the battery in the rear port.
■ Red—The battery is not charged.
■ Green—The battery is fully charged.
- Flashing red—The battery is not making contact or there is a charging problem. Reset the battery. If the problem is not resolved, contact your service provider.
NOTE: The first port filled is the first port to charge. If you insert the extra battery into the rear port before you place the phone in the front port, the extra battery will be charged first.
Turning the phone on and off
To turn on the phone for the first time
- With the flip closed, press and hold for few seconds. You see the message "Powering on" on the screen.
- Remove the stylus from its slot on the top left side of the phone.
- Open the flip. Follow the procedures in the welcome screens to calibrate the phone. Use the stylus to tap the screen when you are instructed to do so. To prevent scratches, never use a pen, pencil, or other sharp object to tap or write on the screen. The phone is now ready to use.
To turn the phone on and off at any time
Press and hold down Ⓜ few seconds. Status messages appear on the screen.
flowchart
graph TD
    A["Hold To Power On."] --> B["Powering On."]
    B --> C{If a signal is found}
    B --> D{If no signal is found}
    C --> E["Phone is ON."]
    D --> F["Phone is searching or OFF."]
    G["Hold To Power Off."] --> H["Powering Off."]
    H --> I["Phone is OFF."]
When the phone is on and it finds a signal, the home screen appears.
When the phone is powered on and the flip is closed, the home screen appears.
The home screen gives you information about battery power and signal strength. From this screen, you can make calls or open the flip-closed menus by pressing the shuttle in.
Phone features
① Backlight button and infrared port—Tap the button to turn the screen on and off. Press and hold the button to turn the backlight on and off. Point the infrared port at other devices for beaming data.
② Antenna—Extend during calls.
③ LED Green = Home area Amber = Roaming Red = No signal or low power
④ Stylus—Slide the stylus out of its slot. Hold it like a pen to write on the screen. NEVER USE A PEN, PENCIL, OR OTHER SHARP OBJECT ON THE SURFACE OF THE SCREEN.
⑤ Shuttle—Roll the shuttle up or down to scroll through menus. Press it in to make selections. During a call, roll it up or down to adjust the volume.
⑥ Headset jack—Plug the headset cable in here.
⑦ Data port—Plug the data cable in here.
⑧ Power port—Plug the power cable in here to recharge the battery without the sync cradle.
When the phone is turned on
- You can send and receive calls. If there is an incoming, outgoing, or active phone call, information about the call appears on the screen.
- You can use the phone with the keypad flipped open or closed. If you are using an application when the phone rings, you can answer the call with confidence. The Kyocera Smartphone stores your work for you automatically.
When the phone is turned off
- You can use all the organizer features, but you cannot send or receive calls, send or receive email, or search the Web.
Features with the keypad closed
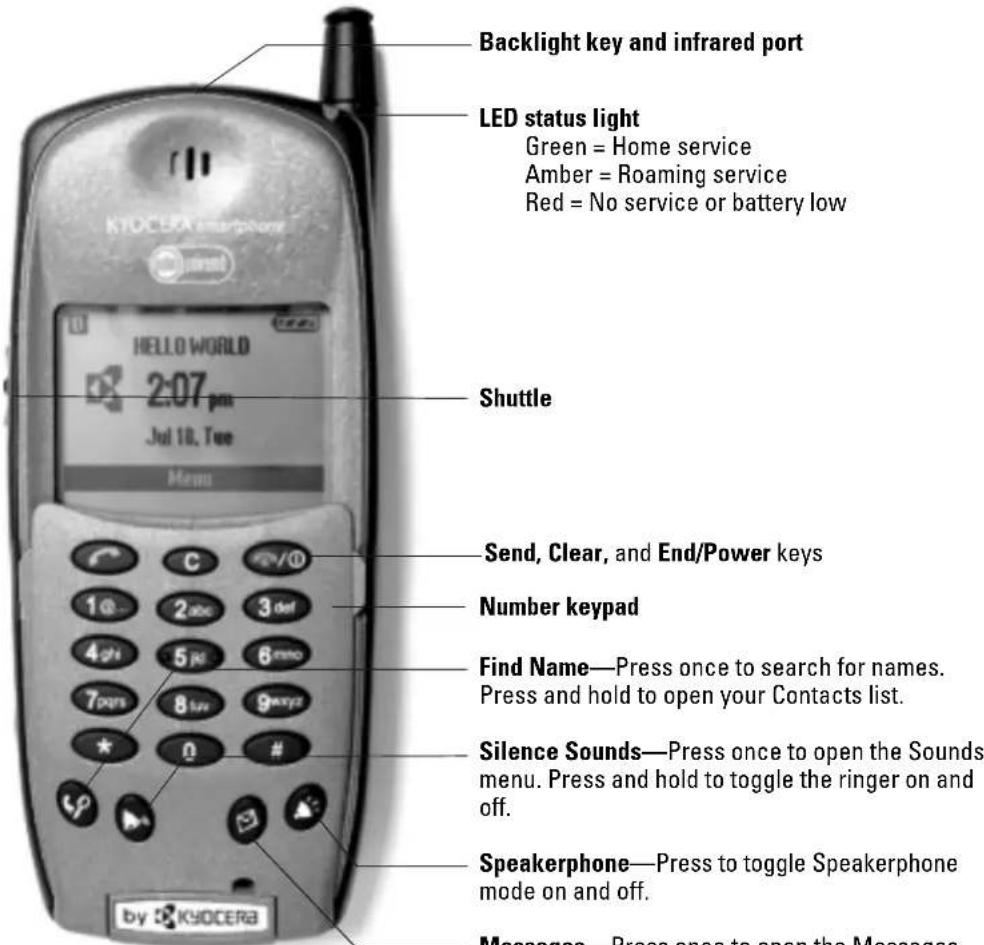
Keys on your phone

Send/Talk key
Press this key (the green phone icon) to send or answer a call.

Clear key
■ In menus, press this key to move back to the previous menu level.
- When entering or editing text, press the key to move the cursor to the left and erase the last character. Press and hold the key to erase an entire line.

End/Power key
■ When on a call, press this key once to end the call.
- To turn the phone on or off, press and hold down the key for about two seconds until you see “Powering On” or “Powering Off.”
- In menus, press this key to exit the menus and return to the Home screen.
1-0
Numeric keys
Press these keys to enter the numbers or letters printed on them.

Find Name key
- Press the key once to search for names in your Address Book.
- Press and hold the key to open your Contacts list.

Silence Sounds key
- Press the key once to view the Sounds menu where you can silence all sounds or adjust the ringer volume.
- Press and hold the key to turn all sounds off. When sounds are off, the bell icon and the words "Ringer Off" appear on screen. Press and hold the key again to turn the sound back on.

Messages key
- Press the key once to view the Messages menu where you can check your voicemail or pager messages.
- Press and hold the key to dial directly into your voicemail service.

Speakerphone key
- Press the key to put the phone in Speakerphone mode.
■ Press the key again to take the phone out of Speakerphone mode.
Using the shuttle
The shuttle is designed to be pressed in three ways: up, down, and in.
To use the shuttle (with the flip closed)
The phone must be turned on to use the shuttle with the flip closed.
- Roll the shuttle up or down to scroll through menu items. From the top item in a menu, roll the shuttle up twice to back up to a previous menu.
■ Press the shuttle in to select a highlighted item.
■ During conversation, roll the shuttle up or down to adjust the earpiece volume during a call. - Shortcut to the Contact List—From the home screen, press the shuttle up once to view the Contact list. This shortcut works when the Main Menu View is set to List Menus (the default setting). If you have changed the Main Menu View to Large Icons, pressing the shuttle either up or down moves through the icons instead of opening the Contact List.
- Shortcut to Voice Memos—From the home screen, press the shuttle down once to view the Voice Memo list. This shortcut works when the Main Menu View is set to List Menus (the default setting). If you have changed the Main Menu View to Large Icons, pressing the shuttle either up or down moves through the icons instead of opening Voice Memos..
To use the shuttle (with the flip open)
- Roll the shuttle up or down to move through lists, text, or applications on the screen. The shuttle works like the Up and Down keys.
■Press the shuttle in to view a status bar at the top of the screen showing the following information:
If the phone is on— Signal strength and battery charge
If the phone is off— Time and battery charge
■Press the shuttle in again to remove the status bar.
Status indicators
On the top line of the screen, the status bar displays icons to show the phone's current status. You might see the following icons:
Digital Mode means the phone is operating in CDMA digital mode. If this icon isn't present, the phone is either in analog mode or there is no service.
Signal Strength shows current signal strength. The more lines you see, the stronger the signal. When this icon appears, you can make and receive calls. If the signal strength is very low, you may not be able to complete a call.
No Service means the phone is not receiving a signal from the system. You cannot make or receive calls. Wait a little longer or move to an open area.
In Use means a call is in progress. (In standby mode, the phone icon does not appear.)
Roaming means the phone is outside of its home area.
Envelope means you have a text message, voice mail, or page.
Padlock indicates your phone is operating with enhanced CDMA voice privacy (if available from your service provider).
Battery Charge shows how much power remains in the battery. The more black bars you see, the greater the charge.
Checking status—the LED
The LED indicates the following states:
- Green—Home. The phone is on and in its home area. The light flashes slowly when you are not making a call, it flashes three times per ring when you receive a call, and it becomes solid during a call.
- Amber—Roaming. The phone is on and in roaming mode. The light flashes slowly when you are not making a call, it flashes three times per ring when you receive a roaming call, and it becomes solid during a call.
- Red—No signal available. The phone is on and searching for a signal. The light flashes slowly if there is no service.
- Rapid red flashes—Alerts. The LED flashes five times rapidly to signal an incoming message or voice mail. It flashes three times rapidly to signal all other types of alerts.
■ No light—The phone is off.
Features with the keypad open
When you open the flip, the organizer features appear.
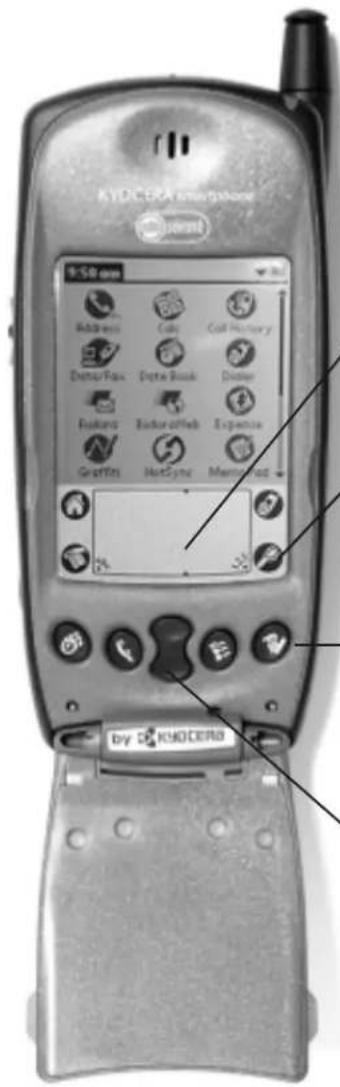
Graffiti® writing area
Write here with the stylus. Write letters on the left and numbers on the right.
Icons
Tap the icons in the area below the screen to open the following:

Applications Launcher

Dialer

Menus

Find
Application keys
Press these keys to open the following Palm applications:

Date Book

To Do List

Address Book

Memo Pad
Up and Down keys
Press these keys to move through lists.
Palm applications
In your phone package, you will find a CD-ROM containing third-party applications for sending email, browsing the Internet, and using web clipping services. Many other applications are available on the Internet. For help with these applications, contact their source. For example, if you need help with Eudora®, go to the Eudora web site (www.eudora.com).
To use Palm applications
Open the flip.
It does not matter whether the phone is turned on or off. You can use the Palm applications at any time.
Easy access to Palm applications during calls
If you're talking on the phone and need to check information in any of your applications (such as the Date Book or Memo Pad), simply open the application you want to use. Your call is not affected by opening and closing the keypad or by opening any of the applications on your Kyocera Smartphone.
You can use the on-screen keyboard or the stylus to add or change information (such as appointments, addresses, or memos) during the call. Attach the Kyocera Smartphone headset while you are entering information during a phone call for even greater convenience.
If you are already using a Palm device
If you are already familiar with Palm organizers, you'll find that the Kyocera Smartphone operates the same way, with a few exceptions. Many applications like the Address Book have been enhanced so that you can make phone calls directly from them.
Icons—Most icons and buttons are identical to those on your Palm organizer. Only the Calculator icon has been replaced with the Dialer 📂n. Tap this icon to open the on-screen Dialer. You'll find the Calculator on the Applications Launcher screen.
Palm Desktop—You do not need to reinstall the Palm Desktop from the CD-ROM. The Kyocera smartphone can use your existing Palm Desktop.
Transferring data—You can transfer all the data from your existing Palm device to your new Kyocera smartphone. Before doing so, however, be sure to read “Transferring information between Palm devices” on page 88.
There are several ways to transfer the data.
- Synchronize the data—Follow this procedure only if you are not planning to use your Palm device anymore. See “To synchronize using the same user name” on page 88.
- Copy the data—Follow this procedure if you intend to use both devices on an ongoing basis. Since every Palm handheld device must have a unique name,
serious synchronization problems may occur if you synchronize two Palm devices with the same user name. See "To copy and paste data" on page 89 or "To copy data using Windows Explorer" on page 90.
Accessories for your Kyocera Smartphone
You can purchase a number of accessories for your phone, including the following:
■ Batteries ■ Headsets
■ Adaptors ■ Phone cases
■ Chargers ■ Data products
For the full line of accessories, visit our Web site at
http://www.kyocera-wireless.com/store
Where to get more information
To help you learn about the many features of your Kyocera Smartphone as quickly as possible, your product package includes the following documents.
User's Guide—The User's Guide takes you on a quick tour of the phone's major features. It identifies all the icons, buttons, and controls and explains how to use both phone and organizer features. As you explore, you'll notice that there are many ways to use your phone. Each procedure begins with a graphic that tells you whether the phone should be on or not, and whether the flip should be open or closed.
Reference Guide—This guide contains detailed information about the Kyocera Smartphone and the applications delivered with it. It includes a glossary and troubleshooting section for reference. To view the Reference Guide, insert the CD-ROM in your computer and double-click the PDF file. You can read and search through this document on your computer or you can print it out. You can also download the latest versions of all phone documentation at www.kyocera-wireless.com.
Where to go next
Preferences
Using the Preferences screens, you can customize the configuration of your Kyocera Smartphone. Your choices range from selecting ringer sounds to configuring the phone for use on a network. See Chapter 12, "Setting Preferences."
Network settings
Your Kyocera Smartphone is capable of connecting wirelessly to network services for email and Internet access. To make these connections, your service provider must offer digital data coverage in your area.
In most cases, if you have purchased data coverage, your Kyocera Smartphone has already been configured for network services. The network settings have been entered for you by your service provider.
If your phone is not correctly configured, contact your service provider for the correct settings to enter yourself. For details about network settings, see Chapter 11, "Setting Up Network Connections."
Synchronizing data
For details about synchronizing your phone with a computer, see Chapter 4, "Transferring Information."
Chapter 2
Making and Receiving Calls
On your Kyocera smartphone, you can make calls in many different ways (for example, from your Address Book or from the Call History list). You can also receive pages, check voice mail, and make data connections to the Internet.
This chapter explains how to use your Kyocera smartphone as an integrated phone and message manager.
In this chapter
■ Dialing calls on the keypad page 24
■ Using the Dialer page 25
■ Making a call from Speed Dial page 28
■ Making a call from the Contacts list page 30
■ Making a call from the Address Book page 31
■ Redialing recent calls page 32
■ Checking your own phone number page 34
■ Making a conference call page 34
■ Making a data connection page 35
■ Answering calls page 36
■ Ending calls page 38
- Answering calls "hands-free" page 37
■Adjusting sounds page 39
- Looking up information on your phone page 42
■ Using power-save mode page 44
■ Viewing the phone status bar page 46
Dialing calls on the keypad
To dial a call from the keypad

- Extend the antenna and wait for the signal strength icon to appear.
- Press the keys to enter the phone number.
As you dial, you can access information in your Speed Dial list and Address Book.
- Speed Dial—The phone automatically checks your Speed Dial list and displays the matching information. For example, if you have set up 12 as a Speed Dial number, that entry appears when you press 12. (For details on setting up Speed Dial numbers, see “Adding an entry to the Speed Dial list” on page 229.)
-
Address Book—As you press the digit(s), the following options appear at the bottom of the screen: Save, Find, Time Pause, and Hard Pause. To check your Address Book, roll the shuttle up until Find is highlighted. Then press the shuttle in. All the phone numbers beginning with the digit(s) you have entered appear on the screen. Roll the shuttle up or down until the one you want to call is highlighted.
-
When you have entered or selected the correct number, press to make the call.
- When you have finished your call, press .
If you make an error while dialing
- If you press the wrong key while dialing, press to move the last digit you entered.
- To remove all the digits you have entered, press and hold C press .
Using the Dialer
When the flip is open, you can use the Dialer application as a keypad. You can press the keys in the Dialer with the stylus or with your fingers.
To place a call from the Dialer

- Tap the Dialer

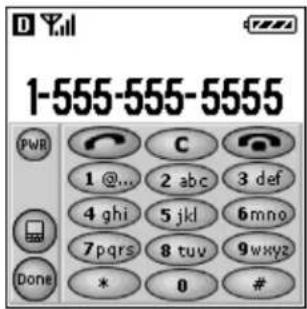
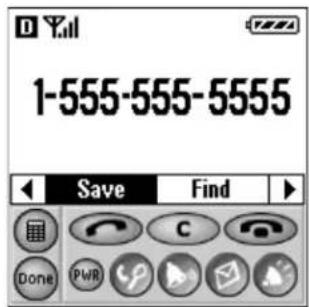
The Dialer has two modes: minimized and full-screen.
- Minimized—You can see more information about the call (for example, information from the Speed Dial list) in the upper half of the screen, but the number keys do not appear. The Dialer opens in minimized mode when you receive an incoming call or message.
- Full-keypad—You do not see contact information, but the number keypad is large enough to press with your fingers. The Dialer opens in expanded mode when you tap the Dialer 📂in.
- To toggle between these two modes, do the following:
■ In the minimized Dialer, tap to open the full-screen Dialer.
- In the full-screen Dialer, tap or press the shuttle in to open the minimized Dialer.
-
If the phone is not already on, tap the Power icon.
-
Tap the keys either with the stylus or your finger to enter the phone number. If you prefer, you can write the numbers to dial in the Graffiti writing area. If the phone number is in a memo or note, you can copy it and paste it into the Dialer.
-
Tap .
-
When you have finished your call, tap

- To close the Dialer and return to the application you were previously using, tap the oicon in the lower left of the screen.
Dialer icons —full keypad screen
Left column

Turn the phone power on or off.

Switch to the minimized Dialer.

Return to the previous application.
Top row

Make a call.

Erase a number or clear an error.

End a call.
Dialer icons—minimized screen
Left column

Switch to the full keypad Dialer.

Return to the previous application.
Top row

Make a call.

Erase a number or clear an error.

End a call.
Bottom row

Turn the phone power on or off.

Find names from the Address Book.

Silence the phone.

Check messages.

Toggle speakerphone mode.
To use the Dialer with the flip-closed menus
PHONE
On
FLIP
Open
When you are using the Dialer, you can open the flip-closed menus.
- Tap the Dialer

- Tap to view the minimized Dialer.
- Press the shuttle in to open the menus.
- Use the shuttle to move through the menus. Tap the icons in the Dialer with the stylus or your finger.
To set Dialer preferences

You can set preferences so that the Dialer application opens automatically or places calls directly in a variety of circumstances.
-
Tap the Dialer
-
Tap to open the Dialer menus.
-
From the Options menu, select Preferences.
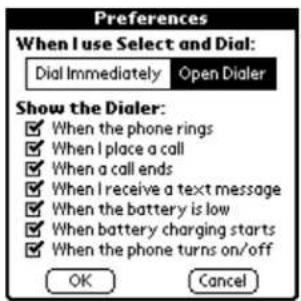
- Select how you want the phone to handle dialable numbers (including phone numbers, Web addresses, and email addresses) in applications.
- Dial Immediately—Tap this box if you want to place a call directly when you select a dialable number in any application. For example, if you select a phone number in a memo or an email message, the phone will dial that number directly, without asking for confirmation.
- Open Dialer—Tap this box if you want to open the Dialer when you select a dialable number in any application. When the Dialer opens, the number you selected is already copied there. Tap to dial it, or modify it if necessary first.
- Tap the check boxes to indicate when you want the Dialer to appear.
For example, put a check mark beside When a call ends if you want the Dialer to open automatically at the end of each call. Remove the check mark if you do not want the Dialer to open in that circumstance.
- When you have finished, tap OK.
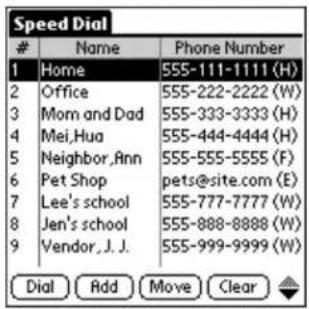
Making a call from Speed Dial
You can designate up to 199 phone numbers from your Address Book to be on your Speed Dial list. You can then call these phone numbers just by pressing the one, two, or three digit Speed Dial number (1 through 199). Because Speed Dial is linked to the Address Book, when you change a phone number in the Address Book, it is automatically updated in the Speed Dial list.
To add numbers to your Speed Dial list
PHONE May be either on or off
FLIP Open
-
Tap to open the Address Book.
-
Tap to open the Address Book menus.
-
From the Options menu, tap Launch Speed Dial.
- Tap Add.
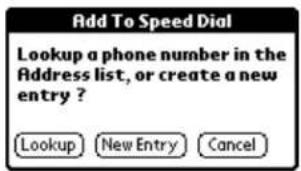
- Tap Lookup.
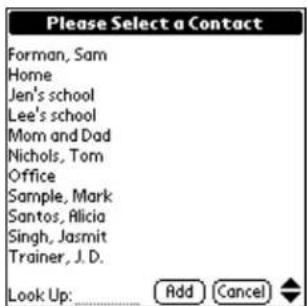
- Tap the entry you want to add to the Speed Dial list. Then tap Add. The entry is added to the next available Speed Dial number.
For detailed information about how to add, modify, or delete numbers from the Speed Dial list, see Chapter 14, "Speed Dial."
To make a call from the Speed Dial list (with the flip open)

-
Tap to view the Applications Launcher.
-
Tap to open Speed Dial.
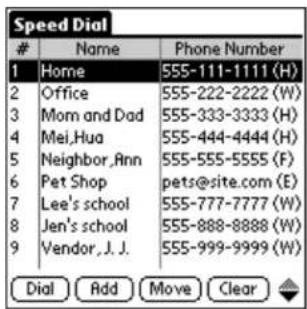
-
Tap to select the number you want to call.
-
Tap Dial.
-
When you have finished your call, tap End.
To make a call from the Speed Dial list (with the flip closed)

If you know the Speed Dial number
Press the digit(s) on the keypad. Hold down the final digit for a few seconds.
For example, if you are dialing a single-digit number, just hold down the number key for a few seconds. For a two- or three-digit number, press the first digit(s), then hold down the last digit for a few seconds. The call is placed directly.
If you need to look up the Speed Dial number
- Press the shuttle in to open the menu.
- Roll the shuttle down until Contacts is highlighted. Then press the shuttle in.
- Roll the shuttle down until Speed Dial List is highlighted. Then press the shuttle in.
- Press the shuttle up or down to scroll through the Speed Dial list. When the person you want to call is highlighted, press
- When you have finished your call, press .
Making a call from the Contacts list
Without opening the flip, you can view the names and numbers in your Address Book and place calls using the Contacts list.
To make a call from the Contacts list

- From the home screen, press the shuttle in to open the menu.

- Roll the shuttle down until Contacts is highlighted. Then press the shuttle in.
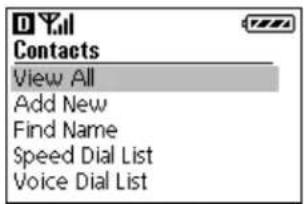
-
With View All highlighted, press the shuttle in.
-
Press the shuttle down to move through the list.
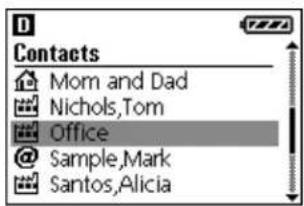
- When the name you want to call is highlighted, do one of the following:
- If there is only one number for this contact, press to make the call. - If there are several numbers for this contact, press the shuttle in to see them all. Select the one you want to call, and then press
- When you have finished your call, press .
Making a call from the Address Book
With the flip open, you can place calls directly from the Address Book.
To make a call from the Address Book

- Press the Address Book
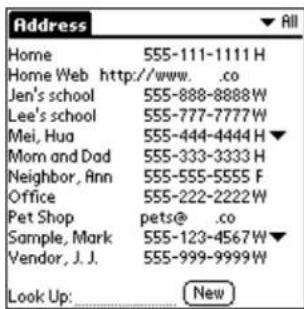
-
Scroll through the Address List using either the up and down keys or the shuttle. Locate the person or business you want to call and do one of the following:
-
If the number you want to call appears in the list, tap the phone number (not the name).
-
To call one of the alternate numbers for an entry, tap the in the right column. All additional numbers for this person or business appear. Tap the one you want to call. That number is moved into the Address List and becomes the primary number for the entry. Tap the number in the Address List to select it.
-
Tap in the Dialer to place the call.
By default, the Dialer opens when you select a number from the Address Book so you can verify the number before placing the call. If you prefer, you can set the phone to place calls immediately without opening the Dialer. See “To set Dialer preferences” on page 27.
- When you have finished your call, tap .
Redialing recent calls
Your Kyocera smartphone provides several ways to redial numbers that you have recently called or received calls from.
Redial—With the flip either open or closed, call the most recently dialed number.
Call History—With the flip open, use the Call History application to return calls to any of the last 99 numbers you either called or received calls from. For each call, you can see the phone number, name of caller (if available), date and time of the call, and type of call (incoming, outgoing, or missed). Duplicate calls are not removed from this list.
Recent Calls list—With the flip closed, use the Recent Calls list to return calls to any of the last 30 unique numbers you either called or received calls from. Duplicate numbers are removed from this list. For each call, you can see the phone number, name of caller (if available), and the date and time of the call.
To redial the most recently called number
PHONE On
FLIP May be either open or closed
- After the phone has acquired service, press
A message prompts you to press 📂 or to speak the number you want to call (if you have set up Voice Recognition).

- To redial the most recently called number, press

To make a call from Call History

-
Tap to view the Applications Launcher.
-
Tap to open the Call History application.
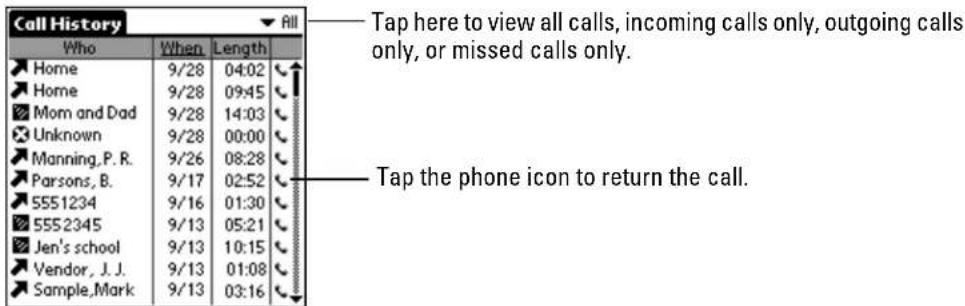
- To display a specific type of call, tap the i→the upper-right corner of the screen. From the pick list, select Incoming, Outgoing, or Missed. To see all your calls, select All from the pick list.
- Scroll through the calls using the scroll bar on the right, the up and down keys, or the shuttle. When you find the call you want to return, tap the phone icon beside it.
- When you have finished your call, tap .
For detailed information, see Chapter 6—Call History and the Recent Calls List.
To make a call from the Recent Calls list

- From the home screen, press the shuttle in to open the menus.
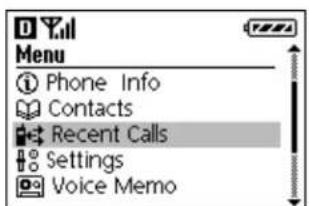
- Roll the shuttle down until Recent Calls is highlighted. Then press the shuttle in.
The Recent Calls list appears. This list contains the 30 most recent phone numbers for both incoming and outgoing calls. Duplicate numbers are removed.
-
Roll the shuttle up or down to move through the list. When the number you want to call is highlighted, press 200 to make the call.
-
To add a number from the Recent Calls list to your Address Book, highlight the number and press the shuttle in. Save and Exit appear at the bottom of the screen. Roll the shuttle up or down until Save is highlighted. Then press the shuttle in. You see a message that the number has been saved in your Address Book. Open the flip to edit the Address Book entry.
-
When you have finished your call, press .
Checking your own phone number
To check your own phone number

-
From the home screen, press the shuttle in. The screen displays information about your Kyocera smartphone, including your phone number.
-
To exit the screen, press . C
Making a conference call
If your service provider supports conference calls, you can use your phone to make a three-way call.
To make a conference call

- Call the first conference participant.
- After you have been connected to the first participant, press
- Enter the phone number of the second participant and press

To make a conference call from the Address Book

Follow these steps to make conference calls from the Address Book or other third-party applications.
-
Press first.
-
Open the flip and launch the application.
-
Select the number you want to call.
-
Press twice.
-
Once the second participant is connected, press a
Making a data connection
You can use your Kyocera smartphone to connect to Internet Service Providers (ISPs) or remote access servers. For details about setting up these services, see "Entering network settings" on page 173. Once they have been set up, follow these procedures to make a data connection.
To make a data connection

-
Tap to view the Applications Launcher.
-
Tap to open the Preferences screen.
-
From the pick list in the upper-right corner, select Network.
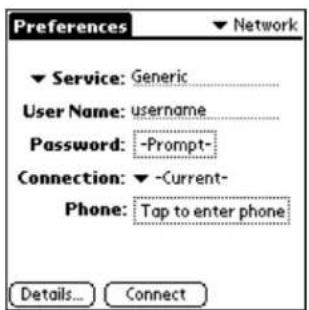
- Verify that the settings on the screen are correct. Tap Connect. The phone connects to your service provider.
Answering calls
When you receive an incoming call, the phone rings, the backlight turns on, and the message "Incoming Call" appears on the screen. If available, caller information from the Address Book also appears.
You can answer a call with the keypad open or closed. If you are working with an application (for example, entering addresses), your entries are not lost when you answer the phone. If you have set up Auto Answer or Voice Answer, you can answer calls using your voice alone, without touching the phone.
To answer a call
PHONE On
FLIP May be either open or closed
- If the flip is closed, press .
Pressing 📄 says answers the call, even if the keypad is locked. Opening or closing the keypad does not have any effect on the call.
- If the flip is open, press the shuttle in to open the Dialer. Then tap ⓒ.
NOTE: If you have set the ringer to a long tone, the phone may continue to ring for a moment or two after you press Send. Don't press Send again. The call will be answered at the end of the ring.
If a second call comes in
If a second call comes in while you are on the phone, the phone does not ring. A tone announces the new call so you can place the current caller on hold, if you wish. The second call is automatically added to the Call History list, whether you answer it or not. Call waiting and messaging services vary depending on your service provider; contact your service provider for information.
To put a caller on hold
PHONE On
FLIP Closed
- To put a caller on hold, press

- To move between two callers, press

Answering calls "hands-free"
You can answer calls using your voice alone, without touching the phone. This capability is particularly useful when the phone is in a hands-free car kit, but can be used at other times as well. You can choose from the following options:
Auto Answer All calls are answered automatically after about 5 seconds. It does not matter whether the phone is in a car kit or not.
Auto Answer (HFK only) All calls are answered automatically after about 5 seconds only if the phone is in a hands-free car kit.
Voice Answer After one ring, a voice prompt asks you whether you want to answer the phone or not. If you answer "Yes," the call is answered. If you answer "No," the call is sent to your voice mail. To use this method, the phone must be attached to a hands-free car kit, the sync cradle, or other powered accessory.
To set up and use Auto Answer

- Tap to view the Applications Launcher.
- Tap to display the last Preferences screen you used.
- Tap the pick list in the upper-right corner and select Phone.

- Tap the ▼ beside Auto Answer and select one of the following:
On Answer all incoming calls after approximately five seconds.
HFK only Answer incoming calls after approximately five seconds only if the phone is in a hands-free car kit.
Once you have selected one of these methods, Auto Answer is in effect.
When you receive a call—The phone rings once and then puts the call through. If you selected On, all calls are handled in this way. If you selected HFK only, calls are not answered automatically unless the phone is in the hands-free car kit. Note that setting overrides other settings, such as Voice Answer.
To set up and use Voice Answer

- Press the shuttle in to open the menu.
- Roll the shuttle down until Settings is highlighted. Then press the shuttle in.
- Roll the shuttle down until Sounds is highlighted. Then press the shuttle in.
- Roll the shuttle down until Voice Answer is highlighted. Then press the shuttle in.
-
Select Enabled to turn on Voice Answer.
-
Press to check up to the previous menu or press to return to the home screen.
Once you have selected this method, Voice Answer is in effect any time the phone is attached to a powered accessory, such as the hands-free car kit.
When you receive a call—After one ring, a voice prompt asks you whether you want to answer the phone or not. To accept the call, answer "Yes." To send the call to your voice mail, answer "No."
NOTE If you have enabled both Auto Answer and Voice Answer, Auto Answer overrides the other setting. Calls are answered directly without the voice prompt.
Ending calls
To end a call
PHONE On
FLIP May be either open or closed
If the flip is closed, press

If the flip is open, tap or in the Dialer.
The length of the call in minutes and seconds appears on the screen for about ten seconds. To clear this information, press C e flip is closed or if the flip is open.
Adjusting sounds
It is easy to adjust the speaker volume, set the microphone to mute, or turn off the ringer on your Kyocera smartphone.
You can adjust the volume of the ringer or set your phone to blink or vibrate instead of ringing when you have an incoming call. For example, if you want to silence the ringer while you are in a meeting, you can quickly do so using either the Silence Sounds key with the keypad closed or the Preferences screen with the flip open.
With the flip open, you can make many adjustments to the sounds using the Sounds Preferences screen. You can adjust the phone ringer separately from alert beeps or other sounds. For example, if you have set an alert for a Date Book event, the phone will beep at the scheduled time, even if the phone ringer is turned off.
To adjust the speaker volume

Press the shuttle up or down during a call.
To mute the microphone during a call

During a call, the word Options appears in the menu bar at the bottom of the screen.
- Press the shuttle in to display the menu.
There are only three options in the menu when a call is in progress—Phone Info, Volume, and Mute/Unmute. - Roll the shuttle up or down to move through the options. When Mute is highlighted, press the shuttle in.
The other party does not hear anything you say until you unmute the microphone. The Mute option at the bottom of the screen changes to Unmute. - To unmute the microphone, press the shuttle in when Unmute is highlighted.
To put the phone in Speakerphone mode

-
If the flip is closed, press the Speakerphone icon. If the flip is open, tap the Speakerphone icon in the minimized Dialer.
-
To turn Speakerphone mode off, press the Speakerphone key or tap the Speakerphone icon again.
To silence the ringer

- Press the Silence Sounds

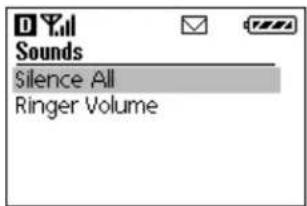
- Press the shuttle in to select Silence All.
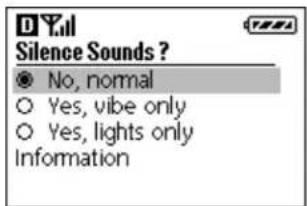
- Press the shuttle up or down to scroll through the choices.
■ No, normal—The phone rings when you receive a call.
- Yes, vibrate only—The ringer and all alert sounds are turned off. The phone vibrates when you receive a call.
- Yes, lights only—The ringer and all alert sounds are turned off. The lights on the phone flash when you receive a call.
- When the mode you want to choose is highlighted, press the shuttle in.
To adjust the ringer volume

- Press the Silence Sounds

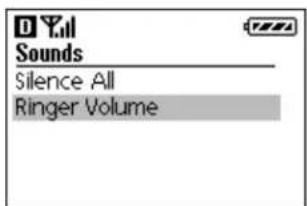
- Press the shuttle down to scroll to Ringer Volume. When Ringer Volume is highlighted, press the shuttle in.
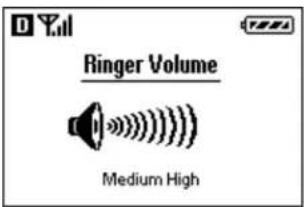
- Press the shuttle up or down to adjust the volume. You hear a sample of the ringer at each level.
To adjust sound preferences
PHONE On FLIP Open
-
Tap to view the Applications Launcher.
-
Tap to display the last Preferences screen you used.
-
From the pick list in the upper-right corner, tap Sounds.
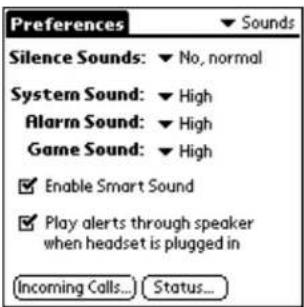
- Tap the beside Silence Sounds and select one of the options:
■ No, normal—The phone rings when you receive a call.
■ Yes, vibe only—The ringer is silent. The phone vibrates when you receive a call.
- Yes, lights only—The ringer is silent. The lights on the phone flash when you receive a call.
Note that this setting affects the phone ringer only; it does not turn off alert beeps from the organizer.
-
If you also want to turn off or adjust the system, alarm, or game sounds, tap the ▼ beside each sound you want to adjust and select High, Medium, Low, or Off.
-
When you have finished, tap Done.
Looking up information on your phone
After using your phone for a while, you may have a large amount of information stored on it. There are several ways to search through this information, locate names or numbers, and place phone calls. You can do any of the following:
■ Find and dial a number by entering all or part of the contact or company name
■ Find and dial a number by entering the first few digits
■ Find text in any application and (if it includes a dialable number) place a call directly from the application
- Find a contact in the Address Book and paste the phone number into another application
To find and dial contacts by name

Using this method, you can look up and dial phone numbers by entering a few letters of a contact's first name, last name, or company name on the keypad.
- Press the Find Name

- Using the keypad, press the first letter of the name you are searching for.
For example, the 2 key is equivalent to A, B, or C. If you press the 2 key once, the letter A appears in the Find window. If you press the 2 key twice, the letter B appears.
-
Wait a moment. The cursor moves one position to the right.
-
Press the key for the second letter of the name you are searching for. Enter as many letters as you wish.
NOTE: If you enter just one letter, the phone searches for all entries in which the first name, last name, or company name starts with that letter. If you enter two or more letters, the phone searches for all entries containing those letters in the first name, last name, or company name field.
- To search for the name you have entered, press the shuttle in.
Matching names from your Address Book appear on the screen. Roll the shuttle up or down to scroll through the names.
- When the contact you want to call is highlighted, press the shuttle in.
To find and dial contacts by number

Using this method, you can look up and dial numbers by entering the first few digits of the phone number on the keypad.
- Using the keypad, press the first few digit(s) of a number.
-
Roll the shuttle down until Find is highlighted in the bar at the bottom of the screen. Then press the shuttle in.
All the entries in your Address Book whose phone numbers begin with those digits appear on the screen. -
Roll the shuttle up or down until the name you want to call is highlighted
-
Press to make the call.
To cancel without making the call, press C4/0 C
To find text in any application

Using this method, you can search for any text in any application, including the notes attached to Date Book or Address Book entries. You can search for whole words or just the beginning letters of a word.
- Tap the item from any application.
If you select text in an application before you tap the selected text automatically appears in the Find dialog.
-
Enter the text that you want to find. Notice that the Find command is not case-sensitive.
-
Tap OK to display a list of all instances of the text that you specified.
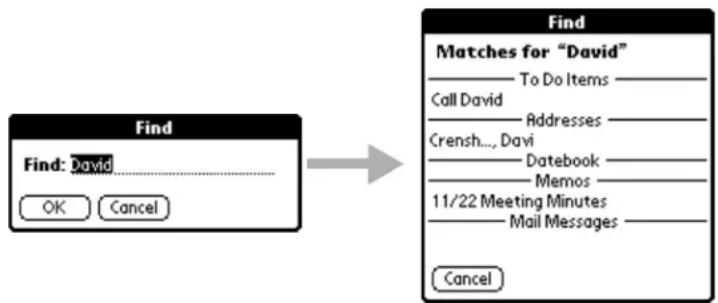
flowchart
graph LR
    A["Find"] --> B["Find: David"]
    B --> C["OK"]
    B --> D["Cancel"]
    E["Matches for "David""] --> F["To Do Items"]
    E --> G["Call David"]
    E --> H["Addresses"]
    E --> I["Crensh... Davi"]
    E --> J["Datebook"]
    E --> K["Memos"]
    E --> L["11/22 Meeting Minutes"]
    E --> M["Mail Messages"]
    E --> N["Cancel"]
NOTE: You can stop the search at any time by tapping the Stop button (for example, if the entry you want appears before the search has finished). To resume the search, tap the Find More button.
-
Tap the text you want to review to display the selected entry and its corresponding application on the screen.
-
To copy the text into another application, use the Copy and Paste commands from the Edit menu.
To look up and insert a phone number into another application
PHONE May be either on or off
FLIP Open
Using the Phone Lookup command, you can search for a phone number and paste it directly into an application. For example, if you want to include a phone number in a memo, you can use Phone Lookup to find the phone number and transfer it directly to the memo.
NOTE You can use the GraffitiCommand stroke /L to open Phone Lookup while entering text. For example, to insert the phone number of Joe Williams in a memo you are writing, write Wi, followed by /L. If you have only one entry beginning with Wi, the phone inserts the phone number immediately. If you have more than one name beginning with Wi, the Phone Lookup screen appears so you can select the correct one.
- Open the entry where you want to insert a phone number.
This can be an event in the Date Book, a To Do item, or a memo. Phone Lookup is not available in the Address Book or the Expense application.
-
Tap to open the menus for your application.
-
From the Options menu, tap Phone Lookup.
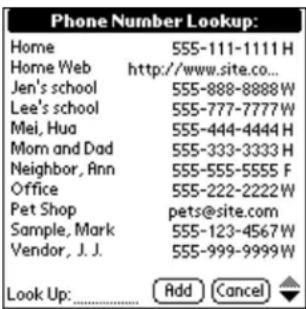
- Tap the phone number you want to use.
NOTE: To find a number more quickly, enter the first letter or two of the name you want to find in the Look Up line at the bottom of the screen. The list scrolls to the first name starting with that letter.
- Tap Add to paste the name and number into the entry selected in step 1.
Using power-save mode
Since your Kyocera smartphone is both a phone and a connected organizer, you may sometimes want to save power by turning off features you do not plan to use. For example, you can use applications such as the Address Book or the Date Book
without turning on the phone if you don't plan to make or receive any calls. On the other hand, you may want to turn off the organizer to extend the battery life, while leaving your phone turned on to receive calls.
Normally, the organizer applications on your phone are never completely “off” even when you are not using them. This feature allows the applications to “wake up” immediately when you open the flip, but it draws a small amount of battery power at all times. The power-save mode puts the connected organizer to “sleep” so that it is not drawing energy from the battery.
Another benefit of power-save mode is that it automatically engages Keyguard. If you leave your phone turned on when it is inside a purse or briefcase, Keyguard prevents accidental keypresses from initiating calls.
To turn power-save mode on or off

- To turn off the organizer, press again, followed by the backlight key.
The LED slowly flashes to show that the phone is in power-save mode.
If you get an incoming call while the phone is in power-save mode, the phone rings and you can answer it as usual. Keyguard is disabled for the duration of the call.
- To take the phone out of power-save mode at any time, do one of the following:
■ Open and close the flip.
■ Press the backlight button.
- Press, the press 1, 2, 3.
Power modes
This chart summarizes the power modes of the Kyocera smartphone.
| Mode Phone | is... | Organizer is... | To put the phone in this mode | To take the phone out of this mode |
| OFF | Off | Off Press | for 2 seconds until “Powering Off” appears on the screen. Keep the flip closed. | To turn on the phone, press 2 seconds until you hear a beep.Open or close the flip to turn the organizer on or off. |
| Organizer only | Off | On | Pre seconds until “Powering Off” appears on the screen. Open the flip. | To turn on the phone, press 2 seconds until you hear a beep.Open or close the flip to turn the organizer on or off. |
| Power-save or sleep | On Off | To turn on the phone, press 2 seconds until you hear a beep.To turn off the organizer, press the backlight key. | Press 2 seconds until “Powering Off” appears on the screen.Open or close the flip to turn the organizer on or off. | |
| ON | On On | To turn on the phone, press 2 seconds until you hear a beep.To turn on the organizer, open the flip. | Press 2 seconds until “Powering Off” appears on the screen.Open or close the flip to turn the organizer on or off. | |
Viewing the phone status bar
The row of icons across the top of the Kyocera smartphone screen is the phone status bar. These icons provide information on the phone power, battery power, and signal strength, among other indicators.
The status bar is normally visible only when the flip is closed. When you open the flip, it disappears.
However, you may sometimes want to see the phone status bar while the flip is open. For example, if you are about to make a call from the Address Book, you may want to verify that you have a strong signal.
To view the status bar (with the flip open)

- From any application except the Dialer, press the shuttle in.
Icons showing the phone's current state appear across the top of the screen. For example, the icons below indicate that the phone is in digital mode with full signal power, and the battery is fully charged. For details about the icons in the status bar, see "Status indicators" on page 18.

- To remove the status bar, press the shuttle in again.
Chapter 3
Using the Organizer
Record keeping on the go challenges even the most organized person. Your Kyocera smartphone includes the organizer to help you maintain information about the people, places, and events in your life. All it takes is a tap to ensure that information you enter is up-to-date and available in two places when you synchronize your Kyocera smartphone with your computer.
This chapter explains how to work with the built-in applications, enter information, install applications, and use organizer features.
In this chapter
■ Selecting applications page 49
■ Entering information page 51
■ Using application controls page 59
■ Using menus page 59
■ Choosing fonts page 61
■ Using categories page 62
■ Attaching notes page 65
■ Marking private entries page 66
■ Installing applications page 66
■ Removing applications from the phone page 69
■ Removing the Desktop software page 69
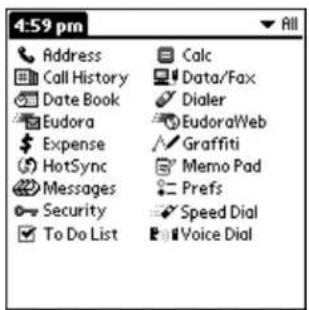
Selecting applications
The Kyocera smartphone comes with a variety of applications that you can open from the Applications Launcher. You can also use the buttons surrounding and below the writing area to open applications.
To open an application
PHONE May be either on or off
FLIP Open
- Tap to view the Applications Launcher.
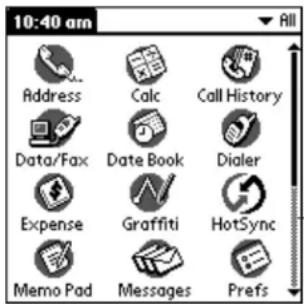
Tap the scroll bar or press the Down button to see additional applications.
- Tap the icon for the application you want to launch.
If you have more applications installed than you can see on one screen, tap the scroll bar or press the Down button to move between screens.
NOTE: As a shortcut, you can write the Graffiti handwriting character for the first letter of an application you want to open. The Applications Launcher scrolls to the first application beginning with that letter.
Changing applications
When working in any application, tap 📋 press a key to switch to another application. The phone automatically saves your work when you change from one application to another, so you don't need to worry about losing information.
Displaying applications
By default, the Applications Launcher displays each application as an icon. If you prefer, you can display applications as a list of names.
You can also put the applications into categories so they are easier to see. For example, you could put all the phone applications into a category called Phone. After assigning applications to categories, you can choose to look at a single category or to see all your applications.
To list applications by name
PHONE May be either on or off
FLIP Open
-
Tap to view the Applications Launcher.
-
Tap to view the Applications Launcher menus.
-
From the Options menu, tap Preferences.
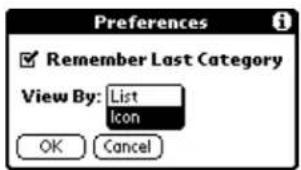
-
In the View By pick list, tap List.
-
Tap OK to view the Applications Launcher in list format.
To display applications by category
PHONE May be either on or off
FLIP Open
-
Tap to view the Applications Launcher.
-
Tap to open the Applications menus.
-
From the App menu, tap Category.
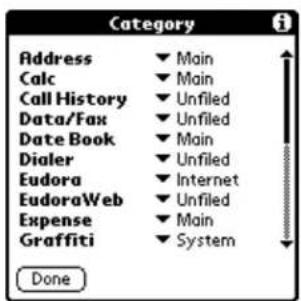
- Tap the next to each application to assign it to a category.
NOTE: You can create your own categories. Tap Edit Category in the pick list. In the Edit Categories dialog, tap New and enter the category name. Tap OK to add the category. Tap OK again to close the dialog.
- Tap Done to return to the Applications Launcher.
- Tap the pick list in the upper-right corner of the screen. From the pick list, tap the application category you want to see.
You can also tap to scroll through the application categories.
Entering information
There are two ways to enter information into your phone. You can use the on-screen keyboard or you can write in the Graffiti area. Both of these methods use the stylus.
Using the on-screen keyboard
You can activate the on-screen keyboard any time you need to enter text or numbers.
To enter text with the on-screen keyboard
PHONE May be either on or off
FLIP Open
- Open any application.
- Tap any record name or tap New.
- Tap abc to open the alphabetic keyboard or 123 to open the numeric keyboard.
- Tap the characters of the on-screen keyboard to enter text and numbers.
![Alpha Tab Caps lock Caps shift q w e r t y u i o p ← ← a s d f g h j k l ;' cap z x c v b n m , . shift space - / Done abc 123 Int'l Backspace Carriage return Tap here to display the Alpha keyboard. Numeric Numeric keyboard 1 2 3 [ ] ( ) < > \ = @ ~ & # ( 0 ) Done abc 123 Int'l Tap here to display the Numeric keyboard. International Tap here to display the International keyboard. d à ä ä ä æ ç ñ σ ← ← é è è í i í i ß y ÿ cap ó ò õ õ ú ù ū ← shift space : « Done abc 123 Int'l](/content/2026/05/1055126/images/5f281025fa2a0a1f4db59bf5178e0e528f18abf39176b86f9b377ac951655534.jpg)
Notice that the on-screen keyboard also has a screen for international characters. You can move among the three screens at any time.
- When you have finished, tap Done to close the on-screen keyboard.
Writing with the stylus
The Kyocera smartphone includes Graffiti power writing software as the primary system for entering text and numbers. In Graffiti, the simple strokes you write with the stylus are instantly recognized as letters or numbers.
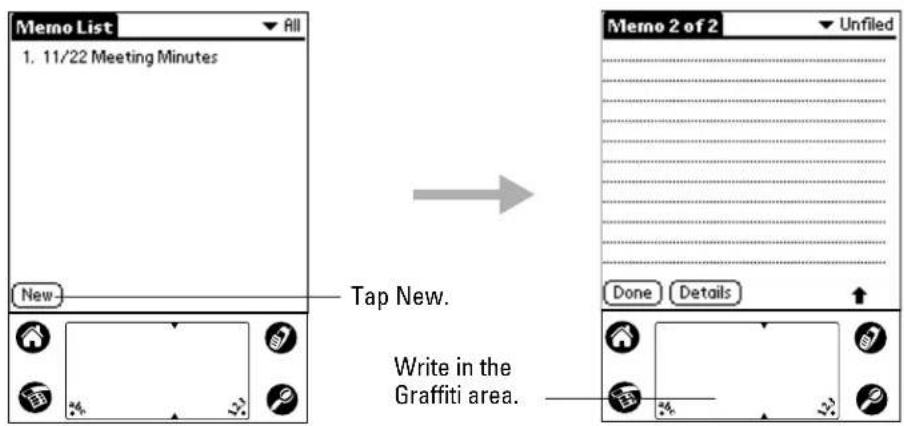
The Memo Pad application is ideal for practicing Graffiti script. This section explains how to open the Memo Pad and use it to practice Graffiti.
To open the Memo Pad application
PHONE May be either on or off
FLIP Open
-
Press the Memo Pad key to open the Memo Pad.
-
Tap New to open a new Memo page.
Writing letters with Graffiti
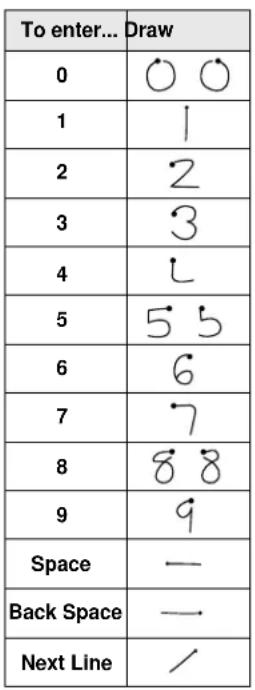
Graffiti includes any character you can type on a standard keyboard. Because the Graffiti strokes closely resemble those of the regular alphabet, most people find they can enter text quickly and accurately with only minutes of practice.

There are four basic concepts for success with Graffiti:
■ If you draw the character shape exactly as shown in the tables in this chapter, you can achieve 100% accuracy.

■ The heavy dot on each shape shows where to begin the stroke. Certain characters have similar shapes, but different beginning and end points. Always begin the stroke at the heavy dot.
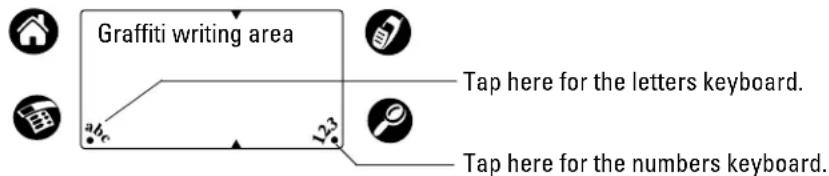
■ Most characters require only a single stroke. When you lift the stylus, the text character is displayed immediately.
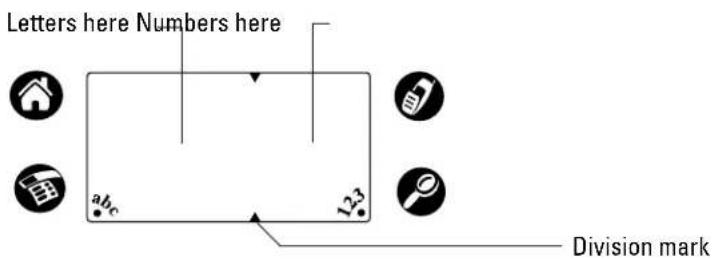
- The Graffiti writing area is divided into two parts: one for writing letters and one for writing numbers. The small marks at the top and bottom of the Graffiti writing area indicate the two areas.
To write letters of the alphabet with Graffiti
- Tap the screen where you want your text to go.
- Use the table on page 55 to find the stroke shape for the letter you want to write. For example, the stroke below creates the letter "n."

You use the same shapes to create both upper- and lowercase letters.
-
Position the stylus on the left side of the Graffiti writing area.
-
Start at the heavy dot. Draw the shape as it appears in the table. Don't try to draw the dot itself. The dot is there to show the starting point.
-
Lift the stylus from the screen at the end of the stroke shape. When you lift the stylus from the screen, the letter appears at the insertion point. You can immediately begin the stroke for the next character.
NOTE: You must begin the character strokes in the Graffiti writing area. If you do not make Graffiti strokes in the Graffiti writing area, the phone does not recognize them as text characters.
Graffiti tips
When writing with Graffiti, keep these tips in mind:
■ Accuracy improves when you write large characters. Draw strokes that nearly fill the Graffiti writing area.
- To delete characters, place the insertion point to the right of the character you want to delete and make the backspace stroke (a line from right to left) in the Graffiti writing area.
- Write at natural speed. Writing too slowly can cause recognition errors.
- Do not write on a slant. Vertical strokes should be parallel to the sides of the Graffiti writing area.
- For some letters, there are two different stroke shapes. Use the one that's easiest for you.
■ If you forget a stroke, a full-screen pen stroke from bottom to top will open Graffiti Help. Place the stylus in the Graffiti writing area and drag it to the top of the screen.
Graffiti script
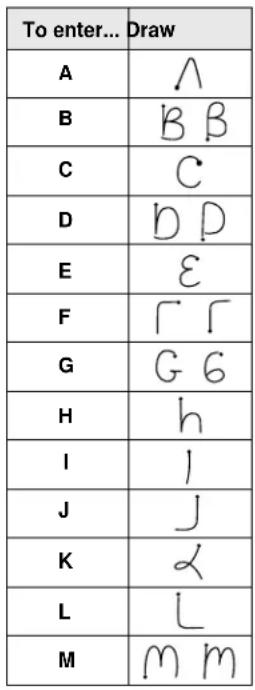 |  |  |
Writing capital letters with Graffiti
You make capital letters with the same stroke shapes as the basic alphabet characters. To make capital letters, you must first “shift” to caps — just as you press the Shift key on a keyboard — and then write the character strokes. When you start a new entry (for example, a new memo or a new Address Book entry), Graffiti automatically capitalizes the first letter.
To make the first letter of a word a capital letter:
▶ Write the Caps Shift stroke.
When Caps Shift is active, an arrow appears in the lower-right corner of the screen. Caps Shift is only active for the first character.

To enter only capital letters (Caps Lock):
Write the Caps Lock stroke. ||
When Caps Lock is active, an underlined arrow appears in the lower-right corner of the screen. To return to lowercase, make the Caps Shift stroke again.

Writing numbers with Graffiti
Writing numbers with Graffiti is similar to writing the letters of the alphabet, except that you make the character strokes on the right side of the Graffiti writing area.
| Number Strokes | |
| 0 | |
| 1 | |
| 2 | |
| 3 | |
| 4 |
| Number | Strokes |
| 5 | 5 5 |
| 6 | 6 |
| 7 | 7 |
| 8 | 8 8 |
| 9 | 9 |
Writing punctuation marks with Graffiti
Graffiti can create any punctuation mark you can enter from a keyboard.
All punctuation marks begin with a single tap on the
Graffiti writing area. When you make this tap, a dot
appears to show that Punctuation Shift is active. The next
stroke you make with the stylus creates a punctuation mark.

| Period | Comma | Apostrophe | ? | ! | - | ( | ) | / | $ |
| • | ? | ! | — | ( | ) | √ | S |
When Punctuation Shift is active, you can make a symbol stroke anywhere in the Graffiti writing area (the letters or numbers side).
Writing symbols and extended characters
All symbols and extended characters begin with the Symbol Shift stroke.
When the Symbol Shift is active, a slanted shift symbol appears in the lower-right corner of the screen. The next stroke you make creates the symbol or extended character.

| • | □ | □ | □ | ‘ | ’ | “ | ” | 5 | • | i | i | + | |
| • | M | R | C | Γ | 7 | N | N | S | O | L | I |
| - | x | ÷ | = | ¢ | € | ¥ | £ | ß | μ | f | ∅ |
| ← | / | XX | Z | G | E | Y | L | β | m | S | Q |
Writing accented characters
^ = To create accented characters, draw the stroke normally used to create the letter, followed by an accent stroke. Graffiti then adds the accent to the letter. This example shows the strokes required to draw an "e" with an acute accent.
Accent strokes

Using these accent strokes, you can write the following accented letters:
Additional non-English characters
You can write the following characters in the lowercase alphabet mode without any special punctuation or shifting:

You must write these non-English characters in the left side of the Graffiti writing area.
Navigation strokes
In addition to character symbols, Graffiti includes special strokes that you can use to navigate within text or fields in applications.
| Command | Stroke |
| Move cursor right |  |
| Move cursor left |  |
| Previous field (Address Book only) | |
| Next Field (Address Book only) | |
| Open Address Record (Address Book only) |
Graffiti ShortCuts
Graffiti ShortCuts make entering commonly used words or phrases quick and easy. Graffiti comes with several predefined ShortCuts, and you can also create your own. Each ShortCut can represent up to 45 characters. For example, you might create a ShortCut for your name or for the header of a memo. See Chapter 12—Setting Preferences to learn about creating your own ShortCuts.
To use a ShortCut, draw the ShortCut stroke followed by the ShortCut characters. When you draw the ShortCut stroke, the ShortCut symbol appears at the insertion point to show that you are in ShortCut mode.
The phone includes the following predefined Graffiti ShortCuts:
| Entry ShortCu | t |
| Date stamp ds Breakfast br | |
| Time stamp ts Lunch lu | |
| Date / time stamp dts Dinner di | |
| Meeting me | |
| Entry ShortCu | t |
e b 7 s
For example, draw these strokes to enter the date and time.
Using application controls
The applications on your Kyocera smartphone use standard controls for moving around the screen. Once you become familiar with them, you can easily select options and navigate through applications. The following table lists the controls and how to use them.

Check box—Tap an empty check box to select that option. Tap it again to remove the check mark.

Scroll arrows—Tap the up arrow to display the previous page. Tap the down arrow to display the next page. You can also press the up and down scroll keys on the front panel of the phone.

Pick list—Tap the arrow to display a list of choices. From the pick list, tap an item to select it.

Button—Tap a button to perform a command. In most cases, tapping a button opens or closes a dialog, a screen where you enter information or change settings. A dialog always contains an OK, Cancel, or Done button for closing the dialog. The on-screen keyboard is an example of a dialog.

Scroll bar—Drag the slider to scroll the display one line at a time. To scroll to the previous page, tap the arrow at the top of the scroll bar. To scroll to the next page, tap the arrow at the bottom of the scroll bar.
Using menus
A menu is a set of commands for actions you can do, such as creating a new record or beaming a business card. You open the menus on your phone by tapping the menu icon 📤
Some menu commands are common to all applications. Others are specific to the application you are using. (For example, menus in the Memo Pad have different options than those in the Date Book). The common menu commands are described in this section. For details about the menus in an application, see the chapter on that application.
To open the menus
PHONE May be either on or off
FLIP Open
-
Open an application (such as the Memo Pad).
-
Tap to open the menus for that application.
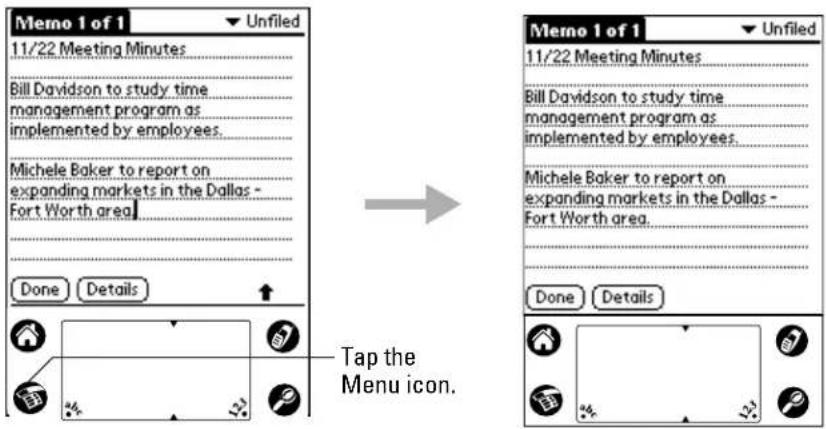
In this example, there are three menus—Record, Edit, and Options. The Record menu, which is open, contains three commands—New Memo, Delete Memo, and Beam Memo.
Choosing a menu
After you open the menus for an application, tap the menu that contains the command you want to use.
The menus and menu commands you can see depend not only on the application that is running, but also on which part of the application is currently on the screen. For example, in the Memo Pad, the menus for the Memo List screen are different from those for the Memo screen.
Using Graffiti Shortcut commands
Most menu commands have Graffiti "Command stroke" equivalents (like the keyboard shortcuts on computers). The command letters appear on the right side of the menu commands.
To use the Graffiti menu commands, draw the Command stroke followed by the command letter. The Command symbol appears just above the Graffiti writing area to indicate that you are in Command mode. For example, to choose the Select All command, draw the Command stroke, followed by the letter "s."
NOTE You do not need to tap 📂 before you use the Graffiti menu commands. However, since the Command mode is active for approximately two seconds, you must write the letter immediately after drawing the command stroke to activate the menu command.
Using the Edit menu
The Edit menu is available with any screen where you enter or edit text. In general, these commands apply to text that you select in an application.
To select text in an application
PHONE May be either on or off
FLIP Open
- Tap the beginning of the text that you want to select.
- Drag the stylus over the text to highlight it (in black). Drag across the text to select additional words, or drag down to select a group of lines.
The following commands may appear in an Edit menu:
| Undo | Reverses the action of the last Edit command. For example, if you used Cut to remove text, the Undo command replaces the text. |
| Cut | Removes text and stores it in memory. You can paste this text into another area of the application or into a different application. |
| Copy | Copies text and stores it temporarily in memory. You can paste this text into another area or into a different application. |
| Paste | Inserts text you cut or copied at the selected point. If you did not previously cut or copy text, the Paste command does nothing. |
| Select All | Selects all the text on the current record or screen. Use this command to cut or copy all of the text and paste it elsewhere. |
| Keyboard | Opens the on-screen keyboard. |
| Graffiti Help | Shows the Graffiti character strokes. Use this command any time you forget the stroke for a particular character. |
Choosing fonts
In most applications, you can change the font style to make the text on the screen easier to read. You can even choose a different font style for each application that supports this feature.
Notice that the Expense application does not support changing fonts.
To change the font style
PHONE May be either on or off
FLIP Open
-
Tap to view the Applications Launcher.
-
Open an application.
-
Tap to open the menus.
-
Tap Font from the Options menu.

-
Tap the font style you want to use.
-
Tap OK to return to the application. The font style has changed.
Using categories
Categories can help you group Address entries, To Do items, or Memos for easy review. You cannot, however, assign categories to Date Book events. When you first create an entry, it is "Unfiled," which means it does not belong to a category. You can leave it Unfiled or assign it to a category at any time.
The use of categories is optional. The category you choose is used only for sorting and viewing records. It does not affect the contents of the record.
To assign a category to an entry
PHONE May be either on or off
FLIP Open
- Open the Address Book, To Do List, or Memo Pad.
- Tap the entry you want to place in a category. Tap Edit.
-
Tap Details.
-
From the Category pick list, tap the category you want to assign.
- Tap OK.
Viewing lists by category
After you have assigned categories to your entries, you can easily view the entries by category. Viewing by category is particularly useful in applications such as the Address Book where you may have a long list of records.
To use categories in a List screen

-
Tap to view the Applications Launcher.
-
Open the application you want to view.
-
Tap the pick list in the upper-right corner of the screen.
-
Tap the category of entries you want to view. The List screen now shows only records in that category.
-
To return to a complete list of your entries, open the pick list in the upper-right corner of the screen and tap All.
Creating a new category
The Kyocera smartphone comes with two default categories: Business and Personal. The Address Book also includes the QuickList category, which contains commonly used names, addresses, and phone numbers.
You can rename the default categories or add new categories to suit your needs. You can define up to 15 categories for each application.
To create a new Address Book category
PHONE May be either on or off
FLIP Open
- Press the Address Book

- Tap the ▼ in the upper-right corner of the screen. Tap Edit Categories.
- In the Edit Categories dialog, tap New.
-
Enter the name of the new category. Tap OK.
-
Tap OK. Your new category has been added to the pick list. Edit any of your records and file them in the new category as appropriate.
Renaming categories
You can change the name of any existing category.
To change the name of an Address Book category
PHONE May be either on or off
FLIP Open
- Press the Address Book

- Tap the pick list in the upper-right corner of the screen. Tap Edit Categories.

-
Tap the category you want to rename. Tap Rename.
-
Enter the new name you want to assign to the category. Tap OK.
-
Tap OK. The new name appears in the pick list.
NOTE: You can "merge" two or more categories by assigning them the same name. For example, if you change the name of the "Personal" category to "Business," all entries formerly in the Personal category appear in the Business category.
Attaching notes
You can attach notes to entries in most applications (except the Memo Pad). A note is anything you want to write. For example, if you have entered an appointment in the Date Book, you could attach a note with directions to the location. A note can be several thousand characters in length.
To attach a note to an entry
PHONE May be either on or off
FLIP Open
-
Open the application and display the entry where you want to add a note.
-
Tap Details.
-
Tap Note. Write the text you want to appear in the note.
-
Tap Done to close the note and return to the application screen.
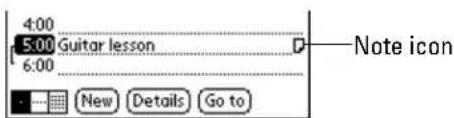
Notice that ☐ appears at the right side of any item with a note attached.
- To review or edit a note, tap .
Marking private entries
In applications, you can mark individual entries as Private. Private entries remain visible and accessible in the organizer until you change the Security setting to hide all Private entries. You can also restrict phone calls to private entries. See “Showing or hiding private entries” on page 223 for complete information about how to use the Security settings.
To mark an entry as private
PHONE May be either on or off
FLIP Open
- Display the entry that you want to make private.
- Tap Details.
- Tap the Private check box.
Installing applications
Your phone comes with many applications installed. You can also install additional applications, including games and programs that are available for downloading from the Internet. There are many third-party applications (called .PRC files) available for Palm connected organizers.
The Palm Install Tool makes it quick and easy to install software on the phone. You install new applications during the process of synchronizing your phone and your computer.
Considerations
- Be aware that each application you install resides in the phone's memory and remains there until you delete it. If you see a message stating that the memory is full, delete some applications to free up memory. A hard reset of the phone automatically deletes these applications; you can also delete them manually.
- Install only applications from reliable sources. It is recommended that you use only Palm-certified or Platinum-certified applications. (Products bearing the "Designed for Palm OS Platinum" logo have passed compatibility testing established by Palm Inc. and administered by Product Quality Partners.)
To install software on your Kyocera smartphone
- Copy the application you want to install to your computer. Put it in the Add-On folder (inside the Palm folder).
If you prefer to copy the application into another folder, you must navigate to that folder before you complete step 5. - From the computer, launch the Palm Desktop for the Kyocera smartphone.
You can double-click the Palm Desktop icon on your Windows desktop (or select Palm Desktop from the Start menu) to open the Palm Desktop software.
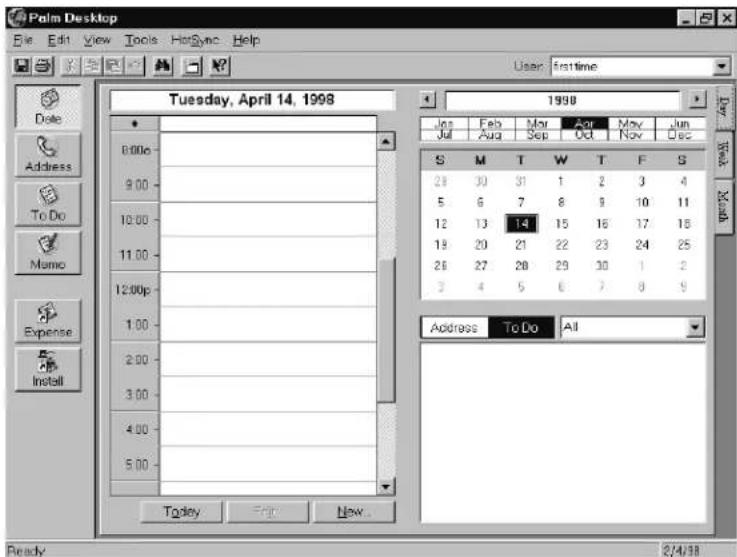
- Click Install.

When you click Install, the Install Tool opens.
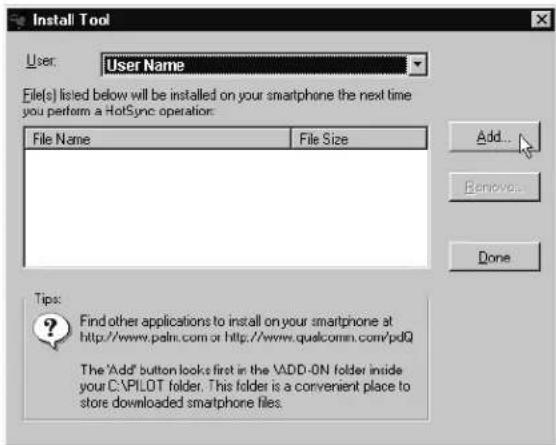
Note: You can also open the Palm Install Tool by selecting Install Tool from the Palm Desktop program group or by double-clicking any file with a PRC file extension.
-
Select the appropriate user name in the User drop-down list.
-
Click Add.
The Add-On folder appears. If you haven't placed the PRC file in the Add-On folder, navigate to the appropriate location to find it.
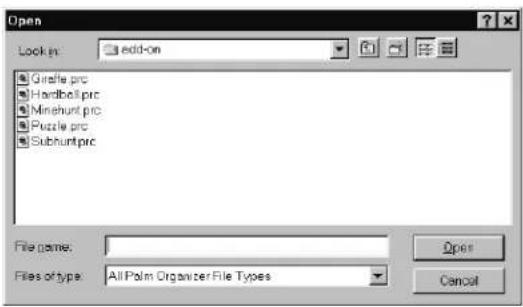
- When you have located the PRC file you want to install, select the file and click Open.
Use Shift-click or Ctrl-click to select multiple applications.
- Repeat steps 5–6 for each PRC file you want to install.
If you decide not to install an application, click it and then click Remove. (This does not remove the application from your computer; it simply removes it from the list of applications to install.)
- When you have identified all the files to be installed, click Done.
These files will be installed on the phone when you perform your next HotSync operation.
-
If you want to install the files immediately, turn on the phone and place it in the cradle. Press the HotSync button.
-
Tap Local Sync. The applications are installed during synchronization.
Removing applications from the phone
Each application you install resides in the phone's memory and remains there until you delete it. If you see a "memory full" message or if you decide that you no longer need an application, you can remove it to recover the memory.
You can remove any application, patch, or extension that you have installed on your phone. You cannot remove the applications that were installed at the factory.
To remove an add-on application
PHONE May be either on or off
FLIP Open
- Tap to view the Applications Launcher.
- Tap to open the Applications menus.
- From the App menu, tap Delete.
The Delete window lists all the additional applications you have loaded on the phone and how much memory each of them takes.
- Tap the application you want to remove. Then tap Delete.
- Tap Yes to confirm that you want to remove the application.
- Tap Done.
Removing the Desktop software
If you no longer want to use the Palm Desktop software, you can remove it.
To remove the Desktop software
- From the Windows Start menu, choose Settings. Then choose Control Panel.
- Double-click the Add/Remove Programs icon.
- On the Install/Uninstall tab, select the Desktop software from the list.
- Click Add/Remove.
- Click Yes to confirm you want to remove the application.
There are many ways to transfer information to and from your Kyocera smartphone. You can synchronize data with your computer; you can beam data to other devices with infrared ports, and you can download third-party PRC applications into the phone.
In this chapter
■Installing Kyocera smartphone Desktop software, page 71
■ Synchronizing data using the sync cradle, page 74
■ Synchronizing data remotely, page 76
■ Wireless direct-to-modem synchronization, page 80
■ Synchronizing data using the infrared port, page 81
■ Creating a user profile, page 84
■ Customizing a conduit, page 87
■ Transferring information between Palm devices, page 88
■ Troubleshooting HotSync operations, page 90
■ Beaming information, page 91
Installing Kyocera smartphone Desktop software
Desktop software extends many of the functions of your Kyocera smartphone to your computer. Using the Kyocera smartphone Desktop, you can easily do the following:
■ Work with applications for the Palm OS platform on your computer.
■ Back up the data on the phone and synchronize the data with the Kyocera smartphone Desktop.
- Import and export data, so you can easily transfer data from other Windows applications into Address Book or Memo Pad.
- Print your Date Book, Address Book, To Do List, and Memo Pad information on any Windows-compatible printer.
About synchronizing data
Using the Kyocera smartphone Desktop, you can synchronize the data on your phone with the information on your computer. Changes you make on either the phone or the computer appear in both places.
Synchronization is a simple, one-step procedure that ensures your data is always safe and up-to-date. You can synchronize your data by connecting the phone directly to your computer with the sync cradle (page 74), by synchronizing remotely to a network directly (page 76), by synchronizing remotely over a modem (page 80), or by “beaming” (sending data via the infrared port—page 91). Synchronization can also be done by connecting to a computer using the smartphone’s wireless modem or over a network (see Chapter 11, “Setting Up Network Connections”).
For example, if you travel with an infrared-enabled laptop, you don't need the sync cradle or the data cable to synchronize information on your phone and your laptop. Simply enable infrared communication on your computer and follow the instructions given in "Customizing a conduit" on page 87.
If you have already installed the Palm Desktop
If you have already installed the Palm Desktop for another Palm handheld device, there is no need to install the software again. However, if you intend to keep using both devices, give your Kyocera smartphone a different user name than the Palm handheld device.
If you need to install from floppy disks
If you need to install using diskettes, you can order the Palm Desktop installation diskettes from Palm Computing.
If you need to install the Palm Desktop on a Macintosh
To install the Palm Desktop on a Macintosh computer, you must purchase a Palm MacPac connection kit. Contact Palm, Inc. at (800) 881-7256 (USA), (800) 891-6342 (Canada), or (801) 431-1536 (worldwide). You can also visit the Palm Connected Organizers Web site at http://www.palm.com.
Windows system requirements
Your computer system must meet at least the following requirements.:
■ Windows 95, Windows 98, Windows 2000, or Windows NT 4.0
■ 12 MB available hard disk space
■ IBM-compatible 486 computer or higher
■ VGA monitor or better
■ 8 MB RAM (memory) minimum; 16 MB recommended
■ CD-ROM drive
■ Mouse
■ One available serial port
Optional equipment
■ Windows-compatible printer
Before you install software
To ensure a safe and uninterrupted installation of the Kyocera smartphone Desktop software, please do the following before you begin:
-
Remove the phone from the cradle during software installation.
-
Exit all programs, including those that run automatically at startup, such as fax software, virus protection software, screen-savers, and application toolbars such as Microsoft Office.
-
If you are installing from diskettes that you have ordered from Palm Computing (rather than the CD provided with your phone), make sure the original Palm Desktop diskettes are write-protected, and then make backup copies of them. Use the copies to install the software, and store the original diskettes in a safe place. Refer to your computer manual for information about locking or copying diskettes.
NOTE: Do not simply copy the Desktop files to your hard drive. You must use the installer to place the files in their proper locations and to decompress the files.
To install the Kyocera smartphone Desktop software
-
Exit any Windows programs and disable any virus-scanning software.
-
Insert the Kyocera smartphone Desktop CD into the computer's CD-ROM drive (or insert the diskette labeled Setup into the diskette drive).
-
Wait for the introduction screen to appear.
If the introduction screen does not appear automatically, open the Start menu and choose Run. Type the letter of your CD-ROM drive, followed by a colon and the word setup. For example, if your CD-ROM drive is drive D, type D:setup.
-
Click the Install button. Follow the instructions on the screen.
-
After you have installed the software, refer to the Help menu for complete information about how to use the Desktop.
To connect the sync cradle
Your package includes a cradle for storing the phone, recharging its battery, and synchronizing information with your computer. If you have purchased an extra battery, you can charge it in the cradle as well.
To synchronize data between your phone and your computer, you must connect the cradle to the computer. If you don't plan to synchronize data, just plug the power cable into the cradle and into a power outlet.
natural_image
Black flip phone with extended screen and antenna, resting on a stand (no visible text or symbols)-
Place the sync cradle on a flat surface near your computer.
-
Insert the small round plug of the power cable (a) into the base of the sync cradle. Use only the power cable that came with your Kyocera smartphone Using any other charger or AC adapter will invalidate your warranty and may damage the sync cradle.
natural_image
Technical line drawing of a handheld device with labeled parts (a and b), showing internal wiring and connector (no text or symbols beyond labels)-
Plug the other end of the cable into an AC power outlet.
-
To attach the cradle to your computer, first turn off the computer.
-
Plug the data cable from the sync cradle (b) into a serial communications (COM) port on your computer. The cradle requires a dedicated port; it cannot share a port with an internal modem, infrared port, or other device.
-
Turn on the computer.
Synchronizing data using the sync cradle
Running your first synchronization
The first time you synchronize data, you must enter user information on both the phone and the Kyocera smartphone Desktop.
Important considerations
- You must perform your first synchronization with a local, direct connection using the sync cradle, rather than using a modem or the infrared port. After the first synchronization, you can use the other methods explained in this chapter.
■ Do not turn the phone power on or off during synchronization.
■ Do not remove the phone from the sync cradle during synchronization. - If you are a Palm user, read "Transferring information between Palm devices" on page 88 before you synchronize the phone.
- If you are a System Administrator preparing several phones for a group of users, see "Synchronizing data using the infrared port" on page 81 before performing the following steps.
To synchronize data the first time
PHONE May be either on or off. Do not turn it on or off during synchronization.
FLIP May be open or closed
- Once you have installed the Desktop, click the icon in the Windows system tray. If the icon doesn't appear in the system tray, open the Start menu and select Programs > Kyocera smartphone Desktop > HotSync Manager.
- In the popup menu, verify that Local is checked. Then click Setup. The Setup window appears.
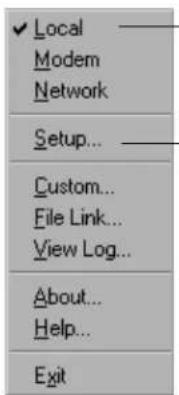
Make sure there is a check mark beside Local.
Then click Setup.
- Click the Local tab.

-
In the Serial Port field, select the port where you connected the cable. Click OK.
-
Slide the Kyocera smartphone into the sync cradle.
IMPORTANT: Do not turn the phone power on or off—or remove the phone from the sync cradle—during synchronization.
-
Press the sync button on the cradle. During your first synchronization, a message asks for your user name.
-
On the computer, enter a unique user name. Problems may occur if you try to synchronize more than one handheld device with the same user name.
-
Click OK.
A message tells you when synchronization is complete.
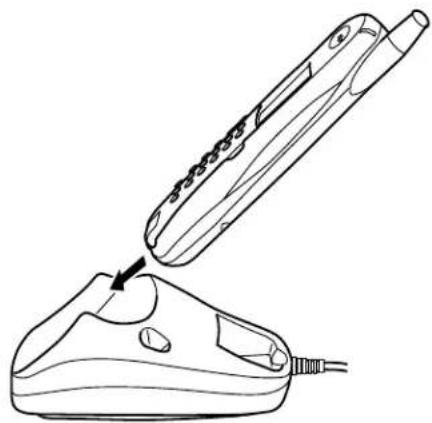
natural_image
Line drawing of a pair of steamers, one emitting smoke from a paper airplane (no text or symbols)To synchronize data using the cradle
PHONE May be either on or off. Do not turn it on or off during synchronization.
FLIP May be either open or closed
After you have completed your first synchronization, the process is even faster and easier.
-
Slide the Kyocera smartphone into the sync cradle.
-
Make sure the icon appears in the computer's taskbar. If it does not, open the Start menu and select Programs > Kyocera smartphone Desktop > HotSync Manager.
-
Press the sync button on the cradle.
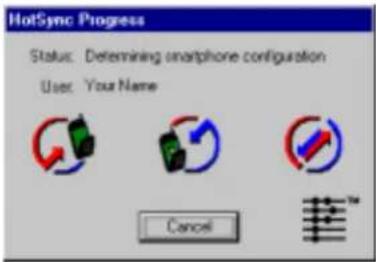
- Wait for a message indicating that the process is complete.
Do not turn the phone on or off or remove it from the sync cradle during synchronization.
Synchronizing data remotely
You can synchronize your Kyocera smartphone with your primary computer (the computer you use on a regular basis) while you are on the road and away from your office or home. There are three methods for doing this:
■ Landline Network Synchronization: this allows you to synchronize your Kyocera smartphone using a remote computer that is on the same network as your primary computer. Both the remote computer and your primary computer must have the Kyocera Smartphone Desktop software installed.
■ Wireless Network Synchronization: this allows you to synchronize your Kyocera smartphone with your primary computer if your primary computer is on a network and the network has dial-up access.
- Wireless Direct-to-modem Synchronization: this allows you to synchronize your Kyocera smartphone with your primary computer by using your smartphone to dial into your primary computer's modem.
Landline network synchronization
Certain conditions must be met before you can perform your first landline network synchronization:
■ The Kyocera smartphone already must have been synchronized with your primary computer. (Your primary computer is the computer that stores all of your information and that you use on a regular basis.)
- The primary computer must have both Local and Network checked in the HotSync Manager.
- The appropriate user(s) must be selected. (In the HotSync Manager, select Setup, then the Network Tab.)
■ The remote computer must have the Kyocera Smartphone Desktop software installed, and must be on the same network as your primary computer.
Synchronizing
-
Start the HotSync application on your Kyocera smartphone.
-
Tap the Menu icon and select Modem Sync Prefs.
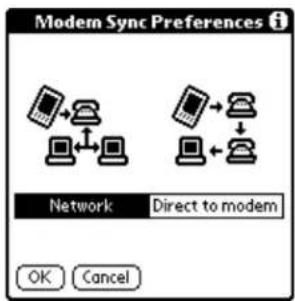
-
Select Network. Tap OK.
-
Tap the Menu icon and select LANSync Prefs.
-
Select LANSync. Tap OK.
-
Tap the Menu icon and select Primary PC Setup. This is the primary computer that you wish to synchronize with.
- Check the settings. These settings should already be filled in with information from initially synchronizing your Kyocera smartphone with your primary computer.
Tap OK.
Log Help
-
Select the Local option on the main screen of the HotSync application.
-
Place your Kyocera smartphone in the cradle (or use the separate data cable accessory) that is connected to the remote computer.
-
Tap the Ⓧ icon on the HotSync application screen. The remote computer will appear to perform a normal synchronization operation.
Wireless network synchronization
Certain conditions must be met before you can perform your first landline network synchronization:
■ The Kyocera smartphone already must have been synchronized with your primary computer. (Your primary computer is the computer that stores all of your information and that you use on a regular basis.)
- The primary computer must have both Local and Network checked in the HotSync Manager.
- The appropriate user(s) must be selected. (In the HotSync Manager, select Setup, then the Network Tab.)
Synchronizing
-
Start the HotSync application on your Kyocera smartphone.
-
Tap the Menu icon and select Modem Sync Prefs.
-
Select Network. Tap OK.
-
Tap the Menu icon and select LANSync Prefs.
flowchart
graph TD
    A["Device 1"] --> B["Device 2"]
    C["Device 3"] --> B["Device 2"]
    D["Device 4"] --> B["Device 3"]
    style A fill:#f9f,stroke:#333
    style C fill:#f9f,stroke:#333
    style D fill:#f9f,stroke:#333
    style B fill:#ccf,stroke:#333
    note right of A LANSync Local HotSync
    note right of D OK Cancel
-
Select LANSync. Tap OK.
-
Tap the Menu icon and select Primary PC Setup. This is the primary computer that you wish to synchronize with.
-
Check the settings. These settings should already be filled in with information from initially synchronizing your Kyocera smartphone with your primary computer. Tap OK.
-
Select the Modem option on the main screen of the HotSync application.
Log Help
-
Tap on "Select Service." The Network Preferences screen will appear.
-
Select the network connection used to connect to the same network that your primary computer is connected to and tap Done.
-
Tap the HotSync icon in the center of the HotSync application screen. Your Kyocera smartphone will initiate a data call for connection to the selected
service. Network synchronization operations take additional time due to general network latency (slowness) and overhead protocols.
Wireless direct-to-modem synchronization
Certain conditions must be met before you can perform your first modem-to-modem synchronization.
■ The Kyocera smartphone already must have been synchronized with your primary computer. (Your primary computer is the computer that stores all of your information and that you use on a regular basis.)
- The primary computer must have both Local and Network checked in the HotSync Manager.
- The appropriate user(s) must be selected. (In the HotSync Manager, select Setup, then the Network Tab.)
Synchronizing
- Start the HotSync application on your Kyocera smartphone.
- Tap the Menu icon and select Modem Sync Prefs.
- Select Direct to modem. Tap OK.
- Select the Modem option on the main screen of the HotSync application.
- Tap the ▼ below the HotSync icon and select Wireless Modem for the connection type.
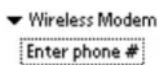
- Tap Enter phone #, the Phone Setup screen will appear.
- Enter the phone number of the modem that you will be dialing into and tap OK.
- Tap on the icon in the center of the HotSync application. A circuit-switched data call will be made to the modem on the primary computer and the synchronization process will be begin.
NOTE: Make sure the conduits on the primary computer will not prompt for a user response. Such a prompt will cause the synchronization process to appear to fail, because the primary computer will wait indefinitely for a user to
respond. This will only happen with third-party conduits; please check with the respective developers for more information.
Synchronizing data using the infrared port
Before you can synchronize data using the infrared port, the computer with which you want to synchronize must fulfill these requirements.
- Your computer must support the IrCOMM implementation of the IrDA standards.
- Your computer must have either an enabled port built into the computer or an enabled infrared device attached to the computer.
Desktop computers are likely to require an infrared device attached to a physical COMM port. Laptops are likely to have a built-in infrared port. Your computer must also have an installed infrared driver.
Check your computer's documentation to learn if the computer supports infrared communication. If your computer is a Macintosh G3 (or higher) or uses Microsoft Windows 98 (or higher), infrared communication is built into the operating system. Some versions of the Macintosh iMac also have built-in infrared communication.
To check if your Windows 95 computer supports infrared communication
- In the Windows taskbar, click Start.
- Choose Settings, and then choose Control Panel.
- In the Control Panel, look for the infrared icon.
If the icon is there, your computer is enabled for infrared communication. If the icon does not appear, you need to install an infrared driver.
To install a Windows 95 infrared driver
- Click in the Windows taskbar to open the menu.
- Choose Setup. Click the Local and Modem tabs. Make a note of the COM ports shown on these panels. You need this information later.
- Go to this Web site: http://www.microsoft.com/windows/downloads
- Follow the links to the Windows 95 or 98 IrDA 2.0 (infrared driver), and follow the instructions to download the driver.
- Find the file W95 or W98ir.exe on your computer. Be sure this file is in a folder where you want to store the infrared driver.
-
Double-click W95 or W98ir.exe. A window displays the files that are being unzipped onto your hard disk. When the title bar displays Finished, close this window.
-
In the same folder where you unzipped W95 or W98ir.exe, find the file Setup.exe. Double-click it to begin installation.
- Accept the defaults provided by the Add Infrared Device Wizard, except when the Wizard asks you to select the port to which your infrared device is connected. Be sure that an available communications port is selected. Do not select the port that the HotSync Manager currently uses.
- If an alert appears telling you that there is a communication port conflict, click OK and proceed with the rest of the installation using the defaults provided.
To configure HotSync Manager for infrared communication
When your computer is prepared for infrared synchronization, you must specify the simulated port to be used.
- Click in the Windows system tray to open the menu.
- Make sure that Local is checked on the menu. Then click Setup.
- Click the Local tab.
- In the Serial Port drop-down box, select the COM port that was given as the simulated port in the Options tab of the Infrared Monitor (in this example, COM4).
- Click OK.
The HotSync Manager is now communicating with the simulated port defined for infrared communication. This means you cannot use your cradle again until you reconfigure the HotSync Manager to communicate with the port defined for cradle synchronization.
To synchronize data using the infrared port
PHONE May be either on or off
FLIP Open
- Tap to view the Applications Launcher.
- Tap to select HotSync.
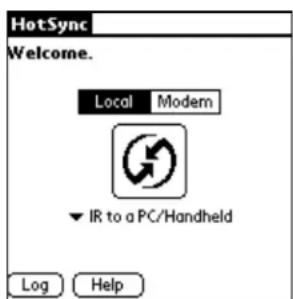
- If Local is not already selected, tap Local.
-
Tap the ▼ below the icon and select IR to a PC/Handheld.
-
Position the infrared port of your phone within a few inches of the infrared port of your computer.
- Tap the HotSync icon to start the synchronization.
To return to synchronization by the cradle
After you have set the computer to synchronize data using the infrared port, you must change the computer settings if you want to return to using the cradle for synchronization.
- If necessary, connect the cradle to a serial (COM) port of your computer and plug the power cord into an outlet.
- Click in the Windows system tray to open the menu.
- From the menu, choose Setup. Then click Local.
- Select the COM port to which your cradle is connected.
- Click OK.
You will also have to reset your Kyocera smartphone for synchronizing by using the cradle. To do this, place your Kyocera smartphone in the cradle and follow these procedures:
PHONE May be either on or off
FLIP Open
- Tap to view the Applications Launcher.
- Tap to select HotSync.
- If Local is not already selected, tap Local.
HotSync
Local Modem

▼ Direct Serial
Log Help
- Tap the ▼ below the icon and select Direct Serial.
You can leave the computer set to synchronize data using the infrared port and still use the cradle. This is useful if you synchronize data from the phone to both your desktop computer and a laptop. When you travel, you don't have to carry a cradle or cable because your phone is set to synchronize data via the infrared port. When you're in the office, just return the phone to the cradle.
Creating a user profile
If you need to configure a number of phones with specific information (such as a company phone list) before distributing them to their actual users, you can create a user profile to load the data into a phone without associating that data with a user name. The user profile feature is designed only for the first-time synchronization, before you assign a User ID to a particular phone. See “Using File Link” on page 85 for information about loading data after you assign a User ID.
To create a user profile
-
Open the Kyocera smartphone Desktop.
-
From the Tools menu, select Users to open the Users dialog.
-
Click Profiles to open the Profiles dialog.
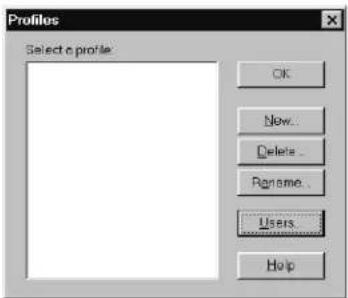
- Click New to open the New Profile dialog.
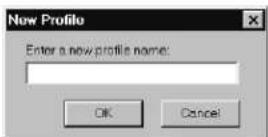
-
Enter a name for the profile and click OK.
-
Repeat steps 4–5 for each Profile you want to create.
-
When you have finished, click OK to return to the Kyocera smartphone Desktop.
-
Select the Profile from the User list and create the data for the Profile (such as company phone list).
To use a profile for the first-time synchronization
-
Place the new phone in the cradle.
-
On the phone, tap to view the Applications Launcher. Tap .

- On the computer, click Profiles to open the Profiles dialog. Choose the profile you want to install on the phone. Click OK.
- Click Yes to transfer all the Profile data to the phone.
The next time you synchronize the phone, you will be prompted to assign a User name to the phone.
Using File Link
Using File Link, you can synchronize the Address Book and Memo Pad information on your phone with an external file, such as a company phone list.
The data is stored in a separate category on your Kyocera smartphone Desktop and your phone. You can configure the File Link feature to check for changes to the external file when you synchronize. For information on how to set up a File Link, see the Kyocera smartphone Desktop Software online Help.
With File Link you can synchronize data stored in any of these formats:
■ Comma-separated (*.csv)
■ Address Book archive (*.aba)
■ Memo Pad archive (*.mpa) ■ Text (*.txt)
Modifying synchronization options
You can choose when you want HotSync Manager to run, and you can adjust the local and modem HotSync settings.
To set HotSync options
-
Click in the Windows system tray to open the menu.
-
On the menu, click Setup.
- Click the General tab and select one of the following options:
Always available
Adds HotSync Manager to the Startup folder and constantly monitors the communication port for synchronization requests. With this option, the HotSync Manager conducts synchronizations even when the Kyocera smartphone Desktop software is not running.
Available when Kyocera smartphone Desktop is running
Starts HotSync Manager and monitors requests automatically when you open the Kyocera smartphone Desktop software.
Manual
Starts the HotSync Manager and monitors requests only when you select HotSync Manager from the Start menu.
If you're not sure which option to use, select Always available.
- Click the Local tab to display the settings for the connection between your PC and the cradle.
- Adjust the following options as needed.
Serial Port Identifies which port the Kyocera smartphone Desktop software will use to communicate with the cradle. This selection should match the port number where you connected the cradle. The Kyocera smartphone cannot share this port with an internal modem or other device. If you have trouble determining the correct port, see HotSync operations, page 260.
Speed Determines the speed at which data is transferred between the phone and the Kyocera smartphone Desktop software. We suggest you try the As Fast As Possible rate first, and adjust downward if you experience problems. This setting allows the phone and the Kyocera smartphone Desktop software to find and use the fastest speed.
- Click OK to close the Setup dialog.
Customizing a conduit
For each application, a program called a conduit controls how the records are moved during synchronization. There are conduits for the Date Book, Address Book, To Do List, Memo Pad, and Expense applications, as well as System and Install conduits.
In most cases, you won't need to make any changes in the default conduit settings. However, in the following cases, you must customize these settings:
■ To overwrite data on either the phone or the Kyocera smartphone Desktop.
- To avoid synchronizing a particular type of file because you don't use it.
NOTE Be aware that some third-party applications install their own conduits. For detailed information on these conduits, see the documentation for the third-party software product.
To customize conduit settings
-
Click in the Windows taskbar to open the menu.
-
On the menu, click Custom.
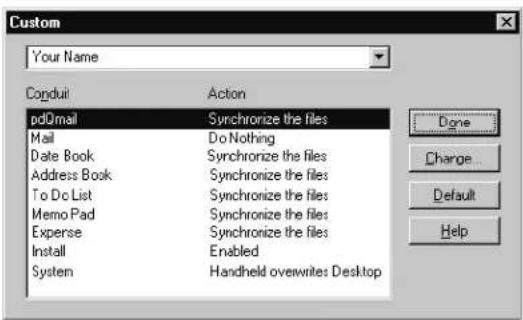
-
Select the appropriate user name from the list at the top of the dialog.
-
Select the application in the Conduit list you want to change.
-
Click Change.
The Change HotSync Action dialog appears.
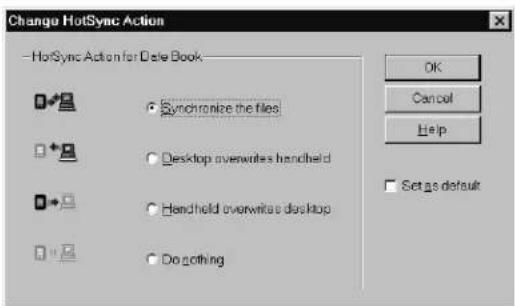
- Click the direction in which you want to write data, or click Do Nothing to skip data transfer for an application.
NOTE: Changing the HotSync setting from the default affects only the next HotSync operation. Thereafter, the HotSync Actions revert to their default settings. To use a new setting on an ongoing basis, select the Set As Default box. Thereafter, just click Default in the Custom dialog to revert to the default settings.
-
Repeat steps 3–6 to change conduit settings for other applications or for a different user name.
-
Click OK to activate your settings.
Transferring information between Palm devices
There are three methods of exchanging information between two or more Palm devices. Do not simply synchronize your new phone to copy the data. Some important settings on the phone will be changed if you do so.
To synchronize using the same user name
Use this method only if you are transferring data from a Palm device you will not be using anymore to a new device. If you intend to use both devices on an ongoing basis, do not use this method, because it gives both devices the same user name. (If you continue to synchronize two Palm devices with the same user name, serious synchronization problems may occur.)
NOTE: If you have accidentally given two Palm devices the same name, see "Troubleshooting HotSync operations" on page 90 for procedures to rename one of them.
-
Synchronize the original Palm device to your computer.
-
On the computer, launch Windows Explorer.
-
Navigate to the C:\Palm directory and open your user folder
This folder has a name similar to the name of your old Palm device. For example, if the user name for your Palm device was "Joe Smith," the folder might be named "smithj."
-
Inside the user folder, open the folder called Backup.
-
Locate the file named Saved_Preferences.prc. Move this file to another folder or delete it.
The Saved_Preferences file contains the preference settings from your Palm device (for example, your selected alert sounds). The Kyocera smartphone has many additional preference settings (for example, network settings and phone settings). If you do not move or delete the existing Saved_Preferences.prc file before synchronizing, the organizer settings will overwrite the phone settings, and you will lose the benefit of these new features.
-
Synchronize the Kyocera smartphone, choosing the same user name as that of the old Palm device. All of your data is transferred to your phone. A new Saved_PREFERENCES.prc file is created, containing the new phone preferences.
-
If you intend to continue using the original device, do a hard reset on it. The hard reset removes the user name and all associated data from the device. It will not affect the data that has already been synchronized with your phone.
To copy and paste data
Use this method if you have a small number of records to move or if you are not comfortable manipulating files and folders in Windows Explorer. This method is also recommended if you want to merge different information between two devices.
-
Perform a HotSync operation on the new device, giving it a new user name. This user name must be unique and different from the first device.
-
Launch the Kyocera smartphone Desktop.
-
In the upper right-hand corner, open the drop-down list of existing user names. Use this list to toggle between the user name of the device with the old information and the user name of the new device.
-
In the Address Book, To Do List, or Memo List on the computer, highlight the information to be copied.
To select a sequential group of records, hold down the Shift key while you select them. To select a group of nonsequential records, hold down the Control key while you select them.
-
Right click on any part of the highlighted item(s). Select Copy from the pop-up menu.
-
From the list of users, select the new user name. Open the appropriate application (Address Book, To Do List, or Memo List).
-
Right click on a blank part of the application. Select Paste from the pop-up menu.
-
Repeat steps 4–7 for all of the other records and applications.
NOTE: You cannot copy categories; the categories must be recreated on the new device. It is a good idea to create them ahead of time to simplify the copy and paste process. Date Book events cannot be copied by category.
- Perform a HotSync operation with the new device and new user name. All of the information will be transferred over.
To copy data using Windows Explorer
The data transfer method is a more advanced method requiring you to move files in Windows Explorer. Do not try this method unless you are familiar with moving files in a Windows environment.
- Perform a HotSync operation on the new device, giving it a new user name. This user name must be unique and different from the first device.
- If the Kyocera smartphone Desktop is open, close it.
- Open the Windows Explorer. Navigate to the Kyocera smartphone Desktop directory. By default, this directory is C:\Palm.
- Locate the folder with the name of the original Palm device. Copy the contents of the folder into another directory or onto the Desktop for safekeeping. This step makes a duplicate of the files in case a problem occurs.
- Go back to the folder with the name of the original Palm device. Copy—do not move—the contents into the folder with the name of the new device.
- Launch the Kyocera smartphone Desktop. All of the data from the older device should be located under the new user name
- Perform a HotSync operation with the new device and new user name. All of the information will be transferred to the new device.
Troubleshooting HotSync operations
The HotSync operation fails to start
■ Make sure your computer is turned on, and that it does not shut down automatically as part of an energy-saving feature.
- Check the cable between the cradle and the computer serial port.
■ Make sure you selected the correct serial port on the Local tab in the Setup dialog. Select the port where you connected the cradle.
- Make sure you are not running another program—such as America Online ^® , CompuServe ^® , or WinFax ^® —that uses the same serial port.
- Verify that HotSync Manager is running. If it is running, exit and restart it.
■ Make sure you selected Local from the HotSync Manager menu or the Kyocera smartphone Desktop menu.
- Try deleting the Saved_Preferences.PRC file on your computer:
Browse to C:\Palm\
your Palm device.
Locate the Saved_Preferences.PRC file and delete it.
The HotSync operation does not run to completion
- Do not turn the phone on or off while it is synchronizing data.
- If you have problems using the As Fast As Possible option or a specific speed, select a lower baud rate setting on the Local tab in the Setup dialog.
- Read the HotSync Log for the user account you are synchronizing.
- Try deleting the Saved_Preements.PRC file on your computer:
Browse to C:\Palm\
\Backup, where is the name of your Palm device. Locate the Saved_Preements.PRC file and delete it.
If you have two Palm devices with the same user name
Problems occur during synchronization if two Palm devices have the same user name. The HotSync process creates a unique user ID in addition to the user name. It is important that no two IDs synchronize to the same user name. Follow these steps to rename one of the Palm devices.
- On your computer, open the Kyocera smartphone Desktop.
- From the Tools menu, select Users.
- Click New.
- Create a different user name.
- Close the Kyocera smartphone Desktop.
- Using Windows Explorer or the Desktop, locate the folder with the old user name. By default, the folder is located in the Pilot or Palm directory
- Copy—do not move—the files from that folder to the folder with the new user name.
- Perform a hard reset on the organizer that will use the new user name.
- Perform a HotSync operation with the reset organizer. When you are prompted from the user name, select the new name.
Beaming information
Your Kyocera smartphone is equipped with an infrared (IrDV) port that you can use to "beam" information to other devices with infrared ports. These devices include other phones, Palm devices, and some laptop computers. You can beam the following:
■ The current Address Book, Date Book, To Do List, or Memo Pad entry
■ All Address Book, To Do List, or Memo Pad entries in the current category
- Your "business card" (To create a business card, see To create a business card, page 103.)
■ An application that you have installed (if the application allows beaming)
To turn the beam receive feature on or off
PHONE May be either on or off
FLIP Open
-
Tap to view the Applications Launcher.
-
Tap to open the last Preferences screen you used.
-
Tap the pick list in the upper-right corner and select General.
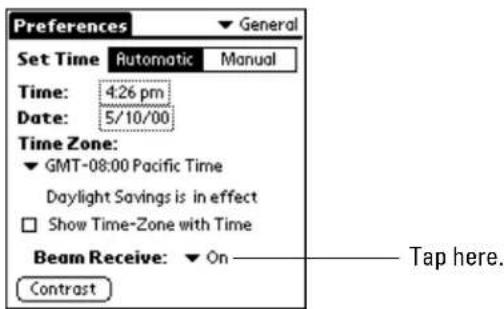
- Tap the ▼ beside Beam Receive and select On or Off.
To beam information
PHONE May be either on or off
FLIP Open
-
Locate the entry you want to beam.
-
Tap to open the menus.
-
From the Record menu, tap Beam.
-
Point the infrared port (at the top of the back panel) at the infrared port of the receiving device.
For best results, the devices should be from 5 to 30 centimeters (approximately 2 to 12 inches) apart, and the path between the two devices must be clear of obstacles.

natural_image
Top-down view of a two-generation mobile phone showing front, side, and back views (no text or symbols visible)- Wait for the Beam Status dialog to indicate that the transfer is complete before you continue working on the phone.
TIP: To quickly beam your business card, just press and hold the Address Book

key for a few seconds.
To receive beamed information
PHONE May be either on or off
FLIP Open
Before you can receive beamed information, the beam receive feature must be turned on. See "To turn the beam receive feature on or off" on page 92. Point the infrared port directly at the infrared port of the transmitting device to open the Beam Status dialog.
- Tap Yes to accept the transmission.
- Wait for the Beam Status dialog to indicate that the transfer is complete, then tap OK to display the new entry.
Troubleshooting the Beam feature
Beamed data does not work
- Verify that the Beam feature is enabled (on the General Preferences screen). See "To turn the beam receive feature on or off" on page 92.
- Verify that the path between the two devices is clear of obstacles.
- Try using the Beam feature at different distances. The usual distance for beaming information is between five centimeters (approximately 2 inches) and one meter (approximately 40 inches). However, in some cases, you may find that greater or lesser distances work more effectively.
When data is beamed at the phone, an out-of-memory message appears
■ The Kyocera smartphone requires at least twice the amount of memory available as the data you are receiving. For example, if you are receiving a 30K application, you must have at least 60K free.
Using the Address Book, you can easily keep track of names, addresses, phone numbers, email addresses, URLs, and other information about your personal and business contacts.
You can make phone calls, send email, or open Web sites directly from the Address Book. Each contact in the Address Book can have up to five phone numbers, email addresses, or Web addresses (URLs). You can put these entries into categories so you can quickly sort and view your entries in logical groups.
When the flip is closed, you can call up the entries in the Address Book by selecting Contacts from the Main Menu.
In this chapter
■ Creating Address Book entries page 95
■ Making calls from the Address Book page 96
■ Editing Address Book entries page 98
■ Beaming entries to other devices page 103
■ Deleting entries page 104
■ Using Address Book menus page 106
Creating Address Book entries
An Address Book entry is the name, address, and phone information you are keeping for a person or business. You can create these entries on the Kyocera smartphone, or you can use the Kyocera smartphone Desktop software to create them on your computer and download them to your phone during a HotSync operation. For complete information about synchronization procedures, see "Synchronizing data using the sync cradle" on page 74.
You can see the names and numbers in the Address Book with the flip either open or closed, but you must open the flip to edit them.
■ With the flip open, press to open the Address Book.
- With the flip closed, use the shuttle to select Contacts from the Main menu. (Shortcut—If your phone is set to List Menus, press the shuttle up once from the home screen to open the Contacts menu.)
The same names and numbers appear in the Address Book and the Contacts list.
NOTE The Kyocera smartphone Desktop software also has data import capabilities that allow you to load database files into the Address Book. Refer to the online documentation supplied with the Desktop software for details.
To create a new Address Book entry

- Press the Address Book

- Tap New to display the Address Edit screen.
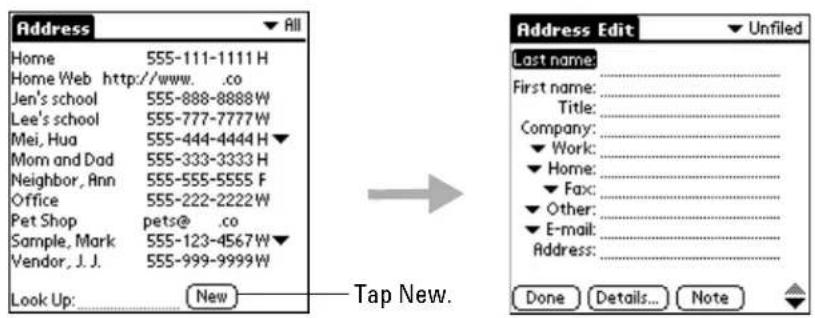
- Enter the last name of a person you want to add to your Address Book.
You can write with the stylus or use the on-screen keyboard. The first letter is capitalized automatically (except for numeric and email information). For details about entering text, see "Entering information" on page 51.
-
Move to the next line either by tapping it or by writing ♦, the Next Field Graffiti stroke.
-
Enter the person's first name on the First Name line.
-
Enter the rest of the information for this person or business.
Notice that you can enter email addresses or Web addresses (URLs) in any of the five phone number fields. To add pauses, see "To enter pauses in a phone number" on page 99.
-
Tap to move to the next page.
-
When you have finished, tap Done to return to the Address screen.
Making calls from the Address Book
After you create an Address Book entry, you can make a call from it directly. If you have entered email addresses or URLs in the Address Book, you can also make direct connections to them if your service provider supports over-the-air data.
NOTE You cannot initiate conference calls from the Address Book. If your service provider supports conference calls, you can initiate a three-way call by entering the numbers directly on the keypad or the Dialer.
To make a phone call from the Address Book (with the flip open)

- Press the Address Book

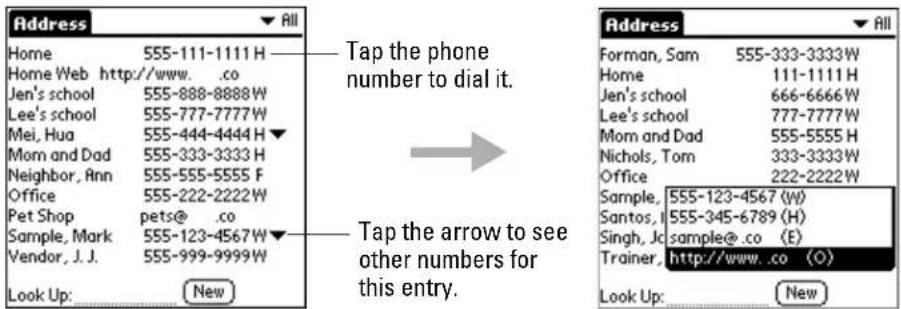
- Scroll through the entries using either the up and down keys or the shuttle.
Locate the person or business you want to call and do one of the following:
-
If the number you want to call appears in the list, tap the phone number (not the name).
■ To call one of the alternate numbers for an entry, tap the in the right column. All additional numbers for this person or business appear. Tap the one you want to call. That number becomes the primary number for the entry. Tap the number to select it. -
Tap in the Dialer to place the call.
By default, the Dialer opens when you select a number from the Address Book so you can verify the number before placing the call. If you prefer, you can set the phone to place calls immediately without opening the Dialer. See "To set Dialer preferences" on page 27.
- When you have finished your call, tap

To make a call from the Contacts List (with the flip closed)

- From the Home screen, press the shuttle in to open the menus.
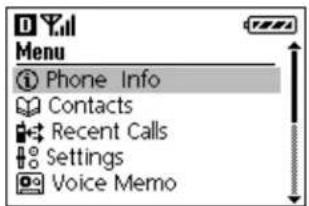
- Roll the shuttle down until Contacts is highlighted. Then press the shuttle in.
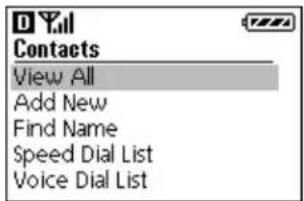
- With View All highlighted, press the shuttle in.
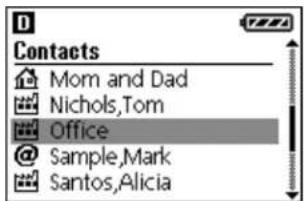
-
Roll the shuttle up or down to scroll through the Contacts list. When the person you want to call is highlighted, press
-
When you have finished your call, press .
Editing Address Book entries
In the Address Book, you can locate your entries quickly, edit them, display them by name or company name, and group them by category. You can also choose the type of information you want your entries to include and exchange Address Book information with other phones or Palm devices.
To edit an Address Book entry
PHONE May be either on or off
FLIP Open
- Press the Address Book

- Tap the name of the entry you want to change.
Tap the name in the left column, not the phone number in the right column. Tapping the phone number initiates a call.
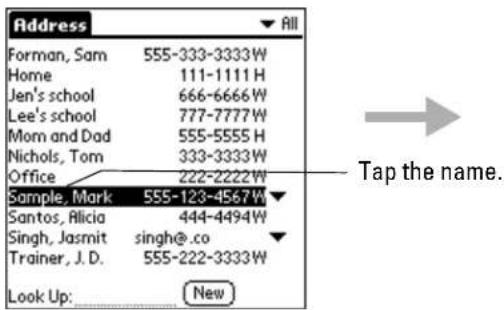
- In the Address View screen, tap Edit.
-
Tap any line (such as Address or City). Enter or change the information.
-
When you have finished, tap Done.
To enter pauses in a phone number
PHONE May be either on or off
FLIP Open
When you call automated systems, you often have to dial a series of numbers with pauses between them (for example, when sending a page or entering a password). You can place these pauses in the Address Book.
- Press the Address Book

- Tap the name of the entry you want to edit.
The Address View screen appears.
- Tap Edit.
The Address Edit screen appears.
- Tap the appropriate phone number. Enter a percent sign for a hard pause or a comma for a timed pause wherever necessary.
To enter these punctuation marks using the on-screen keyboard, tap 123 in the lower right corner of the Graffiti writing area.
To write these punctuation marks using Graffiti, first tap once to enter punctuation mode. Then write the appropriate Graffiti stroke as shown in the table below.
| Hard Pause (%) | When you call this number, the Kyocera smartphone pauses at this point. It does not continue with the next set of numbers until you tap Resume. | |
| Timed Pause (,) | When you call this number, the Kyocera smartphone pauses for two seconds before continuing with the next set of numbers. You can enter as many commas as necessary to extend the length of the pause. |
To scroll through the Address Book
PHONE May be either on or off
FLIP Open
Press the up and down buttons.
■ In the Address screen, you move up or down by a screen of entries.
■ In the Address View screen, you move to the previous or next entry.
To look up an entry in the Address Book
PHONE May be either on or off
FLIP Open
- Press the Address Book

- Enter the first letter of the name you want to find.
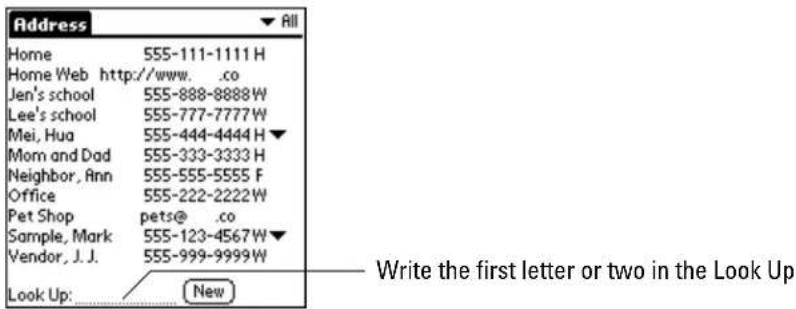
The list scrolls to the first entry beginning with that letter. If you write a second letter, the list scrolls to the first entry beginning with those two letters.
- Tap any entry to view its contents.
NOTE: You can also look up entries in your Address Book with the flip closed. See "Making a call from the Contacts list" on page 30.
To choose other phone numbers in an Address Book entry
PHONE May be either on or off
FLIP Open
In your Address Book, you can keep up to five phone numbers, email addresses, or URLs for each entry. You can select the labels for these numbers individually. For example, you might want to keep a fax number for one person and a pager number for another. You can also choose which of these numbers you want to see in the Address Book for each entry.
- Press the Address Book

- Tap the name of the entry you want to change.
Tap the name in the left column, not the phone number in the right column.
-
Tap Edit to display the Address Edit screen.
-
Tap the ▼ beside the phone number you want to change.
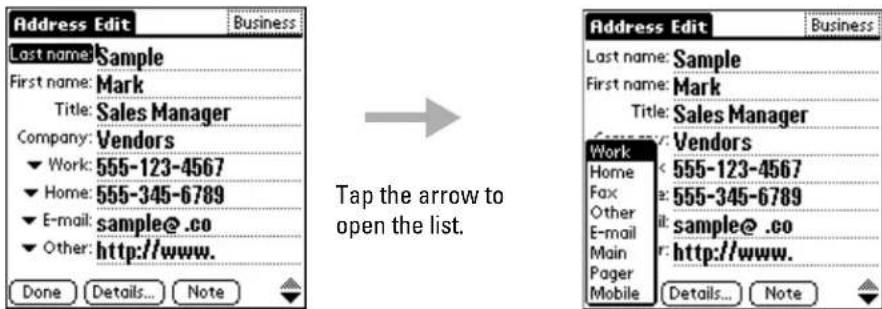
-
From the list, tap the label (for example, Fax or Pager) you want to use.
-
If you want to select which phone number appears in the Address Book and Contact list, tap Details to open the Address Entry Details dialog. If you don't want to change this setting, skip to step 9.
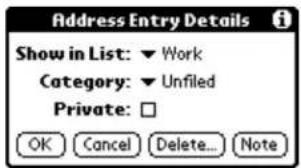
-
Tap the ▼ beside Show in List. Select a label to identify which phone number appears on the Address screen and the Contacts list.
-
Tap OK.
-
Tap Done.
To assign a category to an Address Book entry
PHONE May be either on or off
FLIP Open
Categories can help you file your Address Book entries into groups for easy review. The Address Book has two standard categories (Business and Personal). You can create your own categories up to a total of 15 categories. For information about creating and editing categories, see “Using categories” on page 62.
-
Press the Address Book
-
Tap the name you want to assign to a category. Tap the name in the left column, not the phone number in the right column.
-
Tap Edit in the Address View screen to display the Address Edit screen.
-
In the Address Edit screen, tap the pick list in the upper-right corner. From the list, tap the category you want to assign to this entry.
-
Tap Done.
To mark an entry as private
PHONE May be either on or off
FLIP Open
You can mark any entry as private. When the security features are turned on, private entries are not visible. You must enter a password to see them.
-
Press the Address Book
-
Tap the entry you want to mark as private. Tap the name in the left column, not the phone number in the right column.
-
Tap Edit to display the Address Edit screen.
-
Tap Details to open the Address Entry Details dialog.
- Tap the Private check box.
- Tap OK.
- In the confirmation dialog, tap OK.
- Tap Done.
To sort the entries
PHONE May be either on or off
FLIP Open
You can sort the entries in the Address Book by Company and Last Name, rather than by Last Name and First Name. These settings do not change your Address Book data in any way; they merely change the view.
- Press the Address Book
- Tap to open the Address Book menus.
- From the Options menu, select Preferences.
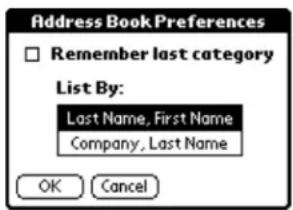
- Tap the setting that you want to use.
- Tap OK.
The Address Book is resorted based on your choice. Entries with no company name are always sorted by last name.
Beaming entries to other devices
Using the infrared (IR) port, you can beam Address Book entries to other Kyocera smartphones or Palm devices.
NOTE To conserve power, your Kyocera smartphone is delivered with the beam receive feature turned off. To turn it on, see "Beaming information" on page 91.
Once the beam feature is turned on, you can beaMm any of the following:
- Your business card—The business card is a specially designated entry containing information you want to exchange with business contacts. You can send your business card quickly with one-touch beaming.
- An address entry—You can select and beam any entry in your Address Book.
- A category of address entries—You can beam all of the entries in a category. For example, you can share a list of restaurants with a friend.
For more information on the IR port, see "Beaming information" on page 91.
To create a business card
PHONE May be either on or off
FLIP Open
- Press the Address Book

- Tap New.
- Create an entry containing the information you want on your business card.
- Tap to open the Address Book menus.
- From the Record menu, tap Select Business Card. Tap Yes to accept this entry as your business card.
- Tap Done.
Notice that in Address View, the ☐on identifies this record as your business card.
To beam a business card
PHONE May be either on or off
FLIP Open
- Press the Address Book

- Tap the name of your business card entry to display the Address View screen. Tap the name in the left column, not the phone number in the right column.
- Tap to open the Address Book menus.
- Tap Beam Business Card from the Record menu to beam your card.
You can also press and hold the Address Book by for about two seconds to beam your card.
To beam the current entry
PHONE May be either on or off
FLIP Open
- Press the Address Book

- Tap the name of an entry you want to beam.
Tap the name in the left column, not the phone number in the right column.
-
Tap to open the Address Book menus.
-
Tap Beam Address from the Record menu to beam the current entry.
If you beam entries often, you can set the full-screen pen stroke to beam the current entry. See “Pen preferences” on page 198.
To beam the current category
PHONE May be either on or off
FLIP Open
- Press the Address Book

-
Tap the pick list in the upper-right corner. From the list, select the category you want to beam.
-
Tap to open the Address Book menus.
-
From the Record menu, tap Beam Category.
Deleting entries
You can remove entries from the Address Book at any time.
To delete an entry from the Address Book
PHONE May be either on or off
FLIP Open
- Press the Address Book

- Tap the name of the entry you want to delete.
Be sure to tap the name in the left column, not the phone number in the right column. Tapping the phone number initiates a call.
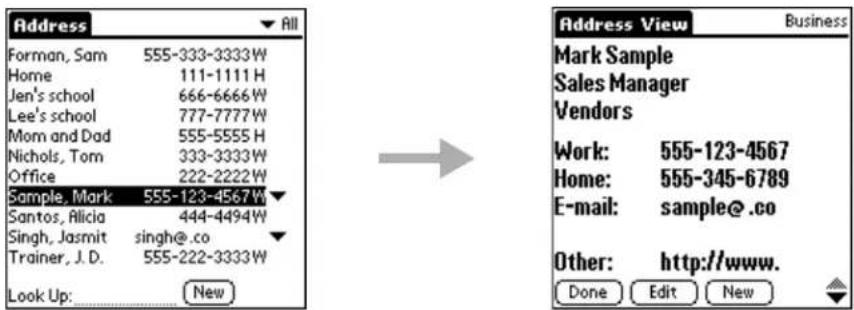
- Tap Edit to display the Address Edit screen.

- Tap Details.
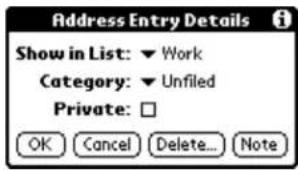
- Tap Delete.
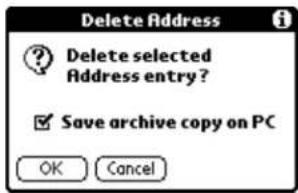
-
If you want to keep a backup copy of this entry on your computer, put a check mark in the Save archive copy on PC check box. If you don't want to save a backup, remove the check mark.
-
In the confirmation dialog, tap OK to delete the entry or Cancel to keep it. If you delete the entry, it is removed from both the Address Book and the Speed Dial list.
Using Address Book menus
This section covers the menu commands specific to the Address Book. For information about menu commands common to all applications, "Using menus" on page 59.
Record menu
The commands in the Record menu vary depending on which screen is open.
If the Address screen is open If Address View is open
Delete Address Remove an Address Book entry. In the alert dialog, tap OK to delete the entry. The entry is removed from the Address Book, but a copy is sent to an archive file on your computer during your next HotSync operation. To delete the entry completely, remove the check mark from the Save archive copy on PC check box.
Attach Note Create a note for the current entry.
Delete Note Remove a note attached to an Address Book entry. In the alert dialog, tap OK to delete the note or Cancel to keep the note.
Beam Address Beam the current Address Book entry to another Kyocera smartphone through the IR port.
Beam Category Beam all Address Book entries in the current category to another Kyocera smartphone through the IR port.
Select Business Card Select the current entry as your business card. To beam your business card, use the Beam Business Card command.
Beam Business Card Send the current business card to another Kyocera smartphone through the IR port. You can also beam your business card by holding down the Address Book button for at least two seconds.
Options menu
The commands on the Options menu vary depending on which screen is open.
If the Address screen is open
If Address View is open
Font
Choose a different font (text) style for your entries.
Preferences
Set how you want the Address Book to list information.
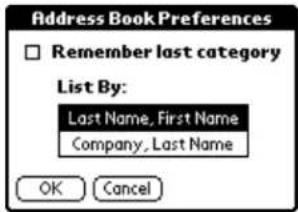
Remember last category—If you select this check box, the Address Book shows the last category you used when you return to it from another application. If you clear it, the Address Book shows the entries for all categories.
List By—Sort address entries by last name or by company.
Rename Custom Fields
Create your own names for the four custom fields. Your changes apply to all of your Address Book entries.
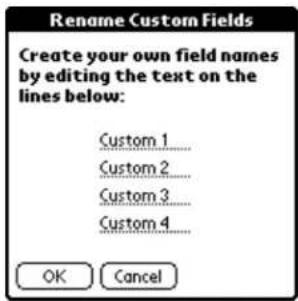
Security
Select Show records, mask records, or hide records.
About Address Book
Show version information for the Address Book application.
Launch Speed Dial
Open the Speed Dial application.
Launch Voice Dial
Open the Voice Dial application.
Call History and the Recent Calls List
Your Kyocera smartphone keeps a record of your incoming, outgoing, and missed phone calls. You can see exactly when someone called you and you can return the call directly. There are two ways to view this information
Call History—When the flip is open, you can see your 99 most recent calls in the Call History application. You can adjust this number as high as 999 if you choose. In Call History, duplicate calls are retained; if you bill for your phone time, you can easily track data about your calls and export it to the Expense application.
Recent Calls List—When the flip is closed, you can see 30 calls in the Recent Calls list. In this list, duplicate calls are removed. Using this list, you can quickly locate recent numbers and return the calls.
In this chapter
■ Opening lists of your recent calls page 109
■ Making a call from Call History page 110
■ Viewing your calls page 111
■ Creating an expense record page 114
■ Using the menus in Call History page 116
Opening lists of your recent calls
You can open a list of calls you have sent, received, or missed with the flip open or closed. When the flip is open, you can see 99 calls in the Call History application. When the flip is closed, you can see 30 calls in the Recent Calls list.
To open Call History
PHONE May be either on or off
FLIP Open
-
Tap to view the Applications Launcher.
-
Tap to open the Call History list.
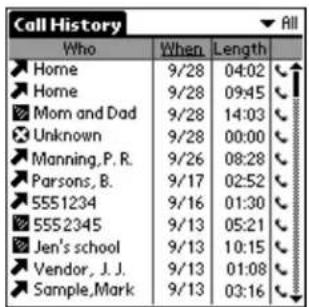
The icons show what type of call was made:
Incoming call
Outgoing call
Missed call
Data call (for example, a call to a Web site)
The screen shows the calls you have made or received, including the date, time, and length. If the phone number is in your Address Book, the contact name appears in the Who column. Otherwise, the Who column displays the phone number. If you haven't made or received any calls yet, the Call History screen is empty.
If you synchronize more than one Kyocera Smartphone with the same user name, the Call History screen displays calls from all of them.
NOTE: Call History does not necessarily reflect all calls made on your phone. Synchronizing the phone with more than one user and/or resetting the phone can both affect the history.
To open the Recent Calls list
PHONE On FLIP Closed
- From the home screen, press the shuttle in to open the menus.
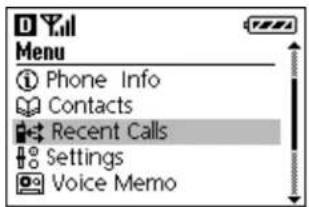
- Roll the shuttle down until Recent Calls is highlighted. Then press the shuttle in.
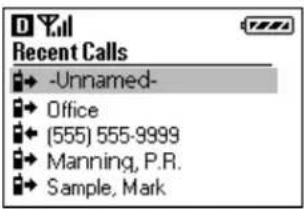
-
Roll the shuttle up or down to move through the list of calls.
-
To return a call, highlight the entry and press the shuttle in. Press .
-
To save a phone number and put it in your Address Book, roll the shuttle up or down until Save is highlighted. Then press the shuttle in.
-
To exit Recent Calls, press to Cove up one menu at a time, or press to return to the home screen.

Making a call from Call History
You can quickly return a phone call directly from either of the lists that show the calls you have received.
To make a call from Call History

-
Tap to view the Applications Launcher.
-
Tap to open the Call History list.
-
To dial the number immediately, tap the phone icon to the right of the number you want to call.
-
To see more information before placing the call, tap the entry to open the Details screen. To dial the number, tap Dial.
To make a call from the Recent Calls list

- From the home screen, press the shuttle in to open the menus.
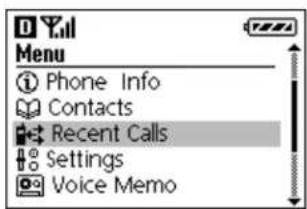
- Roll the shuttle down until Recent Calls is highlighted. Then press the shuttle in.
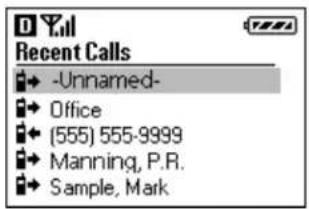
-
Press the shuttle up or down to move through the list of calls.
-
When the call you want to return is highlighted, press .
Viewing your calls
Call History is a valuable tool for keeping track of your incoming and outgoing calls. You can view calls by category, sort the Call History list, copy information from it into the Address Book or the Clipboard, and delete entries.
To view calls by category
PHONE May be either on or off
FLIP Open
You can quickly view the calls in Call History by their category (for example, only calls you have missed).
-
Tap to view the Applications Launcher.
-
Tap to open the Call History list.
-
Tap the pick list in the upper-right corner.
-
From the list, select All, Incoming, Outgoing, or Missed.
The screen displays calls in that category only.
NOTE: The Recent category is the same as the Recent Calls list you see when the flip is closed. It includes the last 30 unique phone numbers of incoming, outgoing, and missed calls. Each number is listed only once; duplicate numbers are deleted (oldest first). For example, if you called the same number four times, only the most recent of these calls is listed.
To sort the Call History list
PHONE May be either on or off
FLIP Open
With a single click, you can sort the Call History list by the name or phone number of the caller, by date and time, or by length of call. No matter which sequence you choose, new calls automatically appear at the top of the list.
-
Tap to view the Applications Launcher.
-
Tap to open the Call History list.
- To list calls in alphanumeric order by name and phone number, tap Who in the column heading. Tap Who again to reverse the sort order.
- To list calls by date, tap Date in the column heading. Calls are listed by date, with all the calls on a single day listed by time. For calls received or made during the current day, only the time is displayed, not the date. For previous calls, both the date and time are listed; expand the column to see all of the information. Tap Date again to resort the list based on the most recent time.
- To list calls in order from longest to shortest, tap Length in the column heading. Tap Length again to resort the list from shortest call to longest call.
To copy information from Call History to the Address Book
PHONE May be either on or off
FLIP Open
- Tap to view the Applications Launcher.
- Tap to open the Call History list.
- Tap the entry you want to add to (or modify) in the Address Book. The Call Detail dialog appears.
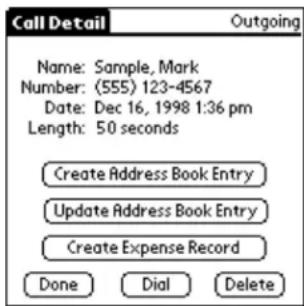
-
Do one of the following:
-
To add a new entry, tap Create Address Book Entry. Tap OK in the confirmation dialog. The Address Details screen appears where you can verify or change the entry.
- To change an existing entry, tap Update Address Book Entry. In the confirmation message, tap OK. The Address Book appears where you can verify or change the entry.
To copy information from Call History to the Clipboard
PHONE On FLIP Open
- Tap to view the Applications Launcher.
-
Tap to open the Call History list.
-
Tap the entry you want to copy.
- Tap to open the Call History menus.
- From the Record menu, tap Copy Number to Clipboard.
Deleting calls
To delete one entry

- Tap to view the Applications Launcher.
- Tap to open the Call History list.
- Tap the entry you want to delete.
- Tap Delete. The call is removed from the list.
To delete a group of entries

- Tap to view the Applications Launcher.
- Tap to open the Call History list.
- Drag the stylus through the entries you want to delete.
- From the Call History list, tap to open the menus.
- From the Record menu, tap Delete Selected Calls. The highlighted calls are removed from your Call History list.
To delete all entries

- Tap to view the Applications Launcher.
- Tap to open the Call History list.
- From the Call History list, tap open the menus.
- From the Record menu, tap Delete All Calls. All the calls are removed from both the Call History list and the Recent Calls list.
Setting up your preferences in Call History
To define Call History preferences
PHONE May be either on or off
FLIP Open
- Tap to view the Applications Launcher.
- Tap to open the Call History list.
- In the Call History application, tap .
- From the Options menu, tap Preferences.
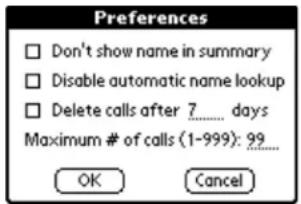
- If you don't want caller names to appear in the Who column even if this information is available, tap Don't show name in summary.
- To delete calls after a specific number of days, tap Delete calls after ____ days. Enter the number of days on the line.
- To set the maximum number of calls to be listed in Call History, enter a number between 1 and 999 on the Maximum # of Calls line.
- Tap OK when you have finished.
Creating an expense record
If you need to keep a financial record of your calls for billing or expense reports, you can generate an expense record from Call History. The calls you select are copied to the Expense application where you can edit them, place them in categories, and export them to Microsoft Excel.
To create an expense record
PHONE May be either on or off
FLIP Open
- Tap to view the Applications Launcher.
-
Tap to open the Call History list.
-
Tap a call you want to track on your expense record. The Call Detail screen appears.
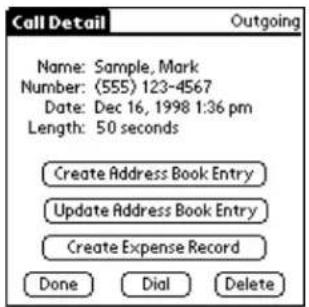
- Tap Create Expense Record.
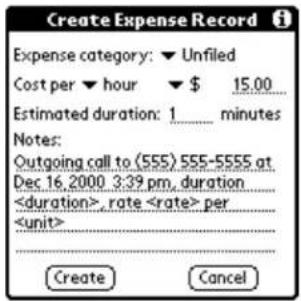
-
Tap the Expense category pick list and select the appropriate category for this call.
-
Tap the Cost pick list and select hour or minute. Select the unit of currency. Enter the amount to be charged per hour or minute.
NOTE: You can change the default settings in the category and cost fields using the Options menu. See "Options menu" on page 117.
-
If necessary, change the estimated duration of the call (for example, if you spent billable time before or after the call that you want to include).
-
Enter any additional information you want to record (for example, the purpose or subject of the call) in the Notes area. The text you write here will appear as a Note in the Expense record of this call.
-
Tap Create.
-
Tap Done.
Information about this call is moved to the Expense application where you can edit it and export it to Microsoft Excel. For details, see Chapter 8, "Expense."
Using the menus in Call History
This section outlines menu commands specific to Call History.
Record menu
The commands on the Record menu vary depending on which screen is open.
From Call History From Call Details
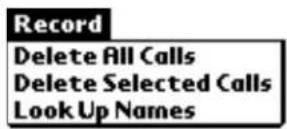

| Delete All Calls | Remove all records from the Call History list (flip open) and the Recent Calls list (flip closed). |
| Delete Selected Calls | Remove highlighted records from the Call History list. Notice that this option does not remove the records from the Recent Calls list. |
| Look Up Names | From the Call History screen, scan the Address Book to update the information in Call History. If you have made a number of changes to your Address Book, you can select this menu option to refresh the information in Call History.Note that if you have 250 or more names in the Address Book, you may want to turn off this feature to increase the performance speed of Call History. |
| Copy Number to Clipboard | From the Call Details screen, copy information from a call to your Address Book. |
| Look up Name in Address Book | From the Call Details screen, scan the Address Book for an entry that matches this number. The Kyocera Smartphone makes this scan automatically after each call. However, if you have made a number of changes to your Address Book, you can select this menu option to update information in Call History. |
Options menu

Preferences
Manage the way calls are handled by Call History.
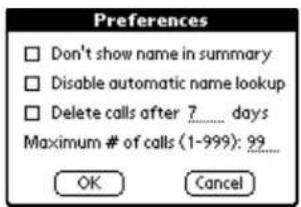
n Display phone numbers only, without names. n Disable the lookup feature that updates Call History with names from the Address Book. If you have more than 250 names in the Address Book, it is recommended that you disable automatic lookup to improve phone performance. n Delete calls after X days. n Set the maximum number of calls to be kept in Call History.
Auto-Expense
Automatically generate expense reports based on your incoming or outgoing calls.
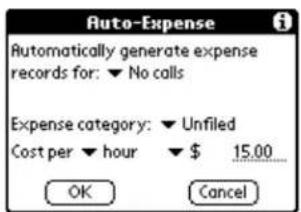
n Generate reports for all calls or for calls in a category. n Enter your cost per minute or hour in any currency you have set up.
About Call History
View version information for the Call History application.
Using the Date Book, you can quickly and easily schedule appointments or any kind of activity associated with a specific time and date.
In this chapter
■ Scheduling events in the Date Book page 120
■ Scheduling repeating events page 124
■ Deleting an event page 126
■ Changing the Date Book view page 128
■ Using the Date Book menus page 132
Scheduling events in the Date Book
An event is any activity that you schedule for a particular day. When you create an event, its description appears on the time line, and its duration is set to one hour. You can easily change the start time and duration for any event.
You can also include events in your Date Book that have no start or end time, such as birthdays, holidays, and anniversaries. These untimed events appear at the top of the Date Book screen and are noted by a diamond.
To schedule an event for the current day
PHONE May be either on or off
FLIP Open
-
Press the Date Book
-
Tap the time at which you want the event to begin.
You can also select a starting time for an appointment by making sure that no event is selected, and then writing a number on the number side of the Graffiti writing area.
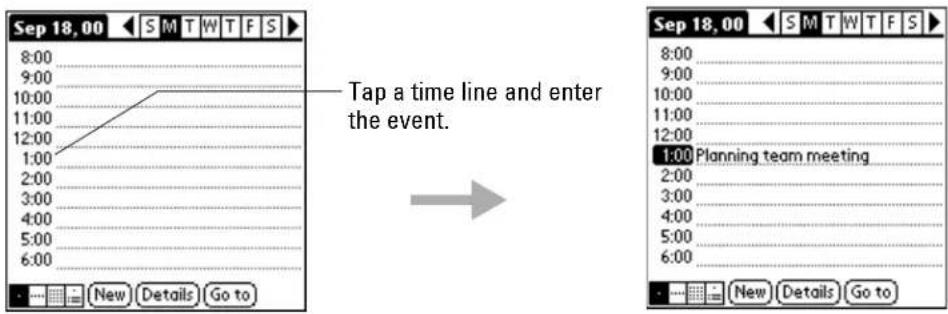
-
Enter information about the event.
-
To set the length of the event, do one of the following:
■ If your appointment is longer or shorter than an hour, tap the time of the event to open the Set Time dialog.
- If your appointment is exactly one hour long, skip to step 8. Date book events are set at one hour by default.
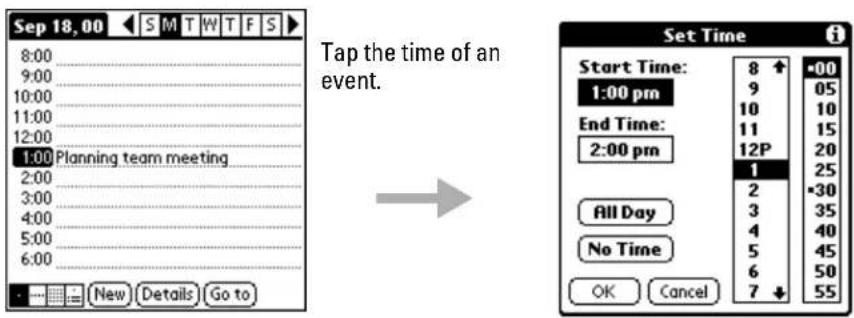
- Tap the appropriate hour and minute in the time columns on the right side of the dialog to set the Start Time.
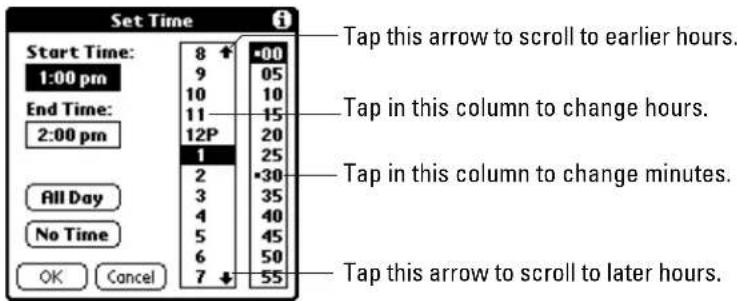
-
To schedule the event for the entire day, tap All Day.
-
To schedule a specific ending time, tap the End Time box. Tap the appropriate hour and minute in the time columns.
-
Tap OK.
To schedule an event for another day

-
Press the Date Book Key.
-
Select the date you want for the event by doing one of the following:
- Tap the day of the week you want to choose in the Date Bar at the top of the Date Book screen. Tap the left arrow to move to the previous week or the right arrow to move to the next week.

- Press the scroll up key to move to the previous day or the scroll down key to move to the next day.
- Tap Go To to open the Go to Date dialog. Select a date by tapping a year, month, and day in the calendar.
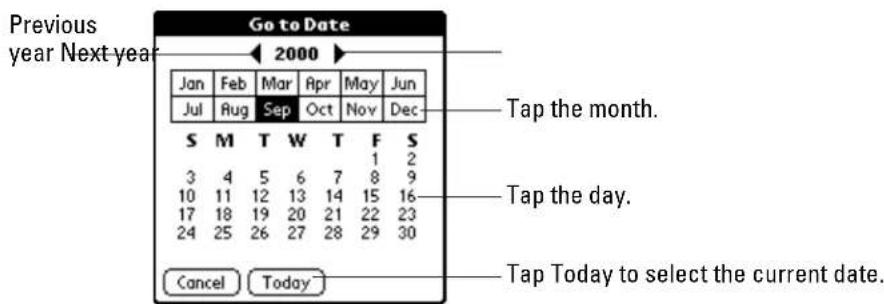
- After you locate the date, follow the steps in the previous section, "To schedule an event for the current day"
To schedule an untimed event
PHONE May be either on or off
FLIP Open
-
Press the Date Book
-
Select the date and Tap New.
-
Tap No Time.
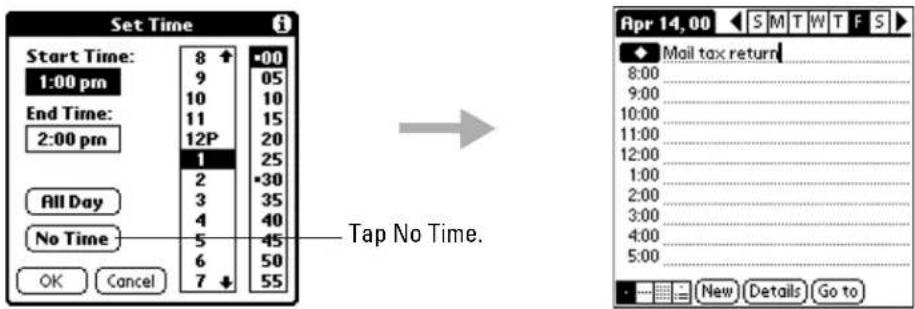
The cursor appears beside a diamond on the top line. The diamond indicates an untimed event for that day.
-
Enter a description for the event.
-
Tap a blank area on the screen to deselect the untimed event.
NOTE: If you create an event and decide later that it has no particular start or end time, you can easily change it to an untimed event. Tap the time of the event in the Date Book screen, tap No Time, and then tap OK.
To reschedule an event
PHONE May be either on or off
FLIP Open
-
Press the Date Book Day.
-
Tap the event you want to reschedule.
-
Tap Details to open the Event Details dialog for that event.
-
Tap the Time box. Select the new time.
-
Tap the Date box. Select the new date.
-
Tap OK to return to the Date Book screen.
Setting an alarm for an event
You can set an audible alarm to remind yourself of upcoming events. The alarm sounds even if the phone is turned off.
The default alarm setting is five minutes before an event, but you can change this time period to any number of minutes, hours, or days. When you set an alarm, appears to the far right of the event.
When the alarm tone sounds, a reminder message appears on the screen. If the phone is turned on, this message (including the event date or time) appears whether the flip is open or closed.
To set an alarm for an event

-
Press the Date Book
-
Tap the event to which you want to assign an alarm.
-
Tap Details to open the Event Details dialog for that event.
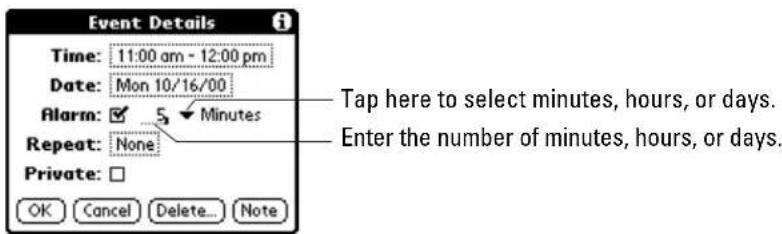
-
To activate the alarm, tap the Alarm check box.
-
Tap ▼ to select Minutes, Hours, or Days.
-
Enter any number from 0 to 99 (inclusive) as the numeric alarm setting.
-
Tap OK to return to the Date Book screen.
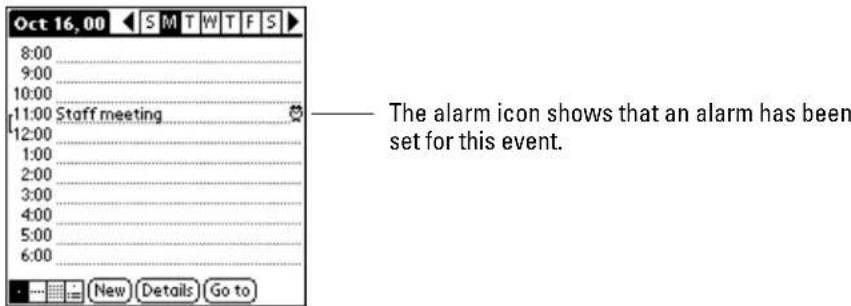
NOTE: If you set an alarm for an untimed event, the alarm sounds a tone at the specified number of minutes, hours, or days before midnight of that day. A reminder message remains on the screen until you tap OK.
Marking a private event
You can designate events as “private.” When you activate the Security features, the Kyocera smartphone hides all private entries. You must enter a password to see them.
To mark an event as private

- Press the Date Book 104.
- Tap the event you want to mark as private.
- Tap Details to open the Event Details dialog for that event.
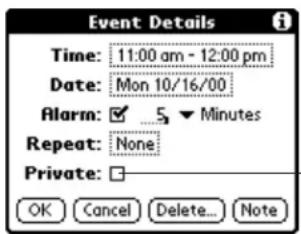
Tap here to make an event private.
- Tap the Private check box.
- Tap OK to return to the Date Book screen.
Scheduling repeating events
You can easily set up repeating events such as weekly meetings or birthdays. After you enter a repeating event, 📋 appears to the far right of the event.
To schedule a repeating event

- Press the Date Book Low.
- Enter a new event or tap anywhere on the text of an existing event you want to repeat.
-
Tap Details to open the Event Details dialog.
-
Tap Repeat to open the Change Repeat dialog.
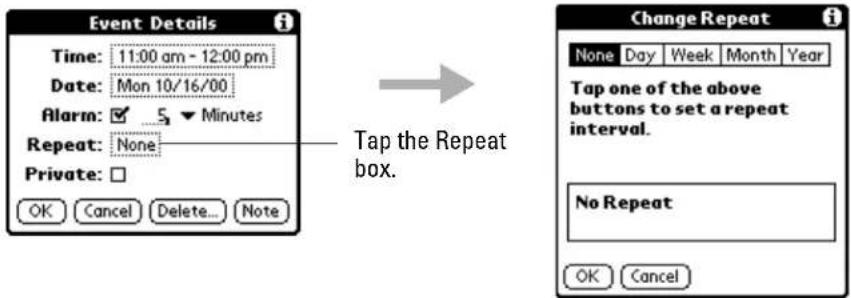
- Tap Day, Week, Month or Year in the Change Repeat dialog.
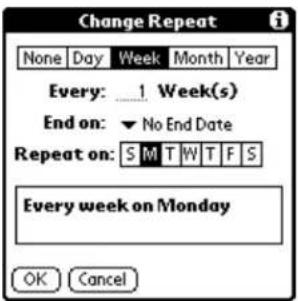
-
In the Every line, write how frequently the event repeats. For example, if you select Week and enter 2, the event repeats every other week.
-
To specify an ending date, tap the ▼ beside End. Tap Choose Date.
-
On the calendar, tap the end date.
-
Tap OK to activate your settings.
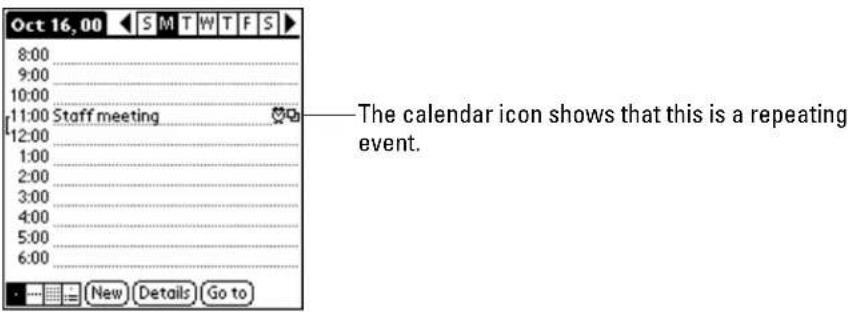
Considerations for repeating events
When you schedule or change a repeating event, be aware of the following:
■ If you change the start date, the Kyocera smartphone calculates the number of days you have moved the event and changes the end date to maintain the same duration.
■ If you change the repeat type (for example, daily to weekly), a new repeating event is created. Past occurrences are not changed.
- If you change the date and apply the change to all occurrences, the new date becomes the start date of the repeating event. The end date is adjusted to maintain the same duration.
■ If you change other repeat settings (such as time, alarm, or private) and apply the change to all occurrences, a new event is created. The start date is the day you made the changes. Past occurrences are not changed. - If you make a change to one occurrence of a repeating event (such as time), that occurrence no longer shows the Repeat icon.
Deleting an event
There are three ways to delete an event from the Date Book application. If you are deleting a single event, you can use any of these three methods. If you are deleting a repeating event, two of the methods allow you to choose which occurrences of the event you want to remove.
To delete a single event Use any of these methods:
- Erase the text.
■ Tap Delete in the Record menu.
■ Tap Delete in the Event Details dialog.
To delete a recurring event Use either of these methods:
■ Tap Delete in the Record menu.
■ Tap Delete in the Event Details dialog.
To delete an event by erasing the text
PHONE May be either on or off
FLIP Open
If you erase one instance of a recurring event, all instances of the event are removed.
- Press the Date Book 104.
- Tap anywhere in the text area of the event you want to delete.
- Drag the stylus through the text to highlight it.
- Draw the backspace stroke to erase the text.
To delete an event using the menus
PHONE May be either on or off
FLIP Open
You can choose to delete only one occurrence or all occurrences of the event.
-
Press the Date Book
-
Tap anywhere in the text area of the event you want to delete.
-
Tap the Menu icon.
-
From the Record menu, tap Delete Event.
If you have selected a repeating event, the Repeating Event dialog appears.
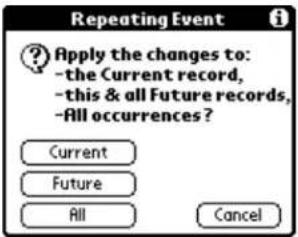
- Select which events you want to delete.
■ Tap Current to delete only the single event you selected.
- Tap Future to delete the event you selected and all future occurrences.
- Tap All to delete all occurrences, including those in the past.
- Tap OK in the Delete Event dialog to confirm your choice.
To delete an event using the Details dialog
PHONE May be either on or off
FLIP Open
You can choose to delete only one occurrence or all occurrences of the event.
-
Press the Date Book Key.
-
Tap anywhere in the text area of the event you want to delete.
-
Tap Details to open the Event Details dialog.
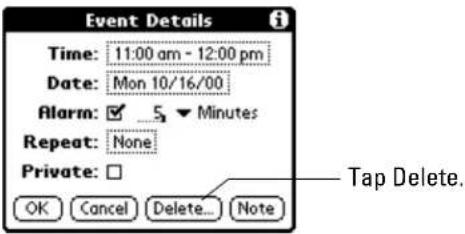
- Tap Delete.
If you have selected a repeating event, the Repeating Event dialog appears.
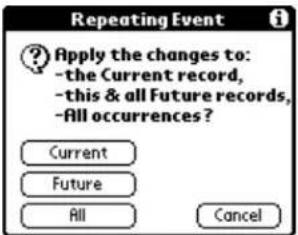
-
Select which events you want to delete.
-
Tap Current to delete only the single event you selected.
- Tap Future to delete the event you selected and all future occurrences.
-
Tap All to delete all occurrences, including those in the past.
-
Tap OK in the Delete Event dialog to confirm your choice.
Changing the Date Book view
In addition to displaying the calendar for a specific day, you can also view your Date Book by the week or month, and you can display a list of appointments.
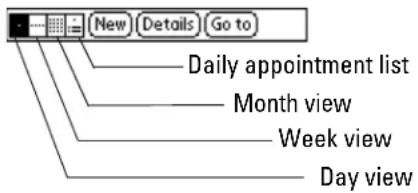
To toggle through the views
Press the Date Book key repeatedly to display the next view.
To display the current time
Tap the date in the Date Book title bar to display the current time.

After a few seconds, the title bar reverts to show the date.
To display and use Week view

-
Press the Date Book Low.
-
Tap the Week view box at the bottom of the screen.
The Week view shows a chart of your events for an entire week so you can quickly review your appointments and available time slots. In addition, the graphical display helps you spot overlaps and conflicts in your schedule.

- Tap the navigation controls to move forward or backward a week at a time, or to display details of an event. The Week view also shows untimed events and events that are before and after the range of times shown.
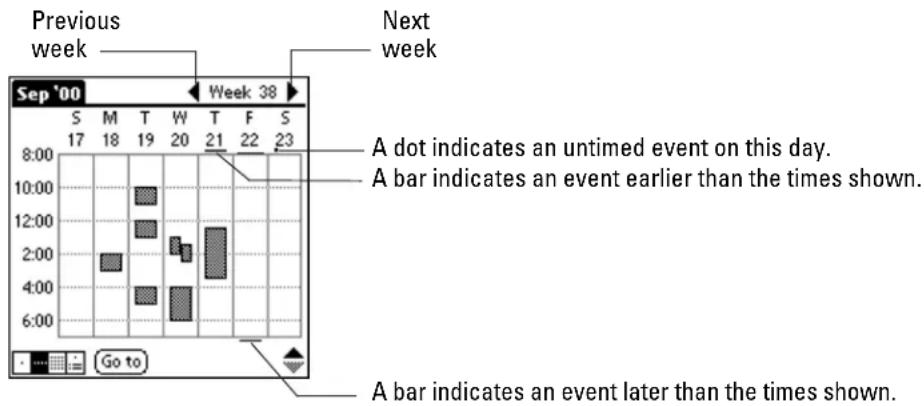
- Tap any of your events to show a description of the event.
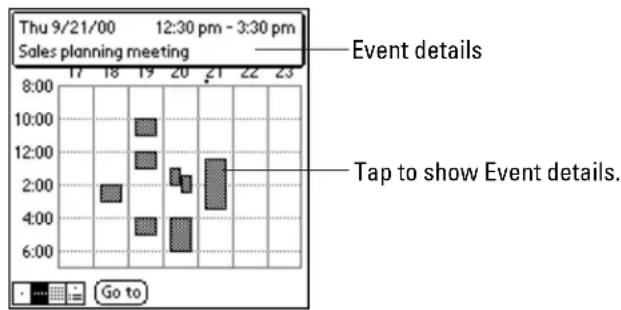
bar
| Time | Event details | Tap to show Event details | | :--- | :--- | :--- | | 17:00 | 2:00 | 4:00 | | 18:00 | 4:00 | 6:00 | | 19:00 | 8:00 | 4:00 | | 20:00 | 2:00 | 4:00 | | 21:00 | 2:00 | 8:00 | | 22:00 | 2:00 | 4:00 | | 23:00 | 2:00 | 4:00 |- To reschedule an event, tap and drag the event to a different time or day. You can tap a blank time on any day to move to that day and time. Or you can tap any of the days and dates that appear at the top of the Week View to move directly to that day without selecting an event.
NOTE: The Week View shows the time span defined by the Start Time and End Time in the Date Book Preferences settings. If you have an event before or after this time span, a bar appears at the top or bottom of that day's column. The ♦on-screen scroll arrows appear if your scheduled events go beyond the displayed time range.
Spotting event conflicts
With the ability to define specific start and end times for any event, it's possible to schedule events that overlap. In this case, any event conflict (time overlap) appears in the Week View as overlapping bars. The Day View displays bracketed bars to the left of the conflicting times.
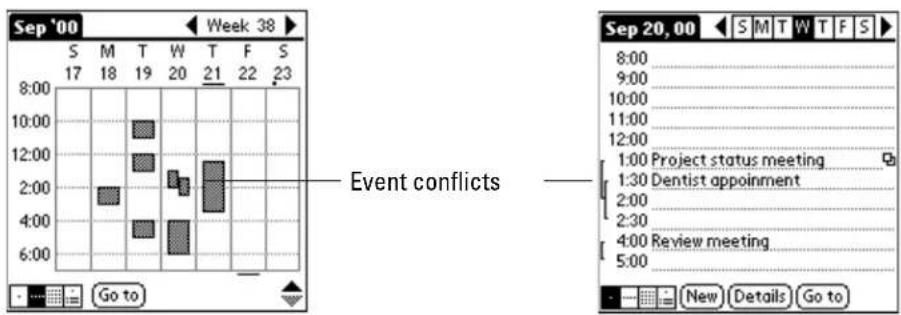
To display and use Month view
PHONE May be either on or off FLIP Open
-
Press the Date Book
-
Tap the Month view button at the bottom of the screen.

The Month view screen shows which days have events scheduled. Dots and lines in the Month view indicate events, repeating events, and untimed events.
-
Tap any day that appears in the Month View screen to move directly to the Day View screen for that day.
-
Tap the arrows at the top of the screen to move forward or backward a month.
-
Tap Go To to open the Date Picker and choose a different month.
-
When the Month View is on the screen, press the scroll up and scroll down keys to move between months.
NOTE: To modify the dots and lines that appear in the Month View, use the Options menu. See page 133.
To display the daily appointment list
PHONE May be either on or off
FLIP Open
- Press the Date Book Key.
- Select the day you want to see an appointment list for.
- Tap the Appointment box at the bottom of the screen.

The appointment list shows the scheduled events for the day.
- Tap the arrows at the top of the screen to move to the previous or next day.
Using the Date Book menus
This section explains the menu commands that are specific to the Date Book. See "Using menus" on page 59 for information about menu commands common to all applications.
Record menu
| New Event | Create an event. The Set Time dialog appears, where you can choose start and end times for the new event. If you do not enter start and end times, the event is untimed. |
| Delete Event | Remove an event from the Date Book. In the confirmation dialog, tap OK to delete the event or Cancel to keep it. You must tap an event before you use the Delete Event command.When you delete a recurring event, you have the choice of removing a single event only, the current and all future occurrences, or all occurrences.By default, the event is removed from the Date Book, but a copy is transferred to an archive file on your computer during your next HotSync operation. To remove the event completely, uncheck the Save archive copy on PC check box. |
| Attach Note | Create a note for the current event. |
| Delete Note | Delete the note attached to an event. In the confirmation dialog, tap OK to delete the note or Cancel to save it. |
| Purge | Remove events older than a certain time to conserve memory.By default, the events are removed from the Date Book, but copies are transferred to an archive file on your computer during your next HotSync operation. To remove the event completely, uncheck the Save archive copy on PC check box.The Purge command deletes repeating events if they end before the date that you activate the Purge command. |
| Beam Event | Beam the current event to another device with an infrared port. See "Beaming information" on page 91. |
Options menu
Font
Choose a font (text) style for your Date Book entries. See "Choosing fonts" on page 61.
Preferences
Set preferences for Date Book times and alarms.
Start/End Time sets the start and end times for the screen.
Alarm Preset automatically sets an alarm for each new event.
Alarm Sound controls the type of tone the alarm generates.
Remind Me defines how many times the alarm sounds. The choices are 1, 2, 3, 5, and 10 times.
Play Every defines how often the alarm sounds. The choices are 1, 5, 10, and 30 minutes.
Display Options
Change the Date Book's appearance and the events that appear.

Show Time Bars turns on time bars in the Day View. Time bars show the duration of events and illustrate event conflicts.
Compress Day View controls how times appear in the Day View. If you remove the check mark, all time slots appear. If you check it, start and end times for each event appear, but blank time slots at the bottom of the screen disappear.
Check any or all of the Month View Settings to show timed, untimed, or daily repeating events in the month view.
Phone Lookup
Search for a phone number and paste it into a Date Book event. See "Looking up information on your phone" on page 42.
About Date Book
Show version information for the Date Book application.
The Expense application enables you to keep track of your expenses and then transfer the information to a spreadsheet on your computer.
Using this application, you can keep records of your expenses (including dates, amounts spent, payment methods, categories, and other details) that you can then transfer to a Microsoft Excel spreadsheet (version 5.0 or later) on your computer. (Please note that Microsoft Excel is not included with the Kyocera smartphone package.)
In this chapter
■ Creating an Expense item page 135
■ Entering or modifying receipt details page 136
■ Printing expense reports page 140
■ Transferring your data to an Excel spreadsheet page 141
■ Sample expense report templates page 143
■ Customizing the templates page 147
■ Using the Expense menus page 153
Creating an Expense item
Using the Expense application, you can record the date, expense type, and amount spent on an item; sort your expense items into categories; and add other information.
To create a new expense item
PHONE May be either on or off
FLIP Open
-
Tap to view the Applications Launcher.
-
Tap to display the Expense List screen.
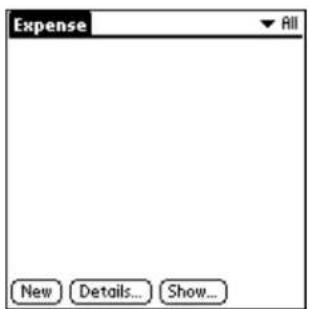
- Tap New.
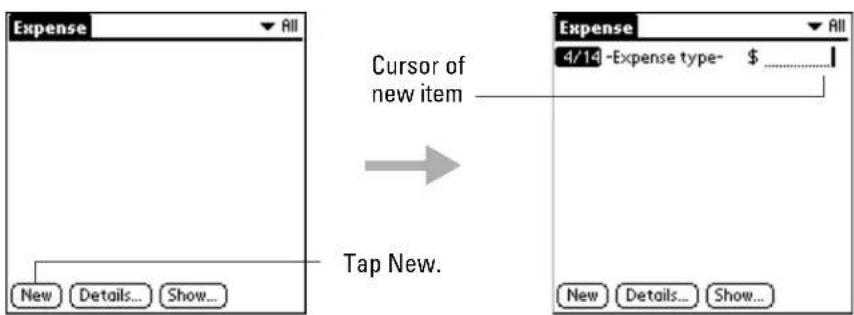
-
Enter the amount of the expense.
-
Tap Expense type and select a type from the pick list.
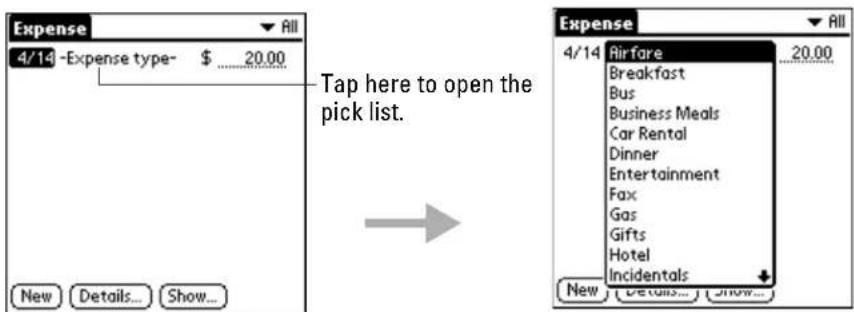
As soon as you select an expense type, your Kyocera smartphone saves your entry. If you do not select an expense type, it does not save the entry.
NOTE: A quick way to create a new expense item is to make sure that no expense item is selected in the list, write the first letter(s) of the expense type, and then write the expense amount. The automatic fill feature completes the information. See "Options Menu" on page 154.
To change the date of an expense item
PHONE May be either on or off
FLIP Open
Initially, expense items appear with the date you enter them on the Kyocera smartphone. You can use the Expense application to change the date associated with any expense item.
- Tap to view the Applications Launcher.
- Tap to display the Expense List screen.
- Tap the expense item you want to modify.
- Tap the date of the selected item.
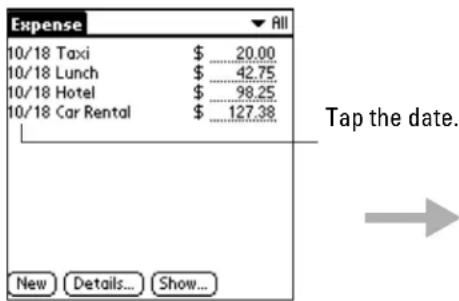
- Tap the date you want to use for the expense item.
Entering or modifying receipt details
To enter or change the details for a receipt
PHONE May be either on or off
FLIP Open
- Tap to view the Applications Launcher.
- Tap to display the Expense List screen.
- Tap the expense item you want to modify.
4. Tap Details.
5. Select any of the following options:
| Category | Select a category for this item. Two sample categories (New York and Paris) are included to show how you might sort your expenses by business trips. Choose Edit Categories from the pick list to create new categories or change existing ones. |
| Type | Select the expense type. |
| Payment | Set the payment method. If the item is prepaid (such as airline tickets supplied by your company), choose Prepaid to place the expense correctly in the expense report. See “Transferring your data to an Excel spreadsheet” on page 141. |
| Currency | Set the type of currency for this item.To change the default currency, see “Options Menu” on page 154. You can also display up to four other common types of currency. See “To customize the Currency pick list” on page 138. |
| Vendor and City | Record the name of the vendor associated with the expense and the city where the expense was incurred. For example, a business lunch might be at Rosie's Cafe (Vendor) in San Francisco (City). |
| Attendees | Display the Attendees screen, which resembles a memo in the Memo Pad. Use this screen to list the people who attended the event or to make any other notes about the expense. |
- Tap Lookup to display the names and companies of people in your Address Book.
- Tap OK to activate your selections.
To customize the Currency pick list
PHONE May be either on or off
FLIP Open
-
Tap to view the Applications Launcher.
-
Tap to display the Expense List screen.
-
Tap an expense item.
-
Tap Details.
-
In the Receipt Details dialog, tap the Currency pick list.
-
Tap Edit currencies.
-
Tap each Currency pick list to choose the country or region whose currency you want to display on that line.
-
Tap OK to activate your selections.
If the correct currency is not in the list of countries, you can create your own country and currency symbol. See the next section, "Setting up a custom currency symbol."
Setting up a custom currency symbol
To define a custom currency symbol
-
From the Expenses screen, tap to open the Expenses menu.
-
Choose Custom Currencies from the Options menu.

- Tap one of the Country boxes to open the Currency Properties dialog.
-
Enter the name of the country and the symbol you want to appear in the Expense application. Tap OK.
-
Tap OK to close the Custom Currencies dialog.
NOTE: To use your custom currency symbol as the default for all Expense entries, choose the symbol in the Preferences dialog. To use your custom currency symbol only for particular expense items, choose the symbol in the Receipt Details dialog associated with those items.
To set the Show options
PHONE May be either on or off
FLIP Open
The Show options set the sort order of your expense items, as well as identifying how mileage and currency should be displayed.
-
Tap to view the Applications Launcher.
-
Tap to display the Expense List screen.
-
Tap Show.
- Select any of the following options:
Sort By Sort the Expense entries by date or expense type.
Distance Display Mileage entries in miles or kilometers.
Show Currency Show or hide the currency symbol in the expense list.
- Tap OK.
Printing expense reports
After you enter your expenses in the Expense application on your Kyocera smartphone, you can view and print the data on your computer using the Kyocera smartphone Desktop software and Microsoft Excel (version 5.0 or later).
NOTE: Please be aware that Microsoft Excel is not included with the Kyocera smartphone.
The procedures in this section assume that you have installed the Kyocera smartphone Desktop. If you have not yet installed this software, see "Installing Kyocera smartphone Desktop software" on page 71.
To print your expense report
-
Perform a HotSync operation to transfer your latest Expense data to your computer. For details, see "Synchronizing data using the sync cradle" on page 74.
-
On the computer, click Expense in the Kyocera smartphone Desktop to open Microsoft Excel and the Expense Report configuration dialog. If you open Expense from the Start menu (instead of the Kyocera smartphone Desktop), you must first choose the user name.
-
Click the expense category that you want to print.

Shift+click to select multiple categories. To view the expenses for all of your Expense categories, click All in the Categories area.
-
To define an end date for the report, enter the date in the End Date area. If you do not specify an end date, all expense entries for the selected categories will appear—up to the date of the last HotSync operation.
-
Click Print to display the expense report in the Print Preview window.
- Click Print in the Microsoft Excel window to print your expense report.
Transferring your data to an Excel spreadsheet
If you have Microsoft Excel (version 5.0 or later), you can transfer expense data from your Kyocera smartphone to an Excel spreadsheet. The Kyocera smartphone Desktop software comes with several Excel templates you can use as they are or customize.
NOTE: Please be aware that Microsoft Excel is not included with the Kyocera smartphone.
To view your Expense data in a Microsoft Excel spreadsheet
-
Perform a HotSync operation to transfer your latest Expense data to your computer and make it available to the Kyocera smartphone Desktop.
-
Click Expense in the Kyocera smartphone Desktop to open Microsoft Excel and the Expense Report configuration dialog. If you open Expense from the Start menu (instead of the Desktop), choose the user name.

-
Click the expense category that you want to use. Shift+click to select multiple categories. To view the expenses for all categories, click All.
-
To define an end date for the report, enter the date in the End Date area. If you do not specify an end date, all expense entries for the selected categories appear up to the date of the last HotSync operation.
-
Click Create to open a Microsoft Excel spreadsheet containing your data.
You can enter information, make formatting changes, save, and print the file in the normal manner.
Sample expense report templates
The Kyocera smartphone Desktop software comes with several Excel templates you can use or customize. They are stored in the Templates folder (the same folder as the Desktop application, usually C:\Palm).
Sample 1—
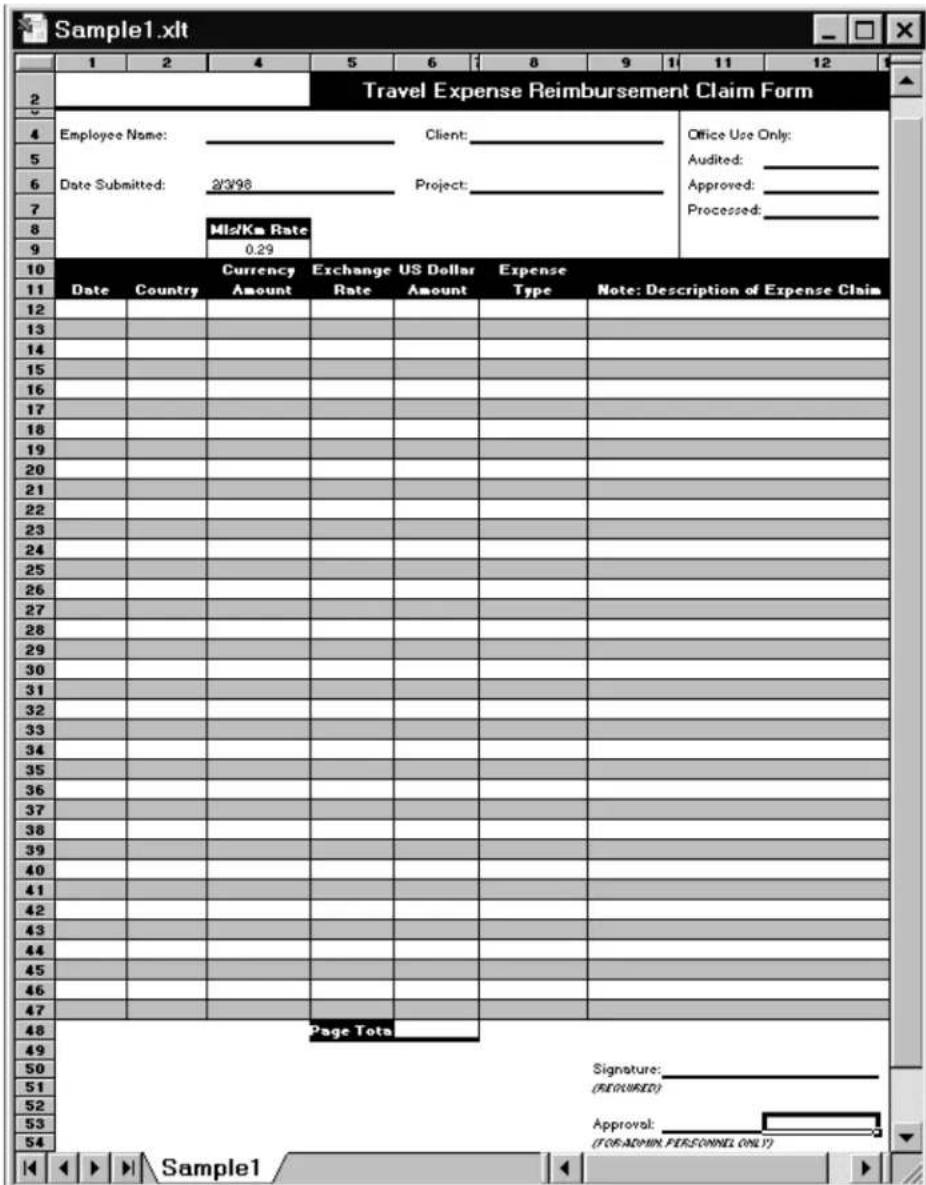
Sample 2—
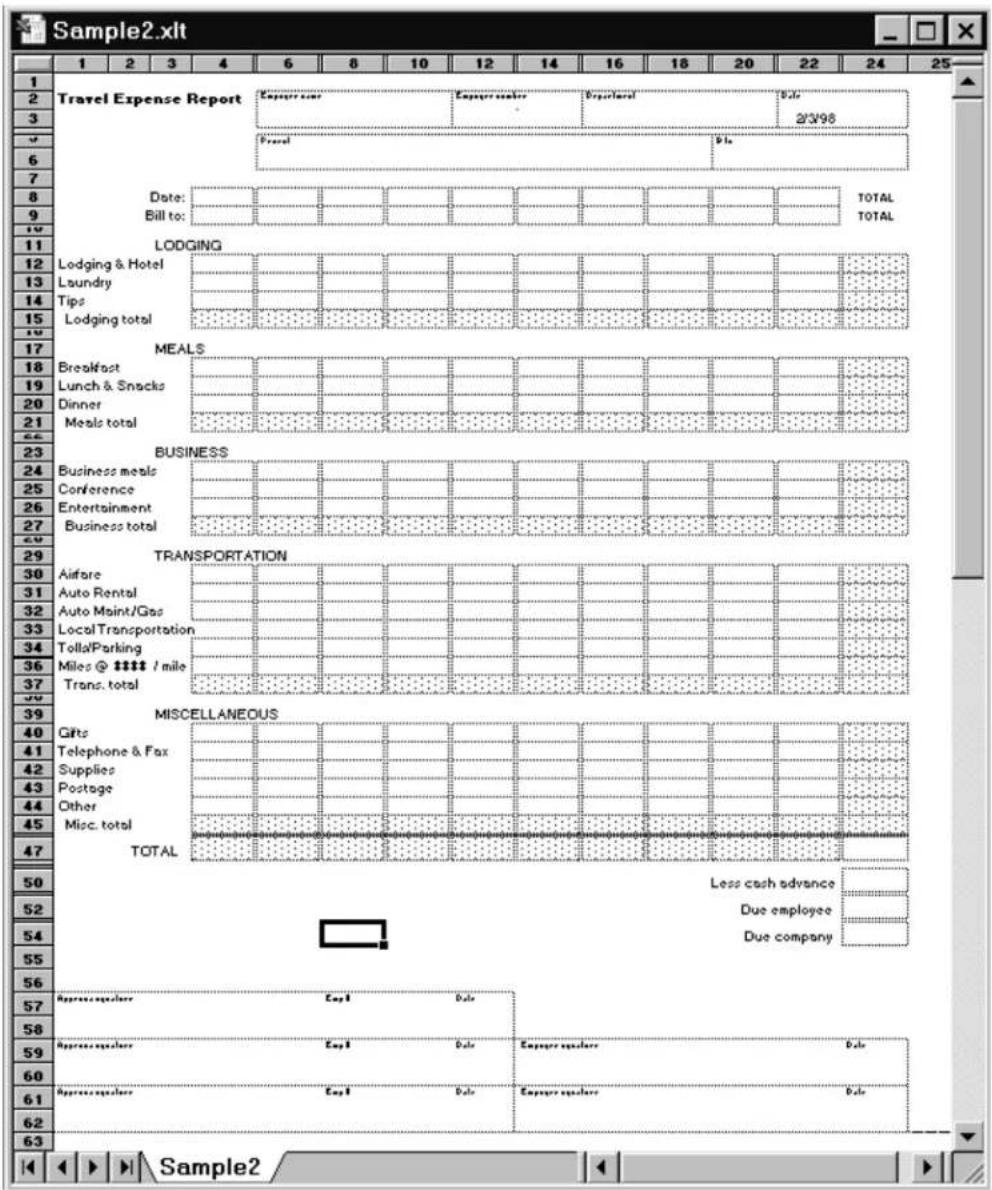
Sample 3—
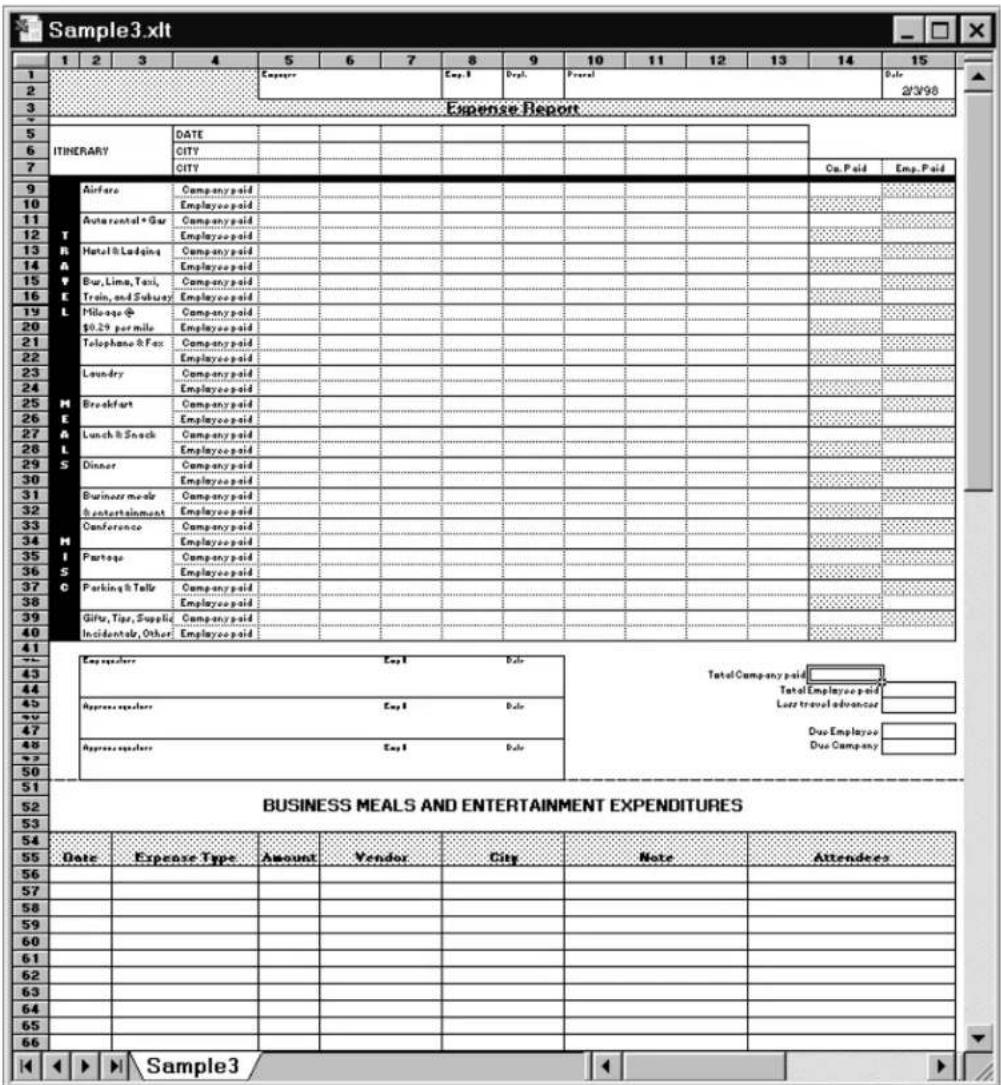
Sample 4—
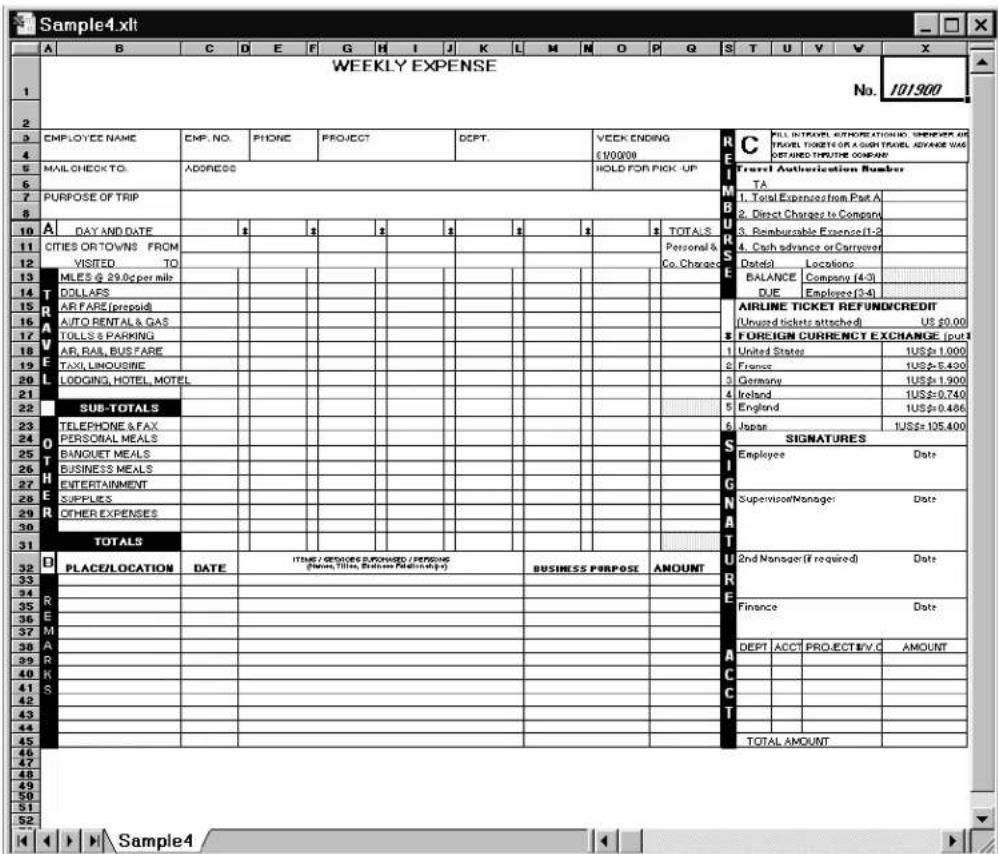
Customizing the templates
If you wish, you can customize the expense report templates. The procedures in this section assume that you are familiar with Microsoft Excel or a similar spreadsheet application. If you are not, consult your company's Information Services department or an experienced user.
About mapping tables
Before creating or modifying a template, it's important to understand how the Kyocera smartphone Desktop Expense application moves data from your Kyocera smartphone into a Microsoft Excel spreadsheet. Each Expense item represents a group of related data. The following data can be associated with an expense item:
Category
Date
- Expense Type
■ Amount
■ Payment Method
■ Payment Currency
■ Vendor
City
■ Attendees
Note
When you perform a HotSync operation, the Expense data is stored on your computer in a file named Expense.txt. When you open the Expense application in the Desktop, an Excel macro populates an expense template with your data based on the rules specified in a spreadsheet file named Maptable.xls.
The Maptable.xls file is an editable spreadsheet that functions as a mapping table. The mapping table guides the Excel macro in extracting the Expense data; it defines how large the spreadsheet is and provides the data-cell layout.
IMPORTANT: Be sure to read pages 147–152 in their entirety before making any changes to the Maptable.xls file. These pages include detailed information on the layout of the report template. If you are not certain how to make these changes, consult your company's Information Services department or an experienced user.
To customize a sample Expense Report template
- Make a backup copy of the contents of the Templates folder.
- Double-click the template you want to modify. It opens in Microsoft Excel.
-
Make any changes you want to the names and information in the sample template. Be aware of the following restrictions:
-
Do not insert rows or columns in the sample template. Doing so causes errors. To move cells to a different location or add or delete rows or columns, you must make changes to the Maptable.xls file.
- You can insert your own company logo without changing the Maptable.xls file. However, if you change the file name, you need to make a corresponding change in the Maptable.xls file.
-
You can rename cells without changing the Maptable.xls file provided that the expense type corresponds to the Kyocera smartphone data. For example, if you change “Snack” to “Munchies,” all items entered on the Kyocera smartphone as “Snack” map to the cell(s) labeled “Munchies.”
-
Choose Save As from the File menu. Click the Save as type drop-down list and choose Template (*.xlt).
-
Navigate to the Templates folder in the Palm directory.
-
If you do not need to change the Maptable.xls file, save the template file with its original file name (e.g., Sample2.xlt).
-
If you do need to change the Maptable.xls file, give your modified template a unique name. Be sure to use the .xlt file suffix.
-
Click Save to save your modified template.
NOTE: If you need to modify the Maptable.xls file, you must do so before you can use the modified template with your Expense data. See "Programming the mapping table" on page 149. Read all of the sections of this appendix before making changes to the Maptable.xls file.
Determining the layout of the expense report
Labels—There are two kinds of labels you must define for your report: day/date and expense type. Each kind of label can be either Fixed or Variable. A Fixed label means that the label always appears as a header at the beginning of a row or column. If a label is not Fixed, it is variable. Examples of both Fixed and Variable labels appear in the sample expense templates.
Sections—A section is an area of the report that has common row and column formatting. Most expense reports have more than one section.
Because your Expense data maps to row and column areas of your final report, different Sections require different definitions. To create additional Sections with different mapping, you add corresponding lines to the mapping table file named Maptable.xls. (See “Programming the mapping table” on page 149.)
If a section contains cells for prepaid (company paid) expenses, you must create a line in the mapping table for "prepaid." This counts as an additional section in the mapping table. The only difference between the prepaid section and the non-prepaid section is the row/column numbers for the expense type.
Analyzing your custom expense report
If you already have a custom Excel expense report, you can use it with a modified mapping table. However, before you can create a Maptable.xls file that corresponds to your custom Expense Report, you must first analyze the characteristics of your report.
Before you begin a custom mapping table
-
Print a copy of your custom expense report. Activate the Row and Column Headings option in the Sheet settings of the Page Setup command so you can quickly determine the size of the Section(s), as well as the numbers for the start rows and columns.
-
On the printed copy, identify the data Sections. A Section is an area of data with common row and column formatting. A yellow highlighter marking pen can make it easy to see the Sections. Your custom Expense Report can contain any number of Sections, and the same data can be repeated in any Section.
-
On the printed copy, identify the Labels that apply to each Section. Each Section can have only one kind of Fixed or Variable Label for rows and only one kind of Fixed or Variable Label for columns.
-
Place a copy of your custom Expense Report in the Templates folder in the Palm directory. Change the file name so it has the file extension .xlt (which defines it as a Microsoft Excel Template). Make a note of the exact file name so it can be defined in the mapping table file.
Programming the mapping table
Once you have analyzed the components of your report, you can program the mapping table to fill the report with data from the Kyocera smartphone.
To program a new custom mapping table
- Open a copy of the Maptable.xls file in Microsoft Excel.
This file is located in the same folder as the Desktop application (usually C:\Palm). Make a backup copy of this file before you make your modifications.
-
Scroll to where you find the name of the original template that you chose for your modifications. The template name is in column B of the Maptable.xls file, next to the cell labeled "Template Name." If you did not modify an existing template, move to any table in the Maptable.xls file.
-
Select all the rows associated with the template name. To select the rows, click and drag on the row numbers (left side), so they appear highlighted.
| 1 | 2 | 3 | 4 | 5 | |
| 5 | Template Name: | SAMPLE1.XLT | |||
| 6 | Section1 | ROW | |||
| 7 | Fixed Label | Variable Label by | |||
| 8 | Day/Date | Expense Type | Day/Date | Expense Type | |
| 9 | X | ||||
| 10 | |||||
| 11 | |||||
| 12 | |||||
| 13 | Template Name: | SAMPLE2.XLT | |||
| 14 | Main | ROW | |||
| 15 | Fixed Label | Variable Label by | |||
| 16 | Day/Date | Expense Type | Day/Date | Expense Type | |
| 17 | X | ||||
| 18 | Business&Entertainment | X | |||
| 19 | |||||
| 20 | |||||
| 21 | |||||
| 22 | Template Name: | SAMPLE3.XLT | |||
| 23 | ROW | ||||
| 24 | Fixed Label | Variable Label by | |||
| 25 | Day/Date | Expense Type | Day/Date | Expense Type | |
| 26 | Main (PREPAID) | X | |||
| 27 | Main | X | |||
-
Choose Copy from the Edit menu.
-
Scroll down to a blank area of the Maptable.xls file (below the rows used for Sample4.xlt), and click on a row number to select a blank row.
-
Choose Paste from the Edit menu. A copy of the rows you selected in step 3 is pasted into the Maptable.xls file.
-
Name the table. In the cell to the right of the cell labeled Template Name, enter the exact file name of your custom Expense Report template.
-
Define the number of Sections.
Each row in a table defines how the Kyocera smartphone data will be placed in a Section of your custom Expense Report. Note that the prepaid portion of a section has its own row and counts as a separate section for map table purposes, even though it is not a separate section in your template.
| 22 | Template Name: | SAMPLE3.XLT | |
| 23 | Main (PREPAID) | ROW | |
| 24 | Fixed Label | ||
| 25 | Day/Date | Expense Type | |
| 26 | × | ||
| 27 | Main | × | |
| 28 | Business Meals & | Entertainment | |
| 29 | Mileage Log | ||
Add or delete rows as necessary so the total number of rows corresponds to the number of Sections in your custom Expense Report. To clear all of the existing
settings in a row, click to select the row and press Ctrl+Delete. Name each row to correspond to a Section of your custom Expense Report.
- In the yellow section of the table, determine the Label settings.
| SAMPLE1.XLT | |||||||
| ROW | COLUMN | ||||||
| Fixed Label | Variable Label by | Fixed Label | Variable Label by | ||||
| DayDate | Expense Type | DayDate | Expense Type | DayDate | Expense Type | DayDate | Expense Type |
| X | X | ||||||
- Determine whether the Rows will contain expense or date information and place an x in the appropriate cell. This setting also defines whether the label is Fixed or Variable. You can place only one x in the Row section (columns 2–5).
- Determine whether the Columns will contain expense or date information and place an x in the appropriate cell. This setting also defines whether the label is Fixed or Variable. You can place only one x in the Column section (columns 6–9).
- In the green columns (10–13), define the dimensions of the Section.
| # of Rows | # of Columns | Start Row | Start Column |
| 36 | 12 | 1 | |
| # of Rows | The total number of rows in the Section, excluding any header or total rows (only the rows where data will be placed). |
| # of Columns | The total number of columns in the Section, excluding header or total columns (only the columns where data will be placed). |
| Start Row | The number of the first row of the Section that will be filled with the Kyocera smartphone data. |
| Start Column | The number of the first column of the Section that will be filled with the Kyocera smartphone data. |
- In the light blue columns (14–17), define the Dates and Intervals.
- In the Date cell, enter the row or column number where date information will be placed.
| Date | Intervals Between | ||
| Date | Dates | Start day | Day |
| 1 | 0 | ||
- In the Dates cell, enter the number of blank columns (or rows) separating the date fields. If there are no blank columns (or rows) between date entries, leave this number set to zero.
- In the Start Day cell, enter a three-character abbreviation for the day that starts the expense reporting period (for example, Sun or Mon).
- In the Day cell, enter the row or column number where all the day information will be placed. If the dates are in a row, enter the row number. If the dates are in a column, enter the column number.
- In the light purple columns (18–19), enter yes if the Section is in list format and no if it is not.
For sections in list format: In the Expense Type cell, enter the number of the row or column where
| Listing Format | Expense Type |
| YES | 8 |
the expense description will be placed. Expense amounts can be entered in several different columns or rows. Expense type labels must all appear in the same column.
- In the aqua columns (20–48), enter the row or column numbers for the expense types that appear in the Section.
| Expense Types | |||||
| Airfare | Breakfast | Bus | Business Meals | Car Rental | Dinner |
| 4 | 4 | 4 | 4 | 4 | 4 |
Note that the same row or column number can be used more than once. For example, meals might encompass breakfast, lunch, dinner, and snacks.
-
Complete the table. All of the remaining columns (49–57) are used to define the column or row number that corresponds to the description.
-
Mark a Section for prepaid expenses (yellow column). If a row in the map table is for prepaid (company paid) expenses, type yes in the cell on that Section's row. Type no in all cells that do not pertain to prepaid expenses.
-
Repeat steps 9–15 for each Section in your custom Expense Report.
| 57 |
| PrePaid |
| NO |
| YES |
| NO |
- In the magenta section, map the Expense Report Options dialog. The Expense Report Options dialog has five fields where you can fill in data for the header of
| Employee Name | Department | ||
| Header1Row | Header1Col | Header2Row | Header2Col |
| 2 | 5 | 2 | 9 |
your report. Use this section to specify the row and column on your template where this information will be mapped. Fill in only one row. If the item does not appear on your template, leave these cells blank.
Using applications other than Microsoft Excel
You can use applications other than Microsoft Excel (such as Lotus ^® 1-2-3 ^® or Corel ^® Quattro ^® Pro) to open and manipulate Expense data on your computer. The data file (named Expense.txt) is stored in the Expense folder within the folder containing Kyocera smartphone user data. The data is in tab-delimited format.
Expense file details
The Expense.txt file contains four groups of data. It will be easier to see these four distinct groups of data if you open the file with a spreadsheet application.
| Trips | Shows the number of Expense application categories and lists each one followed by an “end” statement. |
| Currency | Shows how many currencies were used for the Expense data and lists the countries that correspond to that currency. |
| Trip | Shows the number of expenses by category and lists the expenses for each category. |
| Expenses | Shows the total number of expenses and lists them chronologically. |
Using the Expense menus
This section explains the menu commands in the Expense application. See “Using menus” on page 59 for information about menu commands that are common to all applications.
Record Menu
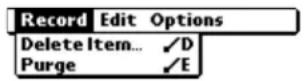
| Delete Item | Delete an expense item. You must tap the item you want to delete before Delete Item appears in the menu. The item is removed from the phone, but a copy is transferred to an archive file on your computer during your next HotSync operation. To remove the item completely, uncheck the Save archive copy on PC check box. |
| Purge | Conserve memory by deleting expense categories you no longer use. An alert dialog prompts you to confirm that you want to purge all records from the selected category. |
Options Menu
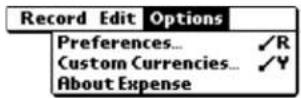
Preferences
Set the automatic fill feature and the default currency symbol.
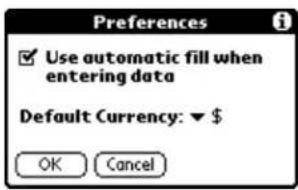
Use automatic fill to select an expense type by writing its first letter in the Graffiti writing area.
Default currency sets the default currency symbol for the Expense application.
Custom Currencies
Define additional currency symbols for the Expense application. Use this command only if the symbol you need is not available in the Currency pick list. (See "Setting up a custom currency symbol" on page 138.)
About Expense
View version information for the Expense application.
The Memo Pad provides a place to quickly jot down information. You can assign categories to these memos, beam them to other devices with infrared ports, and synchronize them to your computer. Once the memos have been synchronized to your computer, you can open them in the Kyocera smartphone Desktop and in many word processors.
In this chapter
■ Creating memos page 156
■ Reviewing and editing memos page 156
■ Deleting a memo page 159
■ Using Memo Pad menus page 160
Creating memos
A memo can contain up to 4,000 characters; the number of memos you can store is dependent only on the memory available on your Kyocera smartphone.
To create a memo
PHONE May be either on or off
FLIP Open
- Press the Memo Pad
The Memo List shows the first line of every memo you have created.
- Tap New to create a new memo.
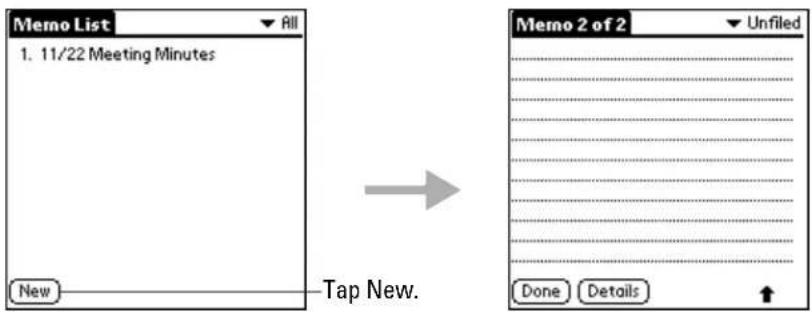
If you just begin writing in the Graffiti writing area while the Memo List screen is open, a new memo is automatically created.
-
Enter the text you want to appear in the memo. The first letter is automatically capitalized. Write (the carriage return stroke) to move down to new lines in the memo.
-
When you have finished, tap Done to return to the Memo List screen.
Reviewing and editing memos
Each time you create a memo, the first line of the memo appears in the Memo list screen. This makes it easy to locate and review your memos.
To review the contents of a memo
PHONE May be either on or off
FLIP Open
-
Press the Memo Pad
-
On the Memo list, tap the memo you want to look at.
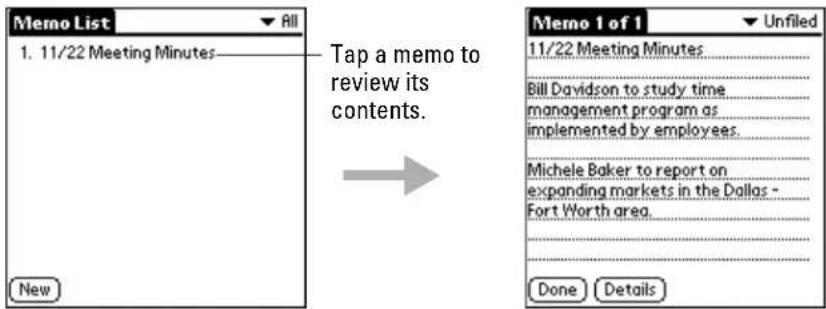
-
Review or edit the text in the memo.
-
Tap Done to save your changes.
To select a sort option

You can sort your memos alphabetically or in any order that you want.
-
Press the Memo Pad
-
Tap to open the Memo Pad menus.
-
From the Options menu, tap Preferences.
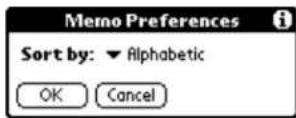
-
From the Sort pick list, select Manual or Alphabetic.
-
Tap OK to activate your setting.
To rearrange your memos manually

You can manually move the memos around in the Memo list. The sequence you create by moving memos manually is used on the Kyocera smartphone only. It is not transferred to the Kyocera smartphone Desktop. The memos on your Desktop remain in alphabetical order.
-
Press the Memo Pad
-
Tap to open the Memo Pad menus.
-
From the Options menu, tap Preferences.
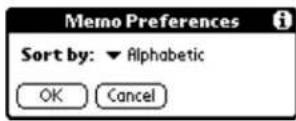
- From the Sort pick list, select Manual.
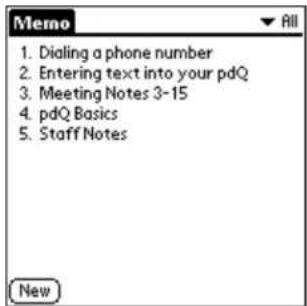
- Locate the memo you want to move. Tap and drag it to a new location in the list. When you lift the stylus from the screen, the memo appears in its new location.
Choosing a memo category
Categories are used to file individual memos into groups for easy review. You can assign and edit categories by using the Categories pick list (in the upper-right corner of the screen) or the Details dialog. See "Using categories" on page 62 for a complete description of categories.
Marking a private memo
You can designate any memo as "private." When you activate the Security features, the Kyocera smartphone hides all private entries. You must enter a password to display them on the screen.
To mark a memo as private

-
Tap the memo you want to mark as private to display it on the screen.
-
Tap Details.
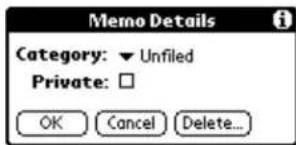
-
Put a check mark in the Private check box.
-
Tap OK.
Beaming a memo
To beam a memo
PHONE May be either on or off
FLIP Open
-
Press the Memo Pad
-
On the Memo list, open the memo you want to beam.
-
Tap to open the Memo Pad menus.
-
To beam one memo, tap Beam Memo from the Record menu.
-
To beam all the memos in the current category, tap Beam Category from the Record menu.
NOTE: Your phone is shipped with the Beam feature disabled to save battery power. To turn it on, see "Setting General preferences" on page 204.
Deleting a memo
There are three ways to delete a memo—simply delete the text of the memo, use the Menu command, or use the Details dialog.
To delete a memo by erasing the text
PHONE May be either on or off
FLIP Open
-
Press the Memo Pad Key.
-
On the Memo list, open the memo you want to delete.
-
Drag the stylus through the text to highlight it.
-
Draw the backspace stroke to erase the text.
To delete a memo using the menus
PHONE May be either on or off
FLIP Open
-
Press the Memo Pad key.
-
Tap anywhere in the memo you want to delete.
-
Tap to open the Memo Pad menus.
-
From the Record menu, tap Delete Event.
To delete a memo using the Details dialog
PHONE May be either on or off
FLIP Open
-
Press the Memo Pad
-
On the Memo list, open the memo you want to delete.
-
Tap Details.
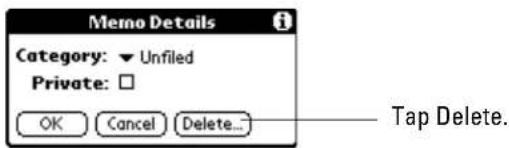
-
Tap Delete.
-
In the Delete Memo dialog, tap OK.
Using Memo Pad menus
The Memo Pad includes menu commands to make it fast and easy to perform common file and editing tasks. See “Using menus” on page 59 for information about menu commands common to all applications.
Record menu
The commands on the Record menu vary, depending on which screen is open.
Memo List Memo screen
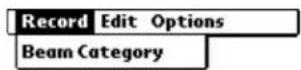

Delete Memo Delete the current memo. In the confirmation dialog, tap OK to delete the memo or tap Cancel to keep the memo.
By default, the memo is removed from the Memo List, but a copy is transferred to an archive file on your computer during your next HotSync operation. To remove the memo completely, uncheck the Save archive copy on PC check box.
Beam Memo Beam the current memo to another device with an infrared port.
Beam Category Beam all memos in the current category to another device with an infrared port.
Options menu
The commands on the Options menu vary, depending on what screen is open.
Memo List Memo screen
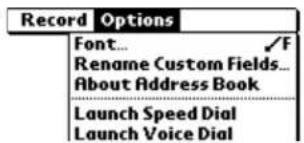
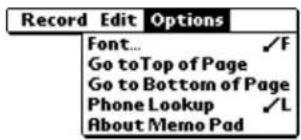
| Font | Choose a font (text) style for your memos. See “Choosing fonts” on page 61. |
| Go to Top of Page | Move to the top (first) line of the memo. |
| Go to Bottom of Page | Move to the bottom (last) line of the memo. |
| Phone Lookup | Activate the Phone Lookup feature. See “Using Phone Lookup” in “Installing applications” on page 66. |
| Preferences | Open the Preferences dialog where you can set up the sor order for your memos. |
| About Memo Pad | Show version information for the Memo Pad. |
Using Messages, you can receive voice mail and send and receive SMS (Short Message Service) text messages on your Kyocera smartphone. The Messages application can hold up to 200 incoming messages, in addition to messages you have saved.
In this chapter
■Setting up the Messages application, page 163
■ Checking your messages, page 164
■ Erasing messages, page 167
■ Setting preferences, page 169
Setting up the Messages application
VOICE MAIL NOTE:
Your phone service provider should give you detailed instructions for checking voice messages. Please read those instructions or contact your service provider if you have trouble connecting to your voice mail.
TEXT MESSAGE NOTE:
Text messaging service must be available from your phone service provider for this feature to work. If it is, they will give you more information about sending and receiving text messages. Please read that information or contact your phone service provider if you have trouble using text messaging.
To use Messages, you must first set up a voice mail account with your service provider. Once you have this account, get the appropriate phone number from your service provider and enter it in the Phone Preferences screen.
To enter the phone number for your voice mail
PHONE May be either on or off
FLIP Open
- Tap to view the Applications Launcher.
- Tap to open the last Preferences screen you used.
- Tap the pick list in the upper-right corner and select Phone.
- If the phone number of your voice mailbox does not already appear in the Voice Mail field, tap the Voice Mail text box.
The Voice Mail screen appears.
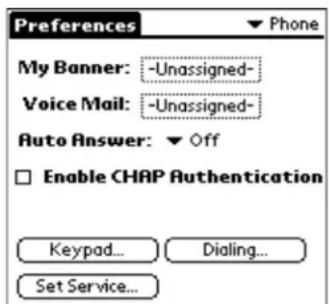
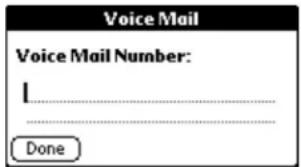
- Write the phone number used to call your voice mailbox. This phone number is assigned by your telephone service provider. If you are not sure what number to enter, contact your service provider.
- When you have finished, tap Done.
Checking your messages
When you receive voice mail or a text message, the LED light on the front of the Kyocera Smartphone flashes red five times, the backlight turns on, and the envelope icon appears on the screen. If you are talking on the phone, a short beep indicates that you have received a message.
You can check your messages with the flip open or closed. However, to respond to messages or create your own messages, the flip must be open.
To check your messages (with the flip closed)

1. Press the Messages

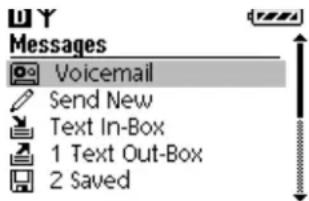
-
Press the shuttle up or down. When the type of message you want to check is highlighted, press the shuttle in.
-
Voicemail—Hear your voice mail messages. (For voice mail messages, the Kyocera Smartphone dials the voice mail number you set in the Phone Preferences panel. See Setting Phone preferences, page 206.)
-
Send New—Compose a new message to Send.
■ Text In-Box—View text messages you have received.
■ Text Out-Box—View text message you have sent.
■ Saved—View text messages you have saved. -
Press the shuttle up or down to scroll through the messages. Press the shuttle in to see more detail about a message.
- To reply to a message, press which the message is bold.
If the message includes a phone number, the Kyocera Smartphone connects to that number.
- To quit the Messages application, press . C
To check your messages (with the flip open)

-
Tap to view the Applications Launcher.
-
Tap the Messages icon .
The icons show you what kind of message you have received. You can tap the icons to respond to the alert messages.
The Message List shows you what kinds of messages you have (voice mail or pages, for example) and how many of each type you have received. The first entry in the Message List is always Voice Mail.
You can view your existing messages with the phone turned on or off, but to respond to them, the phone must be turned on.
To read a message
-
The first part of any text message appears on the Message List screen. To see the complete message, just tap the text.
-
If the message contains a URL (Web address), tap either the URL text or the icon to open the Web site.
NOTE: Your Kyocera Smartphone recognizes many different types of URLs, including Tel: (a URL format for phone numbers) and MailTo: (a URL format for e-mail addresses). It will attempt to follow these links and open other applications as identified in the URL.
To copy or save text
You may sometimes want to copy information from a message and use it in another message or a memo.
-
Tap the message to open it. To copy a portion of the message, highlight the text you want to copy. To copy the entire message, you don't need to highlight it.
-
Tap open the Messages menus. From the Message menu, tap any of the following:
- Tap Copy to copy the highlighted portion of the message to the Clipboard. You can then paste it into another application.
- Tap Select All to copy the entire message. You can then paste it into another application.
3. Tap Done.
Sending messages
With the flip closed, press in the shuttle to view the Menu screen. Use the shuttle to select Messages and Send New. The Kyocera Smartphone will prompt you to Open the flip to continue.
The Outgoing Messages screen will be displayed. Using your stylus, tap the box to enter the recipient. The Message To: screen is displayed. You can enter the recipient several ways.
Using the stylus, you can write the phone number or e-mail address. Please see Chapter 3, Using the Organizer, for more information on Entering Information.
You can also tap Look Up on the Message To: screen to select an entry from your address book. The Please Select a Contact screen will be displayed. Using the stylus, tap on a contact from your list and then tap Add. Since your Address book often contains several phone numbers and addresses for one contact, the Kyocera
Smartphone prompts you to select the phone number or e-mail address you want. Tap Add and use the stylus to enter your message text. Press Send.
You may also select a predefined message from the Kyocera Smartphone's stored messages. Tap Insert and select a message from the list. By selecting Options, you can customize your message.
Erasing messages
The messages you receive on your Kyocera Smartphone are kept until you erase them. The in-box can hold up to 200 messages. This does not count any messages moved to the Saved folder. Therefore, it is important to erase older messages periodically to free up space. You can erase messages manually or you can use the Auto-Erase feature to remove older messages automatically.
To set up and use Auto-Erase

- Tap to view the Applications Launcher.
- Tap the Messages icon .
-
Tap to open the Messages menus.
-
From the Options menu, tap Settings.
-
Put a check mark in the Auto-Erase old in-box text check box.
-
Tap OK.
When Auto-Erase is enabled—You see a warning when your in-box reaches 150 messages and a second warning at 190 messages. At 200 messages, you see the following message:
You have 200 messages. Your oldest read message will be erased when the next message arrives.
As new messages arrive, the oldest messages are erased.
When Auto-Erase is not enabled—You see a warning when your in-box reaches 150 messages and a second warning at 190 messages. At 200 messages, you see the following message:
You have 200 messages. New messages will be rejected.
To make room for more messages, either move some of your messages to the Filed folder, or turn on Auto-Erase.
To erase messages manually
PHONE May be either on or off
FLIP Open
- Tap to view the Applications Launcher.
2. Tap the Messages icon


3. Do one of the following:
■ To erase all of your messages, tap Erase All.
- To erase only those messages you have opened and read, tap Erase Read. If you selected Erase All If you selected Erase Read
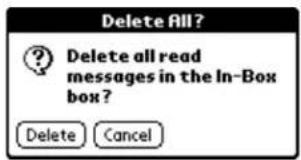
- In the confirmation dialog box, tap Erase to remove the messages.
Setting preferences
You can select the kinds of signals you want to hear when you receive voice mail or other messages.
To set message preferences
PHONE May be either on or off FLIP Open
You can set the kinds of alerts you hear when you receive a voice mail message or SMS message and how frequently you are alerted.
- Tap to view the Applications Launcher.
- Tap the Messages icon .
-
Tap to open the Messages menus.
-
From the Options menu, tap Settings. The following screen appears.

- Tap the ▼ beside Voice Mail. Select the type of alert you want to use for incoming voice mail messages.
| Disabled | Do not use any type of sound or vibration alert for incoming voice mail. |
| Vibrate once | Vibrate when a new voice mail message arrives. Do not repeat. |
| Vibrate & remind | Vibrate every five minutes until the new voice mail is acknowledged. |
| Low beep once | Sound a soft beep when a new voice mail message arrives. Do not repeat. |
| Low beeps | Sound a soft beep once every five minutes until the voice mail is acknowledged. |
| Loud beep once | Sound a loud beep when a new voice mail message arrives. Do not repeat. |
| Loud beeps | Sound a loud beep once every five minutes until the voice mail is acknowledged. |
-
Tap the ▼ beside Pager. Select which of the seven alerts you want to use for incoming pages.
-
Tap the ▼ beside Text Msg. Select which of the seven alerts you want to use for incoming text messages.
-
To erase older message automatically, put a check mark in the Auto-Erase old in-box text check box. For information about Auto-Erase, see "Erasing messages" on page 167.
-
When you have finished, tap OK to return to the Messages screen.
Setting Up Network Connections
Your Kyocera smartphone is capable of connecting wirelessly to network services for email, Internet access, or synchronization. To make these connections, your service provider must offer over-the-air digital data coverage in your area. Note that data coverage is not the same as voice coverage, but both may be offered by the same wireless service provider.
In this chapter
■ Getting started with network connections, page 172
■ Entering network settings, page 173
■ Creating and using service templates, page 180
■ Using service template menus, page 182
■ Troubleshooting network connections, page 183
■ Creating a login script, page 184
■ Setting a proxy server, page 187
■ Using Data/Fax mode with the wireless modem, page 188
Getting started with network connections
Access to the Internet varies depending on your service provider. Before you attempt to use any web application, check with your wireless service provider to see if you have Internet access.
In most cases, if you have purchased data coverage, all of the network settings have already been entered for you by your service provider. If you need to modify any of these settings, follow the procedures in this section.
Some Internet service providers (ISPs) do not allow email to be sent across their SMTP server from outside their network. If this is the case with your ISP, the phone may return mail as undeliverable. Contact your phone service provider for ways to correct this if this occurs.
About network applications
If you have data coverage, you can use the EudoraWeb application for wireless access to Internet sites. This text-only browser makes moving between sites and scrolling through documents a snap. Once the EudoraWeb application is set up, it takes only a few taps to visit an Internet site anywhere in the world.
About network preferences
Network Preferences identify your Internet Service Providers (ISPs) or dial-in (remote access) servers. You can establish any of the following types of connections:
■ PPP (Point-to-Point Protocol)
■ SLIP (Serial Line Internet Protocol)
■CSLIP (Compressed Serial Line Internet Protocol)
The correct network preferences must be set up before you can use the Eudora or EudoraWeb applications. In most cases, if you have purchased data coverage, all of these settings have already been entered for you.
This chapter contains information for the advanced user; check with your phone service provider and your Internet Service Provider before making any entries or adjustments in these screens.
Collecting information
Before you begin, contact an Internet Service Provider. ISPs provide the services required to use the Internet and send or receive email. Use the table below to collect information on the network settings. An asterisk (*) identifies information your ISP provides.
| Network Preferences |
| Service:* |
| User Name: |
| Password: |
| Phone (Internet access phone number):* |
| Network Preferences Details |
| Connection type:* |
| Idle timeout:* |
| Query DNS ☐ |
| Primary DNS (Domain Name System):* |
| Secondary DNS (optional):* |
| IP Address ☐ Automatic |
Entering network settings
Use these procedures to enter network preferences only if your service provider has not set them up for you.
To enter network settings
PHONE May be either on or off
FLIP Open
- Tap to view the Applications Launcher.
-
Tap to open the Preferences screen.
-
From the pick list in the upper-right corner, tap Network.
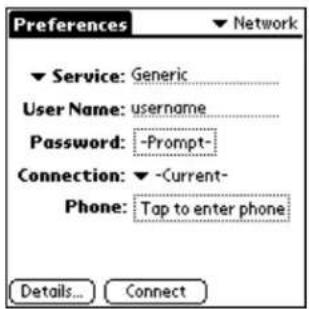
Selecting a service
Use the Service line to select your Internet Service Provider or to set up access to a dial-in server.
-
Tap the Service pick list to display a list of service templates. A service template is a set of configurations that you can create, save, and reuse.
-
Do one of the following:
■ Tap the service you want to use.
- Tap Untitled. Enter a unique name to create a new service template. For information about service templates, see "Using service template menus" on page 182.
Entering your user name
The user name is the name you use when you log into a server. Although this field can contain multiple lines of text, only two lines appear on the screen.
-
Tap the User Name line.
-
Enter your user name. Be aware that most dial-in servers do not accept spaces in the user name.
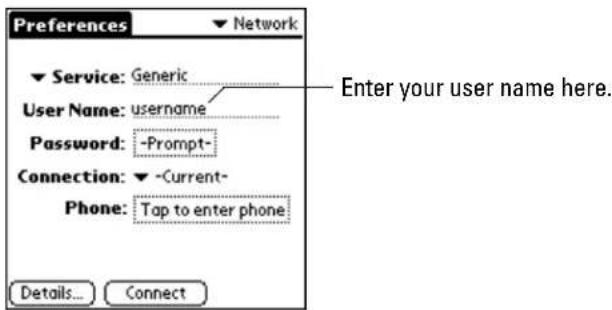
Entering your password
Use the Password field if you want your phone to enter your password automatically each time you log in to your server or ISP. Check with your ISP to confirm whether or not your password is case-sensitive.
If you do not want your password entered automatically—that is, if you want the security of entering it yourself each time you log in—skip this section and continue to “Entering phone settings” on page 176.
1. Tap the Password box.
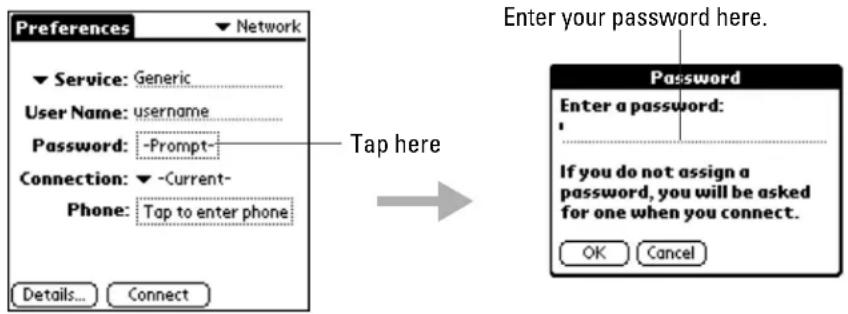
2. Enter the password you use to log in to your server.
If you do not enter a password here, the word "Prompt" remains in the Password box. Each time you log in, you will be prompted to enter your password. If you do enter a password here, the word "Assigned" appears in the Password box. You will not be prompted to enter the password.
3. Tap OK.
Selecting the connection
- Tap the ▼ next to Connection.
- Select from the following methods of connecting to the Internet:
Palm Modem US/Canada Connect an external Palm modem to the phone (in the United States or Canada).
Palm Modem/UK Connect an external Palm modem to the phone (in the United Kingdom).
Wireless Modem Connect using the phone's internal wireless modem.
Direct Serial Connect the phone to the serial port of a computer using a data cable.
IR to a PC/Handheld Communicate with a computer or other handheld device using the infrared port
-Current-
Entering phone settings
In the Phone Setup dialog, enter the telephone number you use to connect with your ISP or dial-in server. Contact your carrier for the correct number.
- Tap the Phone field to open the Phone Setup dialog.
-
Enter the phone number you use to reach your ISP or dial-in server.
-
Do one of the following:
■If you need to enter a dial prefix, disable call waiting, or use a calling card when you log in, continue to those sections.
- If not, tap OK. Skip to "Selecting a connection type" on page 178.
Entering a dial prefix
A prefix is a number you may need to dial before a telephone number. Ordinarily, you should not need to dial a prefix.
- Tap the Dial Prefix check box.
- Enter the appropriate prefix.
Disabling call waiting
When using a landline phone, call waiting can cause a network session to end if you receive another call while you are connected. You should not need to disable call waiting when making a wireless data call, because call waiting is handled differently by wireless phone service providers. If for whatever reason you need to disable this feature on your Kyocera smartphone:
- Tap the Disable call waiting check box.
- Tap the Disable call waiting line. Enter the disable code. Each telephone company assigns a code to disable Call Waiting. Contact your local telephone company for the code you should use.
Using a calling card (optional)
You can use a calling card for your calls to an ISP or dial-in server. After dialing the ISP, the phone enters your calling card number automatically.
However, when you connect to a server, there is usually a delay before you enter your card number. To produce this delay, you must add commas before the card number. Each comma delays the transmission of the number for two seconds. You'll need to experiment to determine the correct delay.
- Tap the Use calling card check box.
- Tap the Use calling card line. Enter your calling card number.
- Tap OK to confirm your selection.
Adding details to preferences
If you are using a predefined service template, you will probably only need to enter your user name and telephone number. If you are creating a new service template, you will need to provide additional information.
Selecting a connection type
There are different protocols for connecting to the Internet. Protocols are the rules for managing and transferring data.
- On the Network Preferences screen, tap Details.
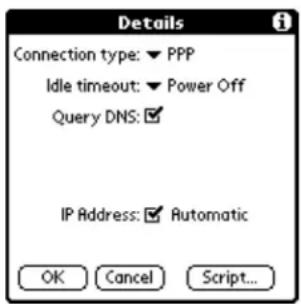
- Tap the Connection type pick list and select one of the following:
PPP Point-to-Point Protocol
SLIP Serial Line Internet Protocol
CSLIP Compressed Serial Line Internet Protocol
Your ISP or System Administrator can provide the correct connection type. If you are not sure, try PPP.
Selecting idle timeout
Idle Timeout sets how long the phone waits before dropping the connection with your ISP or dial-in server after an application closes.
Tap the Idle Timeout pick list and select one of the following:
Immediate The phone drops the connection immediately when you switch to another application.
1, 2, or 3 minutes The phone waits one, two, or three minutes for you to open another application before it drops the connection.
Power Off The PPP or SLIP connection is maintained until you turn off the phone (or until it times out).
Selecting Query DNS
Your Kyocera smartphone can verify the DNS (Domain Naming System) numbers of a computer before attempting a network connection. If you put a check mark in the Query DNS check box, the Primary and Secondary DNS number lines do not appear on the screen. Uncheck the Query DNS check box to display the Primary and Secondary DNS lines. Be aware that not all service providers support querying DNS.
Select the Query DNS check box to turn on this option.
Entering Primary and Secondary DNS
The Domain Name System (DNS) is a mechanism in the Internet for translating the names of host computers into IP addresses. When you enter a DNS number (or IP address), you are identifying a specific server that handles the translation services.
An IP address has four sections, separated by periods. Each section is a number from 0 to 255. In the Details dialog, you enter each section separately. Ask your Internet Service Provider or system administrator for the correct Primary or Secondary DNS IP numbers. Many systems do not require you to enter a DNS. If you are not sure, contact your service provider.
- Remove the check mark from the Query DNS check box.

- Tap the space to the left of the first period on the Primary DNS line. Enter the first section of the IP address.
- Tap the second section on the Primary DNS line. Enter the second section of the IP address.
- Tap and enter numbers in the third and fourth sections of the Primary DNS. If a Secondary DNS number is required, enter it on the Secondary DNS line. Only numbers can be entered on these lines.
Selecting an IP address dynamically
Everyone who logs on to the Internet must have a unique identifier (an IP address), whether permanent or temporary. Some networks dynamically assign a temporary IP address when clients log in. Use the IP Address line to identify whether your
network provides automatic (dynamic) temporary IP addressing. If your IP address is permanently assigned, get that information from your system administrator. If you are not sure, select Automatic.
If your network provider supports dynamic IP addressing, make sure that the IP Address check box is checked.
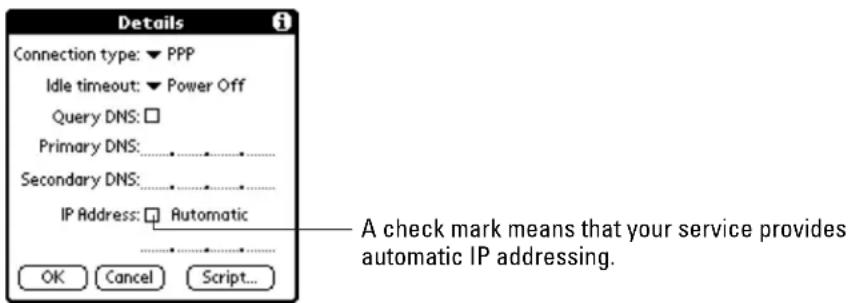
Entering a permanent IP address
- If your network provider does not support dynamic IP addressing, remove the check mark in the IP Address check box. The permanent IP address line appears below the check box.
- Tap the space to the left of the first period, then enter the first section of the IP address you have received from your network provider. Each section must be a number from 0 to 255.
- Tap and enter the remaining sections of the IP address.
- When you have finished, tap OK.
For more information
Depending on your circumstances, you may need to set up additional configurations to access the Internet. See the following sections for more information:
- If you want to automate logging in with a login script, see "Creating a login script" on page 184.
- If you need to access external computers from inside your company's firewall, see "Setting a proxy server" on page 187.
- If you want to create a new service template, see the next section, "Creating and using service templates."
Creating and using service templates
A service template is a set of configurations identifying a network service provider or dial-in server. These configurations include connection type, identification numbers for the host computer, passwords, and other details.
You can create service templates from scratch or by duplicating existing templates and editing information. After you create a new or duplicate template, you can add
and edit the settings. The Network Preferences screen includes menus to make it fast and easy to create and edit service templates.
To add a new service template
PHONE May be either on or off
FLIP Open
-
Tap to view the Applications Launcher.
-
Tap to open the last Preference screen you used.
-
From the pick list in the upper right corner, select Network.
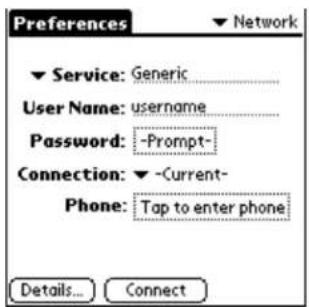
-
Tap to open the menus.
-
From the Service menu, tap New. The word Untitled appears on the Service line.
-
Enter the appropriate information for the network service. See "Entering network settings" on page 173 for details about the information in these fields.
To duplicate an existing service template
PHONE May be either on or off
FLIP Open
-
Tap to view the Applications Launcher.
-
Tap to open the last Preference screen you used.
-
From the pick list in the upper right corner, select Network.
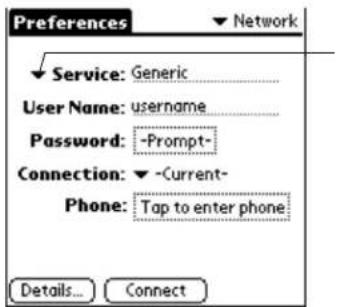
Tap here to open the list of all the network service providers on the phone.
-
Tap the next to Service. All the available services appear in the list.
-
Tap the service you want to duplicate.
- Tap to open the Network Preferences menus.
- From the Service menu, select Duplicate to create a copy of the template.
- Edit the copied template as necessary.
To delete a service template
PHONE May be either on or off
FLIP Open
- Tap to view the Applications Launcher.
- Tap to open the last Preference screen you used.
- From the pick list in the upper right corner, select Network.
Tap here to open the list of all the network service providers on the phone.
- Tap the next to Service. All the available services appear in the list.
- Tap the service you want to delete.
- Tap to open the Network Preferences menus.
- From the Service menu, select Delete.
- In the Delete Service alert, tap OK to delete the template.
Using service template menus
This section explains the menu commands you can use in the Network Preferences screen to work with service templates. For information about the commands in the Edit menu, which are common to most applications, see Using menus, page 59.
Service menu
When you select the Service menu, the following commands appear.
Use these menu commands to do the following
New Create a new (empty) service template and add it to the Service pick list.
Delete Delete a selected service template from the Service pick list.
Duplicate Copy the selected service template and adds it to the Service pick list.
Options menu
When you select the Options menu, the following command appears.

Use this menu command to do the following:
View Log Display the Network Log screen
Troubleshooting network connections
If you are having a problem establishing a network connection using TCP/IP, check this section and try the suggestions listed.
Displaying expanded service connection progress messages
It's helpful to identify at what point in the login procedure the connection fails. An easy way to do this is to display the expanded Service Connection Progress messages. These messages describe the current stage of the login procedure. Press the lower half of the Scroll button at any point during login to display these messages.
Viewing the Network Log
If viewing the expanded Service Connection Progress messages does not give you enough information to find out why you cannot connect to your ISP or dial-in server, take a look at the Network Log. The Network Log lists all of the communication that occurs between your modem and your dial-in server during the login procedure. The information in the Network Log can help your ISP or your System Administrator pinpoint where the login procedure communication fails and why.
To view the Network Log
PHONE May be either on or off
FLIP Open
-
Tap to view the Applications Launcher.
-
Tap to open the last Preference screen you used.
-
From the pick list in the upper right corner, select Network.
-
Tap to open the menus.
- From the Options menu, select View Log.
- Tap the up and down arrows of the scroll bar to see the entire Network Log.
- When you have finished, tap Done.
Adding a DNS number
If your ISP or dial-in server requires a DNS number and you did not enter that information in the Network Preferences screen, it will appear that you successfully logged into your network. However, when you try to use an application or look up information, the connection fails. If this occurs, try adding a DNS number. Ask your ISP or your System Administrator for the correct Primary and Secondary DNS IP numbers.
Creating a login script
A login script is a series of commands that automates logging into your ISP. In most cases, you won't need to create a login script; they are not required by most service providers. However, you may need to create a login script in some corporate environments.
If you need a login script, you can create one on your Kyocera smartphone, using the Command pick list in the Login script dialog.
By selecting commands from this list—and entering the correct parameters from your service provider—you can create a script similar to the example on page 184. Notice that you can use non-ASCII and literal characters in your login script. For details, “Using non-ASCII characters in login scripts” on page 186.
Creating a login script is not a simple process. If you have any questions, contact your ISP or system administrator.
To create a login script
PHONE May be either on or off
FLIP Open
- Tap to view the Applications Launcher.
-
Tap to open the last Preference screen you used.
-
From the pick list in the upper right corner, select Network.
- Tap Details.

- Tap Script.
When the Login Script dialog opens, the script is blank. It contains only the word End.
-
Tap the beside End to open the Command list.
-
Tap the command you want from the Command list.
If the command requires additional information, a line appears to the right where you can enter the information. The following commands are available:
Wait For Tells the phone to wait for specific characters from the server before executing the next command.
Wait For Prompt Tells the phone to wait for a command prompt before executing the next command.
Send Transmits specific characters to the server.
Send CR Transmits a carriage return or LF (line feed) to the server.
Send User ID Transmits the User ID information entered in the User ID line of the Network Preferences screen.
Send Password Transmits the Password (from the Password line of the Network Preferences screen). If you did not enter a password there, this command prompts you to enter one. The Password command is usually followed by a Send CR command.
Delay Tells the phone to wait a specific number of seconds before executing the next command in the login script.
Get IP Reads an IP address and uses it as the IP address for the phone. This command is used with SLIP connections.
Prompt Opens a dialog and prompts you to enter text (for example, a password or a security code).
End Identifies the last line in the login script.
-
Repeat steps 6–7 until the login script is complete.
-
Tap OK.
Using non-ASCII characters in login scripts
You can use the following non-ASCII characters in a login script. This information is provided for advanced users who understand the use and requirements of such characters in a custom login script.
^ char
You may use the caret (^) to transmit ASCII command characters. If you send ^char, and the ASCII value of char is between @ and _, then the character is automatically translated to a single-byte value between 0 and 31. For example, ^M is converted to a carriage return. If char is a value between a and z, then the character sequence is translated to a single-byte value between 1 and 26. If char is any other value, then the character sequence is not subject to any special processing.
For example, the string "Joe^M" transmits Joe, followed by a carriage return.
Carriage return and line feed
You may include carriage return and line feed commands as part of the login script, when entered in the following format:
For example, the string "waitfor Joe
Literal characters
The backslash () character indicates that the next character is transmitted as a character rather than as a processing code.
Examples:—\^Includes a caret as part of the string
\<Includes a < as part of the string
\Includes a backslash as part of the string
Setting a proxy server
A proxy server is used to provide access outside a corporate “firewall.” Most users will not need to set up a proxy server. Generally, you only need to add a proxy server if your Network Preferences are set up to dial a modem inside a corporate network. Check with your network administrator to see if you need to complete these fields.
To set a proxy server
PHONE May be either on or off
FLIP Open
- Tap to view the Applications Launcher.
- Tap to open EudoraWeb.
- Tap to open the menus.
- From the Options menu, select Preferences.
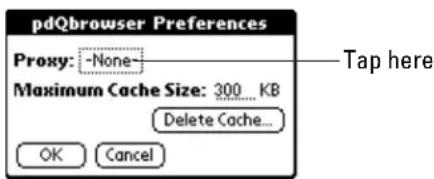
- Tap the box next to Proxy (by default this shows None).
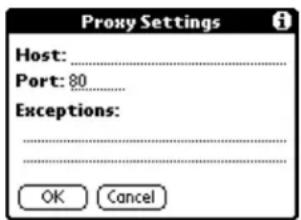
- Tap the Host line. Enter the proxy server name or Internet address. Obtain the information you enter in the fields from your network administrator.
- Tap the Port line. Enter the configuration parameter for the proxy server.
- Tap the Exceptions line. Enter the domain-name endings for which the browser should not use the proxy.
A domain name identifies the server on the Internet; it is the dot-separated words you see in a URL after the characters http://. Typically, the exceptions list includes domain names for servers inside the firewall. You must separate multiple domain names by commas.
Tap OK when you have finished.
Using Data/Fax mode with the wireless modem
Your Kyocera smartphone has a built-in 14,400 BPS (bits per second) wireless modem. Using Data/Fax mode, you can put your phone in the sync cradle and use it like a modem for communication between your computer and other computers or networks. For example, you can connect to a remote file server, visit an Internet site, or send and receive FAX transmissions.
If you prefer, you can connect the phone directly to your computer with the data cable, instead of using the cradle.
Phone status in Data/Fax mode
When you put the phone in Data/Fax mode, it enters the following states:
Ready The message "Ready to Send Data or Faxes" appears on screen. The phone is "expecting" to begin a data call. However, you can still make or receive voice calls.
Modem in use Once you have initiated a data connection (for example, connected to a web site or begun a fax transmission), the phone cannot receive or make voice calls until the data call is over.
Data until off or Fax until off If you select Data until off or Fax until off in the Incoming Calls pick list, the phone continues to "expect" only data or fax calls. You cannot receive voice calls until you change this selection.
To set up Data/Fax mode

-
Tap to view the Applications Launcher.
-
Tap to open Data/Fax mode.
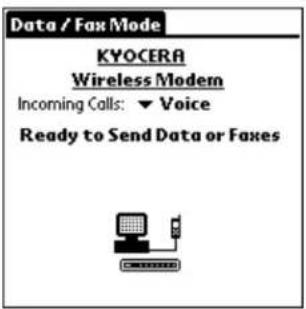
You see status information beginning with "Initializing Modem" and continuing to "Ready to Send Data or Faxes."
NOTE: If you do not see this screen, you may need to perform a soft reset. See Resetting the phone, page 258.
-
Tap to open the Data/Fax mode menu.
-
From the Options menu, tap Settings.
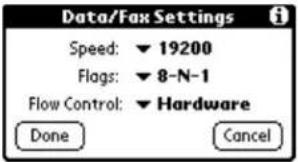
This screen shows the serial communications settings between your computer and the phone. The default settings are adequate in most situations, but you can change these settings if necessary. Refer to your computer user guide if you need to see what the settings are for your computer.
- Tap Speed and select 19200.
NOTE: This setting controls the rate of communication between your computer and the modem. It does not affect the speed at which the modem communicates with the outside world, which is set at 14,400 BPS.
- If you need to change the bit settings to match your computer requirements, tap Flags and select one of the following:
8-N-1 8 data bits; no parity; 1 stop bit
7-P-1 7 data bits; 1 bit parity; 1 stop bit
7-N-2 7 data bits; no parity; 2 stop bits
NOTE: Unless you have an unusual computer system, you will probably not have to change the Flag settings.
- Do not change the Flow Control setting. Leave Flow Control set to Hardware.
8. Tap Done.
- To preset the phone to receive specific types of data calls, tap the beside Incoming Calls and select one of the following:
| Voice | Expect all incoming calls to be voice calls. |
| Fax, next call | Expect the next incoming call to be a fax transmission. Then return to standard voice mode. |
| Data, next call | Expect the next incoming call to be a data transmission. Then return to standard voice mode. |
| Fax, until off | Expect all incoming calls to be fax transmissions until this setting is changed or the phone power is turned off. |
| Data, until off | Expect all incoming calls to be data transmissions until this setting is changed or the phone power is turned off. |
Incoming data call setup with the flip closed
PHONE On FLIP Closed
-
Slide the phone into the sync cradle. Do one of the following:
-
If the sync cradle is attached to the port you use for synchronizing data, turn off the HotSync Manager on your computer by clicking in the Windows system tray. On the menu, choose Exit.
-
If you are using a data cable and/or a different port than the one you use for synchronizing data, it is not necessary to turn off the HotSync Manager.
-
At the home screen, press the shuttle in to open the menus.
- Roll the shuttle down until Settings is highlighted. Then press the shuttle in.
- Roll the shuttle down until Network is highlighted. Then press the shuttle in.
- Roll the shuttle down until Data/Fax Calls In is highlighted. Then press the shuttle in.

- Roll the shuttle up or down to select an option for incoming calls:
| Voice | Expect all incoming calls to be voice calls. |
| Fax, next call | Expect the next incoming call to be a fax transmission. Then return to standard voice mode. |
| Data, next call | Expect the next incoming call to be a data transmission. Then return to standard voice mode. |
| Fax, until off | Expect all incoming calls to be fax transmissions until this setting is changed or the phone power is turned off. |
| Data, until off | Expect all incoming calls to be data transmissions until this setting is changed or the phone power is turned off. |
- Press to turn to the previous menu. Press to return to the home screen. The banner "DATA ONLY" or "FAX ONLY" appears at the top of the home screen.
Opening Data/Fax mode
You can use Data/Fax mode with the flip open or closed. Notice, however, that you cannot make or receive voice calls or use any other applications while the phone modem is in use. Incoming phone calls will receive a busy signal or go directly to voicemail. Opening any other application terminates the modem call.
You can still receive calls while the phone is idle and the Data/Fax application is on the screen; just not while the modem is in use.
To start Data/Fax mode (with the flip open)

- Slide the phone into the cradle. If the cradle is attached to the port you use for HotSync operations, turn off HotSync on your computer.
If you are using a data cable and/or a different port than the one you use for HotSync operations, it is not necessary to turn off HotSync.
- Tap to view the Applications Launcher.
- Tap to Open Data/Fax mode.
You see status information beginning with "Initializing Modem" and continuing to "Ready to Send Data or Faxes."
- From the computer, make the connection you want to initiate.
When Data/Fax mode is running, you see "Modem InUse." You cannot receive voice calls or open other applications while Data/Fax mode is running.
Exiting Data/Fax mode
To exit Data/Fax mode (with the flip open)

Tap the Applications Launcher and select a different application or close the flip and press the End key. The session terminates automatically.
Resetting the phone to accept voice calls

- At the home screen, press the shuttle in to open the menus.
- Roll the shuttle up or down until Settings is highlighted. Then press the shuttle in.
- Roll the shuttle down until Network is highlighted. Then press the shuttle in.
- Roll the shuttle down until Data/Fax Calls In is highlighted. Then press the shuttle in.
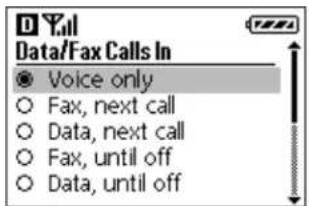
-
Press the shuttle up until Voice only is highlighted. Then press the shuttle in.
-
Press 1 Cck up one menu level or press to return to the home screen.
Troubleshooting Data/Fax mode
- If you see the message "Failed to Initialize Modem," make sure the phone is turned on. Exit Data/Fax mode by tapping the Applications Launcher. Turn on the phone and restart Data/Fax mode.
- You may also see “Failed to Initialize Modem” if you attempt to make a modem connection while you are in a voice call. You cannot make a voice call and a data call simultaneously using the same modem.
- When Data/Fax mode is in the “Modem Ready” state, you can make and receive calls on the phone. Once it is in the “Modem InUse” state, you can no longer make or receive voice calls until you end the modem session.
- You cannot use other applications while running Data/Fax mode. If you open another application, your modem session automatically terminates.
In this chapter
Using the Preferences screens, you can customize the configuration of your Kyocera smartphone. Your choices range from selecting ringer sounds to configuring the phone for use on a network.
■ About preferences page 196
■Setting Button preferences page 197
■ Setting Connection preferences page 199
■ Using the Digitizer page 203
■ Setting Format preferences page 203
■Setting General preferences page 204
■ Setting Network preferences page 206
■ Setting Owner preferences page 206
■ Setting Phone preferences page 206
■ Setting Power preferences page 211
■ Setting Registry preferences page 213
■ Setting ShortCuts preferences page 213
■ Setting Sounds preferences
■ Setting Wireless preferences
page 215
page 218
About preferences
Preferences allow you to adjust many of the features of your Kyocera smartphone. Using the Preferences screens, you can set up all of the following:
Buttons Assign different applications to the buttons on your phone. Change the default settings for the full-screen pen stroke.
Connection Select a connection type (for example, if you connect the phone to an external modem or to a computer's serial port)
Digitizer Calibrate the screen.
Formats Select a country; select the appropriate formats for displaying dates, times, and numbers.
General Set your phone to adjust the date and time automatically. Adjust the date and time manually, if you prefer. Turn the Beam Receive feature on or off.
Network Configure the Kyocera smartphone for use with a network. Select your network service provider and enter your account information.
Owner Enter your name, company name, phone number, and other data.
Phone Customize the service type, time zone settings, on/off power defaults, dialing options, and keypad.
Power Select power-saving settings.
Registry Enable or disable applications that are registered for phone signals.
ShortCuts Set up abbreviations you can use when writing in Graffiti.
Sounds Select or adjust the sounds of ringers, key beeps, alarms, and other signals.
Wireless Enter or change the IP address for receiving Web pages from the Palm web clipping service on your phone.
To open the Preferences screens
PHONE May be either on or off
FLIP Open
-
Tap to view the Applications Launcher.
-
Tap to display the last Preferences screen you used.
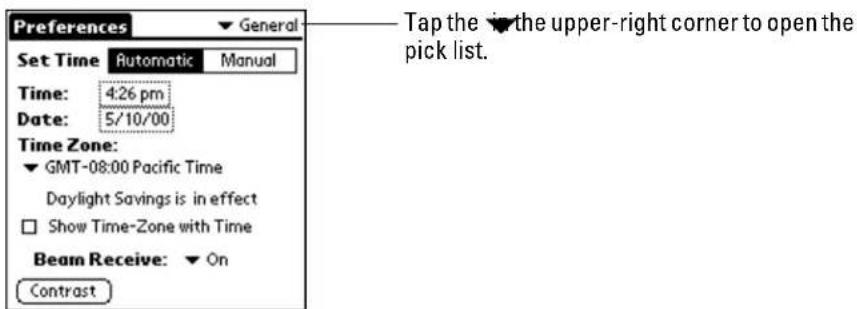
- Tap the pick list in the upper-right corner and select your choice.
Setting Button preferences
On the Buttons preferences screen, you can change the applications that open when you press a button on the Kyocera smartphone. For example, if you find that you seldom use the To Do List and often use the Expense application, you can assign the To Do List button to start the Expense application.
Any changes you make in the Buttons Preferences screen become effective immediately. After you have changed the button preferences, you can still open the original application using the Applications Launcher.
To change the button preferences
PHONE May be either on or off
FLIP Open
-
Tap to view the Applications Launcher.
-
Tap to display the last Preferences screen you used.
-
Tap the pick list in the upper-right corner and select Buttons.
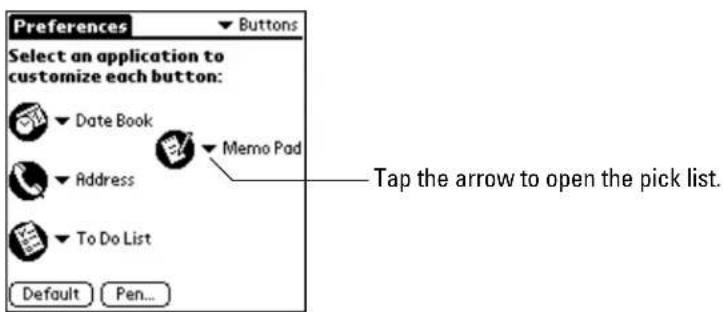
- Tap the next to the button you want to change. The pick list shows all the applications on your phone. Tap the application you want to assign to the button.
- If you later decide to restore the buttons to their factory settings, tap Default.
Pen preferences
On this screen, you can also change what the full-screen pen stroke does. By default, the full-screen pen stroke opens Graffiti Help, but if you prefer, you can set the pen stroke to open the on-screen keyboard, turn on the backlight, lock your phone, or beam data.
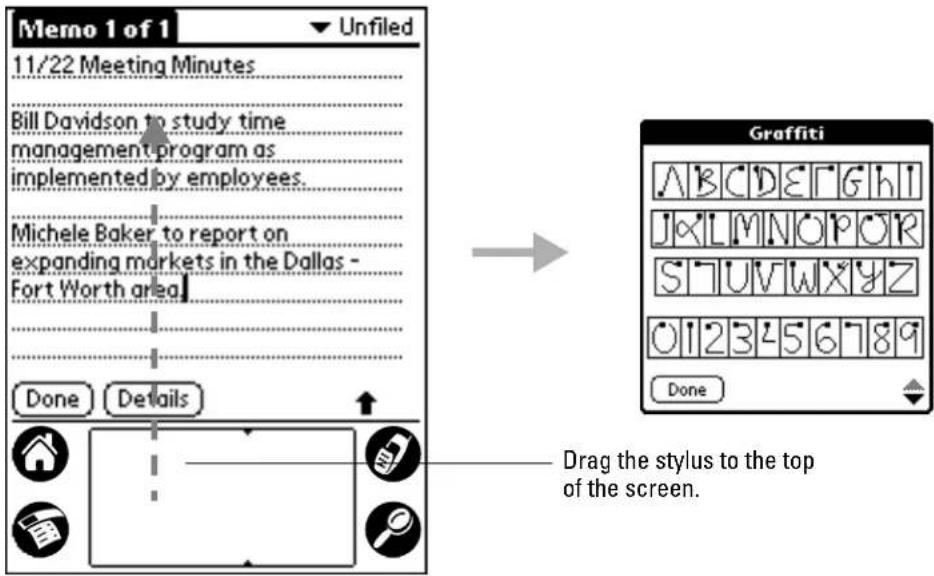
To change the Pen preferences
- Tap Pen in the Buttons Preferences screen to open the Pen dialog.
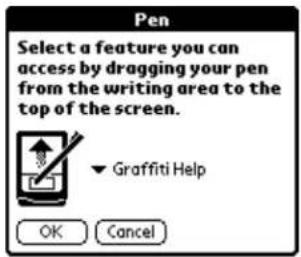
- Tap the pick list and select one of the following:
Backlight Turn the backlight on and off. Keyboard Open the on-screen keyboard for entering text characters. Graffiti Help Open a series of screens that show the complete Graffiti character set.
Turn Off & Lock
Turn off and lock the phone. To use this feature, you must assign a password. Once the phone is locked, you must enter the password to unlock it.
Beam Data
Beam the current entry to another device with an infrared port.
- Tap OK.
Setting Connection preferences
To open the Configuration preferences screen
PHONE May be either on or off
FLIP Open
-
Tap to view the Applications Launcher.
-
Tap to display the last Preferences screen you used.
-
Tap the pick list in the upper-right corner and select Connection.
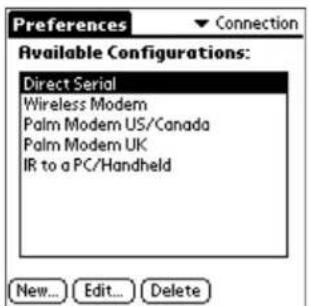
To select a configuration
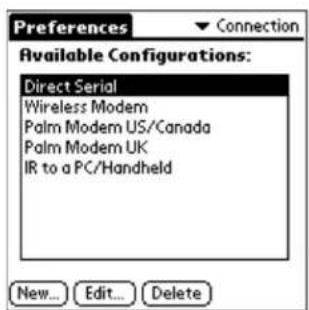
The screen lists all the predefined connections.
The Connection Preferences screen lists all of the predefined connection configurations. If you have created any new configurations, they are also listed here.
To use one of these configurations, just tap it. The highlighted option is the connection that your phone will make.
To add a configuration
PHONE May be either on or off
FLIP Open
INFO HERE ABOUT CONFIGURATIONS
- Tap New.
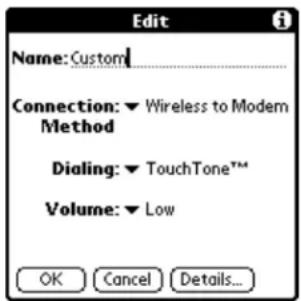
- In the Name field, enter a name for your new connection.
- Tap the beside each field and make your selection from the pick list.
Connection method
Dialing
Select TouchTone or Rotary.
Volume
Select high, medium, low, or off.
- Tap Details.

- On the Details screen, enter the appropriate settings to start the connection.
Speed Select the appropriate connection speed. Speeds range from 1.200 bps (bits per second) to 19,200 bps.
Flow Ctl Select Automatic, On, or Off. [NEED INFO]
Init String If the connection requires an initial string, enter it on the lines below Init String. For details, see ??????????
- When you have finished, tap OK twice to return to the Connection Preferences screen.
To edit a configuration
PHONE May be either on or off
FLIP Open
- On the Connection Preferences screen, tap to highlight the configuration you want to modify.
- Tap Edit.
The options on the Edit screen vary depending on the type of connection you are modifying.
- Change the settings as necessary.
Name
Connection
method
Dialing
Volume
- Tap Details.
- On the Details screen, edit the settings as necessary.
Speed Select the appropriate connection speed. Speeds range from 1.200 bps (bits per second) to 19,200 bps.
Flow Ctl Select Automatic, On, or Off. [NEED INFO]
Init String If the connection requires an initial string, enter it on the lines below Init String. [For details, see ??????????]
- When you have finished, tap OK twice to return to the Connection Preferences screen.
To delete a configuration
PHONE May be either on or off
FLIP Open
You can delete any configuration you have created. You cannot delete the default configurations that are entered at the factory.
- On the Connection Preferences screen, tap the configuration you want to delete.
- Tap Delete.
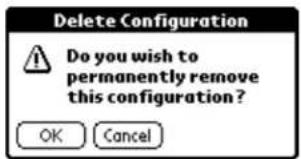
- To remove the configuration, tap OK.
Using the Digitizer
The Digitizer displays targets for you to tap. Using this input, it calibrates your screen.
To calibrate the screen
PHONE May be either on or off
FLIP Open
- In the Preferences screen, select Digitizer from the pick list in the upper-right corner.
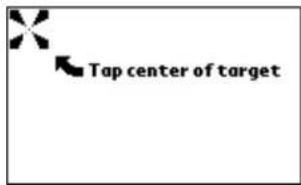
- Tap the exact center of each target that appears on the screen. If you do not tap the exact center, you are prompted to repeat the process.
Setting Format preferences
Use the Formats Preferences screen to set the format of dates, times, and numbers.
To open the Formats preferences screen
PHONE May be either on or off
FLIP Open
-
Tap to view the Applications Launcher.
-
Tap to display the last Preferences screen you used.
-
Tap the pick list in the upper-right corner and select Formats.
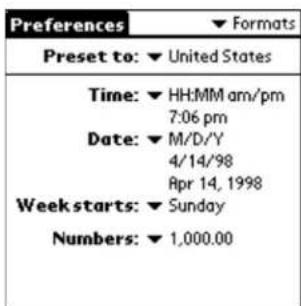
Country default
The country default sets date, time, week start day, and number conventions based on geographic regions. For example, in the United Kingdom, time is often expressed based on a 24-hour clock. In the United States, it is usually based on a 12-hour clock with an AM or PM suffix.
All Kyocera smartphone applications use the Country default settings. You can, however, customize your preferences as described in "Time, date, week start, and numbers formats" below.
To set the country default
Tap the Preset to pick list and select the country you want to use.
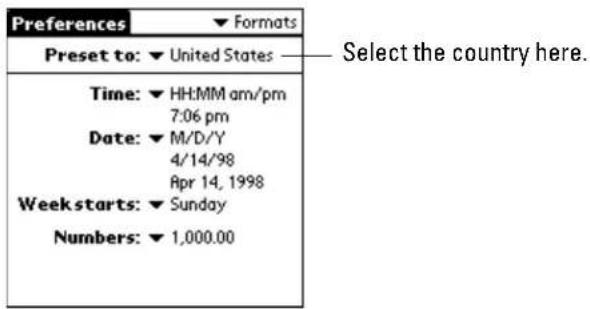
Time, date, week start, and numbers formats
The Time setting defines the format for the time of day. The format you select appears in all applications on your Kyocera smartphone.
To select the time, date, week start, and numbers format
- Tap the Time pick list and select the time format you want to use.
- Tap the Date pick list and select the date format you want to use.
- Tap the Week starts pick list and select Sunday or Monday as the first day of the week. This setting controls the Day, Week, and Month views in the Date Book application and all other calendars.
- Tap the Numbers pick list and select the number format you want to use.
Setting General preferences
Use the General preferences screen to adjust all time-related settings and to turn the Beam Receive feature on or off.
To open the General preferences screen

- Tap to view the Applications Launcher.
- Tap to display the last Preferences screen you used.
- Tap the pick list in the upper-right corner and select General.
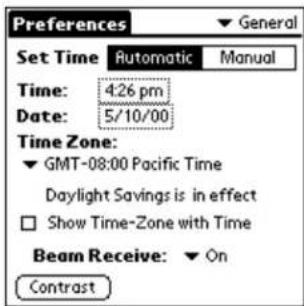
To set the date and time manually
When it is turned on, your phone reads the date and time over the air and automatically sets them. If you prefer, however, you can turn this automatic feature off and set the time manually.
- If you want your phone to set the date, time, and time zone automatically, tap Automatic.
-
If you want to adjust the date, time, and time zone yourself, tap Manual and do the following:
a. Tap the Time box. Select the correct time, including AM or PM.
b. Tap the Date box. Select the correct date.
c. Tap the ▼ below Time Zone. Select the correct time zone.
d. If your region is currently using Daylight Savings Time, put a check mark beside Daylight Savings is in effect. -
If you want the time zone to appear on screen when the time is displayed, put a check mark beside Show Time-Zone with Time. If you don't want the time zone to appear, tap the check box again to remove the check mark.
To turn Beam Receive on or off
PHONE May be either on or off
FLIP Open
When the Beam Receive feature is turned on, your phone can receive information that has been "beamed" from other devices with infrared ports, including other Kyocera smartphones, Palm devices, and laptops.
- Open the General Preferences screen.
- Tap On in the Beam Receive line.
- To turn the beaming feature off, tap Off in the Beam Receive line.
- Tap Done.
To adjust the contrast
PHONE May be either on or off
FLIP Open
- To adjust the contrast of the screen, open the General Preferences screen.
- Tap Contrast.
- Drag the slider bar left to make the screen lighter or right to make it darker.
- When you have finished, tap Done.
Setting Network preferences
Use the Network preferences screen to set up Internet connections on your Kyocera smartphone. See "Entering network settings" on page 158.
Setting Owner preferences
Use the Owner preferences screen to enter your name and any other information you want to include.
To enter the Owner preferences
PHONE May be either on or off
FLIP Open
-
Tap to view the Applications Launcher.
-
Tap to display the last Preferences screen you used.
-
Tap the pick list in the upper-right corner and select Owner.
-
Enter a name or other information you want to use to identify the owner of the phone.
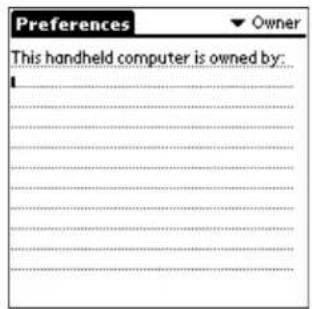
Setting Phone preferences
Use the Phone preferences screens to customize your phone.
To open the Phone preferences screen
PHONE May be either on or off
FLIP Open
-
Tap to view the Applications Launcher.
-
Tap to display the last Preferences screen you used.
-
Tap the pick list in the upper-right corner and select Phone.
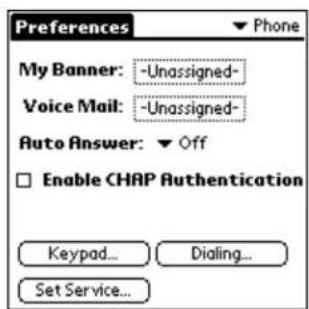
To enter text in the banner
The banner is a name or other text that appears on the screen when the phone is idle and the flip is closed.
- On the Phone Preferences screen, tap the My Banner field.
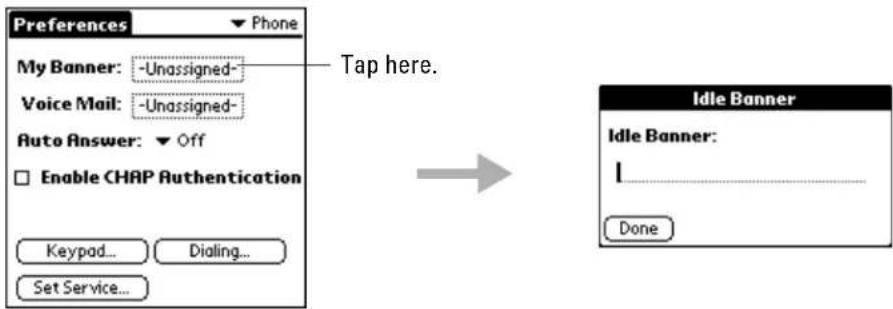
-
Tap once on the line. Then write the text you want to appear in the banner.
-
Tap Done.
To enter the phone number for your voice mailbox
- If the phone number of your voice mailbox does not already appear on the Phone Preferences screen, tap the Voice Mail field.
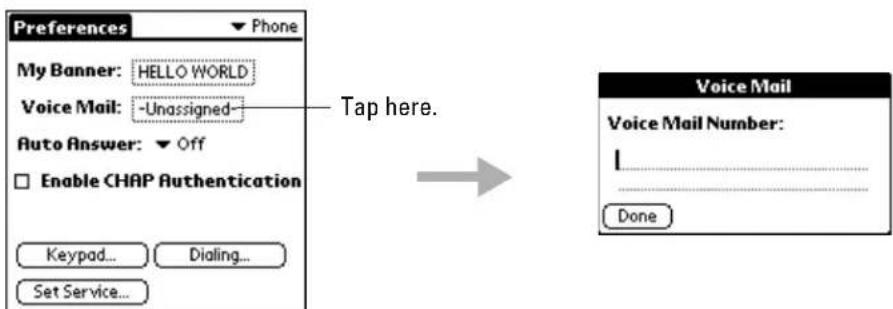
-
Write the phone number used to call your voice mailbox. This phone number is assigned by your telephone service provider. If you are not sure what number to enter, contact your service provider.
-
Tap Done.
To set Auto Answer
On the Phone Preferences screen, tap the ▼ beside Auto Answer and select one of the following:
Off Do not answer incoming calls automatically.
On Answer all incoming calls after approximately five seconds.
HFK only Answer incoming calls after approximately five seconds only if the phone is in a hands-free car kit.
NOTE: If you use your phone in a hands-free car kit, you can select from two answering styles.
■ Auto Answer (HFK only)—When the phone is in a hands-free car kit, all calls are answered automatically.
- Voice Answer—After one ring, a voice prompt asks you whether you want to answer the phone or not. If you answer "Yes," the call is answered. If you answer "No," the call is sent to your voice mail. To use this method, see "Answering calls "hands-free" on page 29.
To enable CHAP Authentication
Some wireless service providers require CHAP authentication for data coverage; others do not. Check with your wireless service provider to determine whether you need to change this parameter. You can turn CHAP authentication on or off on the Phone Preferences screen.
- To turn on CHAP authentication, put a check mark beside Enable CHAP Authentication on the Phone Preferences screen.
- To turn off CHAP authentication, remove the check mark.
If you are not sure, leave CHAP enabled.
Setting keypad preferences
- From the Phone Preferences screen, tap Keypad.
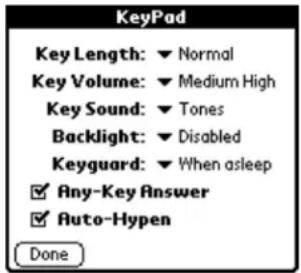
- To adjust the over-the-air tones the phone makes while you are dialing, tap the ▼ beside Key Length. Select Normal or Long.
In most cases, you won't need to adjust this setting. For some applications (for example, modems), you may need to set the tone to Long.
- To adjust the volume of the beep you hear when you press a key on the keypad, tap the ▼ beside Key Volume. Select Off, Low, Medium Low, Medium High, or High.
- To adjust the type of sound you hear when you press a key on the keypad, tap the ▼ beside Key Sound. Select Tones or Clicks.
- To adjust the amount of time the backlight remains lighted, tap the beside Backlight. Select one of the following:
Disabled The backlight does not come on automatically when you press a key.
10 seconds The backlight comes on whenever you press any key and remains on for 10 seconds after the last key press.
30 seconds The backlight comes on whenever you press any key and remains on for 30 seconds after the last key press.
10 sec. & in call The backlight comes on whenever you press any key and remains on for 10 seconds after the last key press. The backlight remains on during all calls.
30 sec. & in call The backlight comes on whenever you press any key and remains on for 30 seconds after the last key press. The backlight remains on during all calls.
- For information on Keyguard options, see "Using Keyguard" in chapter 13.
- If you want to answer calls by pressing any key on the keypad, put a check mark beside Any-Key Answer. If you don't want to use this feature, remove the check mark.
- To insert hyphens automatically in phone numbers, put a check mark beside Auto-Hyphen. If you don't want to use this feature, remove the check mark.
- Tap Done.
Setting dialing preferences
Use these settings if you want your phone to automatically add numbers before or after your local or long-distance phone numbers (for example, a code number for long-distance access). Any numbers you enter in this screen have precedence over all other phone settings except the automatic Area Code setting. You can add up to 32 characters before and after the phone number, although only 12 are visible on the screen.
- From the Phone Preferences screen, tap Dialing.
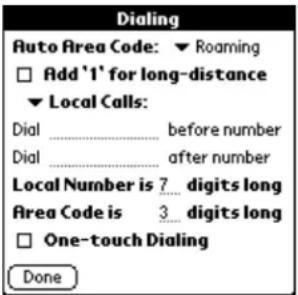
- If you want the phone to add area codes to phone numbers when you travel, tap the ▼ beside Auto Area Code. The area codes are taken from your Address Book, if available. Otherwise, when you are in Roaming mode, the phone insets your home service area code.
Never The phone never inserts area codes.
Roaming The phone inserts the area code for any number you dial while in Roaming mode. It does not insert area codes when you are in your Home area.
Always The phone inserts the area code for any number you dial whether you are in your Home area or roaming.
- To add 1 in front of all long-distance phone numbers automatically, put a check mark in the Add '1' for long-distance check box. If you don't want to use this feature, remove the check mark.
- If you want to add prefixes or suffixes to all your local calls, do the following:
a. Make sure that Local Calls appears on the third line of the screen.
b. Enter the numbers to dial before the phone number on the Dial ____ before number line.
c. Enter the numbers to dial after the phone number on the Dial ____ after number line.
- If you want to add prefixes or suffixes (such as calling card numbers) to all your long distance calls, do the following:
a. Tap the ▼ beside Local Calls and select Long Distance.
b. Enter the numbers to dial before the phone number on the Dial ____ before number line.
c. Enter the numbers to dial after the phone number on the Dial ____ after number line.
- Enter the length of local phone numbers in your area (excluding the area code) in the Local Number is _ digits long line. Enter the length of the area code in the Area Code is _ digits long line.
Because the length of phone numbers varies around the world, this information is used to format your numbers correctly.
- To enable one-touch dialing, put a check mark in the One-touch Dialing check box.
When one-touch dialing is turned on, you can call the numbers in your Speed Dial list simply by entering the Speed Dial number (1–199) and holding down the last digit for a few seconds.
- Tap Done.
Setting service preferences
If you have multiple home service providers, you can select how you want your phone to handle them on this screen. You can also set your phone to permit or restrict roaming. If you do not have multiple home service providers, you will not need to make any changes to this screen.
CAUTION: Use caution when making changes to service settings. Do not make adjustments to your phone account unless you have more than one home service provider. Check with your service provider(s) to verify what changes, if any, should be made.
- From the Phone Preferences screen, tap Set Service.

- To identify the preferred service for your phone, tap the ▼ beside Serving System. Your service provider can tell you whether it is necessary to make changes to this setting, as well as what channel to select.
Auto A Use the Channel A service provider. If it is not available, switch to the Channel B service provider.
Auto B Use the Channel B service provider. If it is not available, switch to the Channel A service provider.
No Roaming Use the home service provider only.
- If you wish to set the phone into a particular mode, tap the ▼ beside Digital/Analog. Select one of the following:
Automatic The phone switches automatically from digital to analog mode if necessary.
Analog Only The phone accepts analog calls only.
Analog Call The phone expects the next call to be analog.
Digital Only The phone accepts digital calls only.
- When you have finished, tap Done.
Setting Power preferences
Use the Power settings to turn your phone on or off under various conditions. Adjusting these settings can extend the life of the battery.
When your phone arrives from the factory, the default power settings are Auto-off after two minutes and Power Phone On at Reset. You can adjust these settings at any time.
To set power preferences
PHONE May be either on or off
FLIP Open
-
Tap to view the Applications Launcher.
-
Tap to display the last Preferences screen you used.
-
Tap the pick list in the upper-right corner and select Power.
-
To set how long the phone screen remains on when it is not in use, tap the ▼ beside Auto-off after and select one of the following:
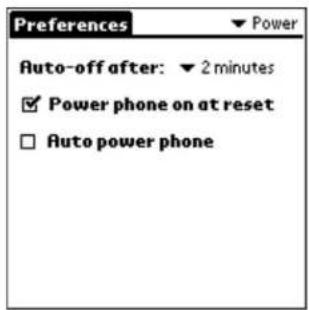
Never The screen remains on as long as the keypad is flipped open, whether you are using any applications or not.
1, 2, 3, 5, or 15 minutes The screen goes blank or "sleeps" after the specified number of minutes of nonuse. It "wakes up" automatically when you press an application button. You can adjust these settings at any time. If you find that the screen is going blank too frequently, select a longer time period.
NOTE: The auto-off setting controls how long the screen remains "awake," not how long the phone remains on.
-
If you want the phone to turn on automatically when you reset it, put a check mark in the Power phone on at reset check box. (This is the default setting.) If you want to leave the phone turned off until you turn it on yourself, remove the check mark from this check box.
-
If you want the phone to turn on or off at specific times, put a check mark in the Auto power phone check box. Then tap the Time on and Time off fields. Enter the times when you want the phone to turn on and off. Notice that these times refer to the current day (the next 24 hours).
-
When you have finished, tap Done.
Setting Registry preferences
The Registry preference screen identifies which applications handle specific types of URLs. If you install third-party applications on your phone, use this screen to register them.
To open the Registry preferences screen
PHONE May be either on or off
FLIP Open
- Tap to view the Applications Launcher.
- Tap to display the last Preferences screen you used.
- Tap the pick list in the upper-right corner and select Registry.
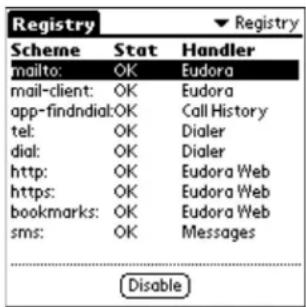
To change Registry preferences
The Scheme column shows types of URLs. The Handler column shows the application that handles each type. For example, a URL beginning with http: is a Web site and must be handled by a browser, while a URL beginning with tel: is a phone number and can be handled by the Dialer.
-
If you don't want your phone to open or respond to a particular type of URL, tap the item. Then tap Disable.
The Stat (status) column changes to Disable. -
To reenable a scheme, tap Enable.
- If you want to delete a scheme from the registry, tap to open the Phone Preferences menus. From the Special menu, tap Delete.
- To re-register a scheme you have deleted, tap to open the Phone Preferences menus. From the Special menu, tap Rebuild.
NOTE: Deleted schemes are re-registered if you reset the Kyocera smartphone. Disabled schemes, however, remain disabled after a reset.
Setting ShortCuts preferences
Using the ShortCuts Preferences screen, you can create your own abbreviations for entering text with Graffiti. For more information, see "Graffiti ShortCuts" on page 50.
To open the ShortCuts Preferences screen
PHONE May be either on or off
FLIP Open
-
Tap to view the Applications Launcher.
-
Tap to display the last Preferences screen you used.
-
Tap the pick list in the upper-right corner and select ShortCuts.
![br - Breakfast di - Dinner ds - [Date Stamp] dts - [Date and Time Stamp] lu - Lunch me - Meeting ts - [Time Stamp]](/content/2026/05/1055126/images/02e534fed222cb6c87cd09aae6d5a4479858b5f4c3b0cab84be210a6726991dc.jpg)
To create a ShortCut
You can create a ShortCut for any words, letters, or numbers. All the ShortCuts you create appear on the list in the ShortCut Preferences screen and are backed up on your computer when you perform a HotSync operation. You can use these ShortCuts in any application.
- Tap New in the ShortCut Preferences screen.
![Preferences br - Breakfast di - Dinner ds - [Date Stamp] dts - [Date and Time Stamp] lu - Lunch me - Meeting ts - [Time Stamp] New Edit Delete... → Tap New. ShortCut Entry ShortCut Name: br ShortCut Text: Breakfast OK Cancel](/content/2026/05/1055126/images/d8f6fee13070f083e6193c7b194c3553c44b098dba11c1753b87f6eeb262eaf5.jpg)
-
On the ShortCut Name line, enter the letters you want to use to activate the ShortCut.
-
Tap the ShortCut Text area and enter the text that you want to appear when you write the ShortCut characters.
-
Tap OK.
NOTE: To use a ShortCut, draw the ShortCut stroke followed by the ShortCut characters. The ShortCut symbol appears at the insertion point and indicates you are in ShortCut mode.
To edit a ShortCut
-
Tap the ShortCut you want to edit in the ShortCuts Preferences screen.
-
Tap Edit to display the ShortCut Name and ShortCut text.
-
Make the changes you want and tap OK.
To delete a ShortCut
- Tap the ShortCut you want to delete in the ShortCuts Preferences screen.
- Tap Delete.
- In the alert dialog, tap Yes to delete your ShortCut.
Setting Sounds preferences
Use the Sound Preferences to choose the types of signals your phone uses to alert you about your calls and pages. These signals include both sounds and silent alerts.
To open the Sounds preferences screen
PHONE May be either on or off
FLIP Open
- Tap to view the Applications Launcher.
- Tap to display the last Preferences screen you used.
- Tap the pick list in the upper-right corner and select Sounds.
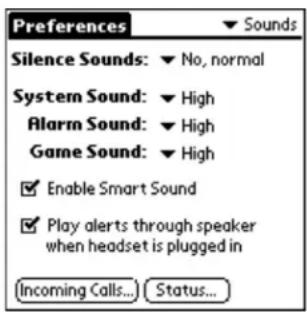
To set basic sound preferences
On the basic Sounds Preferences screen you can set the phone to ring, vibrate, or flash when you receive a phone call. You can also adjust the volume of system sounds, alarms, and games sounds.
- To select the signal for an incoming phone call, tap the ▼ beside Silence Sounds. From the list, select one of the following:
| No, normal | When you receive an incoming call, the phone rings, using the ringer sound you selected on the Incoming Calls screen. |
| Yes, vibe only | When you receive an incoming call, the phone vibrates to signal the call. The phone does not ring. |
| Yes, lights only | When you receive an incoming call, the backlight flashes to signal the call. The phone does not ring. |
- To adjust the volume of system sounds, tap the ▼ beside System Sound. Select High, Medium, Low, or Off. This setting controls the volume of the phone ringer and other beeps and clicks when you tap items on the screen or press keys.
-
To adjust the volume of alarms, tap the ▼ beside Alarm Sound. Select High, Medium, Low, or Off. This setting controls the sound of alerts you set, for example, to remind you of a meeting.
-
To adjust the volume of game sounds, tap the ▼ beside Game Sound. Select High, Medium, Low, or Off. This setting controls the sound effects in built-in games and any third-party games you have downloaded to your Kyocera smartphone.
- If you want your phone to adjust the volume of the earpiece automatically, put a check mark in the Enable Smart Sound check box. If you don't want to turn on this automatic feature, remove the check mark from this check box.
When you turn on the Auto Volume feature, the volume level in the phone earpiece is adjusted up or down based on ambient noise levels and the volume of the speaker's voice.
- Tap the Play alerts through speaker when headset is plugged in check box to route alert sounds through the speaker.
- To make further adjustments to the sounds, tap Incoming Calls (see page 216) or Status (see page 217).
- If you have finished setting the sounds, tap Done to return to the Applications Launcher.
To set the ringer on incoming calls
You can choose from a variety of ringer sounds for incoming phone calls. If you prefer, you can assign different sounds to different categories of calls. For example, you can distinguish between your business calls and your personal calls by selecting a different sound for each. To create additional categories, see “Using categories” on page 54.
- On the Sounds Preferences screen, tap Incoming Calls.
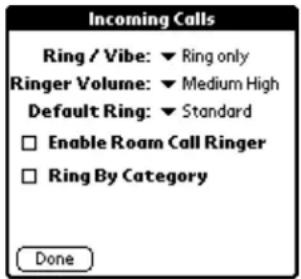
- To choose how the phone signals an incoming call, tap the ▼ beside Ring/Vibe and select one of the following options:
■ Ring only—The phone rings and does not vibrate.
■ Vibrate only—The phone vibrates and does not ring.
■ Vibe then ring—The phone vibrates for a few seconds, then rings.
-
To adjust the ringer volume, tap the ▼ beside Ringer Volume. Select a volume level between Low and High. If you want the ringer volume to increase with each ring, select Escalate.
-
Tap the ▼ beside Default Ring and select a ringer sound. When you select a sound, you hear a sample of it. The phone uses the default ringer for the following types of calls:
-
If you do not use the Ring by Category feature: The default ringer is used for all incoming phone calls.
-
If you use the Ring by Category feature: The default ringer is used for all incoming phone calls that do not fall into the specified categories. For example, if you have selected a ringer for your business calls and another ringer for your personal calls (based on phone numbers in your Address Book), the default ringer indicates a call from a number that is not in either of these categories.
-
If you want to hear different ringer sounds for different categories of calls, do the following steps.
a. Put a check mark in the Ring by Category check box.
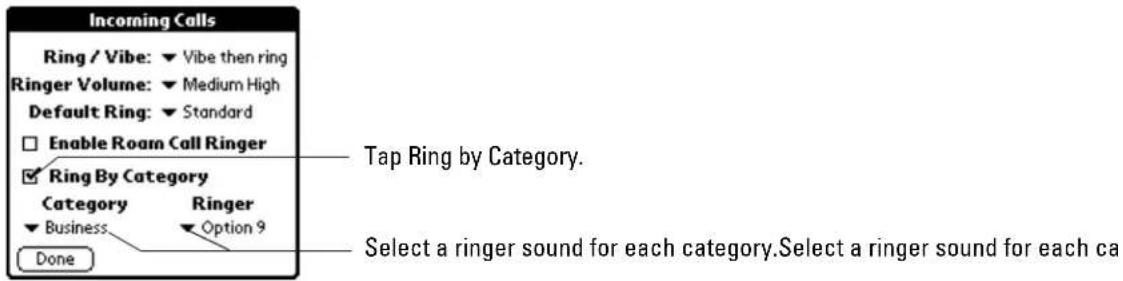
b. Tap the ▼ under Category. Select a category of calls.
c. Tap the ▼ under Ringer. Select the sound for that category of calls.
d. Repeat steps b–c for each category you want to set up.
- When you have finished, tap Done to return to the Sounds Preferences screen.
To set status alerts
You can set your phone to alert you for a variety of service situations, such as when you leave your home service area or when you miss a call.
- On the Sounds Preferences screen, tap Status.
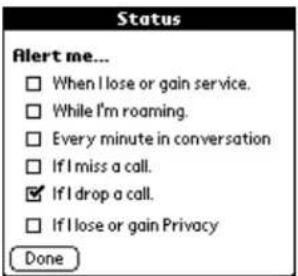
You can select any number of these check boxes.
- To hear a tone for any of these changes in phone service, put a check mark in the appropriate check box.
| When I lose or gain service | You hear three beeps when the phone moves in or out of service areas. When the phone cannot locate a service area, you cannot make or receive calls. |
| While I'm roaming | You hear two beeps when the phone moves in or out of your home service area. When the phone is roaming, you may be billed at a higher rate. |
| Every minute in conversation | You hear a single beep every minute during a call. |
| If I miss a call | You hear a single beep every minute while the “Missed calls” message is on the screen. |
| If I drop a call | This box is checked by default. If a call is dropped, you hear three beeps and an alert message appears on the screen. |
| If I lose or gain Privacy | You hear a beep when you lose or gain Voice Privacy. Voice Privacy (if available from your service provider) uses a more encrypted transmission. |
- When you have finished, tap Done to return to the Sounds Preferences screen.
Setting Wireless preferences
Use the Wireless preferences screen if you want to receive Web pages from the Palm web clipping service on your phone.
To open the Wireless preferences screen
PHONE May be either on or off
FLIP Open
-
Tap to view the Applications Launcher.
-
Tap to display the last Preferences screen you used.
-
Tap the pick list in the upper-right corner and select Wireless.
To enter or change Wireless preferences
Your service provider may already have entered the IP address for the Palm web clipping service. If not, you can enter it yourself on this screen.
In addition, when you connect to a Web site, the web server requests a unique identifier from your remote device. If you do not want your phone's identifier sent automatically to the web service, you can turn it off on this screen.
- If your service provider has not already entered the IP address for the Palm web clipping service in the Proxy field, tap the Proxy box.
- In the Edit Proxy dialog, enter the appropriate IP address.
- To return to the original factory settings, tap Default.
- Tap OK.
- If you do not want your phone's identifier sent automatically to the web site, put a check mark in the Warn when sending ID box.
When this box is checked, a warning message appears whenever you perform a transaction that would send your phone's identifier to the server. Select Continue to send the ID or Cancel to prevent the ID from being sent.
Your Kyocera smartphone comes with a range of security features to prevent unauthorized calls.
- Keyguard—Keyguard protects your phone from accidental calls (for example, when the phone is inside a briefcase where it might slide around).
- Privacy—You can mark entries in your Address Book as private and control who can see them either with or without a password. If you set a password, you must enter that password to see the private entries. If you do not set a password, private entries are hidden until you set the Security application to show them.
- Locked mode—When the phone is locked, you can only make emergency calls from the keypad. You cannot use the PDA.
In this chapter
■ Using Keyguard page 221
■ Showing or hiding private entries page 223
■ Locking the phone page 224
Using Keyguard
Keyguard protects your phone from accidental key presses (for example, if the phone slips around inside a briefcase).
When the phone power is turned on but you are not actively using the phone, the phone enters power-save or "sleep" mode. In this state, the screen is blank and the keypad is locked. The PDA is turned off to save power. The LED light flashes slowly to show that the phone is on.
Keyguard remains on until you either turn it off or answer a call.
To turn Keyguard on immediately

Press the backlight button on the top of the phone.
To turn Keyguard on or off automatically

By default, the phone is set to go into power-save mode automatically after two minutes of nonuse. You can turn this automatic feature on or off and adjust how quickly the phone goes into power-save mode.
- From the home screen, press the shuttle in to open the menus.
- Roll the shuttle down until Settings is highlighted, then push the shuttle in to select it.
- In the Settings menu, roll the shuttle down once until Keyguard is highlighted, then push the shuttle in to select it
- Roll the shuttle up or down. When the option you want to select is highlighted, press the shuttle in.
Guard Now
Keyguard is turned on immediately.
Auto-Guard on Sleep
Keyguard is automatically turned on when the phone is not in use.
Disable Auto-Guard
Keyguard is not turned on automatically.
- To adjust how quickly the phone goes into power-save mode, do the following:
a. Open the flip.
b. Tap View the Applications Launcher.
c. Tap to open the last Preferences screen you used.
d. Tap the pick list in the upper-right corner and select Power.
e. Tap the ▼ beside Auto-off after and select 1, 2, 3, 5, or 15 minutes.
To turn Keyguard off

If you receive a call
- If you receive a call while Keyguard is on, just press to answer the call. Keyguard is automatically turned off.
If you are not on a call
You can turn Keyguard off quickly at any time by doing any one of the following:
■ Press the backlight button on the top of the phone.
■ Press 📞/10, followed by the digits 1, 2, and 3.
■ Open and close the flip.
Showing or hiding private entries
You can hide entries that you mark as private. If you assign a password to your private entries, you must enter that password before the entries appear. Note that the Kyocera smartphone merely hides the entries; it does not delete them.
To hide or mask private entries
PHONE May be either on or off
FLIP Open
-
Tap to view the Applications Launcher.
-
Tap to open the Security screen.
-
Tap the beside Current Privacy.
- Select one of the following:
Hide Records Records marked private do not appear in the Address Book.
Mask Records Records marked private are covered with a gray box in the Address Book
- Tap OK.
Once you have hidden or masked the private records, you must enter your lock code to view them.
To show private entries
PHONE May be either on or off
FLIP Open
-
Tap to view the Applications Launcher.
-
Tap to open the Security screen.
-
Tap the beside Current Privacy.
-
Select Show Records from the pick list.
-
Enter your password and tap OK.
Locking the phone
You can lock your Kyocera smartphone so that no one can use either the phone or the PDA applications without entering a password. When the phone is locked, no calls can be made except emergency 911 calls.
CAUTION: Be aware that if you forget the password you have assigned when you lock the phone, you must perform a hard reset using the reset button to unlock your phone. Performing a hard reset with the reset button deletes all the data in the Kyocera smartphone. However, all previously synchronized data will be restored during your next HotSync operation.
To lock the phone

-
Perform a HotSync operation to synchronize the data on your Kyocera smartphone with your computer.
-
Tap to view the Applications Launcher.
-
Tap to open the Security screen.
- Tap the Unassigned box next to Password. The Password dialog appears.
- On the line, enter the password you want to use and tap OK. A password can contain any combination of numbers and letters.
- Enter the password again to verify it. Tap OK.
- Tap Lock & TurnOff.

- To lock the phone, tap Off & Lock.
The screen becomes blank. The phone is now locked.
To unlock the phone

When the phone is locked, the following screen appears whenever you open the flip.
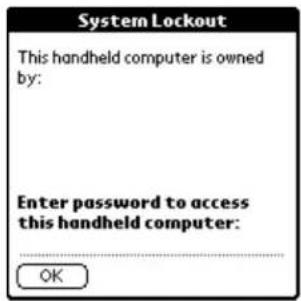
Enter your password and tap OK.
To change the password

-
Tap to view the Applications Launcher.
-
Tap to open the Security screen.
-
Tap the Assigned box beside Password.
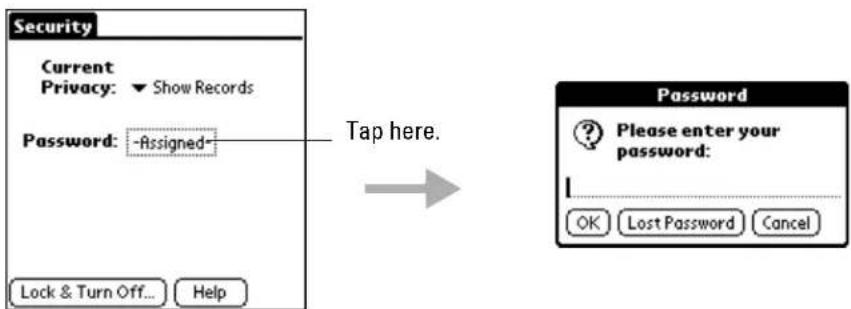
- Enter your password and tap OK.
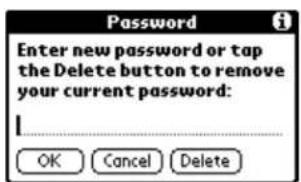
-
To assign a new password, enter it on the line and tap OK. In the confirmation dialog, enter the same password again. Tap OK.
-
To remove password protection entirely, tap Delete.
To recover from a forgotten password
If you forget your password, you can delete the password to free up the phone. However, deleting a password also deletes all entries and files marked Private. If you synchronize with your computer before deleting a forgotten password, the Kyocera smartphone restores your private entries the next time you perform a HotSync operation, but it does not restore the password.

-
Tap to view the Applications Launcher.
-
Tap to open the Security screen.
-
Tap the Assigned box beside Password.
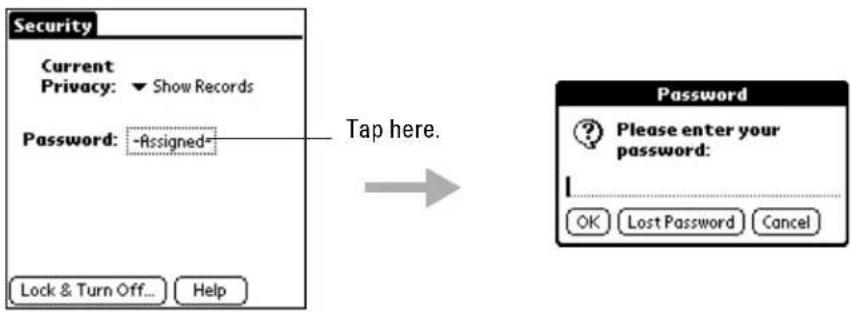
- Tap Lost Password.
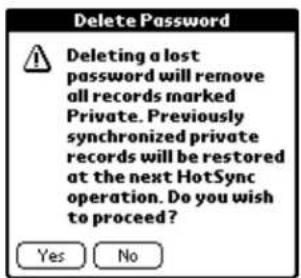
- Tap Yes to delete the password and all records and entries marked Private.
The Speed Dial application stores up to 199 phone numbers that you can call by pressing only one, two, or three keys (1–199). You can even put email addresses and Web pages into the Speed Dial application.
The names and numbers in the Speed Dial list are taken from the Address Book. Every time you change an entry, the Kyocera smartphone updates the Speed Dial list automatically.
In this chapter
■ Adding an entry to the Speed Dial list page 229
■ Making calls using Speed Dial page 231
■ Editing the Speed Dial list page 232
■ Deleting entries page 234
■ Using Speed Dial menus page 235
Adding an entry to the Speed Dial list
You can put up to 199 phone numbers, email addresses, or URLs from your Address Book in the Speed Dial list. The numbers in the Speed Dial list are always selected from the Address Book so you only have to maintain the information in one place. Therefore, before you can use Speed Dial, you must first enter the names and numbers in the Address Book.
To add an entry to the Speed Dial list
PHONE May be either on or off
FLIP Open
-
Tap to view the Applications Launcher.
-
Tap to open Speed Dial.
- Tap Add.
To add a phone number from your Address Book to the Speed Dial list, continue with the steps below. To add a new phone number, skip to "If the phone number is not in your Address Book" on page 230.
If the phone number is already in your Address Book
- In the Add to Speed Dial dialog, tap Lookup.
A list of all the names in your Address Book appears.
- Tap the entry you want to add to the Speed Dial list. Then tap Add.
If the entry has more than one phone number, the following screen appears.
- Put a check mark beside any of the phone numbers you want to add. Then tap Add.
Your new entry is added to the bottom of the Speed Dial list. To reassign Speed Dial numbers, see "To change Speed Dial numbers" on page 232.
If the phone number is not in your Address Book
- In the Add to Speed Dial dialog, tap New Entry.
-
Using the stylus or the onscreen keyboard, enter the last name, first name, and phone number you want to put on the Speed Dial list.
-
Tap Add.
-
At the confirmation message, tap OK.
Making calls using Speed Dial
NOTE You cannot initiate conference calls from the Speed Dial application. If your service provider supports conference calls, you can initiate a three-way call by entering the numbers directly on the keypad or the Dialer.
To make a call from the Speed Dial list (with the flip open)

-
Tap to view the Applications Launcher.
-
Tap to open Speed Dial.
-
Tap to select the number you want to call.
-
Tap Dial.
-
When you have finished your call, press End.
To make a call from the Speed Dial list (with the flip closed)

- Press the shuttle in to open the menu.
- Roll the shuttle down until Contacts is highlighted. Then press the shuttle in.
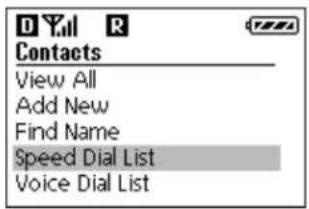
-
Roll the shuttle down until Speed Dial List is highlighted. Then press the shuttle in.
-
Roll the shuttle up or down to scroll through the Speed Dial list. When the person you want to call is highlighted, press
-
When you have finished your call, press .
Editing the Speed Dial list
In the Speed Dial list, you can change the Speed Dial numbers, sort the entries in several different sequences, and move or resize the columns.
To change Speed Dial numbers

-
Tap to view the Applications Launcher.
-
Tap to open Speed Dial.
-
Tap the entry you want to change to a different number.
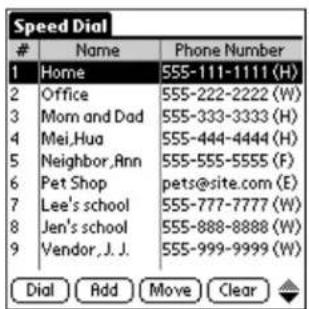
- With the entry highlighted, tap Move.
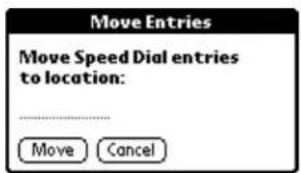
-
Tap once on the location line. Then using the stylus or the onscreen numeric keyboard, enter the Speed Dial number you want to assign to this entry.
-
Tap Move.
The entry is reassigned the new number you entered.
To resort the Speed Dial list
PHONE May be either on or off
FLIP Open
-
Tap to view the Applications Launcher.
-
Tap to open Speed Dial.
-
Tap to open the Speed Dial menus.
-
From the Options menu, tap one of the following:
Sort by Name Speed Dial entries are sorted in alphabetical order by the last name or company name of the entry.
Sort by Call Frequency Speed Dial entries are sorted by how often each number appears in Call History (including both incoming and outgoing calls). The most frequently contacted numbers appear at the top of the list.
Remove Blanks All unused numbers within the Speed Dial list are removed.
- In the Renumber confirmation dialog, tap OK.
To change column size or arrangement in the Speed Dial list
PHONE May be either on or off
FLIP Open
You can easily change the size or arrangement of the columns in the Speed Dial list. For example, if you prefer the Phone Number column to appear on the far left or if you want the Name column to be wider, you can drag the columns to suit your needs.
-
Tap to view the Applications Launcher.
-
Tap to open Speed Dial.
-
To rearrange the columns, place the stylus on the title of the column you want to move. Drag the column left or right.
-
To resize a column, place the stylus in the heading row on the line between the columns. Drag the column left or right to decrease or increase its size.
Deleting entries
You can remove entries from the Speed Dial list without deleting the entry from the Address Book.
To remove an entry from the Speed Dial list
PHONE May be either on or off
FLIP Open
-
Tap to view the Applications Launcher.
-
Tap to open Speed Dial.
-
Tap the entry you want to remove.
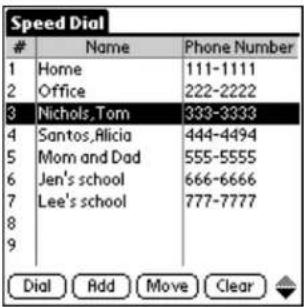
- With the entry highlighted, tap Clear.
- In the confirmation dialog, tap Yes to remove this number from the Speed Dial list or No to keep it.
If you delete the entry, it is removed from the Speed Dial list only. It is not removed from the Address Book.
- Tap Details.
- Tap Delete.
- If you want to keep a backup copy of this entry on your computer, put a check mark in the Save archive copy on PC check box. If you don't want to save a backup, remove the check mark.
- In the confirmation dialog, tap OK to delete the entry or Cancel to keep it. If you delete the entry, it is removed from both the Address Book and the Speed Dial list.
Using Speed Dial menus
This section covers the menu commands specific to the Speed Dial list. For information about menu commands common to all applications, "Using menus" on page 59.
Options menu
Sort by Name Speed Dial entries are sorted in alphabetical order by the last name or company name of the entry.
Sort by Call Frequency Speed Dial entries are sorted by how often each number appears in Call History (including both incoming and outgoing calls). The most frequently contacted numbers appear at the top of the list.
Remove All unused numbers within the Speed Dial list are removed. Blanks
About Show version information for the Speed Dial application. Speed Dial
The Palm To Do List is a convenient place to create reminders of the things you have to do. Each item in your To Do list can be given a priority, a due date, and a category (such as Business or Personal). You can then sort your To Do list by any of these criteria.
In this chapter
■ Creating To Do items page 237
■ Setting Item Details page 238
■ Displaying your To Do list page 240
■ Using the To Do List menus page 242
Creating To Do items
A To Do item is a reminder of a task that you have to complete. You can control the appearance, level of detail, and sort order of To Do items.
To create a To Do item
PHONE May be either on or off
FLIP Open
- Press the To Do List

- Tap New in the To Do List screen.
-
Enter the text for the item. The text can be longer than one line.
-
Tap anywhere on the screen to de-select the To Do item. If you begin to write in the Graffiti area without selecting a To Do item, a new item is automatically created.
To set a priority level for a To Do item
PHONE May be either on or off
FLIP Open
You can arrange the tasks in your To Do List based on their relative levels of importance. The default setting for the To Do List is to arrange items by priority and due date, with priority 1 items (most important) at the top.
- Press the To Do List

- Tap the Priority number on the left side of the To Do item.
- Tap the Priority number for this item. (1 is most important; 5 is least important.)
To check off a To Do item
PHONE May be either on or off
FLIP Open
- Press the To Do List

- Tap the check box to the left of the To Do item.
You can set the To Do List to either show or hide the items that you have checked off (completed). You can also record the date you completed an item. To set these options, see "Displaying your To Do list" on page 240.
Setting Item Details
Use the To Do Item Details dialog to set or modify categories, to set due dates, or to delete To Do items.
To assign a priority or category to a To Do item
PHONE May be either on or off
FLIP Open
- Press the To Do List

-
Tap anywhere on the text of an item in the To Do List.
-
Tap Details to open the To Do Item Details dialog.
-
To assign a priority to the To Do item, tap 1, 2, 3, 4, or 5. You can sort the To Do list in order by priority.
-
To assign a category to the item, tap the ▼ next to Category. Select any category you have set up.
Categories can help you file and view individual To Do items into groups for easy review.
To set a due date
You can assign a due date for any To Do item. You can also sort the items in the list based on their due dates.
- Press the To Do List

- Tap No Date in the Details dialog to open the Due Date pick list.
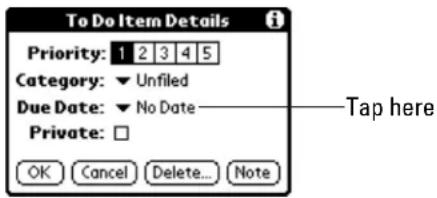
- Tap the Due Date for this item. Choose one of the following:
| Today | Assigns the current date. |
| Tomorrow | Assigns tomorrow's date. |
| One week later | Assigns a date exactly one week from the current date. |
| No Date | Removes the due date from the To Do item. |
| Choose date | Opens the Due Date dialog where you can chose any date you want. |
- Tap OK to confirm your selection and close the To Do Details dialog.
NOTE: If you turn on the Show Due Dates option, you can tap directly on the due date in the To Do List to open the pick list shown above in step 2.
Deleting a To Do item
There are three ways to delete a To Do item—simply delete the text of the item, use the Menu command, or use the Details dialog.
To delete a To Do item by erasing the text
PHONE May be either on or off
FLIP Open
- Press the To Do List

-
On the To Do list, drag the stylus through the text of the item you want to delete.
-
Draw the backspace stroke to erase the text.
To delete a To Do item using the menus
PHONE May be either on or off
FLIP Open
- Press the To Do List
- Tap anywhere in the item you want to delete.
- Tap the Menu icon.
- From the Record menu, tap Delete Item.

To delete a To Do item using the Details dialog
PHONE May be either on or off
FLIP Open
- Press the To Do List
- Tap once on the item you want to delete.
- Tap Details.

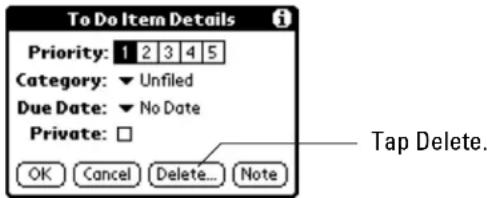
- Tap Delete.
- In the Delete Memo dialog, tap OK.
Displaying your To Do list
You can control which items appear in your To Do list and how they are arranged. For example, you may not want to see items which have been completed or you might want to see due dates for all current items.
To change the Show Options settings
PHONE May be either on or off
FLIP Open
- Press the To Do List

- Tap Show in the To Do List screen to open the To Do Preferences dialog.
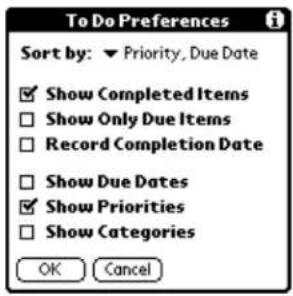
- Select any of the following settings:
| Sort by | Sort the To Do items in one of the following ways:■Priority, Due Date ■Category, Priority■Due Date, Priority ■Category, Due Date |
| Show Completed Items | Include completed tasks in the To Do List. If you turn off this setting, items disappear from the list when you check them. |
| Show Only Due Items | Show only items that are currently due, past due, or have no due date. With this setting, items do not appear in the list until their due date. |
| Record Completion Date | Replace the due date with the completion date when you complete an item. If you do not assign a due date, the completion date is recorded when you check off the item. |
| Show Due Dates | Display due dates for each item. An exclamation mark shows that the item is still incomplete and the due date is past. |
| Show Priorities | Show the priority numbers for all To Do items. |
| Show Categories | Show the category for each To Do item on the far right of the To Do List screen. |
- Tap OK to confirm your selections and close the dialog.
Using the To Do List menus
Record menu
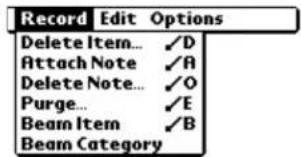
| Delete Item | Remove an item from the To Do List. Select the item before choosing this command. The Kyocera smartphone removes the item from the To Do list, but keeps a copy which is archived on your computer during your next HotSync operation. To remove the event completely, uncheck the Save archive copy on PC check box. |
| Attach Note | Add a note to the current To Do item. |
| Delete Note | Remove a note from a To Do item. Select the To Do item before choosing this command. |
| Purge | Delete all completed items. Completed items remain in the To Do List until you use this command. The Kyocera smartphone removes the items, but keeps copies which are archived on your computer during your next HotSync operation. To remove the events completely, uncheck the Save archive copy on PC check box. |
| Beam Item | Beam the current To Do item to to another device with an infrared port. |
| Beam Category | Beam all To Do Items in the current category to another device with an infrared port. |
Options menu
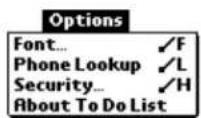
| Font | Choose a different font (text) style for your To Do items. |
| Phone Lookup | Look up a phone number. |
| Security | Select Show Records, Mask Records, or Hide Records. |
| About To Do List | View version information for the To Do List application. |
Using Voice Dial, you make and answer calls by speaking commands. You can put up to 30 names from your Address Book in the Voice Book and call them simply by speaking their names.
Voice Dialing is particularly effective when the phone is in a hands-free car kit. You can then make and answer calls without taking your hands from the wheel.
In this chapter
■ Training Voice Dial page 244
■ Making and answering calls with Voice Dial page 245
Training Voice Dial
To use Voice Dial, you must first "train" the phone to recognize your voice. There are two types of voice tags to train.
Voice Book—You can put up to 30 names from your Address Book into your Voice Book. Once you have recorded these names, you can place calls simply by speaking them. You can record the voice tags using either the Address Book application or the Voice Dial application's Voice Book.
Command words—Command words are instructions to the phone such as "Wake up," "Yes," and "No." Once you have recorded these commands, you can instruct the phone to make voice calls. You must record these words using the Voice Dial application.
To put names in your Voice Book
PHONE On
FLIP Open
- Tap to view the Applications Launcher.
- Tap to open the Voice Dial application.
- Make sure that Voice Book appears in the pick list in the upper-right corner. If it does not, tap the ▼nd select Voice Book.
- Tap New.
A list of all the names in your Address Book appears. If you have not entered names in the Address Book yet, see “Creating Address Book entries” on page 95.
- Select a name and tap Add. If there is more than one phone number, select the one you want to use and tap Add.
- Follow the spoken instructions. When you hear "Speak a name," speak the name. Repeat the name when you are instructed to do so.
To train the command words
PHONE On
FLIP Open
- Tap to view the Applications Launcher.
- Tap to open the Voice Dial application.
- Tap the ▼ in the upper-right corner and select Control Words from the pick list.
- Tap the word or phrase you want to train. Then tap Train.
- When you hear the voice prompt, speak the command word. Repeat it when you are instructed to do so.
- Follow the instructions until the voice prompt says "Training completed."
Making and answering calls with Voice Dial
To make a call using voice commands
PHONE On
FLIP May be either open or closed
Before you can make a call using voice commands, you must "train" the phone to recognize your voice and you must place the names to be called in your Voice Book. See "Training Voice Dial" on page 244.
-
To activate voice dialing, do one of the following:
-
If the phone is in the cradle, in the hands-free car kit, or attached to external power, say "Wake-up" and wait for the beep. After the beep, say "Wake-up" again. If you prefer to use a different command than "Wake-up," you can train the phone to respond to another word.
■ If the phone is not in the cradle, in the hands-free car kit, or attached to external power, press
The message "Speak a name or press 📄 to redial" appears on the screen. The voice prompt says "Speak a name."
- Speak the name of the person you want to call.
■ If the phone recognizes the name from your Voice Book, the voice prompt says "Calling [name]" and places the call.
- If the phone does not recognize the name, the voice prompt says "Did you say ____?" and fills in the closest name match in your Voice Book. Answer "Yes" or "No" until the voice prompt speaks the correct name and places the call.
To answer a call using voice commands
PHONE On
FLIP May be either open or closed
-
If you want to answer incoming phone calls by voice, set up the phone as follows:
-
Place the phone in the cradle, in the hands-free car kit, or attach it to external power.
- Make sure the phone is not set to vibrate instead of ringing. (See “Setting Sounds preferences” on page 215.)
- Turn Auto-answer off. (See "Setting Phone preferences" on page 206.)
When you receive an incoming call, the voice prompt says "Incoming call. Answer?" or "Incoming roam call. Answer?" This message is given twice. If you do not respond, the phone rings.
- To accept the call, answer "Yes" or press any key except

- To reject the call, answer "No" or press 📄/0.
You can record, save, and play back short voice recordings on your smartphone. For example, you might record a memo reminding yourself of something you want to do or buy. You can quickly record the memo at any time when the phone is turned on and then play it back later.
In this chapter
■ Recording a voice memo page 248
■Replaying your voice memos page 250
■ Managing your voice memos page 251
Recording a voice memo
You can record about 60 seconds of short memos on your Kyocera smartphone.
As you record a memo, you can see how long it is (in seconds) on the screen. When there are approximately 5 seconds remaining, you hear the voice prompt “Please finish recording.” When the available space for memos is full, you hear the message “Maximum length recorded” and recording stops.
To record a voice memo using the shuttle

You can record a voice memo simply by holding in the shuttle.
- Press and hold the shuttle in.
After a few seconds, you hear "Please record at the tone" and a beep.
- Release the shuttle and record your memo.
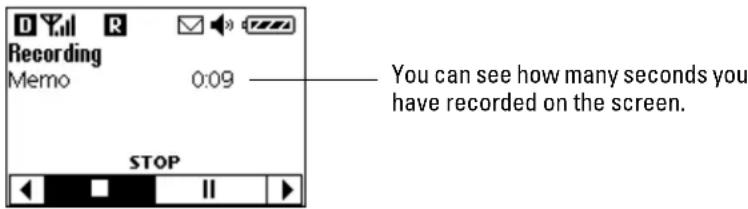
-
To pause the recording, roll the shuttle up or down until the PAUSE symbol || is highlighted. Then press the shuttle in. To resume recording after a pause, roll the shuttle up or down until the RESUME symbol ● highlighted. Then press the shuttle in.
-
To stop recording, press the shuttle in when the STOP symbol is highlighted.
To record a voice memo using the menu

You can also record a memo using the flip-closed menus. This method provides additional options while you record.
- From the home screen, press the shuttle in to open the menus.
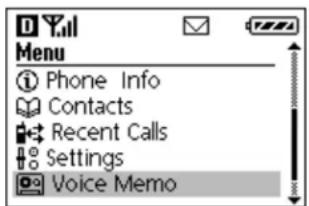
- Roll the shuttle down until Voice Memo is highlighted. Press the shuttle in to select it.
The Voice Memo screen appears.
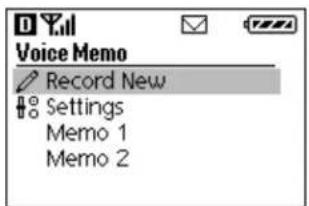
- With Record New highlighted, press the shuttle in.
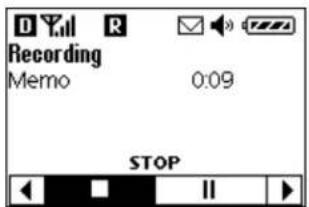
-
Record your memo.
-
Roll the shuttle up or down to scroll through the options at the bottom of the screen. When the option you want to select is highlighted, press the shuttle in.
■ Stop recording.
II Pause.
Play this memo.
Erase Erase this memo.
- If you have paused while recording a memo, resume recording. Otherwise, append a new voice memo to the end of the current memo.
Name Enter a name for this memo. See "To name a memo" on page 251.
-
When you have finished recording the memo, press the shuttle in when (Stop) is highlighted.
-
To return to the Voice Memo screen, press . C kit the voice memo application entirely and return to the home screen, press 📄/0
Replaying your voice memos
To replay a voice memo

- From the home screen, press the shuttle in to open the menus.
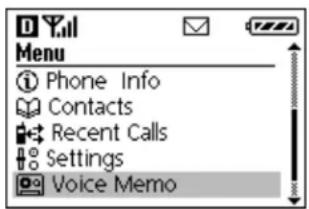
- Roll the shuttle down until Voice Memo is highlighted. Press the shuttle in to select it.
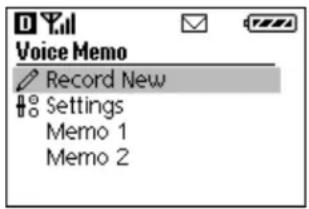
Your voice memos are automatically numbered. You can give the memos names if you prefer. See
- Roll the shuttle down until the memo you want to replay is highlighted. Then press the shuttle in.
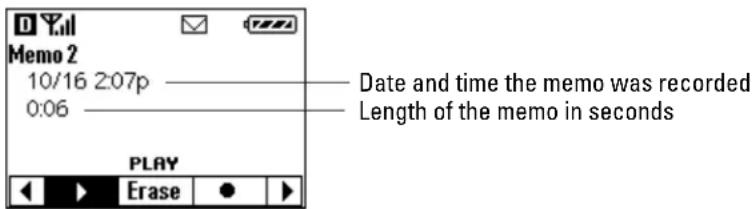
-
Press the shuttle in to play the memo.
-
Roll the shuttle up or down to scroll through the options at the bottom of the screen. When the option you want to select is highlighted, press the shuttle in.
Play this memo.
Erase Erase this memo.
- Append a new voice memo to the end of this memo.
Name Enter a name for this memo. See "To name a memo" on page 251.
- To close this memo and return to the Voice Memo screen, press . C kit the voice memo application entirely and return to the home screen, press

Managing your voice memos
To name a memo

By default, your voice memos are numbered. They appear on the screen as Memo 1, Memo 2, and so on. However, if you prefer, you can enter names for your memos.
- From the home screen, press the shuttle in to open the menus.

- Roll the shuttle down until Voice Memo is highlighted. Then press the shuttle in. The Voice Memo screen appears.
- Roll the shuttle down until the memo you want to name is highlighted. Then press the shuttle in.
- Roll the shuttle down until Name is highlighted at the bottom of the screen. Then press the shuttle in. The Memo Name screen appears.

The phone is now in text entry mode. Use the keypad to enter or delete text.
-
If you want to delete the memo's existing name, press Ⓒ. One letter is removed each time you press Ⓒ
-
To enter a new name, press the first letter of the name on the keypad.
For example, the 2 key is equivalent to A, B, or C. If you press the 2 key once, the letter A appears in the Memo Name window. If you press the 2 key twice, the letter B appears.
-
Wait a moment. The cursor moves one position to the right.
-
Press the key for the second letter of the name.
-
If you want to use upper-case and lower-case letters, roll the shuttle down until abc is highlighted. Then press the shuttle in to toggle between upper-case and lower-case letters.
NOTE: The menu bar shows the case you can change to, not the case you are presently using. If abc appears, you are entering capital letters. Press the shuttle in to switch to lower-case letters. If ABC appears, you are entering lower case letters. Press the shuttle in to switch to capital letters.
- When you have finished entering the name, roll the shuttle up or down until Save is highlighted. Then press the shuttle in.
To erase one memo

- From the home screen, press the shuttle in to open the menus.

- Roll the shuttle down until Voice Memo is highlighted. Then press the shuttle in to select it. The Voice Memo screen appears.

- Roll the shuttle down until the memo you want to erase is highlighted. Then press the shuttle in.
-
Roll the shuttle down until Erase is highlighted. Then press the shuttle in.
-
On the confirmation screen, with Yes highlighted, press the shuttle in to erase the memo.
To erase all memos

- From the home screen, press the shuttle in to open the menus.

- Roll the shuttle down until Voice Memo is highlighted. Then press the shuttle in. The Voice Memo screen appears.
- Roll the shuttle down until Settings is highlighted. Then press the shuttle in. The Settings screen appears.
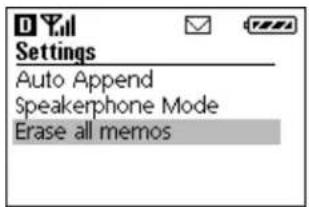
-
Roll the shuttle down until Erase all memos is highlighted. Then press the shuttle in.
-
On the confirmation screen, with Yes highlighted, press the shuttle in.
To adjust the Voice Memo settings

- From the home screen, press the shuttle in to open the menus.

- Roll the shuttle down until Voice Memo is highlighted. Then press the shuttle in. The Voice Memo screen appears.

- Roll the shuttle down until Settings is highlighted. Then press the shuttle in. The Settings screen appears.
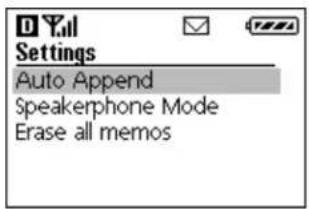
- Highlight the option you want to select. Then press the shuttle in.
| Auto Append | Yes—Each new voice memo is attached to the end of the previous memo.No—Each time you record, a new voice memo is created. (This is the default setting.) |
| Speakerphone Mode | Yes—The phone automatically uses speakerphone mode for all memos.No—When you record a memo, you can select either speakerphone or earpiece by pressing the speakerphone key [IMAGE]. |
| Erase all memos | Yes—Delete all existing memos on the phone. |
| No—Do not delete all existing memos. |
- In the confirmation screen, answer Yes or No.
This chapter explains how to reset the Kyocera smartphone, how to troubleshoot problems, and where to find help.
If you encounter a problem with your phone, look in this section for the description that most closely matches the symptoms and try the suggestions listed.
For troubleshooting tips not included in this handbook, refer to either the README.TXT file or the HelpNotes file located in the C:\Palm directory on your computer. These files are also on the installation CD-ROM and diskettes.
In this chapter
■ Where to find help, page 257
■ Resetting the phone, page 258
■ Troubleshooting tips, page 260
■ Phone care, page 263
■ Safety information, page 267
Where to find help
If you have a problem using the Kyocera smartphone, review the following:
Your service provider
For most questions about your phone and phone service, contact your service provider. Your service provider's customer support department can answer questions about your phone, phone bill, call coverage area, and specific features (such as call forwarding or voice mail) available to you.
Your phone documentation
If you have questions about the features of the phone, refer to this guide, as well as the Kyocera Smartphone User's Guide.
See also the README file and HelpNotes. (These files are located in the folder where you installed the Kyocera smartphone Desktop software on your computer, usually C:\Palm. If they are not there, you'll find them on your installation CD.) You can also download the latest versions of all documents from the Kyocera Wireless Corp. Web site (www.kyocera-wireless.com)
Help on the computer Desktop
The Kyocera smartphone Desktop software includes Online Help. Just open the Help menu.
Help on the phone
Many of the dialogs that appear on the Kyocera smartphone have an online tips icon in the upper-right corner. Online tips contain a summary of what is required by the dialog, shortcuts for using the dialog, or other useful information. Online tips always relate to the function you are currently doing.
- Tap in the upper-right corner of a dialog to open the Tips dialog.
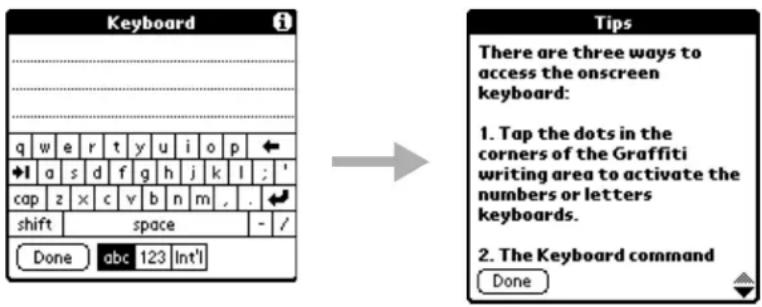
-
Tap to scroll through the information.
-
Tap Done when you have finished.
Customer Care Center
If you have additional questions, contact the Kyocera Wireless Corp. Customer Care Center in any of these ways:
■ Web site: www.kyocera-wireless.com
■ Telephone: (800) 349-4478 (U.S.A and Canada only) or (858) 882-1401
■ Email: phone-help@kyocera-wireless.com
Before requesting support, please try to reproduce and isolate the problem. When you contact the Customer Care Center, call on another phone (not the Kyocera smartphone) since you may be instructed to remove the battery or reset the phone. Be ready to provide the following:
■ The name of your service provider
■ The actual error message or problem you are experiencing
■ The steps you take to reproduce the problem
- The phone's electronic serial number (ESN). This number is in the battery compartment underneath the battery. You must remove the battery to see it.
Standards and safety information
For standards and safety information, visit the Cellular Telecommunications Industry Association (CTIA) Web site at www.wow-com.com or call (888) 901-SAFE (toll-free, U.S.A. only).
Resetting the phone
Under normal circumstances, you may never have to reset the Kyocera smartphone. However, on rare occasions, the phone may "hang" (no longer respond to buttons or taps with the keypad either open or closed). If the phone does not respond to taps or key presses with the flip either open or closed, you may need to perform a reset to get your phone running again.
There are two types of resets—a soft reset and a hard reset. In a soft reset, all records and entries are retained. In a hard reset, all records and entries are erased. If you must do a hard reset, you can restore any data that you previously synchronized using a HotSync operation.
To perform a soft reset
PHONE Off FLIP Open
A soft reset tells the phone to stop what it is doing and start over again. All records and entries are retained. This type of reset is usually sufficient to solve any problem.
-
Turn the phone over. Open the battery door on the back of the phone.
-
Use the stylus to press the Reset button.
-
Replace the battery cover.
The Palm logo screen appears and remains on the screen for several seconds while the phone tests its memory and performs its startup operations.
You can also perform a soft reset by removing and reinstalling the battery.
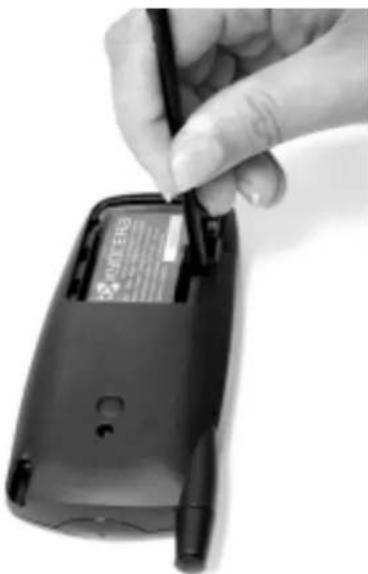
natural_image
Hand inserting a black cable into a black flip phone (no visible text or symbols)To perform a hard reset
PHONE Off FLIP Open
A hard reset tells the phone to start over and to erase all existing data.
CAUTION: When you do a hard reset, all entries stored in the phone are erased. Therefore, never perform a hard reset unless a soft reset has not solved the problem, or you intend to delete data, or you have been instructed to do so by Technical Support. After a hard reset, you can restore previously synchronized data from your computer to the phone by performing a HotSync operation.
-
With the flip open, turn the phone over. Open the battery door on the back of the phone.
-
Press and hold down the backlight key on the top of the phone.
-
Keep holding down the backlight key as you do one of the following:
- Use the stylus to press the reset pin. -or-
■ Remove and reinsert the battery. (Make sure the phone is turned off before removing the battery.)
- When the Palm logo appears, release the backlight key.
The following message appears:
Erase all data? YES - "up" button NO - any other button
If you don't see this message, you have not performed a hard reset.
- Press the Up button below the screen to complete the hard reset. Press any other button to cancel the procedure.
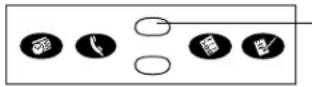
Press the Up button to complete the hard reset and delete your data. Press any other button to cancel the hard reset
The calibration screen appears.
NOTE: If the calibration screen does not appear, the hard reset was not accomplished. Go back to step 1 and try again.
-
Follow the instructions to calibrate the screen. When calibration is complete, the smartphone is ready to use.
-
Run a HotSync operation to restore the data on your computer to the smartphone.
Troubleshooting tips
HotSync operations
The HotSync operation fails to start.
☐ Make sure your computer is turned on, and that it does not shut down automatically as part of an energy-saving feature.
☐ Check the cable between the cradle and the computer serial port.
☐ Make sure you selected the correct serial port on the Local tab in the Setup dialog. Select the port where you connected the cradle.
☐ Make sure you are not running another program—such as America Online, CompuServe or WinFax—that uses the same serial port.
☐ Verify that HotSync Manager is running. If it is running, exit and restart it.
☐ Make sure you selected Local from the HotSync Manager menu or the Kyocera smartphone Desktop menu.
The HotSync operation does not run to completion.
☐ Do not turn the phone on or off during a HotSync operation.
☐ If you have problems using the As Fast As Possible option or a specific speed, select a lower baud rate setting on the Local tab in the Setup dialog.
☐ Read the HotSync Log for the user account for which you are synchronizing the phone and computer. The HotSync Log may indicate where the problem is occurring.
General troubleshooting
The phone does not turn on.
□ Adjust the contrast control.
□ Make sure the battery is installed properly.
☐ Charge the battery for about 15 minutes.
☐ Replace the battery. If the phone still does not operate, try a soft reset. (See "Resetting the phone" on page 258.)
The phone doesn't recognize my handwriting.
□ When you enter text with the stylus, you must use the Graffiti characters. See "Writing with the stylus" on page 52.
☐ Make the Graffiti character strokes in the Graffiti writing area, not on the display part of the screen.
☐ Make sure you are writing the strokes for letters in the left side, and the strokes for numbers in the right side of the Graffiti writing area.
□ Make sure that Graffiti is not shifted into extended or punctuation modes. See Writing with the stylus, page 52.
☐ Recalibrate the screen. Choose Digitizer from the Preferences pick list and follow the directions.
When I tap screen icons, the right application or feature does not open.
☐ Recalibrate the screen. Choose Digitizer from the Preferences pick list and follow the directions.
When I tap nothing happens.
☐ Not all applications or screens have menus. Try a different application.
Beaming does not function.
☐ Verify that the Beam feature is enabled (on the General Preferences screen). See Beaming information, page 91.
□ Make sure the application you are using supports the Beam feature.
☐ Verify that the path between the two devices is clear of obstacles.
☐ Try using the Beam feature at different distances. The usual distance for beaming information is between five centimeters (approximately 2 inches) and one meter (approximately 40 inches). However, in some cases, you may find that greater distances work more effectively.
When data is beamed at the smartphone, an out-of-memory message appears.
☐ The Kyocera smartphone requires at least twice the amount of memory available as the data you are receiving. For example, if you are receiving a 30K application, you must have at least 60K free.
A message appears stating that the memory is full.
☐ Delete unused memos and records. If necessary, you can save these records on your computer using the Save Backup Copy option that appears in the Delete dialogs.
☐ If you have installed additional applications on your phone, remove them to recover memory.
Network
I can't get email on my phone.
☐ To receive email wirelessly, you must have over-the-air digital data coverage in your area. Contact your service provider.
☐ If you do not have digital data coverage, you may still be able to transfer email between your computer and the Kyocera smartphone during synchronization. You must have a Palm OS email program loaded on your phone. Exact procedures depend on the email program you are using.
I can't connect to the Web on my phone.
☐ To access the Internet, you must have over-the-air digital data coverage in your area. Contact your wireless telephone service provider.
Before you can open a Web site on your phone, the Network Preferences must besetup. This is usually done by your service provider. See Entering network settings, page 173, and Setting Phone preferences, page 206.
Security
I forgot the password, and my phone is not locked.
☐ You can use the Security application to delete the password. If you do this, the Kyocera smartphone deletes all entries marked "Private." However, you can save and restore them using the following procedure:
a. Perform a HotSync operation first to back up your information.
b. From the Applications Launcher, tap 🔍. Tap the "Assigned" box next to Password. In the dialog, tap Lost Password. In the confirmation dialog, tap Yes. Your password is deleted; all entries marked private are also removed.
c. Synchronize the phone and your computer to restore the private entries.
I forgot the password, and my phone is locked.
☐ If you lock the phone and then forget the password, you must perform a hard reset to continue using your Kyocera smartphone. See "Resetting the phone" on page 258.
Applications
The current date doesn't appear when I tap Today.
☐ Make sure the General Preferences screen displays the current date. See Setting General preferences, page 204.
Entries seem to be missing in various applications.
☐ Tap the Categories pick list in the upper-right corner of the screen. Choose All to display all of the records for the application.
☐ Check the Security application and make sure that the Private Records setting is set to Show private records.
My Memo Pad entries are not sorted correctly.
☐ If you cannot manually arrange the order of the memos in the List screen, check the Memo Preferences setting. Make sure that Sort by is set to Manual. See CHapter 9, "Memo Pad."
☐ The sorting preferences may be different on the Kyocera smartphone Desktop and in the Kyocera smartphone. Sorting preferences from the Desktop software are not transferred to the phone. The phone uses the sorting preferences you enter in the Memo Preferences screen.
In the Date Book Week View, I can't select overlapping events.
☐ In the Week View, you cannot select overlapping events that have the same start time. If you have two or more events with the same start time, choose the Day View for that day to see the overlapping events.
The Call History application shows a different number of calls on the main screen and the statistics screen.
☐ If you synchronize more than one Kyocera smartphone with the same user name, the statistics will differ. Call statistics show the calls on one phone. Call History shows the calls made by one user on all devices synchronized under the same name. (Be aware, however, that it is not a good practice to synchronize more than one device with the same user name. Other problems may occur.)
Phone care
Use these guidelines to optimize the performance and life of your phone, antenna, and battery.
Phone
☐ Do not let unauthorized personnel install or service your phone or accessories. Faulty installation or service may be dangerous and will invalidate your warranty.
☐ Only use approved accessories. Use of any unauthorized accessories may be dangerous and will invalidate your phone warranty if the accessories cause damage or a defect to the phone. See “Accessories” on page 267.
□ Keep the phone dry. If the phone gets wet, turn the power off immediately. Let it dry before you use it again. In general, treat the Kyocera smartphone as you would a pocket calculator or other small electronic instrument.
☐ To avoid scratching the screen, always use the stylus or other plastic-tipped pen intended for a touch-sensitive screen. Never use a pen, pencil, or other sharp object on the surface of the screen.
☐ Treat the phone gently. The touch-sensitive screen contains a glass element. Do not drop the phone or subject it to any strong impact. Do not carry your phone in your back pocket. If you sit on it, the glass may break.
☐ Protect the phone from temperature extremes. Do not leave it on the dashboard of a car on a hot day, and keep it away from heaters and other heat sources. Store it out of direct sunlight.
☐ Do not store or use the phone in any location that is extremely dusty, damp, or wet.
☐ Use a soft, damp cloth to clean the phone. Use a soft, dry cloth to clean the screen.
☐ Avoid using suntan lotion around the phone. Chemicals in suntan lotions can damage your phone.
Antenna
□ Fully extend the antenna when you place or receive a call.
☐ Do not touch the antenna while you are on a call. Do not bend or twist the antenna.
☐ When using the headset, keep the headset wire away from the antenna.
☐ When using the phone to connect to the Internet or send and receive email, make sure the extended antenna is at least 20 centimeters (8 inches) away from other people and is pointed away from them.
Battery
The Kyocera smartphone has a rechargeable lithium ion battery. You can charge the phone battery in either of these ways:
- Plug the power cable directly into the base of the phone. Plug the other end into an AC power outlet.
- Plug the power cable into the cradle. Plug the other end into an AC power outlet. Then place the phone in the sync cradle.
Leaving the phone in the cradle when you are not using it is a convenient way to keep the battery charged. You can purchase an additional battery, if you wish, that can be charged in the rear port of the cradle at the same time.
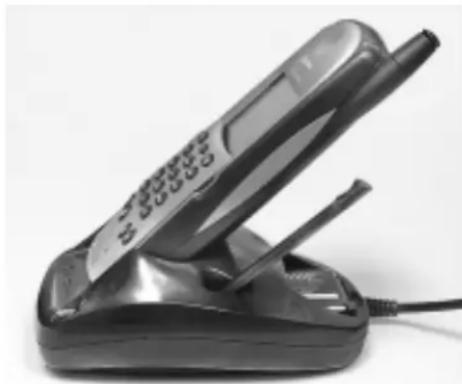
natural_image
Black foldable mobile phone with extended screen and stand (no visible text or symbols)Caution
☐ Do not disassemble or short-circuit the battery.
☐ If you have not used an internal or external battery for more than a month, recharge it before using it.
☐ Do not charge any battery if the temperature is below 32^ F ( 0^ C) or above 122^ F ( 50^ C).
☐ Do not store any battery in hot areas for long periods of time. Use these storage guidelines:
under 1 month: -4^ to 140^ F ( -20^ to 60^ C)
over 1 month: -4°F to 113°F (-20° to 45°C)
□ Never dispose of any battery in or near a fire. It could explode.
Tips for improving battery performance
As you use your Kyocera smartphone, you may notice that the battery seems to drain more quickly at some times than at others. Follow these suggestions to maximize battery life.
□ Fully charge the battery before prolonged use.
☐ Turn off the phone if you are not planning to make or receive calls for a while. Even in standby mode, the phone uses a small amount of power to maintain contact with the local phone provider. Remember that you can use all the Palm applications without turning on the phone.
□ Fully extend the antenna when on a call. In addition to providing the best reception, the antenna draws less power when it is up.
☐ Be aware that certain features draw more power than others. You may want to limit or turn off those that are not important to you.
| Backlight | Minimize the use of the backlight. |
| Vibrate | Using the vibrate feature to signal incoming calls requires more power than using the ringer. Consider using the vibrate feature only in meetings and public places. |
| High volume settings | High volume settings for the earpiece and ringer use more power than low settings. Select as low a setting as is comfortable for you. |
| Alerts | Heavy use of alerts for voice mail and other messages drains battery power, particularly if you have set up persistent alerts that repeat frequently. You may wish to limit alerts to those things that are most important. |
| Auto-off after | Select a shorter “Auto-off after” period on the Power Preferences screen. This feature blanks the screen and deactivates the Palm applications on your phone after 1, 2, 3, 5, or 15 minutes of non-use. The shorter a time you select, the more energy is conserved. |
| Data services | Data calls require more power than normal voice calls. |
| Accessories | Unplug all non-charging accessories such as data cables from the phone when you are not using them. |
| Speakerphone | Using the phone in Speakerphone mode requires more power than receiving sound through the earpiece. |
| Beaming | If you don’t use the Beaming feature to receive data from other phones or Palm connected devices, turn Beam Receive Off. |
Additional factors that affect battery performance
In addition to settings and features you can adjust, there are a number of service-related factors that affect the amount of power your phone draws from the
battery. Although you cannot control these factors, they are listed here to help you understand why battery talk times and standby times may vary.
| Analog-only areas | In analog-only service areas, your phone uses much more power (both on calls and in standby mode) than when it is in a digital service area. It does not matter whether the phone is roaming or in its home area |
| Distance from base stations | In CDMA digital mode, the farther you are from a base station, the more power your phone uses. |
| Calls vs. standby time | Your phone uses more power during calls than when it is in standby mode. |
| High-traffic times and places | In CDMA digital mode, the more people there are using the network, the more power your phone uses. At high-traffic times (such as weekends) or in high-traffic places (such as shopping malls), the phone must draw more power from the battery than at other times. |
| No service areas | In areas with no wireless phone service at all, your phone uses more power as it searches for a signal. If it cannot locate a signal after a set period of time, your Kyocera smartphone goes into power-save mode. |
| Changes in carrier | As you travel, your phone switches to other service providers. These other providers may have network settings that are different from your home service provider. Network settings can affect a phone's performance in a given area. |
Replacing the battery
If you have to replace the battery in your Kyocera smartphone, be aware of the following considerations.
☐ If the battery becomes low in the course of normal use, an alert appears on the screen describing the low battery condition. When you see the alert, perform a HotSync operation to back up your data before you replace the battery. This helps prevent accidental data loss.
☐ If the Kyocera smartphone does not turn on when you press the Power/End key on the keypad, recharge the battery immediately.
☐ Before replacing the battery, turn the phone off. Never remove the battery while the telephone features are active. To verify that the phone is turned off, open the flip. The words "Phone is off" appear at the top of the screen.
Only remove the battery to replace it with another battery. Don't leave the battery out of the Kyocera smartphone. For example, if your battery becomes drained while you are traveling and you don't have a second battery or a cradle to recharge it, it is better to leave the drained battery in the phone than to remove it.
☐ If the battery drains completely, the phone no longer operates. However, the built-in backup battery stores your clock settings for about two days and your data for about seven days. There is enough residual energy in the battery to store the data, but not enough to turn on the phone.
☐ If you leave a drained battery in the phone for an extended period of time (more than seven days), you can lose all of the stored data. If this happens, replace the battery and reset the phone. Then perform a HotSync operation to restore data from your computer.
☐ Whenever you remove the battery and reinsert it, the Kyocera smartphone does a soft reset. No information is deleted in a soft reset; all records and entries are retained. For details, see “Resetting the phone” on page 258.
□ After you have replaced the battery, always check the clock settings.
Accessories
Accessories for your phone may include a Hands-free Headset, travel charger, data cable, and more.
To purchase accessories, visit www.kyocera-wireless.com/store. You may also call (800) 211-1537 (U.S.A. only) or (510) 683-4004.
Safety information
Radio frequency (RF) energy
Your Kyocera smartphone is a radio transmitter and receiver. When it is on, it receives and also sends out RF energy. Your service provider's phone network controls the power level of the RF signal. This power level can range from 0.006 watts to 0.6 watts.
There are situations in which wireless phones must be turned off for reasons of safety. You can quickly turn off the phone simply by holding down the 📣/0 on the keypad for a few seconds.
Exposure to RF energy
In August 1996, the U.S. Federal Communications Commission (FCC) adopted RF exposure guidelines with safety levels for hand-held wireless phones. These guidelines are consistent with the safety standards previously set by both U.S. and international standards bodies in the following reports:
■ ANSI C95.1 (American National Standards Institute, 1992)
■ NCRP Report 86 (National Council on Radiation Protection and Measurements, 1986)
■ ICNIRP (International Commission on Non-Ionizing Radiation Protection, 1996)
Medical devices
Pacemakers—If your portable wireless phone is too close to a pacemaker, the phone's RF energy may interfere with the pacemaker's operation. The Health Industry Manufacturers Association and the wireless technology research community recommend that you follow these guidelines to minimize the potential for interference.
■ Always keep the phone at least six inches (15 centimeters) away from your pacemaker when the phone is turned on.
■ Do not carry your phone near your heart.
■ Use the ear opposite the pacemaker.
- If you have any reason to suspect that interference is taking place, turn off your phone immediately.
Hearing aids—Some digital wireless phones may interfere with hearing aids. In the event of such interference, you may want to consult your service provider or call the customer service line to discuss alternatives.
Other medical devices—If you use any other personal medical device, consult the manufacturer of the device to determine if it is adequately shielded from external RF energy. Your physician may be able to help you obtain this information.
In health care facilities—Turn your phone off in health care facilities when instructed. Hospitals and health care facilities may be using equipment that is sensitive to external RF energy.
Avoiding potentially unsafe areas
Posted facilities—Turn your phone off in any facility when posted notices require you to do so.
Aircraft—FCC regulations prohibit using your phone on a plane that is in the air. Turn your phone off before boarding aircraft.
Vehicles—RF signals may affect improperly installed or inadequately shielded electronic systems in motor vehicles. Check with the manufacturer or its representative regarding your vehicle. You should also consult the manufacturer of any equipment that has been added to your vehicle.
Blasting areas—To avoid interfering with blasting operations, turn your phone off when you are in a blasting area or in areas posted “Turn off two-way radio.” Obey all signs and instructions.
Potentially explosive atmospheres—Turn your phone off when you are in any area with a potentially explosive atmosphere. Obey all signs and instructions. Sparks in such areas could cause an explosion or fire resulting in bodily injury or even death.
Areas with a potentially explosive atmosphere are often, but not always, clearly marked. They include
■ Fueling areas such as gas stations
■ Below deck on boats
■ Transfer or storage facilities for fuel or chemicals
■ Vehicles using liquefied petroleum gas, such as propane or butane
- Areas where the air contains chemicals or particles such as grain, dust, or metal powders
■ Any other area where you would normally be advised to turn off your vehicle engine
Driving safely
Before you use your phone while driving, check the local laws and regulations on the use of portable wireless phones in vehicles. Always obey them, and exercise caution while driving.
The following guidelines are based on recommendations of the Cellular Telecommunications Industry Association (CTIA).
- Get to know your wireless phone and its features such as speed dial and redial.
- Use a hands-free device such as the Hands-free Headset. For ordering information, see "Accessories" on page 267.
- Position your wireless phone within easy reach. If you get an incoming call at an inconvenient time, let your voice mail answer it for you.
- Let the person with whom you are speaking know you are driving.
- Do not utilize any of the Palm applications while driving.
- Dial sensibly. If possible, place calls when you are not moving or before pulling into traffic.
- Do not engage in stressful or emotional conversations.
- Use your wireless phone to call for help. Remember, 9-1-1 is a free call (U.S.A. only) on your wireless phone!
- Use your wireless phone to help others in emergencies. Call roadside assistance or other non-emergency wireless assistance numbers when necessary.
For more information, call (888) 901-SAFE (in the U.S.A.) or visit CTIA's Web site at www.wow-com.com.
Failure to follow these instructions may lead to serious personal injury and possible property damage.
Air bags
If you have an air bag, DO NOT place installed or portable phone equipment or other objects over the air bag or in the air bag deployment area. Air bags inflate with great force. If equipment is not properly installed, you and your passengers risk serious injury.
Using the flip-closed menus, you can make many adjustments to the way your phone operates. These menus also include direct access to your Contacts list, Recent Calls list, and Messages list.
In this chapter
■ Making selections from flip-closed menus page 271
■ Phone Info menu page 275
■ Contacts menu page 275
■ Recent Calls menu page 275
■ Settings menu page 276
■ Voice Memo menu page 284
■Messages menu page 284
Making selections from flip-closed menus
When the phone is turned on and the flip is closed, the home screen appears. This screen displays status icons as well as the date and time. Across the bottom of the screen is a black bar. Depending on whether you are using the large icon view or the list menu view, you see either Menu or Phone Info on this bar.
Using list menus
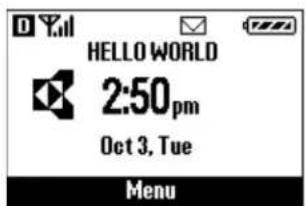
Using large icons
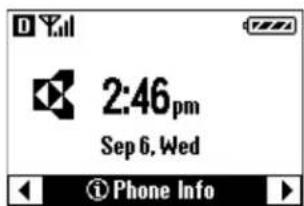
Follow the procedures in this section to open and use the flip-closed menus. To change from list view to icon view, see "Changing the menu view" on page 273.
When you are not on a call
To select options in List Menu view
PHONE
On
FLIP
Closed
When you turn on the phone, the word Menu appears in the black bar at the bottom of the home screen (unless you have changed your Display preferences).
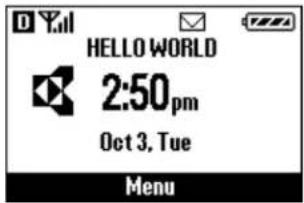
- Press the shuttle in to open the menu.
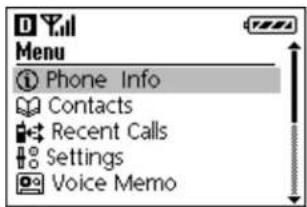
- Roll the shuttle up or down until the option you want to select is highlighted. Then press the shuttle in.
You may see other menu options under the first. For example, if you select Contacts, the following screen appears.
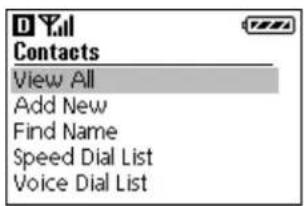
Press the shuttle up or down to move through the options. Press the shuttle in when the one you want is highlighted.
- Press the shuttle up or down to move through the options. Press the shuttle in to select a highlighted option.
- To exit from an option or move up one menu level, press call the shuttle up twice.
- To exit all menus and return to the home screen, either hold down . press 📞/0
To select options in Large Icon view

When you turn on the phone, the words Phone Info appear in the black bar at the bottom of the home screen.
- Roll the shuttle down to move to the right. Roll the shuttle up to move to the left. Each of the six top menu options appears on a separate screen with a large identifying icon.

Phone Info
Check information such as your phone number and current phone state (at home, roaming, or without service)
Contacts
Find and view information from your Address Book, Speed Dial list, or Voice Dial list
Recent Calls
See a list of your recent incoming, outgoing, and missed calls
Settings
Adjust sounds; make many other adjustments to your Kyocera smartphone
Voice Memo
Record, edit, or play voice memos
Messages
Check your voice mail
- When you see the option you want to select, press the shuttle in.
During a call
During a call, the menu strip displays the word Options. Press the shuttle in to see the following options:
Phone Info Check information such as your phone number and current phone state (at home, roaming, or without service)
Volume Press the shuttle up or down to adjust the volume during a call.
Mute or Unmute Mute the sound so the caller cannot hear you.
Pause or Release If you have put hard pauses in the number you are calling, the phone stops dialing when it reaches the hard pause. The options Pause and Release appear. Select Release to continue dialing. See "To enter pauses in a phone number" on page 99.
Changing the menu view
You can view the top level menus as either individual icons or a list. To charge the view, follow these steps.
-
From the home screen, press the shuttle in to open the menu.
-
On the Menu screen, roll the shuttle down until Settings is highlighted. Then press the shuttle in.
- Roll the shuttle down until Display is highlighted. Then press the shuttle in to open the Display Settings menu.
- Roll the shuttle down until Main Menu View is highlighted. Then press the shuttle in.
-
Roll the shuttle down until the option you want is highlighted. Then press the shuttle in.
-
Press to turn to the home screen.
If you selected Large Icons, the words Phone Info appear at the bottom of the screen. If you selected List Menus, the word Menu appears at the bottom of the screen.
Phone Info menu
Phone Info
Select Phone Info to see your phone number, the amount of memory you have available, and the phone's current status (for example Digital Roam).
Contacts menu
Contacts
Select Contacts to view information or place calls to the people or businesses in your Address Book, Speed Dial list, or Voice Dial list.
View All
Roll the shuttle up or down to scroll through your contacts. With a contact highlighted, press the shuttle in to see all the phone numbers for this entry. Highlight the number you want to call and press 📞
Add New
Open the flip. The Address Book appears where you can add a new record.
Find Name
Use the keypad to enter a name to search for in the Address Book.
Speed Dial List
Roll the shuttle up or down to scroll through the list of your Speed Dial numbers. Press 📄 all the highlighted entry.
Voice Dial List
Roll the shuttle up or down to scroll through the list of your Voice Dial numbers.
Recent Calls menu
Recent Calls
Select Recent Calls to view the 30 most recent unique calls. Roll the shuttle up or down to move through the list. With a call highlighted, press the shuttle in to see information about the call. To return a call, highlight the entry and press
Settings menu
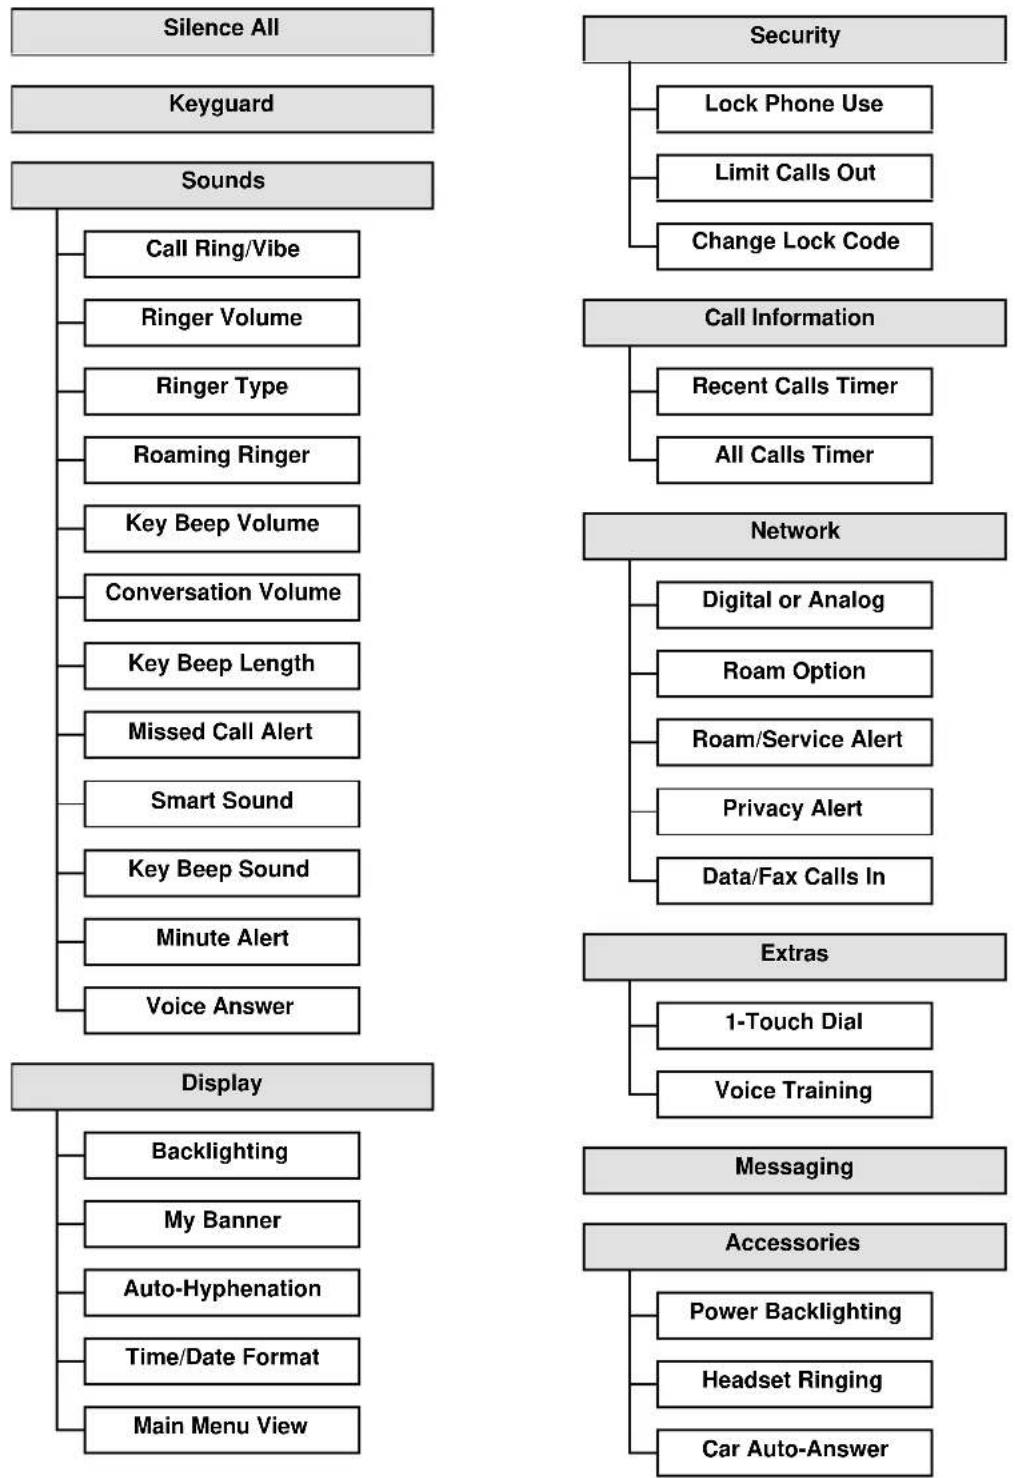
flowchart
graph TD
    A["Silence All"] --> B["Keyguard"]
    A --> C["Sounds"]
    C --> D["Call Ring/Vibe"]
    C --> E["Ringer Volume"]
    C --> F["Ringer Type"]
    C --> G["Roaming Ringer"]
    C --> H["Key Beep Volume"]
    C --> I["Conversation Volume"]
    C --> J["Key Beep Length"]
    C --> K["Missed Call Alert"]
    C --> L["Smart Sound"]
    C --> M["Key Beep Sound"]
    C --> N["Minute Alert"]
    C --> O["Voice Answer"]
    P["Security"] --> Q["Lock Phone Use"]
    P --> R["Limit Calls Out"]
    P --> S["Change Lock Code"]
    T["Call Information"] --> U["Recent Calls Timer"]
    T --> V["All Calls Timer"]
    W["Network"] --> X["Digital or Analog"]
    W --> Y["Roam Option"]
    W --> Z["Roam/Service Alert"]
    W --> AA["Privacy Alert"]
    W --> AB["Data/Fax Calls In"]
    AC["Extras"] --> AD["1-Touch Dial"]
    AC --> AE["Voice Training"]
    AF["Display"] --> AG["Backlighting"]
    AF --> AH["My Banner"]
    AF --> AI["Auto-Hyphenation"]
    AF --> AJ["Time/Date Format"]
    AF --> AK["Main Menu View"]
    AL["Accessories"] --> AM["Power Backlighting"]
    AL --> AN["Headset Ringing"]
    AL --> AO["Car Auto-Answer"]
Silence All option
Use Silence All to quickly turn off all the sounds on your Kyocera smartphone. This feature is useful during meetings, for example, when you do not want the phone to make any noise. All ringers, alerts, and other tones are silenced.
Silence All
Select Silence All to turn all sounds off. Select from the following options:
■ No, normal: Sounds are on.
- Yes, vibe only: The phone vibrates when you receive an incoming call or other message alert.
- Yes, lights only: The backlight flashes when you receive an incoming call or other message alert.
Keyguard option
Keyguard protects your phone against accidental key presses, for example, if the phone is turned on while it is in a briefcase or handbag. When Keyguard is on, the screen is blank and the LED flashes, but keypad is locked. You can still answer calls when Keyguard is on, but you cannot make any calls (including E911 calls) until you turn Keyguard off.
Keyguard
Select Keyguard to lock the keypad and put the phone in power-save mode. Select from the following options:
■Guard Now: Turn on Keyguard immediately.
■ Auto-Guard on Sleep: Turn on Keyguard whenever the smartphone has not been used for the time you specified in the Phone Preferences screen (1, 2, 3, 5, or 15 minutes).
- Disable Auto-Guard: Do not turn on Keyguard automatically when the smartphone is not in use.
Sound options
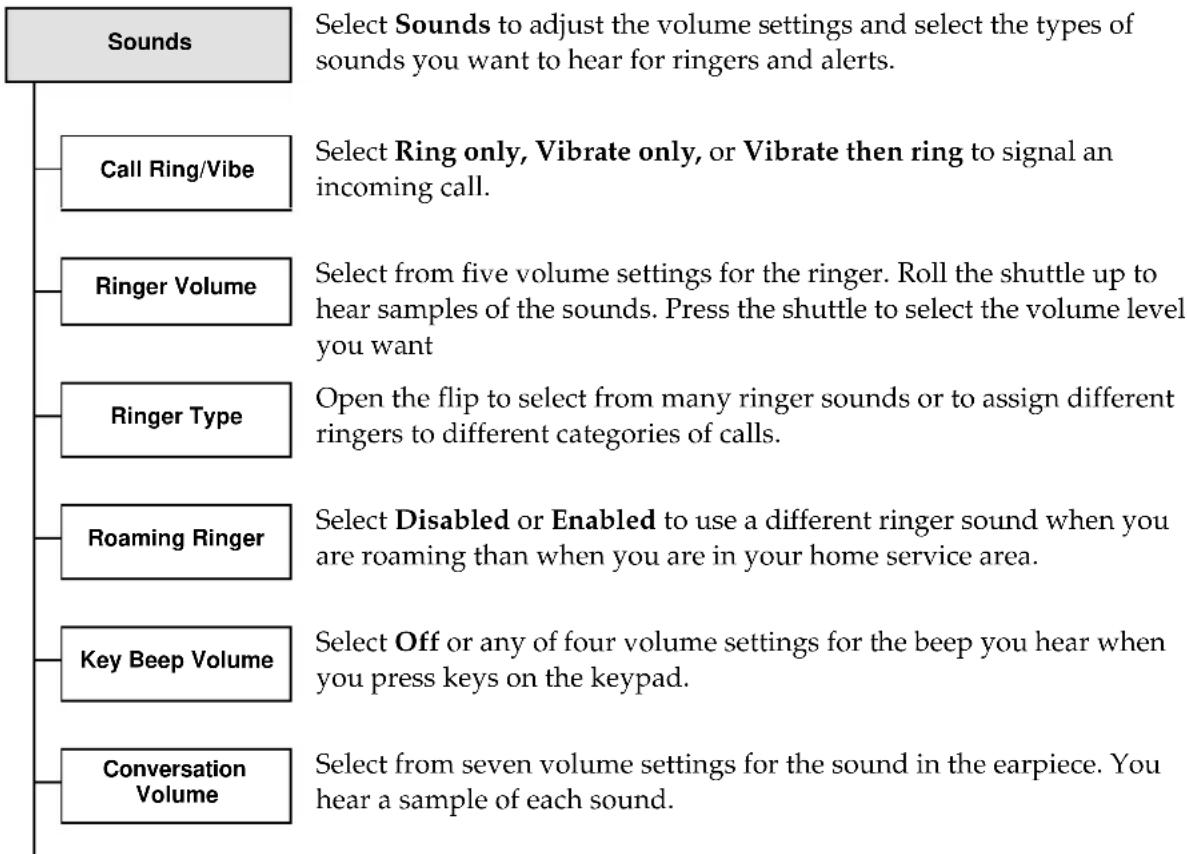
| Key Beep Length | Select Normal or Long to set the length of the tones you hear when you make a call. |
| Missed Call Alert | Select Disabled or Enabled. When this alert is on, you hear a single tone every five minutes to signal a missed call. |
| Smart Sound | Select Disabled or Enabled. When Smart Sound is on, the phone automatically adjusts earpiece volume during a call based on the surrounding noise levels. |
| Key Beep Sound | Select Tones or Clicks to set the sound you hear when you press keys on the keypad. |
| Minute Alert | Select Disabled or Enabled. When this alert is on, you hear a beep 10 seconds before the end of each minute during a call. |
| Voice Answer | Select Disabled or Enabled. When this alert is on, after one ring, a voice prompt asks you whether you want to answer the phone or not. If you answer “Yes,” the call is answered. If you answer “No,” the call is sent to your voice mail. To use this method, the phone must be attached to a hands-free car kit, the sync cradle, or other powered accessory. |
Display options
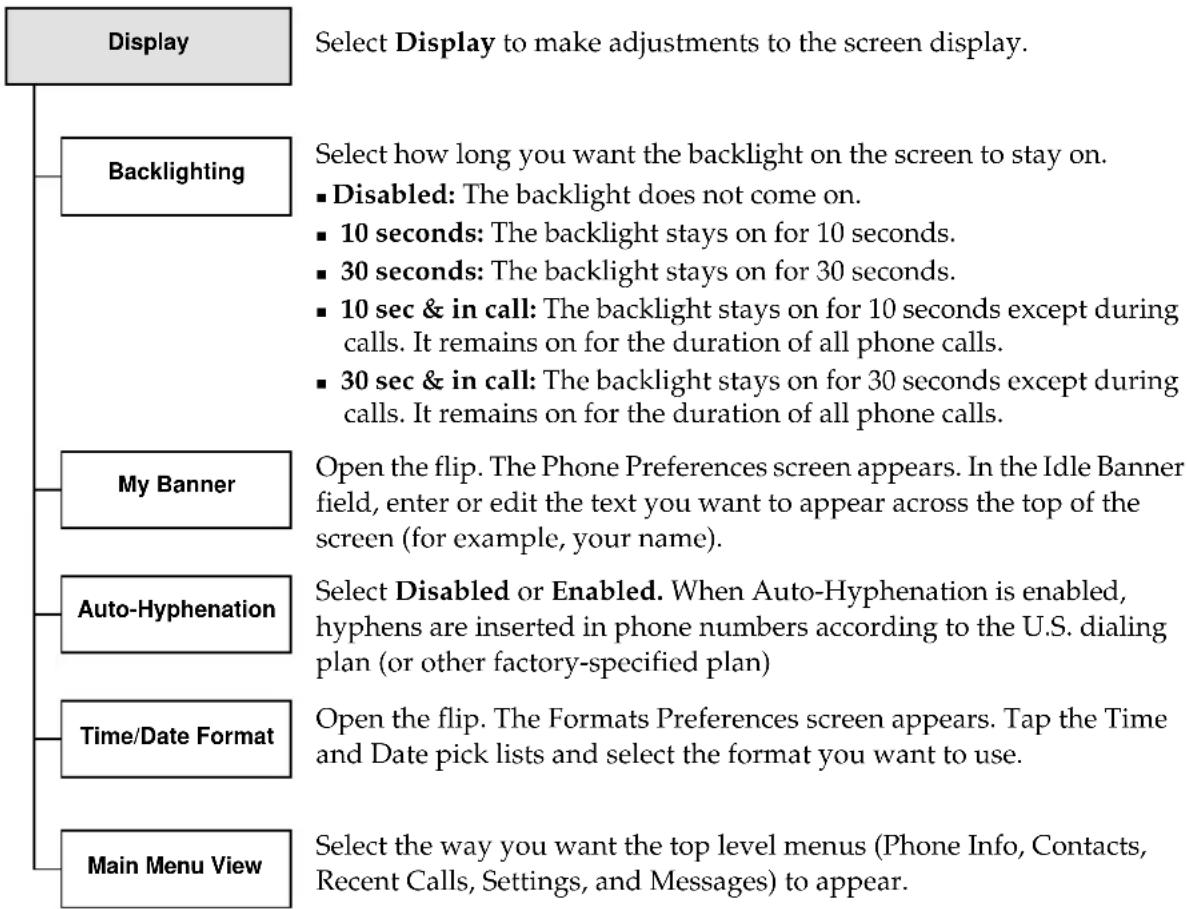
flowchart
graph TD
    A["Display"] --> B["Backlighting"]
    A --> C["My Banner"]
    A --> D["Auto-Hyphenation"]
    A --> E["Time/Date Format"]
    A --> F["Main Menu View"]

    B --> G["Select how long you want the backlight on the screen to stay on."]
    B --> H["■ Disabled: The backlight does not come on."]
    B --> I["■ 10 seconds: The backlight stays on for 10 seconds."]
    B --> J["■ 30 seconds: The backlight stays on for 30 seconds."]
    B --> K["■ 10 sec & in call: The backlight stays on for 10 seconds except during calls. It remains on for the duration of all phone calls."]
    B --> L["■ 30 sec & in call: The backlight stays on for 30 seconds except during calls. It remains on for the duration of all phone calls."]

    C --> M["Open the flip. The Phone Preferences screen appears. In the Idle Banner field, enter or edit the text you want to appear across the top of the screen (for example, your name)."]

    D --> N["Select Disabled or Enabled. When Auto-Hyphenation is enabled, hyphens are inserted in phone numbers according to the U.S. dialing plan (or other factory-specified plan)"]

    E --> O["Open the flip. The Formats Preferences screen appears. Tap the Time and Date pick lists and select the format you want to use."]

    F --> P["Select the way you want the top level menus (Phone Info, Contacts, Recent Calls, Settings, and Messages) to appear."]
Select Display to make adjustments to the screen display.
Select how long you want the backlight on the screen to stay on.
■ Disabled: The backlight does not come on.
■ 10 seconds: The backlight stays on for 10 seconds.
■ 30 seconds: The backlight stays on for 30 seconds.
- 10 sec & in call: The backlight stays on for 10 seconds except during calls. It remains on for the duration of all phone calls.
■ 30 sec & in call: The backlight stays on for 30 seconds except during calls. It remains on for the duration of all phone calls.
Open the flip. The Phone Preferences screen appears. In the Idle Banner field, enter or edit the text you want to appear across the top of the screen (for example, your name).
Select Disabled or Enabled. When Auto-Hyphenation is enabled, hyphens are inserted in phone numbers according to the U.S. dialing plan (or other factory-specified plan)
Open the flip. The Formats Preferences screen appears. Tap the Time and Date pick lists and select the format you want to use.
Select the way you want the top level menus (Phone Info, Contacts, Recent Calls, Settings, and Messages) to appear.
■ Large Icons: The initial menu items appear as icons, one per screen.
- List Menus: The initial menu items appear as a single list.
Security options
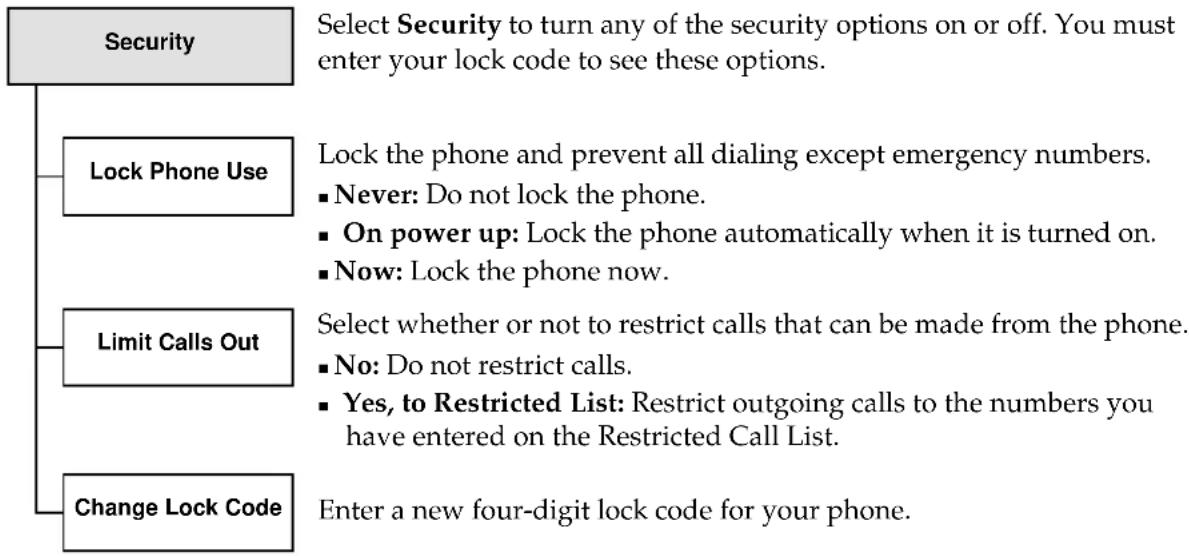
flowchart
graph TD
    A["Security"] --> B["Lock Phone Use"]
    A --> C["Limit Calls Out"]
    A --> D["Change Lock Code"]
    B --> E["Select Security to turn any of the security options on or off. You must enter your lock code to see these options."]
    C --> F["Select whether or not to restrict calls that can be made from the phone."]
    C --> G["Enter a new four-digit lock code for your phone."]
    E --> H["■ Never: Do not lock the phone."]
    E --> I["■ On power up: Lock the phone automatically when it is turned on."]
    E --> J["■ Now: Lock the phone now."]
    F --> K["■ No: Do not restrict calls."]
    F --> L["■ Yes, to Restricted List: Restrict outgoing calls to the numbers you have entered on the Restricted Call List."]
Call Information options
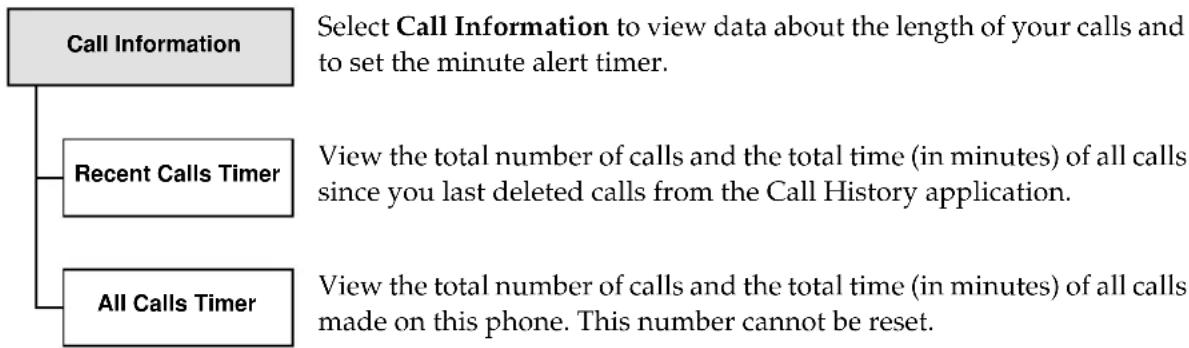
flowchart
graph TD
    A["Call Information"] --> B["Recent Calls Timer"]
    A --> C["All Calls Timer"]
    B --> D["Select Call Information to view data about the length of your calls and to set the minute alert timer."]
    C --> E["View the total number of calls and the total time (in minutes) of all calls since you last deleted calls from the Call History application."]
    C --> F["View the total number of calls and the total time (in minutes) of all calls made on this phone. This number cannot be reset."]
Network options
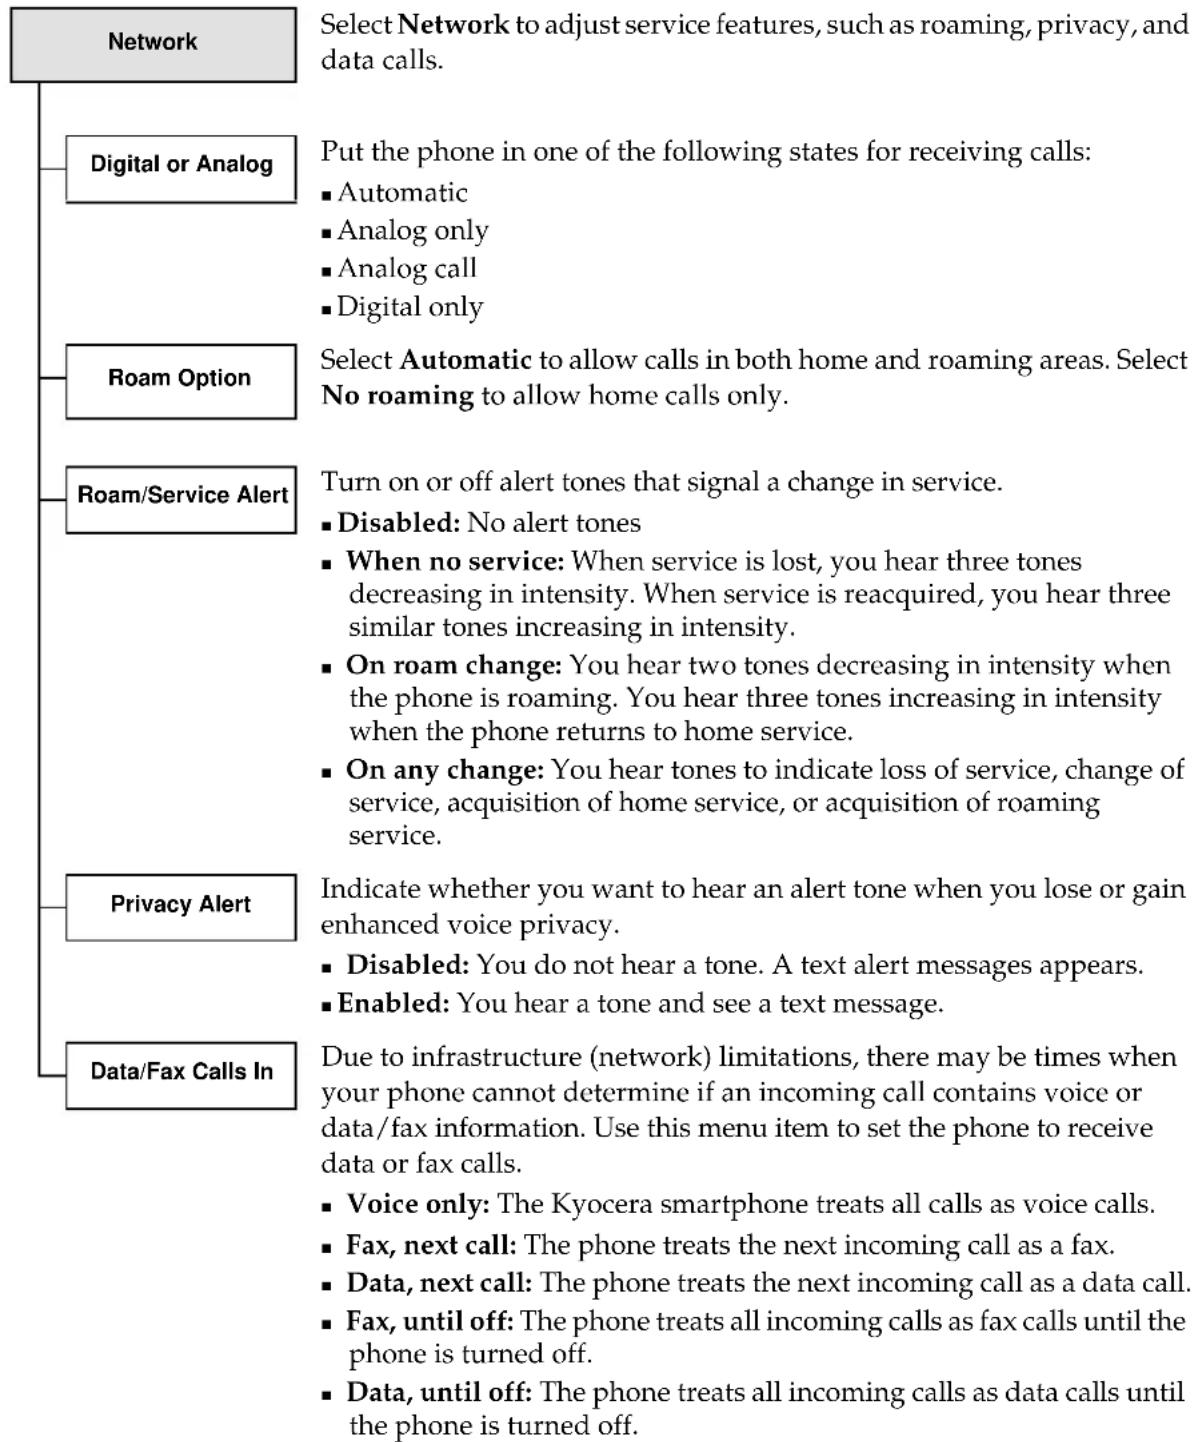
flowchart
graph TD
    A["Network"] --> B["Select Network to adjust service features, such as roaming, privacy, and data calls."]
    A --> C["Put the phone in one of the following states for receiving calls: <br>■ Automatic<br>■ Analog only<br>■ Analog call<br>■ Digital only"]
    A --> D["Select Automatic to allow calls in both home and roaming areas. Select No roaming to allow home calls only."]
    A --> E["Turn on or off alert tones that signal a change in service. <br>■ Disabled: No alert tones<br>■ When no service: When service is lost, you hear three tones decreasing in intensity. When service is reacquired, you hear three similar tones increasing in intensity.<br>■ On roam change: You hear two tones decreasing in intensity when the phone is roaming. You hear three tones increasing in intensity when the phone returns to home service.<br>■ On any change: You hear tones to indicate loss of service, change of service, acquisition of home service, or acquisition of roaming service."]
    A --> F["Privacy Alert"]
    A --> G["Data/Fax Calls In"]
    F --> H["Indicate whether you want to hear an alert tone when you lose or gain enhanced voice privacy. <br>■ Disabled: You do not hear a tone. A text alert messages appears.<br>■ Enabled: You hear a tone and see a text message."]
    G --> I["Due to infrastructure (network) limitations, there may be times when your phone cannot determine if an incoming call contains voice or data/fax information. Use this menu item to set the phone to receive data or fax calls. <br>■ Voice only: The Kyocera smartphone treats all calls as voice calls.<br>■ Fax, next call: The phone treats the next incoming call as a fax.<br>■ Data, next call: The phone treats the next incoming call as a data call.<br>■ Fax, until off: The phone treats all incoming calls as fax calls until the phone is turned off.<br>■ Data, until off: The phone treats all incoming calls as data calls until the phone is turned off."]
Extras options
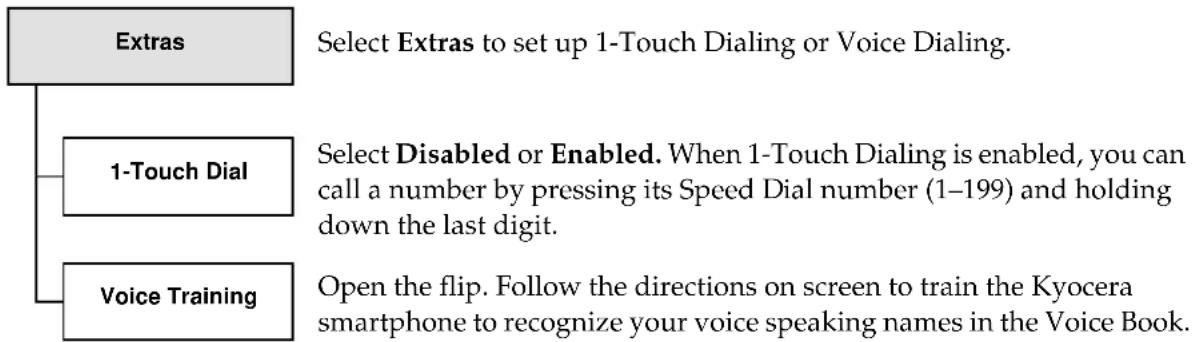
flowchart
graph TD
    A["Extras"] --> B["Select Extras to set up 1-Touch Dialing or Voice Dialing."]
    A --> C["1-Touch Dial"]
    A --> D["Voice Training"]
    C --> E["Select Disabled or Enabled. When 1-Touch Dialing is enabled, you can call a number by pressing its Speed Dial number (1–199) and holding down the last digit."]
    D --> F["Open the flip. Follow the directions on screen to train the Kyocera smartphone to recognize your voice speaking names in the Voice Book."]
Messaging options
| Messaging | Open the flip. The Messages application appears. You can set your preferences for voice mail and text messaging. |
Accessories options
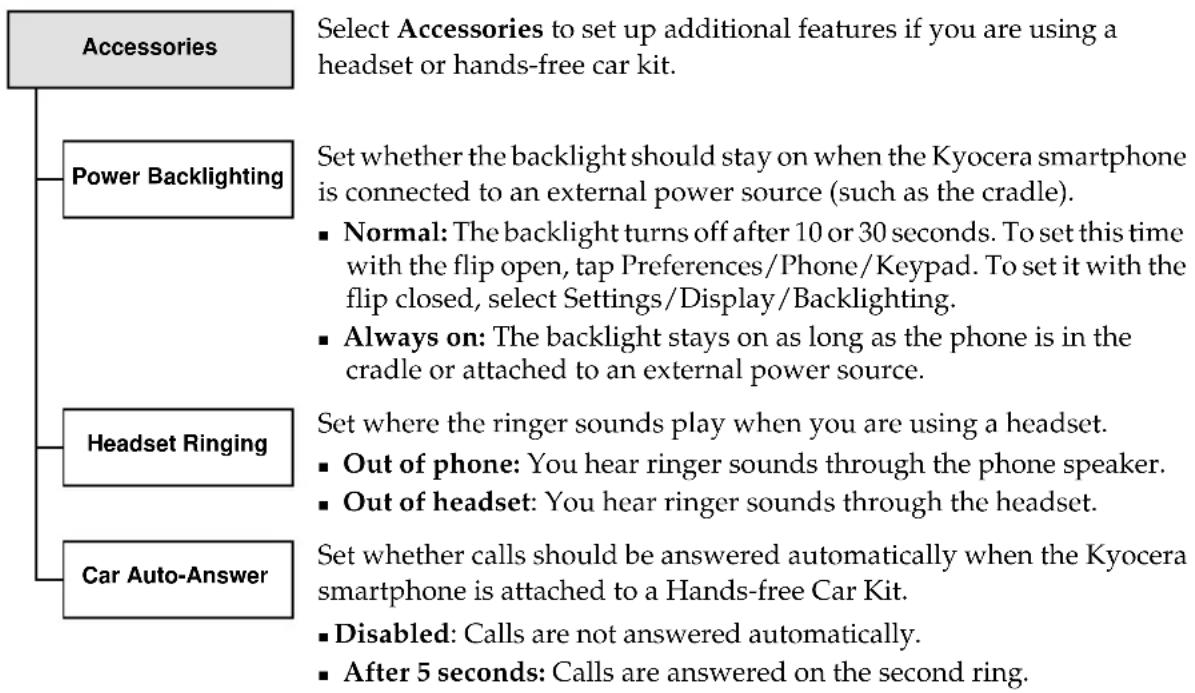
flowchart
graph TD
    A["Accessories"] --> B["Power Backlighting"]
    A --> C["Headset Ringing"]
    A --> D["Car Auto-Answer"]
    B --> E["Select Accessories to set up additional features if you are using a headset or hands-free car kit."]
    C --> F["Set whether the backlight should stay on when the Kyocera smartphone is connected to an external power source (such as the cradle)."]
    F --> G["Normal: The backlight turns off after 10 or 30 seconds. To set this time with the flip open, tap Preferences/Phone/Keypad. To set it with the flip closed, select Settings/Display/Backlighting."]
    F --> H["Always on: The backlight stays on as long as the phone is in the cradle or attached to an external power source."]
    C --> I["Set where the ringer sounds play when you are using a headset."]
    C --> J["Out of phone: You hear ringer sounds through the phone speaker."]
    C --> K["Out of headset: You hear ringer sounds through the headset."]
    D --> L["Set whether calls should be answered automatically when the Kyocera smartphone is attached to a Hands-free Car Kit."]
    D --> M["Disabled: Calls are not answered automatically."]
    D --> N["After 5 seconds: Calls are answered on the second ring."]
Voice Memo menu
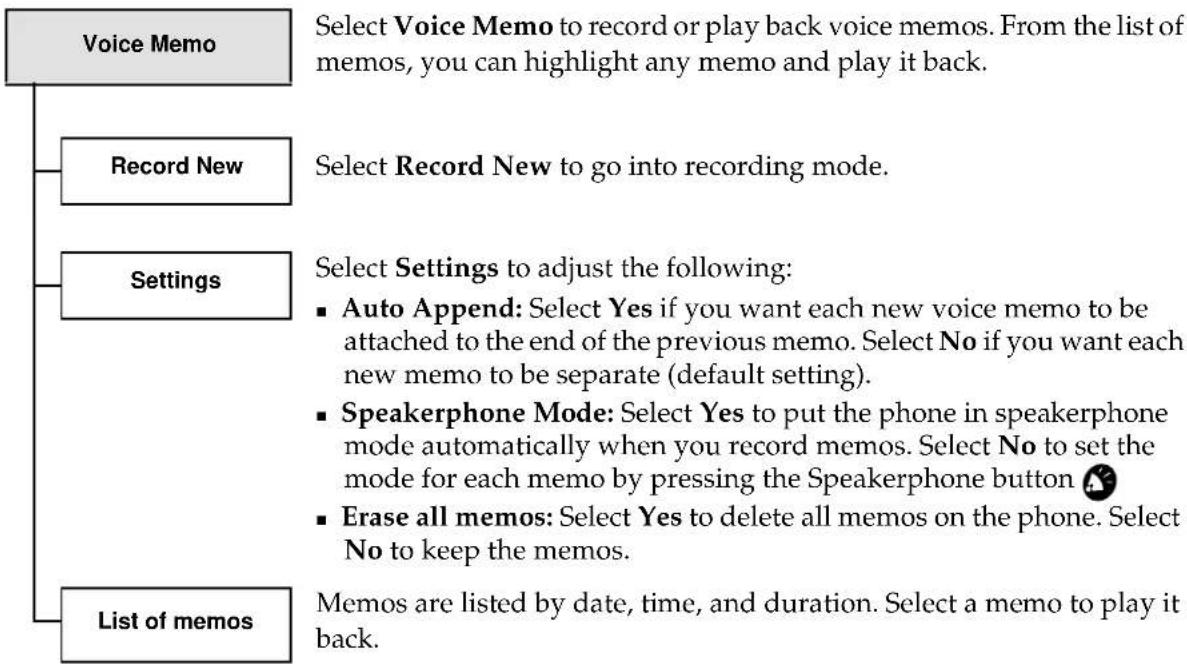
flowchart
graph TD
    A["Voice Memo"] --> B["Record New"]
    A --> C["Settings"]
    A --> D["List of memos"]
    B --> E["Select Record New to go into recording mode."]
    C --> F["Select Settings to adjust the following: <br>    - Auto Append: Select Yes if you want each new voice memo to be attached to the end of the previous memo. Select No if you want each new memo to be separate (default setting).<br>    - Speakerphone Mode: Select Yes to put the phone in speakerphone mode automatically when you record memos. Select No to set the mode for each memo by pressing the Speakerphone button <br>    - Erase all memos: Select Yes to delete all memos on the phone. Select No to keep the memos."]
    D --> G["Memos are listed by date, time, and duration. Select a memo to play it back."]
Messages menu
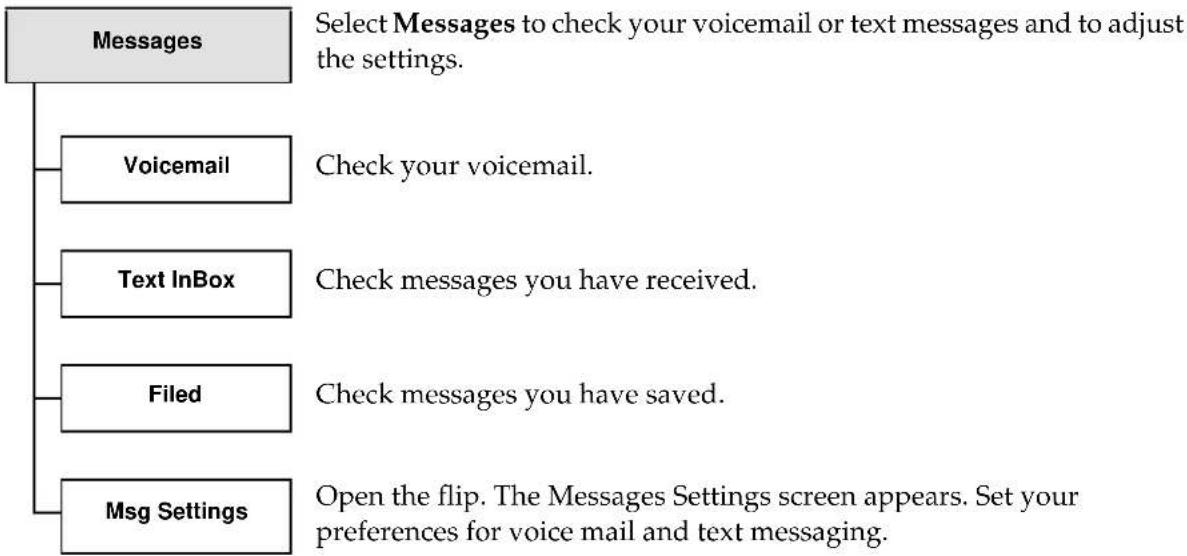
flowchart
graph TD
    A["Messages"] --> B["Voicemail"]
    A --> C["Text InBox"]
    A --> D["Filed"]
    A --> E["Msg Settings"]
    B --> F["Check your voicemail."]
    C --> G["Check messages you have received."]
    D --> H["Check messages you have saved."]
    E --> I["Open the flip. The Messages Settings screen appears. Set your preferences for voice mail and text messaging."]
| AC adapter | A power cable to connect the phone to an AC power outlet and charge the phone battery. |
| analog mode | The traditional method of modulating radio signals to carry information, used in AM/FM radio and cellular telephones. If the Kyocera smartphone cannot find a digital signal, it switches to analog mode. (See also digital mode.) |
| any-key answer | The ability to answer a call by pressing any key on the keypad except the backlight key, the Clear , or the shuttle. To turn this feature on or off, see “Setting Phone preferences” on page 206. |
| auto answer | A feature setting the phone to answer calls automatically after two rings. To turn this feature on or off, see “Setting Phone preferences” on page 206. |
| banner A name or other text that appears on the screen when the phone is idle and the flip is closed. To enter this text, tap Preferences the Applications Launcher. Select Phone Preferences from the pick-list in the upper right corner and enter the text in the My Banner field. | |
| blind-copied message | A message that is copied to one or more people without the knowledge of other persons to whom that message is sent or copied |
| bookmark A Web file that lets you quickly connect to a site you have previously visited and marked (like a bookmark placed in a book) | |
| BPS Bits per second, a measurement of data transmission speed. The Kyocera smartphone transmits data over the air at 14,400 bits per second. (often written as 14.4K BPS). | |
| cache (memory) The amount of memory available for an application to use. Memory allocated to one application cannot be used by other applications. | |
| call forwarding | A phone option that permits you to reroute incoming calls to a different telephone number, either all the time or only when your phone number is busy or doesn't answer |
| call history A list of the last 199 calls you have sent or received | |
| call waiting | An option available from your telephone service provider. When you're engaged in a call, a signal notifies you that another call has arrived. |
| carrier features | Options available from your telephone service provider. Since these options vary, you must contact your service provider for detailed information. |
| CDMA Code Division Multiple Access, a spread-spectrum telephone technology that digitally encodes your call as it is transmitted and decodes it when it is received. CDMA provides both increased security and greater efficiency in using available wireless bandwidth. | |
| command An instruction that causes a computer to perform an action | |
| conduit A program that controls how records are moved during a HotSync operation | |
| contacts list The entries from your Address Book when viewed with the flip closed.The contacts list includes names and phone numbers for all entries. To see addresses, categories, and other information, open the flip and view the Address Book. | |
| cradle The unit designed for storing the Kyocera smartphone, recharging its battery, and synchronizing data with a computer | |
| data transmission The technology of transmitting and receiving information over communication channels | |
| default domain | The name that an email program automatically adds to an unqualified name addressed in messages. An unqualified name is a name that doesn't have an “@” sign followed by a domain name. The default domain can be used to save time if you need to address large numbers of messages to users in the same domain you work in. |
| dialog A temporary box or window of information that prompts you to enter and/or select information that is necessary for a task to continue | |
| digital mode A method of transmitting information (both voice and data) by converting it to binary code. Digital transmission provides stronger reception, greater call handling capacity, improved call privacy, and the potential for data services. The Kyocera smartphone operates in digital mode on two frequencies (800 MHz and 1900 MHz). If it cannot find a digital signal, it switches to analog mode. (See also analog mode.) | |
| DNS Domain Name System, a mechanism on the Internet for translating the domain names of host computers (server.company.com, for example) into IP addresses | |
| domain name The address of a network connection, written as a sequence of words separated by dots such as server.business.com | |
| DTMF Dual Tone Multi-Frequency, a method of using tones to communicate commands and responses to and from a master controlling unit. These are the tones you hear when you dial a telephone. | |
| dual band | Able to operate in two frequency ranges—800 MHz and 1900 MHz. Your Kyocera smartphone is a dual band phone. |
| Electronic mail, a store-and-forward service for text and graphical messages from one computer to another. The information is stored for you until you log into the system to retrieve the messages. | |
ESN Electronic Serial Number, a unique code that identifies each mobile phone. It is printed on the back of the Kyocera smartphone. You may be asked for this number if you contact Customer Care.
extension Part of a file name or URL. An extension begins with a period and usually has three characters (for example, edu, gov, or com).
field A location where you enter data; in your Kyocera smartphone, a field is often displayed as a line where you can write information
Graffiti The handwriting recognition software included on your Kyocera smartphone
handset Another name for any ordinary telephone; may refer to the part of the telephone containing the mouthpiece and receiver
hard reset A reset of the Kyocera smartphone that erases all data
home screen The screen that appears when you turn on the phone.
host name The name given to a mainframe computer
HotSync A technology that synchronizes information between a Palm connected device and a computer. You can run a HotSync operation using the cradle, the infrared port, a data cable, or over a network. See Chapter 4—Transferring Information.
HTML Hypertext Markup Language, the software authoring language used on the Internet's World Wide Web
HTTP Hypertext Transfer Protocol, the rules used by the web server and the browser to communicate (invisible to the user)
IAP Internet Access Provider, a service that provides companies and individuals with a link to the Internet
idle The state of your phone when it is turned on and has acquired a signal, but no call is currently in progress.
idle timeout The amount of time the Kyocera smartphone waits before dropping a connection with your ISP or dial-in server after a network application closes
incoming server The server that receives incoming email messages (sometimes called a POP server). Email messages you receive are delivered to your account on this server.
Internet The worldwide set of interconnected networks that share the same network address scheme and use the TCP/IP protocol
intranet A network within a company or organization
IP Address Internet Protocol Address, the address that identifies the network to which each computer on a TCP/IP network is attached as well as the computer's unique identification
| IrDA port | Infrared port, a port on the top of the Kyocera smartphone that transmits data wirelessly to another device with an infrared port (such as a laptop computer, another Kyocera smartphone, or a Palm device). |
| ISP Internet Service Provider, a vendor who provides direct access to the Internet | |
| Keyguard A feature that locks the keypad to protect against accidental keypresses.Keyguard is automatically engaged after a few minutes when the phone is on but not in a call. | |
| LED Light-emitting diode, the status light on the upper right of the Kyocera smartphone near the base of the antenna. The LED flashes to indicate status (home, roaming, or no signal) when the phone is powered on. | |
| lock code | A four-digit sequence of numbers (usually 0000 or the last four digits of your phone number). You can restrict access to the phone using the lock code. |
| mail host The computer on which email messages are stored | |
| MAPI Mail Application Programming Interface, an Internet standard format for email | |
| menu A list of choices. When the flip is closed, you move through menus and make choices using the shuttle. When the flip is open, you move through menus and make choices using the stylus. | |
| MIME Multipurpose Internet Mail Extension, an extension to Internet mail that adds support for the exchange of multi-part messages, including binary files | |
| NAM | Number Assignment Module, the code that identifies a phone's home service area. The NAM contains all the settings for your service provider. You can set up only one NAM on your Kyocera smartphone. |
| OTA Over The Air, an acronym used to refer to wireless voice or data transmission | |
| password | A combination of letters (or letters and numbers) used to gain access to a network and/or computer system. Passwords are security measures that help to prevent unauthorized persons from working with another person's computer resources or obtaining access to a network. |
| PDA Personal Digital Assistant, an electronic organizer such as a Palm connected device. On a Kyocera smartphone, the terms PDA or organizer refer to the applications you use with the flip open, as distinct from the features you use when the flip is closed. | |
| pick list | A list of choices that appears when you tap ▼ on the Kyocera smartphone screen |
| point-to-point | A term used to describe a data channel which connects two—and only two—computers |
POP or POP3 Post Office Protocol, the Internet standard protocol for retrieving messages on a computer
PRC An application that can be downloaded from a computer to a Palm device or Kyocera smartphone via a HotSync operation.
prefix The number you dial before the telephone number to reach an outside line
protocol A set of rules followed by two computers when they communicate with one another
proxy A software agent that acts on behalf of the user
real name The name assigned to your principal account in an electronic mail system. The real name is generally your first and last name. It appears in the From field of all your outgoing messages and identifies to your recipients who the mail is from.
return address The email address at which you can be reached. Along with your real name, the return address appears in the From field of all your outgoing messages. It is usually in the following form: loginname@incomingmailserver
RF Radio frequency
roaming Using telephone services outside of the area covered by your home service provider. The ☐on appears on the screen when the phone is roaming.
screen key The large key at the top of the Kyocera smartphone used to turn the backlight and screen display on and off
script A file used by some communications programs to automate logging onto services such as email
scroll bar A bar at the right border of a window whose contents are not completely visible. Each scroll bar contains two scroll arrows and a scroll box that you can tap to move through the contents of the window.
service template A set of network configurations that you can create, save, and reuse. See "Creating and using service templates" on page 180.
serial port An input/output port used to connect serial devices, such as a mouse, external modem, or the Kyocera smartphone cradle, to a computer
shuttle The semi-circular key on the left side of the Kyocera smartphone. You move the shuttle up and down to scroll through lists. You press it in to make selections
signal strength The amount of radio frequency energy the phone is receiving, shown by the 🎨️ icon. Both weather and distance affect signal strength. The more bars (up to 4 as shown here), the stronger the signal. If there are no bars, calls may be disconnected.
SMS Short Message Service, a service that provides short text messages or pages sent by phone. The Messages application accepts SMS messages.
SMTP Simple Mail Transfer Protocol, the Internet standard protocol for sending electronic messages from one computer to another
soft reset A reset of the Kyocera smartphone that restarts the telephone features and Palm applications without erasing data
talk time The amount of time you can talk on a wireless phone when the battery is fully charged.
TCP/IP Transmission Control Protocol/Internet Protocol, the standard rules used for data transmission over the Internet
trimode Able to operate in (and switch between) three modes—CDMA digital service at both 800 MHz and 1900 MHz, and analog cellular service at 800 MHz. Your Kyocera smartphone is a trimode phone.
URL Uniform Resource Locator, the address of an Internet location A URL typically takes the form http://www/locationname.com
username A name provided by your ISP or your organization's email administrator. It usually consists of the text that appears before the @ sign in your return email address (for example, in Beatrix@company.com, the login name is Beatrix).
WAP Wireless Application Protocol, a technology used to support Internet services on wireless phones
web browser A program for accessing Web sites on the Internet
End-User
Software License Agreement
IMPORTANT: Read before using this product
YOU SHOULD CAREFULLY READ THE FOLLOWING TERMS AND CONDITIONS BEFORE USING THIS PRODUCT. IT CONTAINS SOFTWARE, THE USE OF WHICH IS LICENSED BY KYOCERA WIRELESS CORP. ("KYOCERA") TO ITS CUSTOMERS FOR THEIR USE ONLY AS SET FORTH BELOW. IF YOU DO NOT AGREE TO THE TERMS AND CONDITIONS OF THIS AGREEMENT, DO NOT USE THE SOFTWARE. USING ANY PART OF THE SOFTWARE INDICATES THAT YOU ACCEPT THESE TERMS.
LICENSE: Kyocera grants you a nonexclusive license to use the accompanying software program(s) (the "Software") subject to the terms and restrictions set forth in this License Agreement. You are not permitted to lease or rent (except under separate mutually agreeable terms set forth in writing), distribute or sublicense the Software or to use the Software in a time-sharing arrangement or in any other unauthorized manner. Further, no license is granted to you in the human readable code of the Software (source code). Except as provided below, this License Agreement does not grant you any rights to patents, copyrights, trade secrets, trademarks, or any other rights in respect to the Software.
The Software is licensed to be used on any personal computer and/or any Kyocera product, provided that the Software is used only in connection with Kyocera products. With respect to the Desktop software, you may reproduce and provide one (1) copy of such Software for each personal computer or Kyocera product on which such Software is used as permitted hereunder. With respect to the Device Software, you may use such Software only on one (1) Kyocera product. Otherwise, the Software and supporting documentation may be copied only as essential for backup or archive purposes in support of your use of the Software as permitted hereunder. You must reproduce and include all copyright notices and any other proprietary rights notices appearing on the Software on any copies that you make.
NO ASSIGNMENT; NO REVERSE ENGINEERING: You may transfer the Software and this License Agreement to another party if the other party agrees in writing to accept the terms and conditions of this License Agreement. If you transfer the Software, you must at the same time either transfer all copies of the Software as well as the supporting documentation to the same party or destroy any such materials not transferred. Except as set forth above, you may not transfer or assign the Software or your rights under this License Agreement.
Modification, reverse engineering, reverse compiling, or disassembly of the Software is expressly prohibited. However, if you are a European Community
("EC") resident, information necessary to achieve interoperability of the Software with other programs within the meaning of the EC Directive on the Legal Protection of Computer Programs is available to you from Kyocera upon written request.
EXPORT RESTRICTIONS: You agree that you will not export or re-export the Software or accompanying documentation (or any copies thereof) or any products utilizing the Software or such documentation in violation of any applicable laws or regulations of the United States or the country in which you obtained them.
TRADE SECRETS; TITLE: You acknowledge and agree that the structure, sequence and organization of the Software are the valuable trade secrets of Kyocera and its suppliers. You agree to hold such trade secrets in confidence. You further acknowledge and agree that ownership of, and title to, the Software and all subsequent copies thereof regardless of the form or media are held by Kyocera and its suppliers.
UNITED STATES GOVERNMENT LEGEND: The Software is commercial in nature and developed solely at private expense. The Software is delivered as “Commercial Computer Software” as defined in DFARS 252.227-7014 (June 1995) or as a commercial item as defined in FAR 2.101(a) and as such is provided with only such rights as are provided in this License Agreement, which is Kyocera’s standard commercial license for the Software. Technical data is provided with limited rights only as provided in DFAR 252.227-7015 (Nov. 1995) or FAR 52.227-14 (June 1987), whichever is applicable.
TERM AND TERMINATION: This License Agreement is effective until terminated. You may terminate it at any time by destroying the Software and documentation together with all copies and merged portions in any form. It will also terminate immediately if you fail to comply with any term or condition of this License Agreement. Upon such termination you agree to destroy the Software and documentation, together with all copies and merged portions in any form.
GOVERNING LAW: This License Agreement shall be governed by the laws of the State of California as such laws are applied to agreements entered into and to be performed entirely within California between California residents and by the laws of the United States. You agree that the United Nations Convention on Contracts for the International Sale of Goods (1980) is hereby excluded in its entirety from application to this License Agreement.
LIMITED WARRANTY; LIMITATION OF LIABILITY: All warranties and limitations of liability applicable to the Software are as stated on the Limited Warranty Card or in the product manual accompanying the Software. Such warranties and limitations of liability are incorporated herein in their entirety by this reference.
LIMITATION OF LIABILITY: TO THE FULL EXTENT ALLOWED BY LAW, KYOCERA EXCLUDES FOR ITSELF AND ITS SUPPLIERS ANY LIABILITY, WHETHER BASED IN CONTRACT OR TORT (INCLUDING NEGLIGENCE), FOR INCIDENTAL, CONSEQUENTIAL, INDIRECT, SPECIAL, OR PUNITIVE DAMAGES OF ANY KIND, OR FOR LOSS OF REVENUE OR PROFITS, LOSS OF BUSINESS, LOSS OF INFORMATION OR DATA, OR OTHER FINANCIAL LOSS ARISING OUT OF OR IN CONNECTION WITH THE SALE, INSTALLATION,
MAINTENANCE, USE, PERFORMANCE, FAILURE, OR INTERRUPTION OF THIS PRODUCT, EVEN IF KYOCERA OR ITS AUTHORIZED RESELLER HAS BEEN ADVISED OF THE POSSIBILITY OF SUCH DAMAGES, AND LIMITS ITS LIABILITY TO REPLACEMENT OR REPAIR OF THE PRODUCT OR PART, OR REFUND OF THE PURCHASE PRICE PAID, AT THE OPTION OF KYOCERA. THIS DISCLAIMER OF LIABILITY FOR DAMAGES WILL NOT BE AFFECTED IF ANY REMEDY PROVIDED HEREIN SHALL FAIL OF ITS ESSENTIAL PURPOSE.
SEVERABILITY: In the event any provision of this License Agreement is found to be invalid, illegal or unenforceable, the validity, legality and enforceability of any of the remaining provisions shall not in any way be affected or impaired and a valid, legal and enforceable provision of similar intent and economic impact shall be substituted therefor.
ENTIRE AGREEMENT: This License Agreement sets forth the entire understanding and agreement between you and Kyocera, supersedes all prior agreements, whether written or oral, with respect to the Software, and may be amended only in writing signed by both parties.
A
accented characters
using Graffiti, 57
using on-screen keyboard, 52
accessories, 21
adding
Address Book entry, 95
Date Book event, 120
Expense item, 135
memo, 156
To Do item, 237
Address Book
beaming, 104
calling from, 31
creating business card, 103
creating entry, 95
custom fields, 107
features, 94
making a call from, 96
menu commands, 106
preferences, 107
with keypad closed, 30
adjusting
speaker volume, 39
aircraft safety, 268
alarm
setting in Date Book, 123
alert
change in status, 217
missed call, 279
when roaming, 218
answering calls
any key answer, 209
flip closed, 36
flip open, 36
hands-free, 37, 38
in car kit, 207
putting caller on hold, 36
second call, 36
setting up Auto Answer, 207
antenna, 14
any-key answer, turning on or off, 209
appending voice memos, 255
applications
attaching notes, 65
controls, 59
installing, 66
menus, 59
opening, 49
removing, 69
switching, 49
Applications Launcher, 49
area code, entering automatically, 209
attaching
note to Address Book entry, 106
note to Date Book event, 132
note to To Do item, 242
Auto Answer, 37, 207
Auto Append, 255, 284
auto-hyphen, turning on or off, 209
B
backlight
location on phone, 14
setting how long light stays on 208
battery
back-up battery, 266
charge icon, 18
low battery signal, 18
removing, 267
strength indicator, 15
baud rate, 192
beaming
Address Book entries, 104
business card, 103, 106
Date Book events, 132
memos, 159, 160
To Do items, 242
troubleshooting, 93, 261
using, 91
using full-screen pen stroke to beam data, 199
billing
roaming, 18
blasting areas, 268
browser
setting up, 173
business card
beaming, 103, 106
creating, 103
buttons
changing applications assigned to buttons, 197
C
call
setting missed call alert, 279
Call History
copying data to Address Book, 112
creating Expense record, 114
deleting calls, 113
features, 108
making a call from, 110
menu commands, 116
opening, 109
preferences, 114
sorting, 111
tracking calls, 111
call in progress, 15
call waiting, disabling, 177
calling
from Address Book, 31, 96
from Call History, 110
from Contacts list, 30
from keypad, 24
from Recent Calls list, 110
most recently dialed number, 32
no signal, 18
voice dialing, 245
calling cards, 177
capital letters, 55
care of phone, 263
category
beaming Address Book categories, 104
choosing, 62
creating new, 63
merging, 65
putting To Do items in categories, 238
renaming, 64
using in lists, 63
viewing by, 63
CDMA voice privacy, 18
changing
buttons, 197
categories, 64
from one application to another, 49
speaker volume, 39
CHAP authentication, 208
charge icon, 18
check box, 59
CLR key, 24
conduit
defined, 87
conference calls, 34
configuring
multiple devices, 84
conflicts, viewing in Date Book, 130
connecting to Internet, 35
contacts
contacts menu, 275
Contacts list
making calls, 30
Copy, 61
copying
from Call History to Address Book, 112
country preferences, selecting, 203
cradle
connecting, 73
synchronizing data, 74
creating
Address Book entry, 95
Expense item, 135
memo, 156
To Do item, 237
custom fields in Address Book, 107
Cut, 61
D
data port, 14
data/fax mode
defined, 188
setting up, 188
using, 190
date
changing on Expense item, 136
setting date, 205
setting due date in To Do List, 239
Date Book
adding event, 120
beaming events, 132
commands in Options menu, 133
deleting events, 126
deleting note, 132
event conflicts, 130
features, 119
menus, 132
month view, 130
new event, 120
private events, 124
scheduling event for current day, 120
scheduling future event, 121
setting alarm, 123
setting preferences, 133
switching views, 128
untimed events, 122
week view, 128
defined, 174
deleting
applications, 69
calls from Call History, 113
Date Book events, 126
event, 132
Expense items, 153
memo, 159, 160
note in Date Book, 132
Palm Desktop, 69
service template, 182
To Do item, 239
voice memos, 252, 253, 284
dial 1 before all numbers, 210
Dialer
making call from, 25
setting preferences, 26, 27
dialing
conference call, 34
Contacts list, 30
keypad, 24
one-touch dialing, 210
redial, 32
digital icon, 18
digital service, 15
Digitizer, using, 203
DNS
entering, 179
query DNS, 179
Domain Naming System, 179
driving safety, 268, 269
due date, setting in To Do List, 239
E
Edit menu, 61
editing
expense record from Call History, 114
memos, 156
To Do items, 238
email, 172
connecting to ISP, 35
ending calls, 38
entering text
Graffiti, 52
on-screen keyboard, 51
entries
assigning to categories, 62
attaching notes, 65
marking as private, 66
envelope icon, 18
erasing
voice memos, 252, 253, 284
event
adding new, 132
changing to untimed, 122
conflicts, 130
deleting, 126, 132
in week view, 128
private, 124
purging past events, 132
scheduling an untimed event, 122
scheduling for current day, 120
scheduling future event, 121
Expense
Call History data, 114
creating new item, 135
receipt details, 136
explosive areas, 268
F
fax
putting phone in data/fax mode, 188
setting up data/fax mode, 188
File Link, 85
Find command, 43
Find Name key, 15
finding
text, 43
firewall, 187
flip-closed menus, using, 271
fonts, setting, 61
formats
setting date and time formats, 204
setting number formats, 204
full-screen pen stroke, 198
G
Go to Date, 121
Graffiti
accented characters, 57
alphabet, 53
capital letters, 55
concepts, 53
defined, 52
menu shortcuts, 60
navigation strokes, 58
numbers, 56
online help, 61
problems recognizing handwriting, 261
punctuation marks, 56
shortcuts, 58
symbols, 56
writing characters, 54
writing tips, 54
Graffiti help
assigning to full-screen pen stroke, 198
H
hands-free
answering calls, 37, 38
auto answer always, 37, 207
auto answer in car kit, 207
setting up, 37
Voice Answer, 38, 279
handwriting, problems, 261
hard pause, 99
headset jack, 14
hearing aid, using phone with, 268
help
in Graffiti, 61
notes in the Palm Desktop directory, 256
online tips, 257
hold, putting caller on hold, 36
home area indicator, 18
home screen, 13
home service, 15
HotSync operation
creating user profile, 84
customizing, 87
File Link, 85
infrared port, 81
local, 75
setup options, 85
synchronizing with data file, 85
troubleshooting, 90, 260
hyphens, automatically inserting in phone
numbers, 209
|
idle timeout, 178
infrared port
beaming data, 91
synchronizing data with computer, 81
troubleshooting, 93, 261
Install Tool (Palm Desktop), 66
installing
applications, 66
Palm Desktop software, 71
international characters
Graffiti, 57
on-screen keyboard, 52
Internet
connecting to, 35
IP address, 179, 286
K
key
setting key beep length, 279
setting key beep sounds, 279
keyboard
assigning to full-screen pen stroke, 198
chart, 52
using on-screen keyboard, 51
keyguard, 221
padlock icon, 18
keypad
answering calls, 209
keys on the phone, 15
setting key beep volume, 208
setting preferences, 208
L
large icon view, 272
LED, 14, 18
length of phone numbers, 210
letters
choosing font style, 61
writing with Graffiti, 53
license, 291
light, adjusting backlight, 208
list menu view, 271
locking phone
assigning to full-screen pen stroke, 199
login script, 184
looking up information
Find, 43
M
making calls
from Address Book, 31, 96
from Contacts list, 30
from Dialer, 25
from keypad, 24
from Speed Dial, 28
voice dialing, 245
medical devices, using phone near, 268
Memo Pad
beaming memo, 159
creating memo, 156
deleting memo, 159
editing memos, 156
features, 155
marking private memo, 158
menus, 160
troubleshooting, 263
memos, voice
appending text, 255
deleting all, 253
deleting memo, 252
naming memo, 251
recording memo, 248
replaying memo, 250
settings, 254
menus
Address Book, 106
Call History, 116
choosing a command, 60
Date Book, 132
Edit menu, 61
large icon view, 272
list menu view, 271
Memo Pad, 160
shortcuts, 60
To Do List, 242
using, 59, 271
messages
checking, 164
envelope icon, 18
setting up Messages application, 163
Messages key, 15
Minute Alert, 279
missed call
setting alert, 279
modem, 188
opening Modem Emulation, 192
modifying
expense record from Call History, 114
To Do items, 238
month, Date Book view, 130
mute call, 39, 273
N
name
entering for voice dialing, 244
two devices with same user name, 91
voice memo, 251
navigation strokes in Graffiti, 58
network
connection types, 178
disabling call waiting, 177
DNS, 179
idle time, 178
login script, 184
password, 175
phone settings, 176
selecting service, 174
setting up browser, 173
user name, 174
network connections
setting up, 171, 172
new
Address Book entry, 95
Date Book event, 120, 132
Expense item, 135
memo, 156, 160
no service, 15
no signal icon, 18
no signal indicator, 18
note
attaching to Address Book entry, 106
attaching to Date Book event, 132
attaching to To Do item, 242
creating, 65
numbers
entering with on-screen keyboard, 51
writing, 56
0
on call icon, 18
one-touch dialing
turning on or off, 210
on-screen keyboard
chart, 51, 52
opening, 61
opening
preferences screens, 197
Options menu
commands in Date Book, 133
over-the-air tones, setting, 208
own phone number, 34, 273
P
padlock icon, 18
pages
checking, 164
envelope icon, 18
Palm Desktop
installing, 71
removing, 69
system requirements, 72
using the Install Tool, 66
password
for network, 175
forgotten password, 262
past events, purging from Date Book, 132
Paste, 61
pause, 99, 273
pen, full-screen pen stroke, 198
phone calls
answering, 36
from Address Book, 31, 96
from Call History, 110
from Contacts list, 30
from keypad, 24
from Recent Calls list, 110
tracking in Call History, 111
voice dialing, 245
phone info, 273
Phone Lookup, 161
phone numbers
automatically inserting hyphens, 209
own phone number, 34, 273
phone preferences
setting basic, 206
setting for network connections, 176
phone ringer
setting sound, 215
phone setup
calling cards, 177
disabling call waiting, 177
playing back voice memos, 250
power (in battery), 18
power port, 14
power preferences, setting, 211
PRC files, 66
preferences
Address Book, 107
button preferences, 197
Call History, 114
connection preferences, 199
country, 203
data and time formats, 204
Date Book, 133
Dialer, 26, 27
dialing preferences, 209
format preferences, 203
keypad preferences, 208
messages, 169
network, 172
number formats, 204
opening preferences screens, 197
pen preferences, 198
phone preferences, 206
power preferences, 211
registry preferences, 213
service preferences, 210
sounds preferences, 215
status alerts, 217
prefixes to phone numbers, adding automatically, 210
primary DNS, 179
printing
expense reports, 140
priority, setting for To Do list, 238
privacy, enhanced CDMA voice privacy, 18
private entries
creating, 66
Date Book event, 124
memo, 158
punctuation marks
auto-hyphen in phone numbers, 209
Graffiti, 56
on-screen keyboard, 51
purging
Expense categories, 153
past events from Date Book, 132
Q
query DNS, 179
R
radio frequency energy, 267
receipts, entering information, 136
receiving calls
messages, 18
no signal, 18
recent calls
making a call from Recent Calls list, 110
viewing Recent Calls list, 109
recording voice memos, 248
records
attaching notes, 65
beaming, 104
displaying by category, 63
marking as private, 66
redialing most recently called number, 32
registry preferences
setting, 213
release, 99, 273
removing
applications, 69
battery, 266
Date Book event, 126
Palm Desktop, 69
replaying voice memos, 250
resetting
phone, 258, 267
RF energy
exposure, 267
unsafe areas, 268
ringer
setting sound, 215
silencing, 40
roaming
icon, 18
LED indicator, 15
setting alert, 218
roaming indicator, 18
S
safety
driving guidelines, 269
pacemaker, 268
RF energy, 267
unsafe areas, 268
scheduling
event for current day, 120
future event, 121
selecting a date, 121
untimed event, 122
screen
icons, 18
turning off after x minutes, 212, 222
script, login, 184
searching
Find, 43
secondary DNS, 179
security
creating private entries, 66
forgotten password, 262
password, 175
Select All, 61
sending data, 91
service area, roaming, 18
service preferences
changing, 210
service template, 174
creating, 180
deleting, 182
setting
alarm in Date Book, 123
font style, 61
format preferences, 203
HotSync options, 85
keypad preferences, 208
preferences in Date Book, 133
status alerts, 217
setting up
Messages application, 163
multiple devices, 84
Voice Dial, 244
Settings
voice memos, 284
setup options
HotSync, 85
shortcuts
creating, 213
Graffiti, 58
menus, 60
shuttle, 14
signal strength, 15, 18
Silence Sounds key, 15
silencing sounds, 40
Smart Sound, 279
soft reset, 267
sorting
Call History list, 111
sounds
adjusting, 279
adjusting speaker volume, 39
muting call, 39
setting phone alerts, 215
setting preferences, 215
silencing all, 40
speaker
adjusting volume, 39
Speakerphone
for voice memos, 284
speakerphone
for voice memos, 255
Speakerphone key, 15
Speed Dial
making call from, 29
standby time
battery charge icon, 18
status alerts, 217
status light, 15, 18
stylus, 14
suffixes to phone numbers, adding automatically, 210
symbol shift, 56
symbols
Graffiti, 56
on-screen keyboard, 51
sync cradle
connecting, 73
synchronizing data
connecting cradle, 73
first time, 74
system requirements, 72
T
talk time
battery charge icon, 18
text entry
accented characters, 57
capital letters, 55
choosing font style, 61
Graffiti, 52
Graffiti shortcuts, 58
Graffiti tips, 54
numbers, 56
on-screen keyboard, 51
punctuation marks, 56
symbols, 56
time
setting alarm, 123
setting phone to turn on or off at specific times, 212
setting time, 205
tracking call length, 111
timed pause, 99
To Do List
adding items, 237
deleting item, 239
display options, 240
features, 236
menus, 242
tracking
call expenses, 114
training Voice Dial, 244
transmitting data, 91
troubleshooting
general problems, 261
Graffiti, 261
HotSync operation, 90
HotSync operations, 260
infrared communications, 93, 261
Memo Pad, 263
turning off
phone off at set times, 212
screen after x minutes, 212, 222
turning on
phone on at set times, 212
setting phone to power on at reset, 212
turning on and off
phone, 12
U
Undo, 61
unmute call, 273
untimed event, 122
URLs
setting preferences, 213
user name, 174
user profile, 84
V
viewing
entries by category, 63
Voice Answer
menu, 279
setting up, 37, 38
Voice Book, 244
Voice Dial
training, 244
voice dialing
entering names, 244
making calls, 245
voice mail
driving safety, 269
entering voice mail phone number, 207
envelope icon, 18
setting up, 163
voice memos
appending, 255
deleting all, 253, 284
deleting memo, 252
naming memo, 251
recording memo, 248
replaying memo, 250
settings, 254, 284
volume
adjust during a call, 273
adjusting, 16
adjusting speaker volume, 39
muting call, 39
setting key beep volume, 208
W
week
Date Book view, 128
writing
accented characters, 57
capital letters, 55
Graffiti, 52
numbers, 56
on-screen keyboard, 51
punctuation marks, 56
symbols, 56
tips, 54

KYOCERA
Kyocera Wireless Corp.
10300 Campus Point Drive, San Diego, CA 92121
Visit us at www.kyocera-wireless.com.
For the full line of Kyocera Wireless Corp. accessories visit www.kyocera-wireless.com/store or contact your local service provider or retailer.
80-B6596-2EN, Rev. A
- The Kyocera Smartphone
- Reference Guide
- KYOCERA
- FCC/IC Notice
- Warning
- Caution
- Contents
- Chapter 1—Introducing the Kyocera Smartphone 9
- Chapter 2—Making and Receiving Calls ...... 23
- Chapter 3—Using the Organizer .... 48
- Chapter 4—Transferring Information .... 70
- Chapter 5—Address Book 94
- Chapter 6—Call History and the Recent Calls List .... 108
- Chapter 7—Date Book 119
- Chapter 8—Expense 134
- Chapter 9—Memo Pad .... 155
- Chapter 10—Messages .... 162
- Chapter 11—Setting Up Network Connections ...... 171
- Chapter 12—Setting Preferences .... 195
- Chapter 13—Security 220
- Chapter 14—Speed Dial .... 228
- Chapter 15-To Do List 236
- Chapter 16—Voice Dial....243
- Chapter 17—Voice Memos 247
- Chapter 18—Troubleshooting .... 256
- Appendix A—Phone Menus 270
- Appendix B—Glossary 285
- Appendix C—End-User
- Software License Agreement 291
- Chapter 1
- Introducing the Kyocera Smartphone
- In this chapter
- What to do first
- To install the battery
- To charge the batteries
- To charge the batteries using the power cable
- To charge the batteries in the sync cradle
- Turning the phone on and off
- To turn on the phone for the first time
- To turn the phone on and off at any time
- Phone features
- When the phone is turned on
- When the phone is turned off
- Features with the keypad closed
- Keys on your phone
- Send/Talk key
- Clear key
- End/Power key
- 1-0
- Numeric keys
- Find Name key
- Silence Sounds key
- Messages key
- Speakerphone key
- Using the shuttle
- To use the shuttle (with the flip closed)
- To use the shuttle (with the flip open)
- Status indicators
- Checking status—the LED
- Features with the keypad open
- Graffiti® writing area
- Icons
- Application keys
- Up and Down keys
- Palm applications
- To use Palm applications
- Easy access to Palm applications during calls
- If you are already using a Palm device
- Accessories for your Kyocera Smartphone
- Where to get more information
- Where to go next
- Preferences
- Network settings
- Synchronizing data
- Chapter 2
- Making and Receiving Calls
- Dialing calls on the keypad
- To dial a call from the keypad
- If you make an error while dialing
- Using the Dialer
- To place a call from the Dialer
- Dialer icons —full keypad screen
- Left column
- Top row
- Dialer icons—minimized screen
- Bottom row
- To use the Dialer with the flip-closed menus
- To set Dialer preferences
- Making a call from Speed Dial
- To add numbers to your Speed Dial list
- Name Phone Number
- To make a call from the Speed Dial list (with the flip open)
- To make a call from the Speed Dial list (with the flip closed)
- If you know the Speed Dial number
- If you need to look up the Speed Dial number
- Making a call from the Contacts list
- To make a call from the Contacts list
- Making a call from the Address Book
- To make a call from the Address Book
- Redialing recent calls
- To redial the most recently called number
- To make a call from Call History
- To make a call from the Recent Calls list
- Checking your own phone number
- To check your own phone number
- Making a conference call
- To make a conference call
- To make a conference call from the Address Book
- Making a data connection
- To make a data connection
- Answering calls
- To answer a call
- If a second call comes in
- To put a caller on hold
- Answering calls "hands-free"
- To set up and use Auto Answer
- To set up and use Voice Answer
- Ending calls
- To end a call
- Adjusting sounds
- To adjust the speaker volume
- To mute the microphone during a call
- To put the phone in Speakerphone mode
- To silence the ringer
- To adjust the ringer volume
- To adjust sound preferences
- Looking up information on your phone
- To find and dial contacts by name
- To find and dial contacts by number
- To find text in any application
- To look up and insert a phone number into another application
- Using power-save mode
- To turn power-save mode on or off
- Power modes
- Viewing the phone status bar
- To view the status bar (with the flip open)
- Chapter 3
- Using the Organizer
- Selecting applications
- To open an application
- Changing applications
- Displaying applications
- To list applications by name
- To display applications by category
- Entering information
- Using the on-screen keyboard
- To enter text with the on-screen keyboard
- Writing with the stylus
- To open the Memo Pad application
- Writing letters with Graffiti
- To write letters of the alphabet with Graffiti
- Graffiti tips
- Writing capital letters with Graffiti
- To make the first letter of a word a capital letter:
- To enter only capital letters (Caps Lock):
- Writing numbers with Graffiti
- Writing punctuation marks with Graffiti
- Writing symbols and extended characters
- Writing accented characters
- Accent strokes
- Additional non-English characters
- Navigation strokes
- Graffiti ShortCuts
- Using application controls
- Using menus
- To open the menus
- Choosing a menu
- Using Graffiti Shortcut commands
- Using the Edit menu
- To select text in an application
- Choosing fonts
- To change the font style
- Using categories
- To assign a category to an entry
- Viewing lists by category
- To use categories in a List screen
- Creating a new category
- To create a new Address Book category
- Renaming categories
- To change the name of an Address Book category
- Attaching notes
- To attach a note to an entry
- Marking private entries
- To mark an entry as private
- Installing applications
- Considerations
- To install software on your Kyocera smartphone
- Removing applications from the phone
- To remove an add-on application
- Removing the Desktop software
- To remove the Desktop software
- Installing Kyocera smartphone Desktop software
- About synchronizing data
- If you have already installed the Palm Desktop
- If you need to install from floppy disks
- If you need to install the Palm Desktop on a Macintosh
- Windows system requirements
- Optional equipment
- Before you install software
- To install the Kyocera smartphone Desktop software
- To connect the sync cradle
- Synchronizing data using the sync cradle
- Running your first synchronization
- Important considerations
- To synchronize data the first time
- To synchronize data using the cradle
- Synchronizing data remotely
- Landline network synchronization
- Synchronizing
- Wireless network synchronization
- Wireless direct-to-modem synchronization
- Synchronizing data using the infrared port
- To check if your Windows 95 computer supports infrared communication
- To install a Windows 95 infrared driver
- To configure HotSync Manager for infrared communication
- To synchronize data using the infrared port
- To return to synchronization by the cradle
- PHONE May be either on or off
- FLIP Open
- HotSync
- Local Modem
- Log Help
- Creating a user profile
- To create a user profile
- To use a profile for the first-time synchronization
- Using File Link
- Modifying synchronization options
- To set HotSync options
- Always available
- Available when Kyocera smartphone Desktop is running
- Manual
- Customizing a conduit
- To customize conduit settings
- Transferring information between Palm devices
- To synchronize using the same user name
- To copy and paste data
- To copy data using Windows Explorer
- Troubleshooting HotSync operations
- The HotSync operation fails to start
- The HotSync operation does not run to completion
- If you have two Palm devices with the same user name
- Beaming information
- To turn the beam receive feature on or off
- To beam information
- To receive beamed information
- Troubleshooting the Beam feature
- Beamed data does not work
- When data is beamed at the phone, an out-of-memory message appears
- Creating Address Book entries
- To create a new Address Book entry
- Making calls from the Address Book
- To make a phone call from the Address Book (with the flip open)
- To make a call from the Contacts List (with the flip closed)
- Editing Address Book entries
- To edit an Address Book entry
- To enter pauses in a phone number
- To scroll through the Address Book
- To look up an entry in the Address Book
- To choose other phone numbers in an Address Book entry
- To assign a category to an Address Book entry
- To sort the entries
- Beaming entries to other devices
- To create a business card
- To beam a business card
- To beam the current entry
- To beam the current category
- Deleting entries
- To delete an entry from the Address Book
- Using Address Book menus
- Record menu
- Options menu
- Call History and the Recent Calls List
- Opening lists of your recent calls
- To open Call History
- To open the Recent Calls list
- Making a call from Call History
- Viewing your calls
- To view calls by category
- To sort the Call History list
- To copy information from Call History to the Address Book
- To copy information from Call History to the Clipboard
- PHONE On FLIP Open
- Deleting calls
- To delete one entry
- To delete a group of entries
- To delete all entries
- Setting up your preferences in Call History
- To define Call History preferences
- Creating an expense record
- To create an expense record
- Using the menus in Call History
- Auto-Expense
- About Call History
- Scheduling events in the Date Book
- To schedule an event for the current day
- To schedule an event for another day
- To schedule an untimed event
- To reschedule an event
- Setting an alarm for an event
- To set an alarm for an event
- Marking a private event
- To mark an event as private
- Scheduling repeating events
- To schedule a repeating event
- Considerations for repeating events
- Deleting an event
- To delete an event by erasing the text
- To delete an event using the menus
- To delete an event using the Details dialog
- Changing the Date Book view
- To toggle through the views
- To display the current time
- To display and use Week view
- Spotting event conflicts
- To display and use Month view
- To display the daily appointment list
- Using the Date Book menus
- Font
- Display Options
- Phone Lookup
- About Date Book
- Creating an Expense item
- To create a new expense item
- To change the date of an expense item
- Entering or modifying receipt details
- To enter or change the details for a receipt
- Tap Details.
- Select any of the following options:
- To customize the Currency pick list
- Setting up a custom currency symbol
- To define a custom currency symbol
- To set the Show options
- Printing expense reports
- To print your expense report
- Transferring your data to an Excel spreadsheet
- To view your Expense data in a Microsoft Excel spreadsheet
- Sample expense report templates
- Customizing the templates
- About mapping tables
- To customize a sample Expense Report template
- Determining the layout of the expense report
- Analyzing your custom expense report
- Before you begin a custom mapping table
- Programming the mapping table
- To program a new custom mapping table
- Using applications other than Microsoft Excel
- Expense file details
- Using the Expense menus
- Custom Currencies
- About Expense
- Creating memos
- To create a memo
- Reviewing and editing memos
- To review the contents of a memo
- To select a sort option
- To rearrange your memos manually
- Choosing a memo category
- Marking a private memo
- To mark a memo as private
- Beaming a memo
- To beam a memo
- Deleting a memo
- To delete a memo by erasing the text
- To delete a memo using the menus
- To delete a memo using the Details dialog
- Using Memo Pad menus
- Setting up the Messages application
- VOICE MAIL NOTE:
- TEXT MESSAGE NOTE:
- To enter the phone number for your voice mail
- Checking your messages
- To check your messages (with the flip closed)
- Press the Messages
- To check your messages (with the flip open)
- To read a message
- To copy or save text
- Tap Done.
- Sending messages
- Erasing messages
- To set up and use Auto-Erase
- To erase messages manually
- Tap the Messages icon
- Do one of the following:
- Setting preferences
- To set message preferences
- Setting Up Network Connections
- Getting started with network connections
- About network applications
- About network preferences
- Collecting information
- Entering network settings
- To enter network settings
- Selecting a service
- Entering your user name
- Entering your password
- Tap the Password box.
- Enter the password you use to log in to your server.
- Tap OK.
- Selecting the connection
- Entering phone settings
- Entering a dial prefix
- Disabling call waiting
- Using a calling card (optional)
- Adding details to preferences
- Selecting a connection type
- Selecting idle timeout
- Selecting Query DNS
- Entering Primary and Secondary DNS
- Selecting an IP address dynamically
- Entering a permanent IP address
- For more information
- Creating and using service templates
- To add a new service template
- To duplicate an existing service template
- To delete a service template
- Using service template menus
- Service menu
- Troubleshooting network connections
- Displaying expanded service connection progress messages
- Viewing the Network Log
- To view the Network Log
- Adding a DNS number
- Creating a login script
- To create a login script
- Using non-ASCII characters in login scripts
- ^ char
- Carriage return and line feed
- Literal characters
- Setting a proxy server
- To set a proxy server
- Using Data/Fax mode with the wireless modem
- Phone status in Data/Fax mode
- To set up Data/Fax mode
- Tap Done.
- Incoming data call setup with the flip closed
- PHONE On FLIP Closed
- Opening Data/Fax mode
- To start Data/Fax mode (with the flip open)
- Exiting Data/Fax mode
- To exit Data/Fax mode (with the flip open)
- Resetting the phone to accept voice calls
- Troubleshooting Data/Fax mode
- About preferences
- To open the Preferences screens
- Setting Button preferences
- To change the button preferences
- Pen preferences
- To change the Pen preferences
- Turn Off & Lock
- Beam Data
- Setting Connection preferences
- To open the Configuration preferences screen
- To select a configuration
- To add a configuration
- To edit a configuration
- To delete a configuration
- Using the Digitizer
- To calibrate the screen
- Setting Format preferences
- To open the Formats preferences screen
- Country default
- To set the country default
- Time, date, week start, and numbers formats
- To select the time, date, week start, and numbers format
- Setting General preferences
- To open the General preferences screen
- To set the date and time manually
- To turn Beam Receive on or off
- To adjust the contrast
- Setting Network preferences
- Setting Owner preferences
- To enter the Owner preferences
- Setting Phone preferences
- To open the Phone preferences screen
- To enter text in the banner
- To enter the phone number for your voice mailbox
- To set Auto Answer
- To enable CHAP Authentication
- Setting keypad preferences
- Setting dialing preferences
- Setting service preferences
- Setting Power preferences
- To set power preferences
- Setting Registry preferences
- To open the Registry preferences screen
- To change Registry preferences
- Setting ShortCuts preferences
- To open the ShortCuts Preferences screen
- To create a ShortCut
- To edit a ShortCut
- To delete a ShortCut
- Setting Sounds preferences
- To open the Sounds preferences screen
- To set basic sound preferences
- To set the ringer on incoming calls
- To set status alerts
- Setting Wireless preferences
- To open the Wireless preferences screen
- To enter or change Wireless preferences
- Using Keyguard
- To turn Keyguard on immediately
- To turn Keyguard on or off automatically
- To turn Keyguard off
- If you receive a call
- If you are not on a call
- Showing or hiding private entries
- To hide or mask private entries
- To show private entries
- Locking the phone
- To lock the phone
- To unlock the phone
- To change the password
- To recover from a forgotten password
- Adding an entry to the Speed Dial list
- To add an entry to the Speed Dial list
- If the phone number is already in your Address Book
- If the phone number is not in your Address Book
- Making calls using Speed Dial
- Editing the Speed Dial list
- To change Speed Dial numbers
- To resort the Speed Dial list
- To change column size or arrangement in the Speed Dial list
- To remove an entry from the Speed Dial list
- Using Speed Dial menus
- Creating To Do items
- To create a To Do item
- To set a priority level for a To Do item
- To check off a To Do item
- Setting Item Details
- To assign a priority or category to a To Do item
- To set a due date
- Deleting a To Do item
- To delete a To Do item by erasing the text
- To delete a To Do item using the menus
- To delete a To Do item using the Details dialog
- Displaying your To Do list
- To change the Show Options settings
- Using the To Do List menus
- Training Voice Dial
- To put names in your Voice Book
- To train the command words
- Making and answering calls with Voice Dial
- To make a call using voice commands
- To answer a call using voice commands
- Recording a voice memo
- To record a voice memo using the shuttle
- To record a voice memo using the menu
- Replaying your voice memos
- Managing your voice memos
- To name a memo
- To erase one memo
- To erase all memos
- To adjust the Voice Memo settings
- Where to find help
- Your service provider
- Your phone documentation
- Help on the computer Desktop
- Help on the phone
- Customer Care Center
- Standards and safety information
- Resetting the phone
- To perform a soft reset
- PHONE Off FLIP Open
- To perform a hard reset
- Troubleshooting tips
- HotSync operations
- The HotSync operation fails to start.
- The HotSync operation does not run to completion.
- General troubleshooting
- The phone does not turn on.
- The phone doesn't recognize my handwriting.
- When I tap screen icons, the right application or feature does not open.
- When I tap nothing happens.
- Beaming does not function.
- When data is beamed at the smartphone, an out-of-memory message appears.
- A message appears stating that the memory is full.
- Network
- I can't get email on my phone.
- I can't connect to the Web on my phone.
- Security
- I forgot the password, and my phone is not locked.
- I forgot the password, and my phone is locked.
- Applications
- The current date doesn't appear when I tap Today.
- Entries seem to be missing in various applications.
- My Memo Pad entries are not sorted correctly.
- In the Date Book Week View, I can't select overlapping events.
- The Call History application shows a different number of calls on the main screen and the statistics screen.
- Phone care
- Phone
- Antenna
- Battery
- Tips for improving battery performance
- Additional factors that affect battery performance
- Replacing the battery
- Accessories
- Safety information
- Radio frequency (RF) energy
- Exposure to RF energy
- Medical devices
- Avoiding potentially unsafe areas
- Driving safely
- Air bags
- Making selections from flip-closed menus
- When you are not on a call
- To select options in Large Icon view
- Phone Info
- Contacts
- Recent Calls
- Settings
- Voice Memo
- Messages
- During a call
- Changing the menu view
- Phone Info menu
- Contacts menu
- Recent Calls menu
- Silence All option
- Silence All
- Keyguard option
- Keyguard
- Sound options
- Security options
- Call Information options
- Network options
- Extras options
- Messaging options
- Accessories options
- Voice Memo menu
- Messages menu
- End-User
- Software License Agreement
- IMPORTANT: Read before using this product
- A
- B
- C
- D
- E
- F
- G
- H
- |
- K
- L
- M
- menus
- Messages key, 15
- missed call
- modem, 188
- modifying
- N
- name
- network connections
- new
- no service, 15
- note
- numbers
- 0
- on-screen keyboard
- opening
- P
- pages
- Palm Desktop
- password
- Paste, 61
- phone calls
- phone info, 273
- phone numbers
- Q
- R
- S
- T
- U
- V
- W
Brand : KYOCERA
Model : QCP 6035
Category : Smartphone