
BCR-9DABi - Radio BLAUPUNKT - Free user manual and instructions
Find the device manual for free BCR-9DABi BLAUPUNKT in PDF.
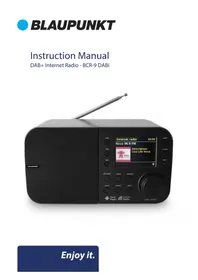


| Brand | Blaupunkt |
| Model | BCR-9DABi |
| Product Type | Portable DAB+/FM Radio |
| Dimensions (approx.) | 200 x 130 x 70 mm |
| Weight (approx.) | 0.5 kg |
| Power Supply | AC adapter (included) or 6 x AA batteries (not included) |
| Radio Bands | DAB/DAB+, FM with RDS |
| Preset Stations | 20 (10 DAB, 10 FM) |
| Display | LCD with backlight |
| Alarm | Dual alarm with snooze |
| Sleep Timer | Yes, adjustable (15-120 min) |
| Audio Output | Built-in speaker, 3.5mm headphone jack |
| Additional Inputs | 3.5mm AUX input |
| Antenna | Built-in telescopic antenna for FM; internal for DAB |
| Controls | Rotary volume, buttons for mode, preset, info |
| Safety Features | Overvoltage protection, automatic power off (if idle) |
| Maintenance | Clean with a soft, dry cloth; do not use liquids |
| Repairability | Not repairable by user; contact authorized service center |
| Accessories Included | AC adapter, user manual |
| Warranty | 2 years (depending on region) |
Frequently Asked Questions - BCR-9DABi BLAUPUNKT
User questions about BCR-9DABi BLAUPUNKT
0 question about this device. Answer the ones you know or ask your own.
Ask a new question about this device
Download the instructions for your Radio in PDF format for free! Find your manual BCR-9DABi - BLAUPUNKT and take your electronic device back in hand. On this page are published all the documents necessary for the use of your device. BCR-9DABi by BLAUPUNKT.
USER MANUAL BCR-9DABi BLAUPUNKT
| General | Safety | |
| Product | Overview | |
| Basic | Operation | |
| Specification | 11 | |
| Customer | Support |
GENERAL SAFETY
Read this manual thoroughly before you start using the Speaker.
Store this manual, the completed warranty card, your receipt and the product packaging. The safety precautions instructions reduces the risk of fire, electric shock and injury when correctly complied to.
Please follow all instructions and take notice of all warnings.

This unit must be serviced by a qualified service personnel only.


The lightning flash with symbol within the triangle is intended to warn you of a non-insulated dangerous voltage in the product's enclosure that could be of sufficient magnitude to generate a risk of electric shock to persons.
The exclamation point within the triangle is intended to warn you to the presence of important operating and maintenance instructions in the documents included with the product.
IMPORTANT INFORMATION
The lightning flash symbol within the triangle is intended to warn you of non-insulated dangerous voltage the product's enclosure that could be of sufficient magnitude to generate a risk of electric shock to persons.
- Only using furniture that can safely support the Products.
- Ensure the Product is not overhanging the edge of the supporting furniture.
- Do not place the product on a high furniture without securing both the furniture and the product to a stable support.
- Do not place the product on cloth or other conductive materials.
- Warn children of the dangers of climbing on furniture to reach the product or its controls and to call for an adult to assist.
GENERAL SAFETY (CONT.)
IMPORTANT INFORMATION
- Do not expose this product to rain or moisture as it may result in fire or an electric shock hazard
- Do not temper or change or modify the product in any way.
- Only use Accessories outlined and recommended by the manufacturer.
- Please do not expose the product to splashing or water contact
- Please do not place any object on top of the product
This product must be positioned in a sufficiently stable location, it can be potentially hazardous due to falling when mounted and can cause injury, particularly to children if it positioned incorrectly.
- Do not use a damaged power cord, plug or loose outlet. Doing so may cause an electric shock.
- Do not plug several devices into the same outlet. Doing so may cause the outlet to overheat and start a fire. Make sure the outlet is readily accessible during operation of the equipment.
- Do not bend, twist or kink the power cord excessively.
- The apparatus shall not be exposed to dripping or splashing and no objects filled with liquids, such as vases, shall be placed on the product. Dry location use only.
- Do not run the power cord near heat-producing appliances such as radiators, stoves or irons. The excessive heat could melt the insulation and expose live wires, resulting in fire or electric shock.
- No naked flame source, such as candles, should be placed on the product.
- Do not allow anything to rest on or roll over the power cord. Doing so may cause fire or electric shock.
- Do not run the power cord near heat-producing appliances such as radiators, stoves or irons. The excessive heat could melt the insulation and expose live wires, resulting in fire or electric shock.
- Unplug this product during lightning storms or when unused for long periods of time. Not doing so may result in fire or electric shock.
- Do not cover the ventilation openings of the product with items such as newspapers, tablecloths, curtains etc or insert objects into the slots available on the products.
As this could result in the product temperature rising and could cause a fire.
GENERAL SAFETY (CONT.)
- If you notice any unusual odors or smoke around the unit, immediately disconnect the unit from the outlet and contact the service center. Failure to do so may result in fire or electric shock.
- When not using the unit for long periods of time or when you are moving the unit please ensure to disconnect the power supply from the wall socket.
- Please beware that Dust could accumulate over time on the unit and cause it to generate heat and or deteriorate insulation, which in turn may result in an electrical fire.
- The product is not intended for use by persons (including children) with reduced physical, sensory or mental capabilities, or young children of any age, They must be supervised product by a person responsible for their safety.
- Batteries from the remote control must be only removed by an adult, the adult must ensure to keep them out of reach of infants and children. Seek medical attention immediately if a child has swallowed a battery.
- To maintain the product do not use any chemical or cleaning agent or wet cloth, please only ensure to utilize a dry cloth to wipe it down from marks or dust and only after unplugging the product from the power socket.
- Please ensure to contact our call center for any repair or service required for the products.
- Wall mounted installation must be carried out by a qualified personnel only. Incorrect installation may result in severe personal injury, electric shock and/or fire hazard.
Please make sure upon positioning this product, the place is:
- Not wet or damp and Well ventilated
- Away from direct sunlight or heaters.
- Away from splashes or food.
- Protected from excessive dust or grease.
- Do not place this equipment in a confined space such as a bookcase or similar unit. Allow 20cm above and 5cm spacing on both sides for proper ventilation.
- Do not place the Product near heat sources such as radiators, stoves or other audio visual equipment that produce heat.
- Do not place containers with liquids, if liquid falls inside the products it may result in short-circuit, fire or electric shock.
- Do not place small metallic objects on top of the unit.
- Do not use or store flammable or combustible materials near the unit. Doing so may result in fire or explosion. Do not place any naked flame sources, such as lit candles, cigarettes or incense sticks on top of the product.
PRODUCT OVERVIEW

1 Button
- Press to skip previous track in Spotify, Music player and Bluetooth mode.
- Press and hold to fast reverse current playing track in Music player or Bluetooth Mode.
2 Button
- Press to pause or play current playing track.
3 Button
- Press to skip to next track in Spotify.
- Press and hold to fast forward current palying track in music player and Bluetooth mode.
4 Menu Button
- Press to display or exit menu screen.
5 📋/POWER Button
Press to switch unit on or standby.
6 PRESET Button
- Press and hold to store preset station.
- Press to recall preset station.
7 MODE button
Press to switch mode among Internet, Spotify Connect, Music player, DAB, FM, Aux in and Bluetooth mode.
8 BACK button
Press to return to previous option.
9 Display
10 SLEEP button
Press to set sleep timer.
11 ALARM button
Press to set alarm.
12 INFO button
Press to browse program information.
13 TUNE/VOL. button
Press to shift the function of SCROLL/SELECT knob between tuning and volume adjusting.
14 SCROLL/SELECT knob
- Turn to adjust volume level when volume adjusting function is active.
- Turn to browse options when tuning function is active.
- Press to confirm selection.
PRODUCT OVERVIEW (CONT.)
TOP VIEW

1 NFC Sensor
REAR VIEW

1 DC IN socket
2 AUX IN socket
3 Headphone socket
4 AUDIO OUT sockets
5 5V 2.1A USB Port - For charging mobile device
6 DAB/FM Antenna
PRODUCT OVERVIEW (CONT.)
ICONS ON DISPLAY


ICONS
: WiFi level
Music/program is paused
UPnP : Music player mode - Music/programs played from a Media Server on your network
: Repeat play
: Shuffle play
1 : Alarm 1 is active
② : Alarm 2 is active
: Sleep timer is active and unit will go to standby after “##” minutes
: Preset station “#”
: RDS (Radio Data System)
The FM station with RDS which plays Program Name, Program Type, Program Contents and other information.
Audio of the FM station is produced in stereo
Station signal strength
GETTING STARTED
- Main Unit
- Power Adaptor
- Manual
Positioning your Radio
Place your radio on a flat/stable surface that is not subject to vibrations.
Adjusting the Antenna
Extend the antenna to ensure you receive the best reception possible in both DAB and FM radio modes. It may be necessary to adjust the position of the radio and /or antenna to achieve the best signal.
Turning the unit On/Off
Connect the plug at the end of power adapter cable to the DC IN socket on the rear of unit. Then insert the power adapter into the mains socket. The unit will turn on.
Press ⏻/POWER button to switch unit standby.
To switch the unit off completely, unplug the power adapter from the mains socket.
Radio Auto-standby
To avoid unnecessary energy consumption, the radio will automatically go to standby after 10 minutes if the radio isn't playing any program/track.
Charging from USB Port
The USB port is designed for charging mobile devices (e.g. MP3 player, mobile phone, etc.). It supplies 5 V DC at a charging current of up to 2100 mA (2.1 A).
Use a USB cable (not included) to connect mobile device to the USB port of the unit and the mobile device will start charging.
Automatically Setting the Clock
The clock can be set and updated automatically if are connected to the internet or receive DAB/FM signals in your location. In order for the clock to synchronise to the current local time you must leave it on an Internet Radio, DAB or FM station for a short period of time. You can also choose how you would like to keep the clock up to date the Internet, DAB or FM radio signals. Go to Main menu - System settings - Time/Date - Auto update.
GETTING STARTED (Cont.)
Wireless LAN Setting
• A broadband Internet connection.
- A wireless access point (Wi-Fi) connected to your broadband Internet, preferably via a router.
- If your wireless network is configured to use Wired Equivalent Privacy (WEP) or Wi-Fi Protected Access (WPA) data encryption then you need to know the WEP or WPA code so you can get the Internet Radio to communicate with the network.
- If your wireless network is configured for trusted stations you will need to enter the Radio's MAC address into your wireless access point. To find the Radio's MAC address use menu items as follows: Main menu - System settings - Network - View settings - MAC address. Before you continue, make sure that your wireless access point is powered up and connected to your broadband Internet. To get this part of the system working, read the instruction supplied with the wireless access point is highly recommended.
INTERNET RADIO MODE
- The display will show "Main menu" after "Setup wizard" completed. Press SCROLL/SELECT knob to select Internet radio mode.

- While "Station list" is highlighted, press SCROLL/SELECT knob to confirm.

- Then refer following section to choice stations. Or if failed to connect to network, please follow:
a. Check your Router, see it working normally or not;
b. Relocate your radio to a stronger signal position is necessary!
c. Make sure your password is correct input.
INTERNET RADIO MODE (Cont.)
Local "Country" will change according to your current location (e.g. Local Australia).
It displays local stations of your current location.
- To enter local stations, press MENU button - Station list - Local "Country", press
SCROLL/SELECT knob to confirm.

- Station genres are listed. Turn SCROLL/SELECT knob to select the genre you wanted, and then press SCROLL/SELECT knob to confirm.
- Turn SCROLL/SELECT knob to select you desired station, and then press SCROLL/SELECT knob to confirm broadcasting.
INTERNET RADIO MODE (Cont.)
Stations enables you to select a station from categories: Location, Genre, Popular stations or New stations, or search stations.
- Press MENU button - Station list - Stations, press SCROLL/SELECT knob to confirm.

- In "Stations" menu:
- "Location" enables you to choose from the radio stations provided by any country which you choose from a list.
a. While "Location" is highlighted, press SCROLL/SELECT knob to confirm.
b. Turn SCROLL/SELECT knob to select the region you wanted, and then press SCROLL/SELECT knob to confirm.
c. Turn SCROLL/SELECT knob to select the country you wanted, and then press SCROLL/SELECT knob to confirm.
d. Turn SCROLL/SELECT knob to select the station you wanted, and then press SCROLL/SELECT knob to confirm. The station will be broadcast.
- “Genre” enables you to choose radio stations according to their content, for example Classic Rock, Sport, News, etc.
a. While "Genre" is highlighted, press SCROLL/SELECT knob to confirm.
b. Turn SCROLL/SELECT knob to select the genre you wanted, and then press SCROLL/SELECT knob to confirm.
c. Turn SCROLL/SELECT knob to select through All Stations, Highlighted Stations or the country you wanted, and then press SCROLL/SELECT knob to confirm.
d. Turn SCROLL/SELECT knob to select the station you wanted, and then press SCROLL/SELECT knob to confirm. The station will be broadcast.
- “Search stations” enables you to enter all or part of station name to find a station.
- “Popular stations” enables your radio to list the stations that have the most listeners.
- “New stations” enables your radio to list the stations that have recently joined the Internet radio network.
STORING PRESET STATIONS
Your radio can store up to 10 of your favourite Internet stations. This will enable you to access your favourite stations quickly and easily.
- While playing your favourite station, press and hold PRESET button on the main unit until display shows as below:
![Save to Preset 1. [Not set] 2. [Not set] 3. [Not set] 4. [Not set] 5. [Not set]](/content/2026/05/1055057/images/f6b8455cf3c80df16e17e796a0587c6c92a8b591ab1a1982c720b7b3bfd4f491.jpg)
-
Turn SCROLL/SELECT knob to cycle through the preset numbers 1-10.
-
Select one preset number and then press the SCROLL/SELECT knob, display will show "Preset stored".
-
Preset number “★ #” will show on the display.
SPOTIFY
Spotify brings you the right music for every moment – on computers, mobiles, tablets, home entertainment systems, cars, gaming consoles and more.
Just search for music you love, or let Spotify play you something great. Create and listen to your playlists for free or subscribe to Premium for on-demand access at the highest audio quality – with zero ads.
Listen out loud with Spotify Connect
- Connect your DAB+ Internet Radio to your wifi network
- Open up the Spotify app on your phone, tablet or laptop using the same wifi network
- Play a song and select Devices Available.
- Select your partner device and start listening.

SPOTIFY (Cont.)
Note: If unattended to use radio for long periods of time, e.g. overnight, while on holiday or while out of the house, select “NO” to avoid unnecessary energy consumption.
*For information on how to set up and use Spotify Connect please visit www.spotify.com/connect
Controlling Spotify Connect
You can now control Spotify from the app like normal; search for and play your tracks, change the volume and add to playlists even though playback is through your radio. The next time you open the Spotify app, playback will continue through your radio. Spotify Connect is a cloud-based service, therefore after activation on your radio, your smartphone or tablet no longer needs to be on the
DAB MODE
Selecting DAB Mode
- Press MODE button repeatedly to select DAB mode.
- For initial use, radio will carry out a full scan and store stations list in memory

- Once the scanning is completed, the DAB/DAB+ stations will be displayed in alphanumeric order. The first station in the list will be selected, press SCROLL/SELECT knob to broadcast.
NOTE If no DAB/DAB+ signal is found in your area, it may be necessary to relocate your radio to a stronger signal area. Visit: www.digitalradioplus.com.au to check if DAB is available in your area.
Selecting another station
- While a program is playing, press MENU button, turn SCROLL/SELECT knob to select "Station list", and then press SCROLL/SELECT knob to confirm.
- Turn SCROLL/SELECT knob to select the station you want to play, and then press SCROLL/SELECT knob to confirm.
NOTE alternatively, while a program is playing, press TUNE/VOL. button to activate tuning function of SCROLL/SELECT knob. Turn SCROLL/SELECT knob to browse through station list, and then press SCROLL/SELECT knob to confirm the station you desired.
DAB MODE (Cont.)
Scanning Stations
Press MENU button, turn SCROLL/SELECT knob to select "Scan", and then press SCROLL/SELECT knob to full scan.
Manual Tune
This can help you when adjusting your antenna or when adding stations that were missed while auto tuning.
-
Press MENU button, turn SCROLL/SELECT knob to select "Manual tune", and then press SCROLL/SELECT knob to confirm, the display will show the channel number and frequency.
-
Turn SCROLL/SELECT knob to select the channel you wanted, and then press SCROLL/SELECT knob to confirm. (Visit: www.digitalradioplus.com.au to learn more channel and frequency of DAB stations.)

DRC (Dynamic Range Control) value
If you are listening to music with high dynamic range in a noisy environment (for example classical music while cooking), you may wish to compress the audio dynamic range. This makes quiet sounds louder and loud sounds quieter
-
Press MENU button, turn SCROLL/SELECT knob to select "DRC", and then press SCROLL/SELECT knob to confirm.
-
Turn SCROLL/SELECT knob to select "DRC high", "DRC low" or "DRC off", and then press SCROLL/SELECT knob to confirm.
DAB MODE (Cont.)
Changing Station Order
You may want to display the stations in different order.
- Press MENU button, turn SCROLL/SELECT knob to select "Station order", and then press SCROLL/SELECT knob to confirm.
- Turn SCROLL/SELECT knob to select "Alphanumeric", "Ensemble" or "Valid", and then press SCROLL/SELECT knob to confirm your selecting option.
| Alphanumeric | Display all stations in alphanumeric order. |
| Ensemble | List currently broadcasting active stations before inactive ones. |
| Valid | Remove inactive stations from the station list. |
Viewing Station Information
DAB/DAB+ stations broadcast additional information. To view DAB station information, press SCROLL/SELECT knob to Press INFO button repeatedly to view information through DLS (Dynamic Label Segment), Ensemble, Program Frequency, Signal Quality, Signal Strength, Bitrate, Codec, Channel and Date.
Note: To view station information while the display is playing full screen pictures, press SCROLL/SELECT knob to minimize picture, and then you can press INFO knob repeatedly to view information. Press SCROLL/SELECT knob a second time to play full screen pictures.
Showing Signal Strength
While you selected signal strength, a signal bar with the strength of the current station will show on the display.

The indicator on the signal bar shows the minimum acceptable signal level.
Note: Stations with signal strength below the minimum signal level may not provide a steady stream of audio.
FM Mode
Selecting FM Mode
- Press MODE button repeatedly to select FM mode.
- For initial use, it will start at the beginning of the FM frequency range (87.50MHz). Otherwise, the last listened FM station will be selected.
![FM 15:36 87.50MHz [No Radio Text] FM Radio](/content/2026/05/1055057/images/6aaf48f48508f03296b2d51f167a2f15e3499370fce531115360084cb07b137b.jpg)
- To manually change the FM frequency, while FM frequency shows up, press TUNE/VOL. button to activate tuning function of SCROLL/SELECT knob, and then turn SCROLL/SELECT knob clockwise or anticlockwise to change the frequency by 0.05MHz per step.
- To automatically scan, while FM frequency shows up, press TUNE/VOL. button to activate tuning function of SCROLL/SELECT knob first, and then turn SCROLL/SELECT knob clockwise or anticlockwise. Press SCROLL/SELECT knob, your radio will skip forward or backward until it reached the next available station.
FM Mode (Cont.)
Scan Settings
This enables you set FM scans stop at stations with strong signal or stop at any available station. By default, FM scans stop at any available station. This may result in a poor signal-to-noise ratio (hiss) from weak stations.
- Press MENU button, turn SCROLL/SELECT knob to select "Scan setting", and then press SCROLL/SELECT knob to confirm.
- Display will show "Strong stations only?", turn SCROLL/SELECT knob to select "YES", and then press SCROLL/SELECT knob to confirm. The scans stop only at stations with good signal strength.
- Turn SCROLL/SELECT knob to select "NO", and then press SCROLL/SELECT knob to confirm. The scans stop at any available station. This may result in a poor signal-to-noise ratio (hiss) from weak stations.
Audio Settings
By default, all stereo stations are reproduced in stereo. For weak stations, this may result in a poor signal-to-noise ratio (hiss).
-
To play weak stations in mono, press MENU button, turn SCROLL/SELECT knob to select "Audio setting", and then press SCROLL/SELECT knob to confirm.
-
Display will show "Listen in Mono only?", turn SCROLL/SELECT knob to select "YES", and then press SCROLL/SELECT knob to confirm.
FM Mode (Cont.)
Storing Preset Stations
Your radio can store up to 10 of your favourite FM stations. This will enable you to access your favourite stations quickly and easily.
- While playing your favourite station, press and hold PRESET button on the main unit until display shows as below:
![Save to Preset 1. [Not set] 2. [Not set] 3. [Not set] 4. [Not set] 5. [Not set]](/content/2026/05/1055057/images/7b8f30362fb58b780f756f0f6676ce8bdd18509b4e4e9c401d19f9a1cec3d7ac.jpg)
- Turn SCROLL/SELECT knob to cycle through the preset numbers 1-10.
- Select one preset number and then press the SCROLL/SELECT knob, display will show "Preset stored".
- Preset number “ #” will show on the display.
Recalling a Preset Station
- Press PRESET button to show the saved preset stations.
![Recall from Preset 1. 95.80MHz 2. 97.10MHz 3. [Not set] 4. [Not set] 5. [Not set]](/content/2026/05/1055057/images/4d265d0e28c31d857dbce59624c96c50cebbb8684182931e462bf7c543068712.jpg)
- Turn SCROLL/SELECT knob to select the preset station you want to play and then press the SCROLL/SELECT knob to confirm.
- The display will show "Preset Empty" if the preset station isn't allocated.
AUX Mode
Aux in allows for quick and easy connection to an MP3 player or other external audio sources.
-
Before connecting to the mains socket, use a 3.5mm audio cable (not supplied) to connect to your external audio device through the AUX IN socket on the rear of unit.
-
Connect power adapter to mains socket, press /POWER button to switch unit on.
-
Press MODE button repeatedly to select Aux in mode.

-
In Aux in mode, you may operate your audio device directly for playback features.
-
To gain optimal volume levels, adjusting the output volume level on the audio device as well is recommended.
Bluetooth Mode
Pair the unit with a Bluetooth device to listen to music:
- Press the MODE button to select Bluetooth mode.
- The display will flash in repeatedly.
- Activate your Bluetooth device and select the search mode.
- "BCR-9 DABi" will appear on your Bluetooth device.
- Select "BCR-9 DABi" and enter "0000" for the password if necessary.
- The icon will remain steadily on the display when connection is successful.
- While a track is playing, you can:
a. Press ◀◀ button once to resume to the beginning of track, and then press ◀◀ button once again to skip to previous track; press and hold ▶▶ button to fast reverse current playing track.
b. Press button to pause or play current playing track.
c. Press▶▶ button to skip to next track; press and hold▶▶ button to fast forward current playing track. - To disconnect the Bluetooth connection, press MENU button, turn SCROLL/SELECT knob to select "BT disconnect", and then press SCROLL/SELECT knob to confirm. The display will show "Device disconnect?", turn SCROLL/SELECT knob to select "YES", and then press SCROLL/SELECT knob to confirm.
NFC (Near Field Communication)
NFC enables you pair and connect with Bluetooth devices in an easy way.
- Press MODE button repeatedly to select Bluetooth mode.
- Make sure that your NFC is turned "On" on your mobile device.
- Hold your mobile device about 2cm close to NFC sensor on top panel for receiving an auto-connection between your mobile device and radio.
- Your device then will turn-on Bluetooth automatically and will pair your device with radio. No additional settings are necessary.
General Operation
Settings Sleep
This feature enables your radio to switch to standby mode by itself after a set sleep time.
- Press MENU button - Main menu - Sleep, and then press SCROLL/SELECT knob to confirm.
- Turn SCROLL/SELECT knob to view options Sleep OFF, 15, 30, 45 or 60 MINS, press SCROLL/SELECT knob to confirm. The sleep icon and sleep time will show on the display.
- To turn the sleep function off while the sleep timer is still counting down, select "Sleep" option, turn SCROLL/SELECT knob to select "Sleep OFF".
Note: Alternatively, press SLEEP button repeatedly to set sleep time.
Setting Alarm
Your radio includes dual alarms. Set Alarm, making sure set time at first.
- Press MENU button - Main menu - Alarms, and then press SCROLL/SELECT knob to confirm.
Note: Alternatively, press ALARM button to go to alarm menu. - Turn SCROLL/SELECT knob to select "Alarm 1" or "Alarm 2", and then press SCROLL/SELECT knob to confirm.
- Turn SCROLL/SELECT knob to select options, and then press SCROLL/SELECT knob to confirm the setting.
| Enable: | Alarm active day: Off, Daily, Once, Weekends or Weekdays |
| Time: | Alarm time: 00:00 (manually set up the time) |
| Mode: | Alarm mode: Buzzer, Internet radio, DAB or FM(If the wake-up mode is DAB and the DAB signal strength is low, the buzzer alarm will be triggered.) |
| Preset: | Last listened or saved preset station (not available for Buzzer mode). |
| Volume: | Alarm volume |
| Save: | Save the alarm |
-
When the display shows "Alarm Saved", the alarm setting is successful. ① or ② will show on the display.
-
To temporarily switch off alarm, press SCROLL/SELECT knob repeatedly to set snooze time for 5, 10, 15 or 30 minutes in turn. The set snooze time will show on the display and unit will go to standby.
- To turn off alarm, press /POWER button when the alarm sounds.
- To cancel Alarm, refer to steps1-3 to enable alarm "Off".
General Operation (Cont.)
Setting Equaliser
This feature enables you to choose a sound equalization profile. Each of the equalization setting will change the tone of the sound from your radio when selected.
-
Press MENU button - Main menu - System settings - Equaliser, and then press SCROLL/SELECT knob to confirm.
-
Turn SCROLL/SELECT knob and then press it to select a profile through Normal, Flat, Jazz, Rock, Movie, Classic, Pop, News and My EQ.
-
To set up My EQ, select "My EQ profile setup", and then press SCROLL/SELECT knob to confirm. Turn SCROLL/SELECT knob to select Bass, Treble or Loudness, and then press SCROLL/SELECT knob to confirm. Turn SCROLL/SELECT knob to change the value of Bass, Treble or Loudness, and then press SCROLL/SELECT knob to confirm. Press BACK button, display will show "Save changes". Turn and press SCROLL/SELECT knob to select "YES" to save changes.
Network Setup
Users encountering networking issue may find these options useful for diagnosing and fixing network problems.
-
Press MENU button - Main menu - System settings - Network, press SCROLL/SELECT knob to confirm.
-
Turn SCROLL/SELECT knob to select your preferred network setting option:
| Network wizard: | Scan for available networks |
| PBC Wlan setup: | Set up a WPS encrypted network (only support the router uses WPS 2.0) |
| View settings.: | View network settings such as MAC address, Wlan region, IP address etc. |
| Manual settings: | Set wireless connection |
| Network profile: | List of registered networks or delete some of unwanted networks |
| Keep network connected: | Keep network connected in DAB, FM, Bluetooth, Aux in and standby modes |
- Press SCROLL/SELECT knob to confirm your setting.
General Operation (Cont.)
Setting Time/Date
-
Press MENU button - Main menu - System settings - Time/Date, press SCROLL/SELECT knob to confirm.
-
Turn SCROLL/SELECT knob to select options, and then press SCROLL/SELECT knob to confirm the setting.
| Set Time/date: | Manually set-up both Time and Date |
| Auto update: | “Update from DAB”, “Update from FM”, “Update from Network” or “No update” |
| Set format: | 12 or 24 hour format |
| Set timezone: | Select a timezone(Only available when auto update from Network.) |
| Daylight saving: | Daylight saving settings(Only available when auto update from Network.) |
- Then setting time according to your personal preference.
Setting Language
This feature enables you to change menu language. There are thirteen languages available: English/German/Danish/Dutch/Finnish/French/Italian/Norwegian/Polish/Portuguese/Spanish/Swedish/Turkish.
-
Press MENU button - Main menu - System settings - Language, press SCROLL/SELECT knob to confirm.
-
Turn SCROLL/SELECT knob to select your language, and then press SCROLL/SELECT knob to confirm.
Factory Reset
Doing a factory reset clears all user defined setting, replacing them with the original default values, so time/date, DAB station list and preset stations are all lost.
-
Press MENU button - Main menu - System settings - Factory Reset, press SCROLL/SELECT knob to confirm.
-
Turn SCROLL/SELECT knob to select "YES", and then press SCROLL/SELECT knob to confirm.
General Operation (Cont.)
Software Update - Over the Network
From time to time, your radio may make software upgrades available with bug fixes and/or additional features. If your radio detects that newer software is available, it will ask if you want to go ahead with an update. If you agree, the new software is then downloaded and installed. After a software upgrade, all user settings are maintained.
CAUTION
Before starting a software upgrade, ensure that your radio is plugged into a stable mains power connection. Disconnecting power during a software update may permanently damage the unit.
- Press MENU button - Main menu - System settings - Software update, press SCROLL/SELECT knob to confirm.
- Turn SCROLL/SELECT knob to select "Auto-check setting", your radio will check periodically for new version software.
- Turn SCROLL/SELECT knob to select "Check now", your radio will now to check new version software and automatically upgrade the detected new version software.
Setup Wizard
When this unit is started for the first time, it runs through a setup wizard to configure settings for date/time and network. Once this has finished, the system is ready to use in most modes. Redo setup wizard will not erase user settings such as searched stations and presets.
-
Press MENU button - Main menu - System settings - Setup wizard, press SCROLL/SELECT knob to confirm.
-
Turn SCROLL/SELECT knob to select "YES", and then press SCROLL/SELECT knob to confirm.
Viewing System Info
This information may be requested when dealing with technical support issues.
-
Press MENU button - Main menu - System settings - Info, press SCROLL/SELECT knob to confirm.
-
Turn SCROLL/SELECT knob to view "SW version", "Spotify version", "Radio ID" and "Friendly Name".
General Operation (Cont.)
Setting Backlight
This radio display has a backlight with adjustable brightness level.
-
Press MENU button - Main menu - System settings - Backlight, press SCROLL/SELECT knob to confirm.
-
Turn SCROLL/SELECT knob to select "Power-on Level" or "Standby Level", then press SCROLL/SELECT knob to confirm.
-
Turn SCROLL/SELECT knob to select backlight level, and then press SCROLL/SELECT knob to confirm the setting.
| Power-on Level | HighMediumLow |
| Standby Level | HighMediumLow |
General Operation (Cont.)
Multi-room
Multi-room is a feature that enables you control your radio (one or more) via UNDOK App for playback. You can enjoy music by using your smartphone or tablet which has UNDOK App to respectively control the radios (multi-room capable devices) in the kitchen, bedroom or living room. Of course you also can group control the radios for playing.
- To use multi-room feature, download UNDOK

from App Store for your iOS
smartphone or download from Google Play for your Android smartphone.
- Start UNDOK app, making sure your radio and smartphone are connected to same WiFi network.
- All available devices will be listed. Tap your radio "BRC-9 DABi xxxxxxxxxxxxx" (the 12 digit alphanumeric code is the MAC address of your radio) to connect to.
- Now playing screen is shown. (Playing Internet radio mode for example.)
![graph TD A["Device name."] --> B["BR320DABC 0022..."] C["Return to device list."] --> B D["Standby/wake up"] --> B E["Select a mode from here to listen."] --> F["SOURCE"] G["Set device settings such as change friendly name, view radio information, etc."] --> H["BROWSE"] I["Select something from here…](/content/2026/05/1055057/images/941c59361fb980c7b78be14af557bbc6f260cb3ef60cf8bb594ba8564de8e9eb.jpg)
General Operation (Cont.)
- If you have more than one radio (multi-room capable device), you can group them to play synchronously. Tap the “Return to device list” icon.
- Create group, taping the edit icon which is following device name on device list, and then "Group Setup" screen will be shown. (Please refer to Figure 1 and 2.)
a. Tap the grey circle before device name which is under "Sharing with" option on "Group setup" screen and make it turn green to add the device to group. (Please refer to Figure 2.)
b. Tap "Rename" under "Group name" option on "Group Setup" screen to enter a group name or select one usual name from the list, and then select "Done" to create group. (Please refer to Figure 2 and 3.)
Note: To dissolve the group, tap "Delete group" to delete the group. (Please refer to Figure 2 and 7.)
c. Device list will appear again and the group will be shown with group name and the devices in the group. Tap on group name to select the group. (Please refer to Figure 4.)
d. All clients in the group will synchronously play the program which the master device is playing. You can drag the volume control bar to change the master volume for all grouped devices. You also can tap on the volume control and then change volume for each device respectively.
(Please refer to Figure 5 and 6.)
Note: Master device is which you selected from device list for editing group; client is the device you selected sharing with on "Group Setup" screen.
Figure 1 Figure 2

General Operation (Cont.)
Figure 3

Figure 4

Figure 5

Figure 6

General Operation (Cont.)
Figure 7

General Operation (Cont.)
- Alternatively, you can edit group through your radio.
a. Press MENU button - Main menu - System settings - Multi-room, and then press SCROLL/SELECT knob to confirm.
b. Turn SCROLL/SELECT knob to select options, and then press SCROLL/SELECT knob to confirm.
| View details | View your radio state (Ungrouped, Server or Client) and the group which it belong to. |
| Create new group | Create a new group that your radio will be joined. |
| Add to group | Devices in current network will be listed. Select the device you desired to add to the group which your radio belong to. |
| List current clients | Clients in the group which your radio belong to will be listed. Select a client will remove it from group. |
| Leave group | Remove your radio from group |
| Dissolve group | Dissolve the group which your radio belong to. |
- To ensure you can use UNDOK app when your radio is in all modes especially in non-internet modes (i.e. in DAB, FM, Bluetooth or Aux in mode) you need to select Main menu - System settings - Network - Keep network connected - YES. This also allows you to wake the radio from standby using your UNDOK app.
Note: If unattended to use radio for long periods of time, e.g. overnight, while on holiday or while out of the house, select "NO" to avoid unnecessary energy consumption. Your radio cannot be found in the network and cannot be waked-up by using UNDOK app once you set "Keep network connected" to "NO".
TROUBLESHOOTING
If a problem occurs, it may often be due to something very minor. The following table contains various tips.
| Problem | Solution |
| No Power. | ● Ensure the mains cable is properly connected.● Make sure that the unit is turned on. |
| The unit does not respond when pressing any buttons. | ● The unit may freeze up during use. Switch the unit off and then on again to reset it. |
| Poor radio reception. | ● Make sure the antenna is fully extended.● Electrical interference in your home can cause poor reception. Move the unit away from them (especially those with motors and transformers). |
| Desired station not found. | ● Weak signal. Search manually. |
| I cannot find “BCR-9 DABi” on my Bluetooth device | ● Ensure the Bluetooth function is activated on your Bluetooth device.● Re-pair the unit with your Bluetooth device. |
SPECIFICATIONS
| Audio Output Power 5W RMS | |
| Power Adaptor | |
| Input 110-240V, 50-60 Hz 0.5A Max | |
| Output 7.5V 2.4A | --- |
| Frequency | |
| DAB 174.928-239.200 MHz | |
| FM 87.5-108 MHz | |
| Power Consumption | |
| Operation 24W (Max) | |
| Standby <2W | |
| Dimensions 250 x 165 x 135 mm (w x d x h) | |

BLAUPUNKT
CUSTOMER HELPLINE:
1300 296 699
info@ayonz.com
DISTRIBUTED BY:
Ayonz Pty Ltd
PO Box 3291, North Strathfield, NSW, 2137
- GENERAL SAFETY
- IMPORTANT INFORMATION
- GENERAL SAFETY (CONT.)
- PLEASE MAKE SURE UPON POSITIONING THIS PRODUCT, THE PLACE IS
- PRODUCT OVERVIEW
- BUTTON
- MENU BUTTON
- 📋/POWER BUTTON
- PRESET BUTTON
- MODE BUTTON
- BACK BUTTON
- DISPLAY
- SLEEP BUTTON
- ALARM BUTTON
- INFO BUTTON
- TUNE/VOL. BUTTON
- SCROLL/SELECT KNOB
- PRODUCT OVERVIEW (CONT.)
- TOP VIEW
- REAR VIEW
- ICONS
- SLEEP TIMER IS ACTIVE AND UNIT WILL GO TO STANDBY AFTER “##” MINUTES
- PRESET STATION
- GETTING STARTED
- POSITIONING YOUR RADIO
- ADJUSTING THE ANTENNA
- TURNING THE UNIT ON/OFF
- RADIO AUTO-STANDBY
- CHARGING FROM USB PORT
- AUTOMATICALLY SETTING THE CLOCK
- GETTING STARTED (CONT.)
- WIRELESS LAN SETTING
- INTERNET RADIO MODE
- INTERNET RADIO MODE (CONT.)
- STORING PRESET STATIONS
- SPOTIFY
- LISTEN OUT LOUD WITH SPOTIFY CONNECT
- SPOTIFY (CONT.)
- CONTROLLING SPOTIFY CONNECT
- DAB MODE
- SELECTING DAB MODE
- SELECTING ANOTHER STATION
- DAB MODE (CONT.)
- SCANNING STATIONS
- MANUAL TUNE
- DRC (DYNAMIC RANGE CONTROL) VALUE
- CHANGING STATION ORDER
- VIEWING STATION INFORMATION
- SHOWING SIGNAL STRENGTH
- FM MODE
- SELECTING FM MODE
- FM MODE (CONT.)
- SCAN SETTINGS
- AUDIO SETTINGS
- RECALLING A PRESET STATION
- AUX MODE
- BLUETOOTH MODE
- NFC (NEAR FIELD COMMUNICATION)
- GENERAL OPERATION
- SETTINGS SLEEP
- SETTING ALARM
- GENERAL OPERATION (CONT.)
- SETTING EQUALISER
- NETWORK SETUP
- SETTING TIME/DATE
- SETTING LANGUAGE
- FACTORY RESET
- SOFTWARE UPDATE - OVER THE NETWORK
- CAUTION
- SETUP WIZARD
- VIEWING SYSTEM INFO
- SETTING BACKLIGHT
- MULTI-ROOM
- TROUBLESHOOTING
- SPECIFICATIONS
- BLAUPUNKT
Brand : BLAUPUNKT
Model : BCR-9DABi
Category : Radio