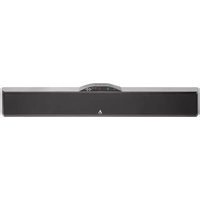
H-PAS PowerBar 235 - Loudspeaker ATLANTIC - Free user manual and instructions
Find the device manual for free H-PAS PowerBar 235 ATLANTIC in PDF.


| Product Type | Soundbar with built-in subwoofer (H-PAS technology) |
| Model | H-PAS PowerBar 235 |
| Brand | Atlantic |
| Dimensions (W x H x D) | Approximately 1000 x 80 x 120 mm |
| Weight | Approximately 3.2 kg |
| Power Supply | AC 100-240V, 50/60Hz (built-in power supply) |
| Power Output | 120W RMS (total) |
| Frequency Response | 40Hz - 20kHz |
| Connectivity | Bluetooth 5.0, HDMI ARC, Optical, USB, 3.5mm AUX |
| Speaker Configuration | 2.1 channels (two full-range drivers + dedicated subwoofer) |
| Controls | Touch controls on unit, remote control included |
| Audio Decoding | Dolby Digital, DTS |
| Wall Mountable | Yes (brackets included) |
| Maintenance & Cleaning | Wipe with a soft dry cloth; do not use harsh chemicals. |
| Safety | Do not expose to moisture; unplug during storms. |
| Spare Parts & Repairability | Contact Atlantic service center for parts; repairability score not rated. |
| General Information | Designed for TV enhancement; H-PAS ensures clear dialogue and deep bass. |
Frequently Asked Questions - H-PAS PowerBar 235 ATLANTIC
User questions about H-PAS PowerBar 235 ATLANTIC
0 question about this device. Answer the ones you know or ask your own.
Ask a new question about this device
Download the instructions for your Loudspeaker in PDF format for free! Find your manual H-PAS PowerBar 235 - ATLANTIC and take your electronic device back in hand. On this page are published all the documents necessary for the use of your device. H-PAS PowerBar 235 by ATLANTIC.
USER MANUAL H-PAS PowerBar 235 ATLANTIC
Amplified Soundbar with DSP Surround and H-PAS Bass


dts
Digital Surround
H-PAS™

DOLBY.
DIGITAL

DOLBY
PRO LOGIC II

)™ User Switchable
) Display
Atlantic
TECHNOLOGY
Table of Contents
2 Important Safety Instructions
3 H-PAS PowerBar 235 Amplified Soundbar
3 Introduction
3 Description
3 What's in the Box?
4 Front Control Panel
5 Rear Connection Panel
6 Remote Control
7 Placement
7 Speaker Placement and Home Theater
8 Setting Display for Orientation
8 Rotating Grille for Orientation
9 Connecting Your System
9 Digital Audio Inputs
9 Analog Audio Inputs
9 Turning Off Your TV's Internal Speakers
11 Modes
11 Surround Modes
11 Speech Enhancement
12 Troubleshooting
12 F.A.Q.
13 Advanced Operations
13 Control Panel Tone Controls
13 Subwoofer Output
13 Front Panel Controls Disable aka "Parental Lock"
13 Restore Factory Defaults
13 Remote Commands
14 Care of Your Speaker
14 Specifications
15 Warranty
Important Safety Instructions
This product was designed and manufactured to meet strict quality and safety standards. There are, however, some installation and operation precautions which you should be particularly aware of.
- Read Instructions. All the safety and operating instructions should be read before the system is operated.
- Retain Instructions. The safety and operating instructions should be retained for future reference.
- Heed Warnings. All warnings on the appliances and in the operating instructions should be adhered to.
- Follow Instructions. All operating and use instructions should be followed.
- Cleaning. Unplug the appliance from wall outlet before cleaning. Do not use liquid cleaners or aerosol cleaners. Use a damp cloth for cleaning.
-
Attachments. Do not use attachments not recommended by the product manufacturer as they may cause hazards.
-
Water and Moisture. Do not use these appliances near water: for example, near a bath tub, washbowl, kitchen sink, or laundry tub, in a wet basement, or near a swimming pool, and the like.
- Accessories. Do not place these appliances on an unstable stand, bracket, or table. The products may fall, causing serious injury to a child or adult, and serious damage to the products. Any mounting of the appliances should follow the manufacturer's instructions, and should use mounting accessories recommended by the manufacturer.
- Power Sources. This product should be operated only from the type of power source indicated on the marking labels. If you are not sure of the type of power supply to your home, consult your appliance dealer or local power company.
- Grounding or Polarization. This product may be equipped with polarized alternating-current line plugs (plugs having one blade wider than the other).
This plug will fit into the power outlet only one way. This is a safety feature. If you are unable to insert the plug fully into the outlet, try reversing the plug. If the plug should still fail to fit, contact your electrician to replace your obsolete outlet. Do not defeat the safety purpose of the polarized plug.
- Power Cord Protection. Power-supply cord should be routed so that it is not likely to be walked on or pinched by items placed upon or against it, paying particular attention to cords at plugs, convenience receptacles, and the point where they exit from the appliances.
- Lightning. Unplug the product from the wall outlet for added protection during a lightning storm, or when it is left unattended and unused for long periods of time. This will prevent damage to the product due to lightning and power-line surges.
- Overloading. Do not overload wall outlets and extension cords as this can result in a risk of fire or electric shock.
- Object and Liquid Entry. Never push objects of any kind into this product through openings, as they may touch dangerous voltage points or short out parts that could result in a fire or electric shock. Never spill liquid of any kind on this product.
- Servicing. Do not attempt to service this product yourself, as opening or removing covers may expose you to dangerous voltage or other hazards. Refer all servicing to qualified service personnel.
- Damage Requiring Service. Unplug this product from wall outlets and refer servicing to qualified service personnel under the following conditions:
a. When the power supply cord or plug is damaged.
b. If liquid has been spilled, or objects have fallen into the product.
c. If the product has been exposed to rain or water.
d. If the product does not operate normally by following the operating instructions. Adjust only those controls that are covered by the operating instructions, as an improper adjustment of other controls may result in damage and will often require extensive work by a qualified technician to restore the product to its normal operation.
e. If the product has been dropped or the cabinet has been damaged.
f. When the product exhibits a distinct change in performance this indicates a need for service.
- Replacement Parts. When replacement parts are required, be sure the service technician has used replacement parts specified by the manufacturer or that the parts have the same characteristics as the original part. Unauthorized substitutions may result in fire, electric shock or other hazards.

CAUTION: Danger of EXPLOSION if battery is incorrectly replaced. Replace only with the same or equivalent type. (CR2025)

WARNING: Do not expose batteries or battery pack to excessive heat such as sunshine, fire or the like.
- Safety Check. Upon completion of any service or repairs to this product, ask the service technician to perform safety checks to determine that the products are in proper operating condition.
- This product is not intended for use outdoors.

CAUTION: To prevent electric shock, match wide blade of plug to wide slot, insert fully.

CAUTION: No naked flame sources, such as candles, should be placed on the apparatus.
PRODUCT DISPOSAL: Cer-

tain international, national and/or local laws and/or regulations may apply regarding the disposal of this product.
For further detailed information, please contact the retailer where you purchased this product or the Atlantic Technology Importer/Distributor in your country. A listing of Atlantic Technology Importer/Distributors can be found on the Atlantic Technology website www.atlantictechnology.com or by contacting Atlantic Technology at: 343 Vanderbilt Avenue, Norwood, MA 02062, USA. Phone: 781.762.6300.
NOTE: This equipment has been tested and found to comply with the limits for a Class B digital device, pursuant to part 15 of the FCC Rules. These limits are designed to provide reasonable protection against harmful interference in a residential installation. This equipment generates, uses and can radiate radio frequency energy, and, if not installed and used in accordance with the instructions, may cause harmful interference to radio communications. However, there is no guarantee that interference will not occur in a particular installation. If this equipment does cause harmful interference to radio or television reception, which can be determined by turning the equipment off and on, the user is encouraged to try to correct the interference by one or more of the following measures:
- Reorient or relocate the receiving antenna.
- Increase the separation between the equipment and receiver.
- Connect the equipment into an outlet on a circuit different from that to which the receiver is connected.
- Consult the dealer or an experienced technician for help.
Instruction Manual
H-PAS PowerBar 235 Amplified Soundbar
Introduction
Thank you for choosing Atlantic Technology products. Your new speaker components are precision-crafted to give you years of enjoyable, trouble-free service. This manual covers the Atlantic Technology PowerBar 235 speaker system. This speaker can be used with all current and past sound formats including Stereo, Dolby Surround®, Pro Logic II®, Dolby Digital 7.1 and 5.1®, Dolby Digital EX®, DTS®, DTS ES®, DTS ES Discrete®, DTS Neo:6®, DVD-Audio and SACD Audio.
IMPORTANT: Although it may seem like asking for driving directions, please take a few moments to read all of this booklet. It has many helpful tips and ideas on properly setting up and using your system. We promise that if you take the time to read and follow these tips you'll get better system performance and more enjoyment.
Description
The H-PAS PowerBar 235 is a 42"-long self-powered soundbar that delivers multi-channel high-fidelity sound for your home entertainment system. It features Atlantic's patented H-PAS bass system, which produces deep, distortion-free bass without the need for a subwoofer!
Using just two 4" woofers, the H-PAS PowerBar 235 reaches down to a solid 47 Hz at very high theater-like SPLs, for an absolutely convincing and totally satisfying sonic experience. Because of its extended frequency response and dynamics the H-PAS PowerBar 235 is the first soundbar where the subwoofer is truly optional. You no longer have to deal with the "black box on the floor." This represents a quantum leap forward in both acoustic technology and user convenience.
The PowerBar 235 is powered by an on-board amplifier that supplies 80 total watts RMS. It also boasts sophisticated Digital Signal Processing with Dolby Digital ® and DTS that effectively develops a 2, 3 or 5 channel experience for total listener immersion in the video program. Dolby and DTS signals are automatically identified and selected by the system. Included is a simple remote control, but can also be used with most universal remotes.
In addition to its ground-breaking bass capabilities, the H-PAS PowerBar 235's digital display can be "flipped" to read correctly whether the unit is sitting on a table or inverted on a flat-screen mount.
Unpacking the Speaker
Use care when unpacking the speaker. Remember to keep the original box and packing material, in the unlikely event the speaker needs servicing, or if you move.
For Future Reference
Record the serial number and date of purchase of the speaker here. The serial number is found on the back of the enclosure.
Serial Number
Date of Purchase
What's in the Box?
1 PowerBar 235

1 PowerBar Mounting Template

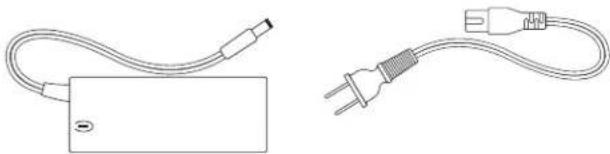
2 tall feet 4 short feet 1 Optical Cable

AC Power Supply Power Supply Cable
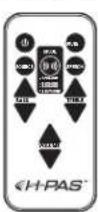
Remote Control (battery included)
Quick Start Guide

Inverse Control Panel Label

Front Control Panel
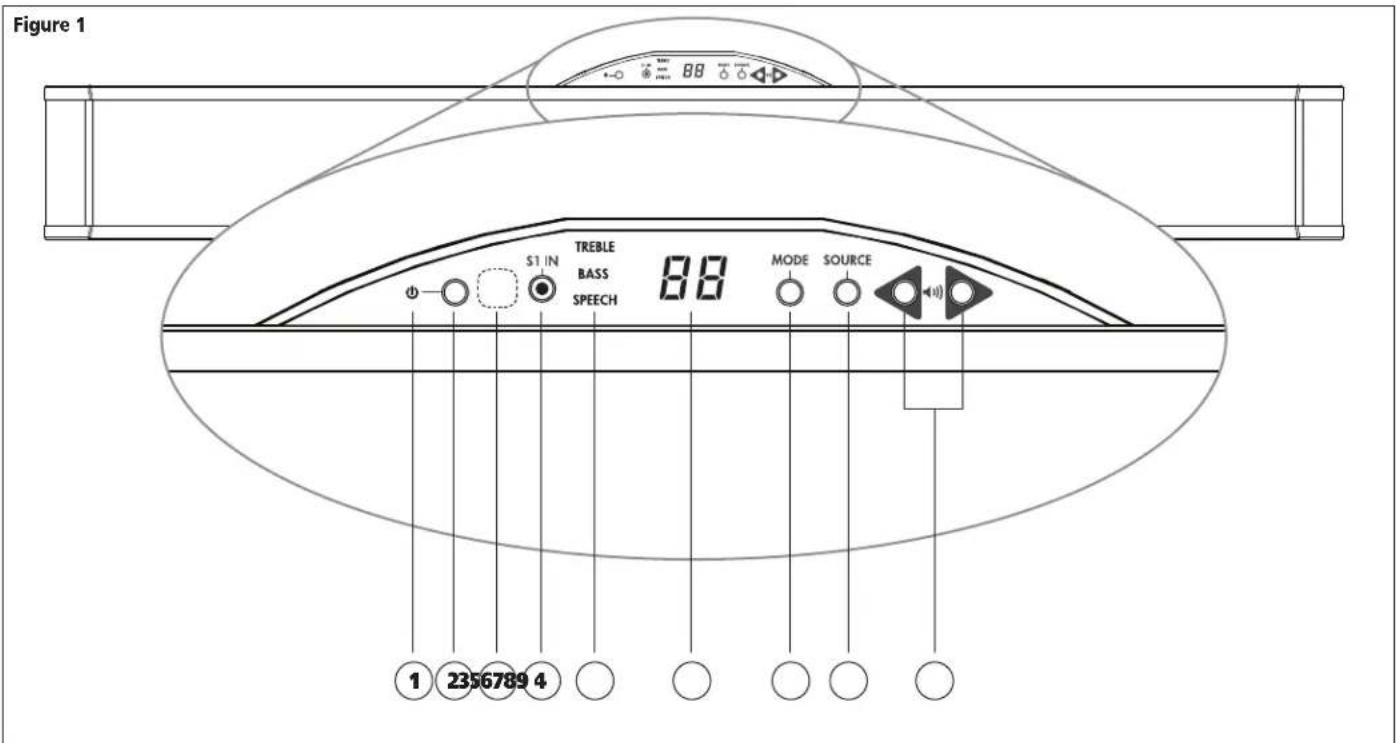
① Power Status LED
This will be green for ON condition, amber for STANDBY.
Power/Mute Button
② When PowerBar is in STANDBY, press momentarily to turn unit ON. When PowerBar is ON, press momentarily to toggle MUTE. When PowerBar is ON, press and hold to turn unit to STANDBY.
IR Receiver
3 Allows control of unit by included IR remote or Universal Remote.
Source 1 (S1) Input
④ Front accessible 1/8" mini phono jack input for portable device such as an iPod, MP3 player or mobile device.
Acoustic Controls Status Display
⑤ These status displays will illuminate when adjusting TREBLE or BASS or when SPEECH ENHANCEMENT is on. Use the remote to make these adjustments. For adjustment of these controls from Front Control Panel see Advanced Operation on pg. 13.
6 Central Display
This 2-character display offers feedback on various operations including volume, source selection.
⑦ Mode Button
Momentarily press to cycle through various surround modes. See page 11 for details on surround modes. Also used to adjust Tone Controls (see pg. 13).
8 Source Button
Momentarily press to cycle through different Sources. Central Display will confirm source by temporarily displaying selected source (S1 through S5).
⑨ Volume Up/Down Buttons
Press to adjust volume. Max volume is 30. Also used to adjust Tone Controls (see pg. 13)
Rear Connection Panel
Figure 2
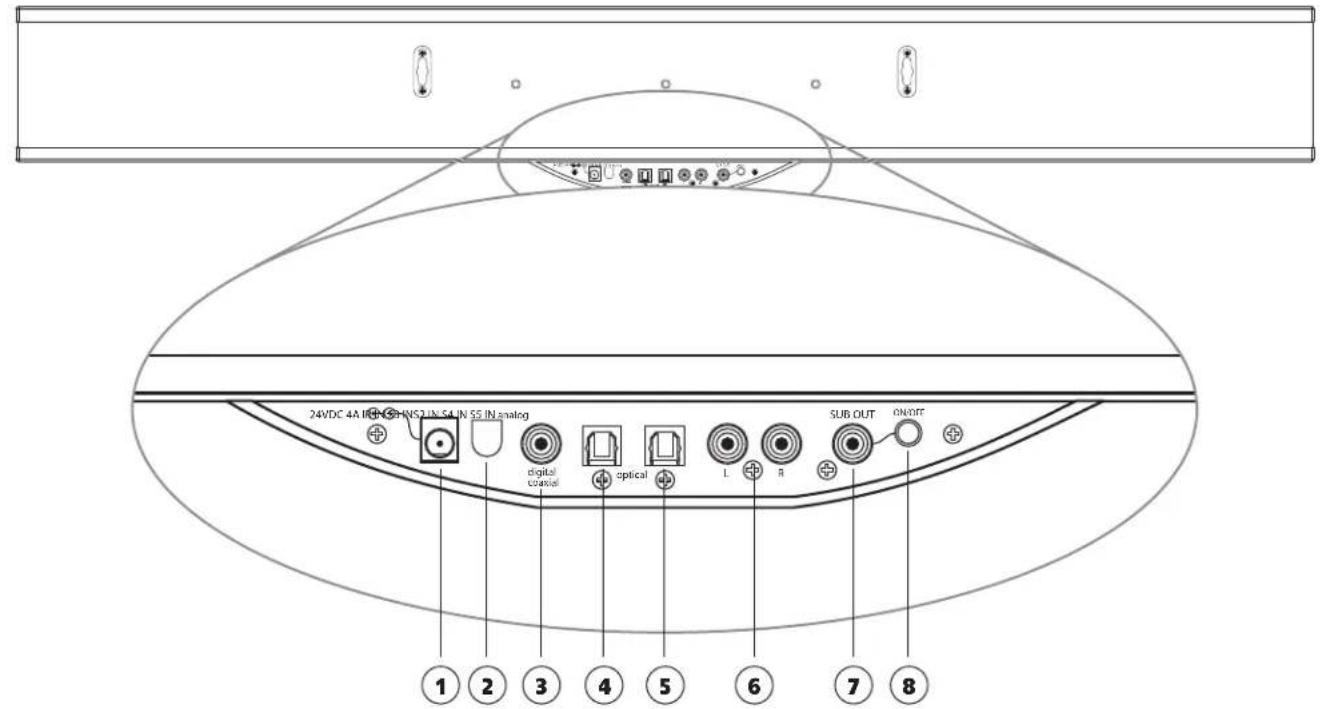
① Power Input
24Volt DC 4Amp input for power. Use only with appropriate power supply.
2 Rear IR Receiver
This rear facing IR window is designed for the application of an adhesive IR flasher (emitter). Flasher not included.
③ Source 2 (S2) Input
Digital Coaxial Audio Input. For sources with Coaxial (RCA) style digital outputs.
④ Source 3 (S3) Input
First of two Digital Optical Audio Inputs. For sources with Optical (Toslink) style digital outputs.
⑥ Source 4 (S4) Input
Second of two Digital Optical Audio Inputs. For sources with Optical (Toslink) style digital outputs.
⑥ Source 5 (S5) Input
Analog Stereo Audio Input. For sources without digital outputs.
⑦ Sub Out
Analog LFE audio output for connection to an optional subwoofer.
⑧ Sub Out On/Off Button
Button toggles Sub Out On/Off. When unit is in STANDBY, press and hold to turn Sub On (display will read "S1") or Sub Off (display will read "S0").
Remote Control
The PB-235 has 3 options for working with remote controls.
• The dedicated remote control provided with your system.
- Universal remote controls. We have provided the source code required for programming many universal remote controls. (this may need to be programmed by a professional custom installer)
- Multi device remote controls that are pre-programmed to be used with many devices, such as ones provided by many cable or satellite TV providers. If your multi-device remote control has the ability to control an audio receiver then it will most likely allow you to operate the basic functions of the PB-235. Simply follow the instructions for the remote control and use the code provided for Marantz receivers. The functions accessible are: On/Off, Mute, Volume Up/Down
Figure 3
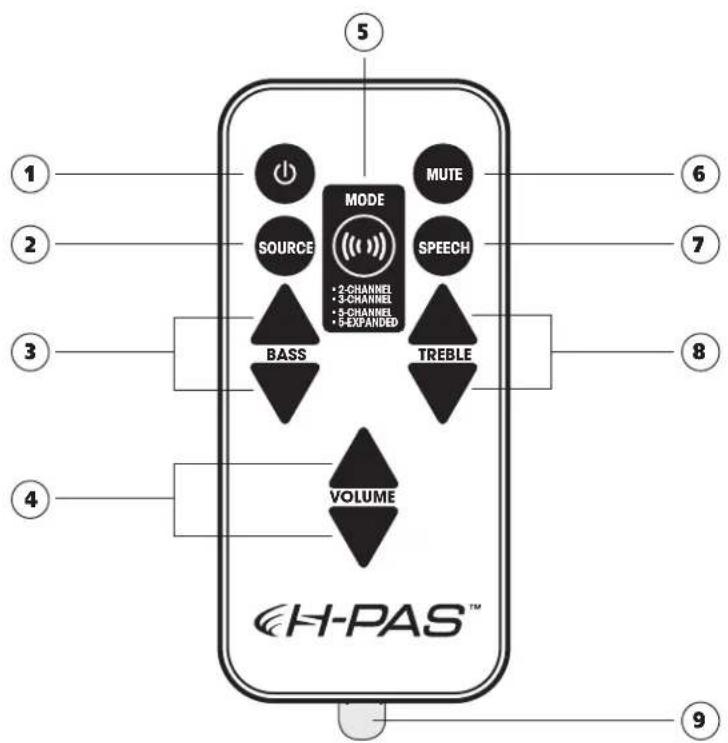
① Power Button
Press to toggle PowerBar between ON and STANDBY.
2 Source Button
Press to cycle through different Sources.
3 Bass Adjustment Buttons
Press buttons to adjust Bass output incrementally up or down. Maximum adjustment of +/- 8dB in 1dB increments.
④ Volume Buttons
Press buttons to adjust volume up or down. Max volume is 30.
5 Mode Button
Momentarily press to cycle through various surround modes. See page 11 for details on surround modes.
6 Mute Button
Mutes audio output. Press to toggle mute on/off.
⑦ Speech Enhancement Button
Press to toggle Speech Enhancement on/off. Speech Enhancement circuit adjusts audio to increase intelligibility in environments with excessive background noise.
8 Treble Adjustment Buttons
Press buttons to adjust Treble output incrementally up or down. Maximum adjustment of +/- 8dB in 1dB increments.
⑨ Battery Tab
This clear plastic tab must be removed to allow remote to operate. Pull tab from remote and discard.
Placement
Speaker Placement and Home Theater
Remember that the primary goal of a good home theater is not to make you believe that you are in a movie theater. It's to make you believe you're in the movie. For a home theater system, place the PowerBar 235 speaker either above or below your flat screen display, centered horizontally.
The PowerBar 235 can be used as a set-top or shelf-mounted speaker. Self-adhesive rubber feet are included to prevent vibration, protect the mounting surface and serve to angle the speaker up or down if needed. See Figure 4.
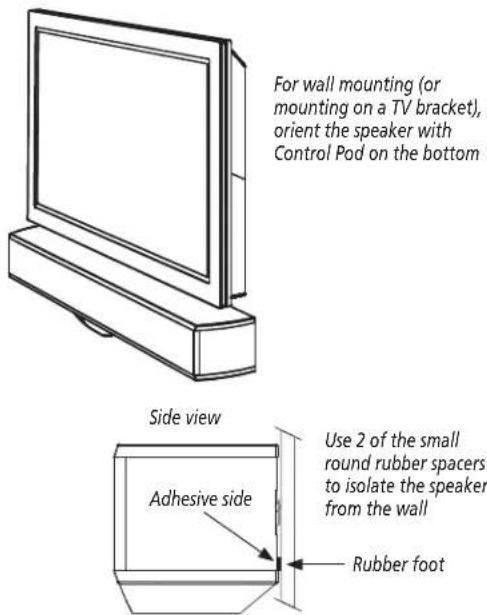
You may also simply mount the speaker to the wall using the built-in key-hole brackets or attach it to a suitably equipped articulating flat-panel TV wall mount via the threaded inserts on the rear panel of the PowerBar 235. See Figure 5.
CAUTION: Because of the high quality components used, the PowerBar 235 speaker is very heavy for its size and care must be used when hanging it. Be sure to use a strong screw to drive into the wall, one whose head and shaft will fit properly within the keyhole opening and slot. Also be sure to drive the screw directly into a stud or to use a mounting device (such a molly-bolt) that is capable of safely holding the speaker's weight. Never simply drive a nail or screw into sheet rock or other wall materials, as this mounting method may not be sufficient to safely support the weight of the speaker.
NOTE: Always consult a knowledgeable installer regarding the proper mounting hardware to use with your speakers. Mounting the speaker safely and securely is the responsibility of the owner.
Figure 4 - Cabinet or shelf mounting
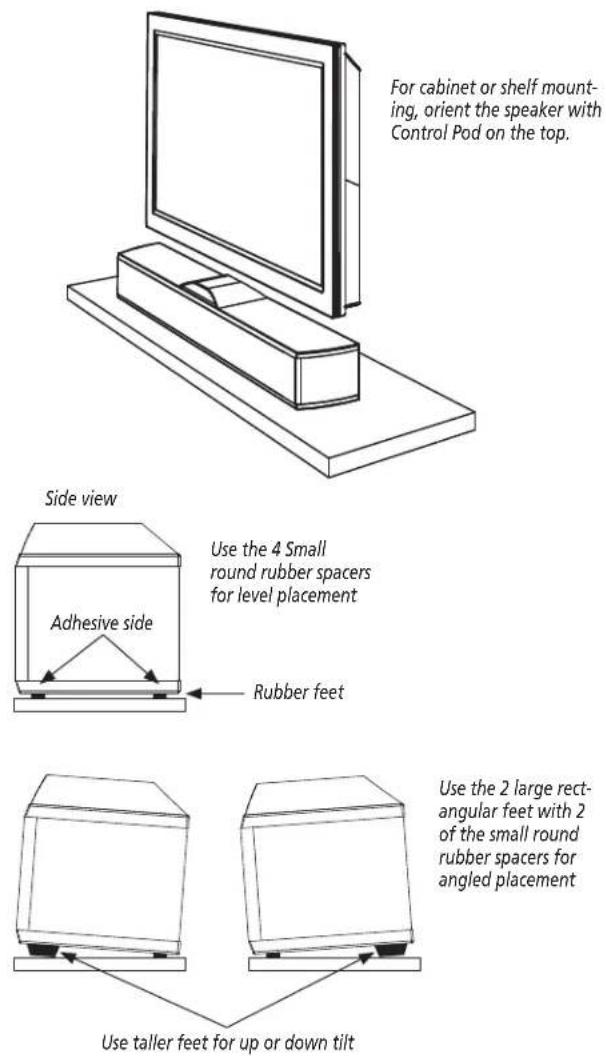
Figure 5 - Wall mounting

Placement
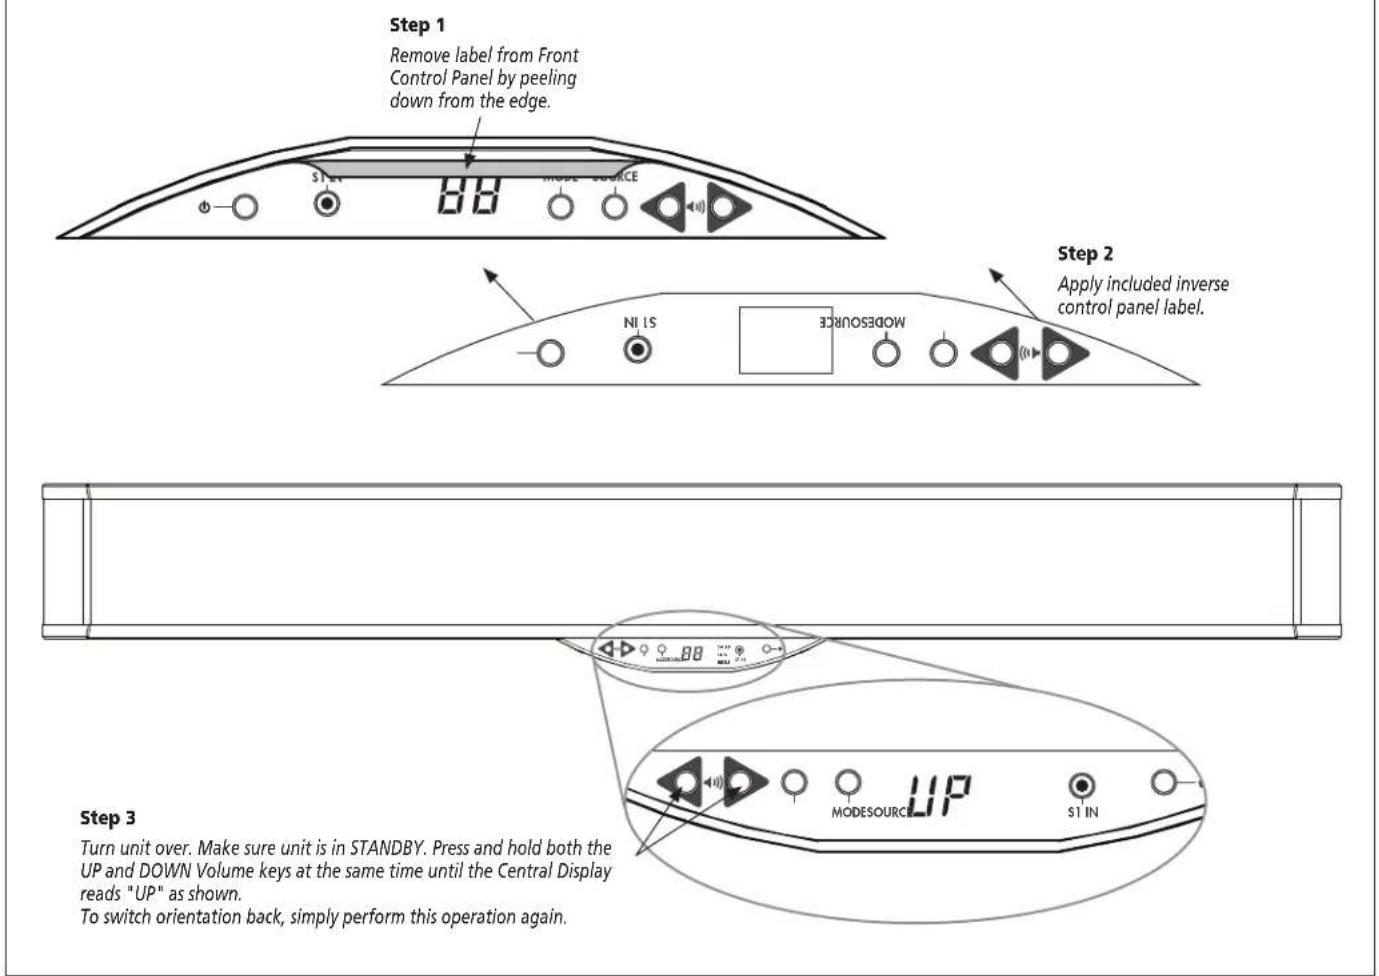
Setting Display for Orientation
Before you begin setup of your system, you must determine the orientation you want to use for your PowerBar 235. The PowerBar 235 can be oriented with the Control Pod on either the TOP or the BOTTOM of the unit. The PowerBar 235 comes pre-configured for use with the Control Pod on Top. If are planning to use the PowerBar on a shelf or cabinet or wall-mounted above a TV, this is the orientation you will use.
If you plan to mount your PowerBar on the wall or bracket underneath a TV, you may need to set your orientation for the Control Pod on the BOTTOM. See Figure 6 below.
NOTE: It is important that the unit be set for correct orientation. Doing so is essential for display to operate properly and to keep correct Left-to-Right speaker orientation.
Rotating Grille for Orientation
Once you have swapped the Control Panel Label and reconfigured the display, the last thing you will need to do is remove and rotate the grille so that the logos are in the correct orientation. To do so, gently pry the grille free from the cabinet starting at both ends. Continue to gently pry the grill off moving towards the center of the cabinet. Do not use a tool or pick as this may damage the cabinet.
Once the grille is free, rotate and reattach. Make sure to line up the grille trees with the mounting cups. Press firmly until the grille is once again flush with the cabinet.
Figure 6 Reconfiguring unit for Control Pod on Bottom
Connecting Your System
The PowerBar 235 offers a variety of both analog and digital audio source inputs. Each were designed for particular uses.
NOTE: For optimum audio performance, we recommend that you use a source with a digital output (either optical Toslink or coaxial) connected directly to the PowerBar. It is particularly important to directly connect digital A/V sources (such as DVD players and cable boxes), as routing through a TV may cause loss of the multi-channel encoding used to generate DTS and Dolby Digital.
Digital Audio Inputs
The Powerbar offers three digital inputs. A digital coaxial (RCA) audio input for Source 2 (S2) and optical (Toslink) audio inputs for Sources 3 and 4 (S3 and S4). There is no audible benefit of one connection over the other. Different source components simply have different types of output connections. See Figures 7 and 8 for connection diagrams.
Analog Audio Inputs
The PowerBar offers two analog inputs. The mini-jack analog audio connection for Source Input 1 (S1) on the front of the unit is designed for quick and easy connection of a portable audio device such as a mobile phone, iPod or MP3 player. See pg. 10 for diagrams.
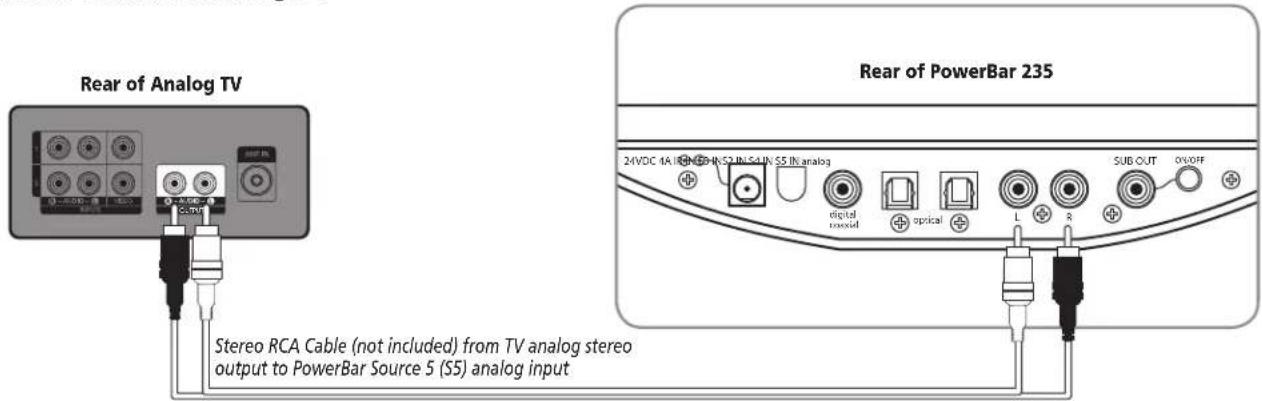
The stereo RCA analog audio connection for Source Input 5 (S5) on the rear of the unit are designed for audio sources which don't have digital audio outputs. See pg. 10 for diagrams.
NOTE: When using an analog input, the additional channels required for multi-channel output will be interpolated by the DSP (Digital Signal Processor) in the PowerBar.
Turning Off Your TV's Internal Speakers
We recommend that you turn off your TV's internal speakers. It's impossible to give specific instructions on how to turn off the speakers for every TV, but here is a way to do it that covers many of the TVs out there.
- On your TV remote control, find a "menu" or "setup" button.
- Press this button. You should see an on-screen menu.
- Next, look for an option to control audio functions and select it.
- The setting to turn off your TV's internal speakers should be here.
Power Supply
A separate power supply and power supply cable has been included with your system. After the audio connections have been made, connect the cable from the power supply to the 24VDC jack in the rear of the powerbar. Then connect the power supply cable to power supply and plug the cord into an active outlet.
NOTE: The power supply provided is capable of working with voltages from 100-240 volts.
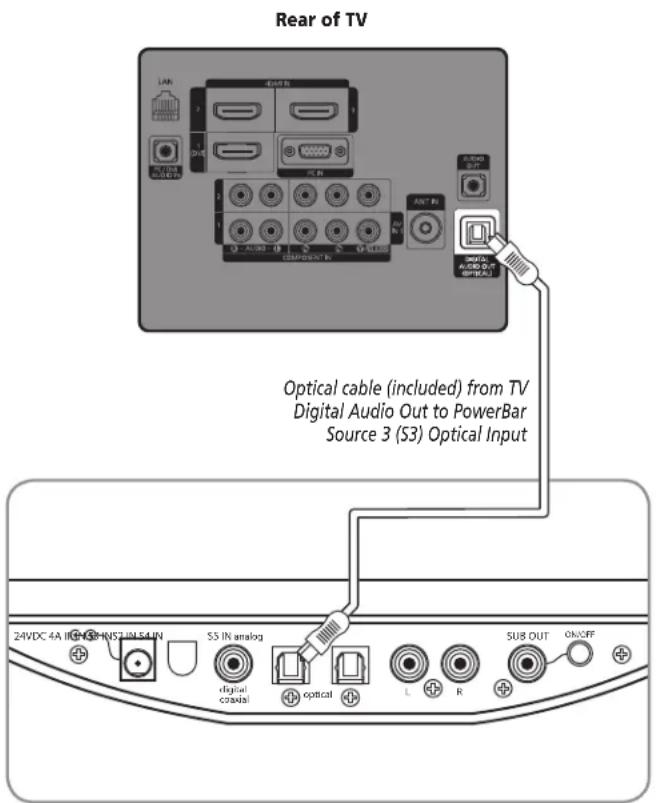
Figure 7 Simplest Connection Method
The simplest method to connect your PowerBar 235 is from the digital output on your TV. This would allow the sources to be switched at the TV. Unfortunately many TV manufactures down convert their digital output signal and this removes the DTS and Dolby encoding used to generate detailed multi-channels. Although your system will function you will not receive the full impact provided by using DTS and Dolby encoded signal. Please consult the instruction manual for your TV or contact the manufacturer before using.
Rear of PowerBar 235
Figure 8 Optimum Audio Performance Method
For optimum performance connect all your sources directly to the PowerBar 235 using the digital output from each source. This will guarantee the highest sound quality and reduce the risk of signal loss.

Rear of PowerBar 235 Front of PowerBar 235
Figure 9 Mobile Device Connection via Analog mini-jack
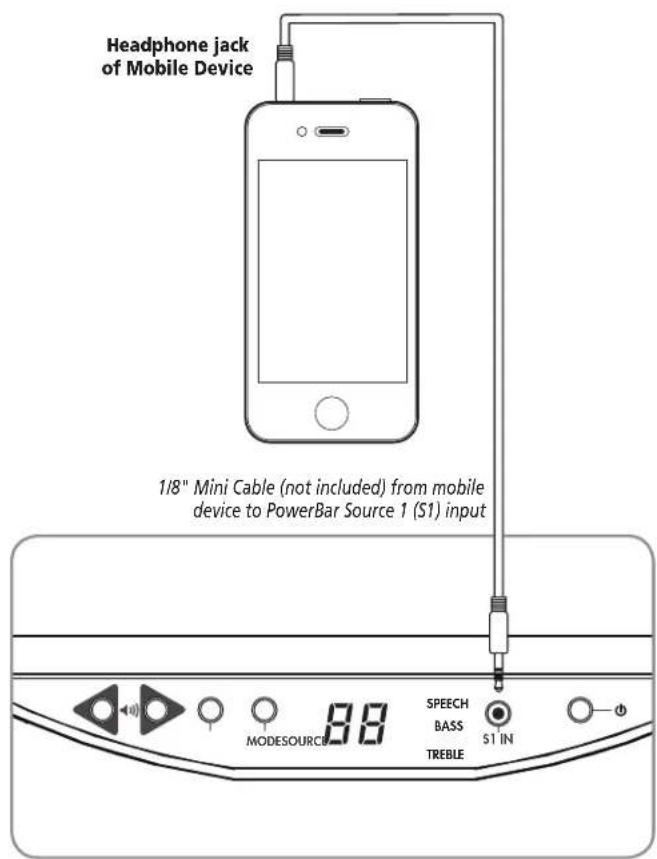
Figure 10 TV Connection via Analog RCA
Modes
Surround Modes
This product was designed to take advantage of today's advanced digital sound recordings. The system automatically detects both DTS and Dolby soundtracks and processes the signal using sophisticated Digital Signal Processing (DSP). You have a choice of 4 modes for listening.
As you cycle through the Modes, the central display will show the current mode for a brief period.
Speech Enhancement Mode
The PowerBar 235 has a special Speech Enhancement Mode. When engaged, the DSP boosts the frequency range where human voices are reproduced and directs more of those frequencies to the front center image. This effect gives you the ability to boost the intelligibility of speech in situations where there is a lot of background noise such as those generated by a running air conditioner or dishwasher.
NOTE: Although Speech Enhancement can be engaged in all Surround Modes, it is more effective the less surround effect you use. It is most effective in 2-Channel and least effective in 5-Channel Expanded.
Figure 11 Surround Modes
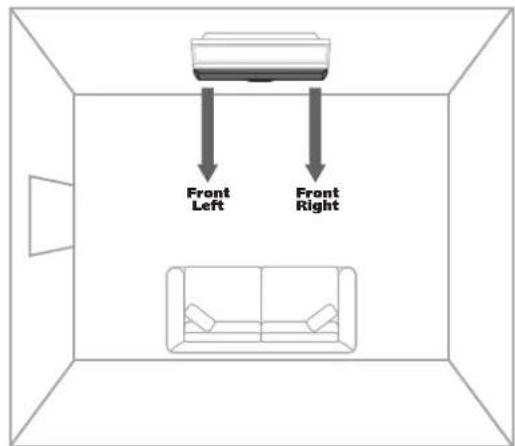
2C: 2-channel mode is like a traditional stereo music system, optimized for pure audio accuracy.
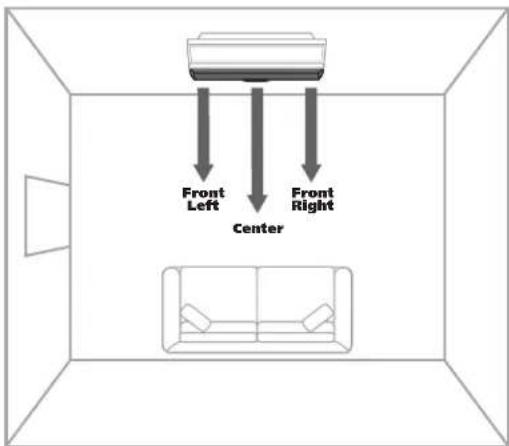
3C: 3-channel mode has no virtual surround effects and strong vocals. Use this setting if vocal clarity is very important to you.
![graph TD A["Room"] --> B["Center"] B --> C["Left Surround Effect"] B --> D["Right Surround Effect"] C --> E["Front Left"] D --> F["Front Right"]](/content/2026/05/1053892/images/3362a9b8918eadd0f58fde35ad471ab7d7f59d98910d6a13f3d5f0c5150db664.jpg)
5C: 5-channel mode has moderate virtual surround effect and moderate vocals. Most people prefer this setting for most program material.
![graph TD A["Center"] --> B["Front Left"] A --> C["Front Right"] A --> D["Left Surround Effect Plus"] A --> E["Right Surround Effect Plus"] B --> F["Center"] C --> F D --> F E --> F](/content/2026/05/1053892/images/87ecf176dddccf211c60052068dad0b45ac40386bd31e47e78e430317094b84e.jpg)
5E: 5-channel Expanded has strong virtual surround effect and moderate vocals. Many people prefer this setting when watching movies.
Troubleshooting
My PowerBar 235 was responding to commands, but now it isn't. What should I do?
In this rare event, simply unplug the power cord from the rear of the unit, wait 10 seconds, and then plug the power cord back in. This should restore control.
The bar does not power on.
- Ensure you have plugged the power supply into a live wall outlet.
- Ensure that all components of the power supply are connected properly.
- Ensure the power supply is properly connected to the bar power input.
- Ensure that the Battery Tab has been removed from the remote.
No sound from the bar.
- Check that the TV or cable box is providing a signal. Check that the bar is receiving power and is turned on.
- Turn up the volume of the bar.
- Check the input cables to make sure they are connected securely.
- Turn up the volume of your television or cable box.
- Check mute status: Is the central display showing "--"? If so, press the Mute button on the remote or press the Standby/Mute key on the PowerBar.
The sound coming from the bar is distorted.
- Check the signal source to ensure the distortion is not coming from there.
- Audio processing (see FAQ's for further information)—there may be audio processing occurring prior to reaching the bar. Disable this processing.
F.A.Q.
My TV does not have a digital output. How do I connect my audio?
You have several options for connecting your audio:
- Use the optical or coaxial digital output of your cable/satellite box and connect directly to the PowerBar 235.
- Use the headphone output of your TV and connect directly to the PowerBar 235 using a 1/8" (3.5mm) stereo phono cable to Stereo RCA cable (not provided).
- Use the RCA audio outputs (white/red pair) on your TV and connect directly to the PowerBar 235 using a stereo RCA cable (not provided).
What if my provided optical cable is too short?
We did our best to provide an adequate sized cable; however, there might be a few setup instances in which the cable may be too short. If that is your situation, your local electronics store will have cables that meet your required length.
My audio sounds strange and distorted.
Your PowerBar 235 requires a clean, unaltered signal for proper audio performance. If the sound from your PowerBar 235 is strange or distorted, then check the audio menus of whatever source(s) are connected to your PowerBar 235 and make sure any audio processing is turned off.
The best results will be attained by using one of the PowerBar 235's digital inputs. If given the option, choose either the DTS or the Dolby Digital signal on your source equipment for optimum performance.
How do I control the PowerBar 235?
There are three ways to control your PowerBar 235:
- Use the buttons on the front of the bar.
- Use the provided remote control.
- Program your existing remote to control the PowerBar 235.
To contact Customer Service:
If you have a question or comment, please call or email us. Call Atlantic Technology Customer Service: 781.762.6300 (M-F 9-5 EST) or via email: customerservice@atlantictechnology.com.
Advanced Operations
We recommend that you adjust your tone controls via remote from your listening position. However, you can access all tone controls, Speech Enhancement, and Mute from the front of the Powerbar. That way, in the event you lose your remote, you can still access every command. There are also other optional features that can be accessed using the Control Panel buttons.
Control Panel Tone Controls
For all adjustments, the Central Display will show the level of adjustment. To adjust Tone Controls from the front of the PowerBar unit:
- Press and hold the MODE button on the Control Panel until the word TREBLE illuminates.
- Release the MODE button and use the VOLUME UP and VOLUME DOWN keys to adjust.
- Press the MODE button again to access BASS Controls and adjust in a similar manner.
NOTE: For BASS and TREBLE adjustments, tone can be adjusted from "-8" (-8dB) to "8" (+8dB) where "O" represents flat.
- Press the MODE button once again to access the SPEECH Enhancement feature. Press VOLUME UP or DOWN to toggle speech enhancement on/off.
NOTE: For SPEECH Enhancement, display will read "SP" then "On" (for Speech Enhancement On) or "SP" then "OF" (for Speech Enhancement Off).
- Repeated presses of the MODE button will cycle through the available adjustments.
Subwoofer Output
The PowerBar 235 was designed to provide deep bass extension without requiring an additional powered subwoofer. However, if you want to add extra bass impact and extension, the PowerBar 235 offers a Sub-Out. When the subwoofer is added, the system automatically adjusts the frequency range sent to the front channels so the power is not wasted reproducing effects in the subwoofer region.
If you are using a separate subwoofer, it is necessary that you turn on the Subwoofer Output. Unit must be in STANDBY. Press and hold Sub Out On/Off button on rear of Connection Panel for 3 seconds. Watch Central Display for confirmation of changes: "S1" means Sub On, "S0" means Sub is Off.
Front Panel Controls Disable aka "Parental Lock"
If your PowerBar is mounted in a position where small children can reach it or if you simply don't want anybody adjusting the PowerBar from the front panel, we offer a hidden "Parental Lock". To activate this feature, first make sure that the unit is in STANDBY. Then press and hold the SOURCE button (on the front Control Panel) and the SUB OUT ON/OFF button (on the rear Connection Panel) simultaneously. The Central Display will confirm the change as follows: "Fd" means Front Disabled, "FE" means Front Enabled.
To reset all setting to factory default. Press and hold the following 3 keys simultaneously for 5 seconds: SOURCE, VOLUME UP, VOLUME DOWN.
Remote Commands
This is a complete list of remote codes that can be used to control the PowerBar 235. These codes may be used by custom integrators to allow more advanced integrated systems remotes to control the PowerBar 235. This list includes discrete codes for many functions not available on the standard system remote or universal remote controls.
NOTE: The code structure is "NEC," type custom code 40H, 40H
| PowerBar 235 Command Code | |
| Power on/off toggle 00H | |
| Power on 03H | |
| S1 input 0AH | |
| S2 input F2H | |
| (spare) CAH | |
| S3 input D2H | |
| S4 input 32H | |
| S5 input 72H | |
| voice mode toggle 01H | |
| mute off 28H | |
| mute on | 52H |
| 5E mode | 62H |
| 5C mode A2H | |
| 3C mode 92H | |
| 2C mode E2H | |
| mode cycle 2C-5E | AAH |
| input cycle S1-S5 | 04H |
| voice on | 12H |
| voice off | 6AH |
| power off | 18H |
| Volume + A8H | |
| Volume - | 68H |
| mute toggle | 48H |
| Treble + | 78H |
| Treble - | F8H |
| Bass + | 02H |
| Bass - | 82H |
Care of Your Speaker
Clean your cabinet using a soft, lint-free cloth. If you wish, you can slightly moisten the cloth with plain water. Do not use any other cleaning agents or chemicals. Be careful not to get any water on the driver cones or tweeter domes. After carefully removing the grilles from the speaker, gently clean them with a very slightly damp, lint-free cloth. To do so, gently pry the grille free from the cabinet starting at both ends. Continue to gently pry the grill off moving towards the center of the cabinet. Do not use a tool or pick as this may damage the cabinet.
Avoid placing your speakers in direct sunlight or near a source of heat that may, over time, damage the finish.
IMPORTANT: SAVE YOUR BOX! If you can do so, save the carton, packing pieces, and plastic bags that came with your speaker. They will be useful in case you move or have to ship your loudspeaker for any reason. In any case, save all packing materials until you are certain that the system has suffered no damage in shipment. If you find such damage, either visible or internal, contact your dealer immediately.
Specifications
Specifications H-PAS PowerBar 235
| Type: Powered 2/3/5 channel soundbar |
| Inputs (rear panel): (2) Toslink optical connectors, |
| (1) Digital co-ax, (1) analog L/R |
| Inputs (front panel): (1) analog mini jack for iPod, MP3, etc. |
| Drivers: (2) 4" woofers |
| (2) 3⁄4" tweeters |
Frequency Response: 47Hz-20kHz +/-3dB
| Crossover frequency: 4kHz |
| Dimensions (W x H x D): 423/4 × 51/2 × 61/2" (1086 x 140 x 166mm) |
| Weight: 20lbs (+1lb with power supply) |
| Power Requirements: 24VDC, 4.0A (by supplied AC adapter) |
| AC Adapter: 100-240VAC, 50/60Hz, 100W Max |
Remote Control Battery: CR2025
Atlantic Technology and the Atlantic Technology logo are a registered trademarks of Atlantic Technology International, Corp.
U.S. Patent: 8,094,855 B2 H-PAS is a trademark of Atlantic Technology International, Corp. All rights reserved.
Manufactured under license from Dolby Laboratories. Dolby, Pro Logic, and the double-D symbol are trademarks of Dolby Laboratories.
Manufactured under license under U.S. Patent Nos: 5,956,674; 5,974,380; 6,487,535 & other U.S. and worldwide patents issued & pending. DTS, the Symbol, & DTS and the Symbol together are registered trademarks & DTS Digital Surround and the DTS logos are trademarks of DTS, Inc. Product includes software. © DTS, Inc. All Rights Reserved.
The contents of this manual are Copyright ©2012 by Atlantic Technology International, Corp., and may not be duplicated or reproduced by any means, whether physical, electronic or otherwise without prior written consent from Atlantic Technology International, Corp.
Specifications are those in effect at the time of printing. Atlantic Technology International, Corp. reserves the right to change specifications or designs at any time without notice without obligation to modify existing units.
Warranty
First, we'd like to thank you for purchasing an Atlantic Technology product. We wish you many years of enjoyment and satisfaction from it.
Second, be aware that you don't have to send in any Warranty card to be covered by the Limited Warranty. All you need to do is keep your original Invoice or Bill of Sale for proof of purchase, meet the stated requirements, and follow the instructions listed within that Warranty. Please attach your Original Invoice or Bill of Sale to this manual as proof of purchase and keep them in a safe place.
VERY IMPORTANT NOTE: PLEASE NOTE THAT ATLANTIC TECHNOLOGY PRODUCTS CARRY ONLY A 90 DAY LIMITED WARRANTY. YOU MUST MEET ALL THE BELOW REQUIREMENTS AND REGISTER ONLINE IN ORDER TO BE COVERED BY THE FREE EXTENDED SERVICE AGREEMENT TO ASSURE EXTENDED FREE PROTECTION!!
Free Extended Service Agreement
Atlantic Technology offers a free Extended Service Agreement that provides enhanced protection against product defects. In order to qualify for the free Extended Service Agreement you must:
- Have purchased your Atlantic Technology products from an Authorized Atlantic Technology Reseller or Installer.
- Go to www.atlantictechnology.com and click on Support>Register Your Warranty. Fill out the required information. Be sure to have your home address, name, address and invoice from the business you purchased, and the serial numbers of all Atlantic Technology products purchased. THIS MUST BE DONE WITHIN 30 DAYS OF PURCHASE.
- If you purchased multiple Atlantic Technology products you will be able to enter them all using one online form. Model and Serial numbers can be found on the back of each unit and on the outside of their respective boxes.
Once all the criteria have been met, you will receive, by return email, a free Extended Service Agreement that entitles you to additional coverage against defects in workmanship and manufacturing for a period of up to 5 years on passive speakers and up to 1 year on powered speakers (including subwoofers). This coverage is in addition to the 90 Day Limited Warranty included with all Atlantic Technology products.
If you are not able to register your product using the internet, please call customer service at 781.762.6300.
Limited Warranty
Statement of Warranty: Atlantic Technology International Corp. warrants Atlantic Technology Products to be free from defects in material and workmanship for 90 days from the time of original purchase. This Warranty covers the original retail purchaser of this product only and is valid only in the Continental United States, Alaska, and Hawaii and all US Possessions. Extended Service Agreement (only available in the Continental United States, Alaska, and Hawaii and all US Possessions): You must complete the Extended Service Agreement application, and meet all of the purchase criteria stated on that application, to receive an Extended Service Agreement that covers your Atlantic Technology products well beyond the standard 90 day Warranty.
To obtain Warranty service: Please contact your local Atlantic Technology reseller to determine if they are an Authorized Repair Center for Atlantic Technology products. You will need your original Invoice or Bill of Sale to prove Warranty eligibility. If your local dealer is not an Authorized Warranty Center you may contact us at 781-762-6300 for further help or to send the product back to us for service and repair. You must first get a Return Authorization Number from us to ship the product back, so it is imperative that you call us first.
What we are responsible for: We will pay for all labor and parts for covered items. If the repairs are eligible for coverage under the terms of this Warranty we will also pay for return shipping charges to you.
What you are responsible for: You must pack the product properly for safe shipping to your Authorized Dealer or us. You are responsible to pay for all packing, shipping, and insurance costs to get the unit(s) back to Atlantic Technology or your Authorized Dealer.
Optional replacement: We, at our option, may replace rather than repair your Atlantic Technology product with a new or reconditioned one of the same or similar design. The repair or replacement will be warranted for 90 days from date of receipt back to you. All details in terms of eligibility for an Extended Service Agreement will carry over from the original purchase to the replacement item.
What this Warranty does not cover: This Warranty does not cover defects resulting from accidents, damage while in transit, alterations, unauthorized repair, failure to follow instructions, misuse, fire, flood, and Acts of God. This Warranty will be void if the product's serial number has been altered or removed or if the product has been modified or defaced.
Exclusions and Limitations: Implied warranties, including those of fitness for a particular purpose and merchantability (an unwritten warranty that the product is fit for ordinary use) are limited to the period of any Warranty granted hereby. We will not pay for loss of time, inconvenience, loss of use, or property damage caused by your Atlantic Technology product or its failure to work, or any other incidental or consequential damages.
State law rights: Some states do not allow the exclusion or limitation of incidental or consequential damages, so the above limitation or exclusion may not apply to you. This Warranty gives you specific legal rights, and you may have other rights which vary from state to state.
This Warranty is valid only when Atlantic Technology products are purchased from an Authorized Atlantic Technology Reseller in the Continental United States, Alaska, and Hawaii and all US Possessions. If you purchase Atlantic Technology products outside the United States please consult your local distributor or reseller for applicable Warranty coverage and restrictions.

- AMPLIFIED SOUNDBAR WITH DSP SURROUND AND H-PAS BASS
- TABLE OF CONTENTS
- 2 IMPORTANT SAFETY INSTRUCTIONS
- 3 H-PAS POWERBAR 235 AMPLIFIED SOUNDBAR
- 3 WHAT'S IN THE BOX
- 4 FRONT CONTROL PANEL
- 5 REAR CONNECTION PANEL
- 6 REMOTE CONTROL
- 7 PLACEMENT
- 9 CONNECTING YOUR SYSTEM
- 11 MODES
- 12 TROUBLESHOOTING
- 12 F.A.Q
- 13 ADVANCED OPERATIONS
- 13 REMOTE COMMANDS
- 14 CARE OF YOUR SPEAKER
- 14 SPECIFICATIONS
- 15 WARRANTY
- IMPORTANT SAFETY INSTRUCTIONS
- PRODUCT DISPOSAL: CER
- H-PAS POWERBAR 235 AMPLIFIED SOUNDBAR
- INTRODUCTION
- DESCRIPTION
- UNPACKING THE SPEAKER
- FOR FUTURE REFERENCE
- WHAT'S IN THE BOX
- FRONT CONTROL PANEL
- POWER/MUTE BUTTON
- IR RECEIVER
- SOURCE 1 (S1) INPUT
- ACOUSTIC CONTROLS STATUS DISPLAY
- REAR CONNECTION PANEL
- REMOTE CONTROL
- PLACEMENT
- SPEAKER PLACEMENT AND HOME THEATER
- SETTING DISPLAY FOR ORIENTATION
- ROTATING GRILLE FOR ORIENTATION
- CONNECTING YOUR SYSTEM
- DIGITAL AUDIO INPUTS
- ANALOG AUDIO INPUTS
- TURNING OFF YOUR TV'S INTERNAL SPEAKERS
- POWER SUPPLY
- MODES
- SURROUND MODES
- SPEECH ENHANCEMENT MODE
- TROUBLESHOOTING
- MY POWERBAR 235 WAS RESPONDING TO COMMANDS, BUT NOW IT ISN'T. WHAT SHOULD I DO
- THE BAR DOES NOT POWER ON
- NO SOUND FROM THE BAR
- THE SOUND COMING FROM THE BAR IS DISTORTED
- F.A.Q
- MY TV DOES NOT HAVE A DIGITAL OUTPUT. HOW DO I CONNECT MY AUDIO
- WHAT IF MY PROVIDED OPTICAL CABLE IS TOO SHORT
- MY AUDIO SOUNDS STRANGE AND DISTORTED
- HOW DO I CONTROL THE POWERBAR 235
- TO CONTACT CUSTOMER SERVICE
- ADVANCED OPERATIONS
- CONTROL PANEL TONE CONTROLS
- SUBWOOFER OUTPUT
- FRONT PANEL CONTROLS DISABLE AKA "PARENTAL LOCK
- REMOTE COMMANDS
- CARE OF YOUR SPEAKER
- SPECIFICATIONS
- WARRANTY
- FREE EXTENDED SERVICE AGREEMENT
- LIMITED WARRANTY
Brand : ATLANTIC
Model : H-PAS PowerBar 235
Category : Loudspeaker