A12s - Smartphone OPPO - Free user manual and instructions
Find the device manual for free A12s OPPO in PDF.

| Product Type | Smartphone |
| Brand | Oppo |
| Model | A12s |
| Dimensions | 155.9 x 75.5 x 8.3 mm |
| Weight | 168 g |
| Battery Capacity | 4230 mAh |
| Display Size | 6.22 inches |
| Display Resolution | 1520 x 720 pixels (HD+) |
| Processor | MediaTek Helio P35 |
| RAM | 3 GB / 4 GB |
| Storage | 32 GB / 64 GB |
| Rear Camera | 13 MP + 2 MP dual camera |
| Front Camera | 5 MP |
| Operating System | Android 9.0 (Pie) with ColorOS 6.1 |
| Connectivity | Wi-Fi 802.11 b/g/n, Bluetooth 5.0, microUSB 2.0, 3.5mm audio jack |
| Sensors | Accelerometer, proximity, compass |
| Security | Rear-mounted fingerprint sensor, face unlock |
| Colors | Flowing White, Flowing Black |
| Box Contents | Phone, charger, USB cable, SIM eject tool, documentation |
Frequently Asked Questions - A12s OPPO
User questions about A12s OPPO
0 question about this device. Answer the ones you know or ask your own.
Ask a new question about this device
Download the instructions for your Smartphone in PDF format for free! Find your manual A12s - OPPO and take your electronic device back in hand. On this page are published all the documents necessary for the use of your device. A12s by OPPO.
USER MANUAL A12s OPPO
natural_image
Abstract blue and white swirling graphic resembling a stylized number 6 (no text or symbols)ColorOS 6.1 User Guide
Here is everything you need to know about ColorOS 6.1.
ColorOS 6.1 follows the idea of infinite design to bring you the most intelligent user experience, featuring a brand new interface, from home page, app icons, font sizes, to background colors.
Less is limitless. Follow us to explore the infinite world of ColorOS 6.1.
The demonstrated contents (including but not limited to UI, wallpapers) are only references. The features may vary by different models and regions. Please refer to the actual product.
Contents
Get Started....17
System Language 17
Connect to Wi-Fi....18
Terms of Use & Carrier Service Description....18
Log in with Google Account....19
Fingerprint, Face & Passcode....20
Wi-Fi Assistant 21
Auto-Update Overnight....22
Import Data 23
Install Apps in One Tap....24
Complete Setup....24
Communication and Network 25
SIM Card Settings....25
Wi-Fi....27
Wi-Fi Connection....27
Enhance Internet Experience....28
Dual-Wi-Fi Speed-Up 30
Apps Using Wi-Fi and Mobile Data....31
Other Wireless Connections 32
VPN....32
Tethering....33
NFC....37
Wireless Transport....37
Airplane Mode....38
Data Manager....39
Mobile Data Usage....39
Data Saving....39
Contacts....40
Create New Contacts Manually ....40
Import Contacts....41
Name Cards Scan....42
Manage Contacts....43
VIP Contacts....44
All Call Logs....45
My Groups 46
Do Not Disturb....48
Turn on "Do Not Disturb" 48
Customize "Do Not Disturb" 49
Allowed Content......49
Basics....50
Wake the Phone....50
Press Power Button....51
Use Raise to Wake....51
Unlock the Phone....52
Passcode....52
Fingerprint 54
Enroll Face 54
Search Settings 56
Adjust and Control the Volume....57
Volume Control Buttons....57
Customize the Ringtones....59
Silent Mode 59
More Options for Ringtone Customization....61
Dolby Atmos....61
Display and Brightness....62
Adjust Screen Brightness....62
Screen Color Temperature Adjustment....63
Switch on Eye-Protection Mode 63
Night Shield....64
Low-Brightness Flicker-Free Eye Care....64
Font......65
Auto-lock Clock....66
Auto Screen Off 66
Auto Rotate....67
Full-Screen Display....68
Convenience Aid....69
Awake Google Assistant 69
Navigation Keys....70
Assistive Ball 73
Screen-off Gestures....76
Smart Call 77
Smart Sidebar....77
File Console....78
Quick tools....79
Quick Apps....79
Screenshot 80
Button Screenshot....80
3-Finger Screenshot 80
Assistive Ball Screenshot....81
Smart Sidebar Screenshot 81
Long Screenshot....81
App Split-Screen....82
Split-Screen Adjustment....83
Adjust Split-Screen Location....84
Change Split-Screen Apps....84
Exit Split-Screen 85
Clone Apps....85
Power Saver 87
Save Power 87
Smart Power Saver 88
Power Usage....88
Power Saver Options....88
High Performance Mode 89
Control Center....90
Change or Rearrange Icons....90
Quick Actions....91
Notification Bar....93
See Recent and Earlier Notifications....94
Remind Me Later....94
Remove a Notification....95
Unimportant Notifications....95
Set Notification Preference....96
Status Bar....97
App Shortcuts....99
Turn on App Shortcuts Mode....99
Create App Shortcuts 99
Keyboards and Input Methods....100
Keyboards and Input Languages 100
Type with Keyboards 101
Customize Keyboard Settings....101
Type Emojis and Stickers....102
Voice Typing....102
Autofill Service....103
OPPO Share 104
Search Settings, Data, and Files 105
Multi-Screen Interaction....106
Accessibility....107
TalkBack 108
Accessibility Menu....109
Select to Speak 110
Switch Access....111
Text-to-Speech (TTS) Output 112
Accessibility Shortcuts....113
Subtitles....113
Clean Storage....113
Back Up Your Phone....116
Use OPPO Cloud 117
Manual Syncing....118
Charge the Battery 120
Restart or Turn Off Your Phone....121
Privacy and Security 122
Manage the Information and Permissions....122
Personal Information Protection 122
Manage App Permissions....122
Permissions Grant....125
Emergency SOS....125
Turn On Emergency SOS: 125
Emergency Numbers: 125
Initiate an SOS Emergency Call....126
Send SOS Message....127
Privacy Password 127
Set Privacy Passcode....127
Modify Privacy Password....128
Reset Privacy Passcode....128
Turn off Privacy Passcode....129
App Encryption....130
Turn on App Encryption....130
Access Encrypted Apps 130
Turn off App Encryption 132
Hide Home Screen Icons 132
Access-Hidden Apps....132
Payment Protection....133
Anti-Harassment/Fraud....134
Call Blocking 134
Block Messages....135
Blacklist....135
Whitelist....136
Kid Space 136
Private Safe 137
Add Files 138
Access to Private Files....139
Add Private Safe to Desktop....140
Tools & Applications....140
Application Basis 140
Download and Install Apps....140
Switch between Different Apps....141
Move and Organize Apps....142
Delete Apps....144
Clock....145
Alarm Clock....145
Workdays Alarm....146
Set Vibration of a Specific Alarm....147
World Clock....148
Stopwatch 151
Timer....152
Weather....154
Authorization to Acquire Location Information....154
View Current Weather and Weather Forecast....154
View Weather in Multi-Cities 155
Calculator 156
Numeric Calculation....156
Online Exchange Rate Conversion....157
More Unit Conversion....157
Compass 158
Allow Compass to Access to Location....158
Calibrate Compass....158
View the Direction of Where Your Phone is Pointing at....159
Phone Calls 160
Make a Call....160
Favorites....162
Make Emergency Call....162
Manage Incoming Calls 164
Multi-Operations During a Call....168
Call Recording....169
Sound & Vibration....171
Switch Call Type....173
More Operations....173
Identification of Unknown Numbers....174
Call Settings....174
Flash on Call 175
Messages....175
Send and Receive SMS....175
Send Pictures, Videos, and Audios....176
Message Notification....179
Delete and Block Messages 179
Browser....180
Browse the Web....180
Browse Tabs....182
Search....183
Add and Arrange Bookmarks....184
AD Blocking....185
Private Browsing 186
File Manager 187
Quick File Sorting....187
Folder Manager....187
Remotely Manage Files 188
Set as Private....189
Phone Manager....190
Examine and Optimize....190
Clear Storage 191
Privacy Permissions....192
Virus Scan....192
Theme Store....194
Purchase / Download Resources 195
Set the Theme 195
Set Wallpaper....196
OPPO AppStore....198
Banner 198
Games....198
Apps....199
Top....200
My Information....201
Music....202
Manage Music....202
Play Music....204
Music Party 206
Create a Party....206
Join a Party 207
Recorder 208
Standard Recording....208
Meeting/Interview Recording....209
Audio Manager....210
Calls Recording....211
Mark Recording....211
Screen Recording....211
Start Screen Recording 212
Screen Recording Settings....213
One-Handed Mode....214
Smart Driving....214
Driving Mode 214
Riding Mode....216
Clone Phone 218
ORoaming....221
Smart Assistant....222
Smart Convenience Services....222
Search....223
Permanent Services....223
Quick Functions 224
Smart Scenario Services 224
Manage Smart Assistant Cards 225
Make your Shots Outstanding 225
Learn How to Capture the Best Shots....225
Take Photos....226
Adjust Brightness....226
Zoom in or out....226
Turn the Flash on/off....227
Dazzle Color Mode....227
HDR 229
Take Photos with Filters....229
Portrait mode....230
Gesture to Take Photo 231
Al Beauty....232
Cute Photo Shooting....232
Take a Panorama Photo....233
Ultra Night Mode....235
Expert Mode 237
Watermark 239
Camera Settings 241
AI Scene Recognition....242
Shoot Video 243
SLO-MO Video 244
TIME-LAPSE Video 245
Editing a Video....246
Trim a Video....246
Speed Changing 246
Photos....248
Photos....249
Albums 252
Memories 254
Optimize Storage 256
Search Photos....257
Using Soloop to Create Vlogs....259
Game Experience 270
Hyper Boost....270
Game Space 271
Hide Games Icons on Home Screen 272
Game Mode Settings....273
Game Assistant....277
Supported Game Engine 281
Disable Game Space on Home Screen 282
Restart, Update, Back Up, Restore & OPPO Cloud 283
Restart....284
Power on/off 284
Restart the Phone....284
Software Updates....284
OTA Online Update 285
Local Update....285
Back up 285
Back Up to Phone Storage 286
Back Up to OPPO Cloud 286
Restore....287
Restore Phone 287
Restore Data 288
App Optimization....289
App Cleaner 289
Smart System Management....289
Smart Memory Compression 290
OPPO Cloud....290
Activate OPPO Cloud....290
Manage Cloud Storage 292
Purchase More Cloud Storage....293
Contacts Time Machine....293
Support & Service 294
Contact OPPO Support....294
Self Service 294
Get Help and Explore....295
Get More Information....295
Get Started
When you first set up or reset your phone, follow the setup steps. The process varies with devices.
System Language
Follow the prompts to select a system language.
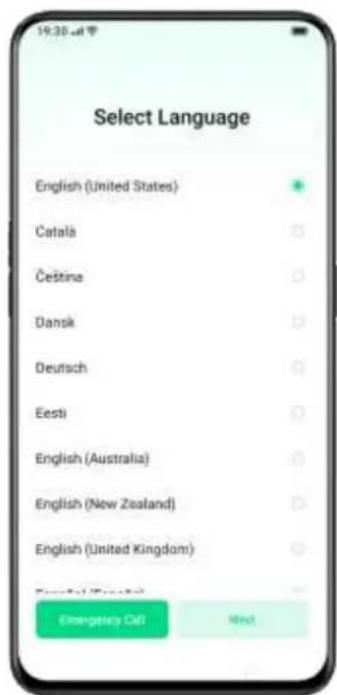
text_image
19:30 AM Select Language English (United States) Catala Čeština Dansk Deutsch Eesti English (Australia) English (New Zealand) English (United Kingdom) Emergency Call NextConnect to Wi-Fi
Select a network that you want to connect to, then enter the password if asked. If you don't want to connect to a Wi-Fi network for now, you can tap "Skip" in the top right corner.

text_image
19:30 am Connect to Wi-Fi Wi-Fi NETCHEE OPPO Connected Manually ADD a NetworkTerms of Use & Carrier Service Description
You need to agree to the User Agreement and Privacy Policy to continue using your OPPO phone.
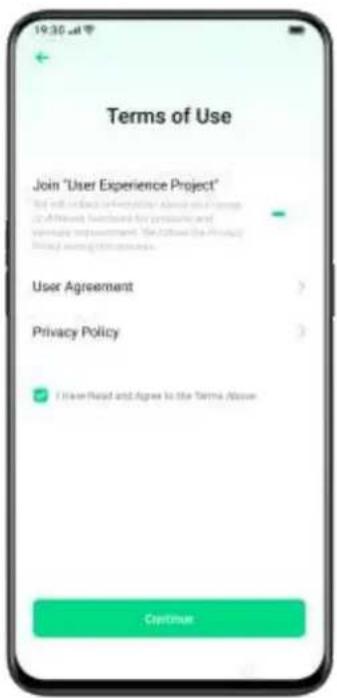
text_image
Terms of Use Join "User Experience Project" Not to be related to the project, but not to include a contract or interest required for privacy and security improvement. The following is Privacy Policy requirements: User Agreement Privacy Policy I have read and agree to the Terms / Issue ContinueLog in with Google Account
You can also log in with your Google account for a better user experience.
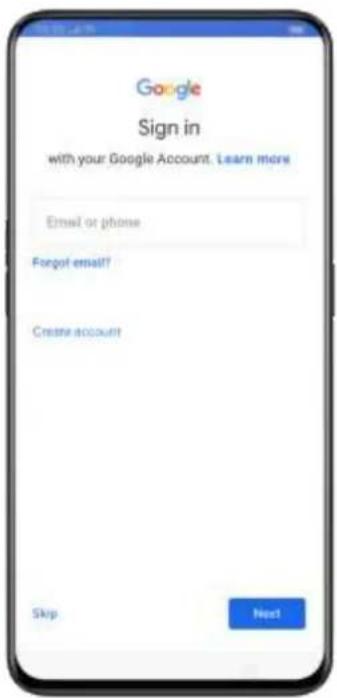
text_image
Google Sign in with your Google Account. Learn more Email or phone Forgot email? Create account Skip NextFingerprint, Face & Passcode
You can use a passcode, fingerprint and face to unlock your OPPO phone.
Note: You can only unlock the screen with passcode after restarting your phone. You can reset the passcode in [Settings].
All passwords are only stored in the local security module, rather than the system nor any apps.
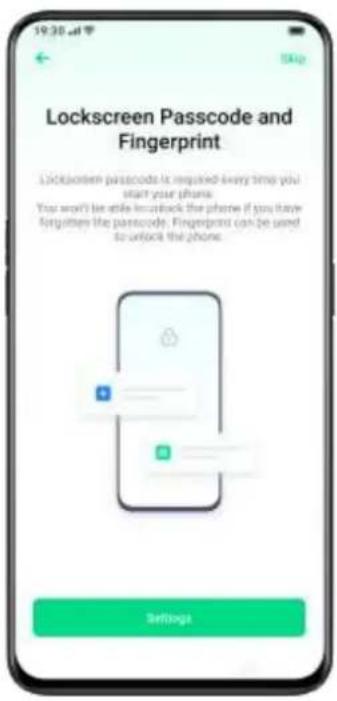
text_image
19:30 am Lockscreen Passcode and Fingerprint Lockscreen passcode is required every time you start your phone. You won't be able to unlock the phone if you have forgotten like passcode. Fingerprint can be used to unlock the phone.Wi-Fi Assistant
Turn on [Intelligently Select the Best Wi-Fi], your phone will automatically select and connect to the best Wi-Fi network by detecting the quality of all available Wi-Fi networks near you.
Turn on [Auto-switch to Cellular Network], your phone will be automatically switched to cellular data when all Wi-Fi networks are of poor quality and cellular data is turned on.

text_image
19:30 am Wi-Fi Assistant Automatically Select the Best Wi-Fi Automatically select the best Wi-Fi Auto-switch to Cellular Network ContinueAuto-Update Overnight
Promptly upgrade the apps to get the latest versions and security patches. Updates automatically will be taking place between 2:00-5:00 AM, while you're not using the phone.

text_image
19:30 AM Software Updates Auto-update Overnight Close your software update on the following services APP to apply this software Open your software your download status Software ALL (using PDF) software (.NET).NET. APP, yellow Software will be done ContinueImport Data
You can choose to use your phone as a new OPPO phone, or import previous backups from the old phone to a new one.
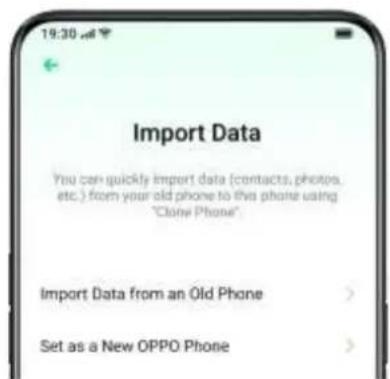
text_image
19:30 Import Data You can quickly import data (contacts, photos, etc.) from your old phone to this phone using "Clone Phone" Import Data from an Old Phone Set as a New OPPO PhoneInstall Apps in One Tap
You can choose to install apps recommended by the App Store in one tap.

text_image
19:30 am App Store These are the apps we have selected for you WhatsApp... Facebook ... TikTok Messenger... MX Player Instagram JetTV Vigo Video imo has id... Install AllComplete Setup
Once you're done with the setups, tap [Start] to embark on a new journey.
Communication and
Network
SIM Card Settings
If your OPPO smartphone supports Dual SIM, the card tray one is for Nano-SIM. The card tray two supports both Nano-SIM and MicroSD Card.
In Dual SIM mode, you can set a default SIM card for dialing, or manually select one when dialing. You can also set a SIM card for cellular networks.

text_image
19:30 AM + Call SIM1 SIM2 Always Ask SPECIAL COMPUTER Call Back from Call History Use the call for your own phone BLOGIESYou can rename two SIM cards and modify the network settings.

text_image
Dual SIM & Cellular Network SIM1 SIM2 GLOBAL SETTINGS Mobile Data GLOBAL LANDING SETTINGS Call Manage size > Internet DSU ORoaming Pass to include non-removable data packages with access and access and within a SIM card (if necessary support by Mobile Gateway) Off > Dual Channel Network AccelerationWi-Fi
Wi-Fi Connection
Go to [Settings] > [Wi-Fi], enable Wi-Fi.
Detected Wi-Fi networks will be displayed.

text_image
19:30 - 41 Wi-Fi Wi-Fi Wi-Fi Assistant Dual Channel Network Acceleration OPPO Automated Connection Apps Using Wi-Fi and Mobile Data Advanced Settings• Wi-Fi Without Password
If you want to connect to Wi-Fi without a password, tap the network directly.
- Password-Required Wi-Fi
Tap the network and enter the password if required.
- Manually Add a Network
If you cannot find the network that you intend to connect, enter both the network name and password after you Tap the option "Manually Add a Network".
Once the device is successfully connected to a network, whenever the network is available, the device will connect to the network without having to re-enter the password.
If you do not want to connect to a network automatically, tap to remove the connected network.
You can view the [Saved Networks] in [Advanced Settings].
Enhance Internet Experience
What if the Wi-Fi signal is unstable?
- Wi-Fi Assistant

text_image
19:30 AM Wi-Fi Assistant Intelligently Select the Best Wi-Fi Automotive, vehicle, gas, power, and other the best power to developing the utility of the self transmission. Auto-switch to Cellular Network Automotive, vehicle, gas, power, and other the best power to developing the utility of self transmission.Enable [Intelligently Select the Best Wi-Fi], the phone will connect to the best Wi-Fi network by detecting and analyzing the quality of all Wi-Fi signals.
You can also activate [Auto-switch to Cellular Network]. When all Wi-Fi networks are of poor quality while the cellular data is on, the phone will switch to the cellular network automatically.
- Dual Channel Network Acceleration
When [Dual Channel Network Acceleration] is turned on, network speed will be intelligently accelerated when cellular data and Wi-
Fi are used concurrently. Then you can enjoy a smoother Internet connection.
Apps for network acceleration are displayed below.
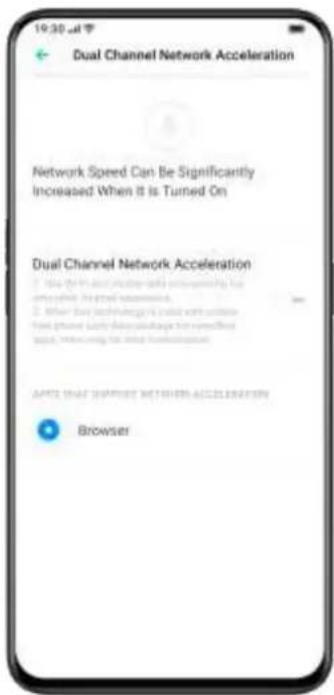
text_image
19:30 Jul 7 Dual Channel Network Acceleration Network Speed Can Be Significantly Increased When It is Turned On Dual Channel Network Acceleration • Use DPT and other skills to improve the accessible performance. • When Dual Channel Network can use a specific free phone, only download package for specific app, meaning the other connection. APIE: Dual Channel Network AC21162/159 BrowserDual-Wi-Fi Speed-Up
After turning on Dual-Wi-Fi mode, two Wi-Fi networks will be connected at the same time, and network connection acceleration and seamless switching will be realized.
Turn on Dual-Wi-Fi Mode
Go to [Settings] > [WLAN] > [Smart Speed-Up] > Enable [Dual-Wi-Fi Speed Up].
Notes:
2 Wi-Fi hot spots. One is 2.4 Ghz, the other is 5 Ghz. No mutual disturbance lies between them and each hot spot can receive and send data independently.
2 hot spots can be named either the same or differently.
2 hot spots can share the same router or be supported by different routers.
Apps Using Wi-Fi and Mobile Data
You can customize network permission settings for each app in [Wi-Fi and Mobile Data], [Wi-Fi] or [Close]. You can also view the total traffic used by each app.
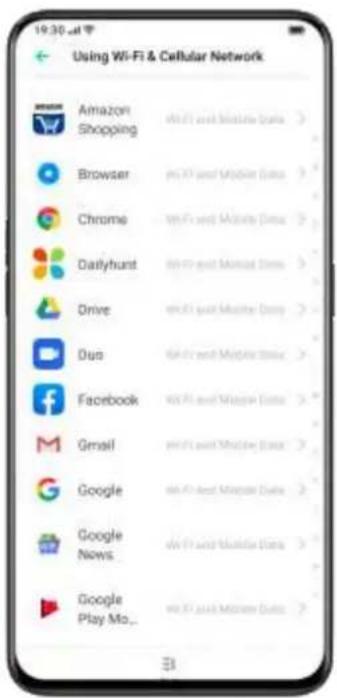
text_image
Using Wi-Fi & Cellular Network Amazon Shopping Browser Chrome Dailyhunt Drive Duo Facebook Gmail Google Google News Google Play Mo...Other Wireless Connections
VPN
VPN is a professional network communication device, extending a private network across a public network. VPN enables users to send and receive data across shared or public networks as if their computing devices were directly connected to the private network.
Add VPN
Go to [Settings] > [Other Wireless Connections] > [VPN] > [Add]. Enter the name, VNP type, server address and more information to add a VPN.
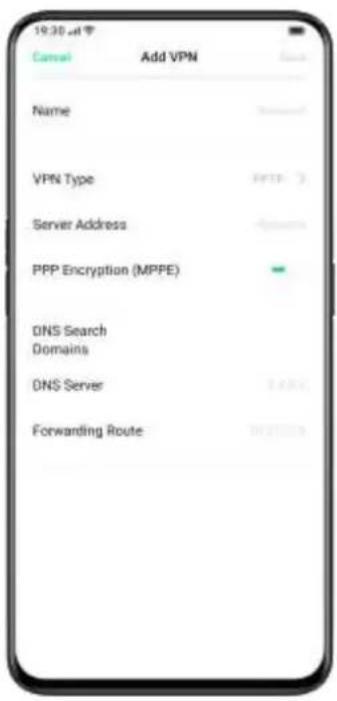
text_image
19:30 am Cancel Add VPN Name VPN Type Server Address PPP Encryption (MPPE) DNS Search Domains DNS Server Forwarding RouteTethering
You can share your network in the following four ways.
- Personal Hotspot
Go to [Settings] > [Other Wireless Connections] > [Personal Hotspot]. When Personal Hotspot is on, your Internet connection can be detected and shared by surrounding devices. It should be noted that more data and power may be consumed. Personal Hotspot will automatically turn off after 10 minutes when no device is connected.
Enter [Personal Hotspot Settings] to set the name and password for your personal hotspot.
You can also set blacklist, maximum connected devices, and data restriction in [Connection Management].
- Wi-Fi Tethering
Go to [Settings] > [Other Wireless Connections] > [Wi-Fi Tethering].
When Wi-Fi Tethering is on, your Wi-Fi network will be shared. More data and power may be consumed. Personal Hotspot will automatically turn off after 10 minutes when no device is connected.
Enter [Wi-Fi Tethering Settings] to set the name and password for your hotspot. When [Visible to Other Devices] is turned off, you can manually add networks to connect to the hotspot.
Other Devices Connect to Your Hotspot
- Search the name of your hotspot.
- Enter the password as prompted to connect.
Note: Up to 10 devices can connect to your hotspot at the same time.
Wi-Fi Tethering cannot be used simultaneously with OPPO Share, Wi-Fi Direct, Multi-screen Interaction, and other functions.
- USB Tethering
Connect your phone to the computer with a data cable. Go to
[Settings] > [Other Wireless Connections].
Turn on [USB Tethering], the computer will automatically recognize and share your Internet connection.
- Bluetooth Tethering
You can share your Internet connection with other devices through Bluetooth.
Another device should be paired with your Bluetooth before sharing your Internet connection.
Open [Settings] > [Bluetooth] > [Search]. Select the device to be paired with.

text_image
19:28 am Bluetooth Bluetooth Device Name Visible to Other Devices Bluetooth Pairing You have sent a pairing request to "OPPO". The pairing code is "600543". CancelWhen the pairing is done. Go to [Settings] > [Other Wireless
Connections] > [Bluetooth Tethering].
Another device should turn on the Bluetooth and tap the name of your Bluetooth to share your Internet connection.
To turn off Bluetooth Tethering. Go to [Settings] > [Other Wireless
Connections] > [Bluetooth Tethering].
Or, you can tap [Unpair] to disconnect Bluetooth and stop sharing your Internet connection.

text_image
19:30 am Paired Device Device Name Disconnect the current connection Unpair Type for: Internet Access Contact Sharing For sharing of passwordNFC
Go to [Settings] > [Other Wireless Connections] > [NFC].
When [NFC] is on, the phone is allowed to exchange data with any device in close proximity.
You can also use [Touch & Pay] and [Android Beam]. Your phone is allowed to make a payment or transfer data via NFC.
Wireless Transport
- Wi-Fi Direct
Through [Wi-Fi Direct], you can transfer data swiftly to peer devices when connecting to the same wireless network.
- Multi-Screen Interaction
Go to [Settings] > [Other Wireless Connections] > [Multi-Screen Interaction].
The Phone screen can be projected to TV sets, TV boxes and other equipment through the same Wireless Display technology.
• DLNA
When [DLNA] is enabled, the phone will automatically search for the DLNA device in the same Wi-Fi wireless network, and then project the phone screen to the target device.
Airplane Mode
You can turn on/off Airplane Mode manually. When the Airplane Mode is on, the Bluetooth, Wi-Fi, Cellular Data will disconnect.
- Go to [Settings] > Turn on/off [Airplane Mode].
- Slide the screen down from the top to enter Control Center, tap to turn on/off Airplane Mode.

Data Manager
Mobile Data Usage
View mobile data usage in [Settings] > [Dual SIM & Cellular Network].
You can set the start date for data usage to start.
Set [Daily Data Reminder] if you want to know the daily usage. You will receive notifications when data usage reaches a limited amount.
Data Saving
When [Data Saving] is on, apps in the background will not be able to use mobile data. Application in the foreground will decide if data-saving measures are to be taken, e.g. reducing image resolutions. In addition, you will not be able to use the network tethering function, and the status bar will display the data saving icon.
You can also set an unrestricted app. When Data Saving is on, those unrestricted ones will be able to receive new messages over cellular data.
[Settings] > [Dual SIM & Cellular Network] > [Data Saving].

text_image
19:30 AM Data Saving Data Saving When turned on, background run- ning apps, including email, iM, so- cial network apps will not be able to receive new messages over cellular except for those unrestricted ones. Cancel OnContacts
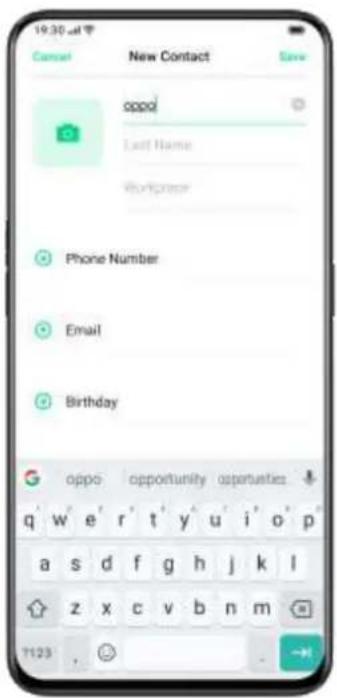
Create New Contacts Manually
- Tap in the upper right corner.
- You can add other additional information for each contact, such as avatar, name, workplace, email address, birthday.
- In [Add More Info], you can set the phonetic name, IM, address, nickname and website, and more.
- In [Notes], you can customize ringtones and align contacts with a particular group.
text_image
19:30 AM Cancel New Contact Save appd Last Name Workplace Phone Number Email Birthday oppo opportunity asperantes q w e r t y u i o p a s d f g h j k l z x c v b n m 7123 ,Import Contacts
- Import Contacts from Storage Device. You can import contacts from your SIM card. If you have contacts stored in the MicroSD Card on your old phone, you can export contacts as a VCF file, and open the file to import contacts into your new phone.
- Import Contacts from Another Phone. Import the contacts stored on other phones to the new phone through Bluetooth. You can also use [Clone Phone] to import contacts.
- Sync with Contacts of Other Accounts. If you have previously synced your contacts to OPPO Cloud, you can log in to the original OPPO ID on your new phone. When the cloud service is
enabled, the contacts will be automatically synced to your new phone. You can also sync the contacts from non-OPPO ID directly.

text_image
Import/Export Contacts Import contacts Import from Storage > Import from Other Phones > Export contacts Export to Storage Device > Write contacts Send Contacts >Name Cards Scan
Tap In the top left corner, scan the name card to identify and save as a new contact.

text_image
19:30 Jun Settings Name Card Recognition > Import/Export Contacts > SIM Card Contacts > Show Contact's Profile Picture CONTACTS MANAGEMENT Contacts to Display > Sort by First Name > View Contact Names as First Name Help > Merge Duplicate Contacts > Manage Contacts >Manage Contacts
Tap to enter [Settings].
Contacts to display. You can choose contacts that you want to display, or you select contacts with numbers to display.
Merge duplicate contacts. Tap [Merge Duplicate Contacts], and then the phone will automatically merge contacts with the same name.
Manage contacts. You can manage contacts without name or number or quickly remove invalid numbers.

text_image
19:30 Jul Manage Contacts Unnamed Contacts Contacts Without Number Delete Special Characters from Numbers Remove Numbers Longer Than 25 DigitsVIP Contacts
When you switch the phone into Silent Mode, or when you set the phone to block calls and notifications using Quiet Time, Game Acceleration, or Anti-harassment, you could still add certain contacts to your VIP Contact list, allowing them to override the phone settings and have their calls come through and ring.

text_image
19:35:44 OPPD India 180 0103 2777 Share Contact Add to VIP Contacts Add to Blacklist Delete Contact Show called, calls here this contact will not be affected by Short Media. Do not Develop, Develop through a sharing. Develop Breakthrough or Add-investment settings. The phone will bring and allocate to access. Add to VIP Contacts CancelAll Call Logs
In [Contacts], you can view all call logs of a specific contact.
View Call Logs
Go to [Contacts] > Select a contact > Tap [All Call Logs].

text_image
19:30 u# All Call Logs Outgoing/Not Connected (07:16:19 12:31) Missed Rang for 2s (07:16:19 12:47) Outgoing/Not Connected (08:24:19 07:35) Missed Rang for 2s (08:24:19 07:36) Outgoing/Not Connected (08:24:19 07:36) Outgoing/Not Connected (08:24:19 07:36) Outgoing 7s (08:24:19 07:36) Missed Rang for 2s (08:24:19 07:37) Missed Rang for 2s (08:24:19 07:37) Incoming 0x (08:24:19 07:38) Outgoing 2s (08:24:19 07:38)Export Contacts
If you want to export your contacts to another phone, tap [Exportto Storage Device] and select the corresponding storage device.
You can also share contacts through Bluetooth by tapping [Send Contacts].
My Groups
You can contact people from "Contacts" in batches through [My Group].
New Group
Go to [Call] > [Contacts] > [My Groups]. Tap [New Group] and enter a group name to create a new group.
- Go to [Call] > [Contacts] > [My Groups]. Choose a group and tap + in the upper right corner to add new members.
- Tap [Select] and choose members to be removed, then tap [Remove].
- You can send messages or emails to one or many members of a group. You can customize ringtones for VIP contacts and self-created groups.
VIP Contacts
Calls from VIP Contacts will not be affected by Silent Mode, Do Not Disturb, Do-Not-Disturb Gaming, Do-Not-Disturb Driving, Do-Not-Disturb Cycling or Anti-harassment settings. The phone will ring and vibrate as normal.
Smart Groups
There is a Smart Group [Company] in ColorOS 6.1, the system will automatically identify the company information of contacts. You can send a message and email to contacts in smart groups.
Do Not Disturb
If you are attending a meeting or in sleep, turn on "Do Not Disturb" to exempt from phone disturbance. In this mode, calls, messages, and notifications will be muted.
Turn on "Do Not Disturb"
Go to [Settings] > [Do Not Disturb].
When [Do Not Disturb] is turned on, calls, messages, and notifications will be muted except for alarm clock, countdown timer, and alerts that you previously permit. A warning-moon-shaped symbol will show up in the status bar.
You can choose to turn on the [Do Not Disturb] manually or automatically.
In the Auto-on mode, you can customize the time not to be disturbed or the content allowed to show up.

text_image
19:30 AM Do Not Disturb Enable Manually When "Do But Don't" is accepted by the bus. Show will be used to show that bus calls are suggested for details but have permitted, and automatically will be allowed (or if required) that you need not complete next will not be avoided. Enable Automatically Days Start 22:00 End Tomorrow 07:00 ALLOWED COMPANY Allow Notifications Allow Messages From Allow Calls From Allowed Contacts It's? Ring for Repeated CallsCustomize "Do Not Disturb"
If you want to activate [Do Not Disturb] mode during either on weekdays or at night automatically, you can choose to start the mode on particular dates, and set the starting and ending time as well.
Allowed Content
You can choose to allow notifications, messages, or calls from specific contacts.
When [Ring for Repeated Calls] is activated, another call from the same contact within 3 minutes will not be muted.

text_image
19:30 am Allow Calls From Disallow All From Anyone Only from Contacts Starred Contacts OnlyBasics
Wake the Phone
There are multiple ways to wake your phone.
Press Power Button
Press the Power Button on the right side to wake the phone.

text_image
Power ButtonUse Raise to Wake
Enable [Raise to Turn On Screen]. When you raise your phone to look at it, it will automatically wake the locked screen.
Go to [Settings] > [Convenience Aid] > [Gesture & Motion], enable [Raise to Turn On Screen].
Unlock the Phone
For safety consideration, you can set diverse ways to unlock your phone, including passcode, fingerprint, and facial recognition. You can use more than one method to unlock your phone.
Passcode
You can set a 6-digit numeric code to unlock your phone. After waking the phone, slide the phone and enter the passcode.
Go to [Settings] > [Fingerprint, Face & Passcode] > [Lock Screen Passcode].
If you forget the passcode, you can:
- Reset via security email
You can reset the passcode as long as you have bounded your security email address at the initial phase of password creation.
Tap [Forget Passcode] > Enter the email address you have bounded on the phone > Enter verification code that was sent to your email > Tap [Done] to finish the reset.
- Reset via Fingerprint
Tap [Forget Passcode] > Place the corresponding finger on the fingerprint button.

text_image
Use Fingerprint or Enter Passcode 1 2 3 4 5 6 7 8 9 0 Emergency Call Back
text_image
19:30 - 47 Reset Using Fingerprint Reset Using Email CancelFingerprint
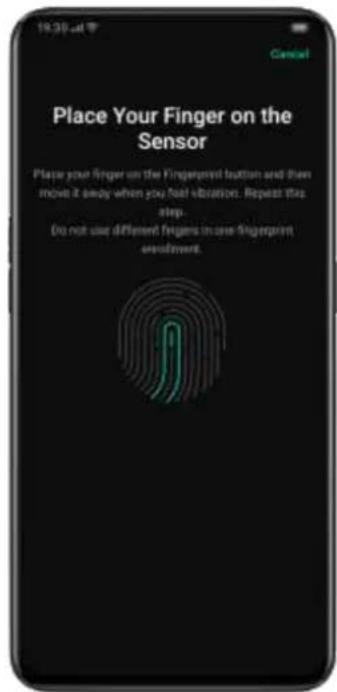
You can also unlock the phone through fingerprint. Follow the onscreen instructions the first time you set up your fingerprint passcode. You can add up to five different fingerprints.
Go to [Settings] > [Fingerprint, Face & Passcode] > [Fingerprint] > [Add a Fingerprint].
text_image
Place Your Finger on the Sensor Place your finger on the Fingerprint button and then move it away when you feel vibration. Repeat this step. Do not use different fingers in use Fingerprint sentiment.Enroll Face
You can also unlock your phone within only 0.08 seconds with a simple glance at the phone.
To use Face enrollment, you should set up the facial-recognizing passcode on your phone.
Go to [Settings] > [Fingerprint, Face & Passcode] > [Face] > [Enroll Face].

text_image
19:30 am Cancel Enroll Facial Info For the latest results, keep the device 50cm to $50cm from your face and avoid surroundings that we are bright or too dim once emptying. ContinueRemember to follow the onscreen instructions by enrolling your face to acquire the best results.
Look straight to the screen. Keep the phone 20-50 cm away from your face and position your entire face in the circle until the enrollment is finished. Avoid exposing your face to the bright or dim environment.
You are advised to turn on Raise to Turn on Screen, to better identify your face.
There are two ways to unlock while using face enrollment:
- Swipe up to unlock
- Wait for the automatic unlock if the screen light is on.
Tip: You can further protect personal security if you set your phone as inaccessible to be unlocked when your eyes are closed.
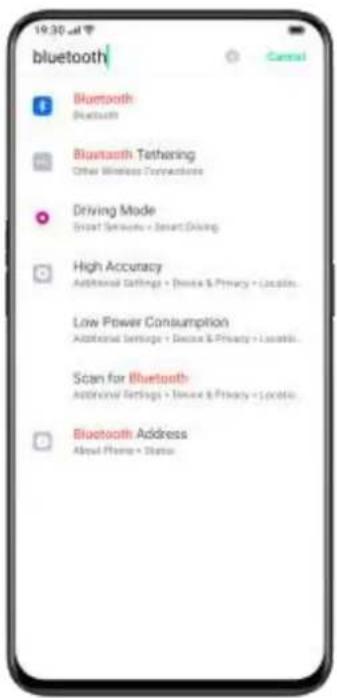
Search Settings
In [Settings], tap at the top right and enter a keyword, you will find relevant functions. Tap a result to quickly jump to the corresponding setting page. For instance, if you search "Bluetooth", you will see all the settings related to Bluetooth.
text_image
19:30 AM bluetooth Bluetooth Bluetooth Bluetooth Tethering Other Wireless Constructions Driving Mode Smart Services + Smart Driving High Accuracy Additional Settings + Device & Privacy + Location. Low Power Consumption Additional Settings + Device & Privacy + Location. Scan for Bluetooth Additional Settings + Device & Privacy + Location. Bluetooth Address About Phone + StatusAdjust and Control the Volume
ColorOS 6.1 offers personalized volume adjusting and controlling solutions. You can set customized volume levels for different uses.
Volume Control Buttons
Use buttons on the left side of the phone to adjust the audio volume if you are listening to songs, movies, or other media.
If you want to adjust the volume for ringtones, alerts, and other sound effects, tap on the sidebar and slide the bar to adjust the volume.
text_image
19 30 Sun Apr 10 April 26°CTap on the bottom to personalize volume for media, ringer, and alarm. For example, you can turn off the volume for media and ringer and turn on the alarm before sleep, in order to ensure the best quality during your rest.

text_image
19 30 Open Add Store Theme Store Play Store SinginCustomize the Ringtones
ColorOS 6.1 enables the user to customize ringtones. You can set different ringtones to identify incoming calls, messages, and calendar notifications. You may also customize the ringtones by importing alert files on your phone or from online sources.
Go to [Settings] > [Sound & Vibration].
Silent Mode
You can turn on the silent mode if you're not hearing or seeing incoming calls and alerts when you expect.
How to turn on the silent mode:
- Swipe down the screen from atop, go to Control Center, and tap Silent Mode.
- Tap on the volume button on the side of the phone, Tap at the lower-left area of the volume button.
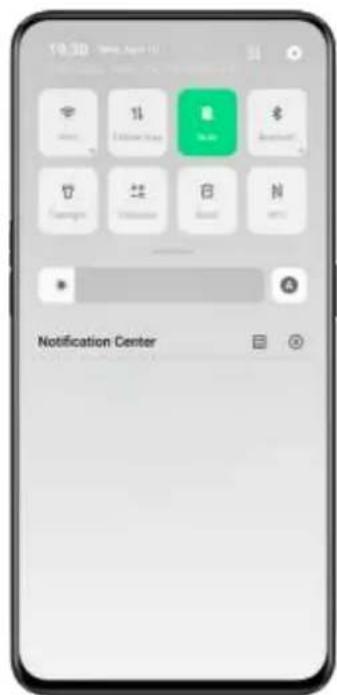
text_image
19:30 Notice Center
text_image
19 30 Apr 10 light rain 28°C Ringtone is turned off for incoming calls and notificationsMore Options for Ringtone Customization
To provide better operational feedback, ColorOS 6.1 offers four personalized ringtones settings.
Go to [Settings] > [Sound & Vibration] > [System Feedback].
- Dial-Pad Tone
- Lock Screen Tone
- Vibrate on Touch
- Fingerprint Animation Tone
Dolby Atmos
Dolby Atmos is activated by default, you can choose to turn it off when your device is connected to an earphone.
Besides Smart mode, there are Movie, Gaming and Music modes for you to choose according to use scenarios.
Go to [Settings] > [Sound & Vibration] > [Dolby Atmos].

text_image
19:30 AM Dolby Atmos Dolby Attnos Smart Movie Gaming MusicDisplay and Brightness
You can adjust screen brightness under different lighting conditions to have a better visual display.
Adjust Screen Brightness
Adjust the screen brightness manually
- Swipe down from the top of the screen, enter Control Center and drag the slider.
- Go to [Settings] > [Display & Brightness], drag the slider.

Automatically adjust the screen brightness
After you turn on Auto-Brightness, ColorOS 6.1 will adjust the screen brightness for current light conditions using the built-in ambient light sensor, to prevent eye fatigue and increased power consumption.
- Swipe down from the top of the screen, enter Control Center and tap button 📄 on the right side of the brightness slider.
- Go to [Settings] > [Display & Brightness] > [Auto-Brightness].
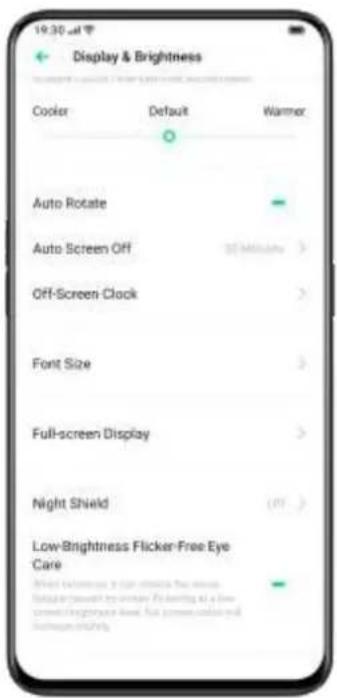
Screen Color Temperature Adjustment
You can set the screen tone as either warm or cool.
Go to [Settings] > [Display & Brightness], set screen tone by dragging the slider.
Cooler
Default
Warmer

Switch on Eye-Protection Mode
ColorOS 6.1 makes it easier when you use the phone at night or under dimming light. You can turn on the eyes-protective mode to reduce eye strain and fatigue when exposing to digital display for a long time.
There are two types of eyes-protective mode.
Night Shield
The Night Shield mode could help reduce the blue light emitted from the display to prevent eye fatigue.
Low-Brightness Flicker-Free Eye Care
When Low-Brightness Flicker-Free Eye Care is turned on, eye fatigue will be much relieved as it is in the minimum brightness in dimly-lit environments. But the image noise may be slightly increased if you turn on the none-stroboscopic dim light mode.
Go to [Settings] > [Display & Brightness] > Switch on None-Strob [Low-Brightness Flicker-Free Eye Care].
text_image
19:30 Jul 20 Display & Brightness Cooler Default Warmer Auto Rotate Auto Screen Off 30 Minutes Off-Screen Clock Font Size Full-screen Display Night Shield (Off) Low-Brightness Flicker-Free Eye CareFont
Change Font Size
You can also change the font size if you need a larger or smaller font display.
Go to [Settings] > [Display & Brightness] > [Font Size].

text_image
19:30 Font Size European Dot The Wizard of Oz Chapter XI: The Wonderful Emerald City of Oz Even with their eyes protected by the green spectacles, Dorothy and her friends were at first dazzled by the brilliancy of the wonderful City. The streets were lined with beautiful houses all built of green marble and stuffed everywhere with sparkling emeralds. They walked over a pavement of the same green marble, and where the blocks were joined together were rows of emeralds, set closely, and glittering in the brightness of the sun. The window games were of green glass. Even the sky above the City had a green tint, and the rays of the sun were green. There were many people—men, women, and children—walking about, and these were all dressed in every direction and had little other than. Then looked up Small Default Medium Large Extra-large Zoom to or out on the next shown on the screen
text_image
19:30 AM Font Size Sample Text The Wizard of Oz Chapter XI: The Wonderful Emerald City of Oz Even with their eyes protected by the green spectacles, Dorothy and her friends were at first dazzled by the brilliancy of the wonderful City. The streets were lined with beautiful houses all built of green marble and studded everywhere with sparkling emeralds.They walked over a Small Default Medium Large Extra- large Zoom in or out on the text shown on the screen.Auto-lock Clock
You don't need to unlock the phone to check the time. Turn on the Auto-lock Clock to view the exact time and dates.
- The longer the Auto-lock time remains, the more the battery drains.
- The Auto-Lock Clock will be no longer available if there is less than 10% battery.
Auto Screen Off
By default, your device will be automatically locked if you don't operate the phone for over 30 seconds, as a way to protect personal privacy. You can modify this by adjusting the auto-lock time.
Go to [Settings] > [Display & Brightness] > [Auto Screen Off].
Options range from 15 seconds to 30 minutes.

text_image
19:30 AM Auto Screen Off 15 Seconds 30 Seconds 1 Minute 2 Minutes 5 Minutes 10 Minutes 30 MinutesAuto Rotate
You will have different views if you rotate your phone when you are typing texts or watching movies. You can turn on "Auto-Rotate" to automatically switch from landscape or vertical orientation.
- Swipe down from the top of the screen, enter Control Center and tap (☐)
- Go to [Settings] > [Display & Brightness] > [Auto Rotate].
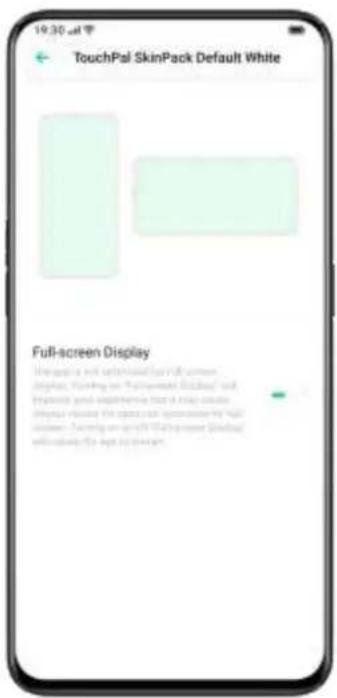
Full-Screen Display
To acquire the more immersive experience in using ColorOS 6.1, you can optimize the app display into full-screen.
Go to [Settings] > [Display & Brightness] > [Full-screen Display]. Select the apps you want to make it into full-screen.
text_image
19:30 AM TouchPal SkinPack Default White Full-screen Display The package with backbrushes has a full screen display. Starting on "TouchPal SkinPack" and opening up the experience that it helps create new display. The screen will also have a free screen. Starting on your first screen screen, it will be used to get your own view.Convenience Aid
Simple gestures lead you with more precise and convenient use with ColorOS 6.1.
Go to [Settings] > [Convenience Aid]. View and customize gestures such as tap, swipe, drag, and spread.
Awake Google Assistant
You can enable [Turn On Awaking Google Assistant by Pressing Power Button for 0.5 Seconds]. While you can press and hold Power Button for
3 seconds to power off pages and hold down Power Button and Vol Up
Button simultaneously for 10 seconds to force a reboot.
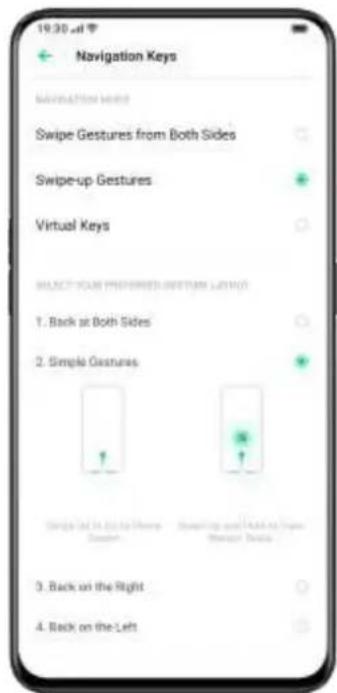
Navigation Keys
There are three types of navigational gestures, including Swipe
Gestures from Both Sides, Virtual Keys, and Swipe-Up gestures.
Swipe Gestures from Both Sides
- Back
Swipe inward from the bottom left or the bottom right of the screen.
- Back to Home screen
Swipe upward from the bottom of the screen.
• View Recent Tasks
Swipe upward from the bottom of the screen and then hold.
- Switch to Previous App
Swipe inward from the bottom left or the bottom right of the screen and then hold.
You can also enable [Mistouch Prevention for Swipe Gestures from Both Sides]. When using the full screen in landscape mode, gestures need 2 swipes to take effect.

text_image
19:30 - 47 Navigation Keys Navigation Keys Swipe Gestures from Both Sides Swipe-up Gestures Virtual Keys Back to Home Screen Swipe upward from the bottom of screen Mistouch Prevention for Swipe Gestures from Both SidesSwipe-Up Gestures
With the help of Swipe-Up Gestures, it will be easier to operate your phone with a larger display and more immersive user experience.
Swipe up to:
- Return to the previous page
- Go to the Home screen
• View recent tasks
You can also customize different gestures, such as:
- Simple gestures. Swipe up from the middle bottom to get to the Home screen, and swipe up from the middle bottom and pause 1 second to view recent tasks.
- Back on the right. Swipe up from the left bottom to view recent tasks, swipe up from the middle bottom to get to the Home screen, and swipe up from the right bottom to return to the upper page.
- Back on the left. Swipe up from the left bottom to return to the upper page, swipe up from the middle bottom to get to the Home screen, and swipe up from the right bottom to view recent tasks.
text_image
19:30 am Navigation Keys Information video Swipe Gestures from Both Sides Swipe-up Gestures Virtual Keys SELECT YOUR INFORMATION OUTPUT LAYOUT 1. Back at Both Sides 2. Simple Gestures Single hit 1x hit to Home Session Snapping up and 1x hit Top Monitor Tools 3. Back on the Right 4. Back on the LeftVirtual Keys
Virtual Keys show up at the bottom of the screen once enabled. You can also customize the layout, or choose to hide Virtual Keys according to your daily usage habits.
Android P Navigation Keys consist of navigation shortcuts. Switch between different pages by easily swiping, dragging or tapping.
- Multi-Tasks: Swipe the middle button up
- Switch Between Apps: Slide the middle button left or right.
- Go to the Home screen: Tap the middle button.
- Awake Google Assistant: Press and hold the middle button.
- Back to Previous Page: Tap the back button.
Go to [Settings] > [Convenience Aid] > [Virtual Keys].

text_image
19:30 am Clock Alarm Clock Stopwatch Timer 00_ 15_ 00_ 01 14 + - - - - - - - - - - - - - - - - - - - - - - - - - - - - - - - - - - - - - - - - - - - - - - - - - - - - - - - - - - - - - - - - - - - - - - - - - - - - - - - -Assistive Ball
Once the Assistive Ball is enabled, you can try different gestures using the Assistive Ball. There are two ways to operate the Assistive Ball.
Gestures
- Tap to return to the upper page
- Double-tap to enter the multi-task mode
- Touch and hold to go back to Home screen
You can also personalize the gestures for Assistive Ball based on your preferences and usage habits.

text_image
19:30 AM Assistive Ball Assistive Ball Use the function in ball to ensure and guarantee Unrealized ways Gesture Operations Tap Menu Identified operations Tap Back > Double-tap Multisensing > Touch and Hold Hello > TRANSFORMATE BY THE ASSISTIVE BALL WITH HOLDING 80% 100% Hide Ball Automatically in Full ScreenTap Menu
After you open the "Tap menu", tap the Assistive Ball and you will see five buttons with different functions. Tap the button to complete your action.
- Return to the upper page
- Screenshot
- Multi-task
- Lock screen
- Go back to the home screen

text_image
19:30 - 47 Assistive Ball Assistive Ball Is the Assistive Ball in move to position. Imputative mode: Gesture Operations Tap Menu Touch the story you want to change Build Startbox Make Action Save Customize Unavailability of The Assistive Ball, www.25.hoAfter you enable Assistive Ball, you can also customize the display.
- Drag Assistive Ball to change its location
- Adjust the transparency of the Assistive Ball
• Auto hide Assistive Ball in full screen
Screen-off Gestures
About Screen-off Gestures
When the screen is off, you can use custom gestures on the screen for quick operations.
Go to [Settings] > [Convenience Aid] > [Gesture & Motion] > [Screen-off Gestures].
After enabling Screen-off Gestures, you can choose to add the following gestures:
- Double tap to turn the screen on.
- Double an O to enable the camera.
- Double a V to open torchlight.
- Music control: Double II to pause/play a track or draw < or >to switch the track when the screen is off.
Add Screen-off Gestures
You can also add your personalized Screen-off Gestures, for example, slide up to open the calculator.
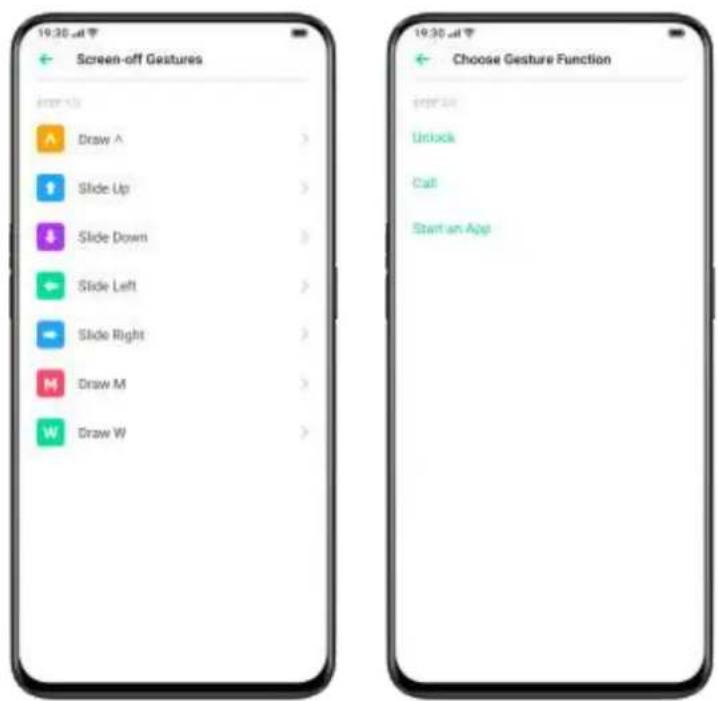
text_image
19:30.m Screen-off Gestures Inter-Link Draw A > Slide Up > Slide Down > Slide Left > Slide Right > Draw M > Draw W > Choose Gesture Function Inter-Link Unlock Call Start an AgeSmart Call
In [Smart Call], you can enable [Auto-answer When Phone is Near Ear], [Mode Switching During Calls] or [Flip to Mute Incoming Calls] as needed.
Go to [Settings] > [Convenience Aid] > [Gesture & Motion] > [Smart Call].
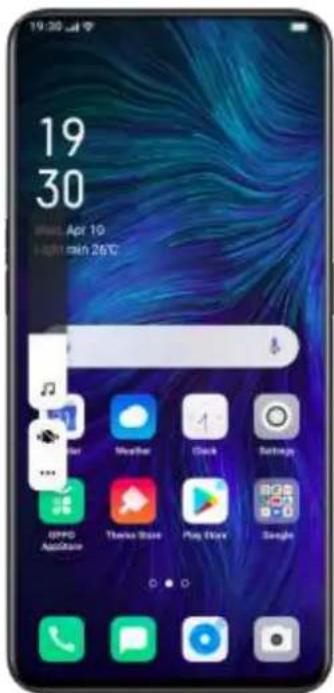
Smart Sidebar
Smart Sidebar enables you to switch between apps, transfer files, reply messages, or take screenshots when playing a game or watching a video.
Go to [Settings] > [Convenience Aid] > [Smart Sidebar].
After Smart Sidebar is enabled, you will see a white vertical bar on theright side. Swipe to the left and the Smart Sidebar will show up.

text_image
19:30 wdt 19 30 Wed Apr 10 Light rain 28°C G 31 Calendar Mobile Click Settings OMFD Add Store Theme Store Play Store Google Airline AirFile Console
Tap on [File Console] and you will see the latest photos, where you can select some of them to share with your friends.
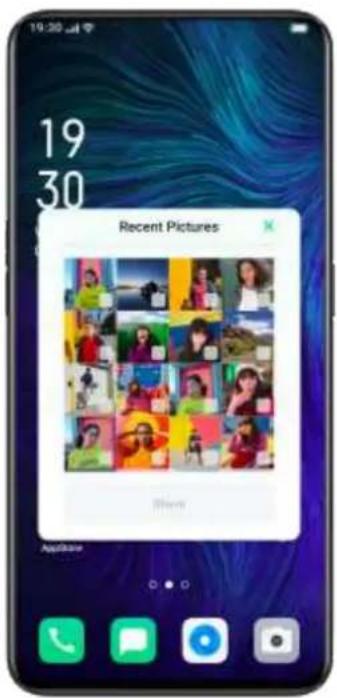
text_image
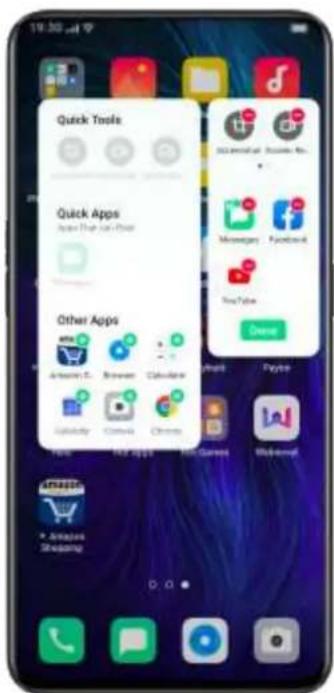
19 30 Recent Pictures Phone ApplicateQuick tools
- Screenshot: You can capture the screenshots.
- Screen Recording: You can record the screen motions.
- Block Banners: All notifications will be silent.
Quick Apps
You can switch from and to several most-used apps. For example, whilewatching a video you can also text messages using the floating sidebar.
text_image
19:30 am Quick Tools Quick Apps App One App One Other Apps Amazon's Brunner Calculus YouTube Chatula Chrome Internet Facebook YouTube Online Payser Tape New App New Games Mail-mail Amazon • Amazon StreamingScreenshot
You can take screenshots while using the phone, the screenshots will be stored in "Photos"
You can take screenshots in the following ways.
Button Screenshot
Press and hold the Power Button and Volume Down Button.
3-Finger Screenshot
Go to [Settings] > [Convenience Aid] > [Gesture & Motion] > [3-Finger
Screenshot].
Swipe down with three fingers to quickly take a screenshot.
Assistive Ball Screenshot
- Go to [Settings] > [Convenience Aid] > [Assistive Ball].
- When Assistive Ball is on, Tap [Tap Menu] to view shortcut icons.
- Tap the Assistive Ball and Tap [Screenshot] to take a screenshot.
Smart Sidebar Screenshot
Go to [Settings] > [Convenience Aid] > [Smart Sidebar].
Swipe out the sidebar and Tap "Screenshot" to take a screenshot.
Long Screenshot
After the screenshot is taken, tap [Long Screenshot] and follow the prompts to slide up to take a long screenshot.
After the screenshot is taken, tap [Edit] to modify the screenshot. You can use [Marker pen], crop and rotate, add filters, add text and more on the screenshot. Tap "Send" to share the screenshot with friends.
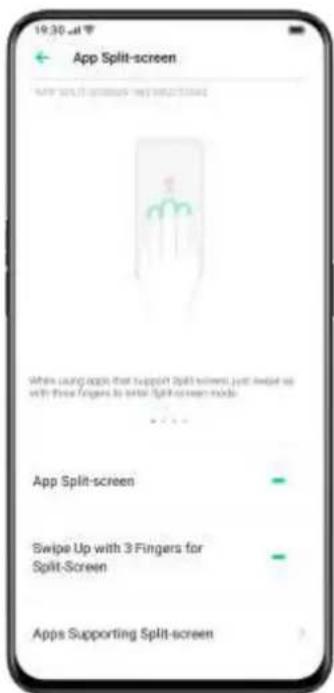
App Split-Screen
The App Split-screen provides you with a divided screen that is split into two areas, with each area showing a different scene at the same time.
You can watch a movie while chatting with friends within the split-screen.
Go to [Settings] > [App Split-screen].
Turn on [App Split-screen] with the following three ways.
- Swipe up with 3 fingers to enter the split-screen mode.
- Press and hold the Multitask button to enter the split-screen mode.
- Swipe down a task card, then tap Split-screen to enter the split-screen mode.
text_image
19:30 am App Split-screen Where set it to account my user-defined When using apps that support split screen just swipe us with three fingers to enter split-screen mode. App Split-screen Swipe Up with 3 Fingers for Split-Screen Apps Supporting Split-screenSplit-Screen Adjustment
After you enter Split Screen, you can drag the borderline between two apps to adjust each screen size.

text_image
19:30 at 早 C % C 7 8 9 4 5 6 1 2 3 0 00 . FOLLOW THE ACTION HERE Gaming Zone APP REVIEWSAdjust Split-Screen Location
You can move the location of the Split-screen apps either upward or downward.
Tap the borderline at the middle and tap .
Change Split-Screen Apps
If you want to change split-screen apps from the upper or lower area,
Tap the borderline at the middle and tap
Exit Split-Screen
You may exit the split-screen mode in the following three ways:
- Go back to Home screen, and tap [Exit Split-screen] at the upper area of the screen.
- Drag the borderline to exit Split-screen. You can drag the line to the top to exit the upper Split-screen, otherwise, you may drag the line to the bottom to exit lower Split-screen.
- Tap the borderline and choose

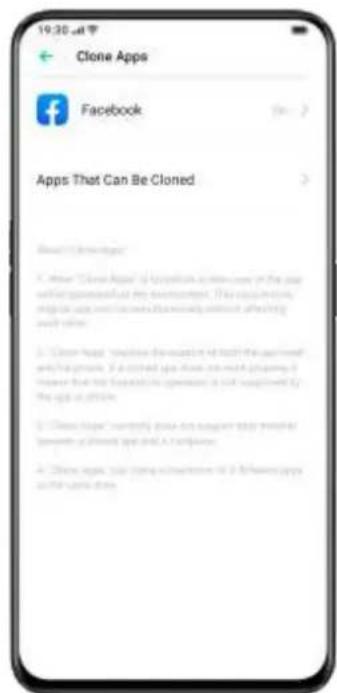
Clone Apps
After enabling Clone Apps, a copy of a particular app will be generated on the Home screen. The original app and its copy could run simultaneously without affecting each other.
Clone Apps works only if both the app itself and the phone supports it. If a cloned app does not work properly, it means that the function or operation is not supported by the app or phone.
Clone Apps currently do not support data transferring between a cloned app and a computer. At most two app clones can be operated simultaneously.
Apps That Can be Cloned:
- BBM
- WhatsApp Messenger
- Messenger
- Hike News & Content
- Imo
- Skype
- Telegram
- Viber Messenger
• Zalo
Go to [Settings] > [Clone Apps] > [Apps That Can Be Cloned].
text_image
19:30 AM Clone Apps Facebook Apps That Can Be Cloned Close Apps • Use "Clone Apps" to Quelieve in new user of the app with a successful new application. The app contains more apps than the new app, but it is also used to access your app. • Close Apps will continue to use it to touch the app's own website or account. If a closed app does not reach any proper information that has been used to open the app, it is required by the app's own website. • Close Apps must have a copy of a new version of a closed app and a complete copy. • Close Apps must have a copy of a new version of a closed app and a complete copy.
text_image
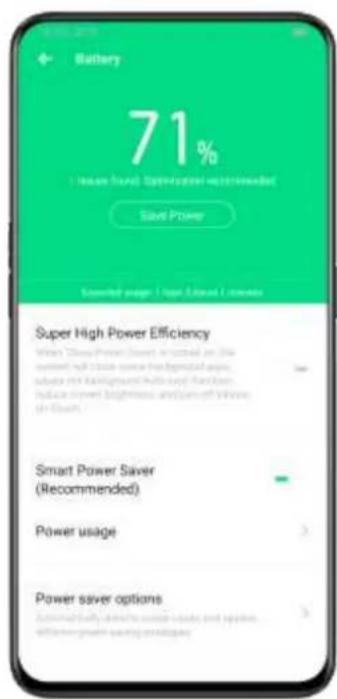
19:30 Facebook Facebook@2014 43Power Saver
ColorOS 6.1 will detect user scenarios, and you can choose from different power saving strategies.
Save Power
ColorOS 6.1 will automatically detect the power consumption issues. You can tap [Save Power] to optimize and extend battery life.
Go to [Settings] > [Battery] > [Save Power] > [Extend Battery Life].
Smart Power Saver
When the [Smart Power Saver] is on, the system will identify the running status of apps and adopt a targeted power saving mode to ensure that the background apps operate smoothly.
You are recommended to use Smart Power Saver to keep your phone in smart power consumption, reducing power consumption and extending battery life.
Go to [Settings] > [Battery] > [Smart Power Saver (Recommended)].
Power Usage
Go to [Settings] > [Battery] > [Power Usage].
You can view power usage of today, yesterday and 2 days ago. You can also view apps' foreground and background activity time, and their power consumption.
Power Saver Options
Go to [Settings] > [Battery] > [Power Saver Options] > [Sleeping Mode].
This feature can sense when you might be sleeping, and then switch to Low Power Mode to make your phone more power-efficient.
High Performance Mode
Go to [Settings] > [Battery] > [High Performance Mode].
The system will operate in a high performance mode, but it will increase extra power consumption.
text_image
Battery 71% ( Issue Fund) Expected (Recommended) Save Power Recommended usage: 1. Top 3. Demand 2. Currents Super High Power Efficiency When China Power Saver is recommended on the system, it's a power source that is recommended as user, where background will be used to function indicate power brightness and current of power (0-1x). Smart Power Saver (Recommended) Power usage Power saver options Recommended fully allow the power source and system otherwise to save practical examplesControl Center
Control Center offers you instant access to the most frequently used features such as calculators, cameras, and flashlights, allowing you to view recent and earlier notifications within simple swipes.
Swipe down from the very top of any screen (except the notch at the top center of the display) to enter Control Center.
Press and hold a certain icon to start customization. For example, you can adjust the display warmth or coolness manually by pressing and holding the icon for Night Shield mode.
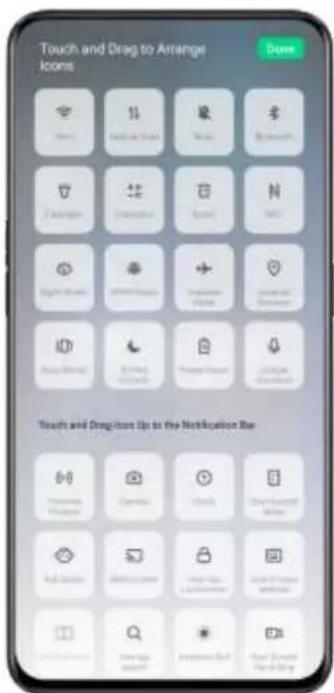
Change or Rearrange Icons
For the frequently used icons or functions, you can add them to the notification bar manually. Scroll down to enter Control Center, Tap from the top right corner, then press and hold to move the icons to the notification bar.
text_image
Touch and Drag to Arrange Icons Done 11 Next 5 New 7 New N New 8 New 9 New 10 New 11 New 12 New 13 New 14 New 15 New 16 New 17 New 18 New 19 New 20 New 21 New 22 New 23 New 24 New 25 New 26 New 27 New 28 New 29 New 30 New 31 New 32 New 33 New 34 New 35 New 36 New 37 New 38 New 39 New 40 New 41 New 42 New 43 New 44 New 45 New 46 New 47 New 48 New 49 New 50 NewQuick Actions
Quick Actions in Control Center include:
Enable Network
● Airplane Mode: Disable cellular data immediately.
- Cellular Data: Enable or disable mobile data to connect to the network.
- WLAN: Look through websites, or download movies.
- Bluetooth: Connect to earphones, car kit system or other devices that support Bluetooth connectivity.
- Personal Hotspot: Connect to computers or other devices that share your network.
- OPPO Share: Share your photos, videos or locations with other OPPO devices around you.
- NFC: Enable NFC to finish payment or transmit data.
- Location Services: Turn on location services to allow apps and system service to access your location.
Control Volume
- Silent Mode: Mute notifications.
- Do-not-disturb Mode: Mute incoming calls and notifications, choose when not to be disturbed.
Accessibility Aid
- Assistive Ball: Switch Assistive Ball on to aid operations.
- One-hand Mode: Shrink the screen size for the users who would like to operate with one hand.
- Auto-rotate: Screen will be automatically switched either to landscape or vertical orientation while you rotate the phone.
- One-tap Lockscreen: Enable the swift screen lock.
Other Quick Actions
- Flashlight: Turn on the LED flashlight if there's a need for lighting.
- Calculator: Launch quick calculating, and complete online currency exchange.
- Quick Search: Enter the OPPO browser and search.
- Accelerate and Clean: Enter Cleanup Storage mode and start the cleanup.
- Power Saver: Turn on to save power.
- Camera: Tap to start shooting, taking selfies or recording videos.
- Clock: Enter Clock to access to the alarm clock, stopwatch, and timer.
- Screen Recording: Tap to start recording the screen.
- Night Mode: Adjust the screentone as warmer at night or dim-lit environment for eye protection.
- Multi-screen Interaction: Project the screen to a TV or other outlets via the Wi-Fi Display.
Notification Bar
You can customize your notifications so you see only what is important to you. However, you would not see what's in the Notification Bar if the
screen is locked. Swipe down from the top to see recent notifications, then scroll up to see older notifications.
See Recent and Earlier Notifications
Tap to see the notifications.
Remind Me Later
Swipe left and tap and the notification will be pushed afterward.
Set the duration of what time you want to receive the notification.

text_image
19:30 Wed, Apr 18 Options: Alert, 24:00, May August 2:00 Notification Center 15 minutes 30 minutes 1 hour 2 hours Cancel Removed LidesRemove a Notification
Swipe it right. Or, swipe left and then tap to remove the notification.
You can also press ⓧ in the top right corner to clear all notifications.
Unimportant Notifications
Once you set a notification as unimportant, ColorOS 6.1 will classify it as an unimportant notification in the Notification Bar.
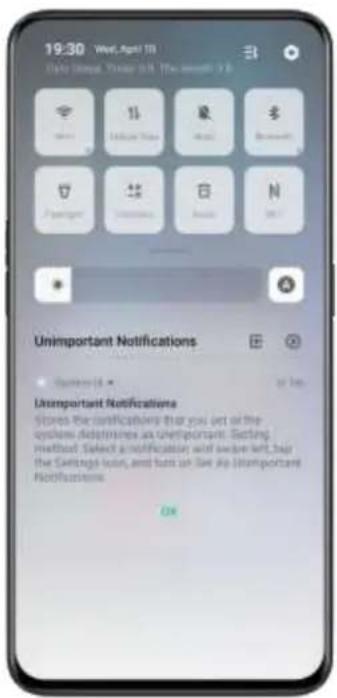
text_image
19:30 Wed, Apr 18 Data Summary, Status 0.5 The amount 2.6 Unimportant Notifications ● System 14 ▼ or less Unimportant Notifications Stores the certifications that you set of the systems disparities as unimportant. Setting method. Select a notification and save let, buy the Settings sets, and runs on live up (unimportant Notifications) OKSet Notification Preference
Swipe left to manage notifications. Tap to set preference for a particular notification, or manage a batch of notifications as following instructions:
Go to [Settings] > [Notification Bar and Status Bar] > [Manage Notification].
Customize notifications based on your preferences and daily usage habits. The customization includes the style of previews and type of notifications.
You can choose to:
• Show icons on the Home screen.
• Show icons on the Lockscreen.
- Turn on ringtones and vibrations.
● Show banners on the top of the screen when the phone is locked.
You may also set to allow some app notifications to show up even if your phone is in silent mode.
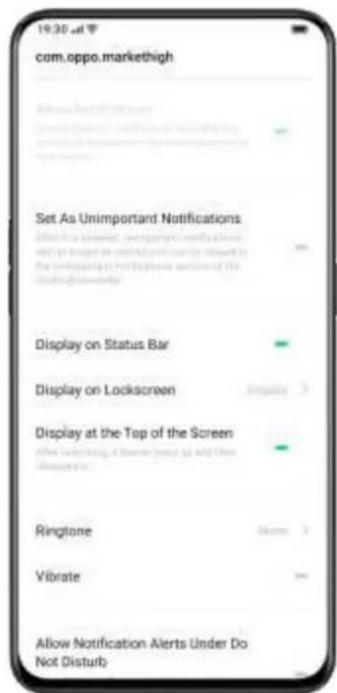
text_image
com.oppo.markethigh Set As Unimportant Notifications If you are surprised, they get your attention to the screen and do not want to wait your attention to the screen the corresponding screen version of the screen. Display on Status Bar Display on Lockscreen Display at the Top of the Screen When looking off from home or away from Windows Ringtone Vibrate Allow Notification Alerts Under Do Not DisturbStatus icons are displayed on the status bar to indicate time, carrier, wireless connectivity, and battery status.
You can acquire a visual presentation of the battery percentage and network speed after you prompt the switch.
Go to [Settings] > [Notification and Status Bar], and switch the sliders to green.
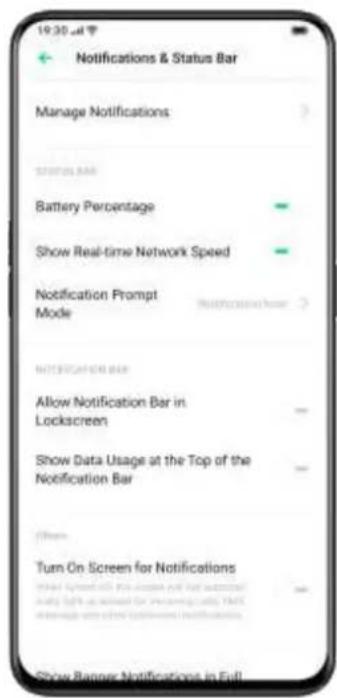
text_image
19:30 AM Notifications & Status Bar Manage Notifications Status Bar Battery Percentage Show Real-time Network Speed Notification Prompt Mode Notification Bar Allow Notification Bar in Lockscreen Show Data Usage at the Top of the Notification Bar Turn On Screen for Notifications Show Ranger Notifications in FullApp Shortcuts
ColorOS 6.1 introduces highly convenient maneuvers, as it allows icons to create simplified operations.
Turn on App Shortcuts Mode
Press and hold an app icon to generate icon [Quick Actions], which offers icons specific features within that app. When the menu appears,
Go to [Settings] > [Wallpapers and Lock-screens] > [App Shortcuts] > Switch the slider to green.
Create App Shortcuts
After enabling the App Shortcuts mode, press and hold the app icon to create an icon. Tap the icon you would like to use, then the app will open directly to that feature. For example, go to your Home screen and press and hold on the icon of Camera that lets you jump straight to Portrait Shooting, Beauty Selfie, Video Recording, or the App Info page.
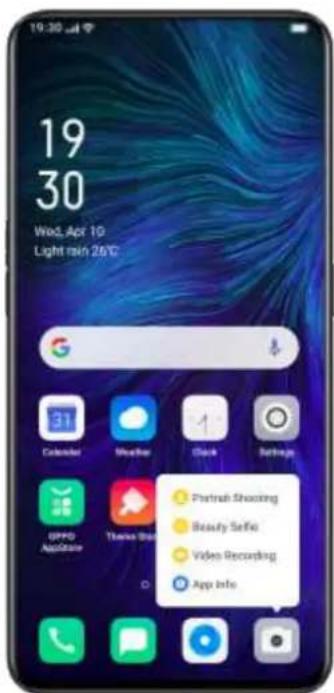
text_image
19 30 Wed, Apr 10 Light min 26°C 31 Calendar Weather Clock Settings GPPD AppStore Thanks Ship Portrait Shooting Beauty SetFix Video Recording App InfoKeyboards and Input Methods
Texts are important ingredients to record and exchange information.
With the help of useful keyboards, working efficiency will be enhanced while communicating with others.
Keyboards and Input Languages
Default Input Methods
Go to [Settings] > [Others] > [Keyboards and input languages] > Change the default input languages.
Security Keyboards
After checking [Turn on security keyboard when typing passcode], the security keyboard will be automatically switched on while you type passwords, in order to better protect the privacy and data safety.
Type with Keyboards
Tap on any text area to input texts with keyboards.
- Type Numbers
Tap the button at the bottom left corner of keyboard ^?123 > type numbers.
Customize Keyboard Settings
To personalize the keyboard settings, go to [Settings] > [Additional Settings] > [Keyboard and input methods] > [Available Keyboards] > Tap on the existing input methods and customize.
Type Emojis and Stickers
It might be a bit dull to merely type with texts. Tap the Emoji button atthe bottom of the keyboards, and try out something interesting such asEmojis and stickers (it has to be downloaded additionally) while typing.

text_image
19:30 am New Message Cancel Recipient: SMS Messages Search emoji ABC GIF >>Voice Typing
While it's a bit inconvenient for you to type texts, you can use the built-in microphone to input audio-generated texts instead of typing it.

text_image
New Message Recipient: Mail Messages Speak now Q W E R T Y U I O P A S D F G H J K L Z X C V B N M 7123 ,Autofill Service
You can download and install autofill apps from the App Store to help you remember what you've already filled in, and fill in the information automatically when you need it.
Go to [Settings] > [Additional Settings] > [Keyboard & InputMethod] > [Autofill Service].
OPPO Share
Use OPPO Share to send files wirelessly and effortlessly between OPPO devices. Mobile data will be no longer needed.
How to turn on OPPO Share:
- The receiver should open Control Center, and then turn on OPPO
Share

- Select the files to be shared and the device to share with, tap Send, then tap the detected OPPO phone.
- Tap Receive on the other device and start sharing.
Tips:
- OPPO Share requires that both the sender and receiver are OPPO phones.
- Make sure the sender and receiver are connecting to the same Wi-Fi network.
- OPPO Share will automatically switch off if there are no operations within 5 minutes.
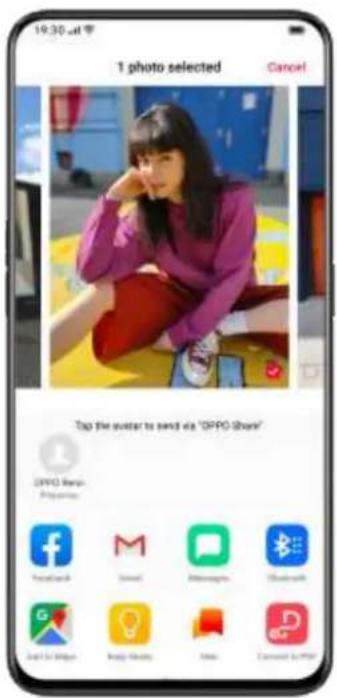
text_image
1 photo selected Cancel! Tap the outlet to send via "OPPO Store" OPPO Store Programms Facebook M Alibaba Shanghai G Image Slots Dai Cannan L.P.M.Search Settings, Data, and Files
You don't need to look through your phone in every single app to find a setting or file. OPPO allows users to optimize the powerful built-in searching engine by simply tapping a keyword.
You can search for relevant keywords to find:
- System Settings
-
Apps
-
Encyclopedia
- Dictionary
- Novel
- Tickets
- Sequence number for service
If you are unsatisfied with the result, tap [Search more in OPPO browser] to undergo more detailed searches.
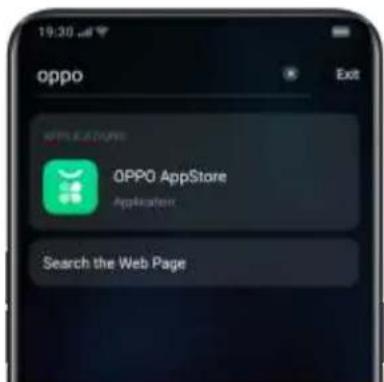
text_image
19:30 oppo Exit OPPO AppStore AppStore Search the Web PageTwo ways to configure searching:
- Swipe down the screen at any page to start searching
- Tap the search bar at [Breeno Quick-view]
Multi-Screen Interaction
Whenever you need to display your files on larger screens while watching TV at home or presenting with sliders or at the office, Multi-screen Interaction will get it done simple and precise.
Make sure to:
- Keep OPPO phone with other projectors under the same Wi-Fi network
- Open Microcast for projecting
- Go to [Settings] > [Other wireless network] > Turn on [Multi-screen Interaction] > Search targeted devices and connect
Accessibility
Accessibility is aimed to optimize user experience for visually impaired users.
Go to [Settings] > [Additional Settings] > [Accessibility].
TalkBack
When TalkBack in on, it provides spoken feedback so that you can use your device without looking at the screen. This can be helpful for people who are blind or have low vision.
Turn on TalkBack
Go to [Settings] > [Additional Settings] > [Accessibility] > [TalkBack].
TalkBack Settings
Go to [Settings] > [Additional Settings] > [Accessibility] > [TalkBack] > [Settings].
You can set Speech, Other feedback, Navigation and Miscellaneous according to your needs.
To Navigate Using TalkBack
- Swipe right or left to move between items.
- Double-tap to activate an item.
- Drag two fingers to scroll.
To Turn off TalkBack
- Tap the switch. You will see a green outline. Double tap the switch.
- On the confirmation message, tap [OK]. Then double-tap OK.
Accessibility Menu
The accessibility menu provides a large on-screen menu to control your phone. You can control gestures, hardware buttons, navigation, and more.
Turn on Accessibility Menu
Go to [Settings] > [Additional Settings] > [Accessibility] > [Accessibility Menu].
Tap the Accessibility button on the bottom of your screen to use this feature.
Turn off Accessibility Menu
Go to [Settings] > [Additional Settings] > [Accessibility] > [Accessibility Menu].
Note: Press and hold the Accessibility button on the bottom of your screen to switch between Accessibility Menu and Select to Speak.
Select to Speak
When Select to Speak is on, you can tap specific items on your screen to hear them read aloud.
Turn on Select to Speak
Go to [Settings] > [Additional Settings] > [Accessibility] > [Select to Speak].
Tap the Accessibility button on the bottom of your screen to use this feature.
Select to Speak Settings
Go to [Settings] > [Additional Settings] > [Accessibility] > [Select to Speak] > [Settings].
You can set Read in the background or Read the text on images according to your needs.
Use Select to Speak
First, tap the icon. Then you can:
- Tap a specific item, like text or an image
- Drag your finger across the screen to select multiple items
- Tap the play button to hear everything on the screen
- Select text that appears inside the Camera view
Turn off Select to Speak
Go to [Settings] > [Additional Settings] > [Accessibility] > [Select to Speak].
Note: Press and hold the Accessibility button on the bottom of your screen to switch between Accessibility Menu and Select to Speak.
Switch Access
Switch Access lets people with motor impairments control phones and tablets using one or more switches. Use switches to select items, scroll, enter text, and more.
Turn on Switch Access
Go to [Settings] > [Additional Settings] > [Accessibility] > [Switch Access].
Switch Access Settings
Go to [Settings] > [Additional Settings] > [Accessibility] > [Switch Access] > [Settings].
You can set Assign switches, Customize scanning, Display & sound, Switch accommodation and more according to your needs.
Turn off Access Settings
Go to [Settings] > [Additional Settings] > [Accessibility] > [Switch Access].
Customize Settings
You can set [Tap When the Pointer Stops Moving], [Press Power Button to End Call] and [Touch & Hold Delay] according to your user habits.
Go to [Settings] > [Additional Settings] > [Accessibility].
Text-to-Speech (TTS) Output
You can customize TTS Output.
Go to [Settings] > [Additional Settings] > [Accessibility] > [Text-to-Speech (TTS) Out].
Tap on the right side of [Preferred Engine], you can select and install voice data.
You can also customize language, speech rate and pitch according to your habits.
Accessibility Shortcuts
When Accessibility Shortcuts is on, hold down both volumes buttons for 3 seconds to turn on accessibility function. You can choose shortcut services and turn on/off [Available Even When the Screen Is Locked].
Go to [Settings] > [Additional Settings] > [Accessibility] > [Accessibility Shortcuts].
Subtitles
You can adjust subtitles on the screen to enhance the watching experience.
Go to [Settings] > [Additional Settings] > [Accessibility] > [Subtitles].
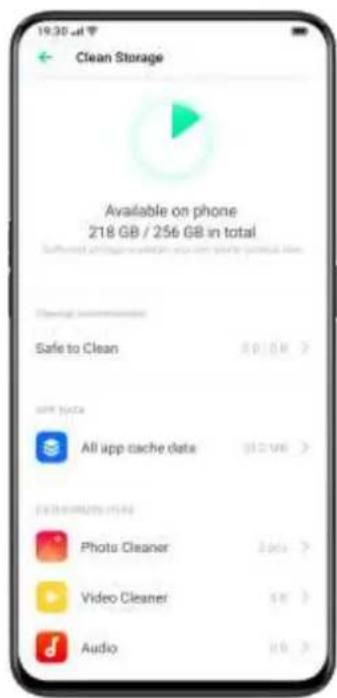
Cleaning the storage when there is less abundant space for storage to download apps and restore photos. While Clean Storage will help you detect and remove unnecessary files, cookie, and cache files to free up more storage.
Check Storage
Go to [Settings] > [Others] > [Storage], and you will see the followings:
• Overall storage availability
- Storage used
- Storage left

text_image
Storage Capacity Used Available Clean Storage Photos Google UC Browser Paytm WPS Office Photos Hello 200 GB (81.4MB) 200 GB (201 GB) 5.76 GB 518 GB 3.8 GB > 193 GB > 118.5MB > 671 MB > 114 MB > 100 MB > 97.4 MB > 75.9 MB >One-tap Cleanup
ColorOS 6.1 will help identify useless or unimportant files if you want to clean up storage. Tap [Clean storage] > [One-tap Cleanup], and the phone will automatically clean the files. Fast and steady.
Delete App Data
ColorOS 6.1 also offer specialized cleanup service for some frequently used apps.
Categorized Cleanup
You can also clean storage and accelerate the system based on different categories of files and data.
- Photo cleanup
You can easily delete photos that may either be less visually aesthetic or repetitive. ColorOS 6.1 assists you while cleaning up photos as it has already automatically screened them out into the categories such as screenshots, recently deletes, similar, burst shooting, blurred shots, and edited photos.
If you delete photos under the above categories, more space will be released. This action cannot be undone.
- Video cleanup
You could delete unnecessary videos or video clips after viewing them.
Select the video files that you intend to remove.
• Audio and documents cleanup
After ColorOS 6.1 filters audio and documents, you can choose which to remove according to the size and type of audio and documents.
text_image
Clean Storage Available on phone 218 GB / 256 GB in total Safe to Clean All app cache data Photo Cleaner Video Cleaner AudioIf you have switched to a new OPPO phone, you can transfer your data from the old phone to your new OPPO phone. It is advised that you are supposed to maintain phone backup on a regular basis. There are two ways to do it.
Use OPPO Cloud
Go to [Settings] > Tap [Sign in to OPPO ID] at the top of the screen > Enter OPPO ID and password.
If you have not created an OPPO ID yet, Tap [Register] at the bottom right corner to finish registration with the mobile phone or email address.
After you log into your OPPO ID, go to [OPPO Cloud] > [OPPO Cloud Backup] > [Backing up], and you are able to transfer following data and files to the cloud, including:
- Messages
- Phone records
- System settings

text_image
19:30 Jul 20 OPPO Cloud Backup OPPO Cloud Backup Back Up NowManual Syncing
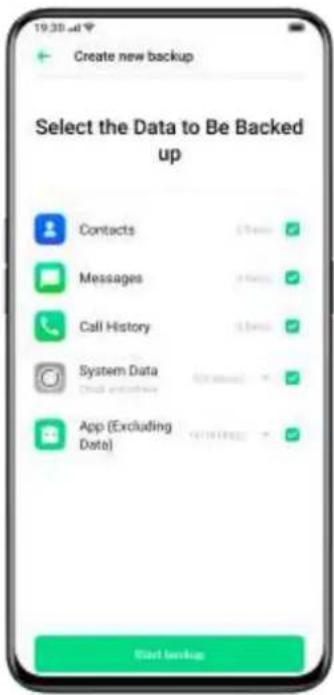
Sync to the Phone
Go to [Settings] > [Additional Settings] > [Back up and Reset] > Tap on [Start New Backup], then select data you want to sync.
- Contacts
- Messages
- Phone call records
- System data
- Applications
After Taping on [Start Backing up], the data selected will be synced and restored in your phone inside a file path named [Backup]. Syncing will take some time. Don't disconnect your phone during the copy backup
process and avoid restarting or turning off the phone, in case of loss of data.
text_image
19:30 am Create new backup Select the Data to Be Backed up Contacts Messages Call History System Data App (Excluding Data) Read backupIt is noted that all the local backup data will be cleared if you erase or reboot all the settings. Therefore, it is wise to copy or restore files and data before rebooting or upgrading the system.
Restore Data on Your Computer
Use USB cable to connect your phone to a computer. Follow the onscreen instruction and choose [Transfer Files]. Open [Sharing Storage] at the computer, and then select the [Backup] folder and copy it to the computer. Then the backup is transferred to your computer.
Charge the Battery
You can view the
percentage of battery remaining in the status bar at the top right corner of the phone. Charge your battery when your phone is low on power using the Type C USB cable and USB power adapter. Charge the battery. Connect your phone to a standard power outlet or a portable charger.

text_image
19 30 Changing CTC 60% +80%If the proportion of battery is too low, it is likely that you won't be able to turn on you phone. You should charge the battery to continue using your phone.
Restart or Turn Off Your Phone
If something isn't working right, try to restart your phone.
To restart the phone, you can:
- Press and hold the Sleep/Wake button for more than 3 seconds, and then drag the white-colored power icon up to restart or.
- Press and hold the Power Button and volume-up button at the same time for more than 10 seconds.
To turn off the phone, Press and hold the Power Button for more than 3 seconds, and then drag the white-colored button downwards.
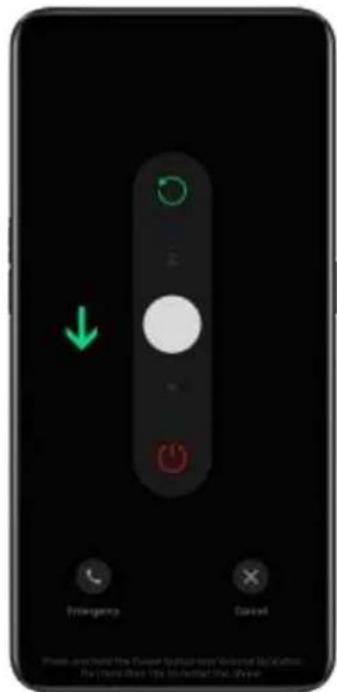
text_image
Emergency Correct Please need to hold the power button copy or print by October. Buy home else it is installed this drive!Privacy and Security
Manage the Information and Permissions
Personal Information Protection
When an app reads personal information such as phone call history and contacts, the system will shield the authentic information to avoid information leakage.
Go to [Settings] > [Security] > [Personal Information Protection].
You can enable [Smart Protection Turn-on] to allow the system to determine on its own whether to turn on protection for new apps. You can also choose to turn on [Protect Call History], [Protect Contacts], [Protect Messages] and [Protect Events] by yourself.
Manage App Permissions
Enable [APP Permissions] to manage and set the permissions of each app, such as locating, dialing, acquiring calling history and more.
Go to [Settings] > [Security] > [APP Permissions].
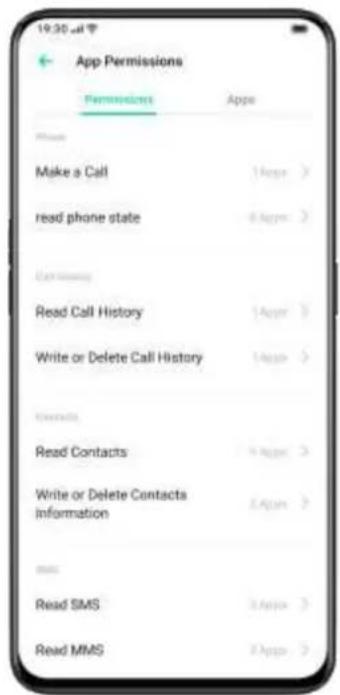
text_image
19:30 am App Permissions Permissions Apps Make a Call read phone state Read Call History Write or Delete Call History Read Contacts Write or Delete Contacts information Read SMS Read MMS
text_image
19:30 am App Permissions Permissions Apps Amazon Shopping Dailyhunt Drive Oue Facebook Google News Google Play Movies & TV Google Play Music Hello LensYou could customize the permissions that allow some apps for particular functions, such as dialing, acquiring contacts and messages, using a camera. You can also set permissions for a single app.
Similarly, you can set the following permissions:
- Calls
- Contacts
- SMS
- Device
- Privacy
- System
- Others
Permissions Grant
Go to [Settings] > [Security] > [App Permissions].
Select the permissions or apps that need to be modified. Switch
between the options such as [Allow], [Ban] and [Inquiry].
Emergency SOS
ColorOS 6.1 cares about users' personal security. [Emergency SOS] is a feature that is aimed to help you make emergency calls and send SOS messages more conveniently.
Turn On Emergency SOS:
Go to [Settings] > [Security] > [Emergency SOS].
After reading the terms and conditions carefully, tap [Agree].
Emergency Numbers:
Go to [Settings] > [Security] > [Emergency SOS] > [Emergency
Numbers] > [Add Emergency Contact].
Police, Fire Police, and Ambulance are the 3 default emergency contacts set by the phone system. You can add up to 3 emergency contact numbers and send SOS messages with locations, pictures, and audio recordings.

text_image
Emergency SOS Make SOS emergency calls to post using the Power System Power System correctly Emergency Numbers Auto Dial the Default Number NOVA - Eddcing an Emergency call for the Power System (or other) without a default condition and setting its connection Sound Alert Before Dialing Send SOS Message With an OFF/AR emergency call, you can need in MY ENGLISH STARTOUT as a communication tool screen plus open by optionsInitiate an SOS Emergency Call
- Press the Power Button 5 times in succession to initiate an SOS emergency call.
- Turn on [Auto Dial the Default Number] by pressing the Power button. An emergency call will be automatically dialed after a 3-second countdown.
Send SOS Message
When you enable [Send SOS Message], you can choose to send an SOS message to the emergency contact that indicates your current location, includes pictures of surroundings or a 5-second audio recording.
Privacy Password
A privacy password is used to protect your personal privacy. When Privacy Password is on, the passcode will be used for verification in App Encryption.
Set Privacy Passcode
- Go to [Settings] > [Fingerprint, Face & Password].
- Tap [Privacy Password] and Tap [Turn on Privacy Password].
- You can choose a pattern password, 4-bit, 6-bit, 4-16 bit digital password, or 4-16 bit alphanumeric password combination.
- After finishing responding to security questions, tap [Done] in the top right corner.
- You can also bind a security email address and your OPPO ID.
Modify Privacy Password
Go to [Settings] > [Fingerprint, Face & Password] > [Privacy Password].
Tap [Modify Privacy Password], enter the original password, and then set up a new password.
Reset Privacy Passcode
- If you forget your privacy password, you can reset it in three ways: answering security questions, entering verification code through the bound security email, and logging into your OPPO account.
Tap [Forgot Password] to reset the passcode:
- Security Question: Answer the security question.
- Security Email: Enter the bound email address to receive verification code.
- OPPO ID: Log into the associated OPPO account with your OPPO ID.
Turn off Privacy Passcode
Go to [Settings] > [Fingerprint, Face & Password] > [Privacy Password]. Tap [Turn off Privacy Password], tap [Turn Off] and enter the original password.
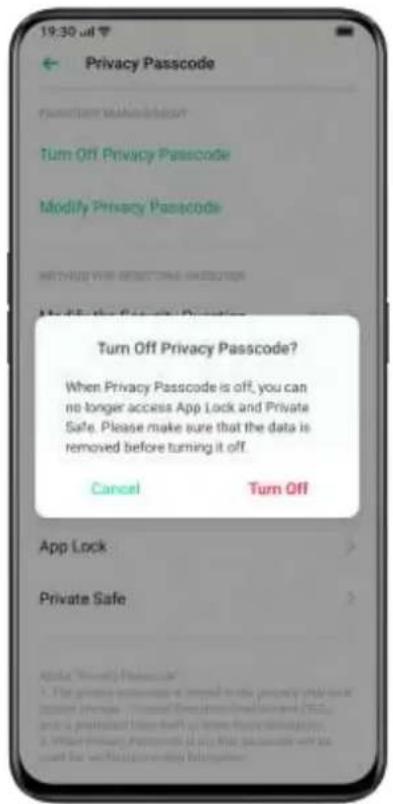
text_image
19:30 u4 Privacy Passcode Turn Off Privacy Passcode Modify Privacy Passcode Turn Off Privacy Passcode? When Privacy Passcode is off, you can no longer access App Lock and Private Safe. Please make sure that the data is removed before turning it off. Cancel Turn Off App Lock Private Safe Apple "Privacy Passcode" 1. The software version is required to use privacy password based on the Open-Open dialog. If you are your own system (e.g., or any other system), then you will access your own system (e.g., or any other system). If you are your own system (e.g., or any other system), then you will access your own system (e.g., or any other system). If you are your own system (e.g., or any other system), then you will access your own system (e.g., or any other system). If you are your own system (e.g., or any other system), then you will access your own system (e.g., or any other system). If you are your own system(If you are your own system) then you will access your own system(If you are your own system) App Store App Store App Store App Store App Store App Store App Store App Store App Store App Store App Store App Store App Store App Store App Store App Store App Store App Store App Store App Store App Store App Store App Store App Store App Store App Store App Store App Store App Store App Store App Store App Store App Store App Store All Users AvailableApp Encryption
You should set a privacy passcode before you use [App Lock].
Turn on App Encryption
- Go to [Settings] > [Security] > [App Encryption].
- Enter the privacy passcode.
- Select the apps that you want to be encrypted, and tap [Enable Encryption].
Access Encrypted Apps
- Access with a private password
If an app is encrypted, enter the correct privacy password to access the app.
- Fingerprint and facial recognition
You can also use fingerprint and facial recognition to open encrypted apps.
Go to [Settings] > [Security] > [App Encryption].
After entering the privacy passcode, Tap to enter the [App Lock Settings], enable [Use Fingerprint for App Lock] or [Use Face for App Lock].
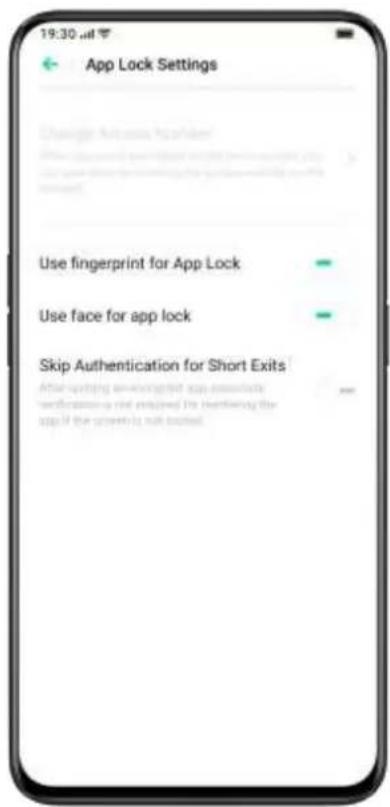
text_image
19:30 App Lock Settings Use fingerprint for App Lock Use face for app lock Skip Authentication for Short ExitsTurn off App Encryption
- Go to [Settings] > [Security] > [App Encryption].
- Enter the privacy passcode.
- Tap the app with and turn off [Enable Password Verification].
Hide Home Screen Icons
- Go to [Settings] > [Security] > [App Encryption] and enter your privacy password.
- Select the app icons that you want to hide in the Home screen, turn on [Enable Password Verification], then turn on [Hide Home screen Icons].
When an app icon is hidden, you can view the app by entering the access number on the touchpad. This does not require verifying the encryption passcode.
Access-Hidden Apps
Enter the access number on the touchpad to open the app. The access numbers begin with [#] and end with [#] which also contains 1-16 digits, such as # 0000 #.
Payment Protection
ColorOS 6.1 provides you with a secure payment environment that ensures a safe environment for online payment.
When you use mobile payment, the system will automatically detect the current payment environment.
Payment environment checking includes:
- System Security Check
- Verification Code Security Check
- App Security Check
Go to [Settings] > [Security] > [Payment Protection]. Select the apps to be protected.
Anti-Harassment/Fraud
ColorOS 6.1 protects users from phishing calls and messages by automatically blocking messages from the pseudo base and intercepting-suspicious calls.
Call Blocking
Go to [Settings] > [Secure] > [Anti-harassment/Fraud] > [Call Blocking]
or Go to ▶Tap [...] in the upper right corner > [Anti-
Harassment] > Enable [Call Blocking].
You can set call blocking rules by yourself:
- Block All Incoming Calls: You won't receive calls anymore unless there are calls from VIP contacts or white-listed numbers.
- Block Numbers that Begin with Specific Digits.
-
Block Unknown Incoming Calls: Please be aware that when you turn this function on, you might miss some important phone calls.
-
Block Unknown Numbers by Location-based Attribution: You can block numbers from specific locations.
- Block One-ring Incoming Calls and No-number Calls: This is for unknown numbers only.
Block Messages
Go to [Settings] > [Security] > [Anti-harassment/Fraud] > [Block Messages].
You can set the message blocking rules on your own.
Keywords for Spams
Messages from unknown numbers containing particular keywords that you have set will be recognized as spams.
Block Messages from All Unknown Numbers
All messages from unknown numbers that are not in your contact list will be blocked.
Blacklist
You will not receive any phone calls or messages from blacklisted numbers.
Add Blacklists
Go to [Settings] > [Security] > [Anti-harassment/Fraud] > [Blacklist].
You can enter numbers manually or select numbers from contacts.
Whitelist
Calls and messages from whitelisted numbers will not be blocked.
Add Whitelist
Go to [Settings] > [Security] > [Anti-harassment/Fraud] > [Whitelist].
You can enter number manually or select number from contacts.
Kid Space
In [Kid Space], you can:
- Customize usage duration that the kid is allowed to use the phone for each time
- Set apps that the kid is allowed to access
- Turn off Cellular Network
Enter Kid Space
Go to [Setting] > [Security] > [Kid Space].
After completing the customization in [Settings], tap [Enter Kid Space].
With Kid Space mode, users are only allowed to use the apps in the list of [Apps allowed to be accessed]. Every time when the preset time is up, the mobile will be locked automatically. A passcode is then needed to unlock the phone.
Quit Kid Space
In Kid Space mode, tap [Quit Kid Space] on the bottom of the screen, and verify your identity to quit Kid Space.
Private Safe
Private Safe conceals photos, audio, documents, and other files. You can choose the files that you want to hide. Passcode, fingerprint or face are needed to access to files in Private Safe. You are unable to take screenshots after entering Private Safe.
Add Files
You can add files in the following ways.
Private Safe
Go to [Settings] > [Security] > [Private Safe]. Verify the password, and select the files to be encrypted.
Encrypted File
Open [File Manager], press and hold the files to be encrypted, and tap [Set as Private] from [More] in the toolbar below.
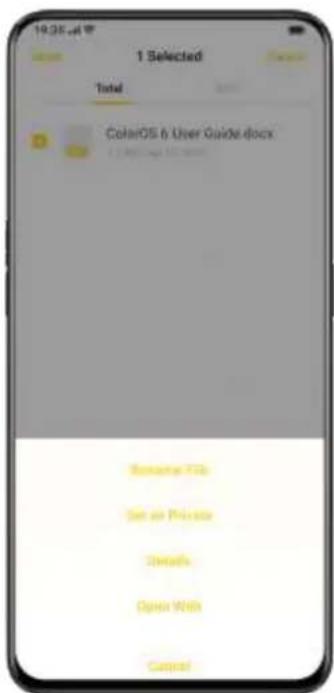
text_image
1 Selected Total ColorOS & User Guide.docx Save As Files Set as Private Details Open Web CancelEncrypted Photos
Open [Photos], press and hold the photos to be encrypted, and tap [Set as Private] from [More] in the toolbar below.
Access to Private Files
- Go to [Settings] > [Security] > [Private Safe] or access [Private Safe] via desktop shortcut.
- The encrypted files can be viewed after you verify with lock screen password, fingerprint or facial recognition.
Add Private Safe to Desktop
- Go to [Settings] > [Security] > [Private Safe] and verify the password.
- Tap on the upper right corner to turn on [Home Screen Shortcut]. You can access to [Private Safe] after creating a home screen shortcut.
Tools & Applications
Application Basis
Download and Install Apps
You can download and install different kinds of apps based on your needs and preferences to extend features of ColorOS 6.1 and enhance user experience.
- Tap "OPPO AppStore" on the Home screen.
- Search and select the app that you want to download, and tap [Install].
- After the app has been installed, tap [Open] in the app store or tap the app from the Home screen to open the app.
App Details
Select the app that you want to download and go to the introduction page to view more details, reviews, and recommendations of the app.

text_image
19:30 ad Facebook 4.8 42.2M 275.4M downloads Details Review Recommended Facebook Sand-Carrado Share Updates Social Share Photo Community Keeping up with friends is faster and easier than ever. Share updates and photos, engage with friends... Ratings & Comments OpenSwitch between Different Apps
You can quickly switch to different apps and multitask with the help of applications run in the backstage.
- Swipe from the bottom of the screen to activate the multitasking interface.
- Browse all the apps in the interface and swipe left or right to switch the app.
- Tap [X] to close all the apps in operation.

text_image
OPPO AppStore Facebook 6:30 - 15:00 - 2 PMI Help Review Recommendation Helping up with friends is faster and more than ever When updates and photos, engage with friends. About & Comments 3 ApplyMove and Organize Apps
How to deal with apps that appear on the Home screen? You can organize and arrange them as needed.
Move Apps
Apps on the Home screen can be moved as you wish.
- Long press the app.
- Drag and drop the app to the desired page and location. Swipe either left or right to jump to another page.
- Move with the dock. The number of dots above the dock shows the number of home screens.
- Move multiple apps at the same time: Long press the blank area of the home screen to enter the editing mode. A selection box will appear at the top right of the app. Check the apps and move simultaneously.
Create Folders
Organize your apps by piling them into folders to make the Home screen seem tidier. It can be also easier to find apps.

text_image
Tools Calculator Recorder Camera Calculator Phone Phone One Tag Lockups Keep Notes Tools Tools' Fools 1123- Create a folder by moving one app icon atop another.
- Move the apps that you want to classify into the folders. One folder can include more than one page.
- To name a folder, tap the name bar to rename, then tap elsewhere outside the name bar to save the folder name.
- Delete the folder to move all apps out of the folder.
Delete Apps
You can remove unwanted apps at any time.
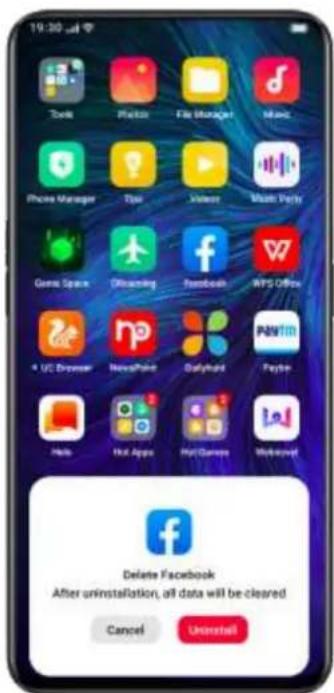
text_image
19:30 Tools Playbox File Manager Music Phone Manager Tie Video Music Peru Gears Spanx Outstanding Facebook WPS Office * UC Browser NewPage Dalyhead Peyto Help Hot Apps Hot Games Workdaynet Delete Facebook After uninstallation, all data will be cleared Cancel Uninstall- Press and hold the app until a white box shows up, and then tap [Uninstall].
- A confirmation box will appear for you to ensure that you are going to uninstall the app. Tap [Uninstall] again to uninstall the app with all related data cleaned up.
Clock
Alarm Clock
If you need the phone to ring or vibrate at a particular time, you can set an alarm clock in the [Clock] app.
Create an Alarm Clock
- Open [Clock] and tap [Alarm] at the top of the interface.
- Tap at the upper right corner to add an alarm.
- Set a time for the alarm and its label.
- Tap [Repeat] to set on what days in a week the alarm will ring.
- You can set different ringtones for the alarm.
- If you turn on [Snooze], the alarm will ring for the second time 5 minutes after you press the Power Button or turn off the clock, or the alarm rings continuously without being turned off.
- Tap [Save] after you complete the setting.
Edit or Delete an Alarm
- To edit the alarm, tap the corresponding alarm in the alarm list.
- The switch button at the right side of an alarm can be used to enable/disable an alarm.
- To delete an alarm, tap [Edit] at the upper left corner or long-press the corresponding alarm, select the alarm and confirm the deletion.
Workdays Alarm
When [Workdays] mode is on, the alarm will automatically skip weekends and official holidays.
Turn on Workdays Alarm
Go to [Clock] > Tap [+] to add a new alarm > Set the label, time, ringtone, vibration and more > Enable [Workdays].
Or
Go to [Clock] > Tap [+] to add a new alarm > Set the label, time, ringtone, vibration and more > Tap [Repeat] to enter [Special Date Settings] > Enable [Skip Holidays].
Set Vibration of a Specific Alarm
The vibration of a specific alarm will not be influenced by the vibration mode of your phone.
Turn on Alarm Vibration
Go to [Clock] > Tap 「+」 to add a new alarm > Set the label, time, ringtone, vibration and more > Turn on/off [Vibrate].
World Clock
Use the [Clock] to view the local time in different time zones.
Time Display Setting
- The 24-hour and 12-hour system
-
Open the [Clock] app.
-
Tap on the upper right corner to enter the setting page.
-
The phone clock will be displayed by default in the 24-four format. If the 24-hour format is turned off, it will be then displayed in the 12-hour format.
- Automatically Set Date & Time
-
Open [Clock].
-
Tap on the upper right corner to enter settings.
-
Turn on [Automatically Set Date & Time], and the phone will automatically calibrate the time when it is connected to the network.
- Time and Time Zone
- Open [Clock].
- Tap on the upper right corner to enter settings.
- After turning off [Automatically Set Date & Time], you can change the time zone and time by yourself.
Add Time Zone Clock
- Open [Clock].
- Tap ^+ on the upper right corner to search different cities, countries or municipalities.
- Tap to add the local time of that location to the Clock.
- To delete the local time, tap [Edit] at the upper left corner or long-press the corresponding clock and tap [Delete].
- To add the world clock to your desktop: Long press the home screen, tap [Add Widgets] and drag the world clock to the home screen.

text_image
19 30 Wed, Apr 10 Delin 12:00 Clock 3:12 Walt Pack Added 19 35 Cash AddedSet Dual Clock
- How to open Dual Clock
Open [Clock] and tap on the upper right corner to enter settings.
-
Tap to turn on [Dual Clock].
-
After turning on the [Dual Clock], the lock screen or clock widget will display the time in two different time zones when you are away from the place of residence.
- Place of Residence
-
Enter [Clock] and tap at the upper right corner to enter settings.
-
Tap [Place of Residence] to select the city of residence after authorizing the weather function to access to a network.
- Where to find Dual Clock?
- Enter [Clock] and tap settings.
at the upper right corner to enter
- Tap [Display Dual Clock in the Following Locations] to choose whether to enable the lock screen and the clock widget to display Dual Clock.
Stopwatch
Use Stopwatch
- Open [Stopwatch]. Tap [Start] to start counting seconds. Even if you open other apps at the same time, the stopwatch will continue working.
- To record laps or split time, tap [Lap].
- Tap [Stop] after recording, and tap [Reset] to clear records.

text_image
19:30 am Scan Local Songs Done Scanned: 3 song(s) 100% Skip Songs Under 60 Secs - Skip Songs Smaller than 100 KB - Scan Specified Folders Scan AgainTimer
Use Timer in the Clock app to set a countdown for multiple events, making it easier to better manage the time.
Set Timer
-
After setting the countdown time, tap [Start].
-
You can pause the countdown by tapping [Pause], and exit the countdown by tapping [Cancel].
Preset Common Items
- System default
There are three preset timing items in the system, including Brush Teeth, Face Mask, and Steam Eggs. Select the timing item and tap to start the countdown.
- Personalized preset
You can also set up a personalized countdown item as needed. To add a timer, tap below it.
For example, set a timer labeled [Study] with a [20 minutes] countdown, and tap [Save].
You can delete unwanted timers by tapping [Edit] at the top left corner and tapping at the upper right corner of the personalized timer.
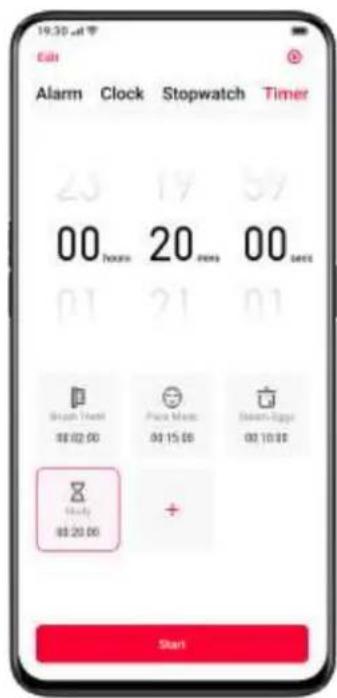
text_image
19:30 AM Edit Alarm Clock Stopwatch Timer 20 19 57 00 hours 20 news 00 secs 01 21 01 Sleep Time $8.02.00 Price Note $0.15.00 Sleep Egress $0.10.00 Sleep $0.20.00 + StartWeather
Get real-time weather information for different cities.
Authorization to Acquire Location Information
The screen shows you local weather information when the Location Info is acquired.
- Go to [Settings] > [Security] > [Permissions] > [App].
- Find [Weather] and tap [Allow].
View Current Weather and Weather Forecast
View current weather and weather forecast for your current location or the other cities.
- View Current Weather: Open [Weather], the screen will show the local weather.
- View Hourly Weather: Pull down the screen, swipe left or right to view the hourly weather during the day.
- View Weather Details: Pull down to the bottom to view air quality, visibility, UV, humidity, and more.
- Weather Forecast: Tap [15-Day Forecast] and go to the [China Weather] page to see more weather information.

text_image
Delhi 30°C Sunny Air Quality Severe Today Fri 30°C / 44°C 16 27 38 49 50 Sunny Cloudy Cloudy Cloudy Cloudy 10°C 24°C 32°C 12°C 54°CView Weather in Multi-Cities
View weather in multiple cities to better manage your trip.
- Go to the [Weather] app, Tap on the building icon at the top right corner, and choose [City Management].
- Tap + at the top right corner, enter the name of a city, and enter the page of city weather.
- Swipe left to right to switch cities and view weather information for different cities.
- Delete a city: Go to [City Management] > [Edit], select a city, and then tap [Delete].
Calculator
In [Calculator], you can add, subtract, multiply, and divide. You can also do math in exponential functions, logarithmic functions, trigonometric functions, etc., as well as online exchange rate, length, area, volume, speed, weight, temperature, power, pressure, and other unit conversions.
Numeric Calculation
Basic Calculation
- In [Calculator], you can perform basic calculations such as addition, subtraction, multiplication, and division.
- Tap (C) to clear the numbers in the current display.
- Slide the keypad down to see history records of calculation.
Scientific Calculation
Rotate the phone to the landscape to enter the scientific calculator mode.
Online Exchange Rate Conversion
In [Exchange Rate], you can easily convert between different currencies.
The online exchange rate conversion apply the latest data from Webull.
Press and hold the calculation result to copy it to the clipboard.
More Unit Conversion
Tap [More] to make unit conversions such as length, area, volume, speed, weight, temperature, power, and pressure.
Compass
Use [Compass] to navigate, display direction, and check latitude and longitude.
Allow Compass to Access to Location
Allow the "Compass" to have access to location information.
- Go to [Settings] > [Security] > [Permissions] > [App].
- You can choose [Allow] or [Ask] to share location information.
Calibrate Compass
Calibrate "Compass" before you use it for the first time. Swing your phone while you stay away from the interference sources to calibrate the compass.

text_image
19:30 μd Compass Calibration Move away from any sources of interference and then perform the operations illustrated in the above picture to re-calibrate the compassView the Direction of Where Your Phone is Pointing at
Use [Compass] to help you navigate the direction.
- Place the phone horizontally to have access to longitude and direction.
- View direction: The lower area around the compass will indicate the direction where the phone is pointing at.
- View latitude and longitude: The bottom of the screen will indicate the latitude and longitude of your current location.

text_image
19:30 μd North East South 30° Northeast 23°67' 113°19'6'Phone Calls
Make a Call
Making a call by selecting a number in your contacts, or tapping one of your favorites or recent calls.
Dial Manually
- Enter the number in the keypad, then tap.
- Tap to delete the back key icon to remove the wrong number.
- Tap the input field above the keypad, tap [Paste] to paste a number to the keyboard, then tap to make a call.
- If your phone has dual SIM cards, tap the dial icon to make a call in the selected number.
Make a Call to Your Contacts
Add someone in your Contacts, make a call by searching the name from Contacts.
- Open [Call] > Go to [Contacts].
- Tap [Name Card] in the Contact.
- Select the number that you want to dial in the Name Card and tap
- In the dual SIM mode, select the SIM card to make a call, then tap
Call Back
The phone keeps the recent calls, tap the number to call back directly.
-
Open [Call] > [Phone] to view recent calls, tap the number to call back.
-
Tap ⓘ after a number to view the detailed information about the call.
Favorites
You can mark contacts as favorites, so you could make a call within a single tap.
Add Favorites
To add someone to your Favorites. Open [Call] > [Favorites], tap in the upper right corner, then you can add names to Favorites from the Contacts.
Remove Favorites
Open [Call] > [Favorites], tap [Edit] in the upper right corner, and enter [Removal of Favorites].
Select contacts and tap [Remove].
Make Emergency Call
In case of any emergency, you can call for instant rescue in [Emergency Call] or [Emergency SOS].
Emergency Call
You can make an emergency call even if the screen is locked.
- Tap [Emergency Call] in the lower-left corner to enter the passcode interface.
- Type the emergency contact to make an instant call.
Emergency SOS
[Emergency SOS] is a feature aiming to help you make emergency calls and send SOS messages more conveniently.
Turn On Emergency SOS:
- Go to [Settings] > [Security] > [Emergency SOS]. After you have read the terms and conditions carefully, tap [Agree].
- Turn on [Press the Power Button Repeatedly for Emergency Call], you can press the Power Button for 5 times in succession to make an SOS emergency call.
Emergency Numbers:
- Go to [Settings] > [Security] > [Emergency SOS] > [Emergency Numbers].
- Tap [Add Emergency Contact], select numbers from [Calls], [Groups], [Contacts], then tap [Add].
Change [Emergency SOS] Settings:
- Auto Dial the Default Number: If auto-dialing is enabled, a 3-second countdown would start the time you make an emergency call after pressing the Power button.
- Send SOS Message: You can choose to send pictures of surroundings or send a 5-second audio recording of the surroundings to the emergency contact.
Manage Incoming Calls
You can answer, mute, reject the incoming calls, or simply respond with text messages.
Answer Calls
You can answer the call manually or automatically.
- Tap or slide up when the phone is locked.
- You can choose to answer automatically when the phone is connected to a headset or Bluetooth.
- Go to [Settings] > [System Apps] > [Call] > [Automatic Answer]. Select how long the phone call defers to be picked up when the Automatic Answer is enabled.
Mute Calls
If you do not want to be disturbed by incoming calls, you can mute all phone calls.
- Tap [Mute] when a phone call rings.
- Press the [Lower Volume] on the left side of the phone to mute the phone calls.
- In the mute mode, you can still answer the call while you have not rejected the call.
Reject Calls
You can reject an unwanted call.
- When the phone is unlocked, Tap to reject the call.
- When the phone is locked, slide up to reject the call.
- If voice mail is enabled, the caller can leave a voice message once the call is denied.
Block Calls
If you do not want to answer the calls from specific phone numbers, you can block the calls.
- Enter [Call], go to [Phone] > [Contacts] > [Favorites], tap ⓘ and Tap [Add to Blacklist] to block the number.
- You will not receive any calls or messages from the number once it has been blacklisted.
- Call-blocking rules: Go to [Setting] > [System Apps] > [Call] > [Block] > [Call Blocking]. You can set rules to block calls. For example, you can block all unknown incoming calls or block one-ring incoming calls, etc.
Respond with SMS
You can reply with SMS if you reject a call.
- Go to [Settings] > [System Apps] > [Call] > [Respond with SMS].
- You can quickly respond to the incoming calls with a default text message. You could also customize the texts on your own.
- When your phone rings, tap [Message], and select a default response or Tap [Customize] to write a text message by yourself.
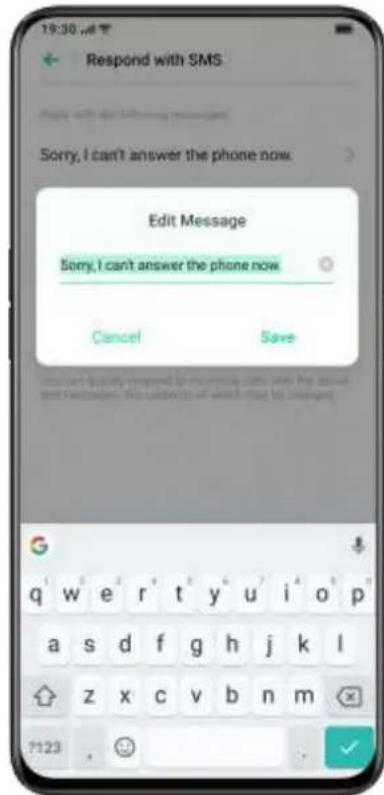
text_image
19:30 Respond with SMS Sorry, I can't answer the phone now. Edit Message Sorry, I can't answer the phone now Cancel Save q w e r t y u i o p a s d f g h j k l z x c v b n m 7123Call Forwarding
When you are unable to answer the call, you can transfer to another number.
- Go to [Settings] > [System Apps] > [Call] > [Carrier Call Settings] > [Call Forwarding].
- Select a call forwarding condition such as [When busy], [When unanswered] and [When unreachable], and enter the number to activate the call forwarding.
- Call forwarding service will be varied as it is based on by the carrier.
Call Waiting
You cannot answer the other calls if you don't hang up on the ongoing call. Turn on [Call Waiting] to get a notification when there is an incoming call.
- Go to [Settings] > [System Apps] > [Call] > [Carrier Call Settings] > [Additional Settings] > [Call Waiting].
Multi-Operations During a Call
Adjust the Audio
You can make some adjustments regarding audio during answering a call.
- Adjust the volume: Press the volume button on the left side of the phone.
- Mute: Tap the

- Hold: Tap .
- Speaker: Tap .
Initiate a Conference Call
Depending on the carrier, you can initiate a conference call with multiple contacts.
- During a call, tap + to add calls. Then go back to the current call, dial another number, and Tap [Merge Calls].
- During a conference call, you can choose to talk to a specific number or hang up a number.
Use Other Apps During a Call
You can also use other apps when you're answering a call.
- During an ongoing call, go to the Home screen and open other apps.
- Tap the green bar at the top of the screen to return to the call.
Call Recording
When you use ColorOS 6.1, you can record a call if you need to keep the audio recordings.
Call Recording
If you need to record a call, tap 📞 before or during a call.
- After initiating the call, Tap 📞 and the button will be switched to [Recording Standby] in green color.
- After the call is connected, the recording mode is turned on until you tap 📞 again to finish the recording.
Auto Recording
You can also set auto-recording rather than record calls manually.
- Enter [Call], tap in the upper right corner and Tap [Call Recording].
- If you need to record audio from specific numbers, tap [Auto-record] and Tap [Add] at the bottom.
- Select numbers from [Calls], [Groups] or [Contacts] to add to the Auto-record list.
- Tap [Select] in the upper right corner to delete the numbers that you do not want to record automatically.
- Turn on [Record All Unknown Numbers], your phone will automatically record all unknown phone calls.
- Turn on [Record All Calls] to record every phone call.
Check Call Recordings
After recording the call, you can play, share, or delete the recording or set the recording as ringtone.
- Go to [File Manager] and tap [Audio] to find all saved call recordings.
- Tap [Select] in the upper right corner to select recordings to be cut, copied, deleted, or set as private, etc.
- Enter [Call], tap in the upper right corner and Tap [Call Recording]. Enter [Check Call Recordings] to view and play the call recordings.
- Tap [Select] in the upper right corner to select recordings to be sent, deleted, renamed, or set as a ringtone.
Recordings Storage Limit
There is no storage limit for call recordings in ColorOS 6.1. Otherwise, you can also set a limit for recording storage on your own for better usage of the phone.
- Enter [Call], tap in the upper right corner.
- Go to [Call Recording], Tap [Recording Storage Limit] and select the items to save the call recordings.
Sound & Vibration
You can adjust the volume of ringtone, set the default ringtone and customize ringtones for particular contacts.
Turn On/Off Ringtone
You can adjust the volume or turn off your ringtone as needed.
- Press either volume button on the left side of the phone, slide the
sidebar to adjust the volume. Tap

to turn off the ringtone and
the vibration will be enabled.
- Tap on the bottom to personalize volume for media, ringer, and alarm.
Modify Sound and Vibration
The ringtone and vibration can be modified as needed.
- Go to [Settings] > [Sound & Vibration].
- Enable or disable [Vibrate When Ringing] or [Vibrate When Silent].
- Go to [Ringtone], you can also customize the ringtones by importing alert files in your phone or from online sources.
Customize Ringtones for Contacts
You can customize the ringtone for each contact.
-
Enter [Call] > [Contacts].
-
Select a contact, tap [Edit] in the upper right corner, and select a ringtone in [Notes].
Switch Call Type
Enter [Call], tap [All Calls] in the upper left corner, then you can view all calls, including the missed calls and blocked calls.
More Operations
Enter [Call], press and hold a number in the call history, you can:
- Copy Number
- Send SMS
- Edit before calling
- Create New Contact
- Save to Existing Contact
- Add to VIP Contacts
- Add to Blacklist
- Add Mark
- Delete Call Log(s)
Identification of Unknown Numbers
Go to [Settings] > [System Apps] > [Call] > [Identification of Unknown Numbers] > [Online Identification of Unknown Numbers].
When [Identification of Unknown Numbers] is enabled, you can accurately identify unknown numbers from incoming calls, call history and messages and then mark them as fraud or harassment, etc. When disabled, unknown numbers can only be identified using the local phone number database.
Call Settings
Vibrate When Answered/Hung Up. When the Screen is On, Press the Power Button to Hang Up
Carrier Call Settings
You can modify the following items:
- Voicemail
- Fixed Dialing Numbers
- Call Forwarding
- Call Barring
- Additional Settings
Flash on Call
The camera flash will blink on incoming calls when the screen is locked or off.
Turn on Flash on Call
Go to [Settings] > [System Apps] > [Call] > Enable [Flash on Call].
Messages
Send and Receive SMS
Start Conversation
You can talk to one or more than one contact in [Messages].
- Go to [Messages], Tap + at the top right corner.
- Enter recipient number directly, or Tap + at the right side of the input field to select contacts from [Calls] [Groups] and [Contacts]. You can add multiple contacts at one time.
- Enter SMS Messages at the bottom of the screen, and then Tap to send the messages.
- Tap in the upper right corner, and you can view contact's name card, mark the contact as [Always on Top], [Mute Notifications] and [Move to Notifications].
Search Messages
Messages will be automatically saved to the message list, which it will be more convenient for you to search for messages at any time.
- In the message list, you can tap the name of a contact to view conversation history.
- If there are too many messages on the list, you can type keywords in the search bar to find corresponding content.
Message to Call
You can make a call to the recipient from a text conversation by tapping at the upper right corner.
Send Pictures, Videos, and Audios
You can send pictures, videos, and audio messages via SMS and MMS.
Send Pictures
- Tap ⊕ in the bottom left side of the screen, and Tap □ to select pictures from [Photos].
- Tap to take photos.
- You can view or delete pictures in the input field after selecting pictures to be sent.
- Tap to send pictures.
Send Videos
- Tap in the bottom left side of the screen and Tap .
- Tap [Select Videos] to select the videos stored on your phone.
- Tap [Take Video] to shoot the video clips.
- You can play or delete videos in the input field after selecting the videos.
- Tap to send videos.
Send Audios
- Tap in the bottom left side and Tap .
- Tap [Record Audio].
- Tap the red button at the bottom of the screen to start recording.
Tap √ after recording.
- You can play or delete videos in the input field after you select the audios.
- Tap to send audio.
View Pictures, Videos, and Audio Messages
- Video messages can be viewed directly from the message list.
Images and audio messages will be displayed as the website links. - Tap a message and open the link to view the picture or listen to the audio message.
- Tap [Save] to download the image or audio.
Send a Namecard
You can share a contact name card to a recipient in [Messages].
- Tap ⊕ in the bottom left side and Tap [Contacts].
- Select [Text] (name and number), select a contact from [Calls], [Groups] or [Contacts], then Tap [Add]. Tap ➤ to send the text name card.
- Select [vCard] (full version of the name card), select a contact, and then tap [Add]. Tap to send vCard.
- Tap vCard will be displayed as a website link. You can view and download the vCard in the browser.
Message Notification
You can customize message notification.
Go to [Settings] > [Notifications & Status Bar] > [Manage Notifications] > [Messages].
- Messages will be displayed on the locked screen.
- Messages will be displayed at the top of the screen.
- When you enable the mode [Do Not Disturb], the notification alerts will be appearing.
Delete and Block Messages
Delete Messages
You can delete messages either one by one or delete them in batches.
- Press and hold a message to copy, share, delete, or add to Favorites, etc.
- Long press a message to repost, delete or add to Favorites in batches.
Delete Conversation
You can delete the conversation with contacts.
- In the message list, find the conversation that you want to delete.
- Press and hold the texts, and tap "Delete Conversation".
Block Messages
- Go to [Settings] > [Security] > [Anti-harassment/Fraud] > [Block Messages].
- Tap [Spam Message Keywords] to add keywords.
- Enable [Block Messages from Unknown Numbers] to block all messages from unknown phone numbers.
Block Messages from Specific Numbers
You can also block messages from particular numbers.
- Tap at the upper right corner of the message texts to view the conversation details.
- Tap again and Tap [Add to Blacklist] to block any messages from the number.
Browser
Browse the Web
View a Website
When you use the OPPO browser, the following operations can help you navigate the website link.
- Open a Web page: Search or enter an URL, or view the Bookmarks/History.
- Refresh the Web: Tap the refresh icon next to the search box.
- Swipe Screen to Navigate: Go to [Settings] > [Swipe Screen to Navigate] to swipe left to go back to the previous page or swipe right to move forward to the next page.
If you want to view the PC version of the web, you can change the Browser identification (UA).
- Go to [Settings] > [Browser Identification (UA)].
- Web pages are unable not be automatically adapted to the mobile display after switching to the PC version of UA
Share the Web Page
Tap [Share] to share the current web page with your friends.
- Tap [Share] at the bottom of the browser.
- Copy the URL to the clipboard or share the link directly to Messages, Gmail, Facebook, etc.
Pictureless Mode
Viewing pictures via a cellular network may consume data. Enable the [Pictureless Mode] to save data.
- Tap [Pictureless Mode] at the bottom of the browser.
- In Pictureless Mode, images will be displayed when Wi-Fi is on, while they will not be shown under cellular networks.
Browse Tabs
You can use browse tabs while viewing multiple websites.
Add New Tabs
Tap the tab icon at the bottom and Tap [New] to add a new tab.
View Tabs
- Tap the tab icon at the bottom to view all tabs that are in display, which are shown in the shape of cards.
- To view a single tab, tap the card.
- Tap the Back button to view the current website.
Close Tabs
- Tap the tab icon at the bottom to view all open tabs.
- To close the tabs, tap ✗ in the upper right corner, or swipe either left or right on the tab.
- To close all open tabs, tap [Close All] on the left of the browser.
Search
In the OPPO browser, enter a URL or keywords to search websites or information.
Search Web
- Search keywords or enter a URL in the search box.
- The search suggestions will appear below the search box. Choose one of the suggestions that are most relevant.
- Tap [Search] on the right side of the search box or Tap [Start] in the keyboard to start searching.
Quickly Access Copied Content
- Go to [Setting] > [Quickly Access Copied Content].
- Search keywords or copy an URL, the browser will show the latest content in the clipboard. Tap [Search] and go.
Find in the Page
- Long press anywhere in the blank area, then tap on the option that pops up as [Find in the Page].
- Tap [Find in the Page] and search the keywords. The related content will be highlighted in blue color.
Search Engine
- Go to [Settings] > [Search Engine] to select the search engine that you want to use with.
- OPPO browser provides four search engines: Goggle, DuckDuckGo, Yahoo, and Bing.
Add and Arrange Bookmarks
Add your favorite web pages to Bookmarks for quick-and-easy access.
Add Bookmarks
- To add the current page to Bookmarks, Tap the star icon on the left side of the search box at the top.
-
Or tap [Bookmarks] in the function bar at the bottom.
-
Tap [Edit] to change the URL and rename the bookmark. Tap [Save] after editing.
- Select the bookmark page and add it to [Bookmarks] or [Home Bookmark].
Arrange Bookmarks
- Tap [Bookmarks/History] at the bottom to view all saved bookmarks.
- Tap [Edit] and select the bookmark to be removed, and then Tap [Clear].
Sync Bookmarks
Enable OPPO Cloud to synchronize bookmarks.
- Log in your OPPO ID to start the cloud service and synchronize bookmarks to the cloud space.
AD Blocking
If you don't want to see ads while browsing webpages, you can enable [AD Blocking].
- Go to [Settings] > [AD blocking], enable [AD Blocking] and [Blocking Reminder].
- While viewing a webpage, long-press the blank and Tap [Block AD] to add the webpage to [Blocking Management].
- Go to [Blocking Management], and tap [Edit] at the upper right corner to delete blocked sites.
Private Browsing
You can customize OPPO browser settings to protect privacy.
Clear Data
Go to [Settings] > [Clear Data].
You can choose to clean input data, history, cached webpages, cookies or other data.
Private Browsing
- Go to [Settings] > [Private Browsing]. Your browsing will not generate any viewing data.
- When Private Browsing is enabled, a watermark will appear at the bottom of the browser, indicating that you are in private browsing mode.
File Manager
There may be many files on the device. [File Manager] helps you find files efficiently and conveniently.
Quick File Sorting
File Manager will automatically detect and sort files. Files will be displayed as [Audio], [Video], [Photos], [Document] and [APK].
Quick File Sorting can be accessed in the quick-sort entry on the Home page, where files are managed through a simple-and-easy interface. For example, all images are displayed in [Photos].
Folder Manager
Open [File Manager] and Tap [Phone Storage] to manage files through a hierarchical view in the folder.
ColorOS 6.1 will automatically identify if a file is created by the app and its file type. The folder attribution will be marked at the right of the file name.
For example, the [Recordings] folder will be marked as [Recordings] where there are all audio files recorded by the [Recording] app.

text_image
Phone Storage Good China All Files Bluetooth 13 March 2019 DCIM 1 July 14, 2019 Movies 8 March 2019 Music 8 March 2019 Pictures 8 March 2019 New Folder GetRemotely Manage Files
[Remotely Manage Files] will make it easy to view and manage yourfiles on the phone without using a data cable.
After entering [File Manager], Tap the computer icon in the upper right corner of the main interface.
Two transfer devices are supposed to connect to the same wireless network. After that, Tap [Start Service]. After entering the FTP address of your computer, type the username and verification code to connect your phone to your computer.
Set as Private
You can set a file as private, private files will not be displayed in File Manager. You must go to [Private Safe] to view it.
Long press to select the file. Tap [More] > [Set as private].
To access the private safely, press and hold [File Manager] at the top, or you can add a shortcut to Private Safe to your desktop to access it later.
You need to set a privacy password before using Private Safe for the first time.
Go to [Settings] > [Fingerprint, Face & Password] > [Privacy Password].
Phone Manager
[Phone Manager] is a security and optimization center. It provides useful tools such as Virus Scan, Clean Storage, Privacy Permissions, etc.
Examine and Optimize
After entering the [Phone Manager], the system will automatically detect and score the overall operation status.
Tap [Optimize] at the bottom of the score to optimize the system.
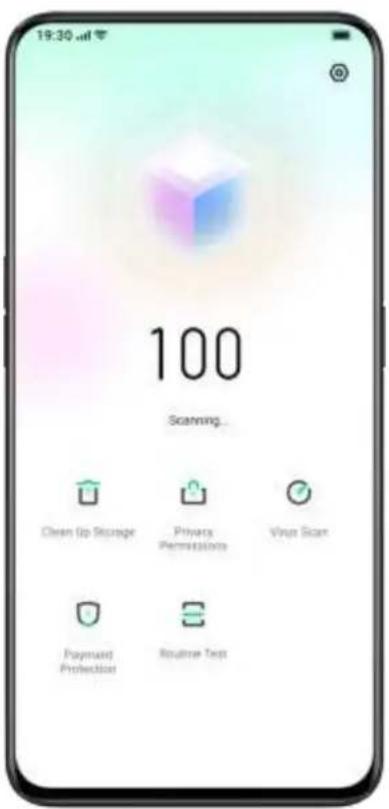
text_image
19:30 am 100 Scanning... Clean Up Storage Privacy Permissions Virus Scan Payment Protection Routine TestClear Storage
[Clean Storage] is an efficient and instant method to clean up the storage of your phone.
You can also access through [Settings] > [Additional Settings] > [Storage] > [Clean Storage].

text_image
Clean Storage Available on phone 218 GB / 256 GB in total Sufficient storage availability (yes) (not available only) from Clear up recommendations Safe to Clean Clear all APP DATA All app. cache data 247 MB CYPGFORIZED FILES Photo Cleaner 28 pcs Video CleanerThe system will automatically analyze the file type, and categorize the apps cache, advertising cache, redundant installation packages, and uninstall the residues for system optimization.
Privacy Permissions
Tap [Privacy Permissions] to view and manage permission for each app.
For example, some apps need to have access to [Use Camera] or to scan the QR Code.
Proper control of the app permissions is able to optimize power consumption and also avoid privacy disclosure and financial loss.
Virus Scan
Tap [Virus Scan] to initiate automatic virus scanning and detect the alleged malicious apps and files. If found, tap the icon below to clean the malicious apps and files.
Go to [Phone Manager] > [Settings] > [Virus Scan Engine]. You can choose different antivirus software to scan the virus.
Payment Protection
Payment Environment Check
Tap [Payment Protection] to initiate an automatic system security check.
For instance, the payment environment check will identify whether the system has been updated with the latest security patches, whether the current network connection is reliable, whether there are malicious applications, etc. Make sure to pay or manage your personal property only when there's a secure payment environment.
Apps Guarded by Payment Protection
[Payment Protection] will secure mobile payments, internet banking, stocks, and other apps to prevent third-party apps from detecting the safety status of your phone, which may ensure your payment process to be private and guard your personal property.
Routine Test
[Routine Test] is equivalent to the safety examination center of a mobile phone, as a way to detect the potential security risks as well as the breakdown in both software and hardware.
Run Test
- Tap [Start Detection] to start the test.
- During the detection, you can choose to skip some items.
- After the test, a test report will be generated indicating if the phone's current hardware and software are functioning well.
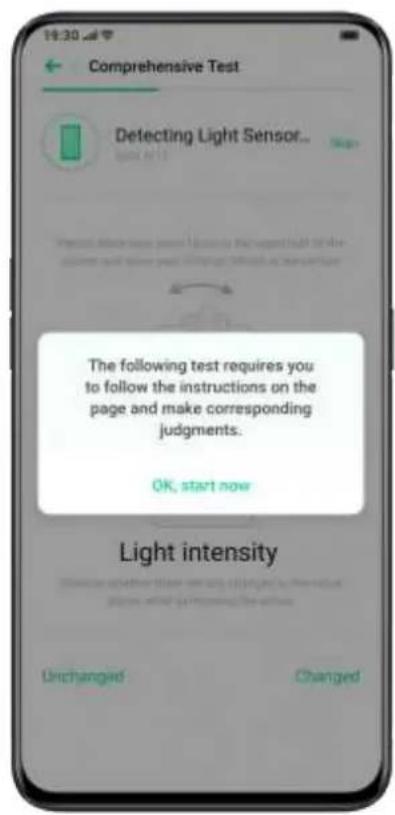
text_image
Comprehensive Test Detecting Light Sensor... The following test requires you to follow the instructions on the page and make corresponding judgments. OK, start now Light intensity Unchanged ChangedTest Records
Tap [Records] to view the previous test report.
Theme Store
In the [Theme Store], you can download and change themes, wallpapers, ringtones, as a way to customize your phone.
Purchase / Download Resources
You can search the theme name, style, color and designer in the searchbox at the top. Otherwise, you can view the available items in the Store.

text_image
19:30 am Theme name/style/curled/designer Official Wallpaper Rank Topic POPULAR RECOMMENDATIONS 20:13 07:06 I Just Like To Study Shiny Zooking-wolf star I Just Like To Study 03:31 02:28 07:39 Tharoe Photoscape LiveSet the Theme
Enter [Theme Store] > [Me] > [My Themes] to view the themes that you currently have.
Themes are divided into [System Themes] and [Downloaded Themes].
A full set of [Themes] may include diverse elements from the lock screen, interface, home screen wallpaper, to icons and others. If you want to merely change some of the elements, enter a theme and choose [Apply the Theme to].
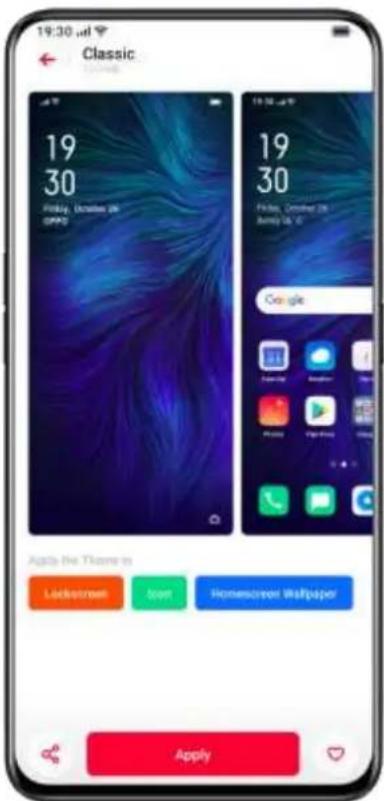
text_image
19:30 Classic 19 30 Friday, October 26 GAPD 19 30 Friday, October 26 July 15 - 20 Google Lockscreen test Homemade Wallpaper Apply the Theme in ApplySet Wallpaper
Enter [Theme Store] > [Me] > [My Wallpapers] to view wallpapers that you currently have.
Themes are divided into [System Wallpapers] and [Downloaded] Wallpapers".
Tap [Apply] to set the wallpaper as [Lock Screen Wallpaper] or [Home Screen Wallpaper] or both of them.
You can also set images in [Photos] as the wallpaper.
Go to [Photos] or [File Manager], select a picture and Tap [More] to set it as wallpaper.

text_image
19 30 MRS. NO. 10 Set as Lock Screen Wallpaper Set as Home Screen Wallpaper Set Both CancelOPPO AppStore
[OPPO AppStore] is an official platform to install and manage various apps. You can download apps that you need in OPPO AppStore.
Apps in OPPO AppStore are free of charge. However, some of the app developers may set a restriction for some specific functions in the app and charge it. It should be noted that it is the developer who charges the fee, not OPPO.
If you remove OPPO AppStore accidentally, go to
https://store.oppomobile.com/ to reinstall.
You will see some recommended apps on the home page, namely
[Home]. Enter the keywords in the search box at the top to search for some related apps.
Banner
You will see the latest updates recommended by OPPO AppStore shown up in the banner.
Games
Selections
View, reserve, and install recommended games.
Categories
You can search games in different categories based on your preferences, such as action, adventure, arcade and more.

text_image
19:30 am People were looking for Candy Small... Selections Categories Trending Attitude Top Racing Shooting Recommended Games 1 Subway Surf... Install 4 2 Temple Run 2 Install 5 3 Angry Birds ... Install 6 Zombie World wiki Plants vs. Zombie Stupid Zombie 2 Stupid DEAD TAKOSE 2Apps
Selections
View, reserve, and install recommended apps.
Categories
You can search apps in different categories based on your preferences, such as Beauty, Business, Comics and more.
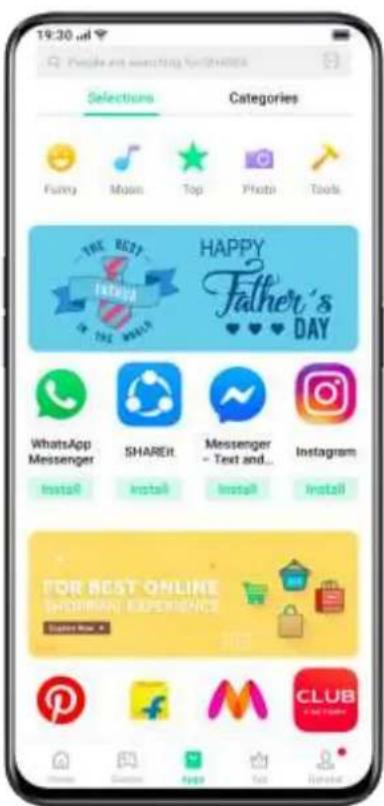
text_image
19:30 Priceline and searching for #STARLES Selections Categories Funny Music Top Photo Tools THE BEST Fisher's HAPPY Father's DAY WhatsApp Messenger SHAREIt Messenger - Text and... Instagram Install Install Install Install TOR BEST ONLINE (WHORRIAN) EXPERIENCE Options Now > CLUB #217500000000000000000000000000000000000000000000000000000000000000000000000000000000000000000000Top
OPPO AppStore also provides you with the top downloaded apps to give firsthand updates, including [Updated] [Trending] [New] [Hot Search].

text_image
19:30 am Single Game Searching for Station Games Apps Only display apps that have not been installed Updated Trending New Hot Search 1 PUBG MOBILE • 4.5M downloads • 7.4M downloads Install 2 Subway Surfers • 4.5M downloads • 2.6M downloads Install 3 Temple Run 2 • 4.5M downloads • 1.6M downloads Install 4 Candy Crush Saga • 4.5M downloads • 1.6 downloads Install 5 Doodle Army 2 : Mini... • 4.5M downloads • 2.6M downloads Install 6 Hill Climb Racing • 4.5M downloads • 1.6M downloads Install Dr DrivenMy Information
Tap [General] at the bottom to view personal information, help, feedback, and more.
Manage Personal Info: You can edit your name, alias, date of birth and more.
Manage Apps: You manage installed apps and view app updates.
Music
[Music] is a built-in music playing app in ColorOS 6.1. It has an artistic interface and very low battery consumption. It can be a good choice for managing the local music files, for you to better enjoy the music.
Manage Music
- Add Songs
[Music] will automatically scan and add local songs on your phone. You can also tap [Scan Local Songs] on the upper right corner to scan and add music.
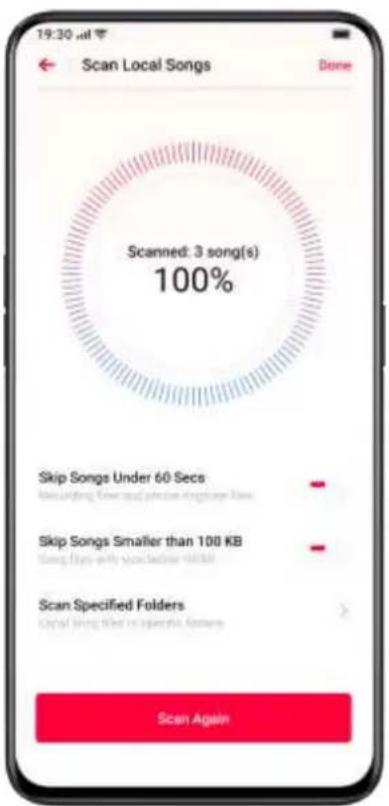
text_image
19:30 Scan Local Songs Done Scanned: 3 song(s) 100% Skip Songs Under 60 Secs Skip Songs Smaller than 100 KB Scan Specified Folders Local being filed in particular. Answers Scan Again- Manage Sorting
Tap in the upper right corner and Tap [Select Sorting Method] to enable [Display Alphabetically] [Display by Time Added] or [Display by Folder].
- Manage a Song
You can manage each song by tapping to [Add to Playlist] [Send Song] [Set as Ringtone] [View Details] etc.
- View a Song
Local songs are displayed in the category of [Tracks] [Artists] [Albums] or [Playlists].
- New Playlist
You can also organize the songs under a certain theme in the form of playlists.
Go to [Playlist] > [New Playlist]. After creating a new playlist, Tap [Add Songs] to select songs in batches, or choose one song and tap [Add to Playlist].
Play Music
The play bar lies at the bottom of the main interface of [Music].
There are three buttons on the right including [Pause] [Next] and
[Playlist]. Tap the play bar to enter a full-screen music-playing interface.
In the full-screen interface, swipe left or right to switch to the song
cover or lyrics interface. There are four buttons below the song [Playlist]
[Dolby Atmos] [Play Mode] and [Song Management].
- Dolby Atmos allows you to choose sound effects in different settings which could enhance sensation when you listen to music with your phone.
- Play Mode: You can switch between 3 play modes from [Shuffle], [Normal] [Single Loop].

text_image
19:30 μl Dolby Atmos Dolby Atmos Smart Smart installing the sound effect on the system being rated Movie Myristo 3D is recommended should not powerful to use Gaming Live performance sound quality with mounting box Music Faller and more balanced audioMusic Party
[Music Party] allows you to play music using more than one device simultaneously.
Create a Party
- Enter [Music Party] > [Create a Party].
- Select the connection mode from "Connect via personal hotspot" or [Connect via Wi-Fi], and then tap [Next].
- You will then receive a QR code, allowing your friends to join the party by simply scanning the QR code. Tap [Done] to finish pairing.
- Tap [Add Songs] to select songs from your devices.
- Tap ·s in the upper right corner to view the party QR code, and then manage the playlist or exit the party mode.
- Tap to view the devices that have joined the party mode.

text_image
19:30 am Join the Party! Music Party syncs several phones to play the same song Create a Party Join a Party
text_image
Music Party + Add Songs Free To Fly 00:02 00:02Join a Party
If you want to join a music party, enter the [Music Party], tap [Join a Party] and scan the QR code to join the party. Tap ••• in the upper right corner to exit the party.
Recorder
You can use the built-in microphone to record various audios, including daily conversations, lectures, interview or calls.
Standard Recording
Tap the Red Dot at the bottom of the main interface of Recorder.
If switch to other apps while recording, the recording will continue in the backstage. To return to [Recorder], tap the red bar at the top of the screen or slide down to open the notification center and tap the ongoing recording task.

text_image
Standard 00:35.97 Recording... 00:10 Mark 1 00:19 Mark 2 00:33 Mark 3Meeting/Interview Recording
You can also choose to record in either [Meeting Recording] or [Interview Recording] mode. These modes are optimized for special usage scenarios to create better recording results.
- Meeting Recording: It is suitable for conferences where there are multiple participants. The enhanced vocal recording effects can be used to record clearer voices of people.
- Interview Recording: It is suitable for dialogue scenarios. Place the top of the phone toward the interviewer and the bottom to the
interviewee, to use the microphones at both ends to record the conversation.
Audio Manager
- The recorded audios will be stored in [File Manager] > [Audio], the default name of the recording is referred to as [REC+ Recording End Time].
- Long-press an audio file to share, rename, cut, and more.
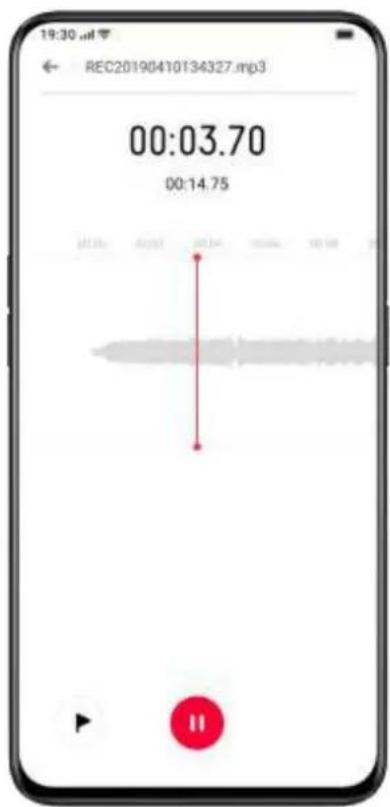
text_image
19:30.m REC20190410134327.mp3 00:03.70 00:14.75Calls Recording
You can record the phone calls, and the audio files will be saved on the phone.
- Tap to initiate the recording during a call.
- Auto-record: Go to [Settings] > [System Apps] > [Call] > "[Call Recording]. You can make the phone to automatically record the calls from those the sources of specific numbers, all unknown numbers or all calls.
- Tap [Calls] in [Recorder] to view the list call recording files.
Mark Recording
- Tap the name of a recording to enter the detailed playback interface with waveform and progress.
- Tap [Flag] on the left side of Play/Pause to mark the important time points.
- The default name of the marked recording is set as [Mark + Number]. To rename the mark, tap the icon on the right.
Screen Recording
ColorOS 6.1 has a built-in screen recording tool that allows you to record videos, game graphics, and operation steps, which can be shared on social media with your friends.
Start Screen Recording
From Control Center
- Slide down from the top notification bar to open the Control Center.
- Tap in the upper right corner.
- Tap and the recording will start automatically within three seconds.
- You can tap and drag up to the notification bar for easier access to screen recording.
Start Screen Recording in the Entry of Smart Sidebar
- Go to [Settings] > [Convenience Aid] > [Smart Sidebar].
- Swipe smart sidebar and Tap [Screen Recording] to start recording the screen.
Screen recording will be automatically stopped and saved when the video file reaches the maximum size of 5GB. Meanwhile, the screen recording process will be also terminated if you lock the screen, make a
call or shut the phone down. The recordings will be saved to [Photos] in MP4 format.
Screen Recording Settings
Go to [Settings] > [System Apps] > [Screen Recording].
- To Allow Sound Recording: If you allow sound recording, the corresponding sounds will be recorded in the video while you are recording the screen. Before using the sound recording, you need to read and accept Privacy & Terms of use to enable the Sound Recording.
- Video Resolution: You can switch video resolutions between 480P and 720P. If to set the video resolution as 480P, the file can be smaller, though the quality can be lower.
- Record Screen Tips: Tips on the screen will be recorded to show the detailed operations, as a way to better illustrate how you operate on the phone.
- Front Camera: Your face will be recorded and shown up on the screen in the form of a small circle, which fits well for those who live-broadcast the game playing.
One-Handed Mode
You are able to zoom in the screen to fit one-thumb operation when you enable the one-handed mode. The one-handed mode allows you to text with a single hand, especially when you have to carry something heavy or take the public vehicles.
- Slide down the screen to open [Notification Center], tap unfold all icons.
to
- Tap to activate One-Handed Mode.
After the One-Hand Mode is turned on, tap the buttons on both sides to switch between the screen near the lower left or near the lower right corner. Tap the button at the top of the screen to exit One-Handed Mode.
Smart Driving
Driving Mode
[Driving Mode] can help you pick up the incoming calls and messages more easily during driving, which may reduce distraction.
- Add [Driving Mode] to the control center, then enable/disable the Driving Mode.
- Go to [Settings] > [Smart Services] > [Smart Driving] > [Driving Mode].
- Go to [Settings] > [Smart Services] > [Smart Driving] > [Automatically Turn On When Connected to Bluetooth Car Kit]. Bluetooth car kits previously connected to your phone will be recognized automatically if turn on Smart Driving. If you're not driving, you can turn it off manually in the notification bar or Settings.
Do Not Disturb
When [Riding Mode] is turned on, everything except incoming calls will be muted by default.
Go to [Settings] > [Smart Services] > [Smart Driving] > [Driving Mode] > [Do Not Disturb].
Allowed Calls
You can customize to whom you allow their calls, including the calls [From Anyone] [From Contacts Only] [From Favorite Contacts Only] or [Decline All Incoming Calls].
Ring for Repeated Calls
Turn on the [Ring for Repeated Calls] function to allows the repeating calls from the same number calls within 3 minutes.
Auto SMS Reply After Rejecting a Call
When [Auto SMS Reply After Rejecting a Call] is turned on, the system will automatically respond to the caller with an SMS after rejecting the call. You can also customize content in the replying texts.
Block Incoming In-app Voice and Video Calls
When Driving Mode is on, voices and video calls from WeChat and Messenger will be blocked.
Block Banner Notifications
When [Block Banner Notifications] is on, notifications will be silenced and banner reminders won't be displayed on the home screen anymore. However, the reminders for the alarm clock, timer, and other features will continue to be displayed.
Riding Mode
[Riding Mode] can help you block out disturbance and handle the incoming calls to reduce distraction. For your safety, make sure to abide by the relevant laws and regulations and cycling guidelines when you are cycling.
Go to [Settings] > [Smart Services] > [Smart Driving] > [Riding Mode].
Do Not Disturb
When [Riding Mode] is turned on, everything except incoming calls will be muted by default.
Go to [Settings] > [Smart Services] > [Smart Driving] > [Riding Mode] > [Do Not Disturb].
Allowed Calls
You can customize to whom you allow their calls, including the calls [From Anyone] [From Contacts Only] [From Favorite Contacts Only] or [Decline All Incoming Calls].
Ring for Repeated Calls
Turn on the [Ring for Repeated Calls] function to allows the repeating calls from the same number calls within 3 minutes.
Auto SMS Reply After Rejecting a Call
When [Auto SMS Reply After Rejecting a Call] is turned on, the system will automatically respond to the caller with an SMS after rejecting the call. You can also customize content in the replying texts.
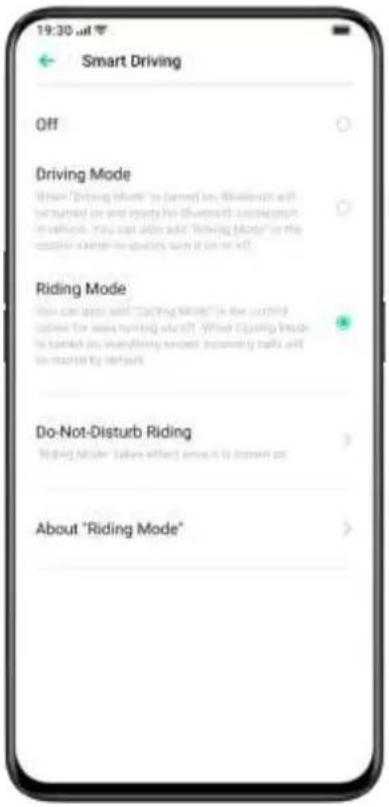
text_image
19:30 AM Smart Driving Off Driving Mode When "Driving Mode" is turned on. The motor will be turned on and ready for blueprint or navigation in vehicles. You can also add "Driving Mode" on the other side to qualify soon if you are off Riding Mode How can also add "Driving Mode" is the carried mode for new morning staff! When fishing leads is turned on everything except (scanning banks) and is started by default Do-Not-Disturb Riding Making Ablder takes without access to screen on About "Riding Mode"Clone Phone
Clone Phone allows transferring all data stored on your old phone (including Settings, Photos, Contacts, Apps) to your new phone within several simple taps.

text_image
19:30 am This Is the Old Phone Transfer Everything on This Phone to the New Phone Contacts, Messages, and Call History Photos, Videos, Music and Documents System Data Including Settings, Clock up Apps and App Data Except for app which currently be used on the new phone. You may also select the closing data by yourself! Start ClosingImport from an Android Phone
The old phone needs to install a [Clone Phone]. Be aware that both devices are sufficiently charged. If the old phone does not install the Clone Phone app, tap https://i.clonephone.ColorOS 6.1.com/download to install.

text_image
19:30 am Select Current Phone Type Done Phone can quickly transfer all data stored on your old phone (including photos, contacts and apps) to your new phone. Please ensure both devices are sufficiently charged This Is the New Phone This Is the Old Phone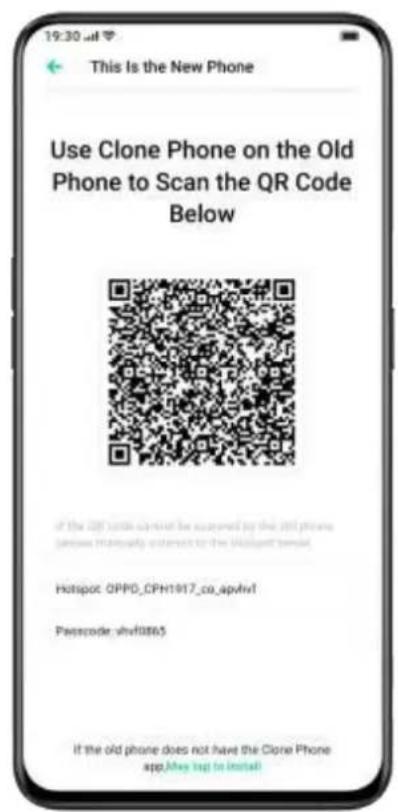
text_image
19:30 AM This Is the New Phone Use Clone Phone on the Old Phone to Scan the QR Code Below if the QR code is required to be scanned by this old phone (see www.100000.com/) Hotspot: OPPD_CPH1017_co_apvivt Passcode: vhw10865 If the old phone does not have the Clone Phone app,May 1ug to install- After selecting [This Is the New Phone] or [This Is the Old Phone] as prompt, use the [Clone Phone] app on the old phone and scan the QR code on the new phone.
- Once paired, the devices will automatically transfer the selected data via personal hotspot.
Import from an iPhone
To import data from an iPhone, firstly, you'll need to sync the data to iCloud. Tap [Import from an iPhone] in the [Clone Phone] app, log in to the iCloud account of the iPhone to import data.
ORoaming
ORoaming provides data packages from local carriers while you are traveling worldwide. Purchasing a data package allows you to access the Internet without a SIM card.
Complete the following steps to gain access to ORoaming before you travel abroad.
- Open the data supermarket, select the package that you want to purchase and Tap "Buy" to finish the purchase.
- Go to [ORoaming] > [Settings] > [Automatically Turn On/Off Data Package]. If it is yet to enable, you need to turn on the ORoaming package manually after you arrive abroad.
A data package cannot be activated and connected to the network until you arrive. No network is required to activate ORoaming. Once activated, it is unable to refund. It usually takes 1 to 3 minutes to activate a data package, depending on the local carrier.

text_image
19:30 off ORoaming Data Package Orders Beginner's guide Next available to ORoaming to join the plan CURRENT & NEIGHBORING COUNTRIES/REGIONS Hong Kong, China From US$1.40 Macao, China From US$1.40 Taiwan, China From US$4.50 Japan From US$1.40 COMMON ACROSS REGIONS EU 36 Bundle From US$4.70 SG&MY&TH Bundle From US$4.70 ASIA China Hong Kong, China Macao, China Taiwan, China
text_image
19:30 Jul Macao, China Macao, China inaction can be expanded, expired automatic net price PAY BY DATA USAGE 42 Macao, China 100 MB 1 Day Full range of high-speed data (US$1.60) Buy PAY BY DAY 42 Macao, China Data Daily 100 MB high-speed data (US$2.80/ Day) Buy Macau, China Data Plus Daily 500 MB high-speed data (US$4.75/ Day) BuySmart Assistant
Smart Convenience Services
Smart Assistant is displayed on the screen furthest from home screen, providing smart convenience services such as quick functions, itinerary management, and weather information.
Go to [Settings] > [Smart Services] > [Smart Assistant].
Search
[Search] will help you quickly find apps, games, quick apps and more on your device. Swipe the screen right to the furthest to [Smart
Convenience Services]. Tap [Search] at the top to search what you need, and Tap [Exit] in the upper right corner to stop the search.
Permanent Services
Permanent Services consist of permanent Smart Assistant, you can view and use those functions. For instance, Step Tracker, Photos, Favorite
Contacts, and more. Permanent Services in Smart Assistant appear only in specific scenarios.
- Step Tracker
[Step Tracker] will display the number of steps and distance traveled for the day.
- Match (Available in India)
Follow the matches you love. Get automatic updates of scores and schedules.
- Favorite Contacts
One-tap calling of favorite contacts.
- Photos
A quick view of the latest memory.
Quick Functions
One-tap to open frequently used apps, such as [Scan DOC], [Photo Translate], [Scan card], and more. Tap + in the upper right corner of Quick Functions to turn on/off Quick Functions or add/remove functions according to your use habit.
Smart Scenario Services
Smart Scenario Services will identify your current scenario such as time and location to appear, disappear and arrange automatically, providing the useful information you are concerned about to make your life easier.
- Schedule
If you created schedules in Calendar, related information such as time and theme will be displayed in Smart Scenario Services, in case you forget important schedules.
• Online Order (Available in India)
Smart Assistant will get and display your online order information.
- Itinerary (Available in India)
Smart Assistant will get and display updated itinerary information.
Manage Smart Assistant Cards
Go to [Smart Convenience Services] and tap + in the upper right corner to manage smart assistant cards.
Tap [Mine] to add Scene Smart Services and Permanent Services.
You can also add different cards according to [Recommended], [Travel], [Life], [Convenience] and [Entertainment].
Make your Shots
Outstanding
Learn How to Capture the Best Shots
Open [Camera] and start to create delicate and professional shots. ColorOS 6.1 also allows you to make the shots more stunning, as you can apply capture timer, HDR, Portrait mode, Night-scene mode, and Time-lapse photography.
Take Photos
Adjust Brightness
Open Camera. Tap anywhere in the frame to sharp focusing. You can customize the focusing area to change with where you tap on the screen. After you complete focusing, press and hold the screen, then slide up or down to adjust brightness.
Zoom in or out
You can tap the button to focus on the object. The object will be zoomed in if you toggle the button, and it will be reverse if you toggle again. You can also pinch the screen to zoom in or out.
Turn the Flash on/off
Tap the flashlight button to turn the flash on or off. You can set the button for different uses including [Off], [On], [Auto] and [Fill Light]. When you set it as [Auto], your phone will be automatically detect lighting conditions and determine if flash is necessary. When you set it as [Fill Light], the flashlight will be kept on to add lighting for the shooting. It is advised that you set to flash as [On] when at night or under a dim-lit environment.
Dazzle Color Mode
When you turn on Dazzle Color mode, the camera will set color enhancement to be vivid and bright, making colors of your photos more striking. Dazzle Color mode is nothing like simply adjusting saturation or adding filters, rather, it will polish every pixel to optimize colors after identifying under which photo mode the photo is taken. Tap the button at the upper area of the screen to turn on.

text_image
Turn On Gazzle Color VIDEO PHOTO PORTRAIHDR
HDR is referred to as High Dynamic Range Imaging. When HDR is on, your photos will be reproducing a greater dynamic range of luminosity, making the photos acquire more display contrast and be closer to what the human eyes see. Tap HDR, you can set it as [On], [Off], or [Auto].
Take Photos with Filters
You can add filters while taking shots and adjust different visual effects.
Tap 📋 the upper area of the screen to select your desired filters.
Swipe left or right to change filters, as you could view it in real-time. You can take shots immediately after you decide which filter to use as a way to edit your shots.
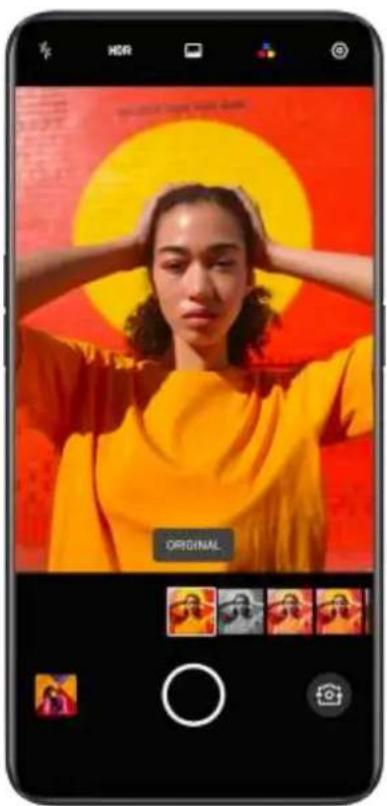
text_image
HOR ORIGINALPortrait mode
Capture photos in portrait mode, make a portrait shot more natural just like an expert. Switch to [Portrait] mode. Tap the button at the top left corner, and select from 5 different styles within the Portrait mode.
You can also take a selfie in Portrait mode. Open [Camera], enter Portrait mode and tap the front-facing camera button. If you are taking
selfies under Portrait mode, you can also choose to keep your face more focused with the background blurred.
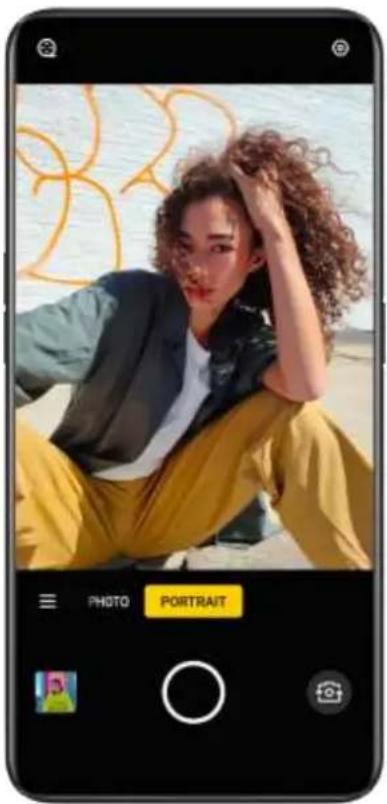
text_image
PHOTO PORTRAITGesture to Take Photo
The gesture control allows you to take long-distance selfies or group photos simply with a hand gesture. No extra touch on the phone is required. You can pose a particular hand gesture, and the shooting is done.
Go to the camera settings and tap [Gesture to Take Photo] to enable automatic shooting based on hand gestures. When you use this function for the first time, follow the on-screen instruction to finish the gesture control. You can only raise a hand when facing the camera for 3 seconds, after that the camera will start automatic shooting.
AI Beauty
You can make 8 categories of AI-enabled beautification for your face appearance in the photos. Tap 📄 at the bottom right corner to enter Beauty mode where you could airbrush your face, enlarge your eyes, make your face slimmer and more chiseled, add touch-ups. Drag the slider at the button of the camera to adjust the level of Beauty mode.
Within Cute photo shooting, you can add animated stickers and filters to your photo in real-time, and turn it into cute Omoji.
- AR sticker
The built-in AR stickers will make your photos cutter and more recreational, as you can add visual effects. There's no need to download any third-party apps, as AR sticker may allow you to decorate your photo with interesting stickers.
- Omoji
Omoji could capture your facial expressions to turn your face into the animated 3D emoji.
Open [Camera], drag the slider at the button of camera to switch to Cute photo shooting Note: There are only some OPPO phones support Cute photo shooting.
Take a Panorama Photo
When it is unable to capture scenery from a wide-angle, take advantage of the panorama mode while taking photos.
Use rear camera for panorama photos
- Open [Camera], tap ⊖ at the bottom left to choose [PANO].
- Tap the Shutter button, pan slowly in the direction of the arrow, keeping the arrow on the centerline. To finish the pan, tap the button again.
- To pan in the other direction instead, first tap the arrow.
- When you take photos of the high-rise buildings, rotate the phone to landscape orientation by panning slowly in the direction of the arrow.
Use front-facing camera for panorama photos
You can also use the front-facing camera to take panorama photos by panning the phone either to right or left.
Tips for panorama photos
- You can take panorama photos from the furthest locations as long as the panorama allows. You may also stop the shooting by tapping the Shutter button.
- Remember to pan the phone slowly to make sure that the camera captures as many details as it can and focuses better. This could also make the photos less blurring.
- Avoid moving the camera up and down during shooting, otherwise, the photos may be formed unevenly.
Ultra Night Mode
Under the Ultra Night mode, the camera will take 4 to 5 continuous shots at different exposures with AI-enhanced algorithmic operations, in a bid to combine shots for clearer and brighter photos.
The built-in AI Ultra Clear Engine is able to identify 21 categories of scene elements with other 800 scene combinations. While taking photos with Ultra Night mode, the camera will recognize the most suitable shooting solution and reconstruct color casts based on the overall color optimization, as a way to enhance color expressiveness under different lighting conditions.
OPPO Reno In the handheld mode, a night photo is synthesized by synthesizing 3-8 photos with different brightness and darkness. In the stand mode, up to 17 photos with different brightness and darkness can be supported for synthesis, and the image quality will be greatly improved.
OPPO Reno 10x Zoom boosts photography even under the lower-light condition at night. It enables more stable shooting experience, capturing more light and making the photos more vivid and brighter even if at night. In addition to the high performance in taking photos in dynamic night mode, OPPO Reno 10x Zoom also elevates portrait when it's taken at night, shortening the shooting duration to 1 to 2 seconds.
Notes: Avoid shaking the phone and keep stable while taking photos in Ultra Night mode.
Open "Camera", tap ☐ on the bottom left corner and choose [NIGHT] (Ultra Night mode is now only available on some OPPO phones).

natural_image
Smartphone displaying a cityscape at dusk with illuminated buildings and skyscrapers (no visible text or symbols)Expert Mode
Expert mode allows you to take more professional photos under more precise settings.
Open [Camera], tap ☐ the bottom left corner and then choose [EXPERT].
You can adjust the exposure, white balance, exposure compensation, focusing, and more. Tap on what you want to adjust and drag the slider to modify the settings for each parameter.
Exposure: You can adjust two parameters for ISO and shutter speed. The lower the ISO, the smoother the photo will be. The higher the ISO, the louder the random background noise will become and the more distracting the quality will be. And the shutter speed determines how long the sensor is exposed to light. If you take a photo of a moving object, for example, a running child, then you need to increase the shutter speed.
White balance: White balance is closely relevant to color temperature. Under different lighting conditions, different color casts could be created. For example, it can be of the slight blue cast under the light source of fluorescent lamps and of the yellow cast under the light source of incandescent lamps. To present the realistic color cast, adjusting white balance could also lead to the change of color temperature to either cooler or warmer tones.
Focusing: Adjust focusing to make photos sharper. Choose to either focus on an object with a blurred background or focus on background with blurred objects.
Exposure compensation: Once exposure compensation is on, the camera will automatically come up with a suitable parameter for exposure compensation, making the photos brighter or dimmer.
Watermark
You can add a watermark to your photos. The watermarks will be read as "SHOT ON RENO". You could also add the author of photos. It should be noted that every photo will be added with the author's watermark once you upload the name of the author.
Open [Camera], tap out the top right corner, then add watermark or the author name for the photo.
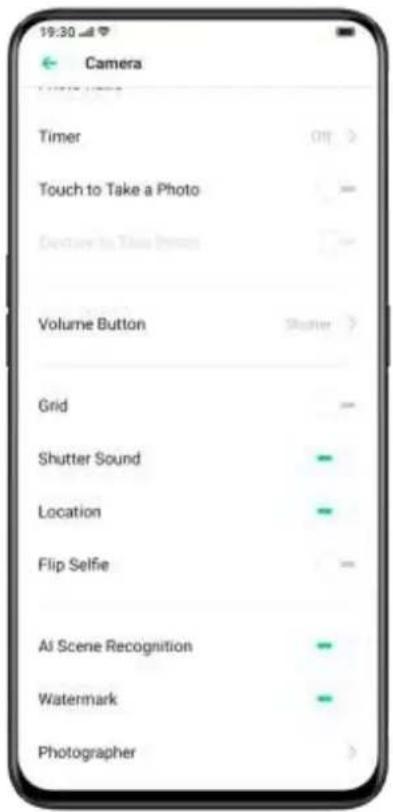
text_image
19:30 Camera Timer Off > Touch to Take a Photo - Capture to Take Photo Volume Button Shutter > Grid - Shutter Sound - Location - Flip Selfie - AI Scene Recognition - Watermark - Photographer
natural_image
Scenic view of a turquoise lake with rocky outcrops and snow-capped mountains in the background under a cloudy sky (no text or symbols visible)Camera Settings
Open [Camera], tap out the top right corner to customize camera settings.
- Photo Ratio: Set the screen size to Default 4:3, Square 1:1, full screen, and 4:3 Ultra HD (with 48 million pixels).
- Timer: Camera will start shooting after you set a timer to 3s or 10s.
- Touch to Take a Photo: Touch anywhere on the screen to start taking photos.
- Volume Button: Set the Volume buttons to function as a shutter release or zoom controls.
- Grid: Display gridlines to ensure the camera is leveled.
- Shutter Sound: Make or mute camera shutter sound when capturing photos.
- Location: Tag your photos with geo-locations.
- Flip Selfie: Your selfies may look mirrored to what's actually taken. Turn on Flip Selfie to flip a mirror selfie image.
AI Scene Recognition
The camera is able to identify different locations with the smart built-in sensors.
Go to [Settings] > [Camera] > [AI Scene Recognition].
Shoot Video
Tap the Record button to start shooting video. Tap again to stop recording. Tap [PHOTO] to switch back to photo-taking mode.
By default, video records at 30 fps (frames per second). Depending on your model, you can choose other frame rates and video resolution settings.
The faster the frame rate and the higher the resolution, the larger the resulting video file.
Video quality can be switched from either 4K / 1080p / 720p.
Note: Only several models could set video quality on your own.
Open [Camera], drag the slider down at the bottom of the phone to switch to video recording.
Take photos while shooting a video: You can also tap the Shutter button in the lower-left corner of the screen to save as photos while you are recording a video, and it won't interrupt the shooting.
SLO-MO Video
SLO-MO records a scene or object with a normal action or move and turns it into a video that plays back in very low speed. You can customize the resolution ratio of the SLO-MO video into 720P or 1080P. The higher the resolution ratio, the more space the video file will occupy.
Open [Camera], tap 📋 button at the bottom left corner and select [SLO-MO].
TIME-LAPSE Video
TIME-LAPSE video records a scene or object that has a slow state-of-change and turns it into a video that plays back at a high speed. Under TIME-LAPSE mode, the videos will be compressed to the short duration based on a ten-to-one ratio regardless of how long the video duration is.
If you want to capture a sunset, traffic flowing or other experiences over a period of time, be sure to place your phone at a stable and safe place.
Open [Camera], tap ☐ at the bottom left corner, select [TIME-LAPSE].
Notes: Not all OPPO phones support TIME-LAPSE video.
Editing a Video
After finishing shooting a video, you can operate the various editing directly within your phone.
Tap [Edit] at the bottom of the video and enter Editing mode.
Trim a Video
Drag either end of the frame viewer to cut unnecessary parts or shorten the video duration.
Speed Changing
Choose what speed you would like the video to play. There are five different speeds including 0.25X, 0.5X, 1X, 1.5X, and 2X. You can play the video in slow motion with the speed of 0.25X while in TIME-LAPSE motion if you apply the speed of 2X.
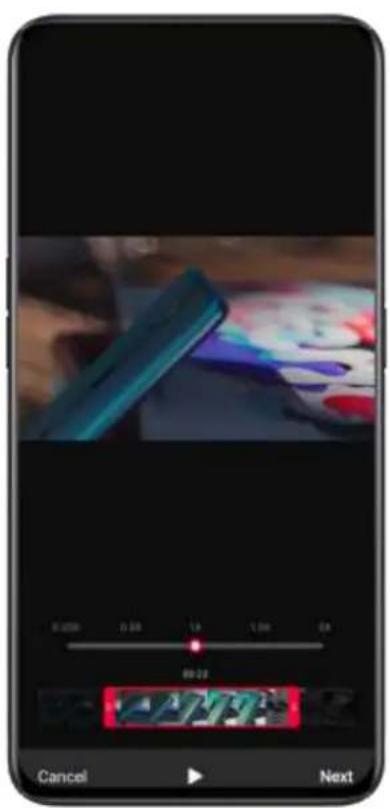
text_image
8:20 0:30 14 1:30 24 88:20 277 Cancel Next
text_image
0.256 0.58 19 1.99 29 10:11 10:44 Cancel NextAdd theme and filter
After finish trimming and speed changing for the video, tap [Next] to add more themes and filters.
Add soundtrack
To make a video more dynamic, you can also add soundtrack both from local and system music.
Add special effect
ColorOS 6.1 offers two kinds of special effects to better highlight the video, including Close-up and Pulsation.
- Close-up: The video frame will be zoomed in for more detailed shots.
- Pulsation: The beat of regular repetitive movements.
Add texts
You can add marks or subtitles at different frames in the video.
Add watermark
Add a watermark with the location and date of the video to show up in the bottom left corner of the video. After editing, tap [Done] to save the video.
Photos
[Photos] is where all photos and videos are restored. This app is categorized into three parts, including [Photos] [Albums] and [Memories].
Photos
All photos and videos will be displayed with the taken date.
View photos
Pinch the screen with two fingers to look through the photos in the Year or Month timeline. Tap the thumbnails to view photos in full screen.
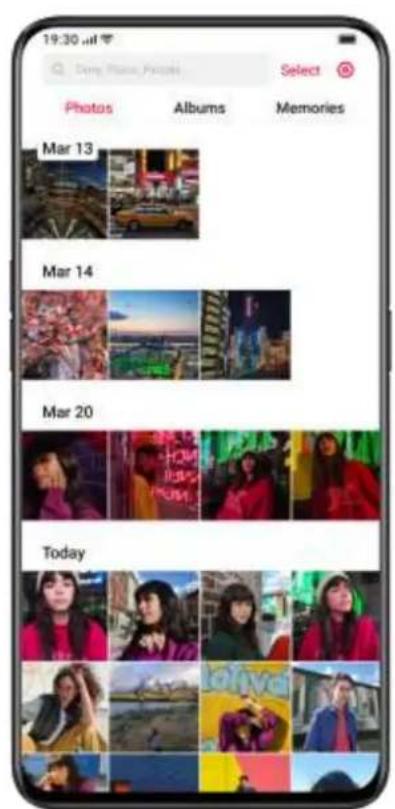
text_image
19:30 μF Deep Photo Photos Select Photos Albums Memories Mar 13 Mar 14 Mar 20 Today
text_image
19:30 AM Sleep Place Foods Photos Albums Memories March 2019 June 2019You can also pinch the screen by zooming in or out to view more details of the photos. Swipe left or right to browse photos.
Tap the photos for more options:
- Share: Send the photo to other users.
- Favorite: Tap to set the photo as favorite and restore in the favorite album.
- Edit: Tap to edit the photo.
- Delete: Tap to delete the photo.
- Others: You can also set a photo as wallpaper, assign as the avatar to a contact, make it private or public, or view more information.
natural_image
Japanese cityscape with a traditional pagoda at sunset, mountains in the background (no visible text or symbols)
text_image
Fujiyoshida Add to Set as Wallpaper Set as Contact Avatar Set as Private DetailsShare photo
If you want to send a photo to your friends, tap at the bottom left corner.
If you want to send more than one photo or video, select them in the thumbnail view, and tap at the bottom left corner.

text_image
1 photo selected Cancel Invite the other side to turn on "OPPO Share" in the notification bar. Help Facebook Gmail Messages Blueprint Add to Maps Keep Home Hello Connect to PDFAfter selecting, you can also do the followings apart from sending them to your friends:
- Set them as private
- Add them to an album
- Collage
- Delete
text_image
19:30 am Temp: Photo Photo Select Photos Albums Memories Today
text_image
19:30 am Select Item(s) Cancel Today Album Memorial SelectAlbums
[Albums] restore and organize all your photos and videos, including photos, screenshots, smart albums and more.
View Albums
ColorOS 6.1 will organize photos into many albums to better search and view photos.
- Camera: All photos and videos taken by phone camera.
- Favorite: All photos and videos you set as favorite.
- Videos: All videos taken by a camera of the phone.
- Screenshots: All screenshots on the phone.
- Last 30 days: All photos and videos taken in the last 30 days
In addition, ColorOS 6.1 also offers a smart album, which categories photos and videos regarding people and locations. You can view photos and videos of certain people or locations.
Create a new album
You can create new albums apart from the albums created by ColorOS 6.1. For example, create a new album that stores your photography named "Personal album".
Go to [Photos] > [Albums], tap at the top right corner, type a name for the new album, then tap "Save".
Once saved, you'll be given categories of photos that you can transfer to your album. Just choose the image or tap [Select All] then tap [Save].
Memories
[Memories] is where the themed collections of photos and videos are scanned and gathered automatically based on dates and locations of taken.
Tap thumbnails to enter Memories, and Tap Play. ColorOS 6.1 will automatically play a movie-like video edited with music and visual effects.

text_image
19:30 am ← Journey Select Journey March 2019 TO June 2019—Create a Memory album
You could create your own Memory album.
Enter [Photos] > [Memories], tap at the top right corner to create a Memory album, then type a name for the Memory album and select no less than 20 photos.
Customize Memory album
You can also edit or polish the Memory video. Tap [Play], Tap the [Edit] at the top right corner and start editing.
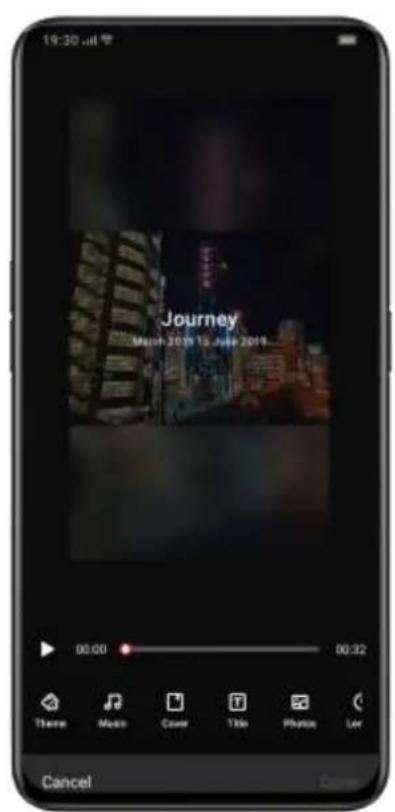
text_image
19:30 jul Journey March 2019 15, June 2019... 00:00 00:32 Theme Music Cover Title Photo Lcr Cancel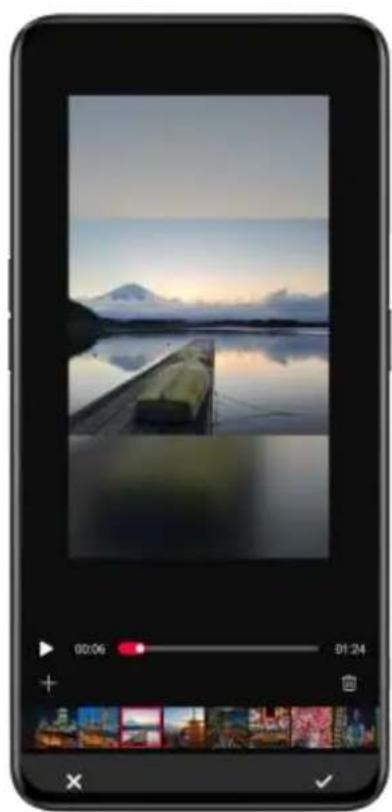
natural_image
Digital photo of a scenic lake at dusk with mountains reflected in the water, displayed within a smartphone interface (no text or symbols on the scene itself)Theme: Choose your favorite from the 10 themes, with each of them matching with different background music and display.
Music: Add the music either from the built-in storage or upload a local file.
Title image: Select one of your favorite title image from Memory video.
Title: Edit the title of the Memory video.
Photos: Choose photos to set time for display. You can also delete them if you think they don't perfectly fit the theme of the Memory album by tapping "Delete" at the bottom right corner. Tap "X" to delete the photos in batches.
Duration: Customize the duration of the video. The maximized duration is 48s.
Optimize Storage
Enable [Optimize Storage] to auto-sync photos and videos in order to make room for other files.
Open [Camera], Tap at the top right corner, and tap [Optimize Storage].
After you enable [Optimize Storage], photos with the original size will be synced in OPPO Cloud, and the photos saved on your phone will be stored as a smaller size, allowing your phone to have more storage. After you disable [Optimize Storage], ColorOS 6.1 will automatically download the photos with the original size for you.

text_image
19:30 am Settings Auto Photo Sync Using WiFi or Cellular Data Videos Sized 500 MB or Above Are Not Synchronized Optimize Storage When installed original photos will be stored on DPGC. Cloud, which contains, currently provides videos of them will be stored in your phone in your space. When installed, compose photos will be automatically downloaded in your phone.Search Photos
ColorOS 6.1 allows you to search for photos with the smart searching function.
Enter [Photos], and tap the search bar atop to start search photos.
You may view photos classified as Latest, by data, event/location, and person.
You can also search with keywords such as time, place, or people to quickly locate results. For instance, search [Scenery] and view the photos you took during travel.

text_image
19:30 μl Time Place People... Cancel Last 30 Days See All Time This Year Jun 2019 Place Expand New York Chiyoda City Shinjuku CI... Chuo City
text_image
19:30 am Shinjuku City Cancel Shinjuku City thanks I we q' w e r t y u i o p a s d f g h j k l z x c v b n m 7123Using Soloop to Create Vlogs
Thanks to technological advances in software and hardware, people everywhere now have the opportunity to take short videos of moments in their daily lives.
ColorOS 6.1 includes a whole new short video editor called Soloop. Soloop lets you edit videos and add filters, music and effects to your videos in seconds. Amazing videos are just one tap away.
Smart Editing, Creating a Video in One Tap
Besides automatically creating wonderful stories, you may also experience the powerful editing functions of Soloop. The mobile phone becomes an omnipotent editor, realizing your dream of becoming a director.
| No. of items found in the last 12 months | |
| Item | Number of items found in the last 12 months |
| 1 | 3 |
| 2 | 4 |
| 3 | 5 |
| 4 | 6 |
| 5 | 7 |
| 6 | 8 |
| 7 | 9 |
| 8 | 10 |
| 9 | 11 |
| 10 | 12 |
| 11 | 13 |
| 12 | 14 |
| 13 | 15 |
| 14 | 16 |
| 15 | 17 |
| 16 | 18 |
| 17 | 19 |
| 18 | 20 |
| 19 | 21 |
| 20 | 22 |
| 21 | 23 |
| 22 | 24 |
| 23 | 25 |
| 24 | 26 |
| 25 | 27 |
| 26 | 28 |
| 27 | 29 |
| 28 | 30 |
| 29 | 31 |
| 30 | 32 |
| 31 | 33 |
| 32 | 34 |
| 33 | 35 |
| 34 | 36 |
| 35 | 37 |
| 36 | 38 |
| 37 | 39 |
| 38 | 40 |
| 39 | 41 |
| 40 | 42 |
| 41 | 43 |
| 42 | 44 |
| 43 | 45 |
| 44 | 46 |
| 45 | 47 |
| 46 | 48 |
| 47 | 49 |
| 48 | 50 |
| 49 | 51 |
| 50 | 52 |
| 51 | 53 |
| 52 | 54 |
| 53 | 55 |
| 54 | 56 |
| 55 | 57 |
| 56 | 58 |
| 57 | 59 |
| 58 | 60 |
| 59 | 61 |
| 60 | 62 |
| 61 | 63 |
| 62 | 64 |
| 63 | 65 |
| 64 | 66 |
| 65 | 67 |
| 66 | 68 |
| 67 | 69 |
| 68 | 70 |
| 69 | 71 |
| 70 | |
Importing Materials
Start Soloop, tap Create Video, and select and import the required videos and pictures.
You can quickly view and select files by type, for example, All, Photos, and Videos. You can also swipe to the Category module. On this screen, Soloop automatically recognizes over 80 picture scenarios and 24 video scenarios, and intelligently categorizes raw materials, comprehensively covering various scenarios in daily life.
Selecting Video Size
Soloop automatically selects a suitable display ratio based on the video materials. You may manually set the display ratio to 1:1, 4:3, 3:4, 16:9, or 9:16. After the required size is selected, the video and pictures are automatically cropped.
Selecting a Smart Template
Don't painfully learn to edit, just a little, it will automatically select the wonderful picture, and follow the music rhythm card to make the wonderful blockbuster instantly, even if you need to start, when it scans enough excellent clips, Will generate a wonderful story on its own initiative. All you have to do is export and share, and wait for praise.

text_image
21:55 3.4 GOVERNMENT FIELD SPORT 00:05 / 00:12 Reselect Material Video Image Play Change In Travel Story Old Story Movie Sport Templates Film Video SubMide MusicEditing Materials
- Tap Edit to process the materials more specifically.
• To add a material, tap the + sign on the left. - To delete a material, side to the corresponding clip, and tap the delete icon.
-
To cut a material, side to the corresponding clip, and tap the scissors icon to cut this segment into two.
-
To change the sequence, press and hold any segment to go to the sorting screen. Press and hold the corresponding material to arrange it.
- To change the speed, tap the related clip, and choose to speed up or slow down the playing speed at the bottom of the screen.
- To change the duration, tap the related clip, press and hold the left end or the right end of the clip, and slide inwardly to the desired position.
- To add the reverse play effect, tap the related clip, tap the icon to set this segment to be played in reverse.
- To rotate materials, tap the related clip, and tap the on , to rotate this segment 90 degrees clockwise.
- To add rotating animation, tap the icon between two materials, and add rotating animation here, to make the video more smooth and vivid and give it an animated effect like a movie.

text_image
21:54 3:4 I AM THE CHAMPION I AM THE CHAMPION I AM THE CHAMPION I AM THE CHAMPION 00:00 / 00:12 Smart Templates 70% Fbox Subtitle MusicSelecting a Filter
Add a filer so that the video and pictures have a better texture.
Tap Filter and select one for the video. Over 10 filters are available.
After selecting a suitable filter, tap the filter again to adjust the
intensity.

text_image
21:35 3:4 00:07 / 00:12 Smart Temperio Tons Video Subwoo MylinAdding Subtitles
Do you want to add subtitles like those in movies and TV series? This is easy in Soloop.
Tap Subtitle, and side along the time axis to the point where the subtitle needs to be added. Tap Add Subtitle to go to the editing screen, enter no more than 100 characters, and select the font color.
Then, the subtitle will be displayed over the picture. You can tap on the subtitle to enlarge, rotate, move, re-edit or delete it.
After the subtitle has been added, a subtitle layer is displayed in the video editing area. You can press and hold the subtitle layer and change
the time position the subtitle appears at, and press and hold the left or right end and slide inwardly to increase or decrease the duration the subtitle appears for.

text_image
Good night 90 characters leftAdding Music
Tap Music and add suitable background music to the video. Soloop recommends music styles to you based on the video content, so you don't need to worry about the choice of music. The music library is updated regularly and follows trends to satisfy your ears at any time.
You can also tap Local Music to add music locally stored on the mobile phone.

text_image
21:55 3:4 00:07 / 00:12 +/- Mute Street Templates Free Filter Squeeze MyosGenerating the Video
After you've finished editing, tap Generate in the upper right. Wait a moment for your video to be finalized. The video will be automatically saved to Photos on your mobile phone. You can also share the video quickly by choosing OPPO Share, Facebook, or Tik Tok.
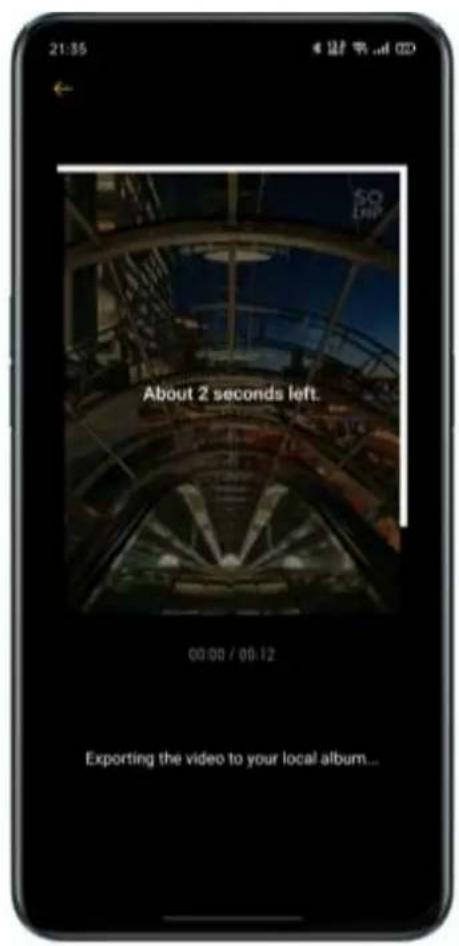
text_image
About 2 seconds left. 00:00 / 00:12 Exporting the video to your local album...Adjusting the Export Resolution
Go to Soloop's home screen, tap the Settings icon in the upper right corner, tap Export Resolution, and select 1080p or 720p.
Adding a Watermark
Go to Soloop's home screen, tap the Settings icon in the upper right corner, and enable Video Watermark. Then a Soloop-specific watermark will be added to pictures in the video.

text_image
21:36 Settings Export Resolution 1080P > Video Watermark Clear Cache 0 B Version No. 1.2.3 Check for Updates User Agreement > Privacy Policy >Viewing My Projects
Go to Soloop's home screen, and tap the icon in the lower right corner to view all your projects. You can tap on a project to enter the editing screen and continue editing it.
Game Experience
Hyper Boost
Hyper Boost is a full scene, system-level resource scheduling optimization solution developed by OPPO. Hyper Boost accelerates performance when needed, which could realize the two-way conversation in real-time between applications and system resources, making your phone operate more smoothly.

text_image
HYPERBOOST SystemBoost AppBoost GameBoostGame Space
OPPO mobile phone provides a dedicated application for game lovers, namely Game Space. It will be automatically installed on the phone with the game together in one place, which is convenient for you to unify the management of game applications. It also offers the performance mode, distraction-free mode, game acceleration, and other features to ensure the best quality game experience for you.

text_image
Game Space PUBG MOBILE Battery Life 8.9H Signal Strength Google PaymentsThe Game Space will automatically launch game mode when you enterthe game, where the phone will intelligently adjust the
CPU/GPU/Storage/Network frequency according to the game scenario, ensuring the game to run smoothly at any time and reducing power consumption.
Hide Games Icons on Home Screen
It is inconvenient to search if the game icons are everywhere on the Home Screen. [Hide Games Icons on Home Screen] makes your Home screen organized and tidy.
Go to [Settings] > [Game Space], enable [Hide Games Icons on Home Screen], then the game icons for the games will no longer be shown on the home screen.
Note: Games Icons will not return to the original display, instead, they will appear on the last page of the home screen.
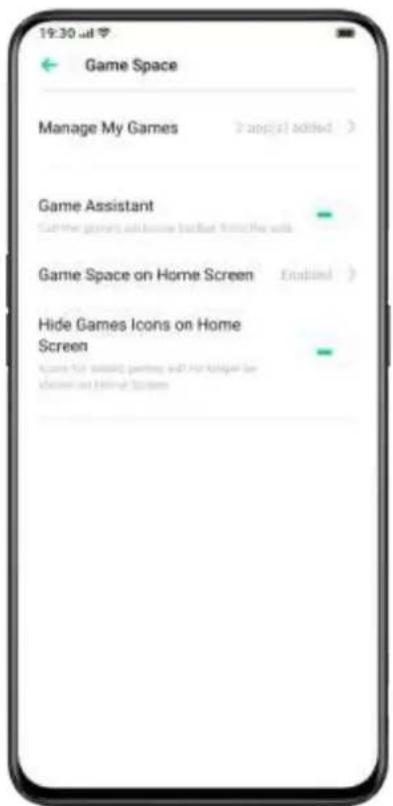
text_image
Game Space Manage My Games Game Assistant Game Space on Home Screen Hide Games Icons on Home ScreenGame Mode Settings
Game Space introduces three types of performance modes and a selection of distraction-free mode. You can Tap on the icons on either left or right to open the menu.
In the middle area, there is an indicator showing the remaining battery usage and the current network latency. Swipe up the menu from the bottom to load more new features.
- Pattern Adjustment
Competitive Mode will improve the game app performance, frame rate and touch response, further enhancing your gaming experience.
However, the pitfall is there will be increased power consumption. Thus, the pattern adjustment is recommended for some large competitive games.
Balanced Mode will balance the performance and power consumption, which is suitable for most light-weight games.
The low-power mode will lower the game quality, but it will prolong the battery usage, which is recommended for the phone in low battery.

text_image
19:30 am Game Space PUSHO MOBILE Competitive Mode 8.0 H Signal Strength Black Runner Competitive Mode Improved performance/frame output responsiveness, last power consumption is higher Balanced Mode Balances game performance and power consumption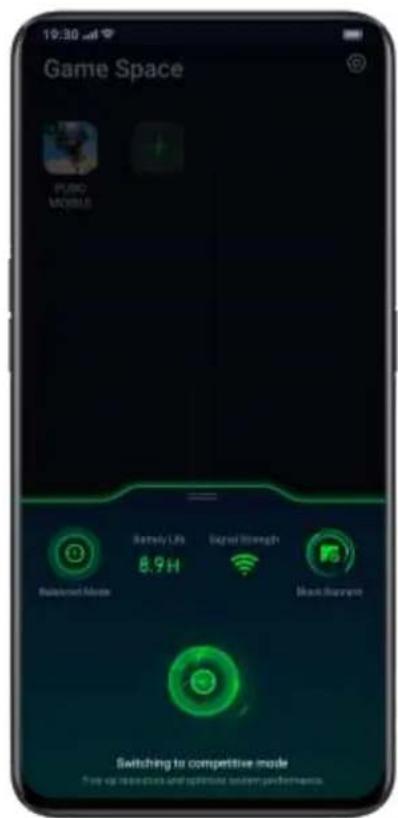
text_image
19:30 AM Game Space PUBO MOBILE - Retained Notice 8.9H Signal Strength Bluetooth Switching to competitive mode Play up reposition and update system performance.• Network Acceleration
Enable [Dual Chanel Network Acceleration], the network speed can be intelligently increased when Wi-Fi and cellular data are used concurrently. It should be noted that additional data consumption might be created.

text_image
Game Space Battery Life 1.7H Network Latency 21ms Competitive Mode Black Ratings Network Optimization Smart Dual Channel Network Optimization (36/FT) network latency HighAvg Alt. Extreme Betates Game 4D Vibration Feedback Enhanced For instance in effects in game scenes. Out > Enhanced Settings Brightness Lock Visualize automatic brightspots during gaming More Preference Smoothness Optimization- 4D Game Vibration
When 4D Game Vibration is turned on, the vibration will be launched automatically in specific game scenarios to enhance the rhythm and atmosphere of games.
(4D Game Vibration is available in Reno 10X Zoom Version currently.)
- Reduce Latency in Single SIM Mode
You can turn on [Reduce Latency in Single SIM Mode] when your phone is in dual SIM mode. When Reduce Latency in Single SIM Mode is turned on, the system will disable the secondary SIM under deep Do-Not-Disturb status to enhance cellular network quality. It should be noted
that you may miss important calls or messages, be cautious to turn on the mode.
- Luminance Lock
This function can maintain the current mobile phone screen brightness and will not adjust screen brightness according to a light sensor, just in case that the screen may be either too bright or dark while you are playing games.
Game Assistant
While playing games, you can use the side-to-slide hand posture with the help of a Game Assistant. It will be displayed in a small window where the user can directly enable screen capture, recording, hang-up, and other related functions.
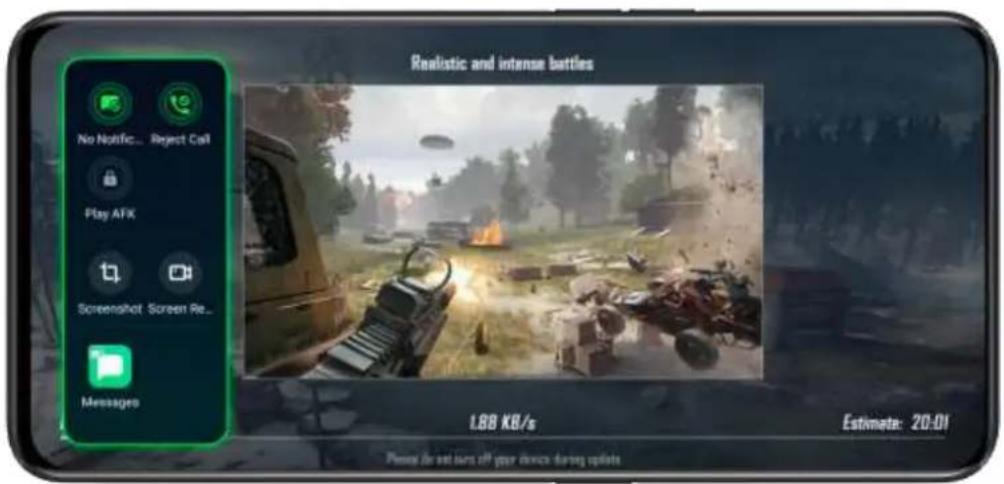
text_image
Realistic and intense bottles No Notific... Reject Call Play AFX Screenshot Screen Re... Messages 1.88 KB/s Estimate: 20:01 Please be set up all your devices during updates- Flip the Switch
Go to [Settings], tap [Game Space], and turn on the button titled
[Assistant Game Assistant]. The toolbar will then appear on the side of the screen.

text_image
Game Space Manage My Games 2 app(s) added > Game Assistant Call the games exclusive to Solar from the side Game Space on Home Screen Enabled > Hide Games Icons on Home Screen Found that a bird of birds will not want to propose on home screen- Shield Banner Notice
If you don't want to receive any push or notification messages during the game, you can toggle to enable [Do Not Disturb].
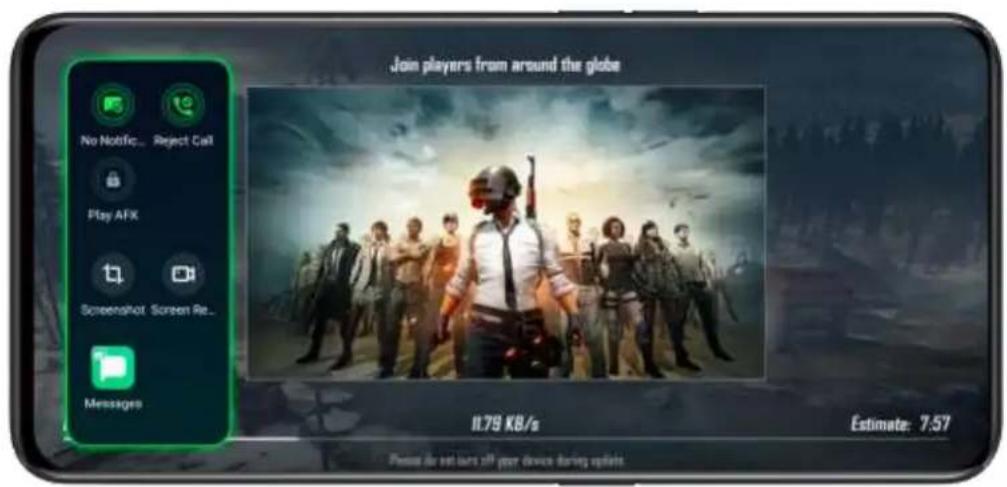
text_image
Join players from around the globe No Notific... Reject Call Play AFX Screenshot Screen Re... Messages 1.79 KB/s Estimate: 7.57 Please do not sure all your device during updates.- Answer Calls in Banner Notice
When you play the game in the landscape, incoming calls will appear as banner notice, you can answer or reject the calls, and the game will not be paused or stopped.
- Decline Incoming Calls
If you do not want to be interrupted by any incoming calls during the game, you can turn on [Reject Calls].
- Screen Hang-up
When you have to exit the game for any emergency, or if you have a game that supports automatic combat, the Hang-up feature can help.
Swipe right to turn the Hang-up on while the game is running. Though the phone will be locked, the game will be on hold in the backstage. You should reactivate the game by yourself by swiping the screen. The screen hang-up would not only remain the current game process but save phone battery.
- Screen Capture
In the menu of Game Assistant, you can capture screenshots or record the screen.
- Floating Window Chat
When you have to reply to some important messages, with the help of Floating Window Chat, you don't have to exit the game anymore. The Game Assistant can help you reply to the messages without quitting the game.
After Taping on APP that needs to be displayed in a floating window, the APP will appear as a small window on the side of the screen, allowing you to quickly reply to Wechat, QQ or SMS messages while you are playing games. All applications that support floating window chat will be displayed in the Game Assistant.
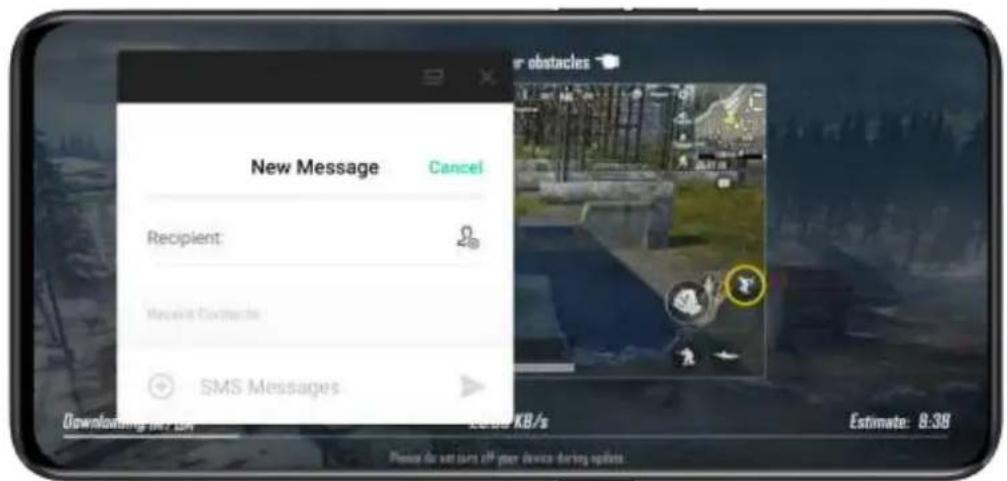
text_image
New Message Cancel Recipient: Recent Comments SMS Messages Downloading new items Estimate: 8.38 KB/s Please do not turn all your device during updates.Supported Game Engine
The core principle of the OPPO Hyper Boost engine is to optimize applications and system resources to achieve the real-time [two-way dialogue] linking a three-level (including system, game and apps) smartphone acceleration, achieving a higher level game-running efficiency.
Based on Game Boost 1.0, the industry pioneered Frame Boost and added Touch Boost.
Frame Boost can predict the possible occurrences of mobile phones and make targeted processing in advance. The game can be optimized up to 73.68%. Touch Boost can greatly improve the touch performance of mobile phones up to 21.6% and optimize image synthesis.
(Data is from the ColorOS 6.1 lab. During the test, get the comparison data of Game Boost for different games is compared by controlling the opening and closing of Game Boost. The specific data will vary slightly depending on the test environment and the version of the test software. Ultimately, the actual optimization data will prevail.)
Disable Game Space on Home Screen
If you don't want to display the [Game Space] icon on the home screen.
Go to [Settings] > [Game Space] > [Game Space on Home Screen] > [Disable Game Space on Home Screen].
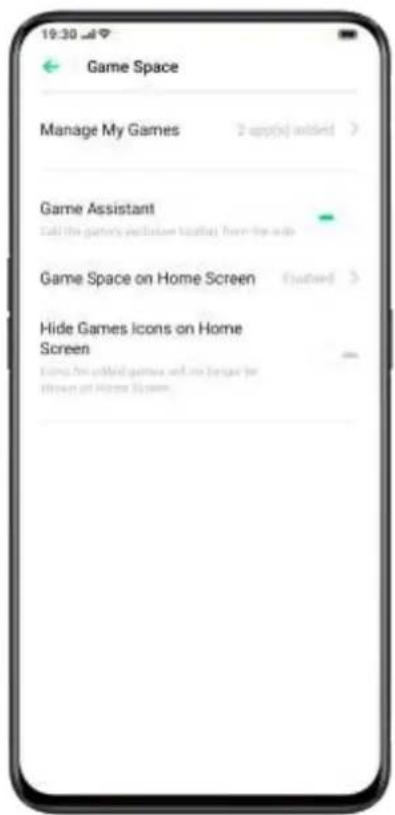
text_image
Game Space Manage My Games 2 app(s) added > Game Assistant Add the gallery exclusive location from the site Game Space on Home Screen (+) joined > Hide Games Icons on Home Screen Using the old games with some games for #trown on Home System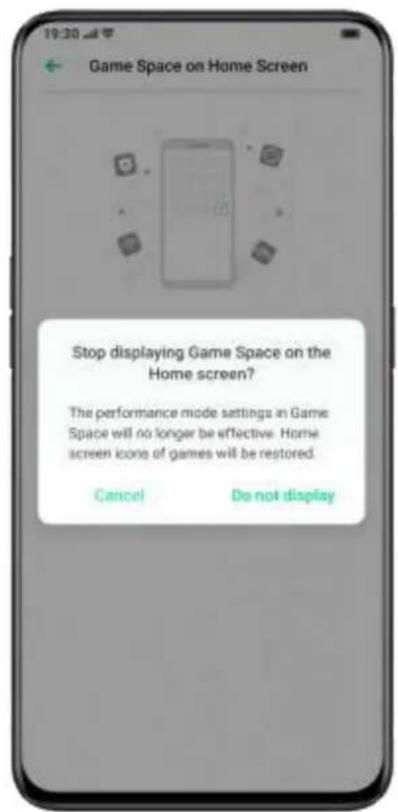
text_image
Stop displaying Game Space on the Home screen? The performance mode settings in Game Space will no longer be effective. Home screen icon of games will be restored. Cancel Do not displayRestart, Update, Back Up, Restore & OPPO Cloud
Restart
Power on/off
To shut down your phone:
- Press and hold the Power button until the slider appears.
- Drag the slider down.
To power on your phone, press and hold the Power button until the OPPO logo appears.
Restart the Phone
Press and hold the Power button until the slider appears, drag the slider up. Or press and hold the Power button and Volume up button for more than 10s to restart the phone.
Software Updates
The upgrading process won't consume your cellular data. Back up your data and ensure your phone is fully charged before upgrading.
You can update ColorOS 6.1 in the following ways.
OTA Online Update
ColorOS 6.1 will automatically download the available updates while it's connected to a network, and you will receive a system notification before installing the new version.
Otherwise, you can manually update your phone in [Settings] > [Software Updates].
Local Update
- Download the update firmware package for the corresponding model from the OPPO official website:
(community.coloros.com/forum.php?mod=phones). - Store the firmware package with the suffix OZIP in the root directory of the phone file storage.
- Open [File Manager], tap the firmware, and select [Update Now].
- Restart your phone after updating.
Back up
You can back up your data to the phone storage or OPPO Cloud.
Back Up to Phone Storage
- Go to [Settings] > [Additional Settings] > [Back Up & Restore].
- Open [Back Up & Restore], tap [Create New Backup], and select the data that you want to back up with.

text_image
19:30 Create new backup Select the Data to Be Backed up Contacts Messages Call History System Data App (Excluding Data) Start backupAll data will be stored in the phone storage. Please copy all back-up files to an external storage device, computer or others before you start cleaning the cache or resetting the data.
Back Up to OPPO Cloud
- Go to [Settings] > [OPPO Cloud].
- Activate [OPPO Cloud Backup].
- To backup manually, tap [Back Up Now].
Restore
You can restore your data and settings from backup, or restore your phone to factory settings. Be careful to back up your data before restoring the phone.
Restore Phone
Go to [Settings] > [Additional Settings] > [Restore Phone].
You have the following options when restoring your phone:
- Reset System Settings Only: It won't consume the stored data including photos and music.
- Clear Downloaded Apps and App Data: Keep data (e.g. photos, songs).
- Clear All Data: Clear all data including photos and music.
- Clear the Contacts and Call History on This Phone: Contacts on the SIM card will be retained.
- Clear the SMS and MMS Messages on This Phone: SIM messages on the SIM card will be retained.
Restore Data
Restore from Phone Storage
- Go to [Settings] > [Additional Settings] > [Back Up & Restore].
- Select the data to be restored, and tap [Start Restoring].
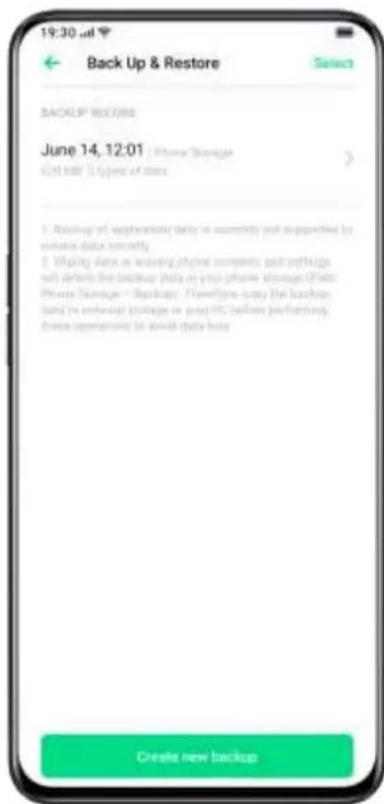
text_image
19:30 pm Back Up & Restore BACKUP RECOINS June 14, 12:01 iPhone Storage CHN MR - It types of mini 1. Backup of accessories data in currently post-processed by inline data recently. 2. Mapping area or embedding phone colors and insets and where the backup data in your phone storage (Phone iPhone Storage - Backup). Flow/Flow copy the backup Band (in embedding) storage in your PC before perfecting. Three operations to save this mini. Create new backupRestore from OPPO Cloud
- Go to [Settings] > [OPPO Cloud Services] > [OPPO Cloud Backup].
- Select the data to be restored, and tap [Restore].
App Optimization
App Cleaner
Clean up the junk cache files on your phone.
Open [Phone Manager] > [Cache Junk]. You can choose the following options:
- One-Tap Clean Up
- Clean All App Data
- Clean Photos
- Cleans Videos
- Clean Audios
- Clean Files
- Clean Idle Apps
Smart System Management
This is a new feature of ColorOS 6.1. The Smart System Management would intelligently stop the apps which have been barely used for a while, as a way to prolong battery usage.
Smart Memory Compression
This is another new feature of ColorOS 6.1. It works to detect inactive apps and compress its memory to make space for other apps.
OPPO Cloud
OPPO Cloud Backup serves to back up your contacts, SMS, photos, files.
Activate OPPO Cloud
- Go to [Settings] > [Sign-in OPPO ID].
- Enter the lock-screen passcode and toggle on [Enable Cloud
Service]. The system will start the backup of photos, contacts, notes, calendar, browsing the history, and WLAN by default.

text_image
19:30 Cancel OPPO ID Make User Service User Address I Enter password Sign In Target password New user registration OPPO ID Privacy StatementOptimize Storage
When enabled the optimized storage, the original photos will be stored at OPPO Cloud, while smaller, clearly visible versions of photos will be stored on your phone to save space.
Go to [Settings] > [OPPO ID] > [Cloud] > [Photos] > [Optimize Storage]. When disabled, the original photos will be automatically downloaded to your phone.
Manage Cloud Storage
OPPO Cloud provides 5G free storage for each user. If you need more cloud storage, you can delete unused data or pay for the upgrade of more storage.
Check Your Cloud Storage
Go to [Settings] > [OPPO ID] > [Manage Cloud Storage].
Free Up Cloud Storage
You cannot back up data to the Cloud after the storage is full. You may delete the unwanted data for more space. Backing up your device is recommended.
Delete Cloud Backup
When Cloud Backup is enabled, it automatically performs a backup of your SMS, call history, apps list and arrangement, and system settings to the cloud. The automatic backup frequency is once every 1 day. You can turn off Cloud Backup or delete stored data for larger cloud storage.
Go to [Settings] > [OPPO ID] > [OPPO Cloud Backup].
Select the backup you want to delete by Taping [Delete] on the bottom right area of the screen.
When [OPPO Cloud Backup] is off, the system will stop the automatic backup. The backed-up data will not be deleted.
Purchase More Cloud Storage
Each user will acquire a 5GB free cloud storage. You can purchase more space when you need.
Go to [Settings] > [OPPO ID] > [Manage Cloud Storage] > [Change Cloud Storage Plan].
You can upgrade the storage plan to either 30GB, 100GB or 1024GB. You can pay for renewal every month, three months, half a year, or on a yearly basis.
Contacts Time Machine
Whenever there are changes in contacts, a record will be automatically generated, allowing you to restore to the previous status.
Activate Cloud Sync of Contacts
Go to [Settings] > [Cloud Data Sync] > [Contacts] > [Cloud Sync of Contacts].
Restore Contacts
Go to [Settings] > [Cloud Data Sync] > [Contacts] > [Restore Contacts].
Select the backed-up data at a certain point that you have previously finished with the backup and tap [Restore].
Support & Service
Contact OPPO Support
Contact OPPO Support Team to get more help.
Email: hello@oppo.com
Self Service
Find more information about user guide, spare parts price, warranty status, and more.
https://oppo.custhelp.com/
Get Help and Explore
View the most frequently asked questions about all popular topics of OPPO.
https://oppo.custhelp.com/app/popular_faq
Get More Information
View more relevant information and services about OPPO available on
the OPPO official website https://www.oppo.com/en/.
ColorOS 6.1 Facebook: http://bit.ly/ColorOS 6.1-FB
ColorOS 6.1 Twitter: http://bit.ly/ColorOS 6.1-TW
ColorOS 6.1 Instagram: http://bit.ly/ColorOS 6.1-INS
ColorOS 6.1 Youtube: http://bit.ly/ColorOS 6.1-YTB
OPPO Cloud
Get more support and service from OPPO Cloud, please log in http://Cloud.oppo.com/.