F5 Youth - Smartphone OPPO - Free user manual and instructions
Find the device manual for free F5 Youth OPPO in PDF.

| Product Type | Smartphone |
| Brand | Oppo |
| Model | F5 Youth |
| Display Size | 6.0 inches |
| Display Resolution | 720 x 1440 pixels (HD+) |
| Processor | Mediatek MT6763T Helio P23 (Octa-core) |
| RAM | 4 GB |
| Internal Storage | 32 GB |
| Rear Camera | 16 MP, f/1.8 |
| Front Camera | 16 MP, f/2.0 |
| Battery Capacity | 4000 mAh |
| Operating System | Android 7.1 Nougat (ColorOS 3.2) |
| Dimensions | 156.5 x 75.2 x 7.5 mm |
| Weight | 158 g |
| SIM | Dual SIM (Nano-SIM, dual stand-by) |
| Connectivity | Wi-Fi 802.11 b/g/n, Bluetooth 4.2, GPS, microUSB 2.0 |
| Sensors | Fingerprint (rear-mounted), accelerometer, proximity, compass |
| Care and Cleaning | Wipe with a soft, dry cloth. Avoid liquids and abrasive materials. |
| Safety | Do not disassemble; avoid exposure to extreme temperatures; use only approved chargers. |
| Spare Parts and Repairability | Battery and screen replacements available at authorized service centers. |
| General Information | Released November 2017. Supports expandable storage via microSD (up to 256 GB). |
Frequently Asked Questions - F5 Youth OPPO
User questions about F5 Youth OPPO
0 question about this device. Answer the ones you know or ask your own.
Ask a new question about this device
Download the instructions for your Smartphone in PDF format for free! Find your manual F5 Youth - OPPO and take your electronic device back in hand. On this page are published all the documents necessary for the use of your device. F5 Youth by OPPO.
USER MANUAL F5 Youth OPPO
OPPO Smartphone ColorOS 3.2 User Guide
Content
- Welcome Page 6
- Safety Information ....6
- Get started 11
3.1. Quick look....11
3.1.1. ColorOS 3.2 Features....11
3.1.2. ColorOS 3.2 Applicable products and specifications....13
3.1.3. Buttons and components....21
3.1.4 Sleep/Wake button....24
3.1.5.Menu, Home and Return buttons....25
3.1.6.Volume buttons....34
3.1.7. Micro-USB port 36
3.1.8. Headset jack....37
3.1.9. SIM and SD cards....37
3.1.10. Accessories came with OPPO phone....39
3.1.11. Charge the battery....41
3.1.12. Gesture & Motion......42
3.1.13.Key combinations....48
3.1.14. Status Icons....51
3.2. Configure settings....54
3.2.1. Google account....54
3.2.2. Fingerprint, Face and Passcode 56
3.2.3. Set up other mail and calendar accounts....65
3.2.4. Transfer data with Clone Phone....65
3.2.5. Date and Time....70
3.2.6. Language and Region....71
3.2.7. Connect to the Internet....73
3.3. Instructions 74
- What's new in ColorOS 3.2....75
4.1. Face ID....75
4.2. Virtual Navigation Keys....80
4.3. Game Acceleration....85
4.4. Enhanced Security Mechanism....89
4.5. Search Settings and Files....92
4.6. Optimized File management....93
4.7. Auto Recording....97
4.8. Reset password with fingerprint....101
4.9. Reset password with fingerprint....104
4.10. Control the volume....107
- Basics ...... 109
5.1. Use apps....109
5.2. Share from apps ....111
5.3. One-click cleanup 112
5.4. Lock the running background apps 114
5.5. View, zoom in and out 115
5.6. Navigation Keys 117
5.7. Change the screen orientation 125
5.8. Multiple modes with easy access 126
5.9. Take a screenshot 127
5.10. Notification and Status Bar 130
5.11. Personalize your Control Center....134
5.12. Search 136
5.13.Text....137
5.13.1. Add or change keyboard languages.... 137
5.13.2. Type, edit and delete text....140
5.13.3. Smart input....143
5.13.4. Voice typing....145
5.13.5. TouchPal for OPPQ....147
5.14. Sound, Vibration and System Feedback.... 149
5.15. Charge and monitor the battery....151
5.16. Location Service....154
5.17. Use the phone internationally....156
5.18. Power Saving Mode....157
- Personalize your OPPO phone....158
6.1.ColorOS 3.2 device name....158
6.2. Personalize the Home screen....159
6.2.1. Organize the Home screen....159
6.2.2. Home screen widgets & Transition Effects....164
6.3. Change the wallpaper....166
6.4. Lock screen magazine....167
6.5. Adjust the screen brightness and color temperature....169
6.6. Change auto-screen lock time....171
6.7. Change the text size....172
6.8. Keyboard and input method....173
6.8.1. Customize the look of the keyboard....173
6.8.2. Split keyboard....175
6.8.3. Trends....176
6.8.4. Keyboard general settings....177
6.9. Set up Startup Manager....179
6.10. Clone Apps.... 180
6.11. Manage Default App....181
6.12. Gesture & Motion....182
6.13. Timing Power On/Off....186
6.14. Game Acceleration....189
6.15. App display in full-screen....193
7. Apps....194
7.1. Phone.... 194
7.1.1. Make and Answer Phone Calls.... 194
7.1.2. Conference calls....202
7.1.3. Block calls....203
7.1.4. Emergency calls....205
7.1.5. Auto Recording....205
7.1.6. Operator's Call Related Settings....210
7.2. Messages....212
7.2.1. Send and receive messages....212
7.2.2. Customize message settings....214
7.3. Contacts....216
7.3.1. Add a contact....216
7.3.2. Edit and delete a contact....218
7.3.3. Import and export contacts....221
7.3.4. SIM contacts....223
7.3.5. Manage contacts....225
7.3.6. Back up your contacts....228
7.4. Phone Manager....230
7.4.1. Scan and optimize the phone....230
7.4.2. Cleanup & Accelerate....231
7.4.3. Privacy Permissions....233
7.4.4. Virus Scan....234
7.4.5. Payment protection....234
7.4.6. Frequently Used Functions....235
7.5. Weather....238
7.6. Cameras....241
7.6.1. Take photos....241
7.6.2. Take a selfie....247
7.6.3. Shoot video....252
7.6.4. Camera settings....253
7.7. Photos....254
7.7.1. Photos overview....254
7.7.2. Albums....256
7.7.3. View and use photos and videos....260
7.8. Music....265
7.8.1. Music....265
7.8.2. Change sort mode.....268
7.8.3. Scan local songs....269
7.9. Videos....271
7.10. Theme Store....274
7.10.1. Online phone theme....274
7.10.2. Online wallpaper....275
7.10.3. My profile....276
7.10.4. Manage your downloads....278
7.11. Clock....279
7.11.1. Set Alarm Clocks....279
7.11.2. Add and view clocks for locations around the .world.....283
7.11.3. Use the stopwatch....284
7.11.4. Set the timer....284
7.12. Files.... 285
7.12.1. Fast file browsing....285
7.12.2. View and manage files....286
7.12.3. Fast cleanup....288
7.12.4. Remote Management....290
7.12.5. File Safe....291
7.13. Calculator....293
7.14. Sound Recorder....294
7.14.1. Record....294
7.14.2. Manage recordings....296
7.15. Compass....298
7.16. Chrome....300
7.16.1. Search the web....300
7.16.2. Browse the web 302
7.16.3. Quick Access....308
8. Safety & Privacy....310
8.1. Device security....310
8.1.1. Lock screen password....310
8.1.2. Smart Lock....312
8.1.3. Safe keyboard....313
8.1.4. Payment protection....314
8.1.5. Set up a SIM card lock....315
8.1.6. Virus Scan....317
8.1.7. Pseudo Base Station Blocking....318
8.2. Device administration 320
8.2.1. Allow and install apps from unknown sources....320
8.2.2. App Encryption....321
8.2.3. App permissions....322
8.2.4. Kids Space 323
8.2.5. Block unwanted calls and messages....324
8.2.6. Find my device....326
8.3. Privacy 328
8.3.1. Location Service....328
8.3.2. Join User Experience Project....329
8.3.3. Security Warning....330
8.4. Advanced--Screen pinning....332
- Share Internet connection and files....334
9.1. Tether your phone's Internet connection....334
9.2. Share files....338
9.2.1. Wireless file sharing....338
9.2.2. Wired file sharing....343
9.2.3. Share from apps....345
- Restart, update, reset, and restore....346
10.1. Restart the phone....346
10.2. Update your software version....347
10.3. Backup and restore the phone....349
10.3.1. Back up your OPPO phone....349
10.3.2. Restore data on your phone 350
10.4. Reset the phone....354
- Accessibility....357
11.1. TalkBack....357
11.2. Magnification Gestures....359
11.3. End Calls with the Power Button 361
11.4. Speak password....362
- Safety, handling and support....363
12.1. Health and Safety....363
12.1.1. Using Environment....363
12.1.2. Battery Safety 364
12.1.3. Charger Usage Notes....366
12.1.4. Traffic Safety....367
12.1.5. Electromagnetic (EM) Radiation....368
12.1.6. Other Important Safety Information....368
12.2. Maintenance and Repair....370
12.2.1. Phone Cases....370
12.2.2. Screen Protector....370
12.2.3. Maximize battery life and lifespan.... 370
12.2.4. Keeping Clean....372
12.2.5. Keeping Dry and Solving Water Damage 373
12.2.6. Use Connectors, Ports and Buttons....373
12.2.7. Other Maintenance and Repairing Information....374
12.3. OPPO Mobile Warranty Information....375
1. Welcome Page

text_image
3.2ColorOS
2. Safety Information
Read through the following information carefully. Failure to follow these safety precautions could result in danger or illegal activities.

Safe Startup
Do not switch on the device when phone use is prohibited or when it may cause interference or danger.

Traffic Safety First
Traffic safety is always of first importance. Use of phones and headphones while driving a vehicle or riding a bicycle is not recommended and is illegal in some areas. Obey and follow all related local laws.

Switching off at Gas Stations
Turn off your phone when in any area with a potentially explosive atmosphere, such as gas stations or any other fueling area. Sparks in such areas could cause an explosion or fire, resulting in serious injury or even death.

Switching off When Taking an Airplane
Wireless devices might be prohibited while in the air in some countries or regions. Obey all related local laws and turn off your phone or switch to airplane mode.

Switching off near Medical Equipment
Hospitals or healthcare facilities might use radio-frequency-sensitive equipment. Obey the relevant rules and regulations.

Switching off at Blasting Areas
To avoid interfering with blasting operations, turn off your phone when in a
"blasting area" or in areas posted "Turn off two-way radio." Obey all signs and instructions.

Radiation
Nearly every electronic device gives off radiation. Mobile phone use does not increase the risk of getting brain cancer or other head tumors. Its effect in humans is negligible.

Interference
Nearly every electronic device is susceptible to interference for external sources if inadequately shielded or designed. As a result, your phone may cause interference with other devices.

Temperature
Operate your phone in a place where the temperature is always between 10^ C
to 45°C. Using or storing your phone in a too hot or too cold environment
might damage the battery, or even cause your phone to short-circuit or burn.

Proper Usage
Use your phone appropriately. Do not touch the antenna area unnecessarily when the phone is turned on. Do not drop, disassemble, crush, bend, deform, puncture, incinerate, or insert foreign objects into your phone.

Qualified Maintenance and Service
Never attempt to repair or modify the phone yourself. If your phone has any hardware or software failure, do not use it until you take it to an authorized service provider. Do not disassemble or root your phone yourself, otherwise the warranty service will be terminated immediately.

Batteries, Chargers and other Accessories
Do not dismantle the built-in lithium-ion battery of your device. Use only the batteries, chargers and other accessories authorized by OPPO, for third-party accessories might cause damage or danger.

Waterproofness
Your device is not waterproof. Do not use your device in rain, or other wet locations.

Avoiding Hearing Damage
Permanent hearing loss may occur if the receiver, speakerphone, headphones, or earpieces are used at high volume. You can adapt over time to a higher
volume of sound that may sound normal but can be damaging to your hearing. Set the volume to a safe level to protect your hearing.

Avoiding Eyestrain
Your device's screen color and brightness might have a different degree of stimulation to your eyesight. Long-term viewing of your phone in normal or darker environments will damage your eyesight. When watching video or reading text on your phone, avoid prolonged use, take breaks and turn on eye protection mode to prevent eyestrain.

Glass Parts
The outside cover of your phone's screen, front/rear camera and flash is made of glass. This glass could break if your phone is dropped on a hard surface or receives a substantial impact. Do not attempt to touch or clean the broken glass. Stop using your phone until the glass is replaced by an authorized service provider.

Connecting to Other Devices
Before connecting to other devices, carefully read the user manual for more detailed, accurate and safety instructions. Do not connect to incompatible products.

Being Aware of Laser Safety
If your phone supports laser focusing, carefully read this user manual before using it. Failure to follow the instructions might lead to harmful radiation exposure. To prevent direct exposure to laser beam, do not attempt to open your phone's outer shell, or keep close contact with laser light.
3. Get started
3.1. Quick look
3.1.1. ColorOS 3.2 Features
ColorOS 3.2 is designed to make OPPO smartphones more convenient, fluid and intelligent for every user. It is jam-packed with thoughtful and easy-to-use functions such as facial recognition, game acceleration, power saving mode, eye protection mode, kid space, and more. These make ColorOS 3.2 a close assistant beyond a system.
Better visual experience
- Give you a larger view. A limitless screen design gives you a beautiful visual effect. It could have content extended to the edges of the screen, and let you see a larger world. ColorOS 3.2 devices have their fingerprint sensor relocated to the rear to make the screen to body ratio more than 80 percent.

natural_image
Two smartphone screens displaying underwater scenes: one with a yellow butterfly and coral, the other with a large orange fish (no text or symbols visible)- Virtual navigation keys. ColorOS 3.2 replaces the physical Home Button with fast and fluid gestures, also offers you virtual navigation keys to operate your phone. The virtual keys follow the typical order for OPPO - recent apps, home, and return from left to right. If you are left-handed, you can also switch their order yourself. The system also set multiple colors for the navigation background to match the color scheme of the popular apps. See Navigation keys.

Facial Recognition
A major highlight of the new features is the Facial Recognition which can identify up to 128 facial recognition spots while clicking selfies. With Facial Recognition, you just need to pick up and wake your phone, then it unlocks the instant you look at it, quickened to 0.08s. It does a great help if you've had trouble with your fingerprints over time. See Face ID.
3.1.2. ColorOS 3.2 Applicable products and specifications
Models
R11s / R11s Plus
F5 / F5 Youth
A83
Appearance
R11s / R11s Plus
Black
Champagne
Red (Limited / R11s only
F5 / F5 Youth
Gold
Red (F5 only)
Black
A83
Champagne
Black

natural_image
Three smartphones in different colors (orange, red, black) shown from front and back angles, no visible text or logos.
natural_image
Side view of a black and pink smartphone with camera lens (no text or symbols visible)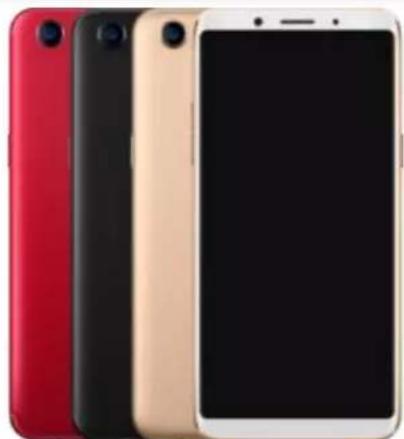
natural_image
Three smartphones in red, black, and beige colors arranged side by side (no visible text or logos)| Height | Height |
| 155.1mm (R11s) | 156.5mm |
| 164.8mm (R11s Plus) |
| Width | Width |
| 75.5mm (R11s) | 76mm |
| 80.2mm (R11s Plus) |
| Thickness | Thickness |
| 7.1mm (R11s) | 7.5mm |
| 7.3mm (R11s Plus) |
| Weight | Weight |
| 153g (R11s) | 152g |
| 182g (R11s Plus) |
Operating System Operating System
ColorOS 3.2, based on Android 7.1 ColorOS 3.2, based on Android 7.1
GPU
Adreno 512
GPU
ARM Mali G71 MP2 770MHz
RAM
4GB (R11s)
6GB (R11s Plus)
RAM
4GB (F5)
6GB (F5)
3GB (F5 Youth)
Storage
64GB (Expandable up to 256GB)
Storage
32GB (Expandable up to 256GB) (F5 4GB
Youth)
64GB (Expandable up to 256GB) (F5 6GB)
Battery
3205mAh (R11s)
4000mAh (R11s Plus)
Battery
3200mAh
Processor
Qualcomm SDM660
Processor
Octa-core MT6763T (F5)
MT6763T (F5 Youth)
Size
6.01 inches (R11s)
6.43 inches (R11s Plus)
Type
AMOLED
Resolution
FHD+(2160 by 1080 pixels)
Colors
16 million colors
Touchscreen
Multi-touch, Capacitive Screen
Size
6.0 inches
Type
LTPS TFT
Resolution
FHD+(2160 by 1080 pixels)
Colors
16 million colors
Touchscreen
Multi-touch, Capacitive Screen
Rear Sensor
20-megapixel,16-megapixel
Rear Sensor
16-megapixel (F5)
13-megapixel (F5 Youth)
Front Sensor
20-megapixel
Front Sensor
20-megapixel (F5)
16-megapixel (F5 Youth)
Flash
LED Flash
Flash
LED Flash
Aperture
Rear: f/1.7
Aperture
Rear: f/1.8 (F5)
Front: f/2.0
Rear: f/2.2 (F5 Youth)
Front: f/2.0
Frequencies
GSM: 850/900/1800/1900MHz
Frequencies
FDD: B1/2/3/5/7/8/20/28
Frequencies
FDD: B1/3/
WCDMA:
TDD: B38/39/40/41
TDD: B38/4
850/900/1700/1900/2100MHz
WCDMA: B1/2/5/8
WCDMA: B1
FDD-LTE:
GSM: 850/900/1800/1900
GSM: 850/9
Bands 1/2/3/4/5/7/8/20/28
TD-LTE:
Bands 38/39/40/41(2535-2655)
| SIM Card Type | SIM Card Type | SIM Card Type |
| Dual Nano-SIM Cards | Dual Nano SIM Cards & Micro SD Card (Total 3 slots) | Dual Nano SD Card (Tot |
| GPS | GPS | GPS |
| Supported | Supported | Supported |
| Bluetooth | Bluetooth | Bluetooth |
| 4.2 | 4.2 | 4.2 |
| Wi-Fi | Wi-Fi | Wi-Fi |
| 2.4/5GHz 802.11 a/b/g/n/ac | 2.4/5GHz 802.11 a/b/g/n | 2.4/5GHz 802.11 a/b/g/n |
| OTG | OTG | OTG |
| Supported | Supported | Supported |
| NFC | NFC | NFC |
| No | No | No |
Proximity Sensor
Distance sensor (F5)
Light sensor
Proximity Sensor (F5 Youth)
G-sensor
Light sensor
E-compass
G-sensor
Gyro Sensor
E-compass
In the Box
| OPPO R11s / R11s Plus | OPPO F5 / F5 Youth | OPPO A83 |
| Earphones | Earphones | Earphones |
| Micro USB cable | Micro USB cable | Micro USB |
| Charger | Charger | cable |
| SIM ejector tool | SIM ejector tool | Charger |
| Documentation | Documentation | SIM ejector tool |
| Case | Case | Documentation |
| n |
Case
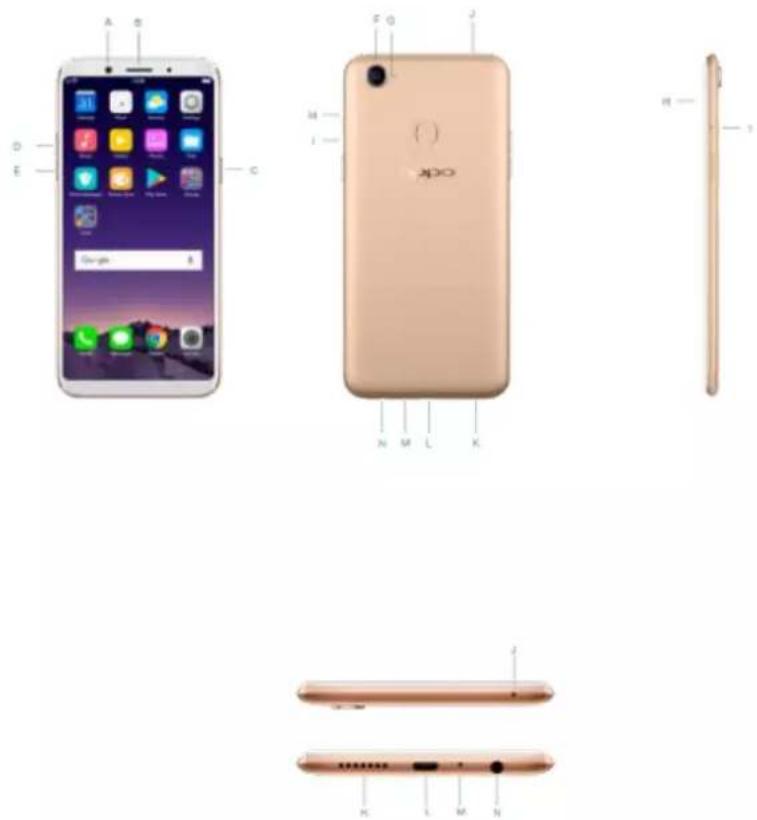
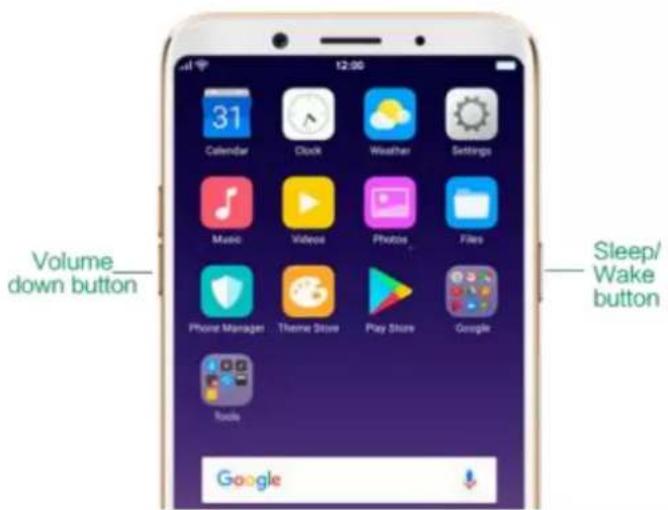
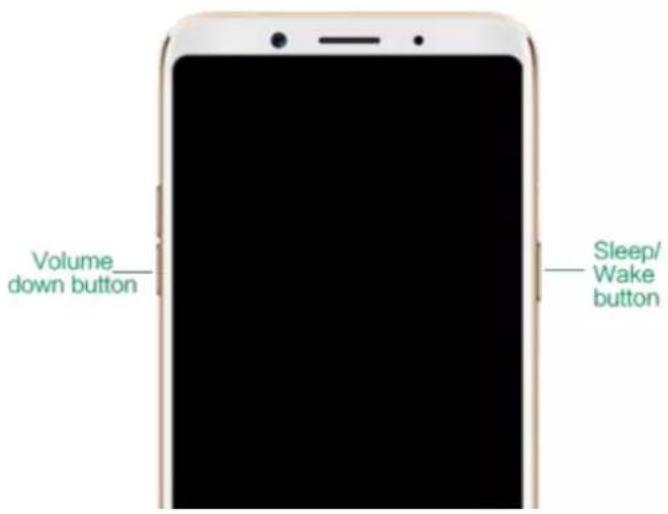
3.1.3. Buttons and components
F5 features
A. Front camera
B. Receiver
C. Sleep/Wake button
D. Volume up button
E. Volume down button
F. Rear camera
G. Flash
H. SIM card tray
I. SIM tray hole
J. Noise cancelling microphone
K. Speaker
L. Micro-USB port
M. Microphone
N. Headset jack
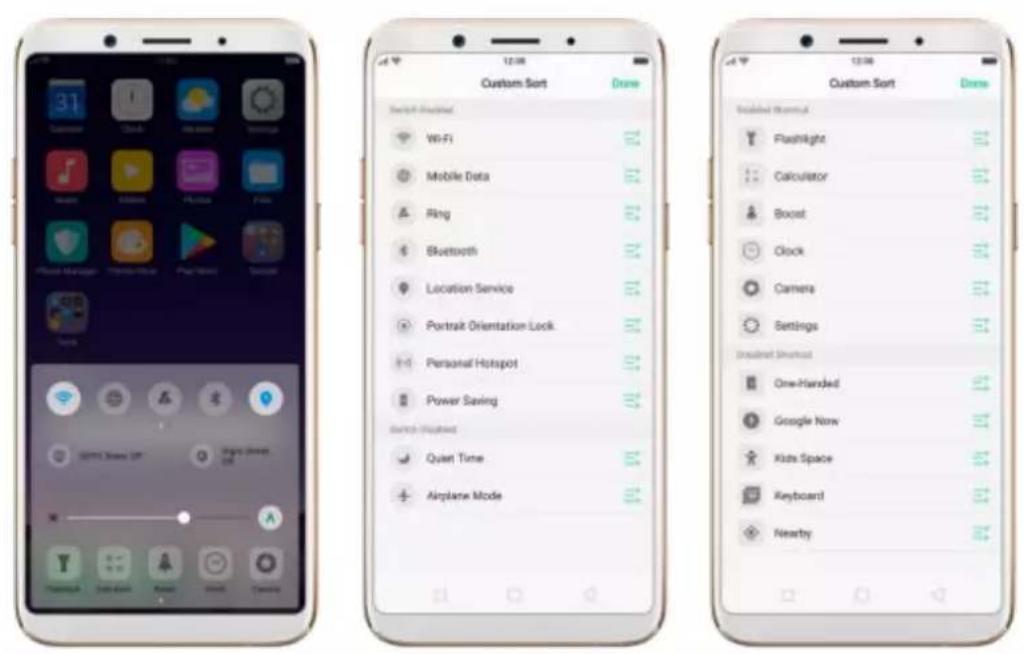
Control Center
Swipe up from the bottom edge of the screen to open control center, which
gives you easy access to Wi-Fi, Mobile data, Bluetooth, GPS, OPPO Share, Nightly Shield, Flashlight, Calculator, Clock and camera. You can also use it to adjust the brightness, boost your phone, disable Bottom keys and go to settings. If you want to change or rearrange the shortcuts, or add other shortcuts, swipe right and click "More".
text_image
31 Smartphone Clock Mac OS Smartphone My Mouse Playbox Playbox Smartphone Sears WiFi Storage UP Google Server Airplane Mode Custom Sort Draw Switch Features WiFi Mobile Data Ring Bluetooth Location Service Portrait Orientation Lock Personal Hotspot Power Saving Switch Features Quiet Time Airplane Mode Custom Sort Draw Enabled Wizard Flashlight Calculator Boost Clock Camera Settings Internet Shutdown One-Handed Google Now Kids Space Keyboard NearbyNotification center
Swipe down from the top edge of the screen to open notification center, which brings all your information into one location, and allows you to manage all the alerts from different apps. Press a notification to respond to it, or swipe a notification left for settings or deleting it.

text_image
12:00 Peking Server 20 ayt RHTODCK, IT.AUST, EPTOSB Settings Access Lockopen Magazine - 6.0% Lockopen Magazine Available available for software magazines Data source: foliar 103, 20 month "100 KB3.1.4 Sleep/Wake button
The Wake/Sleep button on the right side of your phone has a number of different uses.

text_image
12:00 Calendar Clock Weather Settings Music Video Photos Flats Phone Manager Theme Store Play Store Google Tools Sleep/ Wake button GoogleWhen R11 is on
Wake or lock the screen: With the phone powered on, press the Wake/Sleep button once will wake the phone up to the point that you can see the lock screen, like the clock and any notifications that are setup to display there.
When the phone screen is wakened, press this button will blacken the screen and lock the phone.
Take a screenshot: Press and hold the Sleep/Wake and Volume Down buttons at the same time, your phone will take a picture of whatever was displayed on the screen. The image is saved in the Photos app.
Take a long screenshot: Press and hold the Sleep/Wake and Volume Up buttons at the same time, your phone will capture a long screenshot.
End a call: Go to [Settings] > [Additional Settings] > [Accessibility] and turn on [Power Button Ends Call], then you can press the Sleep/Wake button to end phone calls.
Turn off the phone: Press and hold the Sleep/Wake button for a few seconds, whether the phone is on the lock screen or home screen, it will ask you to slide down to power off the device.
Force restart the phone: Press and hold the Sleep/Wake and Volume Up buttons for at least 5 seconds until your device is turned on to force restart your phone.
When R11 is off
Turn on the phone: Press and hold the Sleep/Wake button for a few seconds, and the phone will turn on.
Force restart the phone: Press and hold the Sleep/Wake and Volume Up buttons until your device is turned on to force restart your phone.
Enter Recovery Mode: Press and hold the Sleep/Wake and Volume Down buttons at the same time to enter Recovery Mode.
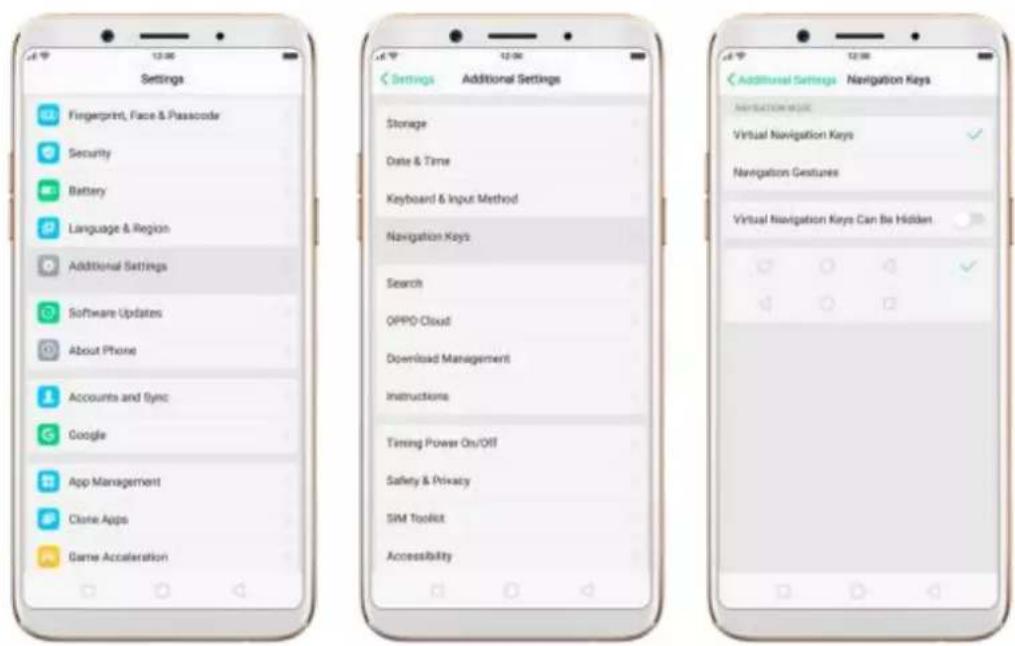
3.1.5.Menu, Home and Return buttons
ColorOS 3.2 replaces the traditional hardware buttons with on-screen virtual navigation keys, also offers you fast and fractures to operate your
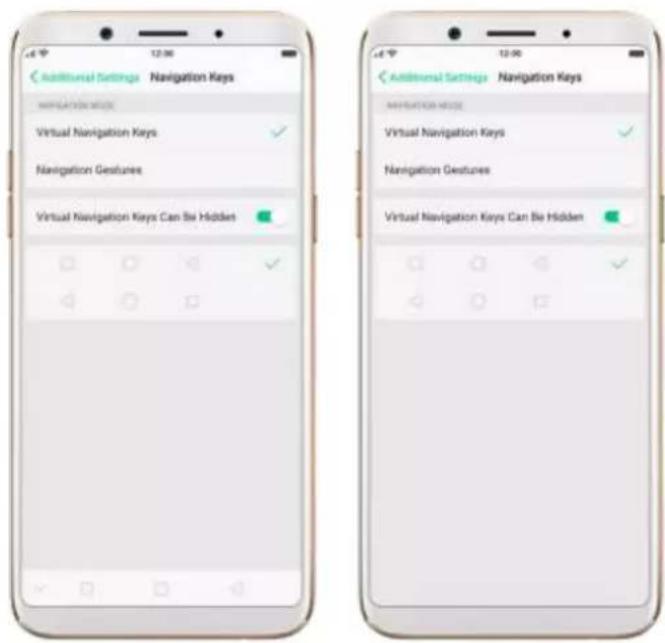
phone. You can change the order of the virtual keys, and set them to appear only when needed to free space on the screen.
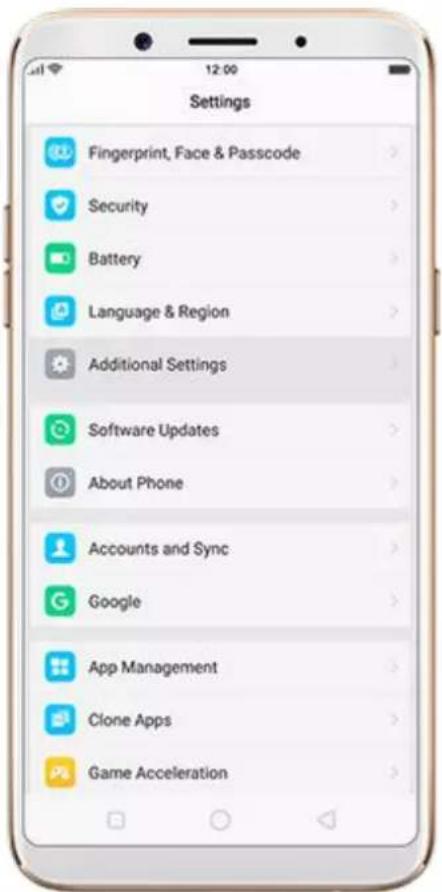
Enable virtual navigation keys. Virtual navigation keys are default on. If you want to enable them manually, go to [Settings] > [Additional
Settings] > [Navigation Keys] and click Virtual Navigation Keys.
text_image
Settings Fingerprint, Face & Passcode Security Battery Language & Region Additional Settings Software Updates About Phone Accounts and Sync Google App Management Clone Apps Game Acceleration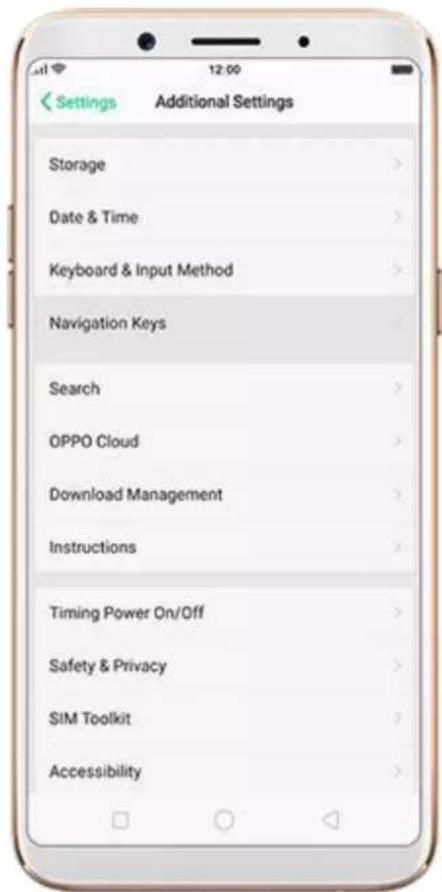
text_image
Settings Additional Settings Storage Date & Time Keyboard & Input Method Navigation Keys Search OPPO Cloud Download Management Instructions Timing Power On/Off Safety & Privacy SIM Toolkit Accessibility
text_image
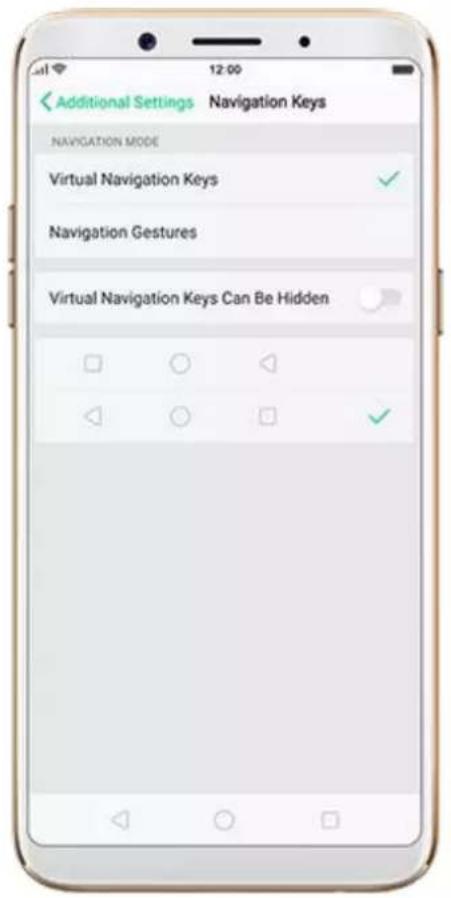
Additional Settings Navigation Keys NAVIGATION MODE Virtual Navigation Keys ✓ Navigation Gestures Virtual Navigation Keys Can Be Hidden ✓Change the order of virtual navigation keys. The keys follow the typical order for OPPO: Menu, Home, and Return from left to right. If you are left-handed, you can change them to the return-home-recent order.
text_image
Additional Settings Navigation Keys NAVIGATION MODE Virtual Navigation Keys ✓ Navigation Gestures Virtual Navigation Keys Can Be Hidden ✓Hide the virtual navigation keys. When you launch a full-screen app, the keys will automatically hide, and can be brought back with a simple swipe:
- When in portrait mode, swipe up from the bottom.
- When in landscape mode, swipe from the bottom to the left.
text_image
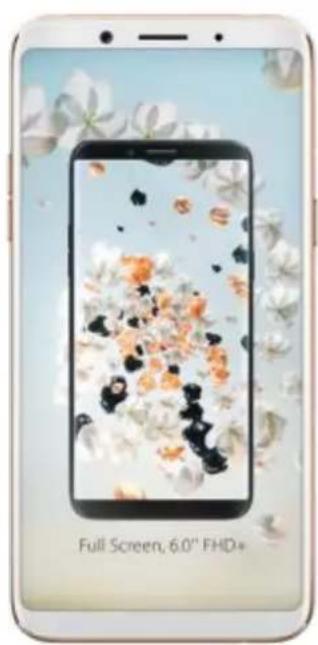
Full Screen, 6.0" FHD+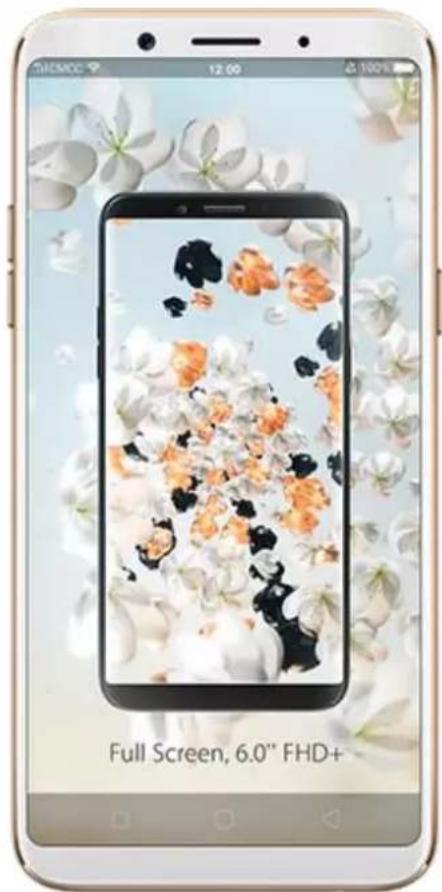
text_image
Full Screen, 6.0" FHD+
text_image
HAY DAY CONNECTING.
text_image
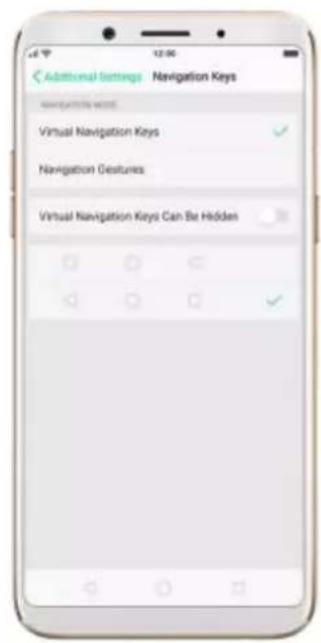
HAV DAY CONNECTING...Manually hide the virtual navigation keys. To set the keys to appear only when needed, go to [Settings] >[Additional Settings] > [Navigation
Keys] and enable Virtual Navigation Keys Can Be Hidden. Then you can click on the left-lower corner of the screen to hide the keys, and swipe from the bottom to reveal them.

text_image
Additional Settings Navigation Keys NAVIGATION MODE Virtual Navigation Keys ✓ Navigation Gestures Virtual Navigation Keys Can Be Hidden ✓
text_image
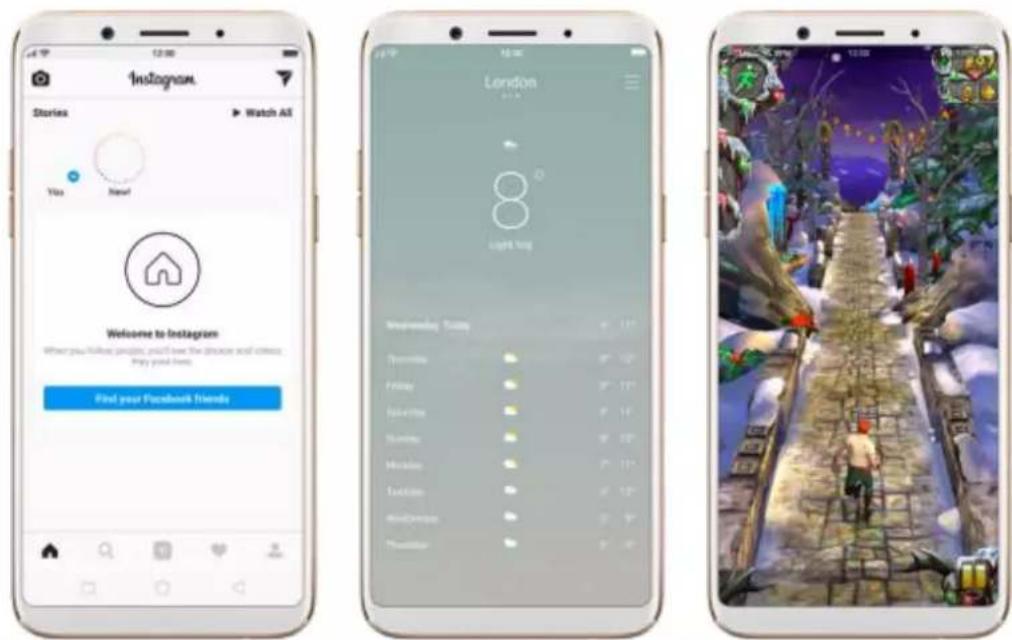
Additional Settings Navigation Keys NAVIGATION MODE Virtual Navigation Keys ✓ Navigation Gestures Virtual Navigation Keys Can Be Hidden ✓Immersive navigation background. The system set multiple colors for the navigation background to match the color scheme of the popular apps. The background color is default white, and it will become translucent or immersive when you open some of the third-party apps.
text_image
Instagram Stories ▶ Watch All You New! Welcome to Instagram When you follow people, you'll see the photos and videos they post here. Find your Facebook friends.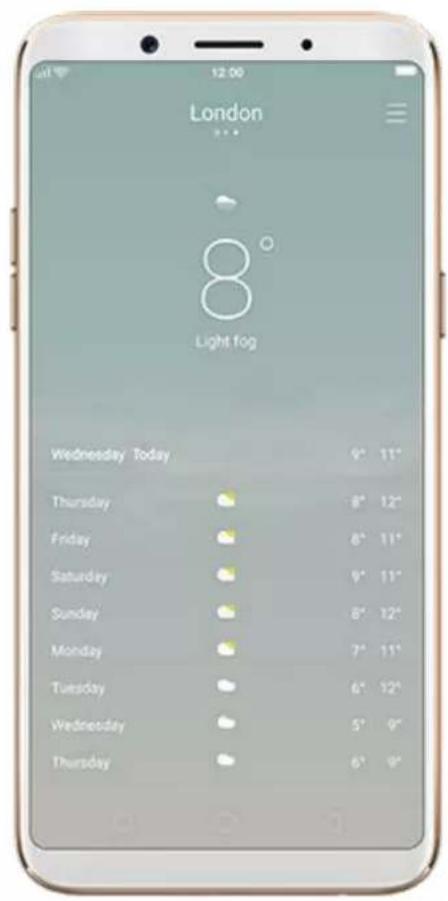
text_image
London 8° Light fog Wednesday Today 9° 11" Thursday 8° 12" Friday 8° 11" Saturday 9° 11" Sunday 8° 12" Monday 7° 11" Tuesday 6° 12" Wednesday 5° 9" Thursday 6° 9"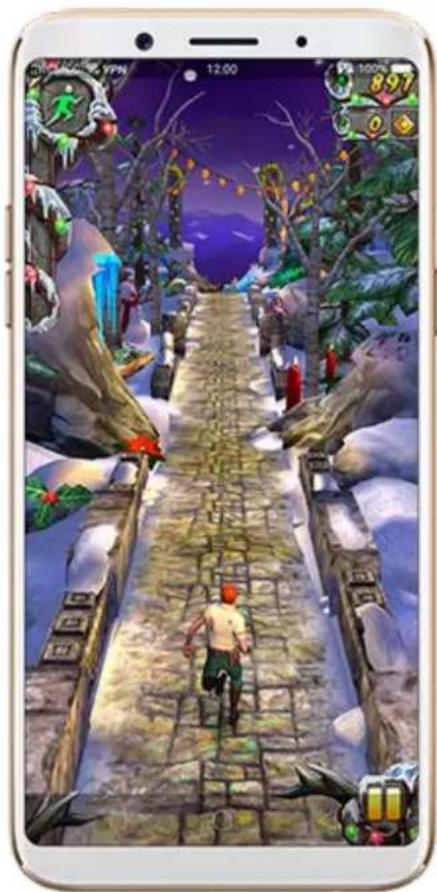
natural_image
Game screenshot showing a character walking on a stone path through a snowy, icy forest with floating game icons and a '100' status bar (no readable text or symbols)3.1.6.Volume buttons
Volume buttons give you easy access to adapt over time to a proper volume of sound. It refers not simply ringer or media, F5 also keeps track of the volume level separately in headphone, microphone and speaker.

text_image
Volume up button Volume down buttonMedia volume: When listening to music, videos and phone calls, use the buttons on the side of the phone to adjust the volume. For information about avoiding hearing loss, see Security Information.
Ringer volume: You can also use the volume buttons to control the volume for the ringer and alerts. When you press and hold the volume down button, your phone will switch to silent mode.
Call volume: When making or receiving phone calls, use the volume buttons to adjust the volume of the call.
* You can also adjust the volume (except call volume) in [Settings] > [Sound & Vibration].+
text_image
Music Video Photos Play Phone Manager Three Star Play Store Google Tools GoogleControlling the camera: Volume buttons can also be used to control your camera. Go to [Settings] > [Camera] > [Volume Button] and set up the volume buttons for Shutter or Zoom.
R11's Micro-USB port is the connector on the bottom of your device where your battery charger connects. It also doubles as the data port, which lets you transfer data to and from a personal computer. Plug the cable in the port to charge or transfer data

text_image
Micro-USB portNotice:
- Repeated connecting and disconnecting of your cable can cause the port to wear out, resulting in a poor connection to your cable.
- Never force a connector into the port, for that might cause damage.
3.1.8. Headset jack
The headset jack is an audio socket that accepts a 3.5mm audio plug. Plug your headset in the jack to listen to music, videos and phone calls. Do not force a mismatched headset into the jack for that might cause damage.

text_image
Headset jack3.1.9. SIM and SD cards
SIM card
* Insert the SIM card before turning on your phone. If you hold a new SIM card, you might need to wait until it is activated by the carrier before you can use it.
A SIM card is provided by your carrier and is used to activate your phone's mobile network. Because it has a small amount of memory, the SIM card not only enables communications between two persons, but stores information
such as phone numbers, security data and more. When using the mobile network, you need to pay charges. To avoid high charges, you can shop data plans with your carrier, or shop international data roaming plans when traveling abroad.
Insert the SIM card: Most OPPO Smartphones support Dual SIM. You can choose to insert one or two.
- Insert the card needle into the hole outside the card tray to pop it open.
- Pull out the card tray and place SIM card(s) on it.
- Put the card tray back in as the same orientation that you removed it.

natural_image
Technical line drawing of a device with two labeled components (Nano) arranged in a layered structure, no text or symbols present.Remove the SIM card: Remove the card(s) in the same way that you insert it(them).
SD card
The SD card is a way to store and transfer images, music, video and other data. You can insert a SD card in your phone to expand phone's memory.
SIM1, SIM2 and SD cards share the same card tray. Insert your SD card in the same way that you insert the SIM card(s).
3.1.10. Accessories came with OPPO phone
Along with the handset, the accessories came with are headset, USB Connecting cable, Power adapter, SIM card tool and Phone case.
Notice : All photos shown are for illustration purpose ONLY. Actual products may vary due to product enhancement.
Headset: A standard headset with 3.5 mm headset plug. Use to listen to music, videos, and phone calls. Use the built-in microphone to talk. When playing the music or videos, click the button once to pause or play a song or video.

natural_image
Close-up of a white circular object with abstract curved shapes, resembling a stylized eye or mask (no text or symbols visible)USB Connecting cable: Use the cable to connect your phone to the computer to charge and transfer files, or use it with the power adapter to charge.

natural_image
Coiled white USB cable with green connectors (no text or symbols visible)Power adapter: Connect the power adapter to your phone using the included cable, then plug it into a standard power outlet to charge the phone.
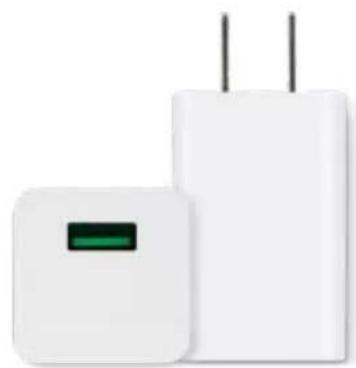
natural_image
Two white electronic devices with black leads, one larger and one smaller, shown against a white background (no text or symbols visible)SIM card tool: Use to pop out the SIM card tray.

natural_image
Simple grayscale illustration of a stylized ovals or ovals with a long handle (no text or symbols)Phone Case: Use to protect against drops and shock damage on the corners and rear of your phone.
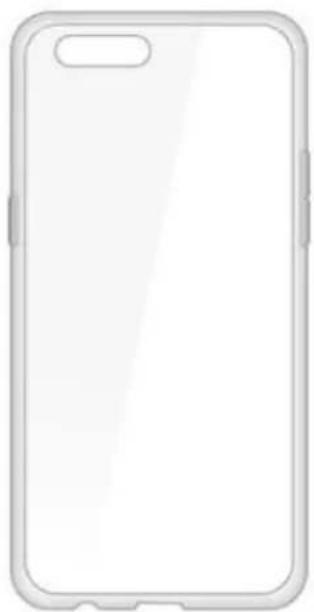
natural_image
Blank white rectangular object with rounded corners and a small rectangular top (no text or symbols)3.1.11. Charge the battery
How to charge the battery:
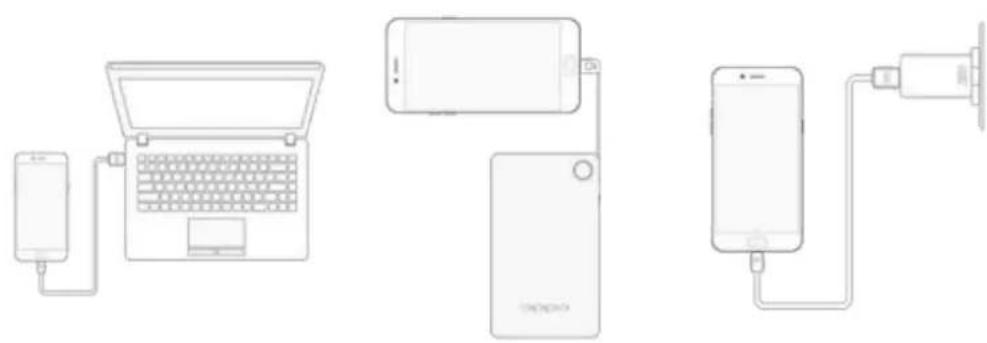
natural_image
Three connected devices: a smartphone, a laptop, and a smartphone with a power outlet (no text or symbols visible)Notice : All photos shown are for illustration purpose ONLY. Actual products may vary due to product enhancement.
Charge with the jack: Connect adapter to your phone using the USB cable, then plug it into a standard power outlet to charge the phone.
Connect to a computer to charge: Use the cable to connect your phone to the computer to charge. Your phone will charge slowly if you connect it to the computer.
Charge with Power Bank: Connect Power Bank to your phone, and your phone will be charged wherever you go. It is an absolute necessity if you are a frequent traveler.
Charging Notice:
-
Charge the phone with the original charging accessories (including adapter, cable and power bank).
-
Charge your phone in a place where the temperature is always between 15^ C to 40^ C. Extreme ambient temperatures will affect flash charging system.
OPPO smartphone is designed to understand gestures. You can use gestures such as tap, swipe, drag and spread to operate your phone.

natural_image
Four hand icons pointing at a blue square, showing different finger movement and rotation (no text or symbols)To set up complex gestures for specific functions, go to [Settings] >
[Gesture & Motion].
text_image
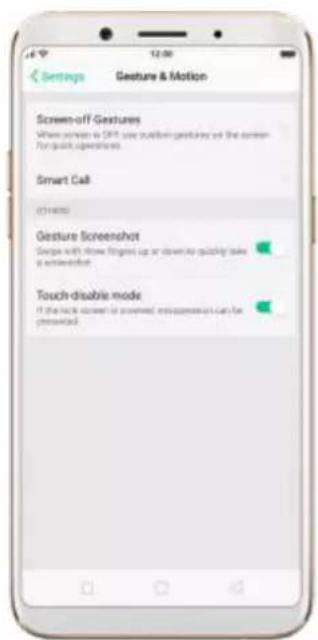
Settings Gesture & Motion Screen-off Gestures Where screen is DFT use multiple gestures on the screen For quick operation Smart Call (214000) Gesture Screenshot Scope with show fingered up or down to quickly take a touchscreen Touch-double mode If the lock screen is opened, it is impossible can be personalizedScreen-off Gestures
To set up screen-off gestures, you need to turn it on first.
Double tap fingerprint button for screen-on: Turn it on to wake up your locked screen with a double-click on the Home button. This function is only effective when the fingerprint sensor is turned off.
Double tap to turn screen on: Turn it on to wake up your locked screen with a double-click on the screen.
Draw O to start camera: When turn it on, you can draw O on the locked screen to open Camera app.
Draw V to open torchlight: When turn it on, you can draw V on the locked screen to open the torchlight.
Music control: When turn it on, you can draw || to pause/play a track, or draw < or > to switch the track when the screen is off.
Add more screen-off gestures: OPPO smartphone of ColorOS 3.1 gives you 7 options, which are Draw ^, Slide up, Slide down, Slide left, Slide right, Draw M and Draw W. Choose one to unlock the phone, call someone or start an app.

text_image
Genture & Motion Screen-off Gestures Screen-off Gestures Double Tap to Turn Screen On Draw O to Start Camera Draw V to Open Torchlight Music Control Draw 1 to pass/stop a track to draw < 0.5 > to switch the touch when the screen is off Add screen-off gesture Add a Screen-off Gesture Back Add a Screen-off Gesture Draw ▲ Slide Up Slide Down Slide Left Slide Right Draw M Draw WScreenshot Gesture
When turn it on, you can take a screenshot by swiping the screen up or down with three fingers.
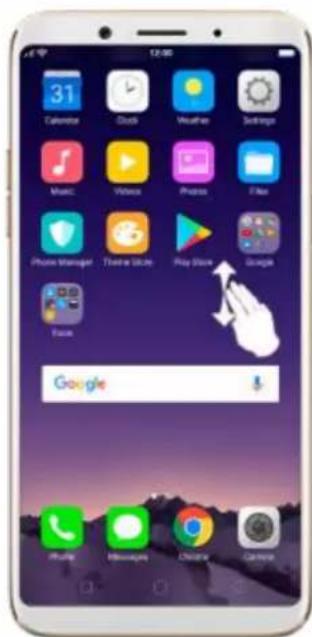
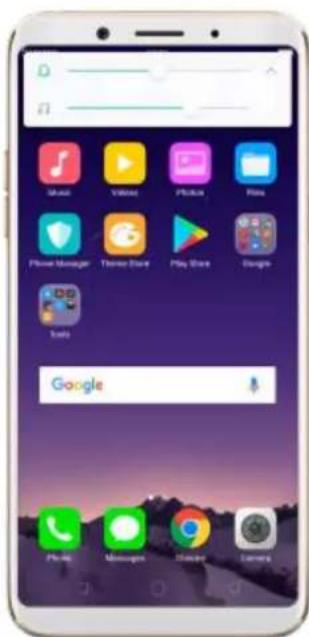
text_image
Smartphone home screen displaying app icons with Google search bar and navigation buttonsMotion
The motion-sensing technology is used in OPPO smartphone. Use it to let your phone response to motion.
Smart call
Auto call when near the ear: Before you can use auto call, you need to set the default SIM card for calling. Go to a contact detail, call detail, message conversation or info interface, put the phone near your ear and your phone will automatically call that specific person.
Auto answer when near the ear: This function lets your phone to answer any incoming calls automatically when putting the phone near your ear.
Switch to receiver for calls: Use it to automatically switch from speaker to receiver when you put the phone near your ear during phone calls.
Flip to mute incoming calls: Use it to silence the ringer by turning the phone over on a table or other flat surfaces.

text_image
Gesture & Motion Smart Call Auto Call When Near the Ear Available at various details call details, messages corresponds and interface Auto Answer When Near the Ear Switch from Speaker for Calls Automatically switch from speaker to receiver when you hold the phone near your ear Flip to Mute Incoming CallsTouch-disable mode
Turn it on to prevent incorrect operations if the lock screen is covered.
+
Take selfies
Open Camera app and switch to the front camera. Click > Palm on the top of the screen. Pose the same hand gesture towards the camera, once the camera captures that, it will take a photo automatically after two seconds. You can change your pose and expression within this two seconds.
3.1.13.Key combinations
Generally, you can use two buttons of your phone to generate a specific result. The common key combinations include:
When phone is on
Press and hold the Power and Volume Down buttons: Your phone will take a screenshot for the current page.
text_image
Volume down button Sleep/ Wake buttonPress and hold the Power and Volume Up buttons:
- Capture long screenshots: About 2 seconds, your phone will be ready to capture a long screenshot. Click [Page-down] to scroll to the next page, continue to click Page-down until you want to stop capturing, then click [Save] to generate a long screenshot.
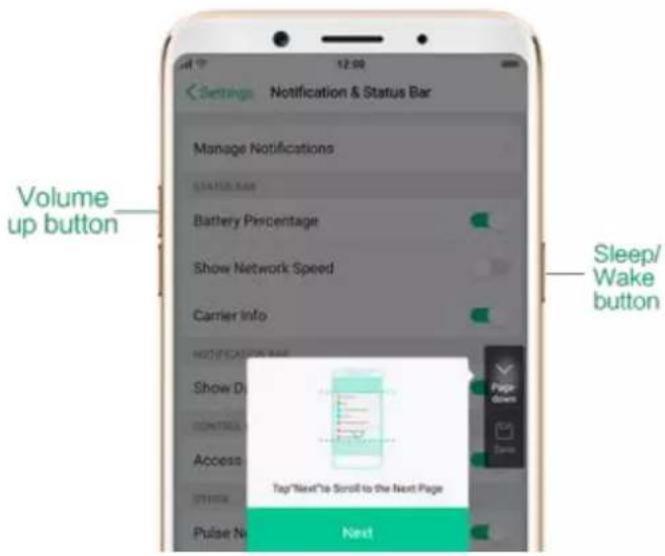
text_image
Volume up button Manage Notifications STATUS: 1.00 Battery Percentage Show Network Speed Carrier Info NOTIFICATION URL Show Di CONTROLS Access STVENUE Pulse Na Next Page Down Sleep/ Wake button Tag"Next"to Scroll to the Next Page Next- Force restart your phone: Press and hold the two buttons for at least 8 seconds until your smartphone is restarted.
Press and hold the Volume Up and Down buttons: Quit Talkback app temporarily.
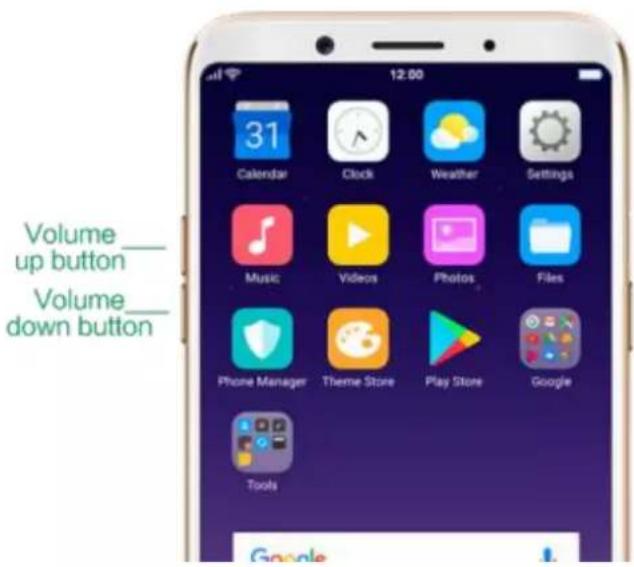
text_image
Volume up button Volume down buttonWhen phone is off
Press and hold the Power and Volume Down buttons: Phone will enter
Recovery Mode, which does help to update the system, wipe data, check disk and more.
text_image
Volume down button Sleep/ Wake buttonPress and hold the Power and Volume Up buttons: Phone will be force restarted. Press and hold the two buttons until your phone is turned on.
The icons in the status bar at the top of the screen give information about your OPPO smartphone:
Status icon
What it means

Mobile network signal
Shows whether you're in range of operanetwork and can make and receive calls.


| more bars, the stronger the signal. | |
| Airplane Mode | Shows that airplane mode is on. Phone's wireless communication abilities are disabled. |
| LTE/ LTE - A | 4G network is available, including LTE and LTE-A. Your phone can connect to the Internet over that network. |
| UMTS/WCDMA | 3G UMTS network is available. Your phone can connect to the Internet over that network. |
| EDGE /GSM | EDGE (GSM) network is available. Your phone can connect to the Internet over network. |
| Wi-Fi | Shows that your phone is connected to Wi-Fi network. The more bars, the strong the signal. See Connect to Wi-Fi. |
| Call Forwarding | Call forwarding is turned on. |
| VPN | You're connected to a network using VP |
| Quiet Time | Quiet Time is turned on. |
| Portrait orientation lock | Phone screen is locked in portrait orientation. |
| Alarm | An alarm is set up on your phone. |
| Bluetooth | Bluetooth is on, or your phone is conneto a Bluetooth device. |
| Bluetooth | Bluetooth Tethering is on. |
| Silent | Silent Mode is on. |
| HD Voice | Your operator's VoLTE service is available HD Voice works to make your calls. |
| USB Debugging | USB Debugging is on. You can transfer via USB. |
| Wireless Display | Wireless projector is connected. |
| Location Service | Location Service is on. |
| No service | Your phone has no signal. |
| Power Saving | Power Saving Mode is on. |
3.2. Configure settings
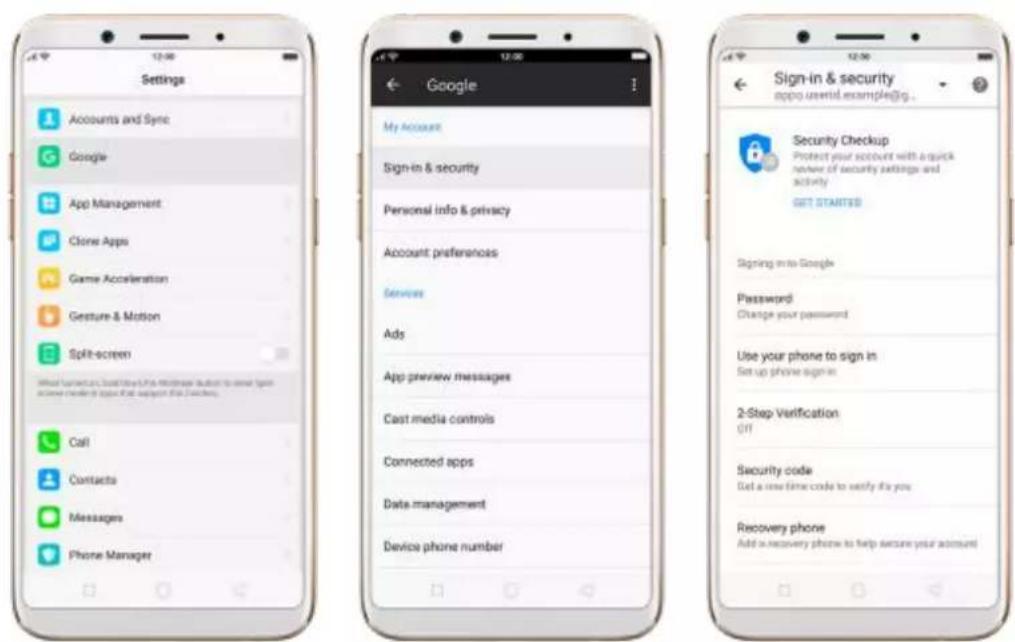
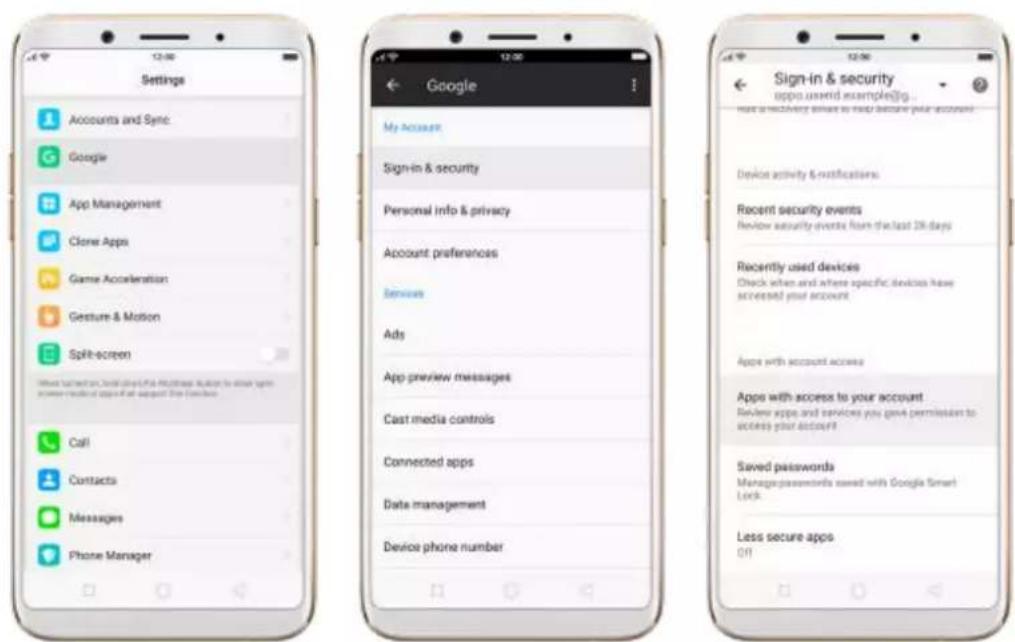
3.2.1. Google account
A Google account is the key to accessing all of Google's products and services, such as Maps, Play Store, Voice Search, YouTube, and more. To sign in your Google account and get the most out of Google, do the following:
Create and sign in your Google account. The first time you switch your OPPO phone on, it will prompt you to sign in to Google. You can also create or sign in your account in [Settings] > [Google] > [Sign-in & security], or in any of the Google apps on your phone.
text_image
Settings Accounts and Sync Google App Management Clone Apps Game Acceleration Gesture & Motion Split-screen Call Contacts Messages Phone Manager Google My Account Sign-in & security Personal info & privacy Account preferences Services Ads App preview messages Cast media controls Connected apps Data management Device phone number Sign-in & security appo.ustwid.example@jg . Security Checkup Protect your account with a quick power of security settings and activity GET STARTEDS Signing into Google Password Change your password Use your phone to sign in Set up phone sign in 2-Step Verification Off Security code Get a new time code to verify it's you Recovery phone Add a recovery phone to help ensure your accountNote: Your Google Account is hooked up with all the Google Services you use. After you login to a Google app, other Google apps on your phone will automatically login to the same account.
View apps with access to your account. Go to [Settings] > [Google] >
[Sign-in & security], scroll down and click Apps with access to your account. If there's an app or service that shouldn't have access to your account, you can revoke its privileges.
text_image
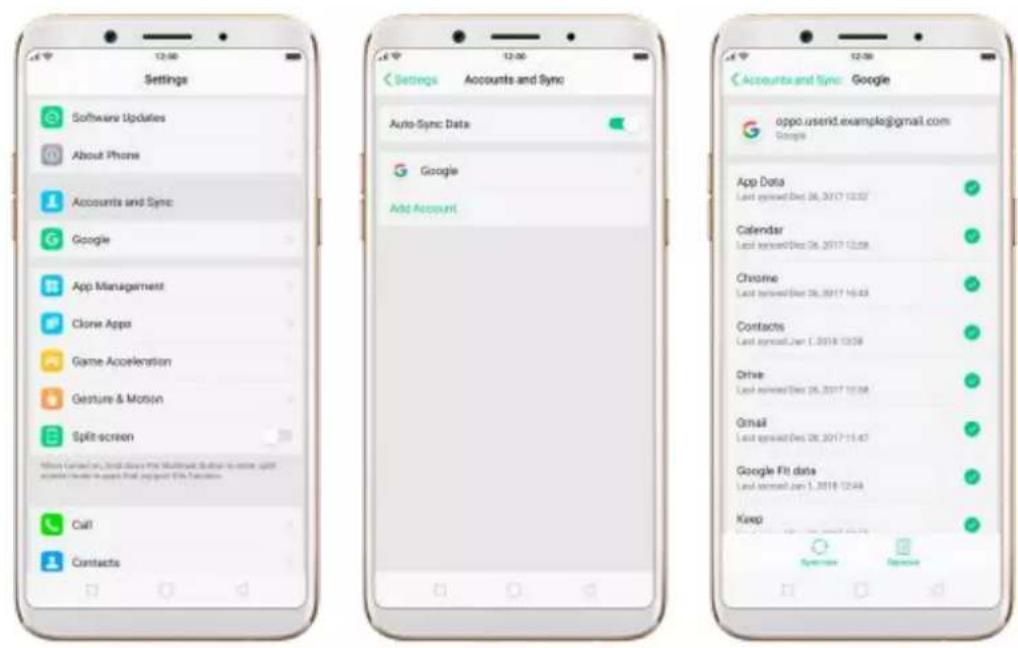
Settings Accounts and Sync Google App Management Clone Apps Game Acceleration Gesture & Motion Split-screen Call Contacts Messages Phone Manager Google My Account Sign-in & security Personal info & privacy Account preferences Services Ads App preview messages Cast media controls Connected apps Date management Device phone number Sign-in & security appoランド examples@g... more a security event to help secure your account! Device activity & notifications Recent security events Review security events from the last 24 days Recently used devices Check when and where specific devices have accessed your account. Apps with account access Apps with access to your account Review apps and services you gave permission to access your account! Saved passwords Manage passwords saved with Google Smart Lock Less secure apps OffSync the Google account. If you have your Google account configured, go to [Settings] > [Accounts and Sync], click Google and you will see the sync options. You can choose which parts of the service you would like to be synced, then click Sync now to start syncing.
Remove your Google account. Go to [Settings] > [Accounts and Sync], click Google, then click Remove acct.
text_image
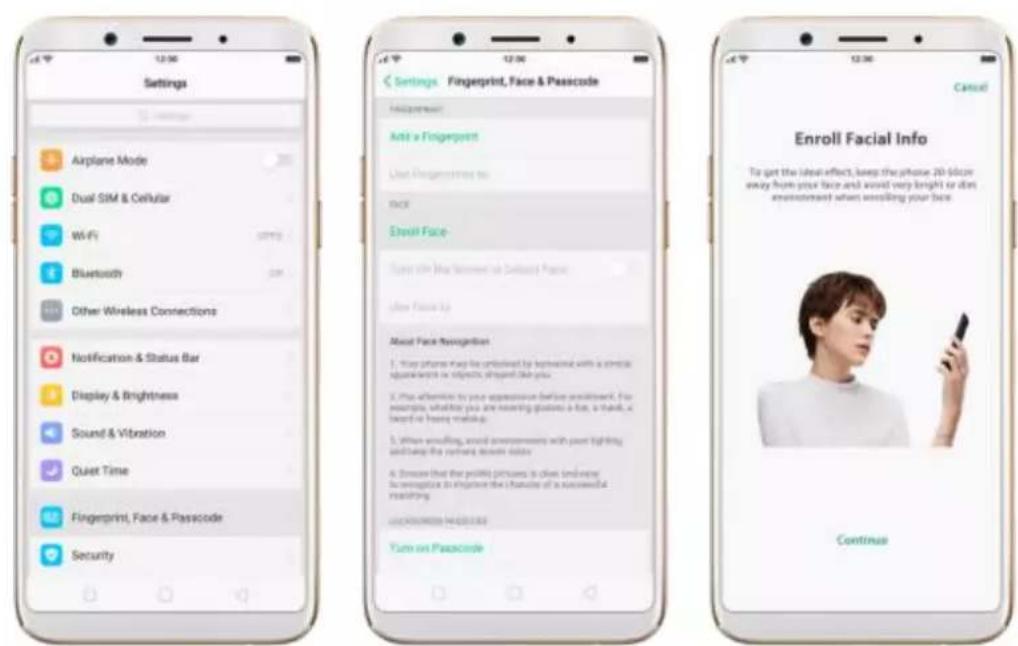
Settings Software Updates About Phone Accounts and Sync Google App Management Clone Apps Game Acceleration Gesture & Motion Split-screen Call Contacts Settings Accounts and Sync Auto-Sync Data Google Add Account Accounts and Sync Google oppo notesd.example@gmail.com Google App Data Last signed Dec 06, 2017 12:57 Calendar Last signed Dec 06, 2017 12:58 Chrome Last signed Dec 06, 2017 16:43 Contacts Last signed Jan 1, 2018 13:58 Drive Last signed Dec 06, 2017 10:58 Gmail Last signed Dec 06, 2017 11:47 Google Fit data Last signed Jan 1, 2018 12:48 Keep3.2.2. Fingerprint, Face and Passcode
Setting a passcode and fingerprint on your OPPO phone are security measures that all users should take. Follow these steps to set a passcode and fingerprint that will be needed to unlock your phone and access the information stored on it.
Use a passcode on your OPPO phone
Set the passcode
-
Go to [Settings] > [Fingerprint & Passcode], click [Turn on Passcode].
-
You'll be prompted to draw a pattern. If you want to use other passcode types, see step 3.

text_image
Set a Lockscreen Passcode Cancel Please draw Your Pattern. Connect your Open & Backs Other Encryptions- Click [Other Encryptions]. You can choose from two types of passcodes:
- Click Custom Alphanumeric Code to use a passcode that contains numbers and/or letters as your preference.
- Click 4-Digit Numeric Code to use a numbers-only passcode that contains four characters.

text_image
Set a Lockscreen Passcode Cancel Enter Lockscreen is required every time you can get your share. Please Enter Passcode Other Escirgating 1 2 3 4 5 6 7 8 9 0-
Draw your pattern or enter your passcode.
-
Re-draw or re-enter your pattern or passcode to confirm it and activate it.
Change the passcode
-
Go to [Settings] > [Fingerprint & Passcode], click [Modify Passcode].
-
Draw or enter your current pattern or passcode.
-
Draw or enter your new pattern or passcode. If you want to use other passcode types, click [Other Encryptions] at the bottom of the screen.
-
Re-draw or re-enter your pattern or passcode to confirm it and activate it.
Turn off the passcode
- Go to [Settings] > [Fingerprint & Passcode], click [Turn off Passcode].
- Draw or enter your current pattern or passcode to confirm.
View more details in Set and use a passcode with your OPPO smartphone.
Use a fingerprint on your OPPO phone
Before you can add a fingerprint, you need to create a passcode for your OPPO phone. You can use fingerprints for:
- Unlocking the phone from the lock screen.
- Making purchases without entering a passcode.
- Encrypting apps
- Protecting files
Add a fingerprint
- Go to [Settings] > [Fingerprint & Passcode], click [Add a Fingerprint].
- Follow the on-screen instructions, placing your finger gently on the Home button until your fingerprint is recorded.

text_image
Place Your Finger on the Sensor Place your finger set the fingerprint button and then move it away. Repeat this step. Place Your Finger on the Sensor Move the edge of your finger away from the fingerprint button and then place it back down again. Repeat this step.- Repeat step 1 and 2 for as many fingers as you like.
Delete or Rename a fingerprint
- Go to [Settings] > [Fingerprint & Passcode], click the fingerprint you've added.
- Enter a name for your fingerprint, or click [Delete Fingerprint].
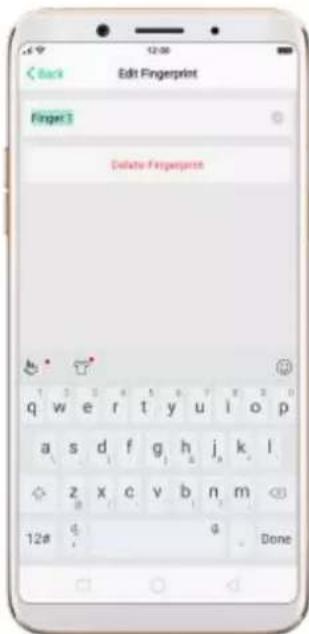
text_image
Edit Fingerprint Finger 3 Delete Fingerprint 1 2 3 4 5 6 7 8 9 10 p q w e r t y u i o p a s d f g h j k l z x c v b n m 12# q DoneUse fingerprint to reset passcode
Prerequisite: The user must have entered the fingerprint and enabled the fingerprint unlock
Reset Passcode methods:
- Restart your phone-enter 5 times the wrong passcode or pattern code-wait for 30s-click the "Use Fingerprint to Reset passcode"-verify fingerprint-reset passcode.

text_image
Please Enter the Passcode Your passcode is required to block the phone after a select 1 2 3 4 5 6 7 8 9 0 No Ingredients To Accept Passcode Emergency Call Back- Without restarting the phone, follow the following operation to reset:
[Settings] > [Fingerprint, Face and Passcode] - Enter the wrong
passcode 5 times - Wait 30s - click on the bottom of the screen to enterthe "Reset Passcode" - verify fingerprint - Reset passcode.
text_image
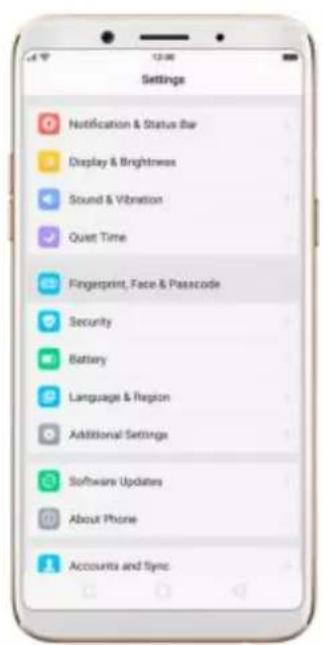
Settings Notification & Status Bar Display & Brightness Sound & Vibration Quiet Time Fingerprint, Face & Passcode Security Battery Language & Region Additional Settings Software Updates About Phone Accounts and Sync
text_image
Enter the Lockscreen Passcode Try Again in 27 Seconds 1 2 3 04 5 6 7 8 9 PUM 0 ###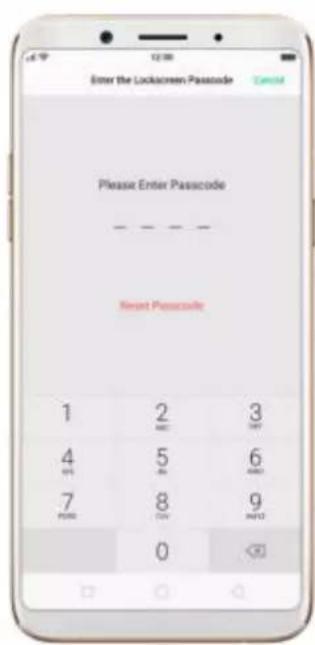
text_image
Enter the Lockscreen Passcode Please Enter Passcode Reset Passcode 1 2 3 MCI MST 4 5 6 P01 JN AMO 7 8 9 P00 CN MISO 0+
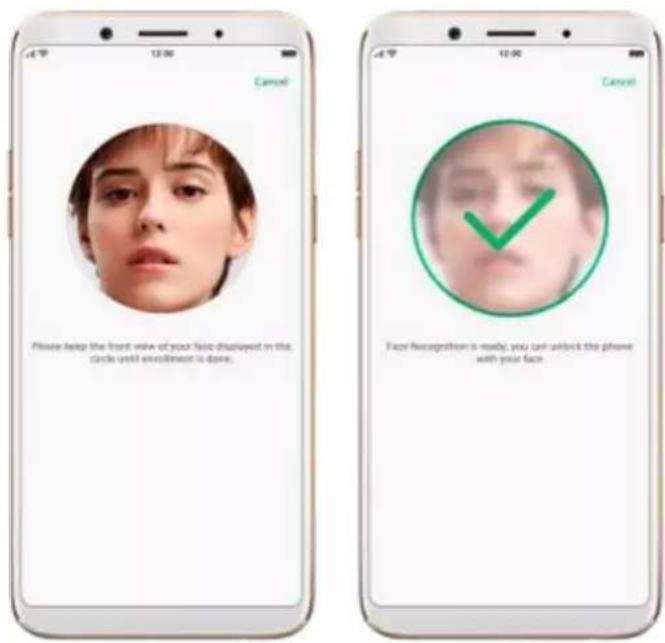
Enroll a Face on your OPPO phone
Before you can add a fingerprint, you need to create a passcode for your OPPO phone. You can use fingerprints for:
- Unlocking the phone from the lock screen.
- Encrypting apps
- Protecting files
Enroll a face
- Go to [Settings] > [Fingerprint,Face & Passcode], click [Enroll Face].
text_image
Settings Airplane Mode Dual SIM & Cellular WiFi Bluetooth Other Wireless Connections Notification & Status Bar Display & Brightness Sound & Vibration Quiet Time Fingerprint, Face & Passcode Security Settings Fingerprint, Face & Passcode Help someone Add a Fingerprint Use Progressives to Face Email Face Use the User's Secret of Delivery Face Use Face Up About Face Navigation 1. You phone may be installed by telephone with a wireless appellation or objects should like you 2. This alternative to your appearance before enrollment. For example, whether you are meeting questions a bit, a hand, a touch or having much up 3. When enrolling, sound environments with past lighting and keep the network sound color 4. Ensure that the profile pictures is clear enough because it requires to navigate the character of a successful matching. Continue- Follow the on-screen instructions. To get the ideal effect, keep the phone 20-50cm away from your face make your whole face in the circle until the enrollment is done and avoid very bright or dim environment when enrolling your face.

text_image
Cancel Please keep the front now of your face displayed in the click-upl enrollment is done. Cancel Face Recognition is ready, you can unlock the phone with your face+
Delete Enrolled Faces
- Go to [Settings] > [Fingerprint,Face & Passcode], click [Delete Enrolled Faces].
Use Face to
- Go to [Settings] > [Fingerprint,Face & Passcode], click [Use Face to] then you can choose to use your Face ID to Unlocking,App Lock,File Safe these function on or off.
View more details in Add and use a fingerprint on your OPPO Smartphone.
3.2.3. Set up other mail and calendar accounts
In addition to the apps that come with your phone, if you want to use other mail and calendar apps, add the accounts to your phone to let the apps associated with those accounts sync with your phone.
Set up an account. Go to [Settings] > [Accounts and Sync], then click [Add Account].
Repeat the steps for as many accounts as you like.
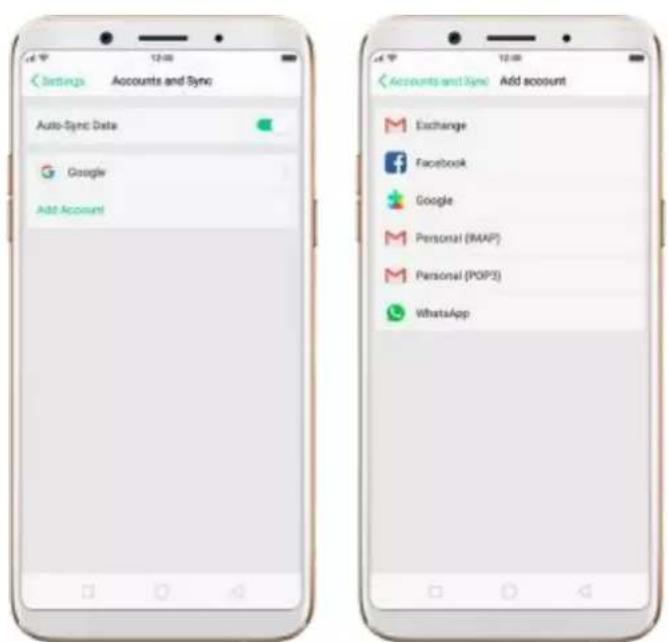
text_image
Settings Accounts and Sync Auto-Sync Data Google Add Account Accounts and Sync Add account Exchange Facebook Google Personal (IMAP) Personal (POP3) WhatsApp3.2.4. Transfer data with Clone Phone
Clone Phone can safely and rapidly transfer all the data including Personal
Data
(Contacts, Messages, etc.), System Data (System Settings, Clock, Weather Info, etc.),
Applications (Applications and Application Data) and Files like Audios,
Videos,
Photos and Documents.
Before Clone Phone
- To support the whole backup process to complete, make sure the battery level of
OPPO smartphone is over 50% and don't turn off or restart your phone during the
backup process.
- Progress and details will be displayed on your phone during the cloning process.
- Your phone might get hot during the process as the processor is overloaded, which
generates heat.
- Keep your device close to the other to ensure the network connection between two
Devices.
How to Clone Phone
Follow these steps to transfer your data from the old phone to the new phone
easily and quickly:
From an Android Phone to an OPPO
Before Clone phone, you have to make sure Clone Phone is available on both your new phone and old phone.
If Clone Phone is not available in your phone, you can type in
i.clonephone.coloros.com/download in your phone's web browser to download and install Clone Phone.
After both of your phones have installed Clone Phone.
- On your new phone, go to [Tools] > [Backup and Restore] > [Clone Phone],
select "This is the new phone". Wi-Fi and mobile data will be turned off automatically.
- On you old phone, go to [Clone Phone] and select "This is the old phone" and scan the QR Code generated by the new phone to start cloning. If the
QR code cannot be scanned, manually connect to the Hotspot below the QR code.
You can also select the data (Personal Data, System Data, Applications,
Storage Data) to be cloned by clicking "Manually Select the Data to be Cloned".

- Enter the lockscreen password to continue.
From an iPhone to an OPPO Phone
For the data transfer between OPPO and iPhone, you can download
third-party apps, such as Zapya and Share it to transfer the data between OPPO and iPhone
* Pictures, settings and paths might differ from those of your phone, but that do not affect the description in this article.
3.2.5. Date and Time
Knowing the time and date is crucial to keeping on schedule. If you want to set the date and time display on your OPPO phone, or if you're out of synch or need a time update, just start with step 1 as below.
- Go to [Settings] > [Additional Settings] > [Date & Time], click it.

text_image
Additional Settings Date & Time 24 Hour Format Automatically set Date and time Time Zone Adding Additional Settings Date & Time 24 Hour Format Automatically set Date and time Time Zone Adding Set Time Dec 26, 2013: 37:08-
24- Hour Format. Switch from 12-hour or a 24-hour format optionally.
-
Set Automatically. Enable [Set Automatically] if you want to use the data
given by your network provider or your GPS, or you can set the time yourself if you prefer. See step 4.
-
Set Manually. You can manually set the time and date. To do so, disable [Set Automatically], and then:
-
Select your time zone. Click [Time Zone] and select the location you would like to adjust your time to.
- Change the date and time. You will see the date and time appear under the current time zone. Drag your finger across each column to change the date and time. Scroll wheels will appear to allow you to change the date and time simultaneously.
View more details in Set up date and time on your OPPO smartphone.
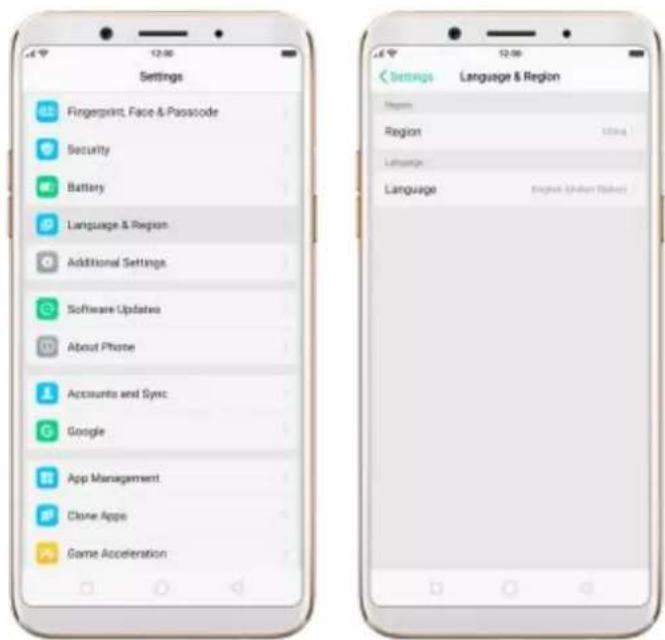
3.2.6. Language and Region
OPPO smartphone offers you an easy access to configure it to display information in another language. If you want to change its language to yours, or if you've relocated to a new country, you can change language and region by following a few easy steps.
- Go to [Settings] > [Language & Region], click it.
text_image
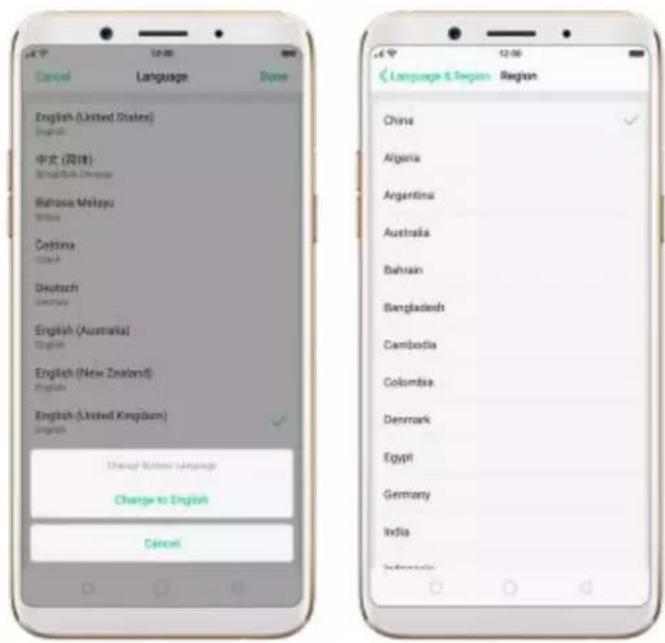
Settings Fingerprint, Face & Passcode Security Battery Language & Region Additional Settings Software Updates About Phone Accounts and Sync Google App Management Clone Apps Game Acceleration Settings Language & Region Region Region Language Language English (Shaker Taback)- Find your desired language.
- Click [Language], you will see a list of languages. Scroll down to find the language you wish to use.
- Select your desired language and click "Done." A confirmation message will appear at the bottom of your screen. Confirm the change by clicking "Change to __." Then your OPPO phone will be in the new desired language.
- Find your desired region. Refer to step 2 to change the region you want to use.
text_image
Cancel Language Done English (United States) English 中文 (简体) English/China Chinese Bulhasa Malayu Malus Ceftima China Deutsch Germany English (Australia) English English (New Zealand) English English (United Kingdom) English Change from English Cancel Language & Region Region China Algeria Argentina Australia Bahrain Bangladesh Cambodia Colombia Denmark Egypt Germany India3.2.7. Connect to the Internet
OPPO smartphone connects to the Internet whenever necessary, using a Wi-Fi connection or mobile network.
Wi-Fi connection
- Go to [Settings] > [Wi-Fi], or swipe up from the bottom of your screen to open Control Center, then tap. The detected Wi-Fi networks will be displayed.
- Tap the Wi-Fi network you want to connect to.
- Fill in the password if required.
Mobile data connection
Go to [Settings] > [Dual SIM & Cellular Data] and enable [Mobile Data], or swipe up from the bottom of your screen to open Control Center, then tap.
Notice: Enabling the mobile networks connection may result in extra cost. Check with your mobile network service carrier.
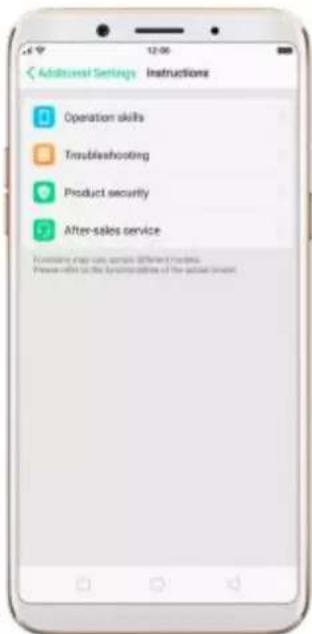
3.3. Instructions
To view Instructions on OPPO smartphone, go to [Settings] > [Additional Settings] > [Instructions].
- Operation skills, including Camera, App permission management, Trash removal, Lock screen magazine, Screen-off gestures, Screenshot with 3 fingers, Long screenshot, Notification settings, Quick setup, System application settings, Low power mode and Add widgets.
- Troubleshooting: Before requesting after-sales services, you can troubleshoot the phone by yourself.
- Product security, including Statement, Safety precautions and Health and safety.
• After-sales service, including E-Warranty Card and Help.
text_image
Additional Settings Instructions Operation skills Troubleshooting Product security After-sales service Formulating map uses specific different fields. Please refer to the system's options of the actual services.4. What's new in ColorOS 3.2
4.1. Face ID
Face Recognition feature can identify up to 128 facial recognition spots while clicking selfies. With Facial Recognition, you just need to pick up and wake your phone, then it unlocks the instant you look at it, or even when you close your eyes. It does help if you've had trouble with your fingerprints over time.
To use Face ID, you must set up a passcode on your phone. When your phone has just been turned on or restarted, you will be required to enter your passcode to unlock the phone.
Set up Face ID
- Go to [Settings] > [Fingerprint, Face& Passcode], then click [Enroll
Face]. Click Continue and follow the on-screen instructions.

text_image
Settings Airplane Mode Dual SIM & Cellular WiFi Bluetooth Other Wireless Connections Notification & Status Bar Display & Brightness Sound & Vibration Quiet Time Fingerprint, Face & Passcode Security Settings Fingerprint, Face & Passcode Add a Fingerprint Use Fingerprint to Face Email Face Play On the Connection Sheet From Make Face To About Face Recognition 1. Your phone may be preferred by sensitive with a single experience or objects played like you. 2. Play attention to your appearance before enrollment: For multiple, checklist you are using the given a hot, a mask, a board or press mechanism. 3. When enrolling, avoid milliseconds with post lighting and keep the camera device state. 4. Ensure that the profile turns to play and serve in recognition is chosen for choice of a household pairing. Enroll Facial Info To get the ideal effects, keep the phone 20 Silicon away from your face and avoid very bright or thin environment when enrolling your face. Continue- Keep the phone 20-50 cm away from your face and position your face in the onscreen frame. Keep the front view of your face displayed in the circle until the enrollment is done.
text_image
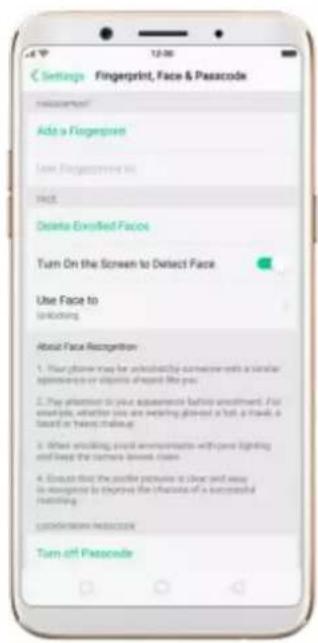
Please keep the front view of your face displayed in the circle until enrollment is done. Face Recognition is ready, you can unlock the phone with your faceUnlock your phone with Face ID. Go to [Settings] > [Fingerprint, Face&
Passcode] first, then choose whether to enable [Turn on the Screen to
Detect Face]:
- When [Turn on the Screen to Detect Face] is on: wake and pick up the phone, then your phone will unlock near instantly.
text_image
Settings Fingerprint, Face & Pascode Recommendation Add a Fingerprint Turn Fingerprint to Face Delete Enrolled Faces Turn On the Screen to Detect Face Use Face to Unlocking About Face Recognition 1. Your phone may be unobstructed when connecting with a similar application or diagnosis of the face. 2. Pay attention to your appearance before enrollment. For example, whether you are meeting glass-cut a hot, walk, a board or hand shaking. 3. When smoking, email refreshments will have lighting and keep the frames lowest class. 4. Ensure that the profile picture is clear and easy to recognize to enjoy the features of a successful building. Consideration: Has a copy Turn off Pascode
text_image
12:00 Monday: 2024 Friday: 9th Colored Pencil The Simplest Art Tool- When [Turn on the Screen to Detect Face] is off: wake the phone and slide up the lock screen, then your phone will unlock near instantly.

text_image
Settings Fingerprint, Face & Passcode Add a Fingerprint Use Passcode to Add Delete Enrolled Faces Turn On the Screen to Detect Face Use Face to Unkissing About Face Recognition 1. Your phone may be unmarked by computer with a similar appearance of pixels if pressed like you. 2. Pay attention to your appearance before enrollment. For example, whether you are wearing glasses, a hat, armrest, a band or heavy making-up. 3. When using sound or movement, will use lighting and keep the camera because it's open. 4. Do not use the profile picture in clean and easy. We recognize to improve the choice of a successful filtering. LOCK SCREEN PASSCODE Turn off Passcode
text_image
1 2 3 4 5 6 7 8 9 0 Emergency Call Back- If Face ID fails to unlock your phone, you can click to retry. Face ID might fail when there's no or low light. In this case, you can use the lock screen passcode or fingerprint to unlock the phone.
text_image
No save detected. Please try the your entry 1 2 3 4 5 6 7 8 9 0 Emergency Call BackUse Face ID for App Lock and File Safe. Face ID is used for more than unlocking your phone. You can also use it to unlock apps and the File Safe. Go to [Settings] > [Fingerprint, Face& Passcode] > [Use Face to], then turn on App Lock and File Safe.

text_image
Fingerprint, Face & Paintscope Use Face to Unlocking App Lock File Safe Will face downgrade, you can look in the kitchen password of online personalization and the installed baseNote
- Your phone may be unlocked by someone with a similar appearance or objects like you.
- Pay attention to your appearance before enrollment. For example, check whether you are wearing glasses, a hat, a mask, a beard or heavy makeup.
- When enrolling, avoid environments with poor lighting and keep the camera lenses clean.
- Ensure that the profile picture is clear and easy to recognize to improve the chances of a successful matching.
4.2. Virtual Navigation Keys
ColorOS 3.2 replaces the traditional hardware buttons with on-screen virtual
navigation keys, also offers you fast and fluid gestures to operate your phone. You can change the order of the virtual keys, and set them to appear only when needed to free space on the screen.
Enable virtual navigation keys. Virtual navigation keys are default on. If you want to enable them manually, go to [Settings] > [Additional Settings] >
[Navigation Keys] and click Virtual Navigation Keys.
text_image
Settings Fingerprint, Face & Passcode Security Battery Language & Region Additional Settings Software Updates About Phone Accounts and Sync Google App Management Clone Apps Game Acceleration Settings Additional Settings Storage Date & Time Keyboard & Input Method Navigation Keys Search OPPO Cloud Download Management Instructions Timing Power On/Off Safety & Privacy SIM Toolkit Accessibility Additional Settings Navigation Keys NAVIGATION NAME: Virtual Navigation Keys Navigation Gestures Virtual Navigation Keys Can Be HiddenChange the order of virtual navigation keys. The keys follow the typical order for OPPO: Menu, Home, and Return from left to right. If you are left-handed, you can change them to the return-home-recent order.
text_image
Additional Settings Navigation Keys Virtuinal Navigation Keys Navigation Desurtes Virtual Navigation Keys Can Be HiddenHide the virtual navigation keys. When you launch a full-screen app, the keys will automatically hide, and can be brought back with a simple swipe:
- When in portrait mode, swipe up from the bottom.
- When in landscape mode, swipe from the bottom to the left.
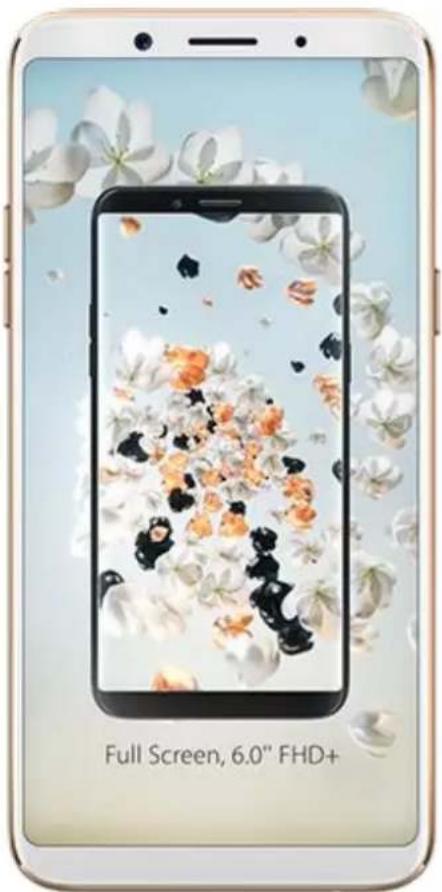
natural_image
Smartphone displaying a full screen with floral wallpaper and 'Full Screen, 6.0" FHD+ label (no other text or symbols)
natural_image
Smartphone displaying a smartphone screen with floral wallpaper, set against a floral background (no text or symbols on screen)
text_image
HAY DAY CONNECTING
text_image
HAV DAY CONNECTING...Manually hide the virtual navigation keys. To set the keys to appear only when needed, go to [Settings] > [Additional Settings] > [Navigation Keys]
and enable Virtual Navigation Keys Can Be Hidden. Then you can click on the left-lower corner of the screen to hide the keys, and swipe from the bottom to reveal them.
text_image
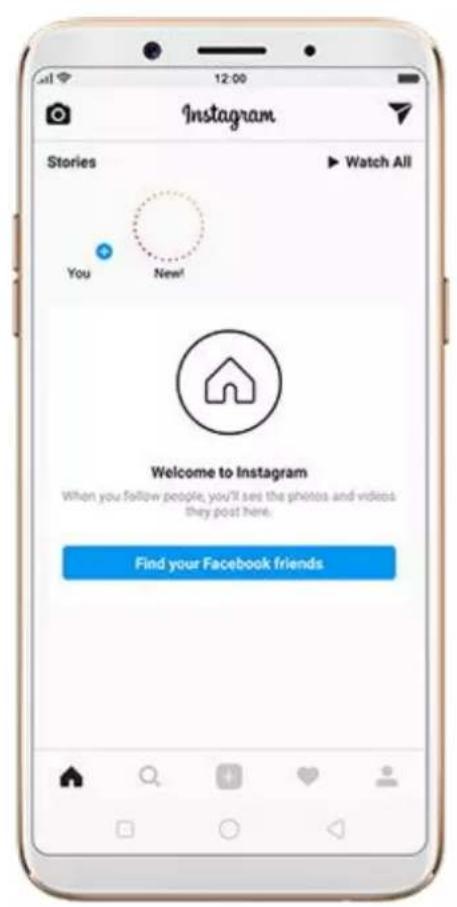
Additional Settings Navigation Keys NAVIGATION KEY Virtual Navigation Keys Navigation Gestures Virtual Navigation Keys Can Be Hidden Additional Settings Navigation Keys NAVIGATION KEY Virtual Navigation Keys Navigation Gestures Virtual Navigation Keys Can Be HiddenImmersive navigation background. The system set multiple colors for the navigation background to match the color scheme of the popular apps. The background color is default white, and it will become translucent or immersive when you open some of the third-party apps.
text_image
Instagram Stories Watch All Vis Name! Welcome to Instagram When you follow possible, you'll have the device and access. Play your friends. Find your Facebook Friends London Light King Understanding Tools 12% 10% 8% 5% 4% 3% 2% 1% 0% 0% 0% 0% 0% 0% 0% 0% 0% 0% 0% 0% 0% 0% 0% 0% 0% 0% 0% 0%4.3. Game Acceleration
Game Acceleration feature is an all-in-one game optimization tool that allowsyou to run your games at the best possible performance. When you'rerunning a game, your phone will automatically turn on high performancestate, adjust the distribution of system resources, and optimize the gamedisplay configuration to provide the best gaming experience available. Toprevent from being interrupted during games, you can also disable bottomkeys, turn on No Disturbance mode, and more.
Tip: Currently, games that can be accelerated contain Candy Crush Saga, Clash of Clans, My Talking Tom, Candy Crush Soda Saga, Ball Pool, My Talking Angela, Farm Heroes Saga, Toy Blast, Hay Day, Temple Run 2 and Mobile Legend (VN/TH/ID). More games will be added soon.

text_image
Settings App Management Clone Apps Game Acceleration Gesture & Motion Split-screen When found us: Field Given the WebBank Tracking or screen split screen order or app help support the business. Call Contacts Messages Phone Manager Camera Weather Settings Game Acceleration Graphics Acceleration Excessive the game shipping configuration to help setting hardware mechanics Mistouches Prevention Is possible to ensure that landmasses will be saved into products. Clicking up for a button or options. No Disturbance Prohibit Auto Brightness Adjustment App Manager Incorporation in for 2 games Other Functions of Game Accelerations Smoothness Pathway Intelligence, adjust system resources for a particular gaming experience Networking Protection Switch network your own games here for a more system gaming experienceManage games that can be accelerated. Go to [Settings] > [Game
Acceleration], click [App Manager] and you will see a list of your games that can be accelerated by your phone. To accelerate a game, toggle its slider to green.

text_image
Game Acceleration App Manager Candy Crush Saga Hay Day Temple Run 2 Game Acceleration App Manager Candy Crush Saga Hay Day Temple Run 2- Your phone will automatically speed up your game. Notice that
acceleration details display on the screen, and appears in the status bar when you launch the game.

text_image
OPPO Game Acceleration Smoothness Optimization +227M Networking Protection Ongoing Maltouches Prevention On No Disturbance On
text_image
HAV DAY CONNECTING...Set up Game Acceleration. Go to [Settings] > [Game Acceleration].
-
Graphics Acceleration: optimize the game display configuration to fully utilize hardware resources.
-
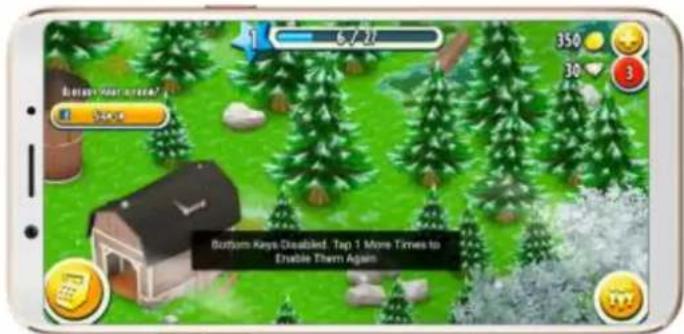
Mistouches Prevention: disable bottom keys when you run a game in landscape mode. You can double-tap on the keys to enable them.
text_image
Bottom Keys Disabled. Tap 1 More Times to Enable Them Again- No Disturbance: block calls and notifications so that you can get fully immersed in the games.

text_image
Game Acceleration No Disturbance Close Block Notifications Block Calls and Notifications- Close: do not block any calls or notifications.
- Block Notifications: block notifications except calls, alarm clocks and scheduled reminders. Notifications will be displayed with a banner on the top screen.

text_image
Unknown Number 1.05 minutes: Hangzhou, Zhejiang 350 30 3 AVERAGE AND ORDER Pay an email Pay! Please pay about over the time to add the week.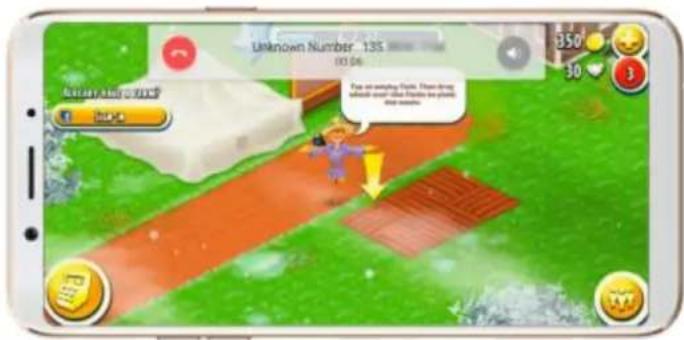
text_image
Unknown Number 135 03:04 Page on something from. When drug which could give Prizes the place. the season.- Block Calls and Notifications: block all calls and notifications.
- Prohibit Auto Brightness Adjustment: your phone will not automatically adjust the brightness of the screen when ambient light changes.
4.4. Enhanced Security Mechanism
For better security, OPPO has provided two new functions to prevent your information from being leaked, including blocking pseudo base stations and preventing apps from taking pictures or making recordings in the background.
Block pseudo base stations. Go to [Settings] > [Security] > [Pseudo
Base Station Blocking] and you will see a list of pseudo base stations identified by the phone.
Your phone might receive many spam messages or be infected by mobileviruses sent from the pseudo base stations. When these stations areidentified, your phone will block the information sent by them, thus
safeguard your property and information security.

text_image
Settings Airplane Mode Dual SIM & Cellular WiFi Bluetooth Other Wireless Connections Notification & Status Bar Display & Brightness Sound & Vibration Quiet Time Fingerprint, Face & Passcode Security Settings Security Permissions App Lock Payment Protection Kids Space Block and Filter Pseudo-Base Station Blocking Floating Windows Other Seconds Options 1. Secure kablemt When you're more sensitive information such as personality, the security will automatically switch to use SMS Driver kablemt toamed your local socket from Alaska and No Pseudo Base Station Blocking Records Security Pseudo Base Station Blocking Pseudo base stations, which are fake base stations diagnosed as hidden users only are used by users who can send followers and advertising messages to phone us on which members cause good harmPrevent apps from taking pictures or making recordings in the background.
Some Android malware can spy on your activities in the background, and can take pictures or make recordings without notifying you, resulting in leaking of the information. When the malware performs these activities, your phone will remind you immediately:
- Pop up a warning window on your phone screen.

text_image
"Camidophosidemas" is about to Use the Camera in the background. Please beware of privacy keyspage. Obry(S) Atire- If you start the sound recorder and go to another application, the status bar turns red.
text_image
31 Calendar Click Weather Settings Music Video Photos Files Music Manager Gamebox Play Store Google Face Google4.5. Search Settings and Files
ColorOS 3.2 devices enable you to search for system settings and files that match a specified keyword or string, so you can spend more time acting on information and less time looking for information.
Search for system settings. A search bar is added at the top of the Settings page to help you quickly find the feature you want to use. Click the search bar and type the name of a feature (or a part of it). Features matching what you've typed appear below and get filtered more specifically when you type in more text. Click a feature to access its settings screen.

text_image
Settings Airplane Mode Dual SIM & Cellular Wi-Fi Bluetooth Other Wireless Connections Notification & Status Bar Display & Brightness Sound & Vibration Quiet Time Fingerprint, Face & Passcode Security
text_image
Airplane Mode Dual SIM & Cellular Wi-Fi Bluetooth Other Wireless Connections Notification & Status Bar 1 2 3 4 5 6 7 8 9 10 11 12 13 14 15 16 17 18 19 20 21 22 23 24 25 26 27 28 29 30 31 32 33 34 35 36 37 38 39 40 41 42 43 44 45 46 47 48 49 50 51 52 53 54 55 56 57 58 59 60 61 62 63 64 65 66 67 68 69 70 71 72 73 74 75 76 77 78 79 80 q w e r t y u i o p a s d f g h j k l o z x c v b n m 12# - - Search
text_image
Access Location Information Security > Pinterest Location Additional Settings > Safety & Privacy > Location Location Service Additional Settings > Safety & Privacy > Location High Accuracy Additional Settings > Safety & Privacy > Location Low Battery Use Additional Settings > Safety & Privacy > Location Device Only 1 2 3 4 5 6 7 8 9 10 p q w e r t y u l o p a s d f g h j k l z x c v b n m <0 12# SearchSearch for files. Click Files app on the home screen, click , then type thename of a file (or a part of it). Files matching what you've typed appear below.If you are sure that the certain file that you are searching for is on a specific
folder, you can search specifically from that location. This will make the search more specific and faster.
4.6. Optimized File management
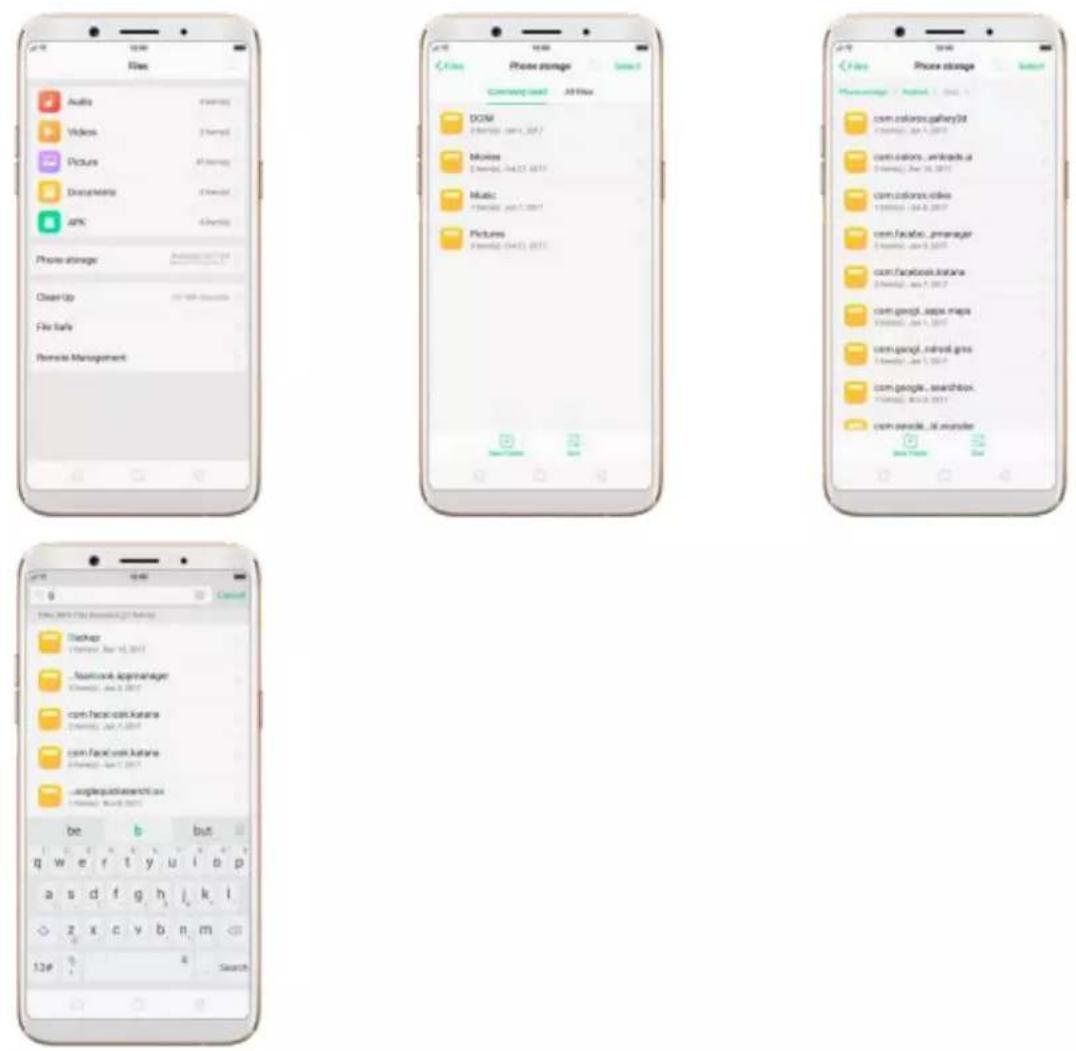
The optimized Files app provides you a more convenient way to work with the file system and perform various operations on files and folders such as search, create, edit, rename, copy, delete, compress, batch process etc.
Optimized search capability. You can search for a file under the root directory, or on a specific folder if you know its general location. This will
make the search more specific and faster.
text_image
< Files Phone storage Select Community Used All Files DCIM 2 items(s) Jan 1, 2017 Movies 2 items(s) Oct 23, 2017 Music 1 item(s) Jan 1, 2017 Pictures 3 items(s) Oct 23, 2017 New Folder Next Phone storage Select com.coloros.gallery3d 1 items(s) Jan 1, 2017 com.coloros_wrlloads.ut 2 items(s) Oct 15, 2017 com.coloros.video 1 items(s) Jan 6, 2017 com.facebook..prmanager 3 items(s) Jan 3, 2017 com.facebook.katana 2 items(s) Jan 7, 2017 com.googi...epps.maps 3 items(s) Jan 1, 2017 com.googi...retroid.gms 1 items(s) Jan 1, 2017 com.google...searchbos 1 items(s) Nov 8, 2017 com.aoogle...id.youtube New Focus NextFile classification
- The Files app automatically categorizes your files based on their extensions so you can browse them more clearly and conveniently.

text_image
Files Audio 3 items(s) Videos 3 items(s) Picture 47 items(s) Documents 8 items(s) APK 9 items(s) Phone storage available (5): 124 Clean Up 0.7 Mbps (available) File Safe Remote Management- Under Phone storage, your commonly used folders will be listed separately so that you can quickly look up them later.
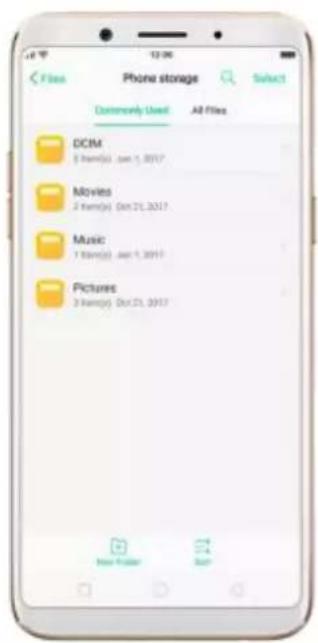
text_image
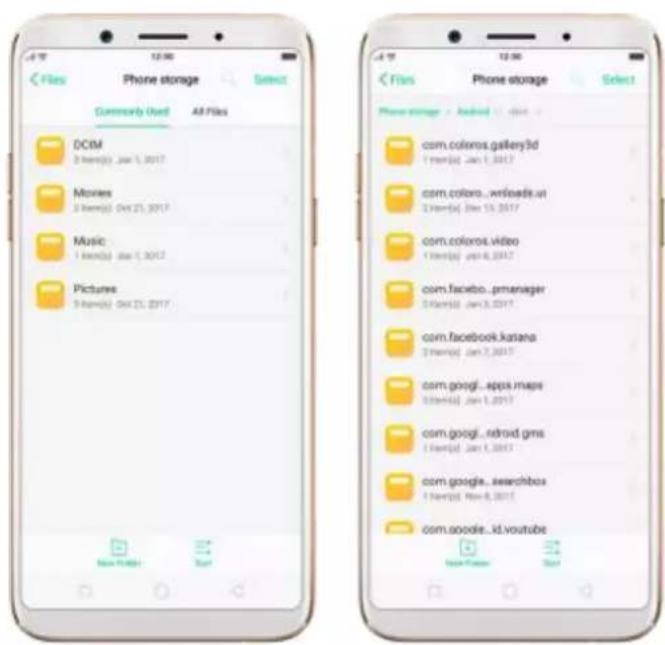
Phone storage Select Commonly Used All Files DCIM 1 film(s) Jan 1, 2017 Movies 2 film(s) Oct 21, 2017 Music 1 film(s) Jan 1, 2017 Pictures 3 film(s) Oct 21, 2017 New Folder Sum- In [Phone storage] > [All Files] > [Android], app files and the files you downloaded from the app will be saved in different folders, so you can quickly find the files you need.

text_image
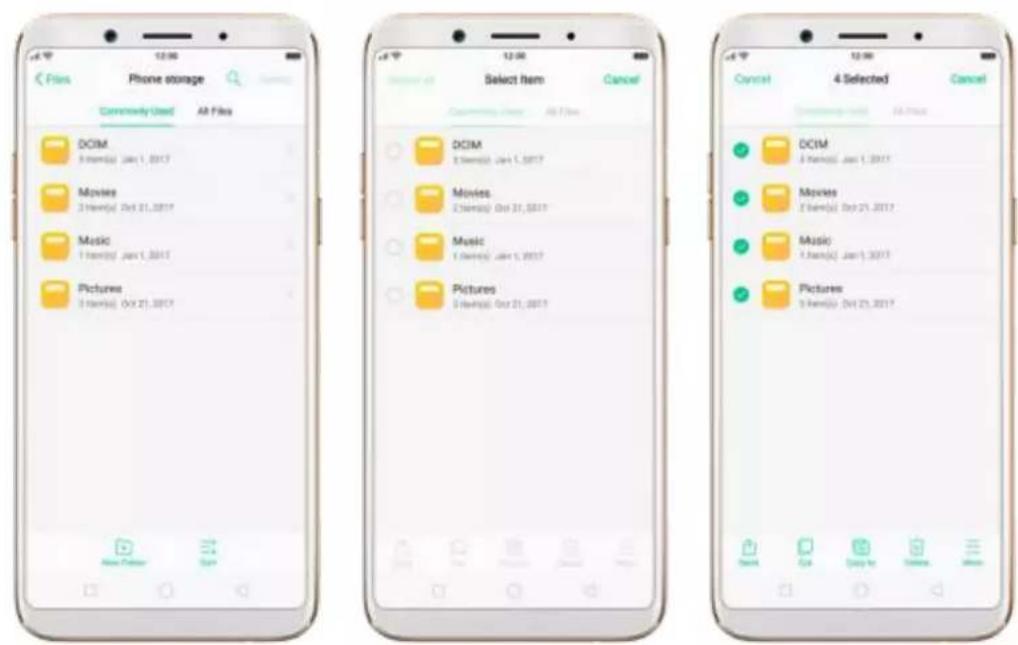
File Phone storage Select Phone storage data www.biosoft.org/ cache 1 file(s) Jun 8, 2017 filex 1 file(s) Jun 5, 2017Select All feature. Select All feature is added in Files, so you can process the files in batches.
text_image
Files Phone storage Commonly Used Alt Files DCIM 3 items(s) Jan 1, 2017 Movies 3 items(s) Oct 21, 2017 Music 3 items(s) Jan 1, 2017 Pictures 3 items(s) Oct 21, 2017 Select item Cancel DCIM 3 items(s) Jan 1, 2017 Movies 3 items(s) Oct 21, 2017 Music 3 items(s) Jan 1, 2017 Pictures 3 items(s) Oct 21, 2017 4 Selected Cancel DCIM 3 items(s) Jan 1, 2017 Movies 3 items(s) Oct 21, 2017 Music 3 items(s) Jan 1, 2017 Pictures 3 items(s) Oct 21, 20174.7. Auto Recording
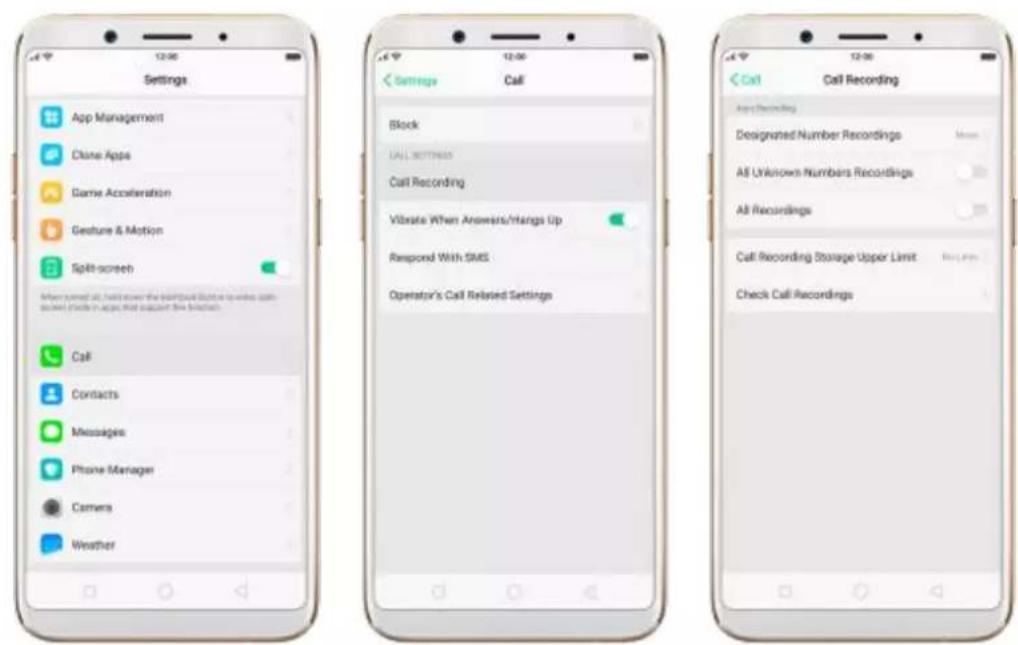
Auto Recording feature enables you to automatically record conversations, which makes it easier for you to review your important incoming and outgoing calls on a daily basis. You can record all calls, or those from your designated numbers or unknown numbers. You can also share your recording files, set them as ringtones, and more.
Turn on Call Recording. Go to [Settings] > [Call], click [Call Recording],
then select which calls to be recorded:
text_image
Settings App Management Clone Apps Game Acceleration Gesture & Motion Split-screen When turned at, held down the keyboard closed to write call-saved icons on apps that support the linkback. Call Contacts Messages Phone Manager Camera Weather Settings Call Block ALL SETTINGS Call Recording Vibrate When Answers/Intags Up Rampord With SMS Operator's Call Related Settings Call Call Recording App Recording Designated Number Recordings All Unknown Numbers Recordings All Recordings Call Recording Storage Upper Limit Check Call Recordings- Record calls from designated numbers. To add the numbers, click Designated Number Recordings, then click Add. Choose the contacts from Call Log, Groups or Contacts, then click Add.

- Record calls from all unknown numbers. Toggle the All Unknown Numbers Recordings slider to green, then your phone will automatically record calls from numbers that are not in your Contacts.

text_image
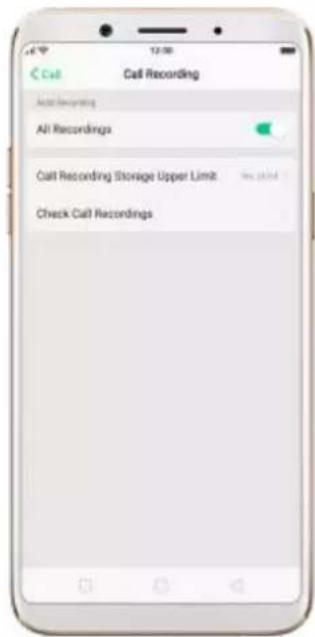
Call Recording Assign Recording Designated Number Recordings 2 March 2017 All Unknown Numbers Recordings All Recordings Call Recording Storage Upper Limit By Limit Check Call Recordings- Record all your calls. Toggle the All Recordings slider to green.
text_image
Call Recording Auto Receiving All Recordings Call Recording Storage Upper Limit Check Call RecordingsSet the storage limit for recording files. Click Call Recording Storage Upper Limit, then choose a storage capacity for the recording files. If your recordings exceed the threshold, the earliest recording will be deleted automatically.

text_image
1000 Items 2000 Items 3000 Items No Limit There is no change for the call recordingManage your call recordings. Click Check Call Recordings, then click Call Recording.
- Play a recording back. Click the recording to play it back.
- Send, rename or delete a recording. Click Select, choose the recording, then choose an option.
- Set a recording as ringtones. Click Select, choose the recording, click Set as, then set the recording as the call, SMS, alarm or contact ringtone.
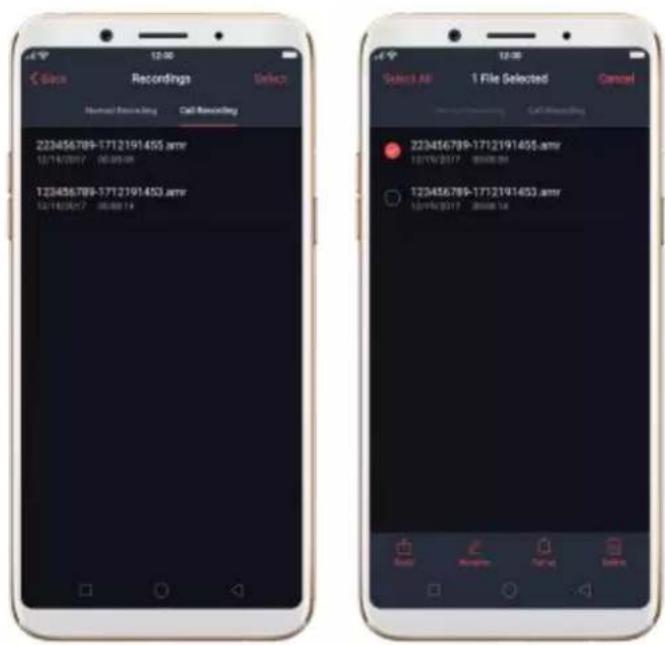
text_image
Recordings Select All 1 File Selected Cancel Normal Recording Call Recording 223456789-1712191455.amr 12/14/2017 00:00:00 123456789-1712191453.amr 12/14/2017 00:00:14 223456789-1712191455.amr 12/14/2017 00:00:00 123456789-1712191453.amr 12/14/2017 00:00:14Note: Call Recording feature is not available in the United States and
Australia.
4.8. Reset password with fingerprint
When you enter the wrong passcode five times in a row, or you've forgotten your passcode, you can easily reset the passcode with your fingerprint.
Before you can use the reset feature, you must add at least one fingerprint to your phone.
Reset passcode with fingerprint after restarting the phone.
-
When you enter the wrong password five times from the lock screen of your phone, your phone will temporarily restrict you from entering the passcode again and ask you to wait 30 seconds.
-
When the waiting period is up, click [Use Fingerprint to Reset Passcode] on the bottom of the screen.

text_image
Please Enter the Passcode Your passcode is required to unlock the phone after a window! 1 2 3 4 5 6 7 8 9 0 Use Inception to Real Passcode Emergency Call Back- Place your finger on the fingerprint sensor, then enter your new passcode and confirm it.

text_image
Reset Passcode Cancel Please put the correct finger on the fingerprint button and keep it still
text_image
Reset Passcode Cancel Enter your new passcode Other Encryptions 1 2 3 4 5 6 7 8 9 0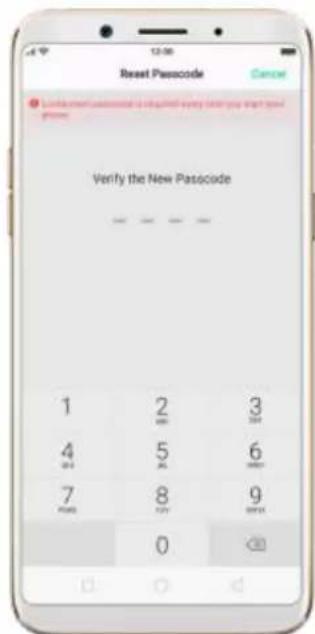
text_image
Reset Passcode Cancel Verify the New Passcode 1 2 3 000 500 600 4 7 8 9 000 000Reset passcode with fingerprint when the phone is unlocked.
When your phone is unlocked, you can change the lock screen password directly from the Settings page.
- Go to [Settings] > [Fingerprint, Face & Passcode], enter the wrong password five times, then your phone will temporarily restrict you from entering the passcode again and ask you to wait 30 seconds.
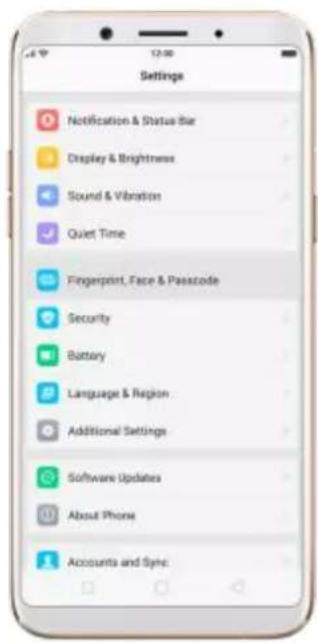
text_image
Settings Notification & Status Bar Display & Brightness Sound & Vibration Quiet Time Fingerprint, Face & Passcode Security Battery Language & Region Additional Settings Software Updates About Phone Accounts and Sync
text_image
Enter the Lockscreen Passcode Cancel Try Again in 27 Seconds 1 2 3 4 5 6 7 8 9 0- When the waiting period is up, click Reset Passcode.
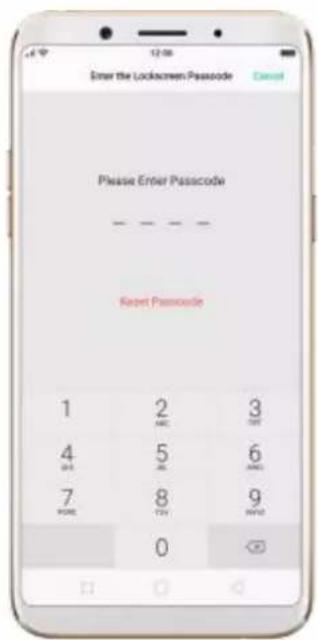
text_image
Enter the Lockscreen Passcode Cancel Please Enter Passcode - - - - - - - - - - - - - - - - - - - - - - - - - - - - - - - - - - - - - - - - - - - - - - - - - - - - - - - - - - - - - - - - - - - - - - - - - - - - - - - - - - - - - - - - - - - - - - - - - - - - -- Place your finger on the fingerprint sensor, then enter your new passcode and confirm it.
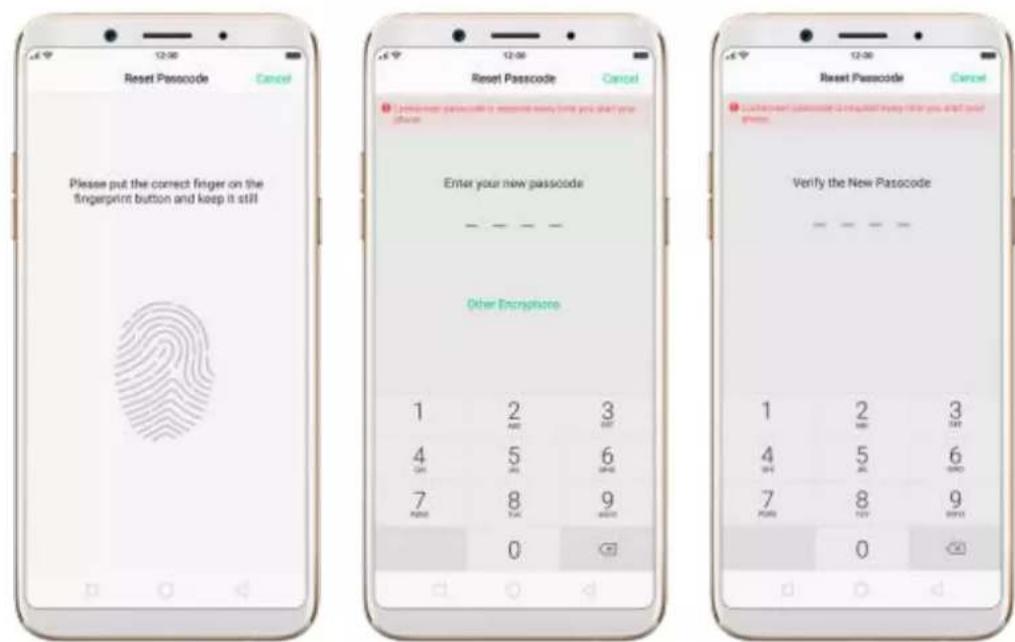
text_image
Please put the correct finger on the fingerprint button and keep it still Enter your new passcode Other Enclosures 1 2 3 4 5 6 7 8 9 0 Verify the New Passcode 1 2 3 4 5 6 7 8 9 04.9. Reset password with fingerprint
When you enter the wrong passcode five times in a row, or you've forgotten your passcode, you can easily reset the passcode with your fingerprint.
Before you can use the reset feature, you must add at least one fingerprint to your phone.
Reset passcode with fingerprint after restarting the phone.
-
When you enter the wrong password five times from the lock screen of your phone, your phone will temporarily restrict you from entering the passcode again and ask you to wait 30 seconds.
-
When the waiting period is up, click Use Fingerprint to Reset Passcode on the bottom of the screen.

text_image
Please Enter the Passcode Your passcode is required to switch the phone after a window! 1 2 3 4 5 6 7 8 9 0 Take Up/Down by Next Passcode Emergency Call Back- Place your finger on the fingerprint sensor, then enter your new passcode and confirm it.

text_image
Please put the correct finger on the fingerprint button and keep it still Enter your new passcode Other Encryptions 1 2 3 4 5 6 7 8 9 0 1 2 3 4 5 6 7 8 9 0 Verify the New PasscodeReset passcode with fingerprint when the phone is unlocked.
When your phone is unlocked, you can change the lock screen password directly from the Settings page.
- Go to [Settings] > [Fingerprint, Face & Passcode], enter the wrong password five times, then your phone will temporarily restrict you from entering the passcode again and ask you to wait 30 seconds.

text_image
Settings Notification & Status Bar Display & Brightness Sound & Vibration Quiet Time Fingerprint, Face & Passcode Security Battery Language & Region Additional Settings Software Updates About Phone Accounts and Sync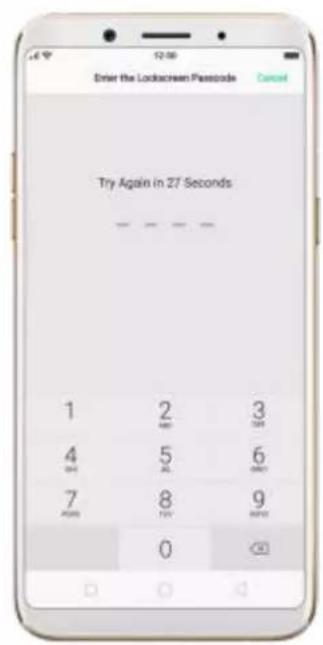
text_image
Enter the Lockscreen Passcode Cancel Try Again in 27 Seconds 1 2 3 4 5 6 7 8 9 0- When the waiting period is up, click Reset Passcode.

text_image
Enter the Lockscreen Passcode Cancel Please Enter Passcode - - - - - - - - - - - - - - - - - - - - - - - - - - - - - - - - - - - - - - - - - - - - - - - - - - - - - - - - - - - - - - - - - - - - - - - - - - - - - - - - - - - - - - - - - - - - - - - - - - - - -- Place your finger on the fingerprint sensor, then enter your new passcode and confirm it.

text_image
Please put the correct finger on the fingerprint button and keep it still Enter your new passcode Other Enclosures 1 2 3 4 5 6 7 8 9 0 Verify the New Passcode 1 2 3 4 5 6 7 8 9 04.10. Control the volume
ColorOS 3.2 devices redesign the volume controls, which give separate controls for the ringer/notifications as well as media. Now you can control the media volume with the volume buttons even if your phone isn't playing anything at the moment.
Raise or lower the volume.
- Using the Volume Buttons. Click the volume buttons on the side of the phone, then you can control the ringer/notifications volume directly. To control the media volume, click on the right, and then move its slider to the left or right.

text_image
Calendar Dash Weather Settings Music Video Music Files Phone Manager Theme Store Play Store Google Search Google Music Video Music Files Phone Manager Theme Store Play Store Google Search Google- Using Settings. Go to [Settings] > [Sound & Vibration], then you control the ringer and media volumes by moving the sliders or clicking the Volume Buttons.
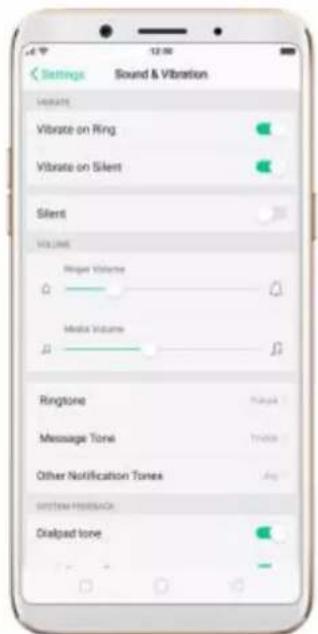
text_image
Settings Sound & Vibration Vibrate Vibrate on Ring Vibrate on Silent Silent Volume Mode: Ringer Volume Media Volume Ringtone Message Tone Other Notification Tones Signal Noise On Dialogated tone- Put the phone in ring or silent mode. Go to [Settings] > [Sound & Vibration], then toggle the Silent slider to white or green.

text_image
Settings Sound & Vibration VARIABLES Vibrate on Ring Vibrate on Silent Silent VOLUME Ring Volume Audio Volume Ringstone Message Tone Other Notification Tones Signal Power Dialogual Tone5. Basics
5.1. Use apps
Open apps
Press the Home button at any time to see your phone applications. Click any application icon to get started.
Apps will show the number of messages pending to be read in red on their Home screen icon.
text_image
31 Calendar Clock Weather Settings Music Video Photos Play Phone Manager Three Store Play Store Tags Tools GoogleSwitch between apps
Click Menu button on the bottom left would bring up a menu for apps thatyou were in. Swipe left or right to see more. To switch to another app, click it.

text_image
31 Calendar Clock Weather Settings Music Video Physics Flats Phone Manager Theme Store Play Store Google Tools Google Theme Store Settings 3G/34 (40) Devoted Clear cache 2.27 GB Available / 4.00 GBClose apps
Click Menu button on the bottom left, and then:
- Close an app: Swipe the app up to the top edge of the screen.
- Close all apps: Click to clean up the list.

text_image
Settings 30:00:40 download Clear cache 2.27 GB Available / 4.00 GB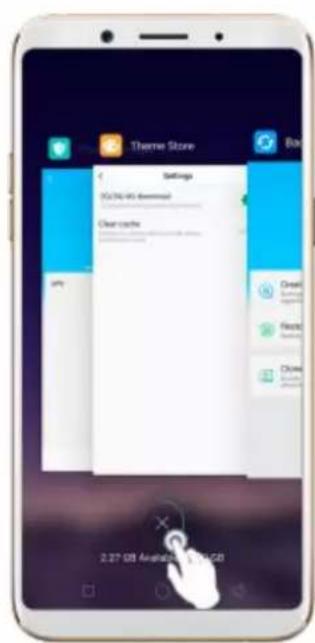
text_image
Theme Store Settings 10/30/45 Download Clear cache My 2.27 GB Available 2:30 GB5.2. Share from apps
In addition to share your information from the Files app, you can also share from many other apps in your OPPO smartphone.
Share from apps. In many apps, you can click Send or to choose how to share your information. The choices vary depending on the app you're using. Additional options may appear if you've downloaded apps with multiple sharing options.
Take the Photos app as an example, click and you'll see all the sharing options.
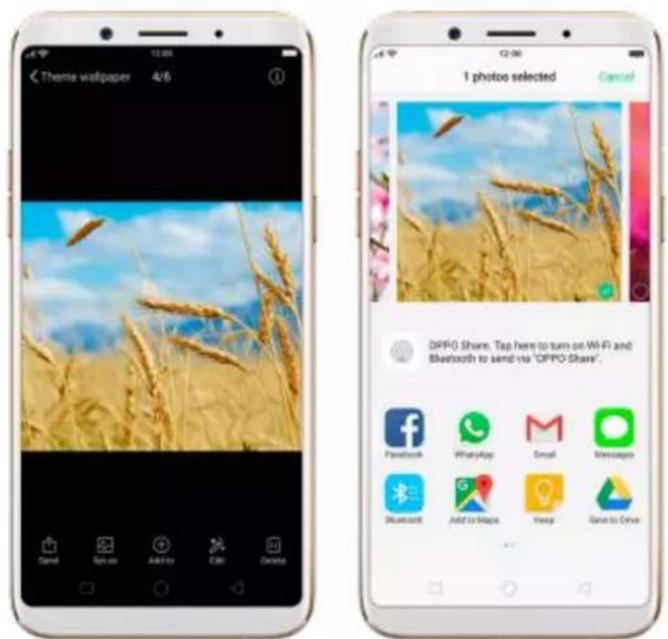
text_image
Theme wallpaper 4/6 1 photo selected Cancel OPPO Share, Tap here to turn on Wi-Fi and Bluetooth to send via "OPPO Share". Facebook WhatsApp Small Messages Bluetooth Add to Maps Keep Save to Drive5.3. One-click cleanup
One-click cleanup option helps you to make your phone perform steadily and faster.
Stop background apps. Click Menu button > to close all active apps. If you want to close a specific app, swipe it up.

text_image
Theme Store Settings 30/50/40 (Download) Clear cache 2.27 GB And 100 GB MongoClean up & Accelerate. Click Phone Manager on the Home screen, then click [Cleanup & Accelerate]. Scan and delete all kinds of junk files. You can also delete unnecessary files, such as downloaded APKs, music, pictures, and more.

text_image
Phone Manager 77 Clean up & Accelerate Build Logging Award One Tip Privacy Permissions Product Privacy Information Virus Scan Isolate Miscellaneous Apps Payment Protection Product Real Property Frequently Used Friends WeChat Cleaner App Cleaner Standard Advanced 65.6 MB On 3 AM December Required by Check/Check Angle Memory Cleanup: 30.1 MB APK: Clear 65.5 MB Standard Advanced 20° Use space ITs a 36 of foreign availability Software: https://www.wther.com/ WeChat Cleaner WhatsApp Cleaner App Data: 128 KB Largest FILE ORDER Video Files: 30.1 MB Picture Files: 4 GB Music Files: 6 GB Documents: 9 GB ZIP:5.4. Lock the running background apps
You may close the running background apps frequently to make your phone perform steadily and faster. If you want some apps to be always connected and reachable, do the following:
Lock an app. Click Menu button to reveal your open apps, then swipe an app down to the bottom edge of the screen. Notice that a lock appears in the upper-left corner of the app.
Repeat the action for more apps.

text_image
Temple Run 2 Settings 1.00 GB Available / 4.00 GB5.5. View, zoom in and out
Use the touchscreen to interact directly with what is displayed.
View items. Drag up or down to scroll. You can also drag some screens in any direction, such as webpages. Flick to scroll quickly. You can wait for the scrolling to come to a stop, or touch anywhere on the screen to stop it immediately.
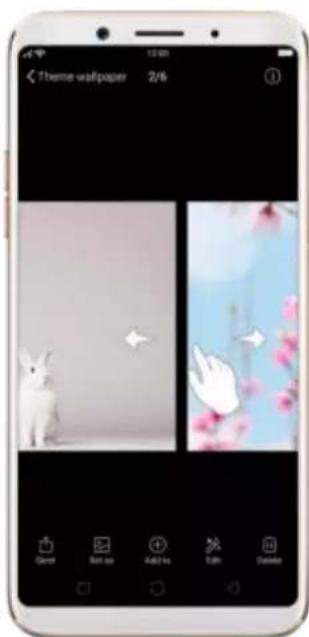
text_image
Theme wallpaper 2/6 Dend Set as Add to Edit DeleteOn some screens such as Settings and Contacts page, double-click the status bar to quickly scroll to top.

text_image
Settings Fingerprint, Face & Passcode Security Battery Language & Region Additional Settings Software Updates About Phone Accounts and Sync Google App Management Clone Apps Game Acceleration Settings Airplane Mode Dual SIM & Cellular 50-Fi Bluetooth Other Wireless Connections Notification & Status Bar Display & Brightness Sound & Vibration Quiet Time Fingerprint, Face & Passcode SecurityZoom in and out. When viewing photos, maps, or web pages, you can zoomin and out. Pinch your fingers together or apart. For photos and web pages,
you can double-click to zoom in, then double-click again to zoom out. Formaps, double-click to zoom in and click once with two fingers to zoom out.

natural_image
Three smartphone screens displaying pink peach blossoms against a blue sky, each with a camera interface (no text or symbols on the flower image itself)5.6. Navigation Keys
ColorOS 3.2 replaces the traditional hardware buttons with on-screen virtual navigation keys, which can be hidden when not in use. You can also arrange the "Back" and "Recent" placements to how you prefer them. Besides, several fast and fluid gestures are added in your phone, which will give you a fresh experience of smartphone interaction.
Virtual Navigation Keys
Enable virtual navigation keys. Virtual navigation keys are default on. If you want to enable them manually, go to [Settings] > [Additional Settings] >
[Navigation Keys] and click Virtual Navigation Keys.

text_image
Settings Fingerprint, Face & Passcode Security Battery Language & Region Additional Settings Software Updates About Phone Accounts and Sync Google App Management Clone Apps Game Acceleration Settings Additional Settings Storage Date & Time Keyboard & Input Method Navigation Keys Search OPPO-Cloud Download Management Instructions Timing Power On/Off Safety & Privacy SIM Toolkit Accessibility Additional Settings Navigation Keys Virtual Navigation Keys Navigation Geasures Virtual Navigation Keys Can Be HiddenChange the order of virtual navigation keys. The keys follow the typical order for OPPO: recent, home, and return from left to right. If you are left-handed, you can change them to the return-home-recent order.
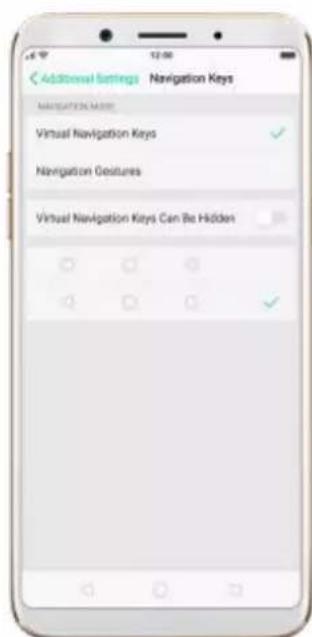
text_image
Additional Settings Navigation Keys NAVIGATION NAME: Virtual Navigation Keys ✓ Navigation Geasures Virtual Navigation Keys Can Be HiddenHide the virtual navigation keys. When you launch a full-screen app, the keys will automatically be hidden, and can be brought back with a simple swipe:
- When in portrait mode, swipe up from the bottom.
- When in landscape mode, swipe from the bottom to the left.

natural_image
Smartphone displaying a full screen with floral wallpaper and orange flowers, no visible text or symbols on the device itself.
natural_image
Smartphone displaying a smartphone screen with floral wallpaper background (no readable text or symbols)
text_image
HAV DAY CONNECTING
text_image
HAY DAY CONNECTING...Manually hide the virtual navigation keys. To set the keys to appear only when needed, go to [Settings] > [Additional Settings] > [Navigation Keys] and enable [Virtual Navigation Keys Can Be Hidden]. Then you can click on the left-lower corner of the screen to hide the keys, and swipe from the bottom to reveal them.

text_image
Additional Settings Navigation Keys NAVIGATION KEY Virtual Navigation Keys Navigation Gestures Virtual Navigation Keys Can Be Hidden Additional Settings Navigation Keys NAVIGATION KEY Virtual Navigation Keys Navigation Gestures Virtual Navigation Keys Can Be HiddenImmersive navigation background. The system set multiple colors for the navigation background to match the color scheme of the popular apps. The
background color is default white, and it will become translucent orimmersive when you open some of the third-party apps.

text_image
Instagram Stories Watch All You Name! Welcome to Instagram Where you're looking you'll read the blog or listen this point here. Find your Facebook friends London Light Bag Wednesday Time Macrolle Friday Saturday Sunday Monday Friday Monday ThursdayNavigation Gestures
Enable navigation gestures. Go to [Settings] > [Additional Settings] >
[Navigation Keys] and click Navigation gestures.
Virtual navigation keys will be hidden and replaced by navigation gestures once you enable navigation gestures.
For example, to perform [Back from right, control center from left], you can operate your phone with the following gestures:
- Return to upper page. Swipe up from the right bottom edge of the screen.
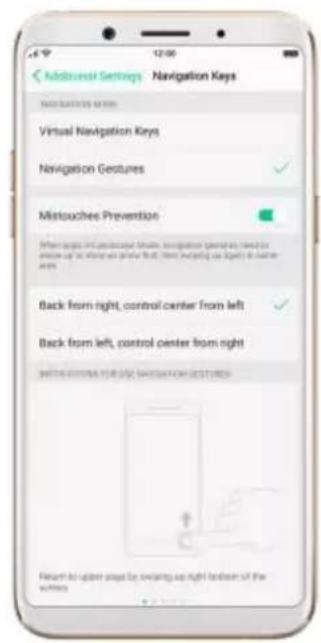
text_image
Additionsal Settings Navigation Keys Virtual Navigation Keys Navigation Gestures ✓ Mistouches Prevention ✓ When images and applications include navigation gestures needed to replace up or where it shows what if, then recycling can qualify to name errors Back from right, control center from left ✓ Back from left, control center from right ✓ RETURN ON/OFFS FOR VIEW NAVIGATION FEATURES Return to upper steps by switching up right button of the window- Open Control Center. Swipe up from the left bottom edge of the screen.

text_image
Additional Settings Navigation Keys NAVIGATION NAME Virtual Navigation Keys Navigation Gestures Mistouches Prevention When again at Cambridge Private navigation generates need to compare up to show that, then asking up right in reverse right. Back from right, control center from left Back from left, control center from right INSTRUCTIONS FROM NAVIGATION GESTURES Open control center by looking up from left capture of the system- Return to the Home screen. Swipe up from the middle bottom edge of the screen.
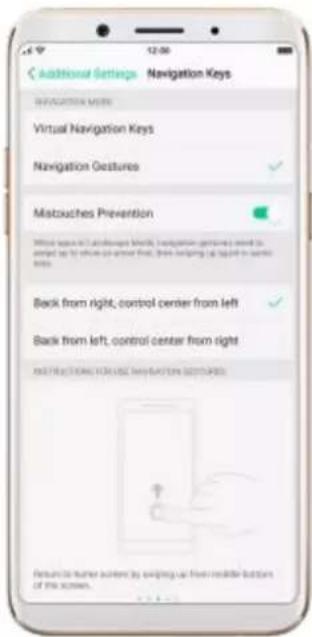
text_image
Additional Settings Navigation Keys NEVIATION MODE Virtual Navigation Keys Navigation Gestures Mistouches Prevention Where appears to be a network of links, navigation functions need to start up to which can answer first, then begin up again in control bits. Back from right, control center from left Back from left, control center from right NOTICE ON/OFF/ON/OFF/ON/OFF/ON/OFF/ON/OFF/ON/OFF/ON/OFF/ON/OFF/ON/OFF/ON/OFF/ON/OFF/ON/OFF/ON/OFF/ON/OFF/ON/OFF/ON/OFF/ON/OFF/ON/OFF/ON/OFF/ON/OFF/ON/OFF/ON/OFF/ON/OFF/ON/OFF/ON/OFF/ON/OFF/On/OFF/ON/OFF/ON/OFF/ON/OFF/ON/OFF/ON/OFF/ON/OFF/ON/OFF/ON/OFF/ON/OFF/ON/OFF/ON/OFF/ON/OFF/ON/OFF/ON/OFF/ON/OFF/ON/OFF/ON/OFF/ON/OFF/ON/OFF/ON/OFF/ON/OFF/ON/OFF/ON/OFF/ON/OFF/OK Resource to turn chosen by switching up from inside button of the screen.- Open recent tasks. Swipe up from the middle bottom edge of the screen and pause 1 second.

text_image
Additional Settings Navigation Keys Virtual Navigation Keys Navigation Gestures Mistouches Prevention Back from right, control center from left Back from left, control center from right Return to the request task by clicking up and push it next From maybe feature of the server- When in landscape mode, you need to swipe up from the bottom of the landscape screen.

text_image
Additional Settings Navigation Keys NAVIGATION NAME Virtual Navigation Keys Navigation Gestures Mistouches Prevention Back from right, control center from left Back from left, control center from right NOTIFICATIONS FOR USE NAVIGATION ON LAYOUTSEnable Mistouches Prevention. Go to [Settings] > [Additional Settings] >
[Navigation Keys]. When you open apps in Landscape Mode, you need to swipe up to show an arrow first, then swipe up again in the same area.

text_image
CONNECTING...5.7. Change the screen orientation
OPPO smartphone supports portrait and landscape screen orientations.
Every time you shift your hands, the screen rotates.

text_image
January 1 Max Nothing planned: Trip to create Jan 7 - 13 Jan 14 - 26 Jan 21 - 27 Jan 28 - Feb 3 February 2018 Feb 4 - 10 Feb 11 - 17 Feb 18 - 24
text_image
Dec 31 0:00 1 2 3 4 5 6 New Year's Day 12:00 12:00 13:00 14:00 15:00To lock the screen in portrait orientation, swipe up from the bottom of the screen to open Control Center, then click

Or go to [Settings] > [Display
& Brightness] and toggle the [Portrait Orientation Lock] slider to green.
Notice that appears in the status bar.
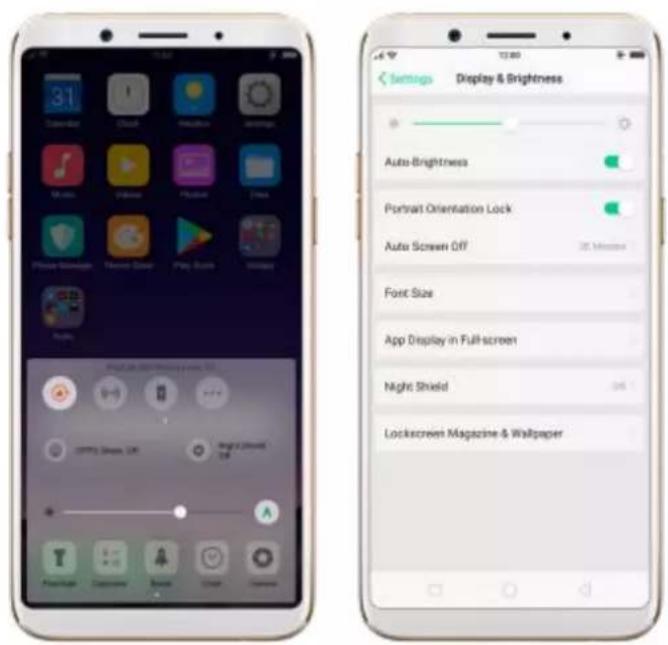
text_image
31 Calendar Cloud Macintosh app Store Phone Server Home Store Play Store Display Auto-Brightness Portrait Orientation Lock Auto Screen Off 25 Minutes Font Size App Display in Full-screen Night Shield Lockscreen Magazine & Wallpaper5.8. Multiple modes with easy access
ColorOS 3.1 lets you set multiple modes to fulfil your personal needs. The split screen mode allows you to work with a second app with the other one remained active. Now you can watch a movie and chat with friends at the same time.
To use Split-screen: Go to [Settings] > [Split-screen] and turn on Split-screen, then open an app. Under the interface of the app, press and hold Menu button and select the other split-screen app. Now your screen will be divided into two areas, which each area shows a different scene at the same time.
* Notice: Both apps need to support Split-screen function. Your phone will alert you if the app doesn't support that.
text_image
Hi there, how about watching "Brokeback Mountain" tonight? Sure Love to Send YouTube Sofia Vergara ... Tha#f3e5... 2.46h views 1 month s... Reese Witherso...5.9. Take a screenshot
You can capture the screen on your OPPO smartphone using three ways:
Capture the current page
- Press and hold the Power and Volume Down buttons for about 2 seconds, the screen will briefly flash white, and you'll hear a shutter sound if your phone's sound is on.
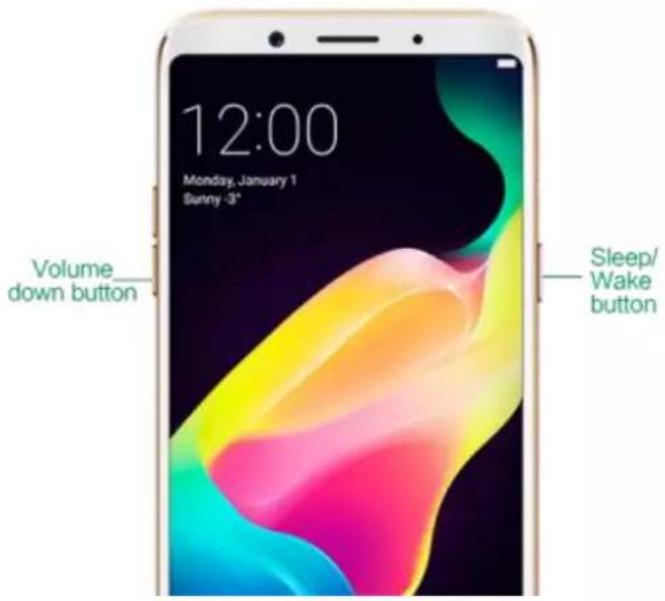
text_image
12:00 Monday, January 1 Sunny -3" Volume down button Sleep/ Wake button- Gesture Screenshot: Go to [Settings] > [Gesture & Motion] and turn on [Gesture Screenshot]. Then swipe the screen up or down with three fingers to take a screenshot.

text_image
Settings Gesture & Motion Screen-off Gestures Where screen is OFF, use culture gestures on the screen for quick app downloads. Smart Call CREATE Gesture Screenshot Setup with five fingers up or down to qualify take a screenshot Touch-disable mode If this call is covered, interpolation can be provided 31 Calendar Clock Messages Settings Music Video Photo Film Phone Manager Theme Store Play Share Google Tools GoogleCapture a long screenshot
With OPPO smartphone, you can easily take longer and scrolling screenshot with simple clicks. Long screenshot allows you to take scrolling screenshot of your conversations on messaging apps or a full webpage. ColorOS 3.1 devices can take long screenshots up to 40 pages.
Note: Long screenshot cannot work when you are on the home page of your phone.
To capture long screenshots:
- Press and hold the Power and Volume Up buttons for about 2 seconds, then your phone will be ready to capture the screen.
- Click [Page-down] to scroll to the next page, continue to click [Page-down] until you want to stop capturing.
- Click [Save] to generate a long screenshot. The image is saved in the Photos app.
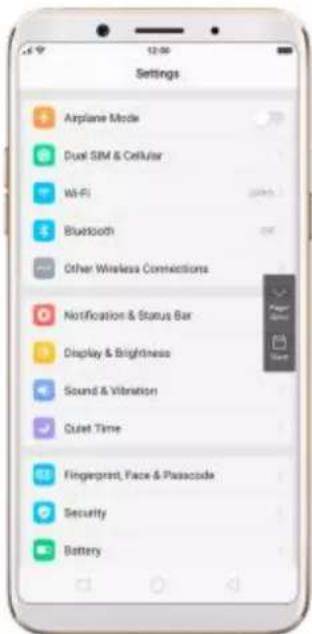
text_image
Settings Airplane Mode Dual SIM & Cellular Wi-Fi Bluetooth Other Wireless Connections Notification & Status Bar Display & Brightness Sound & Vibration Quiet Time Fingerprint, Face & Passcode Security Battery5.10. Notification and Status Bar
Notifications
Notifications alert you to the arrival of new messages, incoming calls, calendar events and so on. When a notification appears, you can click it to open or swipe it away to dismiss.
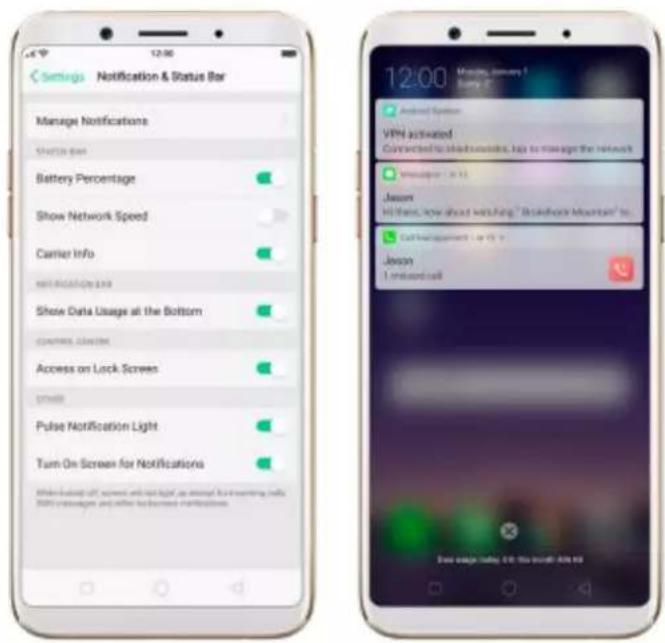
text_image
Settings Notification & Status Bar Manage Notifications Starts bar Battery Percentage Show Network Speed Carrier Info Show Data Usage at the Bottom Access on Lock Screen Pulse Notification Light Turn On Screen for Notifications 12:00 Monday, January 1 Sunday 19:31 Android System VPN activated Connected to dark seconds, help to manage the network Messenger - 18:11 Jason Hi there, how about with Jung "Brakofurn Mountain" to Call Management - 18:11 Jason I unissued call Free usage today on this month 24:00View all notifications. Swipe down from the top of any screen to open notification center.
Open the app to respond. Click a notification to go to the related app.
When phone screen is locked, swipe the notification right. You may need to enter your passcode.
Dismiss notifications. Swipe the notification left. To dismiss all notifications, Click .
Manage your notification settings. Swipe the notification left, click [Settings], or go to [Settings] > [Notification & Status Bar] > [Manage notifications].
Select an app from the list to customize whether new notifications from that
app appear on the lock screen or notification bar, display a banner, play a sound or vibrate, and more.
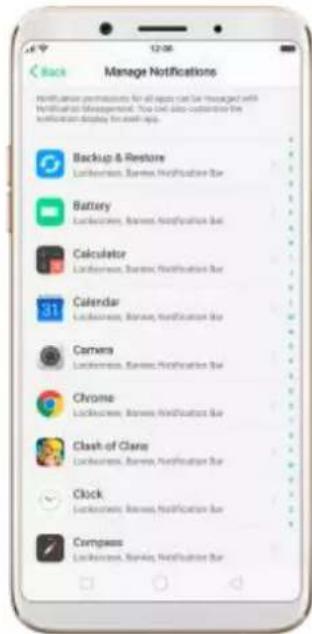
text_image
Manage Notifications Recommendations for all apps can be managed with Notification Management. This is also considered the Notification display for each app. Backup & Restore Lockiness, Business Notification Bar Battery Lockiness, Business Notification Bar Calculator Lockiness, Business Notification Bar Calendar Lockiness, Business Notification Bar Camers Lockiness, Business Notification Bar Chrome Lockiness, Business Notification Bar Clash of Clare Lockiness, Business Notification Bar Clock Lockiness, Business Notification Bar Compass Lockiness, Business Notification BarYou can also let your phone pulse light and turn on screen for new notifications.
Status Bar
Status icons are displayed on the status bar, indicating for instance wirelessconnectivity, the battery status and operator info.
Display or hide status icons. Go to [Settings] > [Notification & Status Bar], and toggle the slider to green/white.
Control Center
OPPO smartphone allows you to control many basic features with just a swipe.
By accessing the Control Center,
-
You can quickly access to frequently used functions such as Wi-Fi, Mobile Data, GPS, Bluetooth, OPPO Share, Personal Hotspot, Flashlight, Calculator, Clock, Camera and more.
-
You can also personalize your settings such as Silent Mode, Airplane Mode, Portrait Orientation Lock, Disable Button keys, Brightness and more.
Open Control Center
Swipe up from the very bottom of any screen to access it.
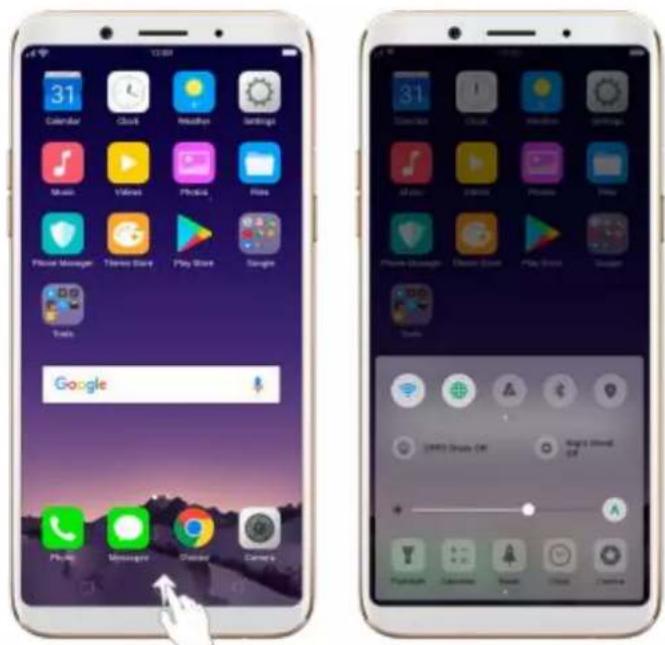
text_image
Two smartphone home screens displaying app icons and status bar, one with Google's 'Google' status visible.5.11. Personalize your Control Center
Swipe the shortcut bar left and click .You can change or rearrange the shortcuts according to preference. Drag next to a shortcut name up or down to enable or disable the shortcut. You can add nine shortcut keys at most.
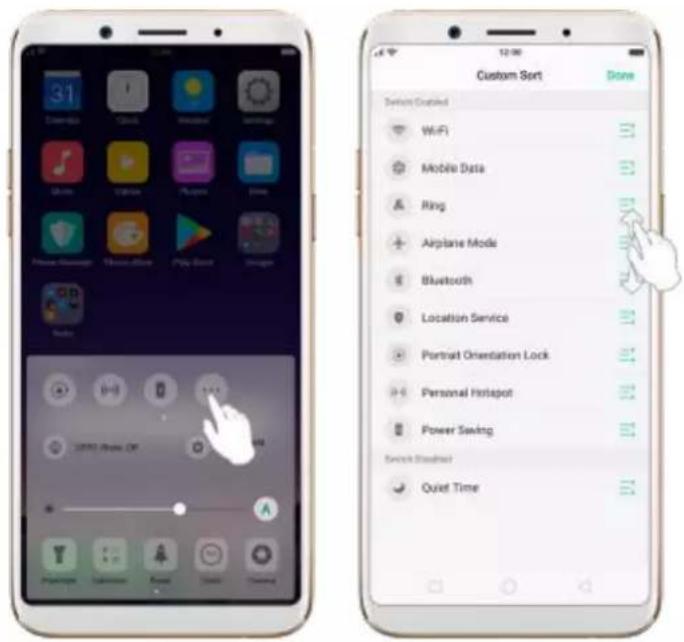
text_image
31 Options Click Windows Settings Mouse Cable Play Game Search Radio USE PDF OF Custom Sort Done Default Enabled WiFi Mobile Data Ring Airplane Mode Bluetooth Location Service Portrait Orientation Lock Personal Hotspot Power Saving Switch Shortset Quiet TimeAirplane Mode. Airplane mode disables your phone's wireless
communication abilities, theoretically making it approved for use on aircraft.
While in airplane mode, your phone cannot send or receive phone calls and messages.
Turn on Airplane Mode: Go to [Settings] > [Airplane Mode] and tap the
slider to turn it on. You can also swipe up from the bottom of your screen to open Control Center, then tap . Notice that the carrier information in the upper-right will be replaced with an airplane icon. Wi-Fi and Mobile Data will be turned off when Airplane mode is enabled, but you can still turn on Wi-Fi under Airplane mode.
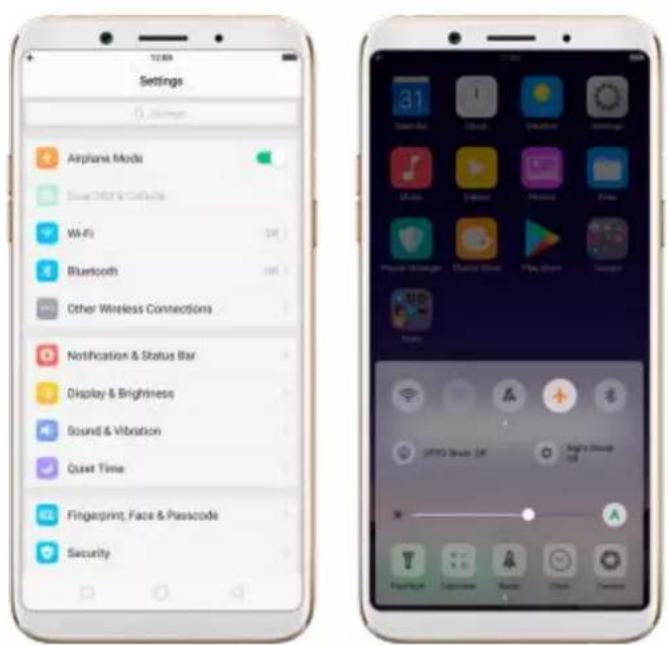
text_image
Settings Airplane Mode Save Digital Audio WiFi Bluetooth Other Wireless Connections Notification & Status Bar Display & Brightness Sound & Vibration Quiet Time Fingerprint, Face & Passcode SecurityQuiet Time. With OPPO phone's Quiet Time feature, you can silence your phone when you need privacy. You can even set it to a schedule, or allow only specific people to reach you.
Turn on Quiet Time. Swipe up from the bottom of the screen to bring up the Control Center, then click 🤒. Or go to [Settings] > [Quiet Time] and toggle the [Enable Manually] slider to green. Notice that appears in the status bar.

text_image
31 Clear-cut Cloud Weather Settings Music Video Phone Video Play Music Game Play Music Play Music Options Help Cancel Cancel Cancel Quiet Time Enable Manually Where "Look Time" to continue on the phone will be put more active when I am on a promotional message where there is also playing home performed. A music card will also be checked up the website. However, the always click and counterbox drive will not be missed. Enable Automatically Allow messages from: Allow Notifications: Allow Messages From: Allow Calls From: From Repeated Repeated Calls A second call has the same card or within it inside will not be referred.Schedule Quiet Time. If you want to set Quiet Time to automatically turn on at specific times, you can set a schedule for it. Toggle the Scheduled slider to green, and change times when you want it to start and stop.
Allow notifications. You can set Quiet Time to allow notifications, and allow calls and messages to come through from people that you specify.
Allow repeated calls. Toggle the [Repeated Calls] option to allow a call to
come through if it rings for the second time in three minutes or less.
Close Control Center. Swipe down, tap the top of the screen, or press the Home or Return button.
5.12. Search
Use the OPPO smartphone's Search feature to find specific apps, contacts,
messages, or quickly search the Internet.
Search with OPPO phone. Swipe down on any page of the Home screen. Do not start swiping at the very top of the screen - that will open the Notification Center instead. Type in your search query, then click a search result in the list to open it.
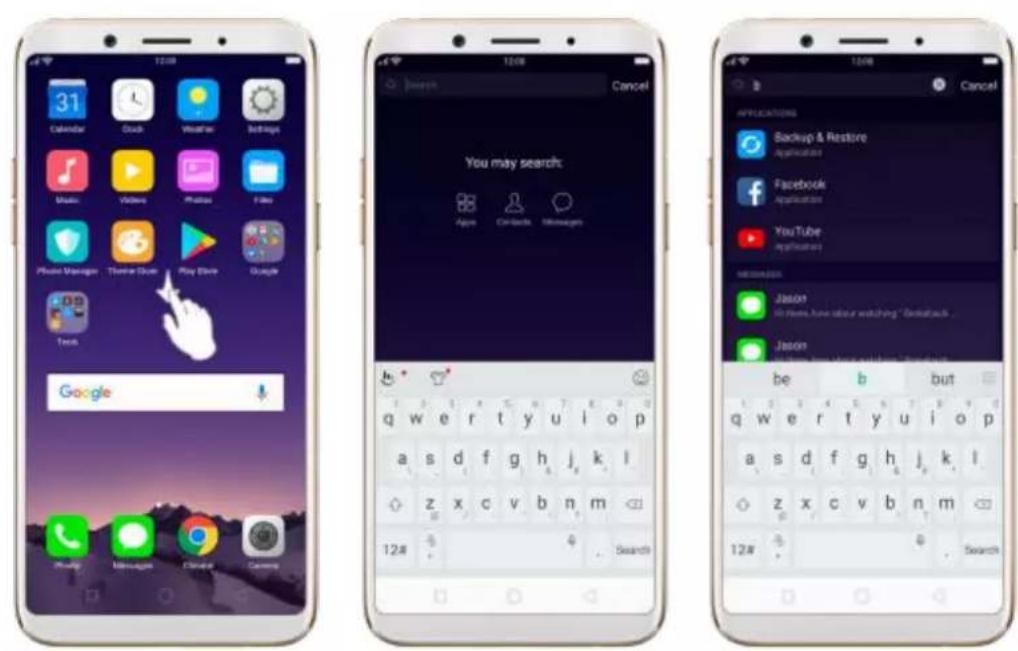
text_image
31 Calendar Crash Weather Settings Music Video Photos Figs Phone Manager Theme Store Play Store Google Text Google You may search: Appn Contacts Messages Cancel Applications Backup & Restore Applications Facebook Applications YouTube Applications Getaway Jason Hi there have little watching "Getaway" Jason be b but q w e r t y u i o p a s d f g h j k l z x c v b n m 12# SearchClose Search. Click "Cancel", the Return button, or the middle of the screen.
5.13. Text
5.13.1. Add or change keyboard languages
If you need to type in a foreign language on your OPPO phone, you can do so by adding and changing the input language:
Add installed languages. Go to [Settings] > [Additional Settings] > [Keyboard & Input Method] > [TouchPal for OPPO] > [Languages], then tick the languages to use.
You can also add languages as you type. Click 🤨 > [Language] > [Add language].
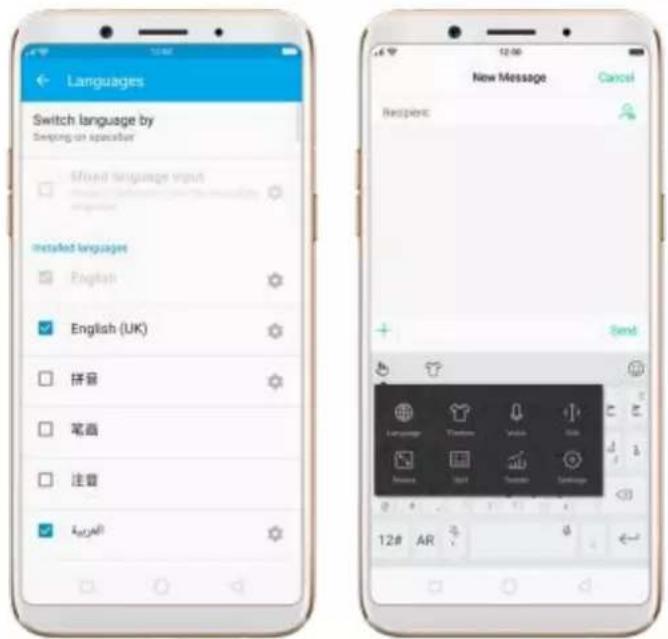
text_image
Languages Switch language by Swinging an speaker Mixed language vns# Installed languages English English (UK) 拼音 笔画 注意 kall New Message Cancel Respenc: Send Language Texter Video Gib Mouse Spot Searcher Language 12# ARDownload available languages. Click to download the language pack. You'll see the language in Installed languages list when the download completes.

text_image
Languages Available languages 手写 Click to download 五笔 Click to download 仓额 Click to download 连成 Click to download Afrikaans Click to download Shop Click to download XPTCT Click to download 阿萨克斯坦 Click to download
text_image
Languages Switch language by Language switch key Mixed language input Predict candidates from the secondary Language Installed languages English English (UK) 拼音 笔画 注意 AfrikaansChange Keyboard languages. As you type, switch language by clicking EN or swiping on spacebar.
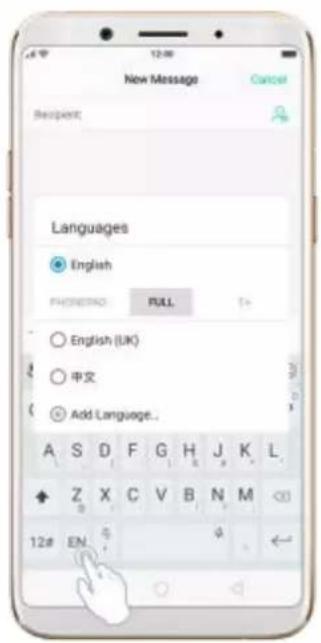
text_image
New Message Cancel Respient: Languages English FHNORING FULL English (UK) 中文 Add Language...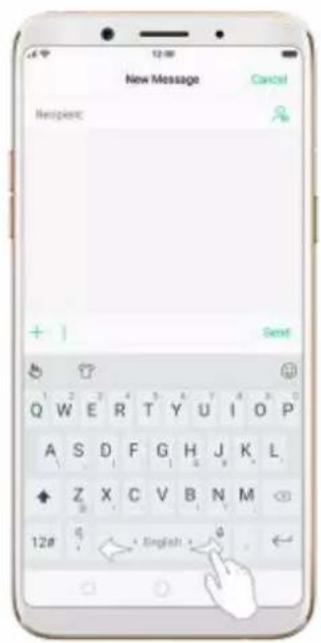
text_image
New Message Cancel Recipient: + Send Q W E R T Y U I O P A S D F G H J K L Z X C V B N M 12# 0. ← English → 05.13.2. Type, edit and delete text
Type text
Click a text field to pop up the keyboard, then click the letter to type.
Type capital letters. OPPO smartphone auto-capitalizing the first letter of a sentence, or you can click to type capital letters.
Turn on Caps Lock. Double-click . A line will appear under the arrow if you have done this correctly.
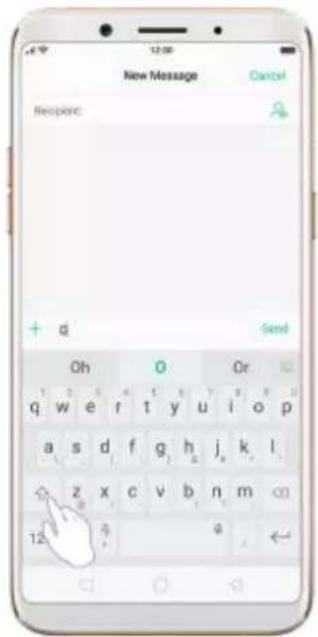
text_image
New Message Cancel Respenc + d Send Oh 0 Or 1 2 3 4 5 6 7 8 9 10 11 12 13 14 15 16 17 18 19 20 21 22 23 24 25 26 27 28 29 30 31 32 33 34 35 36 37 38 39 40 41 42 43 44 45 46 47 48 49 50 51 52 53 54 55 56 57 58 59 60 61 62 63 64 65 66 67 68 69 70 71 72 73 74 75 76 77 78 79 80 a s d f g h j k l z x c v b n m 12 aEnter numbers, punctuation, or symbols. Click 12#. To type alternate characters, touch and hold a key, then slide to choose one of the options.
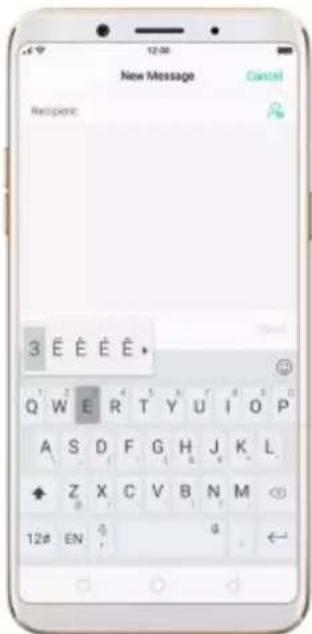
text_image
New Message Cancel Respenc: 3 E E E E E * Q W E R T Y U I O P A S D F G H J K L Z X C V B N M 12# ENSwitch language. Go to [Settings] > [Additional Settings] > [Keyboard & Input Method] > [TouchPal for OPPO] > [Languages].
Tick the languages to use, then switch language by clicking EN or swiping on spacebar.
Revise text. Click on your text to move the cursor to the insertion point.
Edit text
Select text. Touch and hold the target text, or double-click the target text to select. Drag the control points on either side of the highlighted word to select more or less text, or click [Select all] to highlight all of the text.
You can cut, copy, paste or share your text then.

text_image
New Message Cancel Respenc: CUT COPY SHARE SELECT ALL + What is that? Send 1 2 3 4 5 6 7 8 9 10 11 12 13 14 15 16 17 18 19 20 21 22 23 24 25 26 27 28 29 30 31 32 33 34 35 36 37 38 39 40 41 42 43 44 45 46 47 48 49 50 51 52 53 54 55 56 57 58 59 60 61 62 63 64 65 66 67 68 69 70 71 72 73 74 75 76 77 78 79 80 q w e r t y u i o p a s d f g h j k l ◇ z x c v b n m 12# EN φ φDelete text
Click to delete the selected text or characters before the cursor.

text_image
New Message Cancel Respect: + q Send Oh O Or q w e r t y u i o p a s d f g h j k l ◇ z x c v b n m 12# EN g5.13.3. Smart input
Smart input lets you to enter text with ease and without errors.
Go to [Settings] > [Additional Settings] > [Keyboard & Input Method] >
[TouchPal for OPPO] > [Smart input].
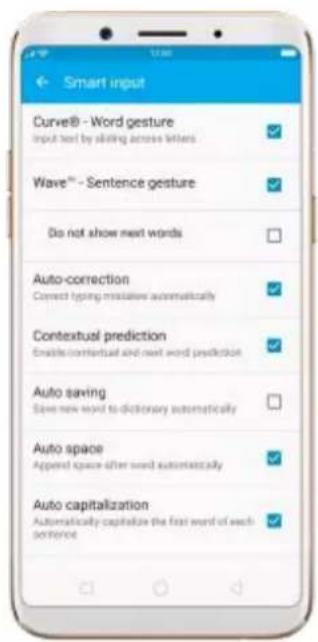
text_image
Smart input Curvet® - Word gesture Input text by asking across letters Wave™ - Sentence gesture Do not show next words Auto-correction Correct typing mislaw automatically Contextual prediction Enable contextual and next word prediction Auto saving Save new word to dictionary automatically Auto space Append space after word automatically Auto capitalization Automatically capitalize the first word of each sentenceUse TouchPal Curve to input text simply by swiping across the keyboard, from one letter to another.
Use Wave – Sentence gesture to input commonly used phrases/sentences.
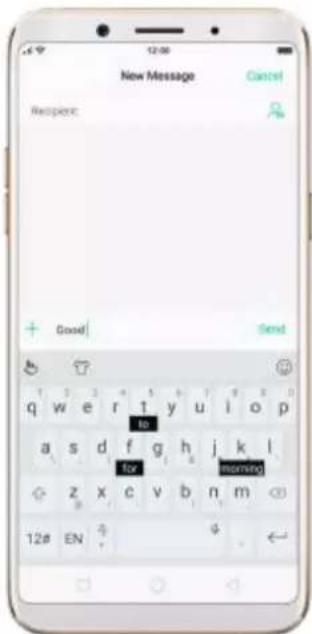
text_image
New Message Cancel Respenc: + Good Send q w e r t y u i o p a s d f g h j k l for morning z x c v b n m 12# EN 4Correct spelling automatically. The keyboard will automatically check and correct the spelling of the text.
Predictive text. While you type, the keyboard predicts your next word, and offer suggestions for likely words before you finish typing. Click the word or the spacebar to select.

text_image
New Message Cancel Respenc: Would you like Send it to me q w e r t y u i o p a s d f g h j k l z x c v b n m 12# EN 4As you type, the keyboard will also automatically save new words to dictionary, append space after word and capitalize the first word of each sentence.
5.13.4. Voice typing
When you're connected to the Internet, you can use the built-in microphone to speak the text instead of typing it.
Start voice typing. Touch and hold the space bar on the bottom of the screen, or click 🎨 [Voice], then speak.
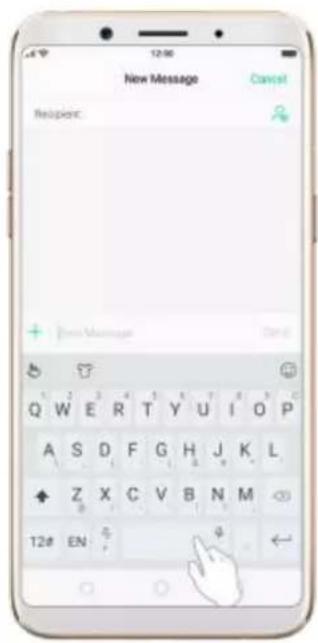
text_image
New Message Cancel Request: + New Message Send Q W E R T Y U I O P A S D F G H J K L Z X C V B N M 12# EN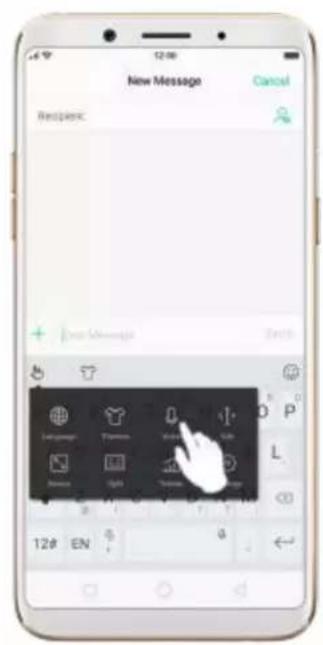
text_image
12:00 New Message Cancel Respenc: + Next Message Status Language Therapy Video Light Text Image D P L 12# EN 6 4Pause voice typing. Click the microphone icon to pause/continue dictating. Click to quit voice typing.
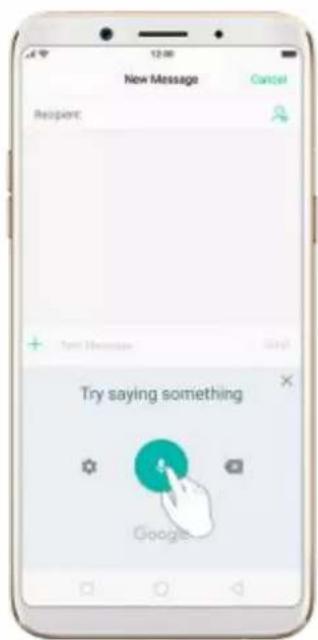
text_image
New Message Cancel Respient: + Text Messages Help! Try saying something Google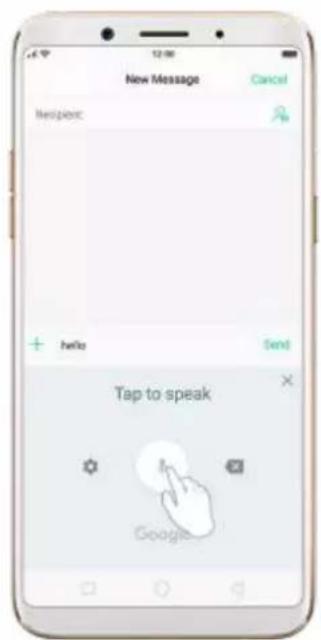
text_image
New Message Cancel NewItem: + hello Send Tap to speak GoogleSelect input languages. Click on the panel, or go to [Settings] >
[Additional Settings] > [Keyboard & Input Method] > [Google voice typing] > [Languages].
Select your preferred languages. To select a primary language, touch and hold the language.
Insert and delete text. To insert or delete text, click to place the insertion point first. Click to the right of the microphone icon to delete text.
To enable voice input while offlineClick on the panel to manage [Offline speech recognition].
5.13.5. TouchPal for OPPO
TouchPal Keyboard is the default keyboard on OPPO smartphones. You can use it to enter text by tapping on the keys or swiping across the keyboard, from one letter to another. Besides its basic typing features, TouchPal has introduced some innovations. Click 🔊 on the on-screen keyboard to get more information.
Multiple themes available. You can dress up the keyboard with various themes or customize the keyboard by yourself.

text_image
TouchPal for OPPO Popular Installed Pink Diamond Offset... Eye Skull Graffiti Sponge Bob Loki Take-in Sub-dish Touchb More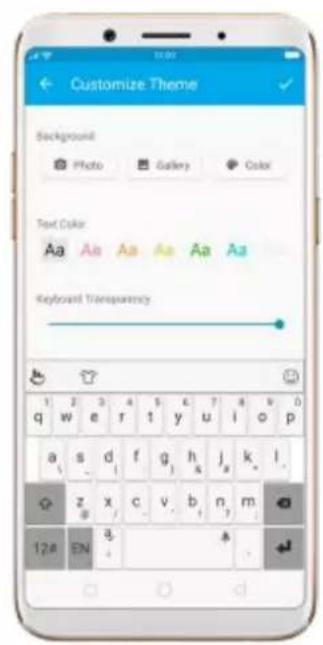
text_image
Customize Theme Background Photo Gallery Color Text Color Aa Aa Aa Aa Aa Aa Keyboard Transparency 1 2 3 4 5 6 7 8 9 0 q w e r t y u i o p a s d f g h j k l z x c v b n m 12# EN a +Emojis and stickers. TouchPal has multiple emojis and stickers, and can predict what emoji comes next.
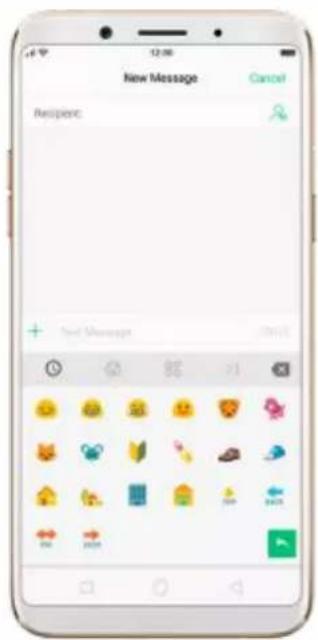
text_image
New Message Recipient Cancel + Text Messages 2015Smart input. With TouchPal Curve®, you can type by sliding from letter to letter instead of tapping. Advanced technologies such as Contextual Prediction, Autocorrection and Cloud Prediction also make typing faster. See Smart input.
5.14. Sound, Vibration and System Feedback
You can set an OPPO smartphone to sound or vibrate for incoming calls, messages and other notifications, and let your phone send sound or haptic feedbacks on key clicks.
Set your phone to vibrate. Go to [Settings] > [Sound & Vibration].
Separate controls let you set your phone to vibrate in ring mode, silent mode, or both.
Turn ringing on or off. Toggle the [Silent] slider to green or white. You can
also swipe up from the bottom of the screen to open the Control Center, then
click to turn on Silent mode.

text_image
Settings Sound & Vibration Vibrate Vibrate on Ring Vibrate on Silent Silent VOLUME Ringer Volume Media Volume Ringtone Message Tone Other Notification Tones Dislipad tone 31 Calendar Cloud Monday Monday Music Video Phone Manager Theme Box Play Ship Session Duty UPPO Sound OK High's Friend AS Hodgung Lockdown Box SmartAdjust the ringer and media volume. Drag the control point left or right.
Change ringtones for incoming calls, messages and other notifications. In addition to the default ringtones, you can create ringtones using your own audio files.

text_image
Sound & Vibration Ringtone CUSTOM From Files PHONE RINGTONE Future Vision Playful Move Drift Memories Hello Cordial Mailers Ringtone Starting Summer SunshineTurn system feedback on or off. Toggle the sliders to green or white. When turn Vibrate on Touch on, your phone vibrates when you touch the Menu, Home, and Return buttons.

text_image
Sound & Vibration Vibrate on Silent Silent Single Voice Single Voice Signal Tone Message Tone Other Notification Tones Signal Resource Dualpad tone Lock Screen Tone Vibrate on TouchTo temporarily silence incoming calls and alerts (without vibrations), see Quite Time.
5.15. Charge and monitor the battery
OPPO smartphones are equipped with a non-removable, lithium-ion rechargeable battery. Do not attempt to open your phone. Charge the phone using the included cable and USB power adapter.
Charge the battery. Connect your phone to a standard power outlet or a
Power Bank.
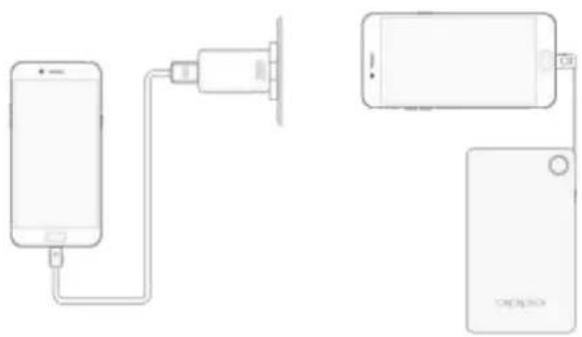
natural_image
Diagram showing two connected devices: a smartphone connected to a charging plug and a smartphone with a USB cable (no text or symbols present)Charge the battery and transfer files. Connect your phone to a computer.
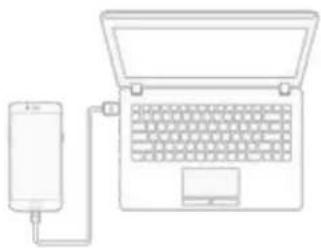
natural_image
Line drawing of a laptop connected to a cylindrical device via tubing (no text or symbols)Notice : All photos shown are for illustration purpose ONLY. Actual products may vary.
An icon in the upper-right corner of the screen shows battery charging status.


Charging VOOC Flash Charging
Notice: Rechargeable batteries have a limited number of charge cycles and may eventually need to be replaced. The OPPO smartphone battery is not
user replaceable; it can only be replaced by an authorized service provider. Removing the battery yourself will void your warranty and might cause damage to your phone.
Show percentage of battery in the status bar. Go to [Settings] > [Notification & Status Bar] and turn on [Battery Percentage].

text_image
Settings Airplane Mode Dual SIM & Cellular WiFi Bluetooth Other Wireless Connections Notification & Status Bar Display & Brightness Sound & Vibration Quiet Time Fingerprint, Face & Passcode Security Battery Settings Notification & Status Bar Manage Notifications: START/START Battery Percentage Show Network Speed Carrier Info NOTICE/NOTICE/NOTICE Show Data Usage at the Bottom STATUS: 100MHz Access on Lock Screen. Other Pulse Notification Light Turn On Screen for Notifications Where panel off, access with and light up enough for scanning calls, SMS Messages and other information notificationsView detailed battery info listed for each app. Go to [Settings] > [Battery].

text_image
Settings Battery Power Saving "Power Saving will reduce consumer consumption by intelligence, controlling the government's impact. When it is saved on, please provide, communicate, and communicate may be turned off by advertising areas" Energy Saver POWER CONSUMPTIONS (19:2) Standby 48.03% Google Account Manager 17.61% MTP Host 3.04% Facebook 5.40% Super VPN 5.02% Messages 3.99% Slide up to unlock 3.99% TouchPal for OPPO 3.99%5.16. Location Service
Apps like Maps, Weather and Compass must know your exact position before it can provide accurate services and results.
Turn on Location Service. Swipe up from the bottom of the screen to open
Control Center, then click 🔒. You can also go to [Settings] > [Google] > [Location] and toggle the slider to green.
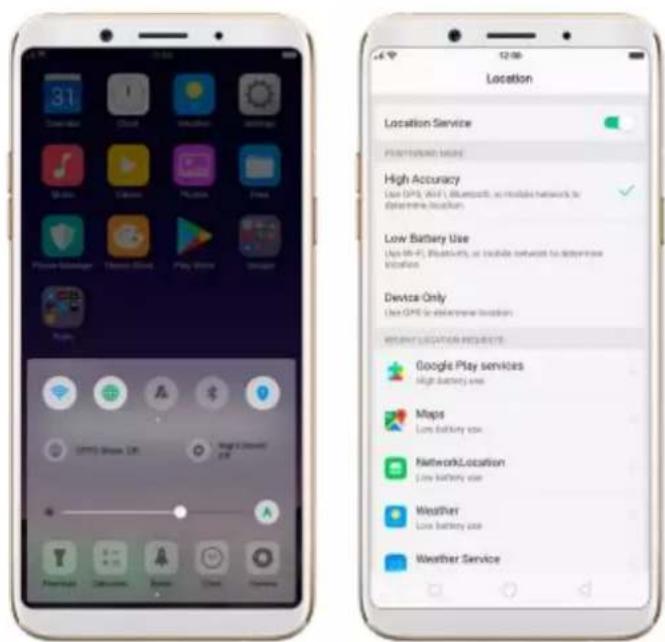
text_image
31 Clear-cut Cloud Bluetooth Smartphone Smartphone Chrome Store Play Store Game Location Location Service Photo/Network Before High Accuracy Use GPS, WiFi, Bluetooth, or mobile network to determine location Low Battery Use Use GPS, Bluetooth, or mobile network to determine location Device Only Use GPS for electronic location Weighted Location Requested Google Play services Light battery use Maps Low battery use NetworkLocation Low battery use Weather Low battery use Weather ServiceYou can choose from three types of positioning modes, which differ in accuracy and battery drain:
- High accuracy (GPS, Wi-Fi, Bluetooth and mobile network).
- Battery saving (Wi-Fi, Bluetooth and mobile network).
- Device only (GPS).
A history of recent location requests. You'll see a list of apps that have requested location. You can turn off each app's access to each of these categories of information:
- Camera
- Location
- Microphone
- Phone
- Storage
Google Location service
Use Google Location History to retrace your steps. Google Location History will customize search results for location and search history.
Use Google Location Sharing to share your locations with friends and contacts in real time.
5.17. Use the phone internationally
When you travel overseas to other countries, do the following steps to make sure you stay connected to friends and family while traveling - without paying more than you have to.
Unlock your phone. Call your wireless operator and ask if your phone needs to be unlocked.
Shop international data roaming plans with your operator. Consult your operator or visit online to shop roaming plans used in the destination country or region.
Buy or rent local Nano SIM cards. You can buy or rent SIM cards for most of the countries and regions. Learn more from travel guides and websites related to the country or region.
Use Wi-Fi. Turn off global roaming on your phone and head to a Wi-Fi hotspot, such as a hotel lobby, or local cafes.
5.18. Power Saving Mode
Power Saving Mode helps increase battery life by intelligently decreasingbackground activities, for example, background media playback anddownloads may be cut out, and notifications may be disabled. Using PowerSaving Mode can give you at least extra 30 minutes to use the phone.
Turn on Power Saving Mode. The phone will let you know when your battery level goes down to 20%, and again at 10%, and will ask you to turn on Power Saving.
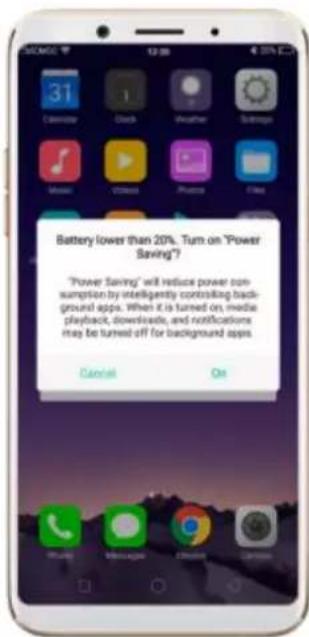
text_image
Battery lower than 20%. Turn on "Power Saving?" "Power Saving" will reduce power consumption by intelligently controlling background apps. When it is turned on media playback, downloads, and notifications may be turned off for background apps.To manually turn on or off Power Saving Mode at any time, swipe up from the bottom of your screen to open Control Center, then click . You can also go to [Settings] > [Battery] and enable Power Saving.
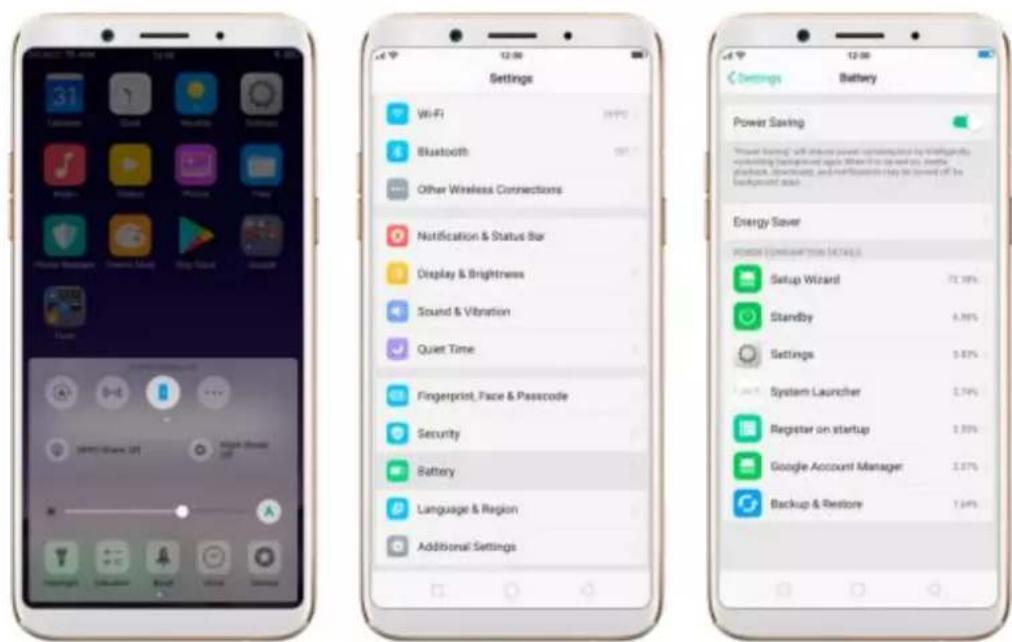
text_image
Settings Wi-Fi Bluetooth Other Wireless Connections Notification & Status Bar Display & Brightness Sound & Vibration Quiet Time Fingerprint, Face & Passcode Security Battery Language & Region Additional Settings Settings Battery Power Saving Power Saving will reduce power consumption by identifying marketing background apple when this is up and you handle playback, download, and refreshments may be lowered off the background data Energy Save Power Consumption Details Setup Wizard Standby Settings System Launcher Register on startup Google Account Manager Backup & Restore6. Personalize your OPPO phone
6.1. ColorOS 3.2 device name
If you scan for a Wi-Fi Direct or Bluetooth connection with your OPPO phone, your device name will display on the target devices.
Change device name for Wi-Fi and Bluetooth. Go to [Settings] > [About
Phone]. You can also change the device name when you enable Bluetooth or Wi-Fi Direct.
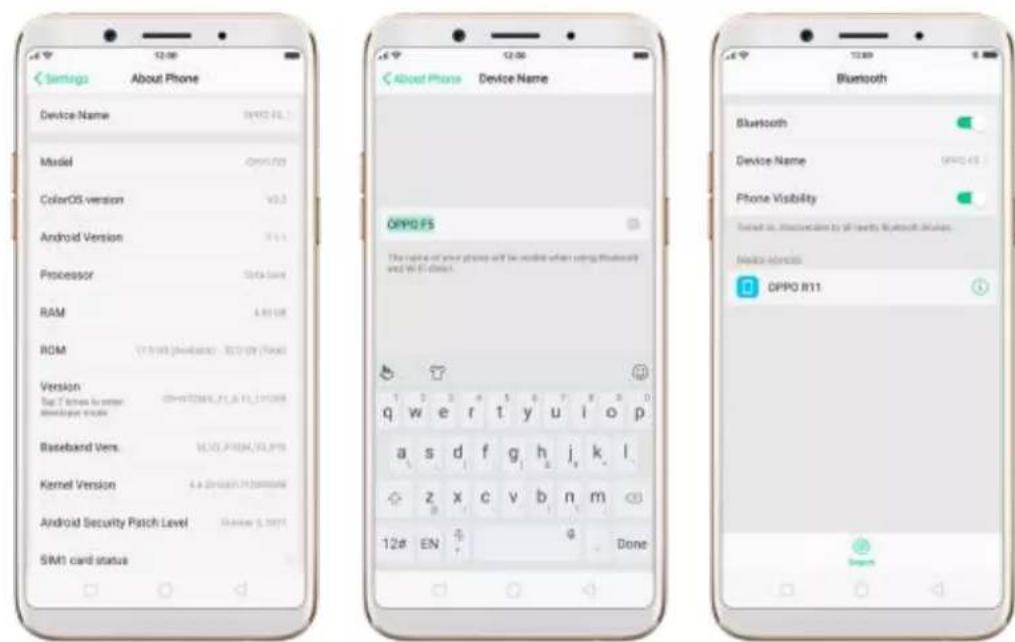
text_image
Setup About Phone Device Name: OPPO FS Model: OPPO FS ColorOS version: V3.3 Android Version: 71.1 Processor: Data Bars RAM: 4.80 GB ROM: (1.5KB) (Modems) - 32.0 GB (Tak) Version: Tag T lines for other developer works Baseband Vers: 16.05 PROM/16.09 Kernel Version: 4.80 GB/16.09 (Tak) Android Security Patch Level: Review 5.2011 SIM1 card status About Phone Device Name OPPO FS The name of your phones will be modified when using the VoSOD and Wi-Fi mode. Bluetooth Bluetooth Device Name: OPPO FS Phone Visibility Selected as: Observation by all rights Bluetooth devices. Media: OPPO R11 12# EN Done6.2. Personalize the Home screen
6.2.1. Organize the Home screen
From the Home screen, you can access all your apps and widgets. To keep everything in order, you can organize your home screen to make it more manageable and keep it looking neat.
Add or Remove a Home screen page
Add a Home screen page. Swipe to the rightmost screen and drag an app or widget off the screen to the right.

text_image
31 Calendar Cloud SmartBox Settings Main Phone Manager Tunes Store Play Store Google Tools GoogleRemove a Home screen page. Drag all the apps and widgets on a Home screen page to another page. The empty Home screen page will be automatically deleted.
Group Apps
Make folders and group apps. You can put apps in folders, which can keep your home screen neat or help to organize similar apps.
Create a folder. Tap and hold on an app until the icons start wiggling. Drag one of the apps onto the other, and lift your finger when the first app seems to merge into the second one. Add more apps by dragging them in.
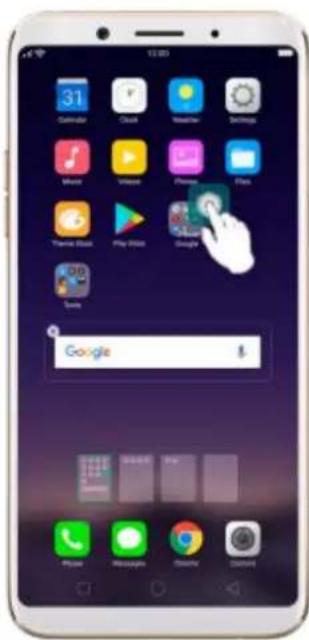
text_image
Smartphone home screen displaying app icons with Google search bar and navigation controlsEdit the folder's name. When you first create a folder, your phone assigns a suggested name to it. To edit the name, tap on the text.

text_image
Tools Contacts Recording Computer Calculator Backup & Plugin Audio HangRearrange apps and folders
Remove apps from a folder. Tap the folder, then tap and hold on an app until the icons start wiggling. Drag the app out of the folder and onto the home screen.
Delete a folder. Drag all the apps out of the folder and onto the home screen, and the folder will disappear.
Rearrange apps and folders. OPPO smartphone has set a default arrangement for users, but you can still rearrange the apps and folders to fit how you use your phone.
Rearrange apps. Tap and hold on an app until the icons start wiggling. Drag and drop the app icon to a new location. To save your changes, press the Home or Return button.
Notice: Icons will be aligned to the left automatically.
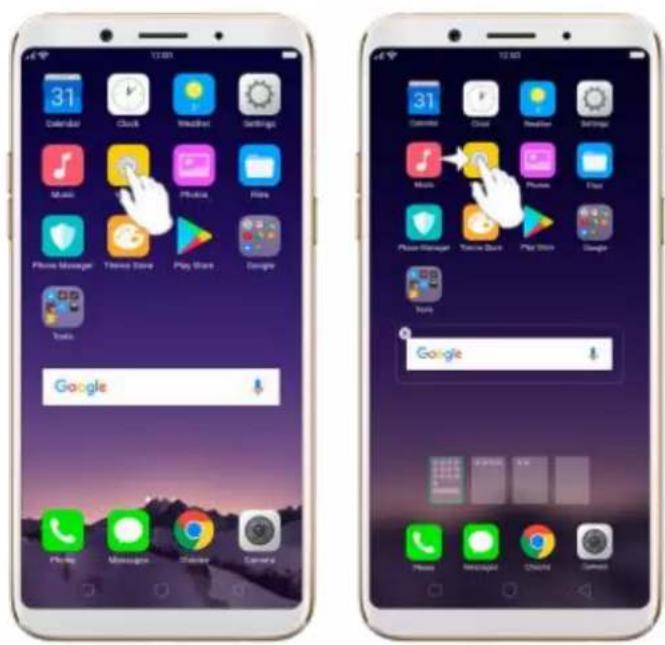
text_image
Screenshot of two smartphone home screens showing app icons and a Google login interface with Chinese text.Move the icon to a new screen. Drag the icon off the screen to the right and let it go when the new page appears.
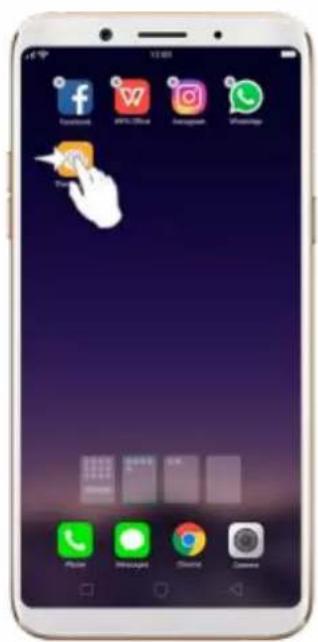
text_image
Smartphone home screen displaying app icons including Facebook, Instagram, WhatsApp, and others with a hand cursor hovering over the screen.Add or remove Home screen widgets. See Home screen widgets.
6.2.2. Home screen widgets & Transition Effects
You can give yourself a fancy home screen with a highly-detailed set of widgets, for example, clock, weather, battery or mail widgets. You can also use them to tweak notifications, alarms and other options. In other words, there's considerably more here than just widgets.
Manage widgets
Add a widget. Pinch your fingers together, then click [Widgets]. You'll see all available widgets. Touch, hold and drag one widget to the screen. Make sure there is enough space for that widget.

text_image
Three smartphone home screens displaying app icons and status bar, including Calendar, Mouse, Playbox, and Google.Move a widget. Touch and hold a widget for about 2 seconds, then drag it around.
Delete a widget. Click in the upper left corner of the widget.
Customize transition effect
You can change the transition effect on your OPPO smartphone, which is thestyle in which you slide the home screen right or left.
Set up transition effect. Pinch your fingers together, then click [Effects].
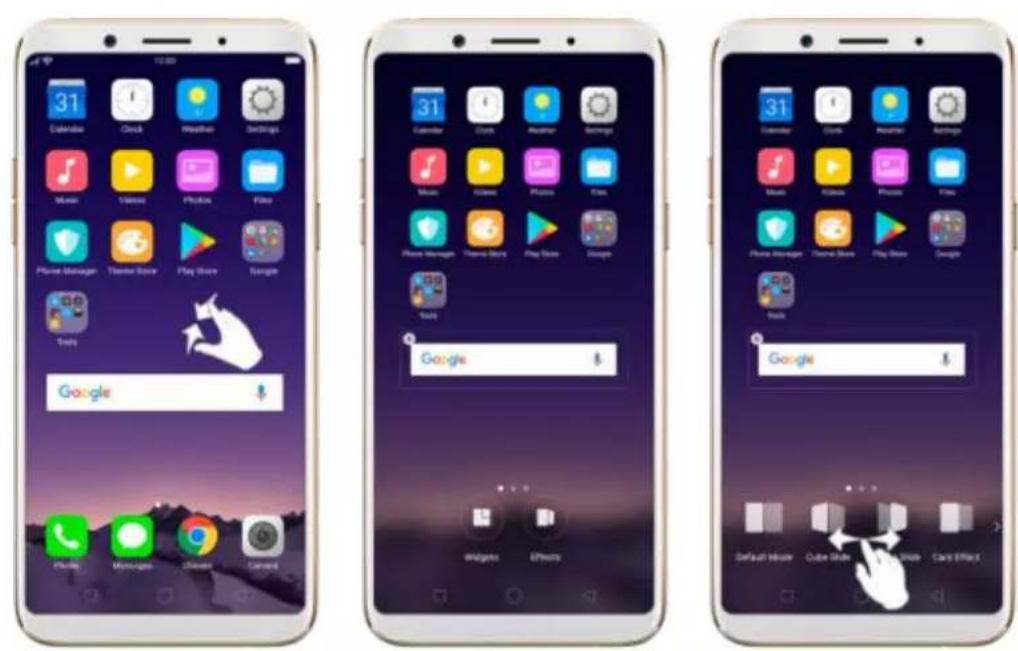
Preview and choose an effect. Click a transition effect and it will show the preview effect. You can choose one from the five options:
- Default Mode
- Cube Slide
- Flipping Slider
- Card Effect
- Tilting Mode
6.3. Change the wallpaper
You see a wallpaper background picture when you unlock your OPPO phone. You can select one of the images that are pre-installed in the phone, or use a photo from your photo gallery, or get some more wallpaper online.
Change the wallpaper. Go to [Settings] > [Display & Brightness] > [Lockscreen Magazine & Wallpaper] > [Set wallpaper].
Tip: When setting the wallpaper as your Home screen or Lock screen, you can drag to move the image, or pinch to zoom in and out, so the image fits the screen.
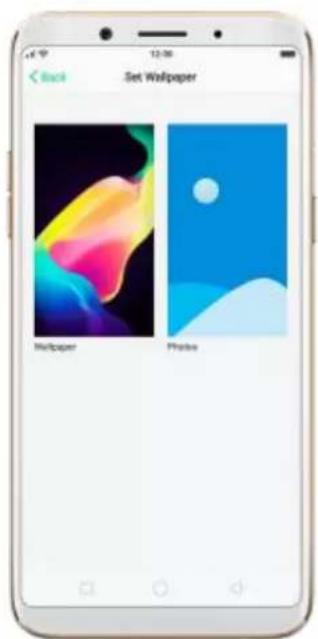
text_image
Back Set Wallpaper Wallpaper PhotoDownload online wallpapers. Click Wallpaper, then click Download more.
You can also click Theme Store on the Home screen directly to find more.

text_image
Wallpapers Edit Download more Category Topic Popular recommendations6.4. Lock screen magazine
You can let your lock screen's wallpaper to switch to a new picture every time you wake up your phone, reducing the likelihood of you getting bored with the same look.
Turn on Lock screen magazine. Go to [Settings] > [Display & Brightness] > [Lock screen Magazine & Wallpaper] and toggle the slider to green.
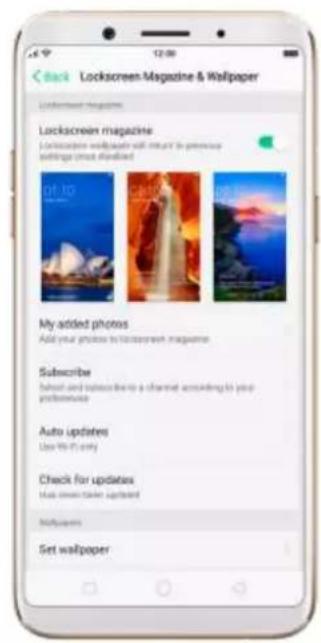
text_image
Lockscreen Magazine & Wallpaper Lockscreen magazine Lockscreen magazine Lockscreen magazine with intent to present settings once displayed My added photos Add your photos to lockscreen magazine Subscribe Show and click the info to a channel according to your preferences Auto updates Use We're only Check for updates Make new folder updates Mallpapers Set wallpaperAdd your local pictures to Lock screen magazine. Click My added photos, click , then select your preferred pictures.

text_image
Back My added photos Add the music video you live on the customer headquarters. Recommendated information @ 10/00/2017 Selection Select Albums 4/10 Photos Selected Inst 6 Photos.Add online pictures to Lock screen magazine. Click Subscribe and select
your preferred channels, then go back and click Check for updates. You can also set the lock screen magazine to update automatically.
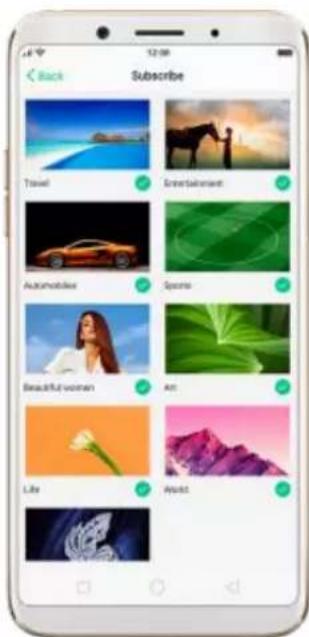
text_image
Back Subscribe Travel Entertainment Automobiles Sports Beautiful Women Art Life Award6.5. Adjust the screen brightness and color temperature
Adjusting the brightness on your OPPO phone tailors visibility to suit your environment. You can manually dim the screen when reading in bed, for example, or make it brighter when you're in a direct sunlight situation. Or use Auto-Brightness, which can automatically change screen brightness depending on the level of ambient light. Reducing screen brightness can also help to conserve battery life.
Adjust the screen brightness. Swipe up from the bottom of the screen to open Control Center, then drag ⚙ . Or go to [Settings] > [Display &
Brightness], then drag the slider.

text_image
< Settings Display & Brightness Auto-Brightness Portrait Orientation Lock Auto Screen Off 32 Minutes Font Size App Display in Full-screen Night Shield Lockscreen Magazine & WallpaperSet OPPO phone to adjust screen brightness automatically. Open Control Center, then click A . Or go to [Settings] > [Display & Brightness], then toggle the Auto-Brightness slider to green. If Auto-Brightness is on, your phone adjusts the screen brightness for current light conditions using the built-in ambient light sensor.
Use Nightly Shield. Go to [Settings] > [Display & Brightness] > [Nightly
Shield]. Drag the control point to adjust color temperature. The warmer you set your screen, the less blue light will be emitted from the display. When you use the OPPO phone at night, you can turn on Nightly Shield to cut down on eye strain and sleeplessness you might get.

text_image
Display & Brightness Night Shield Turn on right side to access dual light from the camera. This is growing, your phone. Scheduled Time Enable Now Take off automatic delay at 8:15 (minutes) Color Temperature Cooler Warner Adjust to your lifetime Age questions affected. COMPLEX EFFECT Display in Color Display in Black and White Comfortable Nighttime Reading Turn on displaying in color to purchase your color when cleaning the color of the color, containing a more acidic loading experience.6.6. Change auto-screen lock time
By default, your OPPO smartphone locks automatically after 30 seconds. To modify this, alter the amount of time yourself.
Change auto-screen lock time. Go to [Settings] > [Display & Brightness] >
[Auto Screen off]. Options range from 15 seconds to 30 minutes.
Tip: The longer your display, the more the battery drain.

text_image
Display & Brightness Auto Screen Off 15 Seconds 30 Seconds ✓ 1 Minute 2 Minutes 5 Minutes 10 Minutes 30 Minutes6.7. Change the text size
OPPO smartphone lets you change the text size to fit your eyesight needs.
Change the text size. Go to [Settings] > [Display & Brightness] > [Text
Size]. Drag the slider to the left or right to shrink or enlarge sample text, then you'll see your new text size immediately applied to the menu text in the upper-left corner of the screen.
Tip: This will not affect the size of your icon text.

text_image
Display & Brightness Font Size ColorDS font size preview Drag the other button6.8. Keyboard and input method
6.8.1. Customize the look of the keyboard
Make the keyboard your own by customizing the font and appearance.
Go to [Settings] > [Additional Settings] > [Keyboard & Input Method] >
[TouchPal for OPPO] > [General settings].
Change the font type. Click [Keyboard font] and choose one of the two fonts:
- TouchPal font
- System default font
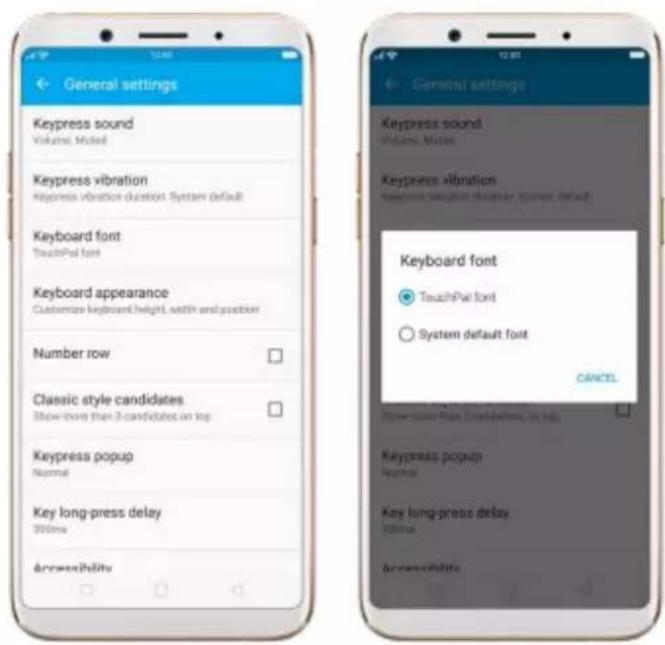
text_image
General settings Keypress sound Volume: Milled Keypress vibration Keypress vibration duration System default Keyboard font TouchPad font Keyboard appearance Customize keyboard height, width and position Number row Classic style candidates Show more than 3 candidates on top Keypress popup Normal Key long-press delay 300ms Accessibility General settings Keypress sound Volume: Milled Keypress vibration Keypress vibration duration System default Keyboard font ● TouchPad font ○ System default font CANCEL Power screen from Downloaded to help Keypress popup Normal Key long-press delay 200ms AccessibilityAdjust candidate word size. Click [Keyboard appearance], then drag the control point to change font size to small, normal or large.
Customize keyboard appearance. Click [Keyboard appearance], or click

on the on-screen keyboard > [Resize], then drag the control arrow to
adjust keyboard height, width and position.

text_image
New Message Cancel Recipient Text Manager Candidate size A A Candidate size A A Touchpad Touchp TouchPal Touchpad Touchp TouchPal 12# EN 6 12# EN 66.8.2. Split keyboard
You can split the phone's on-screen keyboard into two so you can grasp thephone with two hands and type with your thumbs in landscape orientation.
Split the on-screen keyboard. Click on the on-screen keyboard, then click Split.
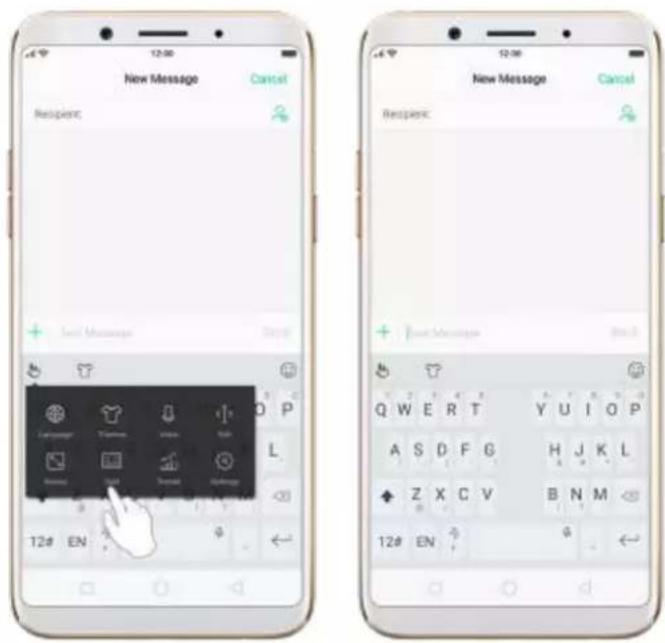
text_image
12:00 New Message Cancel Respient: Next Message Help 12# EN Q W E R T A S D F G Z X C V B N M 12# EN Y U I Q P H J K L B N M ←6.8.3. Trends
With TouchPal's Trends feature, you can download the keyboard themes and buzzwords, and get the latest news and headlines.
Get the latest trends. Click on the on-screen keyboard, then click Trends.

text_image
New Message Cancel Respenc: + New Message Start Language Patterns Music Edit Search Help 12# EN 5 66.8.4. Keyboard general settings
OPPO smartphones come preloaded with TouchPal Keyboard. You can change the keyboard settings directly on your phone. click on the on-screen keyboard, then click [Settings] > [General settings].
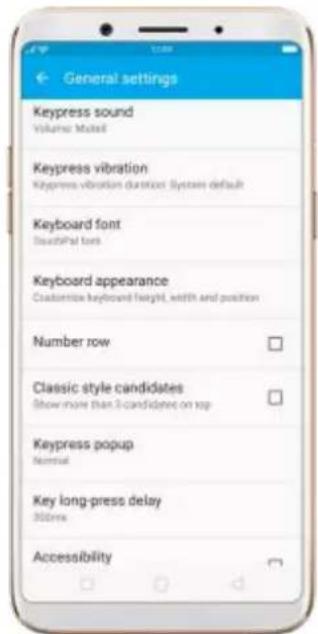
text_image
General settings Keypress sound Volume Mutel Keypress vibration Keypress vibration duration: System default Keyboard font TouchPal toys Keyboard appearance Customize keyboard height, width and position Number row Classic style candidates Show more than 3 candidates on top Keypress popup Normal Key long-press delay 300ms Accessibility
text_image
General settings Keyboard appearance Customize keyboard height, width and position Number row Classic style candidates Show more than 3 candidates on log Keypress popup Normal Key long-press delay 300ms Accessibility Voice feedback Emoji prediction Suggest emoji on candidate bar Expand textbox to full screen In landscape-mode, expand textbox to maximum, helping the next of the screen| Setting | Effect |
| Keypress sound | Adjust the keypress sound, or use the syst volume. |
| Keypress vibration | Adjust the keypress vibration duration, or u the system default setting. |
| Keyboard font | Switch to TouchPal or System default fontyour phone. |
| Keyboard appearance | Customize keyboard height, width and position. See Customize the look of the keyboard. |
| Number row | Add the number row option in quick menu |
| Classic style candidate | Show more than three candidates on top. |
| Keypress popup | A popup bubble displays when you click a |
| Key long-press delay | Adjust the long-press delay time ranging from 200ms to 1000ms. |
| Input animation | Float up effect when clicking the candidate word. |
| Accessibility | TouchPal reads exactly what you're typing. |
| Emoji style | Switch to Android or System emoji on you phone. |
| Emoji prediction | As you type, TouchPal predicts what emoji comes next |
| Expand textbox to full screen | Keyboard opens as full screen in landscape mode. |
6.9. Set up Startup Manager
Startup Manager helps you to manage system startup entries. You can choose what apps to startup after the phone reboots to meet your using habits.
* Too many self-starting apps may cause a low startup or operating speed.
Set up Startup Manager. Click Phone Manager on the Home screen, then click [Privacy Permissions] > [Startup Manager]. Toggle the sliders to white if you don't want to start apps when phone boots or in background.

text_image
Privacy Permissions Startup Manager Starting apps to recommend: The image can be able to write startup information when this is needed? Facebook Startup on boot and startup in background allowed Instagram Startup on boot and startup in background allowed WhatsApp Startup on boot and startup in background allowed Starting staff is recommended: System power consumption will increase when this is needed. Drive Startup on boot and startup in background allowed Duo Startup on boot and startup in background allowed Google Play Music Startup on the background allowed Photos Startup on boot and startup in background allowed Super VPNTip: For apps that receive real-time messages, such as Facebook, WhatsApp and Twitter, you are suggested to allow them running in the background without their being suspended.
6.10. Clone Apps
Clone Apps allows an app to run two accounts on a single phone on parallel. To turn on [Clone Apps], go to [Settings] > [Clone Aps], choose an app and turn on [Enable App Cloning]. A new copy of this app will be generated on the homescreen after Clone Apps is enabled. This copy and its original app can run simultaneously without affecting each other.
-
"Clone Apps" works only if both the app itself and the phone supports it. If a cloned app does not work properly, it means that the function or operation is not supported by the app or phone. Now OPPO smartphone supports two apps: WhatsApp and BBM.
-
"Clone Apps" currently does not support data transfer between a cloned app and a computer.

text_image
Settings Language & Region Additional Settings Software Updates About Phone Accounts and Sync Google App Management Clone Apps Game Acceleration Gesture & Motion Split screen When Closed as built again the network better to write spin open user apps that support this service. Connections... Clone Apps Apache IBM About "Clone Apps" 1. What "Clone Apps" is locked on, a new copy of the app will be generated on the information. This case and its original data can be obtained without affecting each user. 2. "Clone Apps" requires file support of both the apps itself and the phone. It is closed app calls are not properly. I mean that the options or options are not supported by the app or phone. 3. "Clone Apps" will create more resources than other Software - Cloned App and a Compatible 4. "Clone Apps" does not clearly support opening since that two app claims simultaneously. Clone Apps Apache Enable App Cloning Rename Cloned App6.11. Manage Default App
What is Default App: If you've ever installed two different applications that essentially do the same thing (music players, web browsers), you'll likely be presented with a pop-up menu when trying to play a song or open a web page, asking you which application you'd like to complete the action with. You can manage your default app and never be bothered when performing that action again.
Manage Default App. Go to [Settings] > [App Management] and click
Default App to manage Default App.
Take [Photos] as an example, there are six apps and you can choose one of them to be the default one. You are suggested to use the default apps to get a best performance.
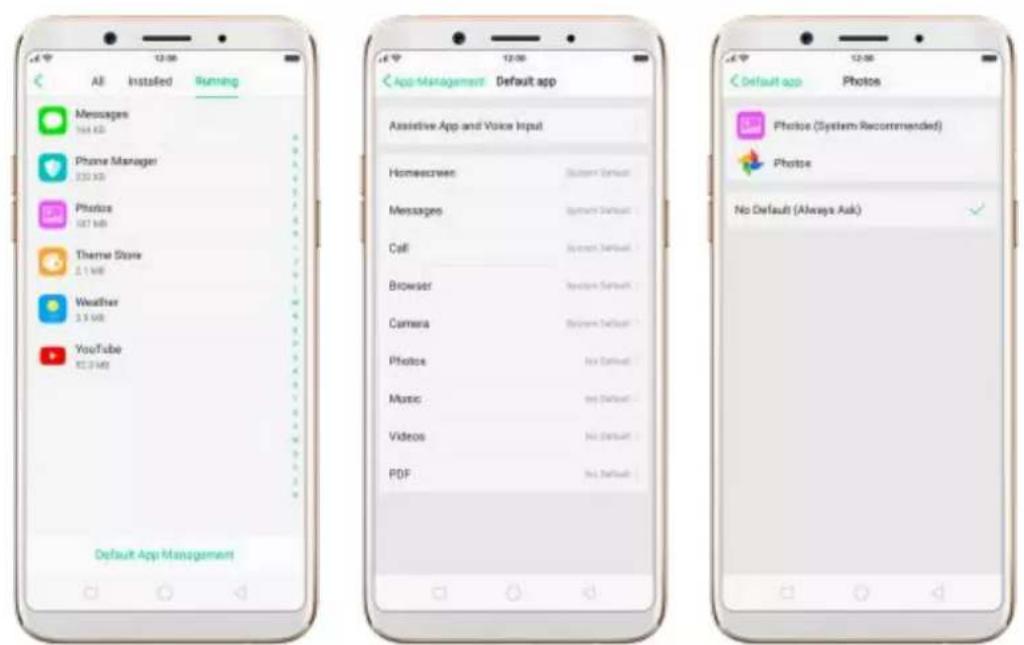
text_image
All Installed Running Messages 164 KB Phone Manager 230 KB Photos 587 KB Thermal Store 2.1 KB Weather 3.5 KB YouTube 82.9 KB Default App Management App-Management Default app Assistive App and Voice Input Homescreen: System Default Messages: System Default Call: System Default Browser: System Default Camera: System Default Photos: No Default Music: No Default Videos: No Default PDF: No Default Default app Photos Photos (System Recommended) Photos No Default (Always Ask)6.12. Gesture & Motion
Gestures
OPPO smartphone is designed to understand gestures. You can use gestures such as tap, swipe, drag and spread to operate your phone.

natural_image
Four hand icons pointing at a blue square, showing different finger movement and rotation (no text or symbols)To set up complex gestures for specific functions, go to [Settings] > [Gesture & Motion].
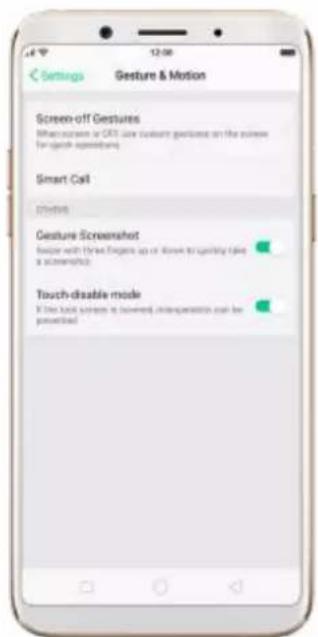
text_image
Settings Gesture & Motion Screen-off Gestures What screen or GPS use custom gestures on the pulses for quick feedback Smart Call Customs Gesture Screenshot Buffer with Inside Faces up or Show to qualify take a screenshot Touch-disable mode If the local screen is broken, interpretation can be poweredScreen-off Gestures
To set up screen-off gestures, you need to turn it on first.
Double tap fingerprint button for screen-on: Turn it on to wake up your locked screen with a double-click on the Home button. This function is only effective when the fingerprint sensor is turned off.
Double tap to turn screen on: Turn it on to wake up your locked screen with a double-click on the screen.
Draw O to start camera: When turn it on, you can draw O on the locked screen to open Camera app.
Draw V to open torchlight: When turn it on, you can draw V on the locked screen to open the torchlight.
Music control: When turn it on, you can draw || to pause/play a track, or draw < or > to switch the track when the screen is off.
Add more screen-off gestures: OPPO smartphone of ColorOS 3.1 gives you 7 options, which are Draw ^, Slide up, Slide down, Slide left, Slide right, Draw M and Draw W. Choose one to unlock the phone, call someone or start an app.
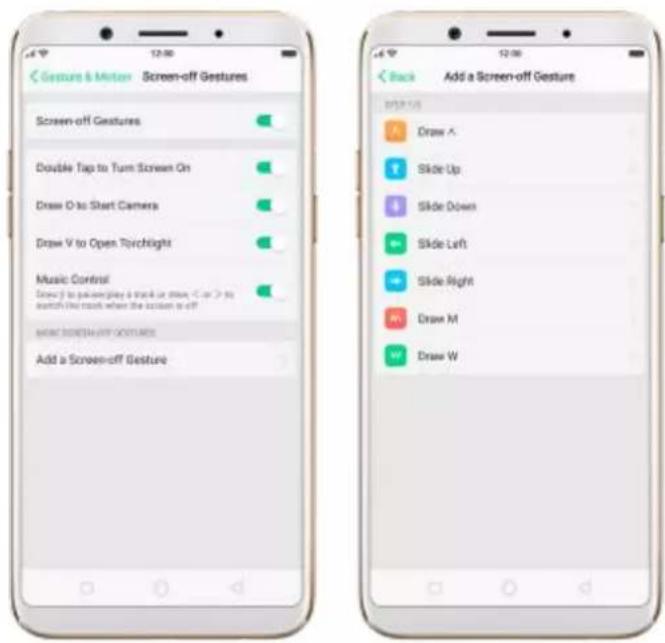
text_image
Screenshot Gesture
When turn it on, you can take a screenshot by swiping the screen up or down with three fingers.

text_image
31 Calendar Clock Weather Settings Music Video Photos Film Phone Manage Theme Store Play Store Google Data GoogleMotion
The motion-sensing technology is used in OPPO smartphone. Use it to let your phone response to motion.
Smart call
Auto call when near the ear: Before you can use auto call, you need to set the default SIM card for calling. Go to a contact detail, call detail, message conversation or info interface, put the phone near your ear and your phone will automatically call that specific person.
Auto answer when near the ear: This function lets your phone to answer any incoming calls automatically when putting the phone near your ear.
Switch to receiver for calls: Use it to automatically switch from speaker to receiver when you put the phone near your ear during phone calls.
Flip to mute incoming calls: Use it to silence the ringer by turning the phone over on a table or other flat surfaces.
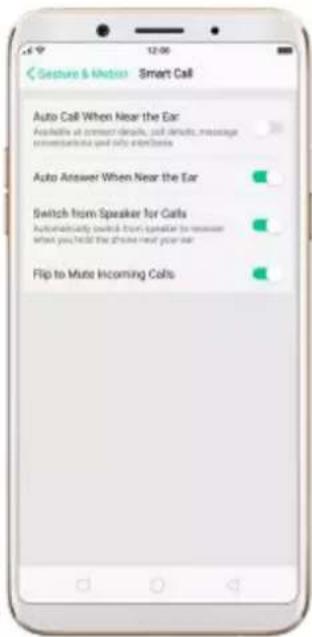
text_image
Gesture & Motion Smart Call Auto Call When Near the Ear Available at connection details, call details, message conversations and info interfaces Auto Answer When Near the Ear Switch from Speaker for Calls Automatically switch from speaker to receiver what you hold the phone next your ear Flip to Mute Incoming CallsTouch-disable mode
Turn it on to prevent incorrect operations if the lock screen is covered.
Take selfies
Open Camera app and switch to the front camera. Click > Palm on the top of the screen. Pose the same hand gesture towards the camera, once the camera captures that, it will take a photo automatically after two seconds. You can change your pose and expression within these two seconds.
6.13. Timing Power On/Off
Timing Power On/Off is a powerful and useful feature that helps you
automatically turn on or off your OPPO smartphone at the scheduled time you specify – for example, you can fall asleep while listening to your favorite music without having to worry about turning off your phone. It also gives you different ways to schedule the events for your needs, such as daily, weekly and only once.
Turn on Timing Power On/Off. Go to [Settings] > [Additional Settings] >
[Timing Power On/Off], then toggle the sliders to green as needed.
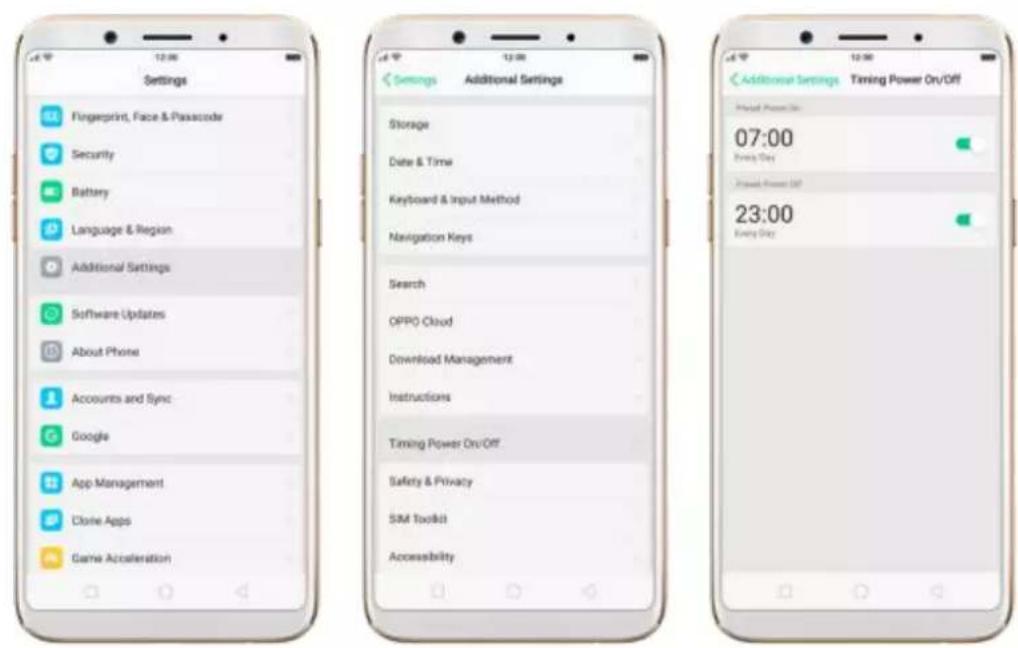
text_image
Settings Fingerprint, Face & Passcode Security Battery Language & Region Additional Settings Software Updates About Phone Accounts and Sync Google App Management Clone Apps Game Acceleration Additions Settings Additional Settings Storage Date & Time Keyboard & Input Method Navigation Keys Search OPPO Cloud Download Management Instructions Timing Power On/Off Safety & Privacy SIM Toolkit Accessibility Additions Settings Timing Power On/Off 07:00 Even Day Power On/Off 23:00 Even DaySet when to turn on or off the phone automatically. Click the time, drag your finger across each column to change the time, then click Save.

text_image
Cancel Preset Power On Save 06 30 07 31 08 32 Repeat Down DayRepeat the event on certain days. Click the time, click Repeat, then choose the days.

text_image
Pretest Power On Repeat Every Sunday Every Monday Every Tuesday Every Wednesday Every Thursday Every Friday Every Saturday6.14. Game Acceleration
Game Acceleration feature is an all-in-one game optimization tool that allows you to run your games at the best possible performance. When you're running a game, your phone will automatically turn on high performance state, adjust the distribution of system resources, and optimize the game display configuration to provide the best gaming experience available. To prevent from being interrupted during games, you can also disable bottom keys, turn on No Disturbance mode, and more.
Tip: Currently, games that can be accelerated contain Candy Crush Saga, Clash of Clans, My Talking Tom, Candy Crush Soda Saga, Ball Pool, My Talking Angela, Farm Heroes Saga, Toy Blast, Hay Day, Temple Run 2 and Mobile Legend(VN/TH/ID). More games will be added soon.

text_image
Settings App Management Clone Apps Game Acceleration Gesture & Motion Split-screen When found us: Field Given the WebBank Tracking or screen split screen order or app help support the business. Call Contacts Messages Phone Manager Camera Weather Settings Game Acceleration Graphics Acceleration Excessive the game shipping configuration to help setting hardware mechanics Mistouches Prevention Is possible to ensure that landmasses will be saved into products. Clicking up for a button or options. No Disturbance Prohibit Auto Brightness Adjustment App Manager Incorporation in for 2 games Other Functions of Game Accelerations Smoothness Pathway Intelligence, adjust system resources for a particular gaming experience Networking Protection Switch network your own games here for a more system gaming experienceManage games that can be accelerated. Go to [Settings] > [Game
Acceleration], click [App Manager] and you will see a list of your games that can be accelerated by your phone. To accelerate a game, toggle its slider to green.
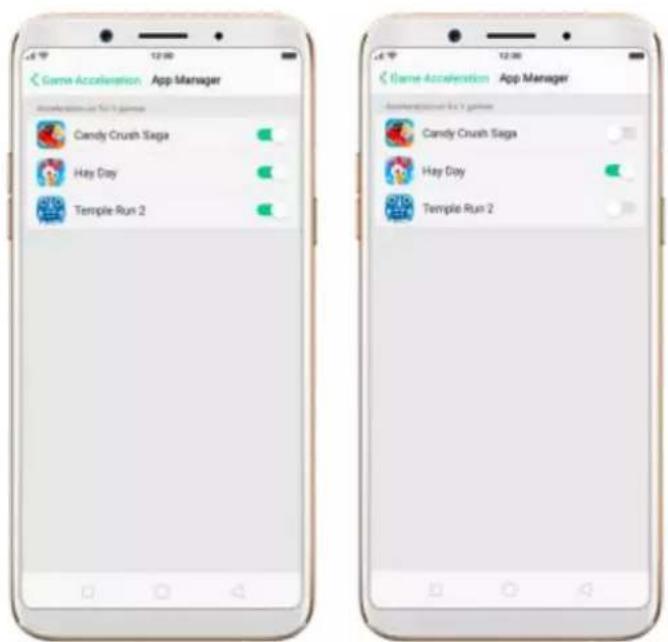
text_image
Game Acceleration App Manager Candy Crush Saga Hay Day Temple Run 2 Game Acceleration App Manager Candy Crush Saga Hay Day Temple Run 2- Your phone will automatically speed up your game. Notice that
acceleration details display on the screen, and appears in the status bar when you launch the game.
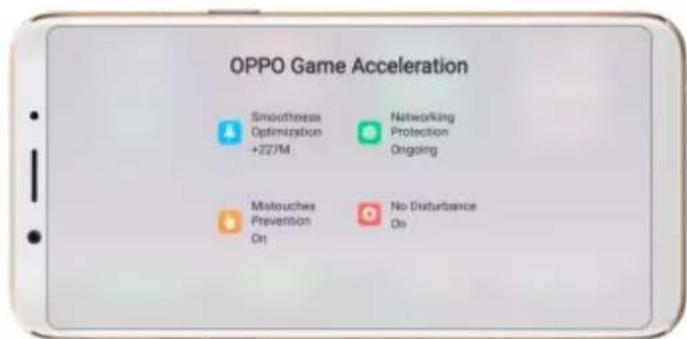
text_image
OPPO Game Acceleration Smoothness Optimization +227M Networking Protection Ongoing Maltouches Prevention On No Disturbance On
text_image
HAV DAY CONNECTING...Set up Game Acceleration. Go to [Settings] > [Game Acceleration].
-
Graphics Acceleration: optimize the game display configuration to fully utilize hardware resources.
-
Mistouches Prevention: disable bottom keys when you run a game in landscape mode. You can double-tap on the keys to enable them.

text_image
Bottom Keys/Disabled, Tap 1 More Times to Enable Them Again- No Disturbance: block calls and notifications so that you can get fully immersed in the games.
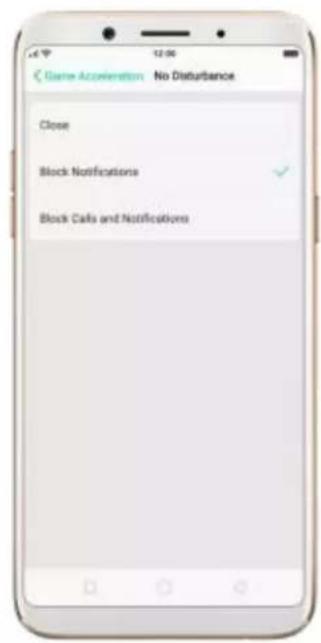
text_image
Game Acceleration No Disturbance Close Block Notifications Block Calls and Notifications- Close: do not block any calls or notifications.
- Block Notifications: block notifications except calls, alarm clocks and scheduled reminders. Notifications will be displayed with a banner on the top screen.

text_image
Unknown Number 1.05 minutes: Hangzhou, Zhejiang 350 30 3 AVERAGE AND ORDER Pay an email Pay! Please pay about over the time to add the week.
text_image
Unknown Number 135 00:06 Egg an everyday Chain. Then drug which must value Fracture the plants and snacks- Block Calls and Notifications: block all calls and notifications.
- Prohibit Auto Brightness Adjustment: your phone will not automatically adjust the brightness of the screen when ambient light changes.
6.15. App display in full-screen
ColorOS 3.2 devices feature a new full screen display format with an aspect ratio of 18:9, and most of the apps are supposed to adapt their size automatically to the new screen size. If some apps are not compatible with full screen mode, you can set them to display at the common 16:9 ratio, ti they can support the full screen mode.
Adjust your app layouts. Go to [Settings] > [Display & Brightness] > [App
Display in Full-screen] and you will see a list of apps that may not support the 18:9 aspect ratio. Toggle the slider to white if you want an app to display at a 16:9 ratio.
When the app has been optimized for full-screen display, its slider will turn
grey, and the app will display at a18:9 ratio by default.
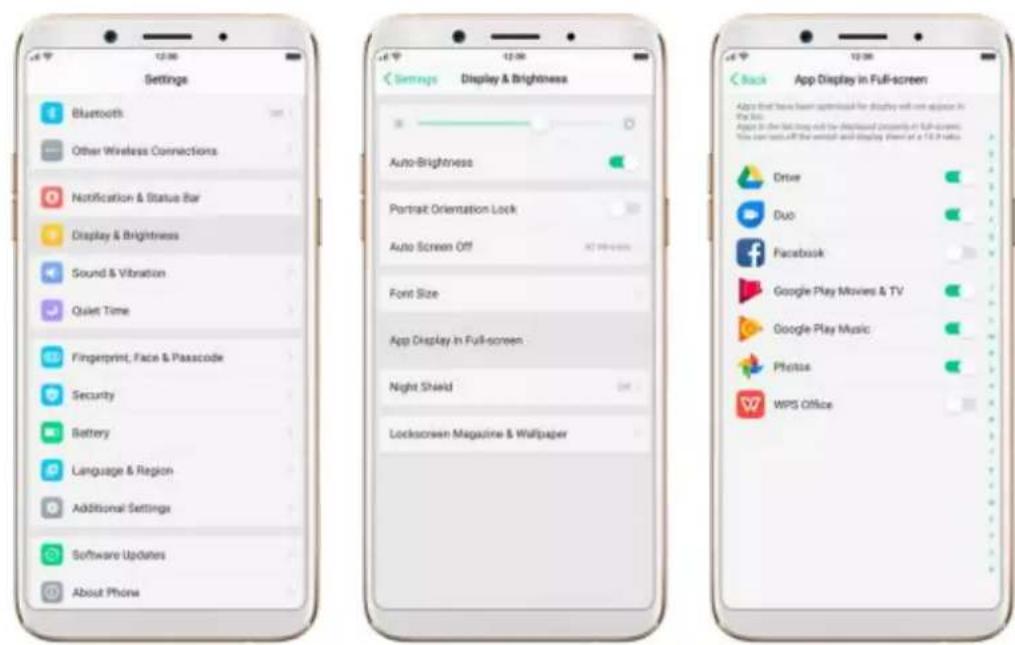
text_image
Settings Bluetooth Other Wireless Connections Notification & Status Bar Display & Brightness Sound & Vibration Quiet Time Fingerprint, Face & Passcode Security Battery Language & Region Additional Settings Software Updates About Phone Settings Display & Brightness Auto-Brightness Portrait Orientation Lock Auto Screen Off Font Size App Display In Full-screen Night Shield Lockscreen Magazine & Wallpaper Back App Display in Full-screen Apply that have been optimized for display will now apply in the UI. Again in the last time it is displayed currently in full-screen. You can test off the output and display them of a 10.2 ratio. Drive Duo Facebook Google Play Movies & TV Google Play Music Photo WPS Office7. Apps
7.1. Phone
7.1.1. Make and Answer Phone Calls
- Make a call
To make a call and talk to your friends, you can manually enter a phone number on the dialer, choose a number in your Contacts or Favorites, or click one of the recent calls.
Note: The signal indicator at the upper-left corner of the screen shows whether you're in range of your operator's network and can make and receive
calls. The more bars, the stronger the signal.
Dial the number you want to call. Click Phone, click the keypad to enter the number, then click. Click if you make a mistake. You can also copy a phone number then open the keypad, it will automatically paste the number to the keypad.

text_image
Supports Smart Search To search for "Order", simply input: 2 6 5 1 2 3 4 5 6 7 8 9 * 0 # Video call Create New Contact Add to Existing Contact 18001 1 2 3 4 5 6 7 8 9 * 0 # Play Decor ViewCall someone in your contacts list. Click Contacts and choose a contact, then click the phone number to make a call. You can also use Search feature to find a contact, see Search.
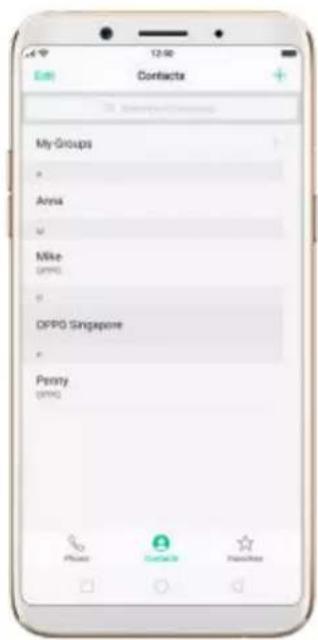
text_image
My Groups Anya Mike OPPO Singapore Penny OPPO
text_image
OPPO Singapore Contact Details Edit Contact Mobile Hangzhou, Pinning service@troppo.com.sg Personal Share Contacts Add to Favorites Add to Backlog Delete ContactCall someone in your favorites list. Click Favorites and choose a contact. To add favorites, click +
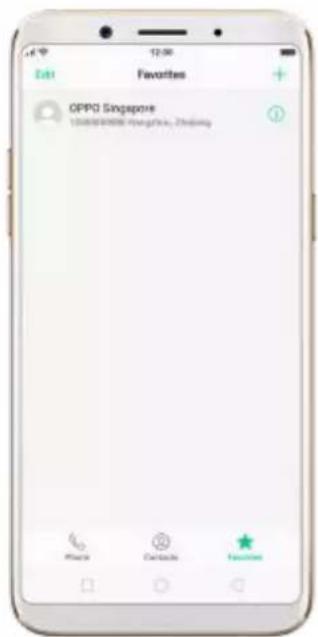
text_image
OPPO Singapore 100% 200% 300% 400% 500% 600% 700% 800% 900% 1000% 1100% 1200% 1300% 1400% 1500% 1600% 1700% 1800% 1900% 2000% 2100% 2200% 2300% 2400% 2500% 2600% 2700% 2800% 2900% 3000% 3100% 3200% 3300% 3400% 3500% 3600% 3700% 3800% 3900% 4000% 4100% 4200% 4300% 4400% 4500% 4600% 4700% 4800% 4900% 5000% 5100% 5200% 5300% 5400% 5500% 5600% 5700% 5800% 5900% 6000% 6100% 6200% 6300% 6400% 6500% 6600% 6700% 6800% 6900% 7000% 7100% 7200% 7300% 7400% 7500% 7600% 7700% 7800% 7900% 8000% 8100% 8200% 8300% 8400% 8500% 8600% 8700% 8800% 8900% 9000% 9100% 9200% 9300% 9400% 9500% 9600% 9700% 9800% 9900%Call someone you've recently called or who has recently called you. Click
Phone, and you'll see the recent calls. Click a number to make the call. Click i to get more info about the call, or the caller. Click "All" to see all, only missed, or only blocked calls.
+
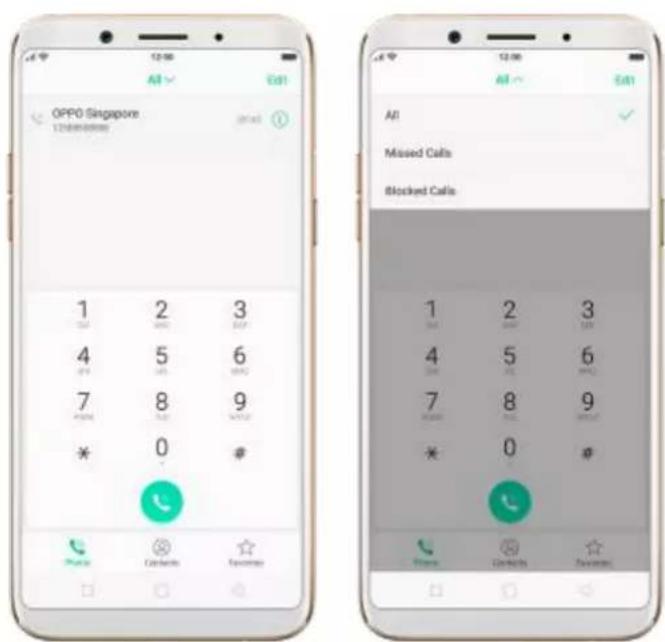
text_image
OPPO Singapore 1 2 3 0 4 5 6 7 8 9 * 0 # Phone Call Tools Favorites All Missed Calls Blocked Calls 1 2 3 0 4 5 6 7 8 9 * 0 ? Phone Call Tools Favorites- Answer or decline a call
When someone calls you, the OPPO smartphone rings and displays the caller's information, if available.
Answer a call. Click Answer. If the phone is locked, click Slide up to answer.
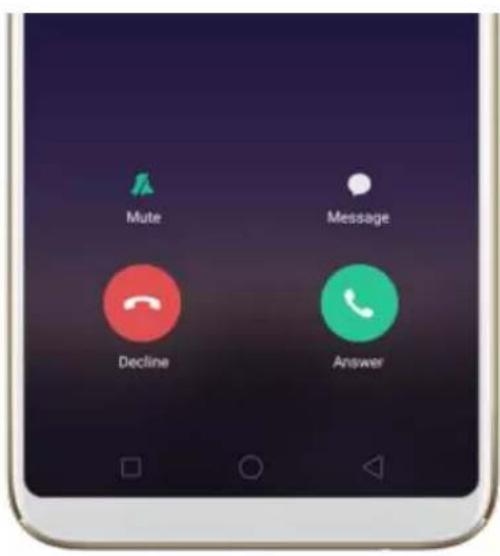
text_image
Mute Message Decline Answer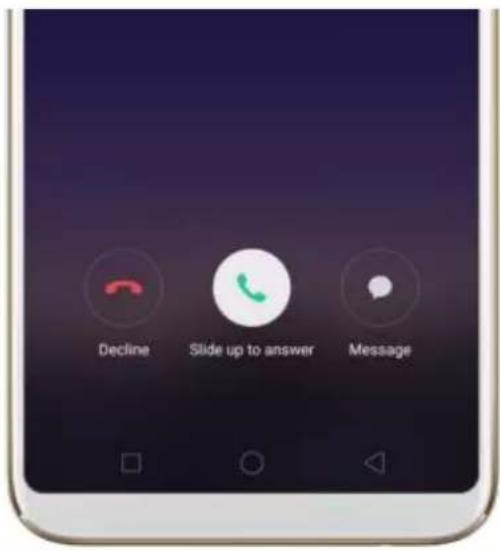
text_image
Decline Slide up to answer Message- If you're listening through the headset, you can click the mic button to answer.
Silence a call. Click Mute, or press the Sleep/Wake button or either of the volume buttons once to stop the phone from ringing or vibrating.
Decline a call. Click Decline, or press the Sleep/Wake button twice quickly.
Respond with a text message instead of answering. Click "Message", then choose a reply or click Customize to reply with your own words. To create
your own default replies, go to [Settings] > [Call] > [Respond with SMS].
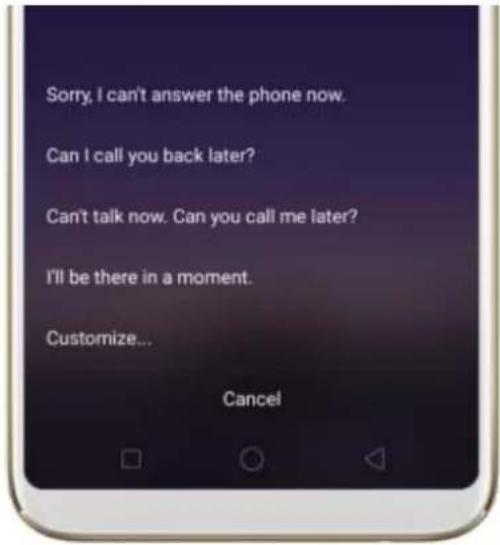
text_image
Sorry, I can't answer the phone now. Can I call you back later? Can't talk now. Can you call me later? I'll be there in a moment. Customize... Cancel- While you're on a call
While on a call, call options will show up on your screen.
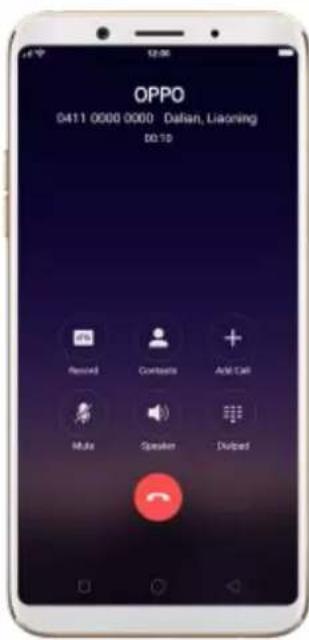
text_image
OPPO 0411 0000 0000 Dalian, Liaoning D0.10 Removed Contacts And Call Multi Speaker DeletedTo
Record a call.
Do this
Click Record. The recording will b
saved in [Phone storage] >
[recordings].
Get contact info.
Click Contacts.
Mute the microphone.
Click Mute. The caller can't hear when you are on mute, but you still hear the caller. Click Mute ag to cancel it.
Activate speakerphone.
Click Speaker.
Use the dialpad to enter
Click Dialpad.
information.
Make a second call during a ca
Click Add call and make a second call. The first call will be put on Click the phone number to switch back to the first call and put the second call on hold. Click Merge calls to merge the two calls, so a three of you can talk and hear e other. See Conference calls.
Respond to a second call, do one of the following:
• To decline the call, click Decline.
• To hold the first call and answer the new call, click Answer.

text_image
OPPO R11 159 0000 0000 Dalian, Liaoning Advance Message Decline AnswerUse other features while on a call. Click the Home button. Click the green status bar on the top of the screen to return the call.
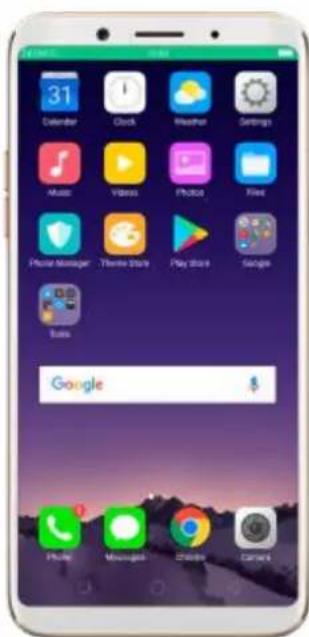
text_image
31 Calendar Clock Weather Settings Music Videos Photos File Photo Manager Theme story Play story Google Data Google7.1.2. Conference calls
A conference call lets you talk to more than one person at a time. You can merge up to six calls for a phone conference.
Notice: You might need to contact your network operator to activate conferencing services first.
Make a conference call.
Do the following:
- Make a call.
- Tap Add Call and make another call. The first call will be put on hold.
- Tap Merge calls. The calls are merged onto one line and everyone can hear each other.
- Repeat second and third steps to add more calls to the conference.

text_image
0411 0000 0000 159 0000 0000 On build 80167 Audio Contacts Message calls Multi Speaker Dialog7.1.3. Block calls
Block feature does help to prevent unwanted phone calls. You can also add numbers to blacklist to block specific phone numbers from calling.
Block calls. Go to [Settings] > [Call], or go to [Settings] > [Security] >
[Harassment blocking]. Click [Block Calls], you'll see several options
available for blocking incoming calls:
- Block one-ring incoming calls
• Block hidden incoming calls
• Block all unknown incoming calls - Do not block repeated incoming calls
• Block all incoming calls
Note: The unknown number refers to an unsaved real phone number, and your phone is able to show its number and location; while the hidden number means the caller's number or location is not accessible, which usually is a harassing call.
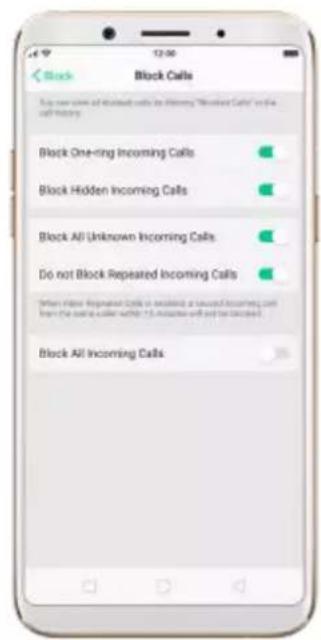
text_image
Block Block Calls Buy new calls of blocked calls to listing "Unknown Calls" on the call history. Block One-ring Incoming Calls Block Hidden Incoming Calls Block All Unknown Incoming Calls Do not Block Repeated Incoming Calls Block All Incoming CallsAdd a contact or a phone number to the blacklist. Click Phone, then click Contacts. Choose a contact, then click Block This Contact. You can also go to [Settings] > [Call] > [Block], or go to [Settings] > [Security] > [Block], click [Blacklist], click , then enter the number or choose your contacts.

text_image
Contacts Contact Details Edit OPPO Singapore 12/08/2019 Mobile Tongkaihui, Zhaqiang service@oppo.com.sg Personal Share Contacts Add to Favorites Add to Blacklet Delete Contact Call Block Block Calls Block Messages Additional: secondary calls and messages according to rules. Blacklet You will not receive any calls and messages from the corner zone. If you need Blacklet. No BlackShirts Enter Number Select Number Cancel7.1.4. Emergency calls
Call for help in an emergency. You can make an emergency call even if you donot have a SIM card installed in your OPPO smartphone in some countries.
Make an emergency call. Click Phone, click keypad and dial the number, then click . Or if your phone is locked with a passcode, click Emergency Call, then dial the number.
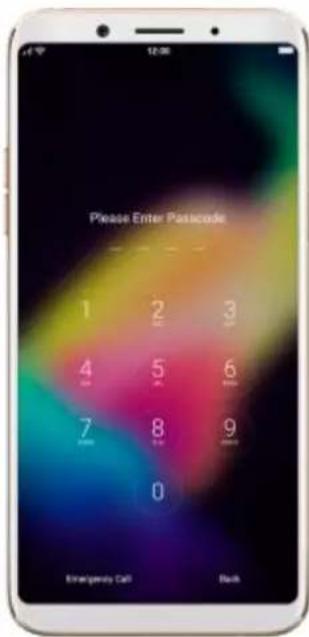
text_image
Please Enter Passcode 1 2 3 4 5 6 7 8 9 0 Emergency Call Back7.1.5. Auto Recording
Auto Recording feature enables you to automatically records conversations, which makes it easy for you to review your important incoming and outgoing calls on the daily basis. You can record all calls, or those from your designated numbers or unknown numbers. You can also share your recording files, set them as ringtones, and more.
Turn on Call Recording. Go to [Settings] > [Call], click [Call Recording], then select which calls to be recorded:

text_image
Settings App Management Clone Apps Game Acceleration Gesture & Motion Split-screen When Enabled on Start from the Multifocus following where screen is able to avoid that impact this location. Call Contacts Messages Phone Manager Camera Weather Settings Call Block CALL SETTINGS Call Recording Vibrate When Answers/Hangs Up Respond With SMS Operator's Call Related Settings Call Call Recording Assign Recording Designated/Number Recordings All Unknown Numbers Recordings All Recordings Call Recording Storage Upper Limit Check Call Recordings- Record calls from designated numbers. To add the numbers, click Designated Number Recordings, then click Add. Choose the contacts from Call Log, Groups or Contacts, then click Add.

- Record calls from all unknown numbers. Toggle the All Unknown Numbers Recordings slider to green, then your phone will automatically record calls from numbers that are not in your Contacts.

text_image
Call Call Recording Assign Reminrling Designated Number Recordings All Unknown Numbers Recordings All Recordings Call Recording Storage Upper Limit Check Call Recordings- Record all your calls. Toggle the All Recordings slider to green.
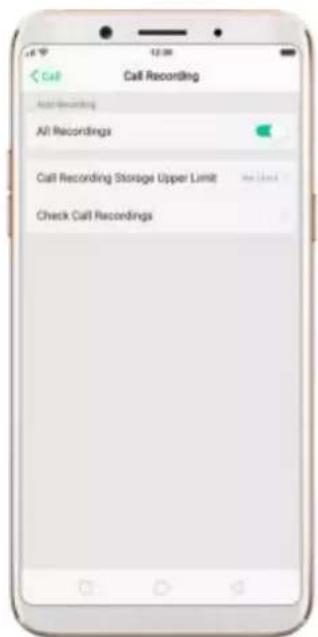
text_image
Call Recording All Recordings Call Recording Storage Upper Limit Check Call RecordingsSet the storage limit for recording files. Click Call Recording Storage Upper Limit, then choose a storage capacity for the recording files. If your recordings exceed the threshold, the earliest recording will be deleted automatically.

text_image
1000 Items 2000 Items 3000 Items No Limit There is no storage land for self-remedingsManage your call recordings. Click Check Call Recordings, then click Call Recording.
- Play a recording back. Click the recording to play it back.
- Send, rename or delete a recording. Click Select, choose the recording, then choose an option.
- Set a recording as ringtones. Click Select, choose the recording, click Set as, then set the recording as the call, SMS, alarm or contact ringtone.

text_image
Recordings historic Recording Call Recording 223456789-1712191455.amr 12/14/2017 00:00:00 123456789-1712191453.amr 12/14/2017 00:00:14 Select All 1 File Selected Cancel 223456789-1712191455.amr 12/14/2017 00:00:00 123456789-1712191453.amr 12/14/2017 00:00:14Note: Call Recording feature is not available in the United States and Australia.
7.1.6. Operator's Call Related Settings
The OPPO smartphone includes several calling features such as Call Forwarding, Call Waiting, Voicemail and more.
Set up calling features. Go to [Settings] > [Call] > [Operator's Call Related Settings].
- Voicemail: When you're away or can't get to the phone, your Voicemail does the answering for you. Callers can leave recorded audio messages to you, and you can view, listen to, and manage the messages.
- Fixed Dialing Numbers: Add numbers to the FDN list, and when activated, FDN restricts outgoing calls to only those numbers listed, or to numbers with certain prefixes.
- Call Forwarding: An incoming call will be redirected to another telephone number where the desired called party is able to answer. Notice that appears in the status bar.
- Call Restriction: Certain types of outgoing calls (such as international calls) and/or incoming calls will be restricted.
- Call Waiting: You'll hear short beeps if someone calls you while you're on the call.
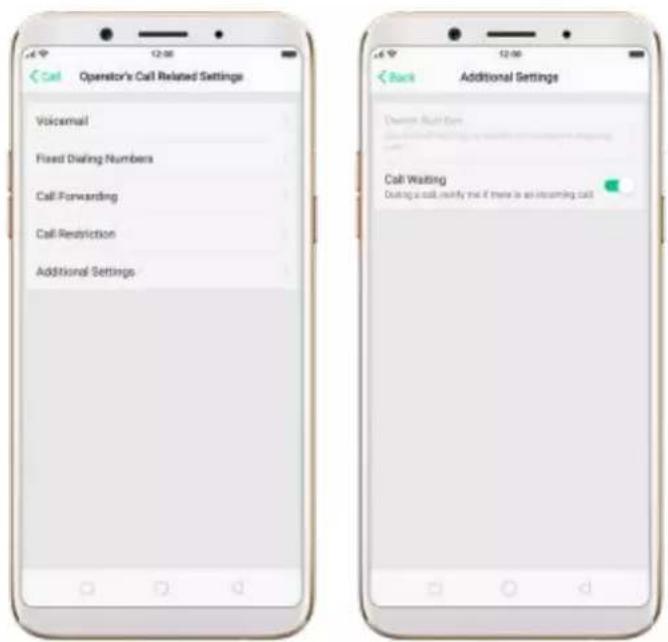
text_image
Operator's Call Related Settings Voicemail Fixed Dialing Numbers Call Forwarding Call Restriction Additional Settings Back Additional Settings Down the Call Call Waiting During a call notify that if there is an incoming call7.2. Messages
7.2.1. Send and receive messages
You can send and receive text messages anytime you're in range of the cell network. Depending on your phone plan, you may be charged for messages you send or receive.
Send a new message. Click, then enter a phone number or name, or click and choose a contact from your contacts list. Type a message and tap

Send.
Tip: As you type, click next to the text field to add an attachment.

text_image
New Message Cancel Recipient OPPO Singapore + Hello Send 1 Selected Add Call Log Groups Contacts OPPO Singapore new messages coming up + Hello Send Recipient OPPO Singapore + Hello SendSend a message to multiple people. Click , then enter multiple recipients,or click and tick all contacts you wish to include in the group message,
then click Add.
Read and reply to a new message. Click the notification on the top of your screen, or click. When phone screen is locked, swipe the notification right. Type your message and tap Send.

text_image
OPPO Singapore 14 Calendar Show Play Settings Music Windows Physics Fines Phone Manager Theme Store Play Store Google Tweet Google OPPO Singapore 12:00 Monday, January 1 Foggy 1* OPPO SingaporeTip: The Messages icon on the Home screen shows the total number of unread text messages you have.
Delete conversations from the Messages list. Click Edit, tick the conversations and click Delete. You can also delete a conversation by swiping left over a conversation and clicking Delete.
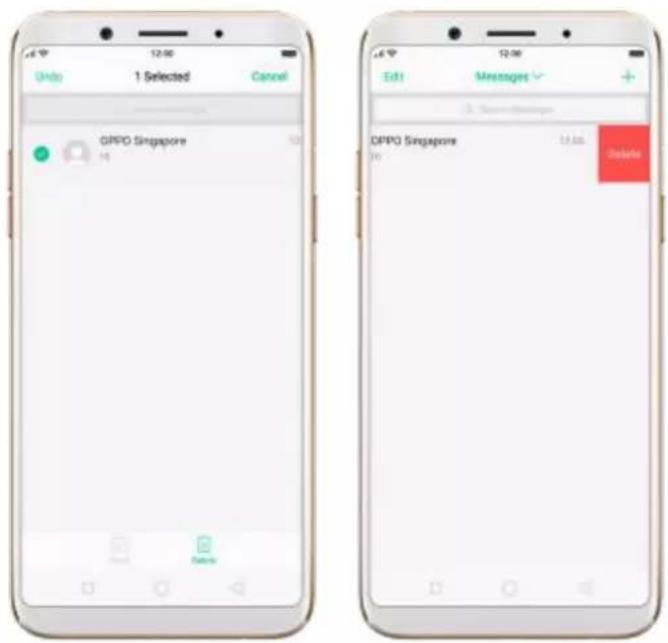
text_image
12:06 Options 1 Selected Cancel OPPO Singapore Add Delete OPPO Singapore Add Delete7.2.2. Customize message settings
The Messages settings menu lets you control options for your text and MMS messages including message limits, displays, notifications, and more. Go to [Settings] > [Messages].
Block messages. Click [Block] > [Block Messages]. Enter the keywords for spam messages. To block all unknown messages, toggle the slider to green.
Note: When Block all unknown messages is turned on, you might miss important verification text messages, as well as messages from people who you know, but are not in your contact list.
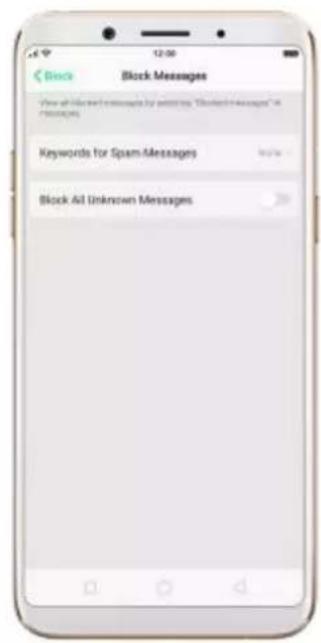
text_image
Block Messages View all Us and messages by clicking "Blended Messages" in messages Keywords for Spam Messages Block All Unknown MessagesReceive instant SMS messages. Toggle the slider to green if you want to receive life related messages pushed by your operator during a call.

text_image
Settings Messages Block Receive Instant SMS Messages Show updated SMS messages are help offered. Use icons pushed by the quarter spring clock. AdvancedCustomize advanced settings. Click [Advanced], then set up message
display and notifications, and the MMS and system related settings.
text_image
Messages Advanced Display SMS Notifications Show Contact Avatars in the List Message Prompt Fetch SMS Delivery Reports Display Recent Contacts MMS Auto Download MMS Auto Retrieve When Roaming Fetch MMS Messages Delivery Reports Turn-on WAP Push Message Center +401380041159 SIM Card SMS7.3. Contacts
7.3.1. Add a contact
With OPPO smartphone Contacts, it's easy to have all your contact information with you.
Add a new contact. Click Contacts, click + , then enter the contact information.
text_image
My Groups Anna Mike OPPO OPPO Singapore Perony OPPO
text_image
Cancel New Contact Add Number Add Email Add Birthday Add Date Add Related Persons Ringsone Default
text_image
Cancel New Contact Add Number Add Email Add Birthday Add Date Add Related Persons Ringtons Groups Add More FieldsAdd a contact from a number entered using the keypad. Click Phone and enter a number, then click Create New Contact and enter the contact information, or click Add to Contacts and choose a contact.
text_image
Vise call Create New Contact Add to Existing Contact 4001666888 1 2 3 0 1 2 4 5 6 0 7 8 9 * 0 # * 0 #Add a recent caller's information to your contacts. Click Phone, and you'll see the recent calls. Click, then click Create New Contact or Add to Contacts.
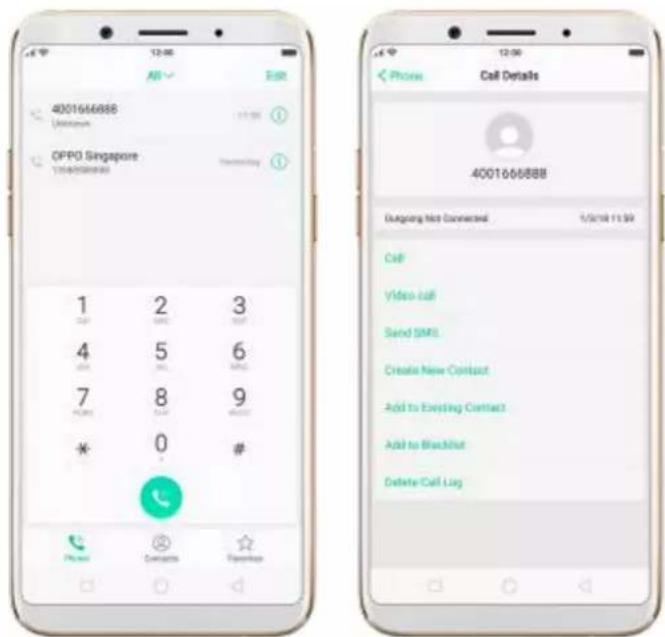
text_image
4001666888 OPPO Singapore 1 2 3 4 5 6 7 8 9 * 0 # Phone Contacts Preview Phone Call Details 4001666888 Design Not Connected 1/3/18 11:59 Call Video Call Send SMS Create New Contact Add to Existing Contact Add to Blanket Delete Call Lug7.3.2. Edit and delete a contact
You can make changes to your contacts directly on your OPPO smartphone.
Edit a contact's phone number, address, and other information. Click Contacts and choose a contact, then tap Edit.
- To add an item - such as an Email address or phone number, click next to the item.
- To delete an item, click next to it.

text_image
Contacts Contact Details Edit Anna 00:05 Mobile Share Contacts Add to Favorites Add to Blocklet Delete Contact Open Edit Contact Annai Last Time Add Users Mobile 00:05 Add Number Add Email Add Birthday Add Date Add Related Persons NotesAssign a photo to a contact or change a contact's photo.
- Click, or click the existing photo.
- Click Take Photo to use the camera to take a picture, or click Select a Photo and select an existing photo, or click Delete Avatar to delete the photo.
- Drag to region to crop the photo, then click Done.
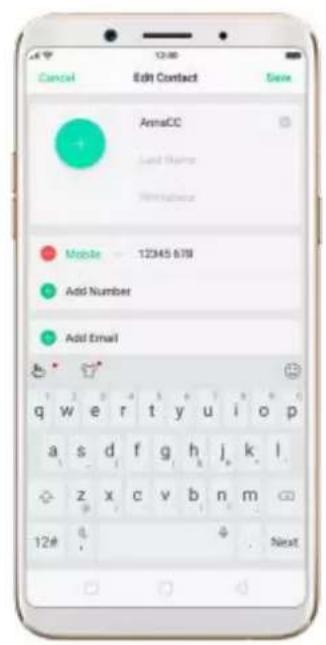
text_image
Cancel Edit Contact Save AnmaCC Add Number Add Email Mobile 12345 678 Add Number Add Email q w e r t y u i o p a s d f g h j k l z x c v b n m 12# .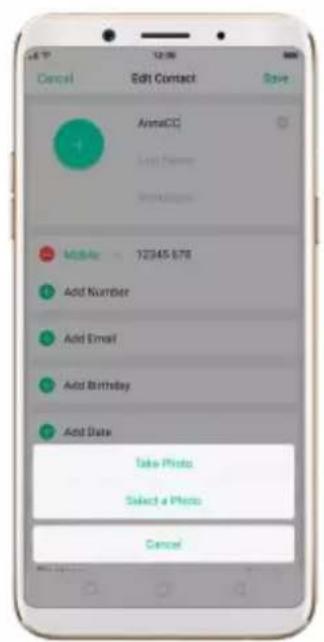
text_image
Cancel Edit Contact Save AnnaQQ Last Name Add Number Add Email Add Birthday Add Date Take Photo Select a Photo Cancel
text_image
Back Crapping Photo DoneDelete a contact. Click Delete Contact in contact Details page or Scroll to the bottom of the contact information and click Delete Contact.
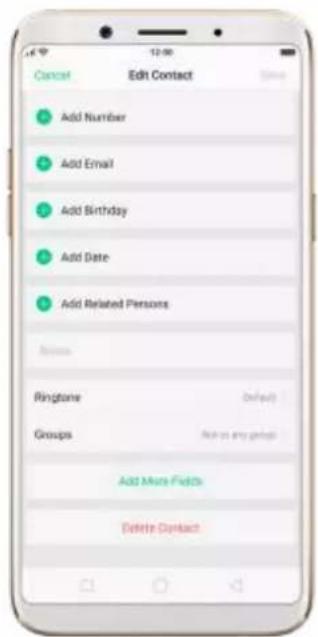
text_image
Cancel Edit Contact Add Number Add Email Add Birthday Add Date Add Related Persons Ringshare Groups Add More Funds Delete Contact7.3.3. Import and export contacts
You can import/export contacts from/to the phone storage or your SIM card. If you have contacts stored in your old phone, you can transfer them through Bluetooth from that phone. If there are repeat contacts it will automatically merge them when you import contacts.
Import contacts. Go to [Settings] > [Contacts] > [Import/Export Contacts].
- Import from device storage. Save the imported contacts to your phone or mail accounts.
- Import from other phones. Import the contacts stored on other phones to your OPPO phone through Bluetooth.

text_image
Contacts Import/Export Contacts IMPORT CONTACTS Import from Storage Device Import from Other Phones EXPORT CONTACTS Export to Storage Device SHARE CONTACTS Send Contacts Back Import from Storage Device Select the Android user to import contacts from this storage device. Phone Open contact(s) Google open user of example@gmail.com An contact. Back Import from Other Phones Select the Type of Other Phone Use Bluetooth to import the contacts from other phones to this phone. iPhone Other PhonesExport Contacts. Export your contacts to the phone storage. Contacts you
export are saved as .vcf file.
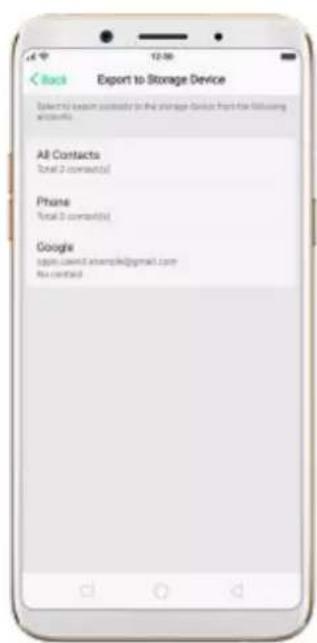
text_image
Back Export to Storage Device Selected menu courtesy in the storage device from the following accounts: All Contacts Total 2 comments(s) Phone Total 3 comments(s) Google applic.cawell.example@gmail.com No contactImport/export SIM card contacts. Go to [Settings] > [Contacts] > [SIM Card Contacts], click Import or Export, then tick the contacts and move them to either SIM or phone.
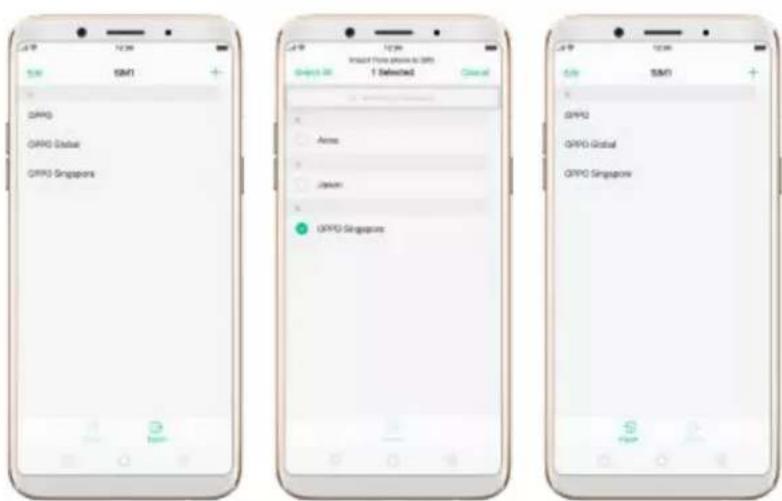
text_image
OFP0 OFP0 Global OFP0 Singapore Import From phone to OFP0 1 Detected Access Options OFP0 Singapore OFP0 OFP0 Global OFP0 Singapore
text_image
OK Default: 0.0 OK OK OK OK OK OK OK OK OK OK OK OK OK OK OK OK OK OK OK OK OK OK OK OK OK OK OK OK OK OK OK OK OK OK OK OK OK OK OK OK OK OK OK OK OK OK OK OK OK OK Ok OK OK OK OK OK OK OK OK OK OK OK OK OK OK OK OK OK OK OK OK OK OK OK OK OK OK OK OK OK OK OK OK OK OKView more details in Import and export contacts on your OPPO smartphone.
7.3.4. SIM contacts
You can add, edit, delete, import and export SIM contacts directly on your OPPO smartphone. Go to [Settings] > [Contacts] > [SIM card Contacts].
Add a SIM contact. Click, then enter the contact information and click Save.
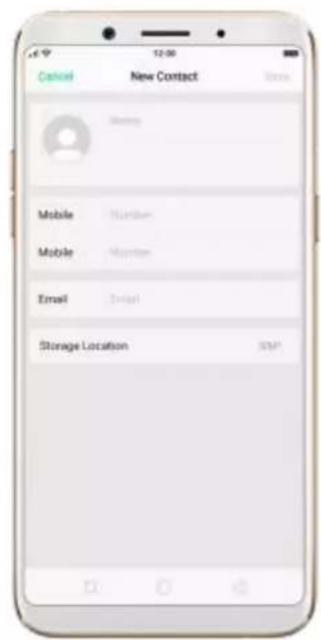
text_image
Cancel New Contact Mobile Number Mobile Number Email Send Storage Location SMPEdit and delete a SIM contact. Click a contact, then click Edit. To delete the contact, scroll to the bottom of the contact information and click Delete Contact.

text_image
Contact Details Edit OPPO 4000 10000s Delete Contact Edit Contact OPPO Mobile 4000 Mobile Maryland Email Email From the following contact: SM1 (version(s)) Delete ContactDelete SIM contacts at a time. Click Edit in the upper-left corner, tick the contacts and click Delete.

text_image
Select All 2 Selected Cancel OPPO OPPO Global OPPO SingaporeDisplay SIM contacts in the Contacts list. You need to import SIM contacts to your phone. See Import and export contacts.
7.3.5. Manage contacts
Contacts allows you to easily save and edit contact information, including names, numbers, addresses, and more. To make your contacts more organized and available, do the following:
Add a new contact. Click Phone on the Home screen, click Contacts, then click +. The contact will be saved to your phone storage.
Modify existing contacts. If you want to add details to an existing account,
click the account then edit.
Import or export contacts. Go to [Settings] > [Contacts], then select the import/export path. View Import and export contacts on your OPPO smartphone.
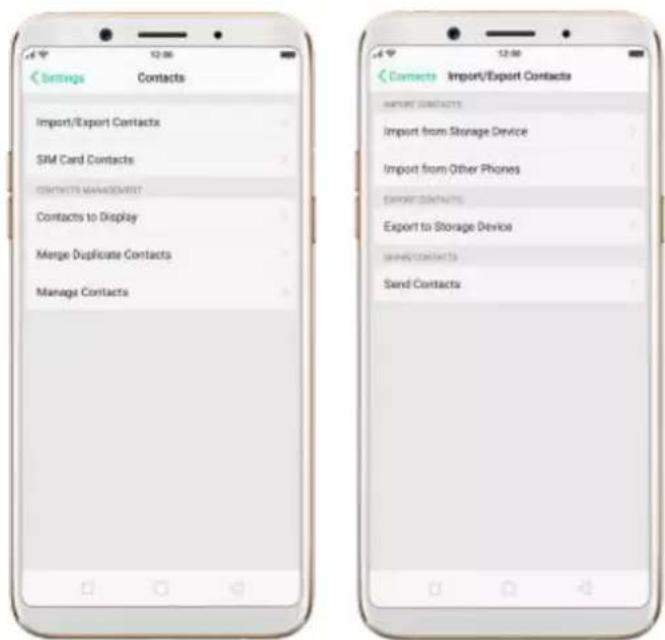
text_image
Settings Contacts Import/Export Contacts SIM Card Contacts CONTACTS MANAGEMENT Contacts to Display Merge Duplicate Contacts Manage Contacts Contacts Import/Export Contacts IMPORT CONTACTS Import from Storage Device Import from Other Phones EXPORT CONTACTS Export to Storage Device IMPORT CONTACTS Send ContactsContacts to Display. Go to [Settings] > [Contacts] then click Contacts to
Display. You can choose Only show Contacts with Numbers, All
Contacts,Phone,Google or others. Also you can customize the contacts in your phone to show.

text_image
Cancel Contacts to Display Done Only Show Contacts with Numbers Delete Contacts to learn.it All Contacts To reach email(s) Phone To reach email(s) Google again content: xamples@gmail.com No contact Customize SME contacts have been moved to "Database - Concepts - All Contacts".Merge duplicate contacts. Click Merge duplicate contacts. The phone will automatically merges contacts with the same name.
Manage contacts. To manage contacts without name or number, or quickly remove invalid numbers, click [Manage Contacts].
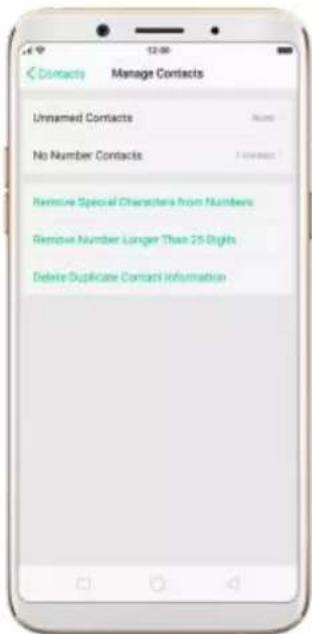
text_image
Contacts Manage Contacts Unnamed Contacts Name No Number Contacts Forward Remove Special Characters from Numbers Remove Number Longer Than 25 Seconds Delete Duplicate Contact InformationSend Contacts. Go to [Settings] > [Contacts] > [Import/Export Contacts].
All contacts stored on your phone will be shared.
Backup your contacts. Click [Backup and Restore] > [Create New Backup].
View Back up your OPPO smartphone.
7.3.6. Back up your contacts
If you use your OPPO smartphone on a regular basis, it is necessary to back up the contacts so that you can easily restore them or use them on another device.
Use OPPO Cloud. OPPO Cloud allows you to back up the Contacts and SMS to the cloud drive. You need to register or sign in OPPO account first.
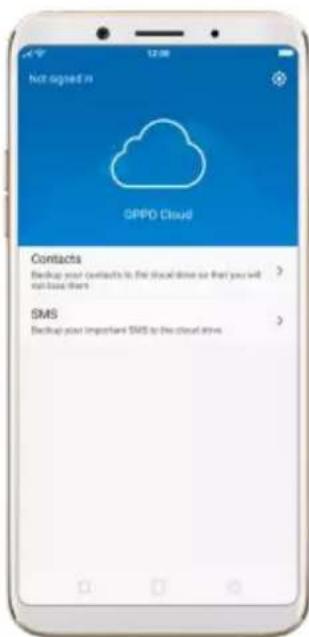
text_image
hot signed in CPPD Cloud Contacts Backup your contacts to the cloud drive so that you will not base them SMS Backup your important SMS to the cloud driveUse the built-in backup tool. Go to [Settings] > [Additional Settings] >
[Back up and reset], or click [Tools] folder on the Home screen, then click
[Backup and Restore]. Back up your contacts. You need to make a copy of the existing backup file and move it to another storage device.

text_image
Backup and restore Create New Backup Stack up important data, settings and applications in your phones Restore Backup Restore from an existing backup Clone Phone Quickly transfer all of your data from the old phone to the new site. Please Select the Data to Be Backed up Personal Data Creating Messages and so on System Data System settings, Cloud and Inks Applications Applications and Applications Data Start backupExport contacts. Export your contacts to your SIM card or a folder on your phone. See Import and export contacts.
7.4. Phone Manager
7.4.1. Scan and optimize the phone
Regularly optimizing your OPPO smartphone can make it perform steadily and faster.
Automatic optimization items. Go to [Phone Manager], the system will start scanning your phone automatically. After the scan is over, click [Go to optimize], then click [One Touch Optimization]. You can also select the items that you want to optimize optionally.

text_image
Phone Manager 77 The Annapprist Clean up & Accelerate Shop Logging With One Tax Privacy Permissions Protect Private Information Virus Scan Random Miscellaneous Apps Payment Protection Protect Your Property Phrequently Used Functions WeChat Cleaner App Cleaner 77 Automatic Optimization Show Memory Cleanup [71] Left and Right to save Cache Junk [71] Left and Right to save Uninstall Residuals [ ] Open all accounts in progress Security Protection [ ] Disgenuine from Manual Optimization Tool The Auto-Lock Time is too long A long auto-lock time comprehensive online power Options Enable App Lock Protect the app from privacy sales One Touch OptimizationManual optimization items. Click the green button on the right side of each item, respectively, then encrypt apps or back up your phone when prompted.

text_image
Phone Manager 92 Manual optimization is required for 2 items. MANUAL OPTIMIZATION ITEMS The Auto-Lock Time is too Long A long auto-lock time commands more power Open Enable App Lock On Protect the app Irish privacy lists Done7.4.2. Cleanup & Accelerate
You can use Cleanup & Accelerate to speed up your phone performance with just one click. It helps you to quickly detect and remove hidden temp, cookie and cache files generated by inner calculations and data exchanges to free up more storage space.
Stop lagging with one click. Click Phone Manager, then click Cleanup & Accelerate. Your phone will thoroughly scan for junk files and APKs, and lets you choose files to be deleted.

text_image
Standard Advanced 93 Import by General Data Browser Memory Cleanup Cache Junk Uninstall Residuals Advertising Junk APK Stop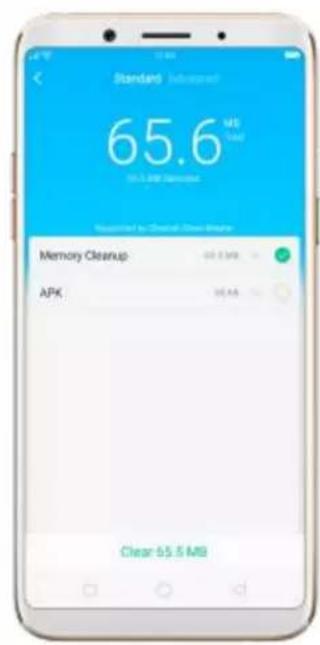
text_image
Standard Substandard 65.6 MB Total 0.5 MP Control Supplified by Clear: Clear Marker Memory Cleanup: 48.2 MB APK: 36.45 Clear 55.5 MBFree up more storage space. Click Advanced, then remove your App data and downloads, or click File Management and go to manage all your data.
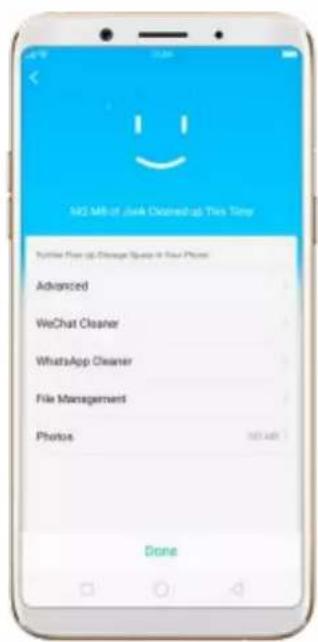
text_image
Add More of Junk Cleared up This Time Further Free up Change Space in Real Phone Advanced WeChat Cleaner WhatsApp Cleaner File Management Photos Done
text_image
Advanced 20° 17.5% of Google available You are your quick access to the WeChat Cleaner WhatsApp Cleaner App Data 100 KB LARGE FILE SCREENP Video Files 23.6 KB Picture Files 1.9 Music Files 2.8 Documents 1.9 ZIP 2.87.4.3. Privacy Permissions
Use Privacy permissions feature to manage app permissions, protect your privacy, and manage apps that start when phone startup. Click Phone Manager, then click Privacy Permissions.

text_image
Privat Manager Privacy Permissions App Lock Permissions App Lacking To apply Startup Manager Floating Windows MgmtEncrypt the apps. Select the apps and click Enable encryption, then set up your passcode and security question.
Grant the app permissions. Select an app and choose to accept, decline or limit call, SMS, device and privacy related permissions.
Allow apps to start when phone boots or in background. Toggle the sliders to green. See Set up Startup Manager.
Enable floating windows. Toggle the app slider to green. Your app message
will be displayed in the floating window for easy viewing and use. (Only for apps which can support Floating window feature.)
View more details in Use Phone Manager on your OPPO smartphone.
7.4.4. Virus Scan
For better security, you can regularly scan and remove potential and actual threats to your phone.
Scan for virus. Click Phone Manager, then click Virus Scan. Wait for the scan to complete. If threats were found, remove them; if not, you will see a message that says your phone is in a good state.

text_image
Your phone is in a good store Made App Made Files Done7.4.5. Payment protection
While you shop online, your OPPO phone will provide protection for the
mobile transactions, such as detecting captcha and app security.
Set up payment protection for apps. Go to [Settings] > [Security] >
[Payment Protection].

text_image
Settings Security Permissions App Encryption Payment Protection Kids Space Hansagement Blocking Pseudo Save Station Blocking Floating Windows Other Security Options 1. Jason Keyboard When you follow sensitive information such as payments, the payments will purchase quickly to check it now (2017) Secret Keyboard is protected your latest version from looking out. Security Payment Protection Safe To Pay No payment Threats View 4 Apps And Quacked by Payment Protection 招商银行 浦发银行 Allpay WeChat Search Scan Pay Correct Pocket Transfer Card Repay Phone Top-up Aot Feature Currency Coupon Uber Utilities Zhenx Credit Air & Rail More - 本店物的互联网评估已完成 3天前 - 按您给你选择了这些 2次前 2017 了不起的好味道 看《2017人气好》在年度评选 1 原支付 2元话券券 发红包现金金 NETT7.4.6. Frequently Used Functions
In Phone Manager, you can quickly clear your downloads and junk files of theapps which are used frequently, such as WhatsApp, WeChat, and more.

text_image
Phone Manager 95 Scanning... Clean up & Accelerate Real Capture, Watch Live Snap Privacy Permissions Request Private Information Virus Scan Includes Autonomous Apps Payment Protection Privacy Push Properties Playfully Get All Powers WeChat Cleaner 4x2 Cleaners WhatsApp Cleaner Apply CleanersWhatsApp Cleaner
Clear junk files. Click Clear button to clear the cache files generated when the app was in use.
Clear other app files. You can delete the app files to free up the phone storage, including pictures, videos, audio, voice message and files. Select an option, click Select to select the files, then click Delete.

text_image
Phone Manager 95 Scanning... Clean up & Accelerate Social caggling WITH Save Tips Privacy Permissions Business Privacy Information Virus Scan Video (Information Engine) Payment Protection Update Your Property Frequency Search Functioning WeChat Cleaner App Cleaner WhatsApp Cleaner App Cleaner WhatsApp Cleaner 80.9 MB Total Cache Junk Files 4.2 MB Last year generated when apps are in use Pictures Videos Audio Voice Message FilesWeChat Cleaner
Clear Temporary cache. Take WeChat Cleaner as example, click WeChatCleaner and wait a few minutes for your phone to scan the cached data, clickClear button on the right to clear the app's cached data. And when the nexttime you use the app, it will download everything it needs from the internetagain.
Clear Old files. Click to clear pictures, videos and downloaded files generated from chats three months ago.
Clear other app files. You can delete the app files to free up the phone storage, including chat images and videos, downloaded files and saved images. Select an option, click Select to select the files, then click Delete.

text_image
31.5 Temporary Cache 28-2 MM Purchased by: Decreasing MS/MS or downloaded for instance from the internal after emailing. OutFiles Details, images and downloaded files specialised from details in a website ago Chat Images and Videos Downloaded Files Stored Images
text_image
WinChat Disease 421 Temporary-latche 32.1 MP Accessed by: PinaTech, PinaTech Microsoft Word (Microsoft Word, 32.1) Microsoft Word (Microsoft Word, 32.1) Open Image 41.4 MP Microsoft Word and downloading files, accessed from: Microsoft Word 41.4 MP Downloaded Maps Current: Microsoft Word image, download and print in Web: Chat Memory Stream, New Web interface Downloaded Maps 41.4 MP Cancel
text_image
Chat Images and Visions Music Record Month
text_image
Chat Images and Videos The following are managed with annotations from the interview. The information is also used to find a healthy diet. Must Recall Munch Delete 25 KB7.5. Weather
Click Weather from the Home screen to see the current temperature and the upcoming week's forecast for a city of your choice. You can store multiple cities for quick access.

text_image
Parts A shower (Orange Warning for West) Wednesday Today 8° 12" Friday 7° 13" Saturday 8° 14" Sunday 3° 15" Sunday 4° 16" Monday 2° 17" Tuesday -1° 18" Wednesday 2° 19" Thursday -2° 20"Look at your local weather. Open Weather, and your phone will attempt to find your current location using the Location Services. Scroll down to see more details, including surface temperature, humidity, visibility, and more.
Add a city. Click, then click . Enter a city name, then click the city when you see it.
Switch to another city. Swipe left or right. The number of dots below the city name shows how many cities are stored. You can also click, then choose a city from the list.

text_image
Exit City Management Done New York Close -7° Beijing Cloudy 0° Paris A Street 8° + AddDelete a city. Click, swipe left on the city, then click Delete, or click Edit, click next to a city, then click Delete.
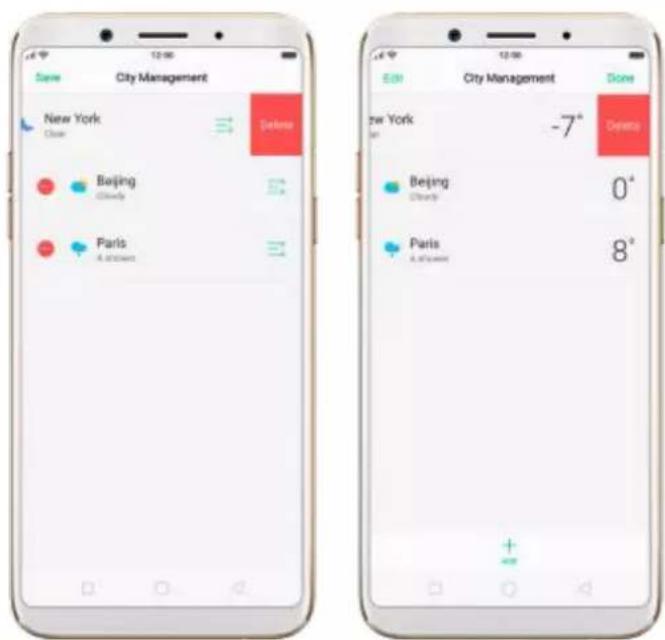
text_image
City Management New York Close Delete Beijing Cloudy Paris A.2019 -7° Depts Beijing Cloudy 0° Paris A.2019 8°Reorder cities. Click ☐, click Edit, then drag next to a city up or down
in the list.
Turn on Disaster warning. Go to [Settings] > [Weather] and toggle the slider to green.
Choose Fahrenheit or Celsius. Go to [Settings] > [Weather] > [Temperature unit].

text_image
Settings Weather Disaster warning Temperature unit7.6. Cameras
7.6.1. Take photos
You can use the cameras to take pictures and videos.
Open camera. Click Camera icon. To quickly get to the camera, touch Camera icon on the Lock screen and swipe up.
Choose a photo mode. Click ☐, then choose to shoot standard, square-format, or full screen photos.

Switch the cameras. Click .
Take a photo. Aim your camera at the subject and click .
Zoom in or out. The dual 20MP cameras capture full-resolution video and stills at 1x and 2x zoom. To quickly switch, toggle or . You can also pinch the screen to zoom in and out.
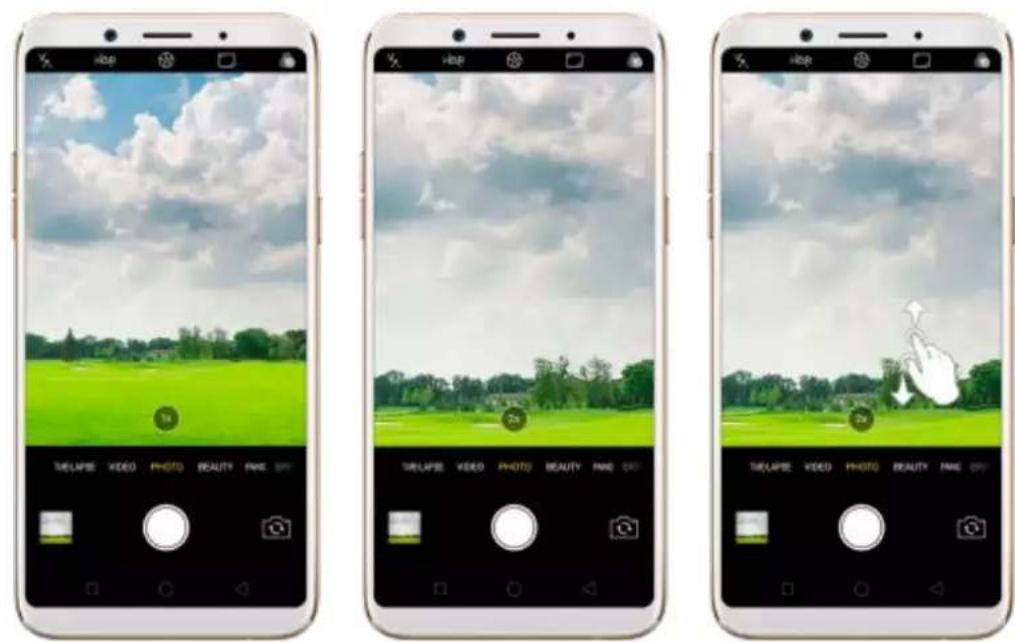
Turn the flash on or off. Click , then click On or Off. When you click Auto,your phone will automatically detect lighting conditions and determine ifflash is necessary. When you click Fill Light, your phone will use the built-inflash as the fill light.
Turn HDR on or off. Click , then click On, Off or Auto. When HDR (highdynamic range) is on, photos take multiple exposures of the same scene andthen combine them to create a better looking, more detailed image.
Use the capture timer. Capture timer gives you time to get in the picture. Click , then click 3s or 10s. Click Tap if you want to take photos by tapping on the screen.
Add a filter. You can apply a filter before you take a photo. Click , andyou'll see eight filter options, with each one showing a preview of what it willlook like applied to your photo. Click the filter you want to use. Click None or

to remove the filter.

text_image
Resort Watermark FilterTake a panorama photo. Choose PANO.
- With the rear cameras, click the Shutter button, then move the phone slowly and steadily across the subject you want to capture. Click the button again when you've got your full photo.
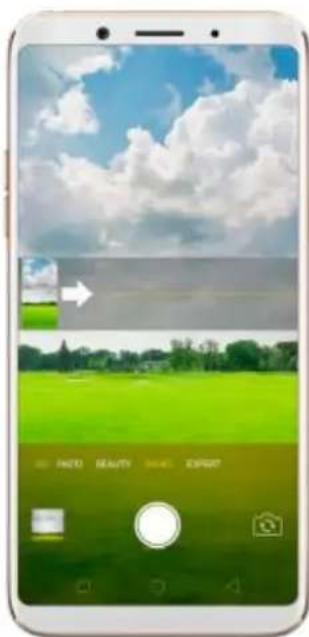
text_image
Mobile app interface screenshot showing weather and landscape editing options with Chinese labels- With the front camera, click the Shutter button and you'll hear a "Ding" sound. Rotate the phone left or right until the phone sounds again. The photo will be taken automatically.

natural_image
Smartphone screen displaying a portrait of a woman with facial features, no visible text or symbols on the image itself.Use Expert mode. Expert Mode allows you to take more professional-looking photos. Choose EXPERT, then you can adjust camera's white balance, exposure compensation, ISO, shutter speed, and more.

text_image
Mobile phone screenshot displaying a music player interface with a landscape photo and playback controlsTake Burst shots. Touch and hold the Shutter button, and you'll see an onscreen count rapidly rise, which shows the number of photos you're taking. Lift your finger to stop. To select the photos you want to keep, click Gallery, click ,select the photos, then click Done.

natural_image
Smartphone displaying a scenic landscape with blue sky, green field, and clouds (no text or symbols visible on the image itself)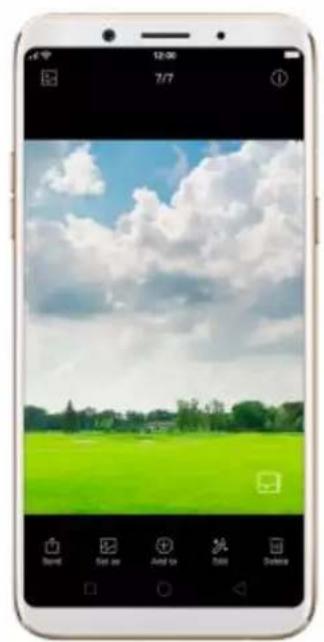
natural_image
Smartphone displaying a scenic photo of a green field under a cloudy sky (no text or symbols visible)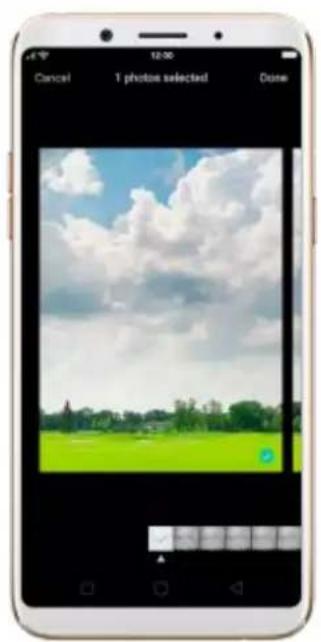
natural_image
Smartphone screenshot displaying a photo frame with a green field and sky background (no text or symbols visible)7.6.2. Take a selfie
To switch to the front-facing camera, click in the lower-right corner of the screen.

natural_image
Mobile phone screenshot showing a woman in a yellow top, with camera and photo editing tools visible (no readable text or symbols on the image itself)Turn the flash on. Click, then click On. A white screen at full brightness is used as front-facing flash.

text_image
TRELAPSE VIDEO PHOTO BEAUTY PINEChoose a photo mode. Click, then choose to shoot standard, square-format, or full screen photos.

text_image
Standard Square Full Screen TELAPSE VIDEO PHOTO BEAUTY MMAdd a photo watermark or filter. You can apply a watermark or filter before you take a photo. Click, then choose a watermark or filter, or click Revert to remove that.
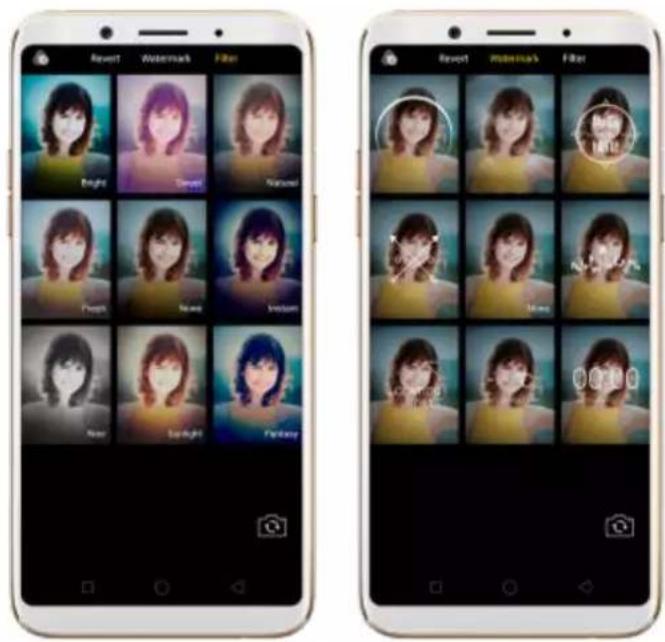
text_image
Report Watermark Filter Bright Clear Nature Pencil Name Indigo New Sound Findings Report Watermark Filter Report Watermark FilterUse Beauty Mode. The built-in beauty filter will automatically adjust the skin tone, enhance facial features, and make other minor changes to your appearance. To change the beauty level, click .

text_image
Two smartphone screenshots showing a woman in a yellow top being edited, with camera controls and UI elements visible.Turn Depth Effect on for a photo. Click on the top of the screen. Depth Effect blurs the background while keeps the face in the foreground perfectly focused.
Use the capture timer. Capture timer gives you time to get in the picture. Click, then click 3s or 10s. Click Tap if you want to take photos by tapping on the screen.
Show palm to take photo. Click, then click Palm. Show your palm to the front camera. After recognizing your palm, the phone will take a photo after two seconds.

text_image
OFF 2x 10x Tap Pixels TURLAPSE VIDEO PHOTO BEAUTY PAKE
text_image
I ME LAPSE VIDEO PHOTO SEAUTY NAMETake a panorama photo. Choose PANO. Click the Shutter button and you'll hear a "Ding" sound. Rotate the phone left or right until the phone sounds again. The photo will be taken automatically.

natural_image
Smartphone screen displaying a portrait of a woman with facial features, no visible text or symbols on the device itself.7.6.3. Shoot video
With Camera you can shoot video, including time-lapse and 10s short videos.

text_image
Smartphone screenshot displaying a photo editing interface with green field, sky background, and UI controlsRecord a video. Choose Video, then click the Record button, or press either volume button, to start and stop recording. You can choose between 720p, 1080P and 4k video.
Note: 4k video is only available on R11, R9s Plus, A57 and F3 Plus.
Capture time-lapse video. Choose Time-Lapse. It records a scene or object that has a slow state-of-change and turns it into a video that plays back in high speed.
Capture 10s short video. Click on the top of the screen. You can capture a video up to 10 seconds.
Take photos when shooting a video. Click the Shutter button in the lower-left corner of the screen.
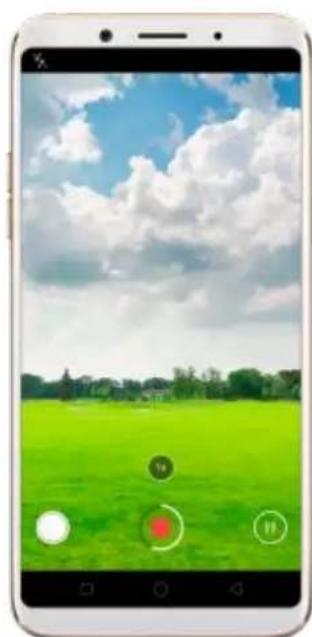
natural_image
Smartphone displaying a green grass field under a blue sky with clouds, no visible text or symbols on the screen or surroundings.7.6.4. Camera settings
Camera settings are special options that help you to take pictures or record videos easier. Go to [Settings] > [Camera].
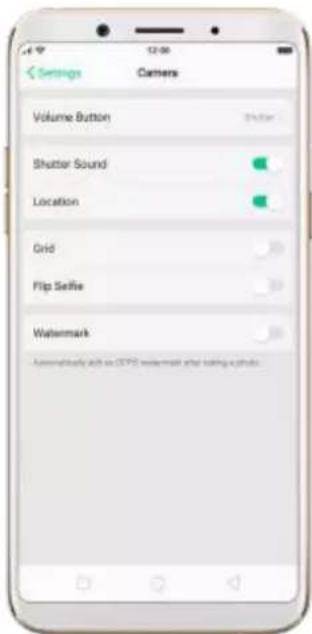
text_image
Settings Camers Volume Button Shutter Sound Location Grid Flip Settle Watermark Automatically add to GPS watermark what setting a photo.Volume button. Set the Volume buttons to function as the volume or zoom controls, or the shutter release.
Shutter sound. Make or mute camera shutter sound when capturing photos. Location. Tag your photos with geo-locations.
Grid. Display grid lines to ensure the camera is leveled.
Flip selfie. Mirror flips your front facing camera photos.
7.7. Photos
7.7.1. Photos overview
The Photos app is where you store your photos and videos, including thoseyou've taken with the built-in camera, saved from an app or a webpage,
copied from optional storage devices, and more. You can view, share, and edit your photos and videos directly on your phone.
View Photos. You can view the roll of photos in either Camera or Photos. All photos are sorted by the dates and times they were taken. In Photos, newly added Timeline year & month view help to position photo faster and more precise. Select YEAR & MONTH view in timeline, easy and convenient operation allows you to fast lock the look-up scope, and no need to slide up and down to look up in DAY view. Also you can click an album to view the photos or videos in that album.

text_image
Year 2017 2016 32 Month January 2017 April 2017 August 2017 November 2017 December 2017 January 2018 November 5, 2017 November 10, 2017 December 20, 2017 Today 19 March, 1 November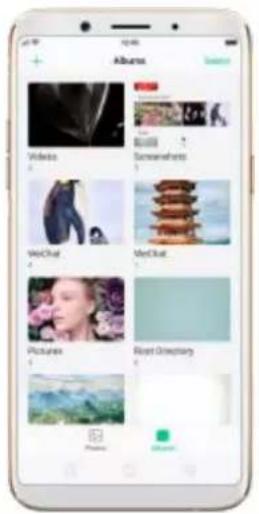
text_image
Albums Video Sawberries MewChat Mew Chat Pictures Rise Directory7.7.2. Albums
Each time you take a new photo, by default, it gets stored in the Photosalbum. Within the Photos app, there are a number of default albums intowhich your photos get automatically organized. In addition to these, you canalso create your own albums into which you can organize photos further.
You can see your photo albums by clicking Albums at the bottom right of the Photos app.
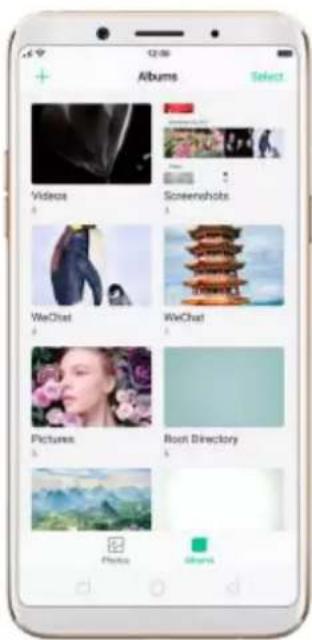
text_image
Albums Select Videos Screenshots WeChat WeChat Pictures Root DirectoryCreate a new album. Click +, enter a name, then click Save. Select photos and videos, then click Done.

text_image
New Albums Next Cancel Save WeChat WeChat Now New Bee q w e r t y u i o p a s d f g h j k l ◇ z x c v b n m 12# 4 4Add items to an existing album. While viewing photos, click Select, select items, click Add to, then select the album.
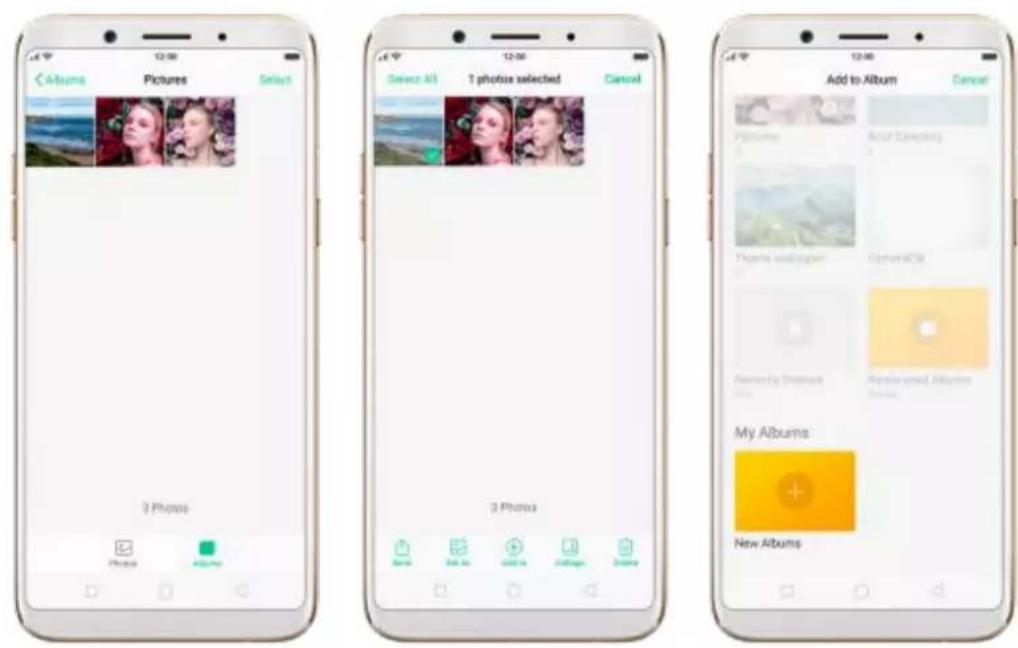
text_image
text_image
Select All 1 photos selected Cancel 3 Photos Cancel Select All 1 photos selected Cancel Delete Photo Canceltext_image
Albums Select Videos Screenshots WeChat WeChat Pictures Root Directory 4 Selected Cancel7.7.3. View and use photos and videos
View your photos and videos. Click Photos, then click a photo or video. Click to play a video. Or click Camera, then click the thumbnail in the lower-left corner of the screen. View a photo at full screen. Click a photo, then click the screen to hide the controls. View the next or previous photo. Flick left or right. View a photo in landscape orientation. On Control center, turn [Portrait Orientation Lock] off, then rotate your phone sideways. The photo automatically reorients and, if it's in landscape format, expands to fit the screen. Zoom in or out. Double-click or pinch a photo open or closed. Drag to see other parts of the photo. See photo and video details. Click a photo or video, and then click . text_image
Details Name: 8MG20180104094400 Time: 1/4/2018 08:44:50 Dimensions: 3456 + 4608 Flashs Size: 2.6 MB Path: Phone/DCBM/Camera/ 8MG20180104094400.jpg Device: CPH1723 Focal Length: 3.65 mm Aperture: 1/1.8 ISO: 118 Flash: No Flash White Balance: Auto Exposure Time: 1/50 stext_image
1 photos selected Cancel OPPO Share. Top here to turn on WiFi and Bluetooth to send via "OPPO Share". Facebook WhatsApp Email Messenger Bluetooth Add to Magic Keep Save to Drivetext_image
Set as Wallpaper Set as Contact's Photo Canceltext_image
12:00 Thursday, January 4 Cancel Set astext_image
12:00 Thursday, January 4 Set as Lockdowns WaRpaper Applicable to Default Lockdowns only Set as Pharmacows WaRpaper Canceltext_image
Set as Wallpaper Set as Contact's Photo Canceltext_image
Select a Contact Anna Mike OPPO Singapore Pennynatural_image
Photo of a penguin standing beside a small animal, displayed on a smartphone screen (no text or symbols on the image itself)natural_image
Smartphone displaying a photo of two penguins, one adult and one juvenile, against a plain background (no text or symbols visible)text_image
12:00 Select All 2 Selected Cancel 4 Photos Select Phone Collage Done7.8. Music
7.8.1. Music
Use the Music app to enjoy music stored on your phone. You can also create playlists, set songs as ringtones for incoming calls, and more. To see what you can do with your music, click to the right side of the song name. text_image
Music Track Article Albums Playlist Free to Fly do and (end) Free to Fly do playings Add to Playing Send Song Set as Ringtone View Details Delete Song Canceltext_image
Maser Thank Action Make Help How to Fly (You're here) OPPO Share: Tag here to turn on Wi- Fi and Bluetooth to send via "OPPO Share" Messages Bluetooth WhatsApp Microsoft Cards Mail Save to Drive Canceltext_image
Mixed Taste Home Hue to My do minutes Set as Call Ringstone Set as SMS Ringstone Set as Alarm Ringstone Set as Contact Ringstone Cancel7.8.2. Change sort mode
By sorting your playlist, you can easily order the songs in your phone. Change the order of your songs. From the Music screen, click Track, click in the upper-right corner of the screen, then click Select Sort Mode. Your songs can be sorted alphabetically, by time when the song is added, or by folders the songs are in. text_image
Music Track Artist Album Player Free to Fly being mono 12:00 Music Track Artist Album Player How to Fly using music Select Sort Mode Seen Local Songs Manage simple Inck Cancel Select Sort Mode Cancel Display Alphabetically Display by Time Added (Default) Display by Folder7.8.3. Scan local songs
The Music app contains all music-related materials on your phone storage. To manually scan for local songs, or choose which songs can be displayed in your list, do the following: Scan all local songs. Click in the upper-right corner of the Music screen, then click Scan Local Songs. Your phone will automatically start scanning. text_image
Music Tracks Find ifc fprp How to Fly syrn.com Select Sort Mode Scan Local Songs Manage simple track Cancel Settings Scan Local Songs Done 100% Scaned: 1 song(s) Scan Againtext_image
Android Backup ColorDS DCIM Download Fonts Movies Pictures ThemeStore Themestext_image
Scan Settings Done Skip Songs Under 60 Secs Skip Songs Smaller than 100 KB File another than this document will not be scanned. Scan specific folders7.9. Videos
Use Videos to watch videos you've downloaded or recorded with the built-in camera. Play a video. Click Videos on the Home screen, then click the video. Control video playback. Click the screen to show or hide the controls. text_image
OPPO_A75 A75 Capture the real you| TO | Do this |
| Play or pause a video | Click or . || |
| Raise or lower the volume | Click the volume buttons on the s of the phone, or swipe your fingeror down on the right side of the screen. |
| Increase or dim the brightness | Swipe your finger up or down on left side of the screen. |
| Skip to the next or previous video | Click or . |
| Rewind or fast-forward | Swipe your finger left or right on screen. |
| Start a video over | Click twice quickly. |
| Skip to any point in a video | Drag the playhead left or right. |
| Lock the screen rotation and disab bottom keys | Click . |