XS-GTF1025B - Haut-parleur auto SONY - Free user manual and instructions
Find the device manual for free XS-GTF1025B SONY in PDF.

| Product Type | Car Subwoofer |
| Brand | Sony |
| Model | XS-GTF1025B |
| Speaker Size | 10 inches (25 cm) |
| Impedance | 4 ohms |
| Peak Power | 1200 W |
| RMS Power | 400 W |
| Frequency Response | 30 Hz - 1000 Hz |
| Sensitivity | 87 dB |
| Magnet Type | Ferrite |
| Cone Material | Polypropylene |
| Surround Material | Foam |
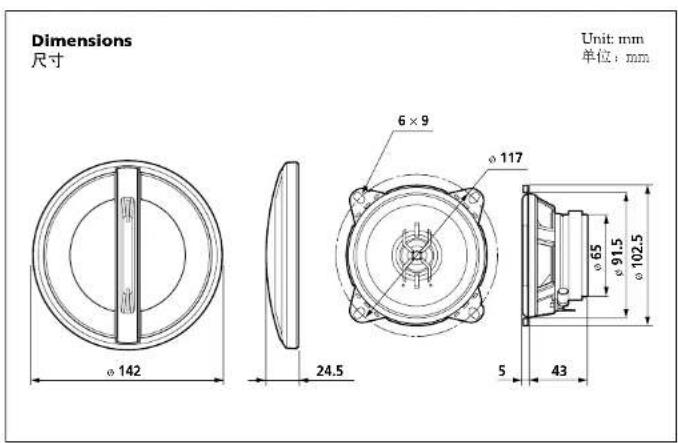
| Mounting Depth | 5.5 inches (140 mm) |
| Mounting Diameter | 9.4 inches (239 mm) |
| Overall Dimensions | 10.2 x 10.2 x 6.3 inches (259 x 259 x 160 mm) |
| Weight | 8.8 lbs (4.0 kg) |
| Power Supply | 12V DC car electrical system |
| Main Functions | High-power bass reproduction, deep low frequencies |
| Maintenance and Cleaning | Wipe with dry cloth; do not use solvents |
| Safety Instructions | Secure mounting, avoid short circuits, use proper gauge wire |
| Spare Parts and Repairability | Contact Sony service center; limited user-serviceable parts |
| General Information | Designed for use in sealed or ported enclosures |
Frequently Asked Questions - XS-GTF1025B SONY
User questions about XS-GTF1025B SONY
0 question about this device. Answer the ones you know or ask your own.
Ask a new question about this device
Download the instructions for your Haut-parleur auto in PDF format for free! Find your manual XS-GTF1025B - SONY and take your electronic device back in hand. On this page are published all the documents necessary for the use of your device. XS-GTF1025B by SONY.
USER MANUAL XS-GTF1025B SONY
- Do not continuously use the speaker system beyond the peak power handling capacity.
- Keep recorded tapes, watches, and personal credit cards using magnetic coding away from the speaker system to protect them from damage caused by the magnets in the speakers.
If you cannot find an appropriate mounting location, consult your car dealer or your nearest Sony dealer before mounting.
使用前注意事项
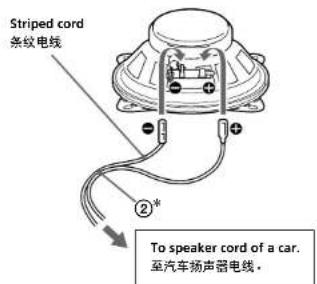
Speaker Coaxial 2-way:
Woofer 10 cm, HOP, cone type Tweeter 2.5 cm, B.D. type
Peak power 130 W ^ Rated power 30 W ^* Impedance 4 Ω ^ Sensitivity 88 *2 dB (1 W, 1 m) ^## Frequency response 45 Hz – 25,000 Hz* Mass Approx. 400 g per speaker Supplied accessory Parts for installation
Design and specifications are subject to change without notice.
^1 Testing Condition : IFC60268-5 (2003-05) ^2 Testing Condition : EIAJ RC-8124A
规格
扬声器
10cm Coaxial 2-way Speaker
Installation/Connections
安装/线路连接
XS-GTF1025B
© 2007 Sony Corporation Printed in China

(O: 不含有,×: 含有)
产品中有毒有害物质或元素的名称及含量
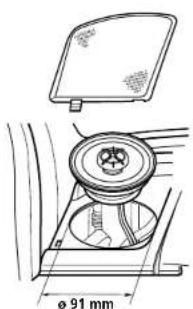
A depth of at least 43 mm is required for flush mounting. Measure the depth of the area where you are to mount the speaker, and ensure that the speaker is not obstructing any other components of the car. Keep the following in mind when choosing a mounting location:
• Make sure that nothing is obstructing around the mounting location of the door (front or rear) where you are to mount the speaker.
- A hole for mounting may already be cut out of the inner panel of the door (front or rear). In this case, you need to modify the board only.
- If you are to mount this speaker system in the door (front or rear), make sure that the speaker terminals, frame or magnet do not interfere with any inner parts, such as the window mechanism in the door (when you open or close the window), etc.
Also make sure that the speaker grille does not touch any inner fittings, such as the window cranks, door handles, arm rests, door pockets, lamps or seats etc.
安装之前
Mounting from the car interior/从汽车内安装
1
Mark the 4 bolt holes and make them 3.3 ~mm^ in diameter. 画出4个螺栓孔,并钻成 3.3 ~mm^ 直径的孔。
2
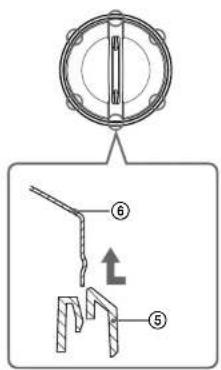
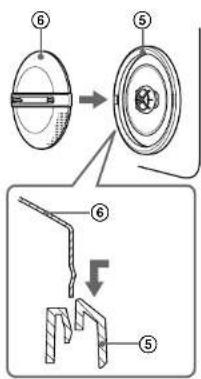
Remove the grille net. 取下格栅网。
5
Press and insert the edges of the grille net. 按下并插入格栅网的边缘。
3
Flat mounting (installed flush with the surface of the dash)/ 平面安装(与仪表板表面齐平安装)
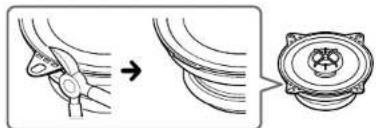
natural_image
Diagram showing a hand holding a cable being inserted into a spool, with an inset close-up of the component (no text or symbols)This speaker can be made to fit in almost any type of car by removing the mounting tabs. Use clippers or pliers, etc. to cut or snap the mounting tabs off so that it is even with the edge of the speaker frame as illustrated. Note After removing the mounting tabs, handle the speaker frame with care, as the edges may be sharp.