
SJMR100 - Dictaphone PANASONIC - Free user manual and instructions
Find the device manual for free SJMR100 PANASONIC in PDF.

User questions about SJMR100 PANASONIC
0 question about this device. Answer the ones you know or ask your own.
Ask a new question about this device
Download the instructions for your Dictaphone in PDF format for free! Find your manual SJMR100 - PANASONIC and take your electronic device back in hand. On this page are published all the documents necessary for the use of your device. SJMR100 by PANASONIC.
USER MANUAL SJMR100 PANASONIC
Note The "EB" indication shown on the packing case indicates United Kingdom.
Before connecting, operating or adjusting this product, please read these instructions completely. Please keep this manual for future reference.
A spacer has been inserted to protect the mechanism. Remove it before using the unit.
Location of controls 4
Power source. 8
The HOLD function 12
Before recording 14
Recording. 18
Other recording functions 28
Playback (Basic play) 32
Other playback functions 36
Other useful functions 46
Editing MDs 48
Titling MDs. 58
Using the unit with optional accessories 68
Some useful information about MDs. 70
Troubleshooting guide 74
Displays 75
Cautions 76
Maintenance. 76
Specifications 77
Supplied Accessories
Check the packing carton for these accessories.
Stereo earphones. 1pc. (RFEV319P-SA)
Wired remote control. 1pc. (RFEV023P-SM)
External battery case. 1pc. (RFA1320-S)
Nickel-metal hydride rechargeable battery............1pc. (RFKFBP140HSY) Remove from case before use.
AC adaptor. 1pc For Continental Europe (RFEA002E-S) For UK (RFEA003B-S)
Carrying case 1pc. (RFC0056-K)
(Use numbers indicated when asking for replacement parts.)
Indice
Location of controls
Main unit A
A Stop/power off/edit cancel button (■, POWER OFF)
Play/record/pause/power on/ character type button (▶/III, CHARA)
Display
Volume/cursor buttons ( -, + ,VOL / CURSOR)
Display, capital/ lower case button (DISPLAY, CAPS LOCK)
F Changing edit mode, changing track mark mode, completing edit button (EDIT, MARK MODE)
G Jog dial (▶,▶, ENTER ▲)
Tone/recording sensitivity/space button (EQ/REC SENS, SPACE)
1 Open switch (OPEN
Play and record mode/character delete button (MODE, DELETE)
K Hold switch ( HOLD)
L Recording pause/power on switch (REC PAUSE )
M Headphone jack (O)
Optical digital in/line in jack (OPT/LINE IN)
Microphone jack [(PLUG IN POWER) MIC]
Rechargeable battery compartment cover ( OPEN)
Connection terminal for battery case
R DC in jack (DC IN 1.8 V
Stereo earphones E
A Plug
B Slider
Slide up to prevent tangling the cord when the earphones are not in use.
Location of controls
Wired remote control A
A Earphone jack
Display
Play/record/stop button
Function selector/hold switch (MAIN, SUB, HOLD)
The operation depends on the position of this switch. Ensure the switch is in the correct position before using the remote control. These symbols are used to indicate the position of this switch in the instructions.
Volume control/tone control/ track mark button (VOL +, EQ, T.MARK)
Volume /play mode/recording pause button (VOL -, PLAY MODE, RECR PAUSE)
Skip/search(forward)/light/display button ( , LIGHT DISP)
Skip/search (backward) button
An operation tone sounds when buttons on the remote control are pressed. This tone is represented in these instructions by
Display information 3
A Synchronized recording display
Recording display
Monaural play/record display
Battery indication
Play mode
F Remaining recording time
G Text
Sound quality
1 Disc mark
Level meter
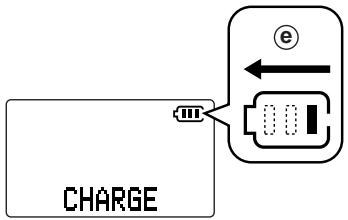
For UK, the shape of the charger is different.
A
ENGLISH
Power source
The rechargeable battery (included)
1 Put the battery into the unit.
The unit cannot recharge batteries other than the one supplied or recommended replacements.
2 Connect the AC adaptor.
a DC IN jack (DC IN 1.8 V 一 一
包 Back panel of the unit
AC adaptor(included)
Household mains socket
Recharging begins.
"CHARGE" appears on the display while recharging. A
Scrolls
"CHARGE" disappears when the battery is fully charged. It takes approximately 3 hours to recharge the supplied battery.
3 Disconnect the AC adaptor from the [DC IN 1.8 V ] terminal and the household mains socket.
Note
The unit can only be recharged while it is off.
- The AC adaptor and battery may become warm during recharging but this is normal.
Recharging time and duration.
(When using the included rechargeable battery.)
Charging: Approx. 3 hours
Playback: Approx. 8.5 hours
Recording: Approx. 4.5 hours
Duration may be reduced under some conditions.
- If the unit is to be used for long periods, such as during recording, use the AC adaptor to power it.
Rechargeable number of times
About 300.
The battery has reached the end of its useful life if play time dramatically reduces after recharging.
Replacement
Nickel-metal hydride rechargeable battery (RFKFBP140HSY).
Please inquire at a Panasonic dealer for a replacement.
Alimentación
Dry cell battery (not included)
Use one LR6 alkaline battery. Use long-life Panasonic alkaline batteries.
1 Put the battery into the battery case.
External battery case (included)
One LR6,AA,UM-3 battery (not included)
2 Attach the case to the unit.
Bottom of the unit
Note
Insert the rechargeable battery when recording on dry cell batteries.
The battery indicator A
The illustration shows how the indicator on the remote control display appears as battery power runs down.
D Full
Empty
When the indicator starts flashing
The battery is almost flat and should be replaced or recharged.
For longer use
- You will be able to playback for 20 hours and record for 9.5 hours if the two types of batteries are used together.
- We recommend using long-life Panasonic alkaline batteries.
Using the AC adaptor (included)
Connect the AC adaptor.
Refer to the step 2 of "The rechargeable battery" (See page 8.) for connection instructions.
Note
The unit is in the standby condition when the AC adaptor is connected. The primary circuit is always "live" as long as the AC adaptor is connected to an electrical outlet.
- Use only the supplied AC adaptor. Use of other adaptors can damage the unit. If the unit is not to be used for a long time disconnect the AC adaptor from the household mains socket and turn the unit off to save power.
Alimentación
Pila seca (no includa)
This function stops the player and remote control from responding when a button is pressed.
(a) Hold mode
Release
Guards against the following
- The unit is powered on accidentally when not in use, causing the batteries to run down.
- A button is accidentally pressed during play or recording, interrupting the operation.
Note
There is a HOLD switch on both the player and remote control, each of which works independent of the other.
The "HOLD" display
This is displayed for about 2 seconds on the main unit's and the remote control's display panels when the following occurs.
The main unit is on hold and a button is pressed. (If off, display appears only if [▶/■, CHARA] or [REC PAUSE →] is operated.)
- The remote control's switch is moved to hold. The display also lights for about 5 seconds at this time.
La Función HOLD
Estamericano.
Modo de retencion
Soltar
Protege contra loARRY
La exhibencia "HOLD" (retencion)
The two methods of recording
Digital
This method records the digital signals from CDs. Compared to analogue recording, this method makes it possible to make recordings of higher quality. Purchase an optical fiber cable (RP-CA2120 or RP-CA2220, sold separately) to record digitally.
Analogue
Use this method to make analogue recordings of digital material, CDs and MDs, and to record analogue sources such as the radio. Use the included line cord to make analogue recordings.
The recording modes
Normal
This method allows you to start and stop recording manually.
Synchronized
This method starts and stops recording at the same time as the source being record. Available with both digital and analogue recording.
One track synchronized
The first track on a CD is recorded and then the unit goes to recording standby. Recording starts again automatically when the first track on another CD is played. Available only when recording CDs digitally.
Note
This function only works with tracks numbered "1".
Monaural
This mode allows you to record approximately double the amount of material normally possible. (For example, it is possible to record about 148 minutes worth of material onto a 74 minute MD.) Available only when analogue recording.
Antes de grabar
Normal (sin exhibicion)
Track marks and track numbers
Like CDs, it is possible to select and play a track on an MD by selecting its track number. There are marks at the beginning of each track, called track marks, that make this possible. The period between each track mark is called a track.
Putting track marks on an MD (See page 28.)
Auto mark mode
The unit automatically decides where track marks are to be put.
Manual mark mode
You can manually put the track marks where you want them to go.
Time mark mode (3 MIN, 5 MIN, 10 MIN)
Track marks are put at a preselected distance from each other.
Antes de grabar
Marcas de pista
Modo demarca diempo (3 MIN, 5 MIN, 10 MIN)
(3 MIN, 5 MIN, 10 MIN)
Connect this unit to a unit that has a digital output terminal.
Digital output terminal
-portable portable)
Purchase an optical fiber cable
(RP-CA2220, sold separately).
品 Digital output terminal
(deck portable)
Purchase an optical fiber cable
(RP-CA2120, sold separately).
Analogue recording
B
Connect this unit to a unit that has stereo LINE OUT terminals.
LINE OUT terminal
Note
Disconnect other cables from the [(PLUG IN POWER) MIC] terminal.
Recording with a microphone
C
Connect the microphone.
④ Stereo microphone (not included)
Purchase a stereo microphone
(RP-VC200, sold separately).
Note
- Disconnect other cables from the [OPT/LINE IN] terminal.
- Stereo recording is made if a stereo microphone is used.
2 Release hold.
A Main unit
Remote control
3 Open the player and insert a recordable MD.
① Slide [OPEN ] to the right.
② Open the lid.
③ Insert disc with label facing upward. Push the disc in the center until it locks in place.
④ Close the lid.
After an MD has been inserted the player turns on, reads the information from it, then, after a minute, the power goes off again.
Grabación
1
Grabación digital

4 Slide [REC PAUSE ] to the right.
The unit enters the recording mode.
If you have inserted an MD with recordings already on it, the unit prepares to record from the first available space.
5 Press [▶/II, CHARA] (main unit) or the main button (remote control) to start recording.
A Main unit
Remote control: Beep
6 Start playback on the source to be recorded or point the microphone at the source of the sound.
Note
Recording level is automatically set. Changes to volume will have no effect on recording.
To select the recording mode Press [MODE, DELETE] while in recording standby mode. A
Each time the button is pressed the mode changes and an indicator is shown in the following order.
Digital recording
Normal (No display) SYNC SYNC 1
Analogue recording
Normal (No display) MONO SYNC
Recording with a microphone
Normal (No display) MONO
SYNC: Synchronized recording
SYNC 1: One track synchronized recording
MONO: Monaural recording
If you have selected
Synchronized recording (SYNC) or One track synchronized recording (SYNC 1) Recording begins automatically when you begin playback of the source.
- Monaural recording (MONO)
Perform steps 5 to 6 to start recording.
Note
If you set the recording mode to "SYNC", recording begins immediately if the source is already playing.
Grabación
A Aparato principal
Control remote h:Plitdo
To pause recording If you have selected
Synchronized recording (SYNC)
Recording pauses if the source stops or if 2 seconds of silence is detected. (Track number increases by one.)
Recording restarts when the source starts again.
One track synchronized recording (SYNC 1)
The unit automatically pauses after track 1 finishes. (Track number increases by one.)
Recording restarts when another track numbered 1 is played.
Normal recording (No display) or monaural recording
Press [▶/II, CHARA] (main unit) or [VOL -, PLAY MODE, RECA PAUSE] (remote control) while recording. A
(Track number increases by one.)
A Main unit
Remote control
:Beep
To restart recording B
Press [▶/III, CHARA] (main unit) or the main button (remote control).
A Main unit
Remote control
:Beep
Note
If you set the recording mode to "SYNC" or "SYNC1", you cannot pause recording manually.
To stop recording
Press [■, POWER OFF] (main unit) or main button (remote control) while recording.
A Main unit
Remote control
:Beep
-UTOC is recorded.
The unit will turn off automatically after about 1 minute.
To turn the unit off D
Press [■, POWER OFF] while stopped.
Grabación
A Aparato principal
3 Control remote
: Pitido
Nota
A Aparato principal
3 Control remote
: Pitido
- When recording from CD
The track marks are put onto the MD as they are found on the CD. Each time a new track starts on the CD, the number of the tracks on the MD increases by one.
(Track marks may not be inserted accurately in some cases.)
- When recording from digital sources other than CDs
2 seconds of silence is determined as the division between tracks and a track mark is added.
To add track marks manually
See page 28.
Analogue recording
2 seconds of silence is determined as the division between tracks and a track mark is added.
To add track marks manually
See page 28.
Note
Track marks will not be added if the space between tracks is short or if there is noise in the space. Track marks may be added in error if there is a silent or especially quiet portion in a track. Use the editing functions after recording to add and remove track marks. (See page 48-56.)
Recording with a microphone
Add track marks manually or have the unit add the marks at selected intervals.
(See page 28.)
Making good recordings
Power the unit with the AC adaptor while recording. If you intend to use batteries, recharge the rechargeable battery fully and use a new dry cell battery.
-
If the unit turns off while recording, or when "UTOC Writing" is on the display ("WRITE" on the remote control), the recording will not be correctly recorded onto the disc. A
-
"DISC ERROR" may appear on the display if the unit turns off while "UTOC Writing" is on the display.
Grabación
Do not open the lid or shake the unit while recording
Be especially careful while "UTOC Writing" is on the display ("WRITE" on the remote control). If the unit is moved at this time, the recording may not be correctly recorded onto the disc. You can damage the unit or disc if you try to force open the lid.
Note
This unit has a sampling rate converter so recording from equipment (DAT deck, BS tuner, etc) with a different sampling frequency is possible.
- Insert the rechargeable battery when recording on dry cell batteries.
(For United Kingdom)
Your attention is drawn to the fact that recording pre-recorded tapes or discs or other published or broadcast material may infringe copyright laws.
Grabación
Other recording functions
Ways of adding track marks
A
Apart from auto mark mode where the unit automatically adds the track marks during recording, there are also the manual and time mark mode methods.
1 Press [EDIT, MARK MODE] while the unit is in the recording standby mode to select the required marking mode.
The mode changes each time the button is pressed. AUTO
Track mark are added automatically when the track changes.
MANUAL
Track marks can be added manually where required.
3 MIN
Track marks inserted at
3 minute intervals.
5 MIN
Track marks inserted at 5 minute intervals.
10 MIN
Track marks inserted at 10 minute intervals.
2 Press [▶/■, CHARA] (main unit) or the main button (remote control) to start recording.
A Main unit
Remote control:Beep
To add track marks manually
Press the jog dial (main unit) or [VOL +, EQ, T.MARK] (remote control) when a track mark is required.
A Main unit
Remote control: Beep
Track marks are added even if "MANUAL" has not been selected.
Note
"AUTO" cannot be selected when recording with a microphone.
A Aparato principal
Control remote N: Pip1
Other recording functions
Checking the remaining time on the MD A
This function allows you to check the time available for recording before you start recording or while recording is in progress.
Press [DISPLAY, CAPS LOCK] (main unit) or press and hold [▶▶], LIGHT DISP] (remote control) while in recording standby mode or during recording.
A Main unit
Remote control
:Beep
The display changes each time this is done to show elapsed recording time and the remaining recording time.
Number of track recording
念 Elapsed recording time
Available time for recording
Adjusting recording sensitivity E
You can adjust the sensitivity of the unit for analogue recording.
Press [EQ/REC SENS, SPACE] while in recording standby mode.
The mode changes each time the button is pressed.
REC SENS L REC SENS H
REC SENS L:
To record from stereos and radio cassette players
REC SENS H:
To record from portable equipment
1 Release the hold function.
A Main unit
Remote control
2 Connect the earphones to the remote control then insert the remote control's plug into the headphone jack () on the player. (Plug in firmly.)
3 Open the player and insert an MD.
① Slide [OPEN ] to the right.
② Open the lid.
③ Insert disc with label facing upward. Push the disc in the center until it locks in place.
④ Close the lid.
After an MD has been inserted the player turns on, reads the information from it, then, after a minute, the power goes off again. The name of the disc or song is shown on the display. The information scrolls from right to left across the display if it can not be displayed all at once.
("NO TITLE" (main unit) or "-- -" (remote control) is displayed when the disc contains no track or disc titles.)
4 Press [▶/■, CHARA] (main unit) or the main button(remote control) to start play.
A Main unit
Remote control: Beep
The player stops automatically when all the tracks on the disc have been played.
5 Adjust the volume.
A Main unit
Remote control: Beep
+: To increase the volume level
- : To decrease the volume level
Volume range is 0-25.
A Aparato principal
3 Control remote
Playback (Basic play)
To pause play A
Press [▶/II, CHARA] (main unit) during play.
Playback restarts when pressed again.
To stop the disc
Press [■, POWER OFF] (main unit) or the main button (remote control) during play.
A Main unit
Remote control
: Beep
The unit powers itself off automatically in about a minute.
To turn the unit off
Press [■, POWER OFF] (main unit) while stopped.
Resume function
The player stores the point at which play was stopped and if / CHARA] on the main unit or the main button on the remote control is pressed again, play begins from that point. This does not work if the player is opened or if the battery is removed. The player starts play from the first track in these cases.
■ Monaural playback
If a disc was recorded monaurally, the unit automatically switches to monaural playback mode.
(MONO" appears on the main unit's display.)
Note
- If the display on the remote control disappears or seems unusual, disconnect the remote control then plug it in again firmly.
This unit is vibration resistant but sound may skip if the vibration is constant.
A Aparato principal
3 Control remote
: Pitido
El aparato se apaga el mesmo automatically n emas o menos un minuto.
Other playback functions
Skip A
This function skips tracks and play begins from the beginning of the selected track.
Main unit
Operation is the same as for "Title search" (See page 38.).
Remote control
Press during play.
Backward
:Beep Beep Beep
包 Forward
: Beep Beep
For your reference:
You can skip more than one track by repeating this operation. The first skip backwards takes you to the beginning of the current track. Pressing the button in quick succession takes you back to previous tracks.
Search B
This function allows you to fast-forward or rewind through tracks.
A Main unit
During play, press and turn the jog dial.
Backward
包 Forward
Playback resumes when you release the dial.
Remote control
Hold down during play.
Backward
包 Forward
For your reference:
-
You cannot fast-forward past the end of the last track. If you release the button at this point, the player stops.
-
You cannot rewind beyond the beginning of the first track. The player starts playing the first track if the button is released at this point.
Other playback functions
Title search
This function allows you to begin listening from a selected track.
A Main unit
1 Turn the jog dial to select the track while stopped or during play.
Backward
包 Forward
Track name and track number appear on the display.
After about 5 seconds (or when the title finishes scrolling if it takes more than 5 seconds) the previous display is restored.
2 Press the jog dial to play the specified track.
Remote control
1 Select a track by pressing while stopped.
a) Backward
$$ \mathcal {J}: \text {B e e p B e e p B e e p} $$
Forward
$$ \mathcal {J}: \text {B e e p B e e p} $$
2 Press the main button.
:Beep
For your reference:
- You can hold the button of the remote control in place to go through tracks.
- If [▲]_on on the remote control is pressed or the jog dial on the main unit is turned left while the first track is selected then the last track is selected.
- If [▶] on the remote control is pressed or the jog dial on the main unit is turned right while the last track is selected then the first track is selected.
Other playback functions
Repeat and Random play
Press [MODE, DELETE] (main unit) or [VOL -, PLAY MODE, REC PAUSE] (remote control) when the player is stopped or playing.
A Main unit
Remote control
: Beep
Every time the button is pressed the mode changes and an indicator is shown on the display in the following order.
1 track repeat (1- )←
One track is played over and over.
All track repeat (
All tracks on the disc are repeated.
Random (RANDOM, RND)
All tracks are played randomly once each then the player stops automatically.
Normal (no indicator is shown)
Note
If you have selected the mode while stopped, press [▶/■, CHARA] (main unit) or the main button (remote control) to start playback.
For your reference:
- When the player is in the all-track repeat mode, you can skip (on the remote control) and search beyond the first and last track.
- You cannot skip or search back to a track that has already been played when in random mode.
- If you specify a track with the main unit during random play, random play begins again from that track.
- The modes are cleared after changing discs.
Aparato principal
Control remoto
: Pitido
Press [EQ/REC SENS, SPACE] (main unit) or [VOL +, EQ, T.MARK] when the player is stopped or playing.
A Main unit
Remote control
:Beep
Every time the button is pressed the mode changes in the following order.
S-XBS
Increases the power of the bass sounds.
TRAIN
Reduces sounds that may annoy others when you are using the player in a public place.

Normal (no indicator is shown)
Note
If you selected the mode when stopped, press [▶/■, CHARA] (main unit) or the main button (remote control) to start playback.
Other playback functions
Change the display
Press [DISPLAY, CAPS LOCK] (main unit) or press and hold [] , LIGHT DISP] (remote control) when the player is stopped or playing.
A Main unit
Remote control
:Beep
Track number
(b) Track name
Elapsed playing time
Remaining playing time
Remaining recording time
① Disc title
Total number of tracks
Total playing time
A While stopped
B While playing
Changes each time the button is pressed Changes automatically after a few seconds ("NO TITLE" (main unit) or "--") (remote control) is displayed when the disc contains no track or disc titles.)
To light the remote control's display
The display lights for about 5 seconds when an operation is done on the remote control. It remains lit for up to 20 seconds while a track or disc title is scrolling on the screen.
Checking the display of the remote control A
Press [▶], LIGHT = DISP].
The display lights for 5 seconds.
Adjusting the display's contrast
1 Turn the unit on and put it in hold. (See page 12.)
2 Press and hold [▶/II, CHARA] on the main unit and...
3 Press [- -, + -, VOL/CURSOR] (main unit) or [VOL +, EQ, T.MARK] or [VOL -, PLAY MODE, REC PAUSE] (remote control).
A Main unit
Remote control
$$ \mathcal {B}: \text {B e e p} $$
+:darker,-:lighter
The operation tone of the remote control
A tone sounds when a button on the remote control is pressed.
The tone can be turned on and off.
Press and hold the main button until following display appears.
(a) To turn on
⑥ To turn off
Note
If the above is done during play, play stops and power automatically goes off in about 1 minute.
MOVE (Moving tracks)
Rearrange the order of the tracks. The new order is recorded onto the MD so the tracks are always played in the order.
1 Press [EDIT, MARK MODE] while stopped.
2 ① Turn the jog dial to select "MOVE?"
② Press it.
Now the display is in the mode to select track to be moved.
3 ① Turn the jog dial to select the track to be moved.
(a) Track number decreases
⑥ Track number increases
② Press it.
Track being moved
New position
Now the display is in the mode to select the new position.
4 ① Turn the jog dial again to select the new position.
(a) Track number decreases
⑥ Track number increases
② Press it.
The display asks you to confirm your selection.
5 Press [EDIT, MARK MODE].
When "UTOC Writing" goes out editing is complete and the unit stops.
To stop part way through an editing operation
Press [■, POWER OFF] before confirming the operation in step 5.
Editando MDs
When performed while playing or paused
1 Press [EDIT, MARK MODE] while the track you want to move is playing or paused.
2 ① Turn the jog dial to select "MOVE?"
② Press the jog dial.
3 ① Turn the jog dial to select the new position.
② Press the jog dial.
The display asks you to confirm your selection.
4 Press [EDIT, MARK MODE].
When "UTOC Writing" goes out editing is complete and the unit stops.
ERASE (Erasing tracks)
Erase one track at a time with TRACK ERASE, or erase all the tracks on the MD with ALL ERASE. When tracks are erased with TRACK ERASE, the tracks following move back to fill in the space and the number of tracks reduces by one each time the operation is performed.
ALL ERASE
1 Press [EDIT, MARK MODE] while stopped.
2 ① Turn the jog dial to select "ALL ERASE?"
(2) Press it.
The display asks you to confirm your selection.
3 Press [EDIT, MARK MODE].
When "UTOC Writing" goes out editing is complete and the unit stops.
("BLANK DISC" appears on the display.)
To stop part way through an editing operation
Press [■, POWER OFF] before confirming the operation in step 3.
Note
ALL ERASE cannot be used while the disc is playing or paused.
Editando MDs
1 Press [EDIT, MARK MODE] while stopped.
2 ① Turn the jog dial to select "TRACK ERASE?".
② Press it.
Now the display is in the track selection mode.
3 ① Turn the jog dial to select the track to erase.
(a) Track number decreases
品 Track number increases
② Press it.
The display asks you to confirm your selection.
4 Press [EDIT, MARK MODE].
When "UTOC Writing" goes out editing is complete and the unit stops.
To stop part way through an editing operation
Press [■, POWER OFF] before confirming the operation in step 4.
When performed while playing or paused
1 Press [EDIT, MARK MODE] while the track you want to erase is playing or paused.
2 ① Turn the jog dial to select "TRACK ERASE?".
② Press the jog dial.
The display asks you to confirm your selection.
3 Press [EDIT, MARK MODE].
When "UTOC Writing" goes out editing is complete and the unit stops.
Editando MDs
COMBINE (Combining 2 tracks)
Remove a track mark from between two tracks, effectively making them one track. (If you combine tracks 2 and 3, for example, the track will take the number 2 and also retain the title for track 2.)
1 Press [EDIT, MARK MODE] while playing the latter of the two tracks you want to combine (or while paused).
2 ① Turn the jog dial to select "COMBINE?".
(2) Press it.
a track before
⑥ track playing
The display asks you to confirm your selection. In the example, the last eight seconds of track 2 and the first eight seconds of track 3 play repeatedly.
3 Press [EDIT, MARK MODE].
When "UTOC Writing" goes out editing is complete and the unit stops.
To stop part way through an editing operation
Press [■, POWER OFF] before confirming the operation in step 3.
When performed while stopped
1 Press [EDIT, MARK MODE] while the disc is stopped.
2 ① Turn the jog dial to select "COMBINE?".
② Press the jog dial.
Now the display is in the mode to select the tracks to be combined.
3 ① Turn the jog dial to select the two tracks to combine.
② Press the jog dial.
4 Press [EDIT, MARK MODE].
When "UTOC Writing" goes out editing is complete and the unit stops.
Note
- COMBINE does not work while playing track 1.
- You cannot combine a track recorded normally and a track recorded monaurally.
Editando MDs
(Dividing a track into two)
This allows you to add track marks, making it easy to divide a classic piece into its separate movements, for example.
1 Press [EDIT, MARK MODE] while playing the track you want to divide.
2 ① Turn the jog dial to select "DI-VIDE?".
② Press it at the point you want to divide the track.
A 4 second segment (8 seconds if track is monaural) of the track is played repeatedly, beginning at the point selected.
To adjust the point
Turn the jog dial to adjust the point.
Adjustments can be made approximately 8 seconds (16 seconds if track is monaural) either side of the original point.
(-128 to +127)
3 Press the jog dial.
The display asks you to confirm your selection.
4 Press [EDIT, MARK MODE].
When "UTOC Writing" goes out editing is complete and the unit stops.
To stop part way through an editing operation
Press [■, POWER OFF] before confirming the operation in step 4.
Note.
- If you divide a track with a title, the latter track becomes untitled.
- DIVIDE cannot be used while the unit is stopped.
Editando MDs
Titling discs and tracks
Tracks and discs can have a titles up to 100 characters long.
1 Press [EDIT, MARK MODE] while stopped.
"TITLE?" appears on the display.
2 A When titling a disc
① Press the jog dial.
"DISC TITLE?" appears on the display.
(2) Press it again.
The text editing mode is entered.
⑥ When titling a track
① Press the jog dial.
"DISC TITLE?" appears on the display.
② Turn it to select the track you want to title.
③ Press the jog dial.
The text editing mode is entered.
3 Enter the title. (See page 62.)
4 Press [EDIT, MARK MODE].
When "UTOC Writing" goes out editing is complete.
After titling a disc
The display automatically shows the track tilting display. Follow the steps for tilting tracks.
To stop part way through an editing operation
Press [■, POWER OFF].
The normal display is restored.
Note
If you start entering a title while a track is playing, the track repeats until you finish.
Titulando MDs
Copying a title from one MD to another (TITLE STATION)
The unit temporarily records the titles from an MD so they can then be copied onto another MD.
Before proceeding
- You cannot copy titles from prerecorded MDs.
- You can copy the title only if both MDs have the same number of tracks.
- Any titles on the second MD are replaced when this function is used.
1 Insert the MD with the title.
2 Press [EDIT, MARK MODE] while stopped.
3 ① Turn the jog dial to select "TITLE COPY?".
② Press it.
"TAKEOUT DISC" is displayed when the unit has recorded the title.
4 Eject the MD.
"CHANGE DISC" is displayed when the lid is opened.
5 Insert the other MD.
After "TOC Reading" is displayed, the display asks you to confirm the operation.
6 Press [EDIT, MARK MODE].
When "UTOC Writing" goes out editing is complete and the unit stops.
Titulando MDs
Copiando un titulo desde un MD a other (TITLE STATION)
1 Press [▶/II, CHARA] to select the type of characters.
The type changes each time the button is pressed.
English capitals<

Numerals and symbols
2 ① Turn the jog dial to move the cursor over the character you want to enter.
② Press it to enter the character.
(a) Entered text
Characters
The character you selected is entered. The cursor moves to the right and shows where the next character will be entered.
To move the cursor B
Press [ -, + ,. VOL/CURSOR].
+→: right
-:left
To erase a character
1 Press to move the cursor over the character you want to erase.
2 Press [MODE, DELETE].
The characters after the erased character move back to take its place.
Titulando MDs
Ingresando texto A
1 Press [- - , + - , VOL/CURSOR] to move the cursor over the character you want to correct.
2 ① Turn the jog dial to move the cursor over the character you want to enter.
② Press it to enter the character. The new character replaces the old one.
To insert an extra character B
1 Press [, +, VOL/CURSOR] to move the cursor over the place you want the character to go.
2 Press [EQ/REC SENS, SPACE].
3 ① Turn the jog dial to select the character to enter.
② Press it to enter the character. The character is inserted.
Changing capitals into lower case or lower case into capitals
1 Press [ -., + , VOL/CURSOR] to move the cursor over the character you want to change.
2 Press [DISPLAY, CAPS LOCK].
To exit the text editing mode part way through Press [■, POWER OFF].
The normal display is restored.
Titulando MDs
Corrigiendo titulos A
Characters available for titles.
| Text mode | Character |
| CAPI-TALS | ABCDEFGHIJKLMNOPQRST UVWXYZ |
| lower case | abcdefghijklmnopqrstuvwxyz |
| Numerals and symbols | 0123456789 !" # $ % &'( ) *+, -. /:;<= >? @ _^ |
Titulando MDs
Using the unit with optional accessories
- Read the operating instructions of the items to be used.
- Use the recommended accessories to ensure correct operation.
Connection to a stereo system A
You can listen to or record the sound from this unit on other audio equipment.
Disconnect the earphones from the remote control and connect the stereo equipment with one of the following line cords.
If the amp's connection is;
a line connection:
Use the included line cord.
a mini-phone jack:
Obtain the optional line cord
(a) Headphone jack
(b) Line cord
Amplifier
(d) (white)
(e (red)
- Turn off the power to all units before making connections.
- Either turn the remote control's operation tone off or perform the operations on the main unit.
Some useful information about MDs
Types of MDs A
(a) Prerecorded MDs
These discs are for playback only.
Recording MDs
Apart from the time limitations, it is possible to record up to 254 tracks on an MD.
Care and storage B
Label MDs only as recommended. Extra labels and exposed adhesive can cause malfunctions.
Do not open the shutter. Close it immediately if it accidentally opens. Never touch the disc inside the MD cartridge.
Shutter
Protecting your recordings
Move the switch to open the write protect hole. Close the hole when you want to record or edit the MD again.
Record protected
Record enabled
Some useful information about MDs
Recording MDs
MDs are different to tapes
MDs give you control over how tracks are recorded and editing functions allow you to change the contents of an MD after recording. Unlike cassettes, it is not necessary to find an empty portion to record onto. All recordings start from the first available space. The MD fills up and when the disc is full, either because the time limit has been reached or 254 tracks have been recorded, recording is no longer possible. You can use the editing functions to erase and move your recordings around within the MD.
Limitations on digital recording
The serial copy management system (SCMS) prevents unlimited recording of digital material.
Digital recordings are of high quality, but to protect the rights of the producer of the original material, it is only possible to make one digital recording of a digital recording. This also applies if you record analogue material digitally. That digital recording can be recorded digitally once more, but is blocked after that.
Analogue recordings are otherwise unaffected.
Glossary of terms
TOC
Table of contents. Information stored on the MD about the tracks and times.
UTOC
User table of contents. This is information the user can edit, such as text and track positions.
The message "UTOC Writing" appears on the display after recording and editing.
Los MDs son differs a lasCNTAs
Before requesting service for this unit, check the chart below for a possible cause of the problem you are experiencing. Some simple checks or a minor adjustment on your part may eliminate the problem and restore proper operation.
If you are in doubt about some of the check points, or if the remedies indicated in the chart do not solve the problem, refer to the directory of Authorized Service Centers (enclosed with this unit) to locate a convenient service center, or consult your dealer for instructions.
Reference pages are shown as black circled numbers 12.
| Problems | Check this |
| Player does not operate at all. | ●Is the hold function on? 12 ●Is a disc loaded? 13 14 ●Is the unit completely connected to the AC power source? 3 ●Have the batteries run down? 10 ●Is there a problem with the disc? |
| Cannot start play. | Have you inserted a blank disc? |
| The player does not play in order from the first track. | ●Has the play mode been switched to “RANDOM” (“RND”)? 10 ●Did you stop the disc part way through the last time you listened to it? |
| Cannot start recording or enter text. | ●Have you inserted a playback disc? ●Is the disc write protected? 10 ●Is the unit correctly connected to the other equipment? 13 ●Is the digital optical signal being correctly output from the other equipment? |
| Noise | Are you using the player near a strong magnet, such as may be found in a television? |
| No sound from the earphones. No response from the remote control. | ●Has the volume been turned down too far? 14 ●Have the plugs on the earphone and remote control been inserted correctly? (Try plugging it in again.) ●Are the plugs dirty? (Wipe away dirt on plug.) |
| Disc and track titles are incorrectly displayed or not displayed at all. | Have you entered more text than the MD can hold? (1792 characters can be entered.) |
| The unit cannot be opened. | Have the batteries run down, or is the unit incompletely connected to the AC power source? |
Displays
| BLANK DISC [BLANK] | A blank disc has been inserted. |
| Can't EDIT [ERROR] | The reason is shown on the lower line of the display. |
| Can't COMBINE | The limitations of the system sometimes mean tracks cannot be combined. |
| Can't DIVIDE | The limitations of the system sometimes mean tracks cannot be divided. |
| Can't REC | The reason is shown on the lower line of the display. |
| DIGITAL IN, UNLOCK | Check the digital optical fiber cable connections and try again. |
| DISC ERROR | There is a problem with the disc and it needs to be replaced. |
| DISC FULL [FULL] | The maximum time or number of tracks has been reached. Either erase some tracks or record with another disc. |
| DISC PROTECT | The write protect hole is open. Close it to enable recording and editing. |
| EMERGENCY, STOP | A problem occurred during recording. Eject the MD, reinsert it and start recording from the beginning again. |
| F17 | There is a problem with the magnetic head. |
| HOLD | The hold function is on. |
| LOW BATTERY, U01 | The batteries have run down. |
| NO DISC [NoDISC] | A disc has not been inserted. |
| Playback DISC | The disc can only be used for playback. It cannot be recorded on or edited in any way. |
| Can't COPY, SCMS | You are trying to make a second copy of a digital recording. |
| SYSTEM ERROR | The self diagnosis function has found an error. |
| TOC Reading [T-READ] | Reading TOC information. |
| TRACK NUMBER, NOT EQUAL | The number of titles doesn't equal the number of titles on the target disc. Make the number equal. |
| TITLE FULL [FULL] | You are trying to enter the text beyond 100 characters. |
| UTOC FULL [FULL] | The display appears for one of the following reasons: • The maximum number of tracks (254) has been reached; erase unneeded titles to make room. • Due to limitations of the recording system, UTOC may become full before the maximum number of tracks or time capacity is reached. Replace the MD. • The section reserved for text information is full; erase unneeded titles to make room. |
| UTOC Writing [WRITE] | UTOC is recorded. |
Remote control displays indicated inside [ ].
Cautions
The main unit
Avoid the following as they may damage the unit.
- Dropping and other strong impacts
- Rain
High humidity areas such as bathrooms - Dusty areas such as warehouses
- High temperatures such as near heating appliances
- This unit is resistant to the effects of vibration but sound may skip if the vibration is constant.
The earphones
Leave a reasonable amount of slack in the cord if you wind it around the main unit.
The rechargeable battery
- Do not peel off the plastic covering on the rechargeable battery.
- The battery may not last as long as usual after recharging if it has not been used for a long period. After a number of uses it will return to normal.
- The battery may heat up while charging but this is normal.
- Do not attempt to recharge the battery for over twelve hours. Overcharging reduces the life of the battery.
Dry cell batteries/rechargeable batteries
- Insert the batteries in the correct polarities to avoid leakage and damage to this unit.
- Remove all the batteries if the set will not be used for a long period of time.
Precautions for Listening with the Headphones or Earphones
- Do not play your headphones or earphones at a high volume. Hearing experts advise against continuous extended play.
If you experience a ringing in your ears, reduce volume or discontinue use. - Do not use while operating a motorized vehicle. It may create a traffic hazard and is illegal in many areas.
- You should use extreme caution or temporarily discontinue use in potentially hazardous situations.
Even if your headphones or earphones is an open-air type designed to let you hear outside sounds, don't turn up the volume so high that you can't hear what's around you.
US and foreign patents licenced from Dolby Laboratories Licensing Corporation.
Maintenance
If the surfaces are dirty
To clean this unit, wipe with a soft, dry cloth.
If the surfaces are extremely dirty, use a soft cloth dipped in a soap-and-water solution or a weak detergent solution.
- Never use alcohol, paint thinner or benzine to clean this unit.
- Before using chemically impregnated cloth, read the instructions that came with the cloth carefully.
Specifications
AUDIO
System: MiniDisc digital audio system
Recording system: Magnetic field modulation direct overwrite
Laser: Semiconductor laser ( = 780nm)
Sampling frequency: 44.1 kHz
Sampling rate converter: 32 kHz/44.1 kHz/ 48 kHz
Coding: Adaptive Transform Acoustic Coding (ATRAC)
No. of channels: 2 (left and right, stereo) 1 (monaural)
Frequency response: 20 Hz-20,000 Hz (+0 dB, -8dB)
Wow and flutter: Below measurable limit
GENERAL
Input terminal
OPT/LINE IN jack
Impedance: 47 kΩ
Input level: SENS H: 178 mV
SENS L: 500 mV
MIC jack
Impedance: 600Ω
Input level: 0.4 mV
Output terminal
Headphone jack
Impedance: 14Ω
Output level: 5mW + 5mW
Play time
(When used in hold mode, at 25^ , on a flat, stable surface)
| Battery type | Play time | Record time |
| Rechargeable (A) | About 8.5 hours | About 4.5 hours |
| Panasonic alkaline | About 10.5 hours | About 2.0 hours |
| Both together (A) | About 20 hours | About 9.5 hours |
(A) When the rechargeable battery (included) is fully recharged.
Power supply
Rechargeable battery: DC 1.2 V (included rechargeable battery)
Battery: DC 1.5 V (One LR6, AA, UM-3 battery)
AC adaptor: DC 1.8 V (included AC adaptor)
Recharging time:
About 3 hours
161 g (with battery)
136 g (without battery)
Note
The play time may be less depending on the operating conditions.
- Specifications are subject to change without notice.
Weight and dimensions are approximate.
THIS PRODUCT UTILIZES A LASER.
USE OF CONTROLS OR ADJUSTMENTS OR PERFORMANCE OF PROCEDURES OTHER THAN THOSE SPECIFIED HEREIN MAY RESULT IN HAZARDOUS RADIATION EXPOSURE.
DO NOT OPEN COVERS AND DO NOT REPAIR YOURSELF. REFER SERVICING TO QUALIFIED PERSONNEL.
WARNING:
TO REDUCE THE RISK OF FIRE, ELECTRIC SHOCK OR PRODUCT DAMAGE, DO NOT EXPOSE THIS APPLIANCE TO RAIN, SPLASHING, DRIPPING OR MOISTURE.
Marking sign is located on bottom of the unit.
SUOMI
VAROITUS!
LAITTEEN KAYTTÄMINEN MUULLA
KUN TASSA KAYTTÖOHJEESSA
MAINITULLA TAVALLA SAATTAA ALTISTAA KAYTTAJN TURVALLISUUSLUOKAN 1 YLITTÄVÄLLE NAKYMÄTTOMÄLLE LASERSÄTEILYLLE.
VAROITUS:
TULIPALO-, SÄHKÖISKUVAARAN TAI MUUN VAHINGON VÄHENTÄMISEKSI EI LAITETTA SAA ALTISTAA SATEELLE, ROISKEELLE, VESIPISARI- LLE TAI KOSTEULELLE.
NORSK
ADVARSEL!
DETTE PRODUKTET ANVENDER EN LASER.
BETJENING AV KONTROLLER, JUSTERINGER ELLER ANDRE INNGREP ENN DE SOM ER BESKREVENT I DENNE BRUKSANVISNING, KAN FORE TIL FARLIG BESTRALING.
DEKSLER MÄ IKKE ÅPNES, OG FORSOK ALDRI A REPARERE APPARATET PÅ EGENHÄND. ALT SERVICE OG REPARASJONSARBEID MÄ UTFORES AV KVALIFISERT PERSONELL.
ADVARSEL:
FOR A REDUSERE FAREN FOR BRANN, STRÖMSJOKK ELLER SKADER PÅ PRODUKTET, MÄ DETTE APPARATET IKK UTSETTES FOR REGN, VANNSPRUT, VANNDRAPER ELLER FUKTIGHT.
JADVERTENCIA!
ESTE APARATO UTILIZA UN LÁSER.
EL USAR LOS CONTROLES, HACER LOS REGLAJES O LOS PASOS REQUIERIDOS EN FORMA DIVERSA DE LA AQUI EXPUESTA PUEDE REDUNDAR EN EXPOSICION PELIGROS A LA RADIACION.
NO ABRA LAS TAPAS NI HAGA REPARACIONES USTED Mismo. EN CASO DE PRODUCIRSE ANOMALIAS SOLICITE AYUDA DE PERSONAL CUALIFICADO.
AVISO:
PARA REDUCIR EL RIESGO DE INCENDIOS, SACUDIDAS ELECTRICAS O DANOS EN EL APARATO, NO LO EXPONGA A LA LLUVIA, SALPICADURAS, GOTEO O HUMEDAD.