SC320D - Solar panel Projecta - Free user manual and instructions
Find the device manual for free SC320D Projecta in PDF.

| Product Type | Portable Solar Panel |
| Model | SC320D |
| Brand | Projecta |
| Rated Power (Max) | 320W |
| Solar Cell Type | Monocrystalline Silicon |
| Efficiency | ~22% |
| Open Circuit Voltage (Voc) | ~24V |
| Short Circuit Current (Isc) | ~13.3A |
| Operating Voltage (Vmp) | ~20V |
| Operating Current (Imp) | ~16A |
| Dimensions (Folded) | 1200 x 500 x 35 mm |
| Dimensions (Unfolded) | 1200 x 1000 x 5 mm |
| Weight | 10 kg |
| Connector Type | MC4 (compatible with standard solar connectors) |
| Kickstand Material | Aluminum alloy |
| Weather Resistance | IP65 rated (weatherproof) |
| Operating Temperature Range | -20°C to 60°C |
| Warranty | 2 years (subject to terms) |
| Maintenance & Cleaning | Clean with soft cloth and mild soap; avoid abrasive materials |
| Safety | Built-in bypass diodes to prevent overheating; reverse current protection |
| Spare Parts & Repairability | MC4 connectors and cables replaceable; contact Projecta support for other parts |
Frequently Asked Questions - SC320D Projecta
User questions about SC320D Projecta
0 question about this device. Answer the ones you know or ask your own.
Ask a new question about this device
Download the instructions for your Solar panel in PDF format for free! Find your manual SC320D - Projecta and take your electronic device back in hand. On this page are published all the documents necessary for the use of your device. SC320D by Projecta.
USER MANUAL SC320D Projecta
- Please read these instructions completely prior to installation.
- Lead acid batteries can be dangerous. Ensure no sparks or flames are present when working near batteries. Eye protection should be used. If mounting on a vehicle follow all manufacturers' instructions.
- Given sufficient light solar panels always generate energy even when they are disconnected. Accidental 'shorting' of the terminals or wiring can result in sparks causing personal injury or a fire hazard. It is recommended to cover the front face of the panel(s) with a soft cloth to block incoming light during installation.
- For use with 12V or 24V (nominal) solar panels.
- For indoor, out of weather use only.
- Do not exceed the total limit of the solar controller:
P/No. SC320: 20A
P/No. SC330: 30A
FEATURES
3 STAGE CHARGING
Ideal for deep cycle batteries, SC320 & SC330 deliver 3 stage charging, maximising battery life and performance. The in-built temperature sensor adjusts the output guaranteeing a thorough charge in all conditions.
- Maintains your battery ready for use
- Safe to leave permanently connected
• Prevents solar over-charge/discharge
PROTECTION
Solar Array Short Circuit
If solar array short circuit occurs, clear it to resume normal charge automatically.
Load Overload
If the load current exceeds the rated current of controller ≥ 1.05 times rated discharge current, the controller will disconnect the load. The cause of the overload must be corrected, it can then be cleared by pressing the switch button.
Load Short Circuit
Full protection against load wiring short-circuit ≥ 2 times rated discharge current. After one automatic load reconnect attempt, the fault must be cleared by restarting the controller or pressing the switch button.
Solar Reverse Polarity
Full protection against solar reverse polarity, no damage to the controller will result. Correct the miswire to resume normal operation.
Battery Reverse Polarity
Full protection against battery reverse polarity, no damage to the controller will result. Correct the miswire to resume normal operation.
Battery Working Voltage Error
If battery voltage does not match controller working voltage, controller will stop working. After correcting the voltage, the failure can be eliminated through pushing the load button.
Damaged Temperature Sensor
If the temperature sensor is short-circuited or damaged, the controller will be charging or discharging at the default temperature 25^ C to prevent the battery damaged from overcharging or over discharge.
Overheating Protection
If the temperature of the controller heat sink exceeds 85^ C, the controller will automatically start the overheating protection and stop the charging and discharging. When the temperature is below 75^ C, the controller will resume to work.
High Voltage Transients
Solar is protected against smaller high voltage surge. In lightning prone areas, additional external suppression is recommended.
Note: The controller has daily automatic fault recovery function which will reduce the manual operation and can intelligently eliminate the fault caused by non-actual hardware failure.
LOW VOLTAGE DISCONNECT (LVD)
LVD will disconnect the DC load before the battery voltage falls too low, preventing damage due to over-discharge. Once the battery is recharged, the DC load will be automatically reconnected.
LOAD CONTROL
The SC320 & SC330 allow you to switch the DC load on/off from the controller without having to physically disconnect the load or appliance. When switched to 'off', the DC load is isolated from the battery ensuring maximum power conservation.
ELECTRICAL PROTECTION
- Short circuit & over current protection
- Reverse polarity protection
- Conformal coated for protection against dust and moisture
INSTALLATION
General Installation Notes
- Be very careful when working with batteries. Wear eye protection. Have fresh water available to wash and clean any contact with battery acid.
- Never short circuit the battery positive and negative terminals, and wires which may cause explosion or fire.
• Install external fuses/breakers as required. -
Disconnect the solar module and fuse/breakers near the battery before installing or adjusting the controller.
-
Confirm that power connections are tightened to avoid excessive heat caused from loose connection.
- Use insulated tools and avoid placing metal objects near the batteries.
- Explosive gases may be present during charging. Be certain there is sufficient ventilation to release the gases.
- Avoid direct sunlight and do not install in locations where water can enter the controller.
- Loose power connections and/or corroded wires may result in resistive connections that melt wire insulation, burn surrounding materials, or even cause fire. Ensure tight connections and use cable clamps to secure cables and prevent them from swaying in mobile applications.
- Only charge the batteries that comply with the parameters of controller.
- Battery connection may be wired to one battery or a bank of batteries. The following instructions refer to a singular battery, but it is implied that the battery connection can be made to either one battery or a group of batteries in a battery bank.
• Use the following cable & fuses for installation:
SC320: 4.5mm^2 cable. 30A Fuse
SC330: 4.5 ~mm^2 cable, 50A Fuse
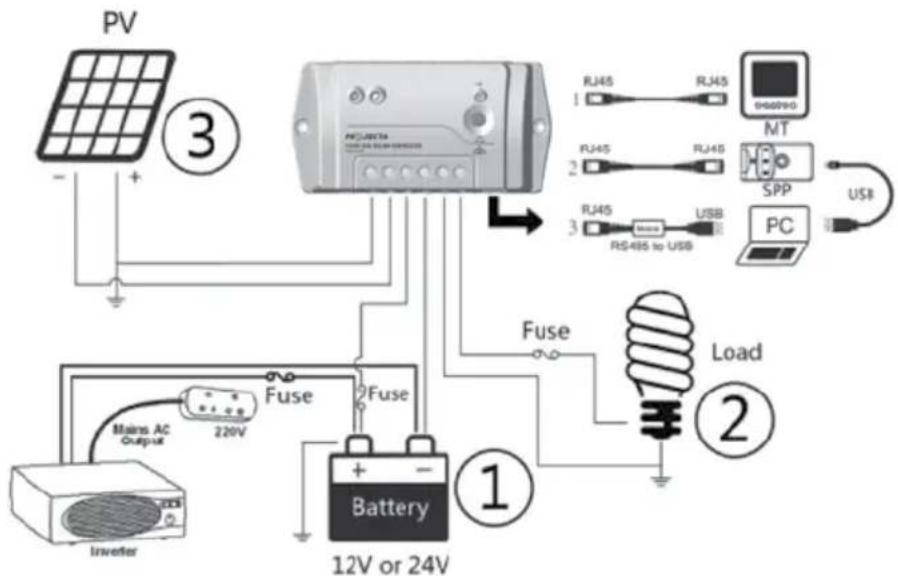
WIRING DIAGRAM
- Connect components to the charge controller in the sequence as shown in the picture below "+"Red and "-"Black. Always power the battery first.
- After power from the battery, check the battery indicator on the controller, it will be green. If it's not green, please refer to the 'Protection' section of the manual.
- The battery fuse should be installed as close to battery as possible. The suggested distance is within 150mm.
OPERATION
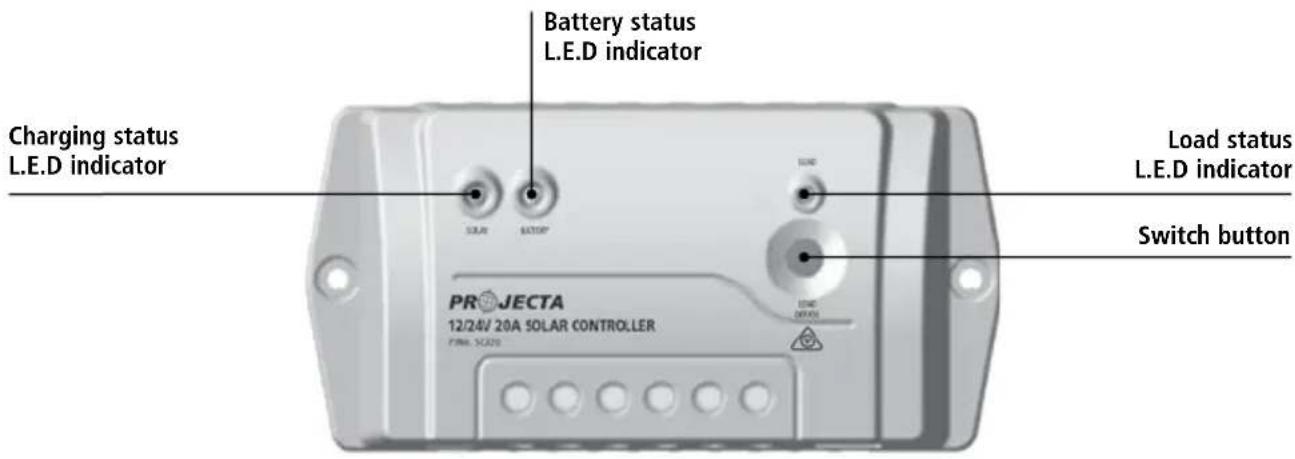
LED Indicators
Indicator Status Description
| Green On Solid Normal | Normal | ||
| Green Slowly Flashing In charging | In charging | ||
| Green OFF No charge | Charge | ||
| Green On Solid Normal | Normal | ||
| Green Slowly Flashing Full | Full | ||
| Green Fast Flashing Over voltage | Over voltage | ||
| Orange On Solid Under voltage | Under voltage | ||
| Red On Solid | Over discharged | ||
| Red | Flashing Battery over temperature | ||
| Red On Solid Normal | Normal | ||
| Red Slowly Flashing | Overload | ||
| Red Fast Flashing | Short circuit | ||
| Charging, load and battery indicator(red) flashing simultaneously | System voltage error | ||
| Charging, load and battery indicator(orange) flashing simultaneously | Controller overheating | ||
Switch Button Function
- Manual Control ON/OFF of the load.
- Resume to normal work after the fault is cleared up.
FAULT CODES
| Faults Possible reasons Troubleshooting | ||
| Charging LED Solar array indicator off during daytime when sunshine falls on solar modules | Check that solar and disconnection correct and | battery wire connections are tight. |
| Green Battery LED indicator fast than over voltage disconnect the flashing disconnect voltage change to a new controller.(OVD) | Battery voltage higher voltage disconnect the voltage change to a new controller. | Check the battery voltage. If voltage levels are high, solar module immediately and controller. |
| Battery LED indicators orange | Battery under voltage | Load output is normal. Charging LED indicator will return to green automatically when fully charged. |
| Battery LED indicators RED color and loads not working | Battery over discharged | The controller cut off the output automatically. LED indicator will return to green automatically when not working. |
| Load status indicator red and slow flashing | Over load | Remove or cut out the additional load and press the button, the controller will resume after 3 seconds. |
| Load status indicator red and fast flashing | Short circuit | Clear short circuit and press the button, the controller will resume to work after 3 seconds. |
| All LED indicators flashing (battery orange indicator flashing) | Temperature of controller too high | When heat sink of the controller exceeds 85°C, the controller will automatically cut input and output circuit. When the temperature reaches below 75°C, the controller will resume operation. Reduce the environment temperature, the power of solar module or the power of the load. |
| All LED indicators flashing (battery red indicator flashing) | System voltage error | Check whether the battery voltage matches the controller working voltage. Please change to a suitable battery or reset the working voltage. If there is nothing abnormal, please press load button to clear the malfunction. |
| SOC value incorrect | Wrong battery type selected using the reconfigured profile of the user defined battery type. | Correct the right battery type; Using the configuration of the charging voltage compensation if choosing the user defined battery type and ignore the SOC. |
SPECIFICATIONS
Electrical Parameters
| Nominal System Voltage | 12/24VDC |
| Max. PV input voltage | 50V |
| Max. Battery Terminal Voltage | 34V |
| Rated Battery Current | SC320: 20A, SC330: 30A |
| Charge Circuit Voltage Drop | ≤0.28V |
| Discharge Circuit Voltage Drop | ≤0.20V |
| Self-consumption | ≤8.4mA/12V; ≤7. 8mA/24V |
| Temperature compensation coefficient | -3mV/°C /2V (Default) |
| Grounding | Positive grounding |
Battery Voltage Parameters (parameters is in 12V system at 25°C, please use X 2 in 24V system
Control Parameters
| Battery charging setting Gel Sealed Flooded User | |||
| Over Voltage Disconnect Voltage 16.0V 16.0V 16.0V 9–17V | |||
| Charging Limit Voltage 15.0V 15.0V 15.0V 9–17V | |||
| Over Voltage Reconnect Voltage 15.0V 15.0V 15.0V 9–17V | |||
| Equalize Charging Voltage – 14.6V 14.8V 9–17V | |||
| Boost Charging Voltage | 14.2V 14.4V 14.6V 9–17V | ||
| Float Charging Voltage 13.8V 13.8V 13.8V 9–17V | |||
| Boost Reconnect Charging Voltage | 13.2V | 13.2V | 13.2V |
| Low Voltage Reconnect Voltage | 12.6V 12.6V 12.6V 9–17V | ||
| Under Voltage Warning Reconnect Voltage | 12.2V | 12.2V | 12.2V |
| Under Voltage Warning Voltage | 12.0V 12.0V 12.0V 9–17V | ||
| Low Voltage Disconnect Voltage 11.1V 11.1V 11.1V 9–17V | |||
| Discharging Limit Voltage | 10.6V 10.6V 10.6V 9–17V | ||
| Equalize Duration | – 2 hrs. | 2 hrs. | 0–3 hrs. |
| Boost Duration | 2 hrs. | 2 hrs. | 0–3 hrs. |
Note:
- The default battery type is Sealed (AGM). For Gel, Sealed, Flooded battery type, the voltage point is fixed, & can only be modified via the remote control SC300D if purchased separately.
- User type is the user defined battery type. The default value is the same as sealed type. When modifying it, please follow the below logistic relation:
a) Over Voltage Disconnect Voltage Charging Limit Voltage≥ Equalize Charging Voltage ≥Boost Charging Voltage≥ Float Charging Voltage Boost Reconnect Charging Voltage;
b) Over Voltage Disconnect Voltage Over Voltage Reconnect Voltage ;
c) Low Voltage Reconnect Voltage Low Voltage Disconnect Voltage≥Discharging Limit Voltage;
d) Under Voltage Warning Reconnect Voltage Under Voltage Warning Voltage≥Discharging Limit Voltage;
e) Boost Reconnect Charging voltage Low Voltage Disconnect Voltage.
*Please carefully to select battery type. It will damage battery if the setting is incorrect.
Environmental Specifications
| Working temperature | -35°C to +50°C |
| Storage temperature | -35°C to +80°C |
| Humidity | ≤95% NC |
| Enclosure | IP30 |
SC320 Mechanical Specifications
| Overall dimension | 159.6 (6.28) x 81.4 (3.2) x 47.8 (1.88) mm/inches |
| Mounting dimension | 147 (5.79) x 50 (1.97) mm/inches |
| Mounting hole size | 4.3 |
| Terminal | 10mm ^2 |
| Net weight | 0.3kg |
SC330 Mechanical Specifications
| Overall dimension | 200.6 (7.9) x 101.3 (3.99) x 57 (2.24) mm/inches |
| Mounting dimension | 190 (7.48) x 70 (2.76) mm/inches |
| Mounting hole size | 4.5 |
| Terminal | 10mm ^2 |
| Net weight | 0.5kg |
WARRANTY STATEMENT
Applicable only to product sold in Australia
Brown & Watson International Pty Ltd of 1500 Ferntree Gully Road, Knoxfield, Vic., telephone (03) 9730 6000, fax (03) 9730 6050, warrants that all products described in its current catalogue (save and except for all bulbs and lenses whether made of glass or some other substance) will under normal use and service be free of failures in material and workmanship for a period of one (1) year (unless this period has been extended as indicated elsewhere) from the date of the original purchase by the consumer as marked on the invoice. This warranty does not cover ordinary wear and tear, abuse, alteration of products or damage caused by the consumer.
To make a warranty claim the consumer must deliver the product at their cost to the original place of purchase or to any other place which may be nominated by either BWI or the retailer from where the product was bought in order that a warranty assessment may be performed. The consumer must also deliver the original invoice evidencing the date and place of purchase together with an explanation in writing as to the nature of the claim.
In the event that the claim is determined to be for a minor failure of the product then BWI reserves the right to repair or replace it at its discretion. In the event that a major failure is determined the consumer will be entitled to a replacement or a refund as well as compensation for any other reasonably foreseeable loss or damage.
This warranty is in addition to any other rights or remedies that the consumer may have under State or Federal legislation.
IMPORTANT NOTE
Our goods come with guarantees that cannot be excluded under the Australian Consumer Law. You are entitled to a replacement or refund for a major failure and compensation for any other reasonably foreseeable loss or damage. You are also entitled to have the goods repaired or replaced if the goods fail to be of acceptable quality and the failure does not amount to a major failure.
Distributed by
AUSTRALIA
Brown & Watson International Pty Ltd
Knoxfield, Victoria 3180
Telephone (03) 9730 6000
Facsimile (03) 9730 6050
National Toll Free 1800 113 443
NEW ZEALAND
Narva New Zealand Ltd
22–24 Olive Road
PO Box 12556 Penrose
Auckland, New Zealand
Telephone (09) 525 4575
Facsimile (09) 579 1192