SPA400 - Solar panel Projecta - Free user manual and instructions
Find the device manual for free SPA400 Projecta in PDF.

| Product Type | Solar Panel |
| Brand | Projecta |
| Model | SPA400 |
| Rated Power | 400W |
| Rated Voltage | 12V / 24V |
| Cell Type | Monocrystalline Silicon |
| Dimensions (L x W x H) | 1722 x 1134 x 35 mm |
| Weight | 22.5 kg |
| Frame Material | Anodized Aluminum |
| Glass Thickness | 3.2 mm |
| Junction Box | IP68 Rated |
| Cable Length | 1.2 m with MC4 Connectors |
| Efficiency | Up to 21% |
| Operating Temperature | -40°C to +85°C |
| Certifications | IEC 61215, IEC 61730 |
| Warranty | 25 Years Performance, 10 Years Product |
| Maintenance | Clean with water, avoid abrasive materials |
| Safety | Reverse current protection, bypass diodes |
| Spare Parts | MC4 connectors, diodes (replaceable) |
| Repairability | Professional repair only, junction box accessible |
Frequently Asked Questions - SPA400 Projecta
User questions about SPA400 Projecta
0 question about this device. Answer the ones you know or ask your own.
Ask a new question about this device
Download the instructions for your Solar panel in PDF format for free! Find your manual SPA400 - Projecta and take your electronic device back in hand. On this page are published all the documents necessary for the use of your device. SPA400 by Projecta.
USER MANUAL SPA400 Projecta
natural_image
Two black rectangular electronic devices with cables and connectors, placed on a geometric metallic frame (no text or symbols visible)WARNING
- Read the operating instructions before use.
- Lead Acid Batteries can be dangerous. Ensure no sparks or flames are present when working near batteries. Eye protection should be used.
- Make sure the solar panel is mounted securely or stowed while driving.
- For use with 12V lead acid batteries or 24V systems (two panels required).
- Follow all vehicle manufacturer's instructions.
FEATURES
- Ideal for maintaining batteries in Caravans, Motorhomes, 4WD's & Boats.
- Prevents power drain caused by radio memories, clocks, alarms, on-board computers & battery self discharge. No more flat batteries!
- Extends your battery's run time while in use.
- Amorphous solar cell technology, maintains the battery in peak condition, even in low light (cloudy) conditions.
- Smart control unit prevents solar discharge at night.
- Tough construction enabling the panel to withstand hailstones.
- Easy to use battery clips for direct battery connection (SPA400).
- Three convenient connection options (SPA900 only). Battery clips for direct battery connection, cigarette plug for vehicle connection and stripped leads for easy connection to terminal blocks such as solar controllers.
- Flashing 'Blue' LED shows when the solar panel is producing power (SPA900 only).
SPECIFICATIONS
| Part Number: SPA400 SPA900 | ||
| Type: Amorphous Amorphous | ||
| Rated Power: 5 Watt 12 Watt | ||
| Test Condition: 1000W/m2 @ 25°C 1000W/m2 @ 25°C | ||
| Open Circuit Voltage: 21-22V 21-22V | ||
| Peak Power Voltage: 13-16.5VDC 13-16.5VDC | ||
| Peak Power Current: | 340-400mA | 750-900mA |
| Short Circuit Current: | 500mA | 1050mA |
| DC lead: | 2m | 3.6m |
| Size: | 500mm x 345mm | 975mm x 340mm |
Recommended Battery sizes (Maintenance)
| SPA400 SPA900 | ||
| AUTOMOTIVE | 150–650CCA | 150–750CCA |
| MARINE | 200–700MCA | 200–850MCA |
| DEEP CYCLE | 17–55Ah | 17–80Ah |
OPERATING INSTRUCTIONS
Placement
Locate the panel in a position where it is exposed to the sun for the majority of the day. For the best results use a northern orientation. Face the front side (Dark Side) of the solar panel to the sun.
Although the panel will function in the horizontal position, for best performance tilt the panel towards the sun especially during the winter months in the southern states, the angle of the tilt should be similar to the angle of the sun. Recommended angles for various Australian latitudes are shown below.

Suggested solar panel angles for different regions of Australia

MOUNTING
The panel is supplied with four mounting holes. Use suitable fasteners and mount the panel to a flat surface or mounting frame. Since the frame is plastic be careful not to over-tighten any fasteners.
If the panel is not mounted, always ensure the panel is securely stowed before driving or moving the vehicle.
CONNECTIONS (SPA400 Only)
Note: Do not allow the output of the solar panel to be shorted and always check the polarity is correct before making any connections. The black clip indicates Negative (−), the red clip indicates Positive (+).
The panel is fitted with a 2 metre DC lead and battery clips for direct connection to a battery.
- Connect the red battery clip to the Positive (+) battery terminal or post.
- Connect the black battery clip to the Negative (-) battery terminal or post.
If connecting to a battery mounted in a vehicle there is no need to remove the battery cables or the vent caps.

natural_image
Simple electrical circuit diagram showing a conductor rod connected to a battery with two clamp probes (no text or symbols)CONNECTIONS (SPA900 Only)
Note: Do not allow the output of the solar panel to be shorted and always check the polarity is correct before making any connections. The black lead or clip indicates Negative (−), the red lead or clip indicates Positive (+).
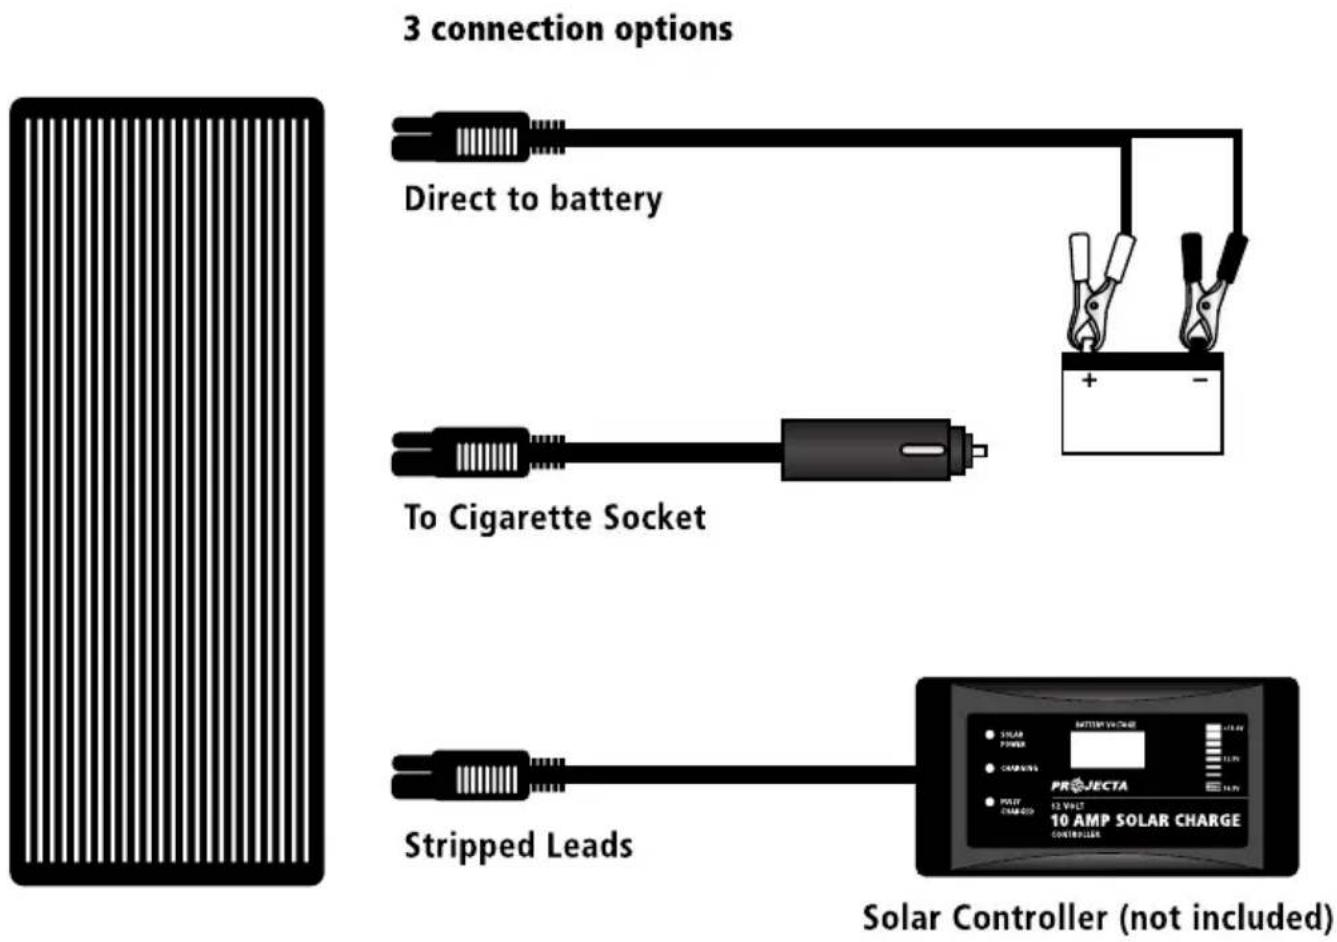
The panel is supplied with a choice of 3 connection adaptor leads:
- Direct to your battery using the battery clips lead.
- To your vehicle's cigarette socket using the cigarette plug lead.
- A solar regulator using the stripped leads.
Select the appropriate adaptor lead for your application and connect as follows:
Direct to battery:
- Connect the red battery clip to the Positive (+) battery terminal or post.
- Connect the black battery clip to the Negative (-) battery terminal or post.
- Then connect the other end of the lead to the solar panel.
If connecting to a battery mounted in a vehicle there is no need to remove the battery cables or the vent caps.
To cigarette socket:
- Insert the cigarette plug into the vehicle's cigarette socket.
- Then connect the other end of the lead to the solar panel.
The vehicle's socket needs to have a permanent electrical connection to the vehicle's battery to allow the solar panel to charge the battery even when the ignition is off & the key is removed.
To solar regulator:
- Connect the red wire to the Positive (+) terminal.
- Connect the black wire to the Negative (-) terminal.
- Then connect the other end of the lead to the solar panel.
Blue 'Flashing' LED (SPA900 Only)
When the solar panel is exposed to sufficient sunlight the Blue LED indicator on the top of the panel will flash to indicate that the panel is now producing power.
CHARGE REGULATOR & REVERSE DIODES
The solar panel is fitted with a diode that will prevent the battery from discharging when the panel is not exposed to the sunlight or during the night.
For most applications the solar panel can be connected to a battery without a
'Charge Regulator' also known as a Solar Controller.
If using the 12-Watt solar panel (SPA900) on a battery less than 50 Amp hours (200CCA) or for maintaining batteries fully charged for long periods the use of a solar controller is recommended. Use Projecta:
P/No. SC005 - 5AMP 12V Auto solar controller.
P/No. SC010 - 10AMP 12V Auto solar controller with LCD voltage display.
SOLAR PANEL CARE
To ensure maximum output, keep the glass surface clean with a soft damp cloth. The solar panel uses glass substrate, handle and store with care. Avoid contact with acid and alkali.
FREQUENTLY ASKED QUESTIONS
Q. Can the solar panel be mounted on a flat roof or wall?
A. Yes. It is fine to mount the panel on a horizontal surface such as a roof or on a vertical surface like a wall as long as the panel receives full sun for a reasonable period of the day. You will however gain better performance if the panel is tilted toward the sun and faced in a northerly direction, since this enables the maximum amount of solar energy to reach the panel.
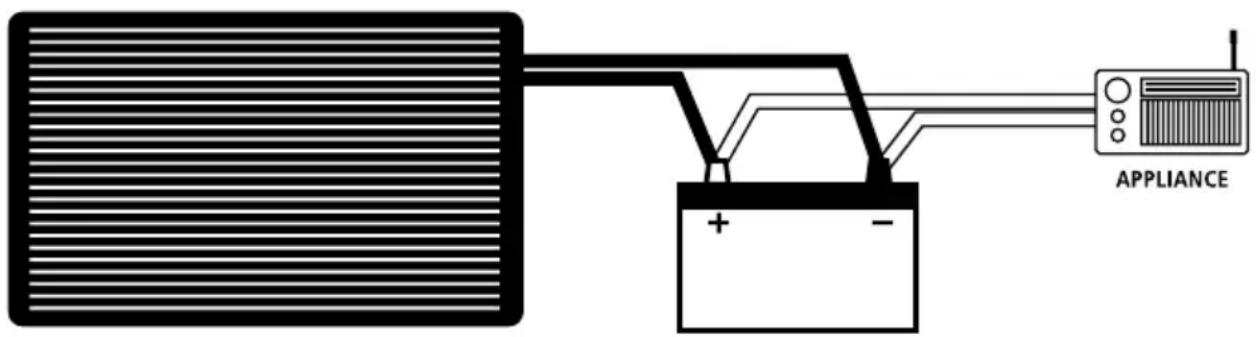
Q. What appliances can I run on the solar panel?
A. Solar panels gain all their energy from the sun and are therefore limited in their ability to operate 12V appliances directly. Although they may run very small appliances it is more common to connect the solar panel and appliance to a battery. This method is much more effective, provides a stable voltage and allows the appliance to continue to operate even if the panel is shaded.
Q. Will the solar panel provide enough power to run my car fridge?
A. Most portable compressor fridges use between 20-72 Amp hours of power per day (24hrs) depending on model and temperature. Since solar panels only produce their peak power for about 8 hours per day you would need approximately a 30 to 110 Watt solar panel to keep up the power being used by the fridge. Although a 5 or 12 Watt solar panel will not keep up with the power being used by the fridge it will help the battery to last longer.
Q. What current output can I expect?
A. The current output (mA) of the solar panel is based mostly on the available solar energy (sun rays). The current ratings (Peak Power) given in the specifications table are based on the 'ideal' sunlight conditions. In reality this may be achieved only on a very bright sunny day. The normal current output will therefore be a little lower. If the panel is shaded or if it is a very hot day the output will decrease further.
Q. Will it charge my flat battery & how long will it take?
A. The SPA400 & SPA900 are designed for 'topping up' and maintaining batteries only. If placed on a flattened battery it is unlikely to fully recharge the battery (except small batteries) however, it may put some charge into the battery if given sufficient time.
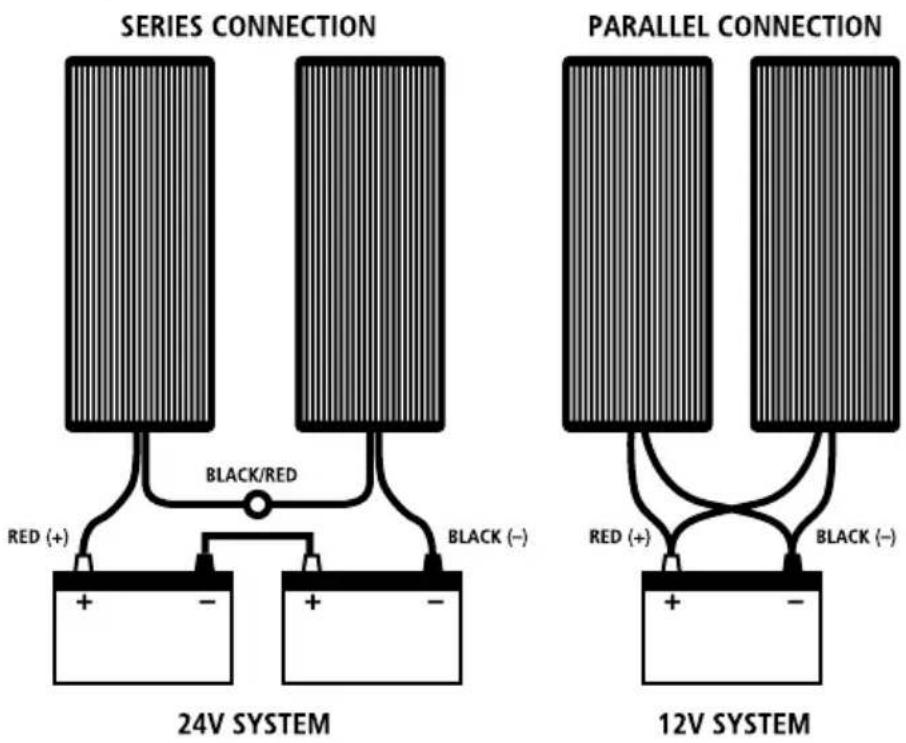
Q. Can I run more than one solar panel?
A. It is possible to run multiple solar panels for higher voltage applications or for more power:
-
Placing 2 solar panels in 'Series' will make them suitable for use on 24V battery systems or vehicles.
-
Placing 2 or more panels in 'Parallel' will still make them suitable for 12V use but will provide twice as much power (current).
If you wish to use multiple panels, you will need to make the electrical connections as per the following diagrams:
Q. How many panels will I need?
A. If connecting panels in series you simply add the voltages: (Do not exceed 48V)
- One panel 12V
- Two panels 24V
- Four panels 48V
If connecting panels in parallel you simply add the current or watts:
- One SPA900 panel 12W (750-900mA)
- Two SPA900 panels 24W (1500-1800mA)
- Four SPA900 panels 48W (3000mA- 3600mA)
VICTORIA (HEAD OFFICE)
Brown & Watson International Pty Ltd
3 Millennium Court, Knoxfield
Victoria 3180.
Telephone (03) 9730 6000
Facsimile (03) 9730 6050
National Toll Free 1800 113 443
NEW SOUTH WALES
Brown & Watson International Pty Ltd
PO Box 995
Campbelltown, NSW 2560
Facsimile (02) 4628 3403
National Toll Free 1800 113 443
SOUTH AUSTRALIA
Brown & Watson International Pty Ltd
5 Phillips Street, Thebarton
South Australia 5031
Telephone (08) 8443 3018
Facsimile (08) 8443 3008
WESTERN AUSTRALIA
Brown & Watson International Pty Ltd
85 Sheffield Road, Welshpool
Western Australia 6106
Telephone (08) 9451 4526
Facsimile (08) 9358 1445
QUEENSLAND
Brown & Watson International Pty Ltd
2A/3375 Pacific Highway, Underwood
Queensland 4119
Telephone (07) 3808 2482
Facsimile (07) 3208 3137
NEW ZEALAND
Narva New Zealand Ltd
22-24 Olive Road
PO Box 12556 Penrose
Auckland, New Zealand
Telephone (09) 525 4575
Facsimile (09) 579 1192