JM400 - Blender JUICEMAN - Free user manual and instructions
Find the device manual for free JM400 JUICEMAN in PDF.


| Product Type | Automatic Juice Extractor |
| Brand | Juiceman |
| Model | JM400 |
| Material | Stainless steel micro-mesh filter, BPA-free plastic parts |
| Speed Settings | 2 speeds: Low (1) for soft fruits, High (2) for hard vegetables |
| Motor | Powerful motor with PTC overheat protection |
| Safety Features | Safety locking lever, auto shut-off when pulp container or lid not properly placed |
| Feed Chute | Large enough for whole fruits and vegetables |
| Juice Pitcher Capacity | Approximately 1 liter (with froth separator) |
| Pulp Container Capacity | Approximately 1.5 liters |
| Dishwasher Safe Parts | All removable parts except base (top rack only) |
| Cleaning Brush | Included for filter cleaning |
| Accessories Included | Food pusher, juice pitcher with froth separator, pulp container, cleaning brush |
| Warranty | 2-year limited warranty (USA and Canada) |
| Power Supply | 120V, 60Hz (polarized plug) |
| Usage | Household use only |
Frequently Asked Questions - JM400 JUICEMAN
User questions about JM400 JUICEMAN
0 question about this device. Answer the ones you know or ask your own.
Ask a new question about this device
Download the instructions for your Blender in PDF format for free! Find your manual JM400 - JUICEMAN and take your electronic device back in hand. On this page are published all the documents necessary for the use of your device. JM400 by JUICEMAN.
USER MANUAL JM400 JUICEMAN
Enjoy the Fresh Side of Life™

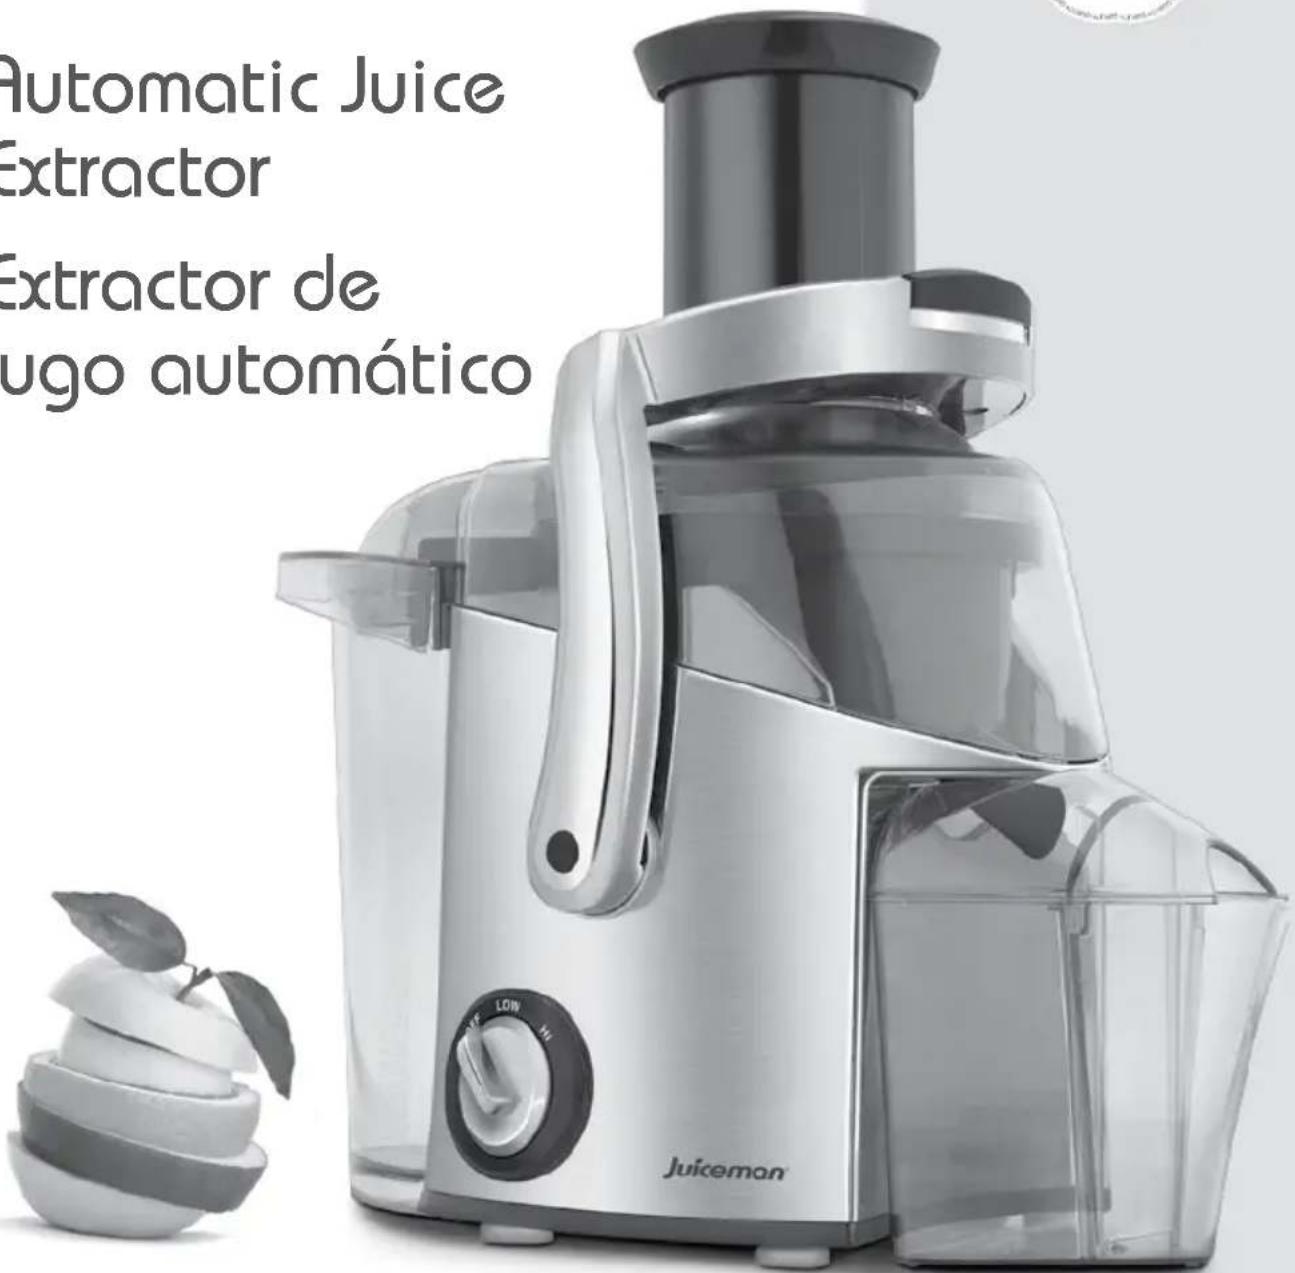
Automatic Juice
Extractor
Extractor de
jugo automático
Customer Care Line:
USA/Canada
1-800-231-9786
Mexico
01-800 714-2503
Accessories/Parts
(USA / Canada)
Accesorios/Partes
(€€.UU / Canadá)
1-800-738-0245
For online customer service
and to register your product, go to
www.prodprotect.com/applica
MODEL/MODELO
O JM400
Please Read and Save this Use and Care Book
IMPORTANT SAFEGUARDS
When using electrical appliances, basic safety precautions should always be followed including the following:
- Read all instructions.
To protect against risk of electrical shock do not put cord, plugs or appliance in water or other liquid.
○ Close supervision is necessary when any appliance is used by or near children.
☐ Unplug from outlet when not in use, before putting on or taking off parts, or before cleaning.
- Avoid contacting moving parts.
Do not operate any appliance with a damaged cord or plug or after the appliance malfunctions, or is dropped or damaged in any manner. Return appliance to the nearest authorized service facility for examination, repair or electrical or mechanical adjustment. Or, call the appropriate toll-free number on the cover of this manual.
The use of attachments not recommended or sold by the manufacturer may cause fire, electric shock or injury.
○ Do not use outdoors.
○ Do not let cord hang over edge of table or counter.
Always make sure juicer cover is clamped securely in place before motor is turned on. Do not unfasten clamps while juicer is in operation.
☐ Be sure to turn switch to OFF position after each use of your juicer. Make sure the motor stops completely before disassembling.
Do not put your fingers or other objects into the juicer opening while it is in operation. If food becomes lodged in opening, use food pusher or another piece of fruit or vegetable to push it down. When this method is not possible, turn the motor off and disassemble juicer to remove remaining food.
○ Do not use the appliance if the rotating sieve is damaged.
○ Do not operate without the pulp container in place.
SAVE THESE INSTRUCTIONS
This product is for household use only.
POLARIZED PLUG (120V Models Only)
This appliance has a polarized plug (one blade is wider than the other). To reduce the risk of electric shock, this plug is intended to fit into a polarized outlet only one way. If the plug does not fit fully into the outlet, reverse the plug. If it still does not fit, contact a qualified electrician. Do not attempt to modify the plug in any way.
TAMPER-RESISTANT SCREW
Warning: This appliance is equipped with a tamper-resistant screw to prevent removal of the outer cover. To reduce the risk of fire or electric shock, do not attempt to remove the outer cover. There are no user-serviceable parts inside. Repair should be done only by authorized service personnel.
ELECTRICAL CORD
a) A short power-supply cord (or detachable power-supply cord) is to be provided to reduce the risk resulting from becoming entangled in or tripping over a longer cord.
b) Longer detachable power-supply cords or extension cords are available and may be used if care is exercised in their use.
c) If a long detachable power-supply cord or extension cord is used,
1) The marked electrical rating of the detachable power-supply cord or extension cord should be at least as great as the electrical rating of the appliance,
2) If the appliance is of the grounded type, the extension cord should be a grounding-type 3-wire cord, and
3) The longer cord should be arranged so that it will not drape over the countertop or tabletop where it can be pulled on by children or tripped over.
Note: If the power supply cord is damaged, it should be replaced by qualified personnel or in Latin America by an authorized service center.
GETTING TO KNOW YOUR JUICE EXTRACTOR
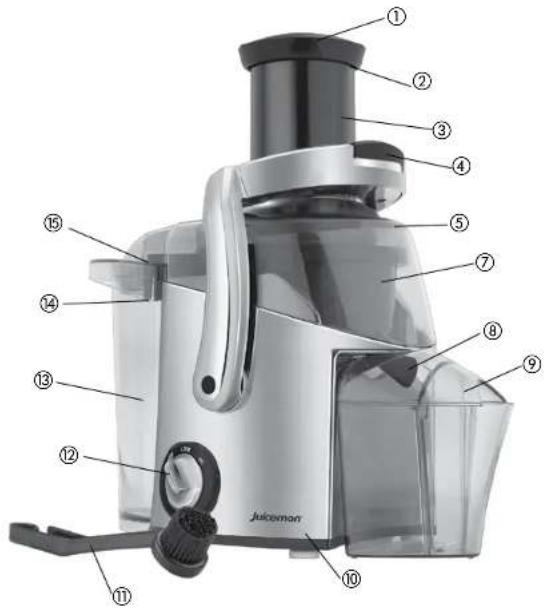
† 1. Food pusher cap (Part # 71291B)
† 2. Food pusher (Part # 71273B)
† 3. Feed chute (Part # 71268FT)
- Safety locking lever
† 5. Lid (Part # 71268LID)
† 6. Stainless steel mesh filter (not shown) (Part # 71269)
† 7. Juice bowl (Part # 71270B)
- Juice spout
† 9. Juice pitcher with froth separator (Part # 71275)
- Base
† 11. Cleaning brush (Part # 71266B)
- Speed control
† 13. Pulp container (Part # 71274)
-
Pulp spout
-
Pulp opening
Note: † indicates consumer replaceable/removable parts
How to Use
This product is for household use only.
GETTING STARTED
- Remove all packing material, and any stickers from the product.
- Remove and save literature.
- Please go to www.prodprotect.com/applica to register your warranty.
- For additional information about your new juice extractor go to www.juiceman.com.
- Your juice extractor is partially assembled in the box.
- Take the appliance apart and wash all removable parts as instructed in CARE AND CLEANING section of this manual. This will remove any traces of dust or residue left from manufacturing and shipping.
- Place on a dry level counter to prepare to assemble.
ASSEMBLING YOUR JUICE EXTRACTOR
Important: Always make sure your juice extractor is unplugged before starting to assemble.
natural_image
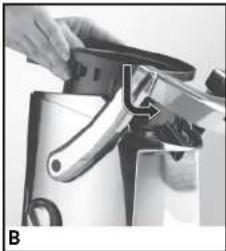
Close-up of hands using a tool to adjust or install a mechanical component (no visible text or symbols)- Place juice bowl over base with juice spout facing toward the safety locking lever. Lower juice bowl onto the base so that spout slides through the oval ring on the base (B).
natural_image
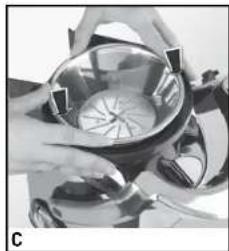
Close-up of hands holding a metallic bowl with a circular object inside, no visible text or symbols- With both hands, hold the filter by the rim and center it over drive shaft inside the juice bowl. Carefully lower filter into the juice bowl, rotating slightly until it drops into place; press down firmly on the rim to secure (C).
Note: When assembled properly, the filter will spin freely in the juice bowl. To check that it is assembled properly, simply try spinning the filter by the rim.
natural_image
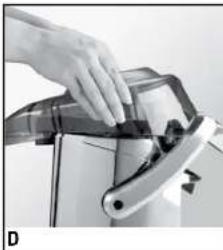
Close-up of a hand pressing down on a mechanical device component (no visible text or symbols)- Place the lid on the juice bowl so that the pulp opening is positioned over the pulp spout. Position the back of the lid over the edges of the pulp spout first; then lower the lid to fit firmly against the base [D].
natural_image
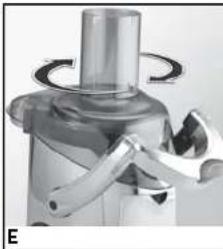
Close-up of a mechanical device with a cylindrical component and a curved arrow indicating rotation (no visible text or symbols)- Center feed chute over lid opening so that the safety lock hook on the feed tube is slightly to the right of the arrow on the lid. Insert three tabs located around bottom of the feed tube into the three slots on the lid. Turn counterclockwise until the safety lock hook on feed chute aligns with the arrow on the lid (E).
natural_image
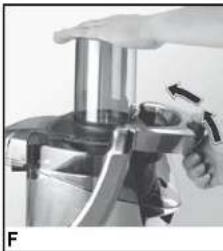
Close-up of a hand operating a stainless steel grater with a tool, no visible text or symbols- Engage the safety locking lever with the safety lock hook on the feed tube (F). You should hear a click as it locks in place.
Important: Your juice extractor will not operate if the safety locking lever is not properly locked.
natural_image
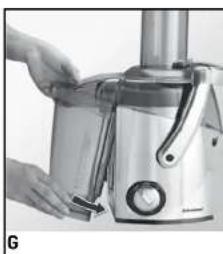
Close-up of a hand using a white juice brush on a stainless steel coffee maker (no visible text or symbols)- Tilt the pulp container slightly and place it directly beneath the pulp opening. Push the bottom of pulp container inward so top edge slides up, behind the pulp spout. Continue to press firmly on the bottom of the pulp container until it fits snugly against the base [G]. When correctly positioned, pulp container will be completely covered by the pulp opening in the lid.
Tip: To make cleaning easier, you may wish to line the pulp container with a small plastic bag to catch the pulp as you juice.
Important: Your juice extractor will not operate unless the pulp container is correctly placed.
natural_image
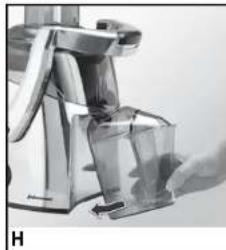
Close-up of a hand using a manual mixer machine (no visible text or symbols)- Place the froth separator into the juice pitcher, then place the lid on top. Position the pitcher beneath the juice spout. Be sure that the juice spout empties into the larger opening in the pitcher lid (H).
natural_image
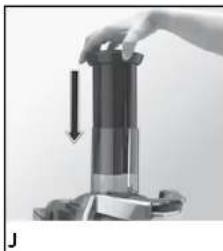
Close-up of a hand pressing down on a cylindrical mechanical component with a downward arrow indicating motion (no text or symbols visible)- Keep the food pusher in the feed chute until you are ready to juice. To insert, rotate the food pusher until the groove on the food pusher is properly aligned with the ridge in the feed chute [J].
Important: Always make sure your juice extractor is unplugged before starting to disassemble.
natural_image
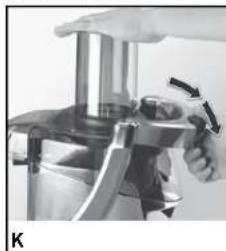
Close-up of hands operating a stainless steel kitchen tool (no visible text or symbols)- Press down on safety lock button, swing safety locking lever away from feed tube. Release safety lock button (K).
natural_image
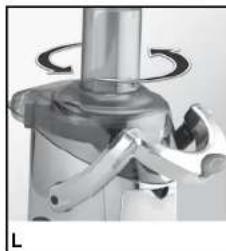
Close-up of a mechanical component with a rotating knob and lever mechanism (no visible text or symbols)- Unlock the feed chute by rotating it clockwise to remove it from the lid (L).
natural_image
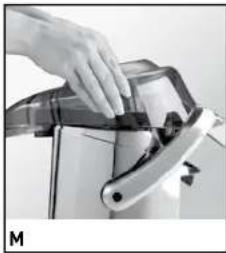
Close-up of a hand operating a kitchen appliance with a tool (no visible text or symbols)- Lift up on the lid to remove from the base. To remove easily, you may need to lift up on the front first, then disengage the back of the lid from the pulp spout on the juice bowl (M).
natural_image
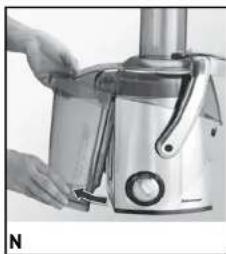
Close-up of a hand using a lever on a stainless steel juice maker (no visible text or symbols)- Grasp bottom of the pulp container and pull it away from the base, titling slightly to release it from behind the pulp spout (N).
natural_image
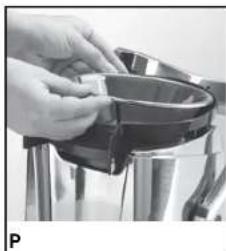
Close-up of a hand holding a metallic bowl with a small object, no visible text or symbols- Lift up on the rim of the filter over the back of the pulp spout. This will disengage the filter from the drive shaft and you can lift it out easily (P).
Important: The cutting blades at the bottom of the filter are extremely sharp! Always hold and carry the filter by the rim.
- Grasp the sides of the juice bowl with both hands and lift off the base.
PREPARATION
How to prepare fruits and vegetables for juicing.
Purchasing and Storing Ingredients:
• Always use fresh fully ripened fruits and vegetables.
- When purchasing consider selecting fruits and vegetables in season for best freshness and flavor.
- Choose fruits that are plump, tender and have bright color. Fruits should be heavy for their size without bruises, cuts or blemishes.
- To ripen fruit, place in a small clean paper bag. Close the bag loosely and let stand at room temperature. (To speed ripening, add a ripe apple or banana to the bag.) Once ripened, store in the refrigerator for a day or 2 until ready to use.
- Store perishable vegetables in the refrigerator until ready to use.
Preparing Fruits and Vegetables:
- Wash fruits and vegetables thoroughly just before using in the juice extractor using a natural bristle brush and a biodegradable cleaner to help remove pesticide residue.
- If desired, remove the skin. The skin may be left on all produce with the exception of:
o All citrus fruits, including
- Oranges
- Grapefruit
- Lemons
• Limes - Tangerines
o Papaya
Note: The oil in the skin of these fruits tastes bitter and is difficult to digest. When removing skin from citrus fruits, remove the white pith, as well, to keep finished juices from tasting bitter.
Hint: Although the skin may be left on melons, you may choose to remove them to maximize the fruit flavor in the finished drink.
- All pits and large seeds should be removed from fruits, including:
o Apricots
o Cherries
o Nectarines
o Mangoes
o Peaches
o Plums
o Melons
o Papaya
- Remove and discard outer leaves of non-organic produce. Peel away any wax coatings.
- Trim any bruised or discolored sections of fruits and vegetables.
- The design of the feed chute accommodates larger produce. It will easily accommodate most whole fruits and vegetables, such as, apples, beets, carrots and celery. If necessary, cut into large pieces before inserting into feed chute.
- Be sure all parts of the juice extractor are clean and dry. See the CARE AND CLEANING instructions on page 11.
- Assemble the fruits and/or vegetables to be used on the counter or in a bowl next to the extractor.
- Place the juice pitcher, a clean measuring cup or a glass under the spout.
- Be sure the pulp container is in place.
Note: When using the appliance, do not allow the pulp container to overfill. This may cause the appliance to stall.
- Plug appliance into standard electrical outlet.
- Turn the power to the low setting (1) and allow it to run 10 seconds.
- Select the low speed (1) for soft-to-medium textured fruits and vegetables; use the high speed (2) for hard foods, such as, carrots, beets and broccoli.
- Insert the fruits and/or vegetables into the feed chute and use the food pusher as a guide to gently direct the produce through the feed chute. To get the most juice from the fruits and vegetables, do not rush the food through the appliance.
Note: Never place fingers or hands into the feed chute.
- The juice extractor will automatically separate the juice and pulp.
Important: Both the juice pitcher and pulp container can be emptied at any time. Always turn the dial to off (0) and allow the motor to come to a complete stop before emptying either. Be sure to replace both containers before resuming extraction.
- When juicing is complete, turn the dial to off (0) and wait for the motor to come to a complete stop. Allow all remaining juice to drip into juice pitcher before removing it.
Tip: You can tip your juice extractor forward to help the remaining juice drain from the juice bowl. Simply unplug, grip the base close firmly with both hands close to the top and tip forward until all juice has drained. - Unplug appliance and follow directions under DISSASEMBLING YOUR JUICE EXTRACTOR.
HINTS AND TIPS
- Do not put food into the extractor before turning the appliance on.
- For best results, refrigerate fruits and vegetables before juicing.
- Let the appliance run for at least 10 seconds before placing any food into the feed chute.
- Do not let the juice pitcher or pulp container overfill while using the machine. Turn the appliance off, wait for the motor to stop running and any juice to stop flowing. Empty the juice pitcher and/or pulp container. Be sure they are properly replaced before resuming operation of the extractor.
- For easy cleanup, place a plastic bag inside the pulp container before using the appliance.
- Do not process bananas, avocados or coconut. They have no juice and will clog the appliance.
- Be sure to remove all pits and large seeds from fruits.
- To make delicious citrus juice, peel the fruit, removing all the white pith. Refrigerate until cold and process the fruit through the extractor for a great drink.
- For maximum nutritional benefits, drink your processed juice right away.
FOR OPTIMUM JUICING
- Avoid excessive build up of pulp on the underside of the cover lid.
- Use the pusher as a guide. Do not use excessive force. Food allowed to flow slowly through the extractor produces more juice.
USES FOR THE PULP
The pulp from the fruits and vegetables is high in nutritional value. Use it to add fiber and flavor to muffins and quick breads. Use it to thicken soups, casseroles and sauces. Use fruit pulp to add nutrition and flavor to desserts, such as, puddings and cakes. Be sure to use it the same day you extract the juice.
Pulp is also food for your garden. You can use it as compost.
Care and Cleaning
This product contains no user serviceable parts. Refer service to qualified service personnel.
Important: Always unplug your juice extractor from the outlet before cleaning. CLEANING
- Disassemble your juice extractor following the instructions in DISSASSEMBLING YOUR JUICE EXTRACTOR.
- Using a sponge or damp cloth, clean the base, rubber feet and underside of the juice extractor. If necessary, you may use a damp toothbrush or cloth to clean juice from the inside the drive shaft (on top of motor base).
Important: Do not immerse the base in water or spray with water. Clean only by wiping with a damp sponge, cloth or paper towel.
- All juicer parts – except the base – are dishwasher-safe (top-rack only) or you may wash in warm, soapy water, using any mild liquid dishwashing detergent. Do not use any products containing ammonia or scouring powders, as these can dull, scratch or mar the surface. Use the cleaning brush provided to remove pulp left on any of the removable parts. Do not use metal brushes or pads.
- To clean the food pusher properly, remove the center cap in the cover of the food pusher. To remove, grasp cap and lift directly out of food pusher, using the notch for leverage. Once parts are dry, replace the cap.
- To clean the filter, use cleaning brush provided to make sure tiny holes in mesh filter are not clogged. This can be accomplished by holding filter basket under a running faucet while brushing the mesh filter screen from both the inside and outside of the filter mesh.
REMOVING TOUGH STAINS
- Due to powerful staining properties of carotenoids found in many vegetables, particularly carrots, we suggest soaking any stained parts overnight in one of the following solutions:
- Biodegradable soap in enough warm water to cover juice extractor parts
- 14 cup bleach added to a sink full of warm water
• 1 part warm water to 1 part cider vinegar - 12 small box of baking soda in enough warm water to cover juicer parts.
Important: Never use ammonia or abrasive cleansers!
- After soaking overnight, lightly scrub with soft bristle brush and liquid detergent.
STORAGE
Store your juice extractor in a clean, dry place. Never wrap cord tightly around the appliance. Do not put any stress on cord where it enters juicer, as this could cause cord to fray and break.
OVERHEAT PROTECTION SYSTEM
Important: This appliance contains a PTC overheat protection system. When the appliance is being operated for too long or with too much load, the PTC protector will shut down the power of the appliance to protect the unit. If the power shuts down, unplug for 15 minutes and plug in for normal operation.
TROUBLESHOOTING
| PROBLEM POSSIBLE CAUSE SOLUTION | ||
| Juice extractor is turned on but will not run. | Safety lock may not be closed securely. | Turn appliance to off (0) and unplug. Check that each part of appliance is attached correctly and all parts are clean and free of food remnants. |
| Appliance makes loud noises and begins to vibrate. | Soft foods may have clogged the filter. | Turn appliance off (0) and unplug. Remove the filter and clean with a brush to remove all food particles. |
| Motor seems to stall. Juicing may be too vigorous and/or pulp has built up under the cover. | Turn appliance off (0) and unplug. Remove the filter and clean with a brush to remove all food particles. Clean lid before replacing and continuing to juice. | |
| Pulp is too wet and not enough juice is being extracted. | May be pushing foods too quickly through the appliance. | Use the pusher as a guide; do not use pressure. Turn appliance off (0) and unplug. Remove the filter basket and clean with a brush to remove all food particles. Soak the filter in a solution of hot water and lemon juice (this will remove excess fiber from the strainer) or wash in the dishwasher on the top rack. |
| Juice leaks between the juice pitcher and the lid of the juice extractor. | Juice pitcher may not be properly placed.Juicing action may be too fast. | Make sure juice pitcher is flush with the appliance.Slow down the juicing action. |
RECIPES
DRINKS
HONEY OF A DRINK
3 cups pineapple
1 pint raspberries
1 nectarine, stone removed
1 orange, peel and white pith removed
1 plum, stone removed
1 tsp. honey
Process fruits through juice extractor. Stir in honey.
Makes about 3 cups.
CARROT ZINGER
3 medium carrots
1 medium apple
¼ inch piece ginger
Process ingredients through juice extractor. Stir to blend flavors.
Makes about 12 ounces (1½ cups).
THE 5 P'S
14 pineapple
1 peach, stone removed
1 pear
1 pluot, stone removed*
1 plum, stone removed
Process ingredients through juice extractor.
Makes about 12 ounces (1½ cups).
*A pluot is a combination of a plum and an apricot. If not available use 1 apricot, stone removed.
BLACKBERRY LEMONADE
4 Granny Smith apples
1 lemon, peel and white pith removed
^3/_4 cup blackberries
Sparkling water
Ice
Process fruits through juice extractor. Stir to blend flavors. Pour into 2 glasses, dividing evenly. Add ice cubes and a splash of sparkling water.
Makes 2 servings.
DRAGONFRUIT CITRUS COOLER
1 dragonfruit
2 oranges, peel and white pith removed
1 grapefruit, peel and white pith removed
Sparkling water
Ice
Process fruits through juice extractor. Stir to blend flavors. Pour into 2 glasses, dividing evenly. Add ice cubes and a splash of sparkling water.
Makes 2 servings.
ENERGY BOOSTER
1 broccoli stem (about 8 ounces)
3 carrots
4 cups loosely packed spinach (about 3 oz.)
1 apple
1 tsp. honey
Process vegetables and fruit through juice extractor. Stir in honey.
Makes about 3½ cups.
FRUIT ESSENTIALS
1 apricot, stone removed
2 kiwis
1 orange, peel and white pith removed
1 peach, stone removed
1 plum, stone removed
1 cup watermelon
Process fruits through juice extractor. Stir to blend flavors.
Makes about 2½ cups.
ISLAND DELIGHT
14 cantaloupe, without seeds (about 8 ounces)
1/3 honeydew, without seeds (about 8 ounces)
3 cups watermelon, rind removed
2 tbsp. coconut milk
Process fruits through juice extractor. Stir in coconut milk.
Makes about 3 cups.
DESSERTS
NECTARINE BREAD PUDDING
2 nectarines
Milk
4 eggs, beaten
12 cup sugar
14 tsp. grated nutmeg
1 tsp. almond extract
4 cups dried cubed egg bread*
^3/_4 cup heavy cream
2 tbsp. sugar
14 tsp. almond extract
Process nectarines through juice extractor following HOW TO USE instructions. Set aside pulp.
Add enough milk to nectarine juice to make 2 ¼ cups. Combine with egg, sugar, nutmeg and 1 tsp. almond extract; whisk to blend. Stir in reserved pulp.
Arrange bread cubes in ungreased 2-quart shallow baking dish. Pour nectarine mixture evenly over bread cubes. Press lightly to moisten bread.
Bake, uncovered at 350^ F for 40 minutes or until pudding is puffed and golden. (A knife inserted into the center of the pudding should come out clean.)
Cool on wire rack for several minutes. Meanwhile, combine heavy cream, sugar and remaining 14 tsp. almond extract. Whip to soft peaks. Serve on top of warm pudding.
Makes 6 to 8 servings.
Note: If desired, substitute peaches for nectarines.
* Toast bread cubes at 350°F for about 10 minutes, until golden, stirring several times. French bread may be substituted for egg bread.
BREADS
VITAMIN RICH CORNBREAD
1 cup loosely packed spinach leaves
3 green onions, trimmed
14 medium red pepper
1 jalapeno, seeded
1¼ cups unsifted all-purpose flour
^3/_4 cup yellow cornmeal
14 cup sugar
2 tsp. baking powder
12 tsp. salt
Skim milk
14 cup vegetable oil
2 egg whites, beaten
Process spinach, green onions, red pepper and jalapeno through juice extractor following manual directions. Set aside juice and pulp.
In large bowl, combine flour, cornmeal, sugar, baking powder and salt. Combine reserved vegetable juice with skim milk to make 1 cup. Add top dry ingredients with oil, egg whites and reserved pulp.
Stir until all dry ingredients are moistened. Spoon into greased 8 or 9-inch square baking pan. Bake at 400^ until lightly browned and toothpick inserted into the center comes out clean.
Serve warm.
Makes about 9 servings.
natural_image
Close-up of hands using a kitchen tool to clean food items (no visible text or symbols)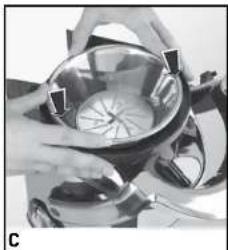
natural_image
Person holding a metal bowl with a fan inside, placed on a stovetop (no visible text or symbols)natural_image
Close-up of a hand pressing down on a mechanical component (no visible text or symbols)natural_image
Close-up of a mechanical device with rotating arms and a cylindrical top (no visible text or symbols)natural_image
Close-up of a hand operating a stainless steel robotic arm (no visible text or symbols)natural_image
Close-up of a hand using a stainless steel-colored food grainer (no visible text or symbols)natural_image
Close-up of a hand operating a manual mixer machine (no visible text or symbols)natural_image
Hand holding a cylindrical object with an arrow indicating downward motion (no text or symbols visible)natural_image
Close-up of hands operating a kitchen presser with a tool (no visible text or symbols)natural_image
Close-up of a kitchen mixer with a rotating handle and cloth (no text or symbols visible)natural_image
Close-up of a hand pressing down on a mechanical device (no visible text or symbols)natural_image
Close-up of a hand using a blender to clean food (no visible text or symbols)natural_image
Close-up of hands cleaning a stainless steel container (no visible text or symbols)For service, repair or any questions regarding your appliance, call the appropriate 800 number on cover of this book. Please DO NOT return the product to the place of purchase. Also, please DO NOT mail product back to manufacturer, nor bring it to a service center. You may also want to consult the website listed on the cover of this manual.
Two-Year Limited Warranty
(Applies only in the United States and Canada)
What does it cover?
- Any defect in material or workmanship provided; however, Applica's liability will not exceed the purchase price of product.
For how long?
- Two years after date of purchase.
What will we do to help you?
- Provide you with a reasonably similar replacement product that is either new or factory refurbished.
How do you get service?
- Save your receipt as proof of date of sale.
- Visit the online service website at www.prodprotect.com/applica, or call toll-free 1-800-231-9786, for general warranty service.
- If you need parts or accessories, please call 1-800-738-0245.
What does your warranty not cover?
• Damage from commercial use
• Damage from misuse, abuse or neglect
- Products that have been modified in any way
- Products used or serviced outside the country of purchase
- Glass parts and other accessory items that are packed with the unit
• Shipping and handling costs associated with the replacement of the unit
- Consequential or incidental damages (Please note, however, that some states do not allow the exclusion or limitation of consequential or incidental damages, so this limitation may not apply to you.)
How does state law relate to this warranty?
- This warranty gives you specific legal rights. You may also have other rights that vary from state to state or province to province.
¿NECESITA AYUDA?
servicente@servicenter.cl
Colombia
PLINARES
Avenida Quito # 88A-09
Bogotá, Colombia
San Jose, Costa Rica
Tel.: (506) 257-5716 / 223-0136
Ecuador
Col. Centro, Cuauhtemoc,
México, D.F.
Tel. 01 800 714 2503
Nicaragua
ServiTotal
City Market Nivel Plaza Local 153
Diagonal Hotel Melia,
Caracas.
Tel. (582) 324-0969
www.applicaservice.com
servicio@applicamail.com
Col. Chapultepec Morales, Mexico D.F
Deleg. Miguel Hidalgo
CP 11570
Copyright © 2009 Applica Consumer Products, Inc.
Made in People's Republic of China
Printed in People's Republic of China
Importado por / Imported by:
APPLICA AMERICAS, INC.
C.U.I.T No. 30-69729892-0
Importado por / Imported by:
APPLICA MANUFACTURING, S. DE R. L. DE C. V.
Presidente Mazarik No111, 1er Piso
Col. Chapultepec Morales, Mexico D.F
Deleg. Miguel Hidalgo
CP 11570
MEXICO
- Automatic Juice
- Extractor
- Extractor de
- jugo automático
- Customer Care Line:
- Please Read and Save this Use and Care Book
- IMPORTANT SAFEGUARDS
- SAVE THESE INSTRUCTIONS
- POLARIZED PLUG (120V Models Only)
- TAMPER-RESISTANT SCREW
- ELECTRICAL CORD
- How to Use
- GETTING STARTED
- ASSEMBLING YOUR JUICE EXTRACTOR
- PREPARATION
- How to prepare fruits and vegetables for juicing.
- Preparing Fruits and Vegetables:
- HINTS AND TIPS
- FOR OPTIMUM JUICING
- USES FOR THE PULP
- Care and Cleaning
- Important: Always unplug your juice extractor from the outlet before cleaning. CLEANING
- Important: Do not immerse the base in water or spray with water. Clean only by wiping with a damp sponge, cloth or paper towel.
- REMOVING TOUGH STAINS
- Important: Never use ammonia or abrasive cleansers!
- STORAGE
- OVERHEAT PROTECTION SYSTEM
- RECIPES
- DRINKS
- HONEY OF A DRINK
- CARROT ZINGER
- THE 5 P'S
- BLACKBERRY LEMONADE
- DRAGONFRUIT CITRUS COOLER
- ENERGY BOOSTER
- FRUIT ESSENTIALS
- ISLAND DELIGHT
- DESSERTS
- NECTARINE BREAD PUDDING
- BREADS
- VITAMIN RICH CORNBREAD
- Two-Year Limited Warranty
- (Applies only in the United States and Canada)
- What does it cover?
- For how long?
- What will we do to help you?
- How do you get service?
- What does your warranty not cover?
- How does state law relate to this warranty?
- ¿NECESITA AYUDA?
- Colombia
- Ecuador
- Nicaragua
Brand : JUICEMAN
Model : JM400
Category : Blender