FROS-450 - Sander Ferm - Free user manual and instructions
Find the device manual for free FROS-450 Ferm in PDF.


| Product Type | Random Orbital Sander |
| Brand | Ferm |
| Model | FROS-450 |
| Power Supply | 230 V ~ 50 Hz |
| Rated Power | 300 W |
| No-Load Speed | 6,000 - 12,000 min⁻¹ (variable) |
| Orbit Diameter | 3 mm |
| Sandpaper Size | 125 mm (5") with hook-and-loop |
| Weight | 1.4 kg |
| Dimensions (LxWxH) | 220 x 140 x 160 mm |
| Dust Extraction | Integrated dust bag with vacuum adapter |
| Housing Material | Reinforced plastic with soft grip |
| Switch Type | Slide switch with lock-on button |
| Speed Control | Variable speed dial on top |
| Vibration Level | 2.5 m/s² (typical) |
| Sound Level | 82 dB(A) |
| Power Cord Length | 2 m |
| Maintenance | Clean dust bag and pad regularly |
| Safety Features | Double insulation, dust guard |
| Spare Parts | Sandpaper, dust bag, pad available separately |
| Warranty | 2 years |
Frequently Asked Questions - FROS-450 Ferm
User questions about FROS-450 Ferm
0 question about this device. Answer the ones you know or ask your own.
Ask a new question about this device
Download the instructions for your Sander in PDF format for free! Find your manual FROS-450 - Ferm and take your electronic device back in hand. On this page are published all the documents necessary for the use of your device. FROS-450 by Ferm.
USER MANUAL FROS-450 Ferm
UK Subject to change
Document Ref:
FRS-125N/13784/PMR17/issue I/Mar 02
Copyright©
These instructions are the sole property of Ferm-Omega Tools and may not be reproduced
USER'S MANUAL
Ferm Rotary Sander
FRS-125N
Ferm®
CE

Art.nr. 726270
Screwfix nr.13784

FERM ROTARY SANDER FRS-125N USERS MANUAL
TECHNICAL SPECIFICATIONS
Voltage | 230 V\~
Frequency | 50 Hz
Power input | 380 W
No load speed | 11000/min.
Sand Paper dimensions | ∅ | 125 mm
Weight 12.2 kg
Sound pressure level Lpa: 180.7 dB(A)
Sound power level Lwa: 193.7 dB(A)
Vibration (-aw): | 15,69 m/s2
SAFETY INSTRUCTIONS
The following pictograms are used in these instructions for use:

Denotes risk of personal injury, loss of life or damage to the tool in case of non-observance tructions in this manual.

Denotes risk of electric shock.
Carefully read this manual before using the machine. Make sure that you know how the machine functions and how to operate it. Maintain the machine in accordance with the instructions to make sure it functions properly. Keep this manual and the enclosed documentation with the machine.
Ferm products are manufactured to high quality standards they are safe and fit for purpose at time of sale, but all tools can be dangerous if the correct precautions are not taken. Always follow these instructions, do not carry out the operation until you are sure you can do so in safety. Remember to consider the work environment for safe operation as well as safety for tool use.

Warning! When using electric tools, basic safety precautions should always be followed to reduce fire, electric shock and personal injury. Read all instructions before attempting to operate this product. The instructions for future reference.
PERSONAL SAFETY
Use Personal Protection Safety Equipment
Protect eyes with safety glasses or goggles note: the use of safety protective eyewear without the CE mark can lead to serious injury if the lens breaks. A suitable dust mask should be worn if cutting, drilling or sanding is dusty, in particular chipboard or MDF. Approved safety footwear and headgear should worn as appropriate, for example on building works or when heavy weights are involved. Wear suitable gloves and apron to protect against sparks/debris. Wear earplugs or ear defenders.
2 Ferm
Dress properly
Do not wear loose clothing or jewellery. It can get caught in moving parts. Non-skid footwear is recommended when working out doors. Wear protective hair covering to contain long hair
Stay alert
Watch what you are doing Use common sense. Do not operate tools when tired or after taking alcohol or prescription/non-prescription drugs.
OPERATIONAL SAFETY

Warning!
Be aware this sander can produce fine dust, which can be hazardous to your health. Some older painted surfaces may contain harmful lead. Clean the area and tool thoroughly after sanding. Always use a suitable mask, eye protection, gloves and use dust extraction during sanding and cleaning.
Concentrate
Routine and repetition can lead to mistakes. Remember that a slight lack of concentration can result in serious injuries in a split second.
Keep work area clean
Cluttered areas and benches invite injuries.
Consider the work environment
Do not expose power tools to rain or use them in damp or wet locations. Keep work area well lit. Do not use power tools in the presence of flammable liquids, vapours or gases.
Guard against electric shock
This unit contains dangerous voltages. Use a RCD (residual current device) to provide protection against electrical shock. Prevent body contact with grounded surfaces (e.g. pipes, radiator, ranges or refrigerators).
Keep children and pets away
Do not let children or pets come into contact with the tool, extension cable or work area.
Do not force the tool
It will work better and safer at the rate for which it was intended.
Use the right tool
Do not force small tools or attachments to do the job of a heavy-duty tool. Do not use tools for purposes for which they were not intended; for example do not use a circular saw for cutting trees or logs.
Do not abuse the cable
Never carry the tool by the cable or pull it to disconnect it from the power socket. Keep the cable away from heat, oil and sharp edges. Do not touch the metal plug pins when connecting or removing the plug.
Do not over-reach
Keep a proper footing and balance at all times.
EXPLODED VIEW
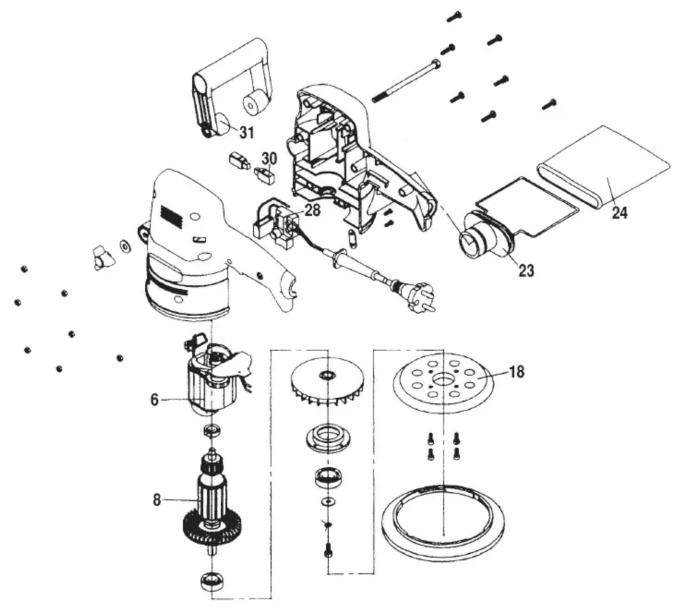
SPARE PARTS LIST FRS-I25N
| REF.NR. DESCRIPTION FERM.NR. | ||
| 6 STATOR 40601 | ||
| 8 ROTOR | 406012 | |
| 18 | BASE PLATE | 406013 |
| 23 + 24 | DUST BAG (COMPLETE) | 406014 |
| 28 | SWITCH 406015 | |
| 30 | CARBON BRUSH | 406016 |
| 31 | ADDITIONAL HANDLE | 406017 |
Ferm 7
Disconnect tools from power supply
When not in use, before servicing and when changing accessories such as blades, bits and cutters. Always switch off and unplug the sander from the power supply before making adjustments or changing abrasive sheets.
Remove adjusting keys and wrenches
Ensure that they are removed from the tool before switching on.
Avoid unintentional starting
Do not carry plugged in tools with your finger on the switch. Check that the switch is off before plugging in to socket.
Extension cables
Use only three core earthed extension cables suitable for the power input of the tool (minimum cable size 1.5mm2). Plug into an earthed socket only.
When using a cable reel unwind it fully. Do not use long extension cables.
Outdoors use
If the tool is suitable to be used outdoors, only use an extension cable intended for outdoor use and marked accordingly. Use a RCD (residual current device) to provide protection against electrical shock. Do not use in rain or damp conditions.
Connect a dust extraction device
Whenever there are facilities for fitting a dust of fume extraction system, make sure it is connected and used.
Use recommended accessories
The use of any other accessory or attachment other than recommended in the instructions or catalogue may present a risk of personal injury. Avoid the use of extension cables.
USING THE ROTARY SANDER

The sander is designed for sanding wood, removing
rust, sanding metal and polishing only. This is designed to be used hand held - do not fix to a h clamps or vice.

Ensure the sander is switched off and unplugged
before changing parts or accessories, adjusting or g this machine.
BEFORE OPERATING
- Check the voltage on the sander corresponds with your power supply voltage and that the plug and lead are in good condition.
- You have the correct type of abrasive. Depending on the finish required use coarse grade 50 for rough/uneven surfaces and medium grade 80 for more even surfaces, finally finish with fine grade 120.
- The sander is only for use on dry surfaces – it is not designed to be used in wet or damp conditions -Do not use water as a lubricant/cutting medium or wet and dry abrasive paper
- Use abrasive sheets designed for the sander only – they have dust extraction holes to remove debris from the surface and will last longer.
- Ensure you have and wear suitable personal protection equipment during sanding and cleaning.
- Route the mains lead away from work area.
- Run idle for 30 seconds - if there is any abnormal vibration or other fault – switch off, inspect and rectify before continuing
FITTING THE ABRASIVE SHEETS
- Open the rear clamp lever (lift and move outwards)
- Push the abrasive sheet in from rear of sander
- Check the sheet is in the correct position (the holes line up with the holes in the sander sole) and close the rear clamp.
- Open the front clamp, put the sheet under the clamp – make sure that its as tight as possible.
- Close front clamp.
OPERATION
- Plug into a suitable mains supply; check the cable is routed well away from moving parts and switch on at plug.
- To switch the sander ON – Push the slide switch on the front to position marked ‘I’
- To switch OFF - push the slide switch to position marked 'O'
DURING USE
- Use gentle pressure – excessive pressure will clog the abrasive paper and slow the sanding action.
- Regularly inspect the abrasive during use for signs of damage or wear and replace as required
- Keep the ventilation slots clear – clean dust and debris with soft brush (switch off and unplug first)
- Use dust extraction – the dust collection adaptor (supplied) attaches to the opening at the rear of the machine to enable the use of a vacuum dust collection system (not supplied).
MAINTENCE, CARE AND REPAIR

Switch off and unplug the machine before carrying out any cleaning or maintenance work.
CLEANING
Wear personal protection equipment during cleaning Do not use water or flammable liquids to clean the sander, clean with a soft brush.
FAULTS
Switch OFF immediately at the mains plug and remove the plug when:
- The plug or cable is damaged.
- The switch on the machine is defective.
- You smell or see smoke caused by scorched insulation in the machine.
Overheating
- Put less pressure on the workpiece.
- The dust is not removed. Check holes in sander sole are clear and line up with holes in the abrasive sheet. Clean the dust extraction opening.
The machine does not start when switched on
- Check the mains lead and the fuse/plug. Take to your Ferm Dealer for repair
- The motor is defective. Take to your Ferm Dealer
There are no user serviceable/repairable parts inside this machine. Qualified service engineers must carry out repairs and servicing.
MAINTAIN TOOLS WITH CARE
Keep the tool clean for better and safer performance. Follow instructions for changing accessories. Inspect tool and extension cables periodically and if damaged, have them repaired by a qualified person or authorised service body.
Check for damaged parts
Do not use a tool with damaged parts, before further use a damaged tool must be carefully checked by a qualified person to determine that it will operate properly. Check for alignment of moving parts, binding or breakage of parts, mounting and other conditions that may affect its operation. A damaged part or guard should be properly repaired by an authorised service centre, unless indicated otherwise in the instruction manual. Have defective switches replaced by an authorised service centre. Do not use a tool if the switch does not turn on and off.
Have your tool repaired by an expert
This appliance is manufactured in accordance with relevant safety standards. Only experts must carry out repairing of electrical appliances, otherwise considerable danger for the user may result.
Storing tools
When not in use tools should be stored in the dry, out of reach of children.
ELECTRICAL INFORMATION
This product is complete with a pre-wired mains plug. If the plug needs replacing follow these instructions.
Wire correctly
The wires in the mains lead are coloured in the following way:
BLUE -Neutral
BROWN -Live
YELLOW/GREEN -Earth

Securing wires
Secure wires carefully and firmly to the correct terminals. Secure the mains cable in the plug cord grip firmly Fit a 5-amp fuse. If a 13amp (BS1363) plug is used a (BS1362) ASTA approved 5-amp fuse must be fitted.
Recycle/Dispose of old plug and cable
Prevent inadvertent connection to socket and risk of electric shock.
Helpline
For any questions relating to operational or safety
matters contact:
Ferm Customer Helpline on: 0115 966 1199
Monday-Friday 8am-6pm
Saturday 9am-1pm
ENVIRONMENT
Recycle the packaging according to the identification marks on it.
At the end of the product or its accessories life please recycle where facilities exist - phone the Helpline for current advice on recycling.
GUARANTEE
The guarantee conditions can be found on the separately enclosed guarantee card.

DECLARATION OF CONFORMITY (UK)
We declare under our sole responsibility that this product is in conformity with the following standards or standardized documents
EN50144-1, EN50144-2-4,
EN55014-1, EN55014-2,
EN61000-3-2, EN61000-3-3
in accordance with the regulations:
98/37EEC
73/23EEC
89/336EEC
from 02-01-2001
GENEMUIDEN NL
W. Kamphof
Quality department


- FERM ROTARY SANDER FRS-125N USERS MANUAL
- TECHNICAL SPECIFICATIONS
- SAFETY INSTRUCTIONS
- PERSONAL SAFETY
- Use Personal Protection Safety Equipment
- Dress properly
- Stay alert
- OPERATIONAL SAFETY
- Warning!
- Concentrate
- Keep work area clean
- Consider the work environment
- Guard against electric shock
- Keep children and pets away
- Do not force the tool
- Use the right tool
- Do not abuse the cable
- Do not over-reach
- Disconnect tools from power supply
- Remove adjusting keys and wrenches
- Avoid unintentional starting
- Extension cables
- Outdoors use
- Connect a dust extraction device
- Use recommended accessories
- USING THE ROTARY SANDER
- BEFORE OPERATING
- FITTING THE ABRASIVE SHEETS
- OPERATION
- DURING USE
- MAINTENCE, CARE AND REPAIR
- CLEANING
- FAULTS
- Overheating
- The machine does not start when switched on
- MAINTAIN TOOLS WITH CARE
- Check for damaged parts
- Have your tool repaired by an expert
- Storing tools
- ELECTRICAL INFORMATION
- Wire correctly
- Securing wires
- Recycle/Dispose of old plug and cable
- Helpline
- ENVIRONMENT
- GUARANTEE
- DECLARATION OF CONFORMITY (UK)
Brand : Ferm
Model : FROS-450
Category : Sander