
UG 50Y - Rangefinder HITACHI - Free user manual and instructions
Find the device manual for free UG 50Y HITACHI in PDF.


| Product type | Laser distance meter |
| Brand | Hitachi |
| Model | UG 50Y |
| Dimensions (L × H × D) | 111 mm × 58 mm × 32 mm |
| Weight (with battery) | 140 g |
| Power supply | 9 V alkaline battery (1 battery) |
| Battery life | Approx. 30,000 measurements |
| Measuring range | 0.5 m to 50 m (1.64 ft to 164 ft) |
| Accuracy (repeat) | ±1.5 mm (±0.06 in) |
| Display units | Meters, feet, inches |
| Laser | Class II, 650 nm, max. power 1 mW |
| Measurement modes | Distance, continuous, area, volume, side (Pythagorean) |
| Protection rating | IP54 (splashes and dust, except battery compartment) |
| Operating temperature | 0 °C to 40 °C |
| Storage temperature | -20 °C to 60 °C |
| Auto power off | Laser beam: approx. 30 s; display: approx. 3 min |
| Included accessories | Soft case, 9 V alkaline battery, shoulder strap |
| Optional accessories | Target plate |
| Maintenance | Check accuracy before and after each use; clean lenses with a soft cloth; store in the case |
| Safety | Never look into the laser beam; do not point at eyes; keep out of reach of children |
| Repairability | Do not attempt to repair yourself; contact the dealer or an authorized Hitachi service center |
Frequently Asked Questions - UG 50Y HITACHI
User questions about UG 50Y HITACHI
0 question about this device. Answer the ones you know or ask your own.
Ask a new question about this device
Download the instructions for your Rangefinder in PDF format for free! Find your manual UG 50Y - HITACHI and take your electronic device back in hand. On this page are published all the documents necessary for the use of your device. UG 50Y by HITACHI.
USER MANUAL UG 50Y HITACHI
natural_image
Illustration of a handheld electronic device with a display and keypad (no text or symbols visible)SAFETY INSTRUCTIONS AND INSTRUCTION MANUAL
WARNING
IMPROPER OR UNSAFE use of this power tool can result in death or serious bodily injury!
This manual contains important information about product safety. Please read and understand this manual BEFORE operating the power tool. Please keep this manual available for other users and owners before they use the power tool. This manual should be stored in safe place.
INSTRUCTIONS DE SÉCURITÉ ET MODE D'EMPLOI
⚠ AVERTISSEMENT
IMPORTANT SAFETY INSTRUCTIONS 6
MEANINGS OF SIGNAL WORDS ......6
SAFETY......6
GENERAL POWER TOOL SAFETY WARNINGS ....6
PRECAUTIONS FOR DIGITAL LASER METER .....9
FUNCTIONAL DESCRIPTION....10
NAME OF PARTS 11
SPECIFICATIONS....12
ASSEMBLY AND OPERATION....13
APPLICATIONS 13
INSERTING/CHANGING THE BATTERY 13
HOW TO USE THE DIGITAL LASER METER ....13
MAINTENANCE AND INSPECTION....17
CHECKING THE ACCURACY (before and after use) ......17
STORING....17
DISPOSAL....17
REPAIRS....18
ACCESSORIES ....18
STANDARD ACCESSORIES ....18
OPTIONAL ACCESSORIES (sold separately) 18
PARTS LIST......47
TABLE DES MATIÈRES
Français
Page Page
CONSIGNES DE SÉCURITÉ IMPORTANTES .....19
SIGNIFICATION DES MOTS D'AVERTISSEMENT .....19
SÉCURITÉ ...... 19
AVERTISSEMENTS DE SÉCURITÉ GÉNÉRAUX
CONCERNANT LES OUTILS ÉLECTRIQUES .....19
PRÉCAUTIONS RELATIVES AU TÉLÉMÈTRE LASER....22
DESCRIPTION FONCTIONNELLE 23
NOM DES PARTIES ....24
CARACTÉRISTIQUES TECHNIQUES 25
ASSEMBLAGE ET FONCTIONNEMENT....26
APPLICATIONS 26
INSERTION/REEMPLACEMENT DE LA PILE....26
UTILISATION DU TÉLÉMÈTRE LASER....26
ENTRETIEN ET INSPECTION ....30
MISE AU REBUT ....31
RÉPARATIONS....31
ACCESSOIRES 32
ACCESSOIRES STANDARD ....32
1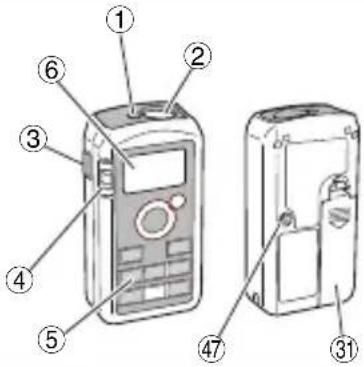 | 2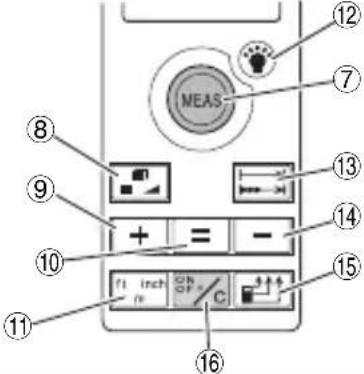 | 3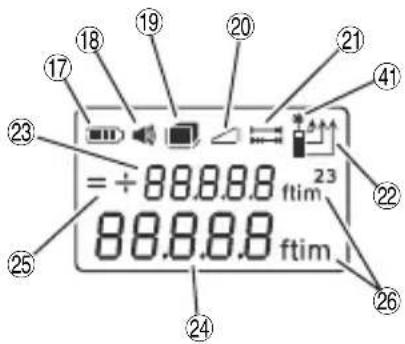 |
4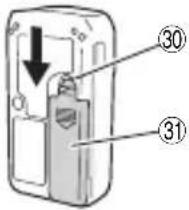 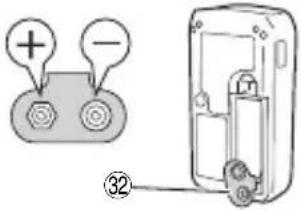 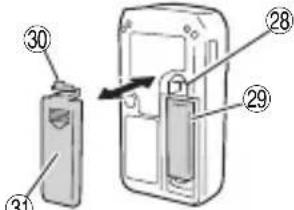 (a) (b) (c) (a) (b) (c) | 5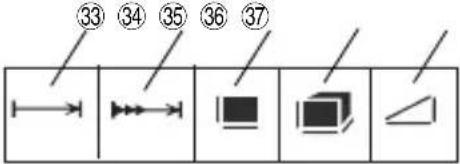 | |
6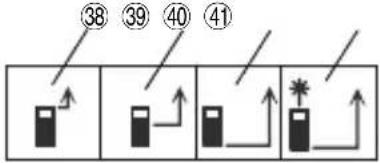 | 7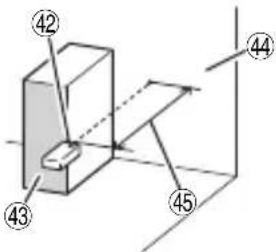 | 8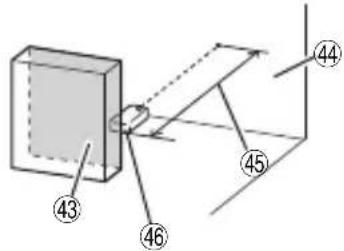 |
9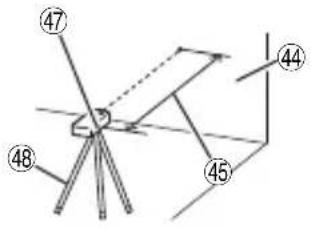 | 1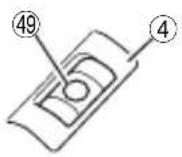 | 0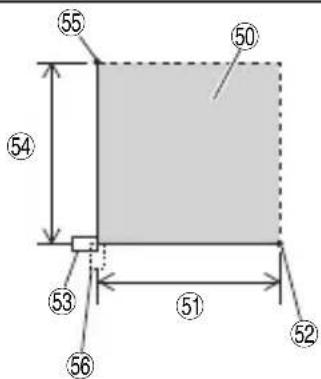 | 1 |
12 1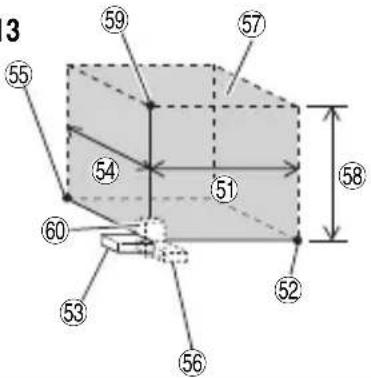 | 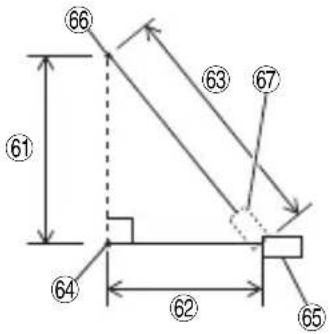 |
IMPORTANT SAFETY INSTRUCTIONS
Read and understand all of the safety precautions, warnings and operating instructions in the Instruction Manual before operating or maintaining this power tool.
Most accidents that result from power tool operation and maintenance are caused by the failure to observe basic safety rules or precautions. An accident can often be avoided by recognizing a potentially hazardous situation before it occurs, and by observing appropriate safety procedures.
Basic safety precautions are outlined in the “SAFETY” section of this Instruction Manual and in the sections which contain the operation and maintenance instructions.
Hazards that must be avoided to prevent bodily injury or machine damage are identified by WARNINGS on the power tool and in this Instruction Manual.
NEVER use this power tool in a manner that has not been specifically recommended by HITACHI.
MEANINGS OF SIGNAL WORDS
WARNING indicates a potentially hazardous situations which, if ignored, could result in death or serious injury.
CAUTION indicates a potentially hazardous situations which, if not avoided, may result in minor or moderate injury, or may cause machine damage.
NOTE emphasizes essential information.
SAFETY
GENERAL POWER TOOL SAFETY WARNINGS
WARNING
Read all safety warnings and all instructions.
Failure to follow the warnings and instructions may result in electric shock, fire and/or serious injury.
Save all warnings and instructions for future reference.
The term "power tool" in the warnings refers to your mains-operated (corded) power tool or battery-operated (cordless) power tool.
English
1) Work area safety
a) Keep work area clean and well lit.
Cluttered or dark areas invite accidents.
b) Do not operate power tools in explosive atmospheres, such as in the presence of flammable liquids, gases or dust.
Power tools create sparks which may ignite the dust or fumes.
c) Keep children and bystanders away while operating a power tool.
Distractions can cause you to lose control.
2) Electrical safety
a) Power tool plugs must match the outlet.
Never modify the plug in any way.
Do not use any adapter plugs with earthed (grounded) power tools.
Unmodified plugs and matching outlets will reduce risk of electric shock.
b) Avoid body contact with earthed or grounded surfaces, such as pipes, radiators, ranges and refrigerators.
There is an increased risk of electric shock if your earthed or grounded.
c) Do not expose power tools to rain or wet conditions.
Water entering a power tool will increase the risk of electric shock.
d) Do not abuse the cord. Never use the cord for carrying, pulling or unplugging the power tool.
Keep cord away from heat, oil, sharp edges or moving parts.
Damaged or entangled cords increase the risk of electric shock.
e) When operating a power tool outdoors, use an extension cord suitable for outdoor use.
Use of a cord suitable for outdoor use reduces the risk of electric shock.
f) If operating a power tool in a damp location is unavoidable, use a residual current device (RCD) protected supply.
Use of an RCD reduces the risk of electric shock.
3) Personal safety
a) Stay alert, watch what you are doing and use common sense when operating a power tool.
Do not use a power tool while you are tired or under the influence of drugs, alcohol or medication.
A moment of inattention while operating power tools may result in serious personal injury.
b) Use personal protective equipment. Always wear eye protection.
Protective equipment such as dust mask, non-skid safety shoes, hard hat, or hearing protection used for conditions will reduce personal injuries.
c) Prevent unintentional starting. Ensure the switch is in the off -position before connecting to power source and/or battery pack, picking up or carrying the tool.
Carrying power tools with your finger on the switch or energising power tools that have the switch on invites accidents.
d) Remove any adjusting key or wrench before turning the power tool on.
A wrench or a key left attached to a rotating part of the power tool may result in personal injury.
e) Do not overreach. Keep proper footing and balance at all times.
This enables better control of the power tool in unexpected situations.
f) Dress properly. Do not wear loose clothing or jewellery. Keep your hair, clothing and gloves away from parts.
Loose clothes, jewellery or long hair can be caught in moving parts.
g) If devices are provided for the connection of dust extraction and collection facilities, ensure these are connected and properly used.
Use of dust collection can reduce dust related hazards.
4) Power tool use and care
a) Do not force the power tool. Use the correct power tool for your application.
English
The correct power tool will do the job better and safer at the rate for which it was designed.
b) Do not use the power tool if the switch does not turn it on and off.
Any power tool that cannot be controlled with dangerous and must be repaired.
c) Disconnect the plug from the power source and/or the battery pack from the power tool before making any adjustments, changing accessories, or storing power tools.
Such preventive safety measures reduce the risk of starting the power tool accidentally.
d) Store idle power tools out of the reach of children and do not allow persons unfamiliar with the power tool or these instructions to operate the power tool.
Power tools are dangerous in the hands of untrained users.
e) Maintain power tools. Check for misalignment or binding of moving parts, breakage of parts and any other condition that may affect the power tools' operation. If damaged, have the power tool repaired before use.
Many accidents are caused by poorly maintained power tools.
f) Keep cutting tools sharp and clean.
Properly maintained cutting tools with sharp cutting edges are less likely to bind and are easier to control.
g) Use the power tool, accessories and tool bits etc. in accordance with these instructions, taking into account the working conditions and the work to be performed.
Use of the power tool for operations different from those intended could result in a hazardous situation.
5) Battery tool use and care
a) Use power tools only with specifically designated battery packs.
Use of any other battery packs may create a risk of injury and fire.
b) When battery pack is not in use, keep it away from other metal objects like paper clips, coins, keys, nails, screws, or other small metal objects that can make a connection from one terminal to another.
the Shortfrochthisbattery terminals together may cause burns or a fire.
c) Under abusive conditions, liquid may be ejected from the battery; avoid contact. If contact accidentally occurs, fl ush with water. If liquid contacts eyes, additionally seek medical help.
Liquid ejected from the battery may cause irritation or burns.
6) Service
a) Have your power tool serviced by a qualified repair person using only identical replacement parts.
This will ensure that the safety of the power tool is maintained.
PRECAUTION
Keep children and infi rm persons away.
When not in use, tools should be stored out of reach of children and infi rm persons.
English
PRECAUTIONS FOR DIGITAL LASER METER

WARNING
- Do not look directly at the laser beam through an optical instrument.
Looking at the laser beam through a telescope, binoculars or magnifying glass may damage your eyes. - If you feel the instrument is not working normally, do not under any circumstances use it.
If the laser is too powerful or too weak, send the instrument for repair. - Do not look directly into the laser beam.
Looking directly into the laser beam may damage your eyes. - Avoid using the laser at eye level.
If the laser beam hits your eyes directly, it may damage your eyes. - Do not stand in the path of the laser beam.
- Do not under any circumstances disassemble or modify the instrument.
In the event of breakdown or repair, contact the dealer where you purchased the instrument or your nearest Hitachi Koki power tool service centre. - Do not place any reflective object in the path of the laser beam. If the laser beam is reflected into your eyes, it may damage your eyes.
- If you suspect any injury due to the laser beam, consult a doctor immediately.
- Do not point the laser beam at anyone.
- Do not allow the instrument to be used by a child.

CAUTION
- Be sure to check the measuring accuracy before and after use. Using the instrument in a faulty condition may result in error.
- Use the instrument in an ambient temperature of 0^ C to 40^ C. Use in any other environment may result in loss of accuracy or failure to emit the laser beam.
- Do not leave the instrument in the following places. Doing so may result in loss of accuracy or breakdown.
○ Where it will be exposed to direct sunlight or high temperature such as near a heating appliance
○ On the dashboard, in the trunk, on the luggage platform or in direct sunlight inside a vehicle with the windows closed
○ Where it will be exposed to magnetism, vibration, dust, moisture or humidity
- Do not use the instrument if there is condensation on it.
Doing so may result in loss of accuracy or breakdown. - Do not use in a faulty condition.
Stop using the instrument immediately and contact the dealer where it was purchased or your nearest Hitachi Koki power tool service centre. - Do not subject the instrument to strong impact by dropping it or knocking it over.
If dropped or knocked over, check the accuracy or send it for repair. - Do not expose the instrument to rain or water.
The performance or service life will be adversely affected and malfunction may result. - Turn the power off before moving the instrument.
- Do not touch the laser aperture or receiver lens.
Doing so may result in loss of accuracy.
- Place the instrument in the soft case for carrying.
Vibration or impact may result in loss of accuracy or breakdown.
- Store the instrument in the soft case.
Humidity or dust may cause breakdown.
- Remove the battery when not in use.
Leakage of battery fluid may cause breakdown.
- User safety training
The user should have adequate understanding of the properties, harmful effects, etc. of lasers. - Perform measuring in a safe place.
Disclaimer
○ Observe all safety warnings and instructions in this manual when using the instrument.
Hitachi Koki assumes no responsibility for damages (including losses due to interruption of business) arising from use of the product other than in accordance with the instructions in the manual.
English
☐ Be sure to check the accuracy before and after use. Similarly, check the accuracy after the instrument has been subjected to impact by being knocked over or dropped. Hitachi Koki assumes no responsibility for damages arising from error due to non-performance of the accuracy check.
- Hitachi Koki assumes no responsibility for damages arising from use of the laser meter other than for the intended purpose.
○ Hitachi Koki assumes no responsibility for damages arising from fire, earthquakes, floods, lightning and other disasters.
SAVE THESE INSTRUCTIONS
AND
MAKE THEM AVAILABLE TO OTHER USERS
AND
OWNERS OF THIS TOOL!
FUNCTIONAL DESCRIPTION
NOTE
The information contained in this Instruction Manual is designed to assist you in the safe operation and maintenance of the power tool.
NEVER operate, or attempt any maintenance on the tool unless you have first read and understood all safety instructions contained in this manual.
Some illustrations in this Instruction Manual may show details or attachments that differ from those on your own power tool.
NAME OF PARTS
| 1 | Laser aperture |
| 2 | Receiver lens |
| 3 | Side measure button |
| 4 | Bubble tube |
| 5 | Operation panel |
| 6 | Display |
| 7 | Measure button |
| 8 | Mode select button |
| 9 | Add button |
| 10 | Memory (beep) button |
| 11 | Unit select button |
| 12 | Display light button |
| 13 | Distance/Continuous measurement button |
| 14 | Subtract button |
| 15 | Measuring reference point select button |
| 16 | On/Off (Clear) button |
| 17 | Battery level indicator |
| 18 | Beep indicator |
| 19 | Area/Volume indicator |
| 20 | Side indicator |
| 21 | Distance/Continuous measurement indicator |
| 22 | Measuring reference point indicator |
| 23 | Measurement/Result display |
| 24 | Measurement display |
| 25 | [=][+] [-] indicator |
| 26 | Unit indicator |
| 27 | Digital laser meter |
| 28 | Hole |
| 29 | 9 V alkaline battery |
| 30 | Hook |
| 31 | Battery cover |
| 32 | Connecting terminal |
| 33 | Distance indicator |
| 34 | Continuous measurement indicator |
| 35 | Area indicator |
| 36 | Volume indicator |
| 37 | Side indicator (Pythagoras' theorem) |
| 38 | Front reference point indicator |
| 39 | W1/4 socket hole reference point indicator |
| 40 | Rear reference point indicator |
| 41 | Laser indicator |
| 42 | Instrument front (Reference point) |
| 43 | Target reference point |
| 44 | Target |
| 45 | Measured distance |
| 46 | Instrument rear (Reference point) |
| 47 | W1/4 socket hole (Reference point) |
| 48 | Tripod |
| 49 | Bubble |
| 50 | Area |
| 51 | Length |
| 52 | Lengthwise target |
| 53 | Instrument (placed lengthwise) |
| 54 | Width |
| 55 | Widthwise target |
| 56 | Instrument (placed widthwise) |
| 57 | Volume |
| 58 | Height |
| 59 | Heightwise target |
| 60 | Instrument (placed heightwise) |
| 61 | Side C |
| 62 | Side A |
| 63 | Side B |
| 64 | Side A target |
| 65 | Instrument(placed lengthwise to side A) |
| 66 | Side B target |
| 67 | Instrument(placed lengthwise to side B) |
SPECIFICATIONS
| Power source 9 V alkaline battery (1) | ||
| Measuring modes Distance, continuous, area, volume, side | ||
| Measurable range * 1 | 1.64 ft to 164 ft (0.5 m to 50 m) | |
| Display unit Feet, inches and meters | ||
| Laser | Laser: Visible light semiconductor laser 650 nmOutput: 1 mW or less (Class II * 2) | |
| Measuring accuracy (repeated) * 3 | ±0.06" (±1.5 mm) | |
| Measuring time * 4 | 0.5 to 3 sec. | |
| Minimum measurement unit 0.039" (1 mm) | ||
| Splash proof & dust-proof Protection Class IP54 * | 5 (excluding battery compartment) | |
| Battery life Approx. 30,000 measurements * | 6 | |
| Operating temperature range 0°C to 40°C | ||
| Storage temperature range -20°C to 60°C | ||
| Auto power off *7 | Laser beam Approx. 30 sec. | |
| Display Approx. 3 min. | ||
| Dimensions (H × W × D) | 4-3/8" × 2-9/32" × 1-17/64" (111 mm × 58 mm × 32 mm) | |
| Weight 0.3 lbs (140 g) (including battery) | ||
*1 The measurable range may vary depending on the characteristics of the laser beam reflected from the target surface and the surrounding brightness.
*2 Laser class based on 21CFR part 1040.10.11
*3 The measuring accuracy may vary depending on the characteristics of the laser beam reflected from the target surface and the surrounding brightness.
*4 The measuring time may vary depending on the characteristics of the laser beam reflected from the target surface and the surrounding brightness.
*5 Water splashes and dust have no harmful effect.
*6 Battery life may be reduced depending on usage environment and type of battery.
*7 Time until the power turns off automatically when left unoperated.
ASSEMBLY AND OPERATION
APPLICATIONS
○ Measuring distance, area, volume and side length at building sites
INSERTING/CHANGING THE BATTERY (See Fig. 4)
The battery is not installed in the instrument when it leaves the factory. Follow the instructions below and insert the battery before use.
- Press the hook of the battery cover in the direction of the arrow and remove the battery cover. (a)
- Connect a new battery, paying attention to the correct polarity. (b)
- Insert the battery with the terminal at the bottom. Match the hook to the hole in the main unit and press the battery cover shut. (c)
HOW TO USE THE DIGITAL LASER METER
Operation
WARNING
Never look directly into the laser beam or point the beam at anyone.
If the light gets in your eyes, it may damage your eyes.
- Turn on the power (Fig. 1, 2)
○ Press the power on/off (clear) button on the operation panel, and when the power is turned on, the display appears.
To turn off the power, press and hold the power on/off (clear) button for at least 2 seconds.
- Select a measuring mode (Fig. 2, 5)
There are fi ve measuring modes to choose from: distance, continuous, area, volume and side. Select a mode by pressing the distance/continuous measurement select button and mode select button on the operation panel. The selected mode is indicated on the display.
☐ The default setting is the distance mode. You can change the selected mode or measure in the selected mode for as long as the power is on.
- Select a unit (Fig. 2, 3)
Press the unit select button on the operation panel. There are three units to choose from: feet, inches and meters. The selected unit is indicated on the display.
- Select a reference point (Fig. 2, 6)
There are three reference settings to choose from: front, W1/4 socket hole and rear.
○ Select a reference point by pressing the Measuring reference point select button. The selected reference point is indicated on the display.
When the power is turned on, the last reference point that was set is selected. If necessary, select a different reference point.
Examples of measuring using different reference points
① Measuring using front reference point (Fig. 7)
Place the front (reference point) of the instrument against the measuring surface.
② Measuring using rear reference point (Fig. 8)
Place the rear (reference point) of the instrument against the measuring surface.
③ Measuring using the W1/4 socket hole (for the tripod) as the reference point (Fig. 9)
Use the center of the socket hole for attaching the tripod as the reference point.
NOTE
If the instrument needs to be level with the target, adjust the level using the bubble tube. (Fig. 10)
English
5. Measuring procedures in each mode
NOTE
○ Check that there is nothing obstructing measurement by the laser.
Do not move the instrument during measuring (except during continuous measurement).
☐ The center of the laser beam is measured. The same applies when the beam is aimed diagonally at the target.
The measuring range may vary depending on the characteristics of the laser beam reflected from the target surface or the surrounding brightness.
To measure quickly and accurately outdoors in bright sunlight, use a target plate (sold separately) or put the target in the shade.
○ Measuring errors may occur with transparent surfaces (such as glass or water) or mirror surfaces, as well as in the case of surfaces with holes in, uneven surfaces, different temperatures and indirectly reflected light.
☐ If the power is turned on and no button is pressed, the power will turn off automatically after approximately 3 minutes. Press the power button again to resume operation.
○ If the instrument is used and then left with no the laser will turn off after approximately 30 seconds. Press the measure button again to resume operation.
☐ The length of time after the power is turned on until the instrument is ready to measure may vary depending on the usage environment.
○ If an error occurs while measuring, remedy the cause before resuming measuring.
Measuring distance (Fig. 2, 6)
① Select distance mode. (See "Selecting a measuring mode")
② Press the measure button and aim the laser beam at the target. The status is indicated on the display.
③ Press the measure button again to stop measuring. A beep sounds and the measurement is indicated on the display. When measuring is finished, the laser goes off.
④ To continue measuring distance, repeat steps ② and ③.
The side button on the side of the instrument has the same function as the measure button on the operation panel.
For convenient operation in narrow spaces, the instrument can be placed in a vertical position.
Continuous measurement
Use continuous measurement to set the desired position from the target.
① Select continuous measurement mode. (See “Selecting a measuring mode”)
② Press the measure button and aim the laser beam at the target.
③ Move the instrument until the desired measurement is indicated on the display.
④ Press the measure button again to finish continuous measurement. The last measurement is indicated on the display.
Measurements are successively indicated on the display with a beep sound every 0.5 to 3 seconds.
The previous measurement is deleted when the next measurement is taken.
In continuous measurement mode, the power does not turn off automatically. Be sure to press the power button after operation to end continuous measurement.
button pressed
Measuring area (Fig. 11)
If you measure the length and the width, the area is automatically calculated.
① Select area mode. (See "Selecting a measuring mode")
② Measure the length.
○ Press the measure button and aim the laser at the target length.
○ Press the measure button again to finish measuring. A beep sounds and the length measurement is indicated on the display. The laser does not go off at this time.
③ Measure the width.
○ Press the measure button and aim the laser at the target width.
○ Press the measure button again to finish measuring. A beep sounds and the width measurement and calculated area are indicated on the display.
| Display Content | ||
| Before measuring ---- ft2---- ft | ||
| After measuring length | 3.083 ft3.083 ft | →Length measurement→Length measurement |
| After measuring width | 6.289 ft22.040 ft | →Area calculation result→Width measurement |
Measuring volume (Fig. 12)
If you measure the length, width and height, the volume is automatically calculated.
① Select volume mode. (See "Selecting a measuring mode")
② Measure the length.
Follow the instructions for measuring the length in area mode.
③ Measure the width.
Follow the instructions for measuring the width in area mode.
④ Measure the height.
○ Press the measure button and aim the laser at the target height.
○ Press the measure button again to finish measuring. A beep sounds and the height measurement and calculated volume are indicated on the display.
| Display Content | ||
| Before measuring ---- ft3---- ft | ||
| After measuring length | 3.083 ft3.083 ft | →Length measurement→Length measurement |
| After measuring width | 6.289 ft ^2 2.040 ft | →Area calculation result→Width measurement |
| After measuring height | 5.333 ft ^6 0.848 ft | →Volume calculation result→Height measurement |
Measuring sides (Pythagorean theorem)
If you measure the two sides of a right triangle, the length of the third side is calculated automatically.
Use this mode when you cannot measure the distance because there is an obstacle or there is no elevated target surface.
To obtain side C (Fig. 13)
① Select side mode. (See "Selecting a measuring mode")
② Measure the length of side A.
Follow the instructions for measuring the length in area mode and measure side A.
③ Measure side B.
○ Follow the instructions for measuring the length of side A and measure the length of side B.
When you have fi nished measuring, a beep sounds and the measured length of side B and calculated result of side C are indicated on the display.
| Display Content | ||
| Before measuring ---- ft---- ft | ||
| After measuring side A | 1.862 ft1.862 ft | →Side A measurement→Side A measurement |
| After measuring side B | 5.039 ft5.372 ft | →Calculated result of side C→Side B measurement |
English
Deleting a measurement (Fig. 2)
Press the power on/off (clear) button on the operation panel to delete a measurement.
Turning on the display light (Fig. 2)
Press the display light button to turn the green backlight on and off.
The backlight goes off automatically after approximately 8 seconds if no button is pressed.
The backlight cannot be turned on and off while measuring.
Muting the beep (Fig. 2)
Press and hold the memory button on the operation panel for at least 2 seconds to turn the beep on and off.
Changing the unit (Fig. 2)
Press the unit select button on the operation panel to change the measurement unit.
Turning off the power (Fig. 2)
Press and hold the power on/off (clear) button on the operation panel for at least 2 seconds to turn the power off.
6. Saving, adding, subtracting and deleting a measurement
Saving (Fig. 2, 3)
Press the memory button to save the measurement indicated on the display. [=] appears in the top row of the display and the saved measurement is indicated next to it.
The saved measurement is not deleted when the power is turned off and it is indicated in the top row of the display the next time the power is turned on.
Adding (Fig. 2, 3)
A new measurement can be added to a previous measurement already stored in the memory.
Press the add button when a measurement is displayed. The calculated result and [+] next to it blink 3 times in the top row on the display.
Measurements in different units (ft, ft ^2 , ft ^3 ) cannot be added.
Subtracting (Fig. 2, 3)
A new measurement can be subtracted from a measurement already stored in the memory.
Press the subtract button when a measurement is displayed. The calculated result and [-] next to it blink 3 times in the top row on the display.
Measurements in different units (ft, ft ^2 , ft ^3 ) cannot be subtracted.
NOTE
- You can continue adding or subtracting when a measurement is indicated on the display.
○ Pressing the memory button when a measurement is already saved in the memory and the latest measurement is shown on the display deletes the existing measurement.
Deleting a saved measurement (Fig. 2, 3)
① Press the memory button to move the measurement indicated on the display to the top row.
② Press the power on/off (clear) button to delete the memory.
MAINTENANCE AND INSPECTION
CHECKING THE ACCURACY (before and after use)
If the accuracy is found to be faulty, contact the dealer for repairs.

WARNING
Be sure to check the following before and after use.
Using the instrument in a faulty condition may lead to errors.
Checking repeated measuring accuracy
① Fix the position of the instrument and measure a distance of approximately 3 ft (1 m) to 16 ft (5 m) ten times.
② Accuracy is normal if the variation in the measurements 0.12" (3 mm).
Measuring accuracy may vary depending on the characteristics of the laser beam reflected from the target surface or the surrounding brightness. Measure the target surface under the following conditions.
○ Dark place away from direct sunlight
○ Smooth surface
○ Not too strongly refl ecting surface (mirror, etc.)
○ White or gray wall
○ Free from steam, mirage or dust
Causes of error and remedies
| Error code | Cause Remedy | |
| 201 | Outside measuring range | Use within measuring range. |
| 202 | Ref l ected signal is too weak | Measure target surface in good condition. |
| 203 | Exceeded display range | Press on/off button to reset. |
| 204 | Calculation error (Pythagorean theorem) | Measure in correct order. |
| 205 Exhausted battery Replace with new battery. | ||
| 206 | Temperature too high | Use in range of 0°C to 40°C. |
| 207 | Temperature too low | Use in range of 0°C to 40°C. |
| 208 | Surroundings too bright | Measure away from strong light (direct sunlight, etc.). |
STORING
○ After use, be sure to turn off the power and store the instrument in the provided case.
○ If the instrument is not to be used for a long period, remove the battery.
○ Avoid storing the unused instrument or accessories in the following places. Store in a safe, dry place.
NOTE
○ Keep out of reach of children
○ Store out of direct sunlight
○ Store away from rapid changes in temperature
○ Store away from vibration
- Keep out of the rain, such as under the eaves, and away from humidity
DISPOSAL
Dispose of the instrument appropriately by a method specified by the local government of the area.
Disposing of the instrument inappropriately may result in the following problems.
English
○ Burning plastic components generates noxious fumes that may present a danger to public health.
☐ If the battery is damaged or is heated and explodes, it may lead to poisoning, burns, corrosion or fire or cause environmental pollution.
○ Disposing of the instrument irresponsibly may lead to someone with no knowledge of the product using it in violation of the regulations.
This may lead to serious injury not only to yourself but to others, as well as causing environmental pollution.
Disposal of battery
Do not dispose of the used battery with household garbage or throw into fire or water. Dispose of it in a legally defined and environmentally friendly manner.
REPAIRS
This product is a high-precision instrument. If it does not operate normally, do not attempt to repair it yourself. Contact the dealer.
ACCESSORIES

WARNING
ALWAYS use Only authorized HITACHI replacement parts and accessories. NEVER use replacement parts or accessories which are not intended for use with this tool. Contact HITACHI if you are not sure whether it is safe to use a particular replacement part or accessory with your tool.
The use of any other attachment or accessory can be dangerous and could cause injury or mechanical damage.
NOTE
Accessories are subject to change without any obligation on the part of the HITACHI.
STANDARD ACCESSORIES
○ Soft case ....1
○ 9 V alkaline battery ....1
○ Strap....1
OPTIONAL ACCESSORIES (sold separately)
○ Target plate
NOTE
Due to HITACHI's continuing program of research and development, the specifications herein are subject to change without prior notice.
CONSIGNES DE SÉCURITÉ IMPORTANTES
Addition (Fig. 2, 3)
| ITEM NO. | PART NAME Q'TY | ||||||
| 1 | MAIN BODY (UG50Y) | 1 | |||||
| 2 | B | A | T | T | E | R | Y |
| 3 | N | A | M | E | P | L | A |
| 4 | C | A | U | T | I | O | N |
| 501 SOFT CASE 1 | |||||||
| 502 STRAP 1 | |||||||
| 503 9V | ALKALINE BATTERY 1 | ||||||
C O V E R
T E 1
P L A T E 1
Issued by

Hitachi Koki Co., Ltd.
Sinagawa Intercity Tower A, 15-1, Konan 2-chome, Minato-ku, Tokyo 108-6020, Japan
Distributed by

Hitachi Koki U.S.A., Ltd.
3950 Steve Reynolds Blvd. Norcross, GA 30093

Hitachi Koki Canada Co.
450 Export Blvd. Unit B, Mississauga ON L5T 2A4
905
Code No. C99182361 A
Printed in China
- SAFETY INSTRUCTIONS AND INSTRUCTION MANUAL
- WARNING
- INSTRUCTIONS DE SÉCURITÉ ET MODE D'EMPLOI
- ⚠ AVERTISSEMENT
- TABLE DES MATIÈRES
- Français
- Page Page
- IMPORTANT SAFETY INSTRUCTIONS
- MEANINGS OF SIGNAL WORDS
- SAFETY
- GENERAL POWER TOOL SAFETY WARNINGS
- English
- 1) Work area safety
- 2) Electrical safety
- 3) Personal safety
- 4) Power tool use and care
- PRECAUTION
- PRECAUTIONS FOR DIGITAL LASER METER
- CAUTION
- Disclaimer
- SAVE THESE INSTRUCTIONS
- AND
- MAKE THEM AVAILABLE TO OTHER USERS
- OWNERS OF THIS TOOL!
- FUNCTIONAL DESCRIPTION
- NOTE
- ASSEMBLY AND OPERATION
- APPLICATIONS
- INSERTING/CHANGING THE BATTERY (See Fig. 4)
- HOW TO USE THE DIGITAL LASER METER
- Operation
- Measuring procedures in each mode
- Measuring distance (Fig. 2, 6)
- Continuous measurement
- Measuring area (Fig. 11)
- Measuring volume (Fig. 12)
- Measuring sides (Pythagorean theorem)
- To obtain side C (Fig. 13)
- Deleting a measurement (Fig. 2)
- Turning on the display light (Fig. 2)
- Muting the beep (Fig. 2)
- Changing the unit (Fig. 2)
- Turning off the power (Fig. 2)
- Saving, adding, subtracting and deleting a measurement
- Saving (Fig. 2, 3)
- Adding (Fig. 2, 3)
- Subtracting (Fig. 2, 3)
- Deleting a saved measurement (Fig. 2, 3)
- MAINTENANCE AND INSPECTION
- CHECKING THE ACCURACY (before and after use)
- Checking repeated measuring accuracy
- STORING
- DISPOSAL
- Disposal of battery
- REPAIRS
- ACCESSORIES
- STANDARD ACCESSORIES
- OPTIONAL ACCESSORIES (sold separately)
- CONSIGNES DE SÉCURITÉ IMPORTANTES
- Addition (Fig. 2, 3)
- Hitachi Koki Co., Ltd.
- Hitachi Koki U.S.A., Ltd.
- Hitachi Koki Canada Co.
Brand : HITACHI
Model : UG 50Y
Category : Rangefinder