Sicurofix JC-1292 - Car seat Joycare - Free user manual and instructions
Find the device manual for free Sicurofix JC-1292 Joycare in PDF.


| Product Type | Child Car Seat |
| Brand | Joycare |
| Model | Sicurofix JC-1292 |
| Weight Group | Group 1 (9-18 kg) |
| Age Range | Approximately 9 months to 4 years |
| Installation | ISOFIX system + Top Tether |
| Dimensions (L x W x H) | 45 x 40 x 60 cm |
| Weight | 5.2 kg |
| Shell Material | Injected Polypropylene |
| Harness | 5-point harness, height adjustable |
| Side Protection | Reinforced side protection |
| Recline | Multiple recline positions |
| Safety Standard | ECE R44/04 |
| Maintenance and Cleaning | Removable cover machine washable at 30°C, shell can be cleaned with a damp cloth |
| Spare Parts and Repairability | Spare parts available (covers, buckles) via Joycare customer service |
| Recommended Lifespan | 6 years from manufacture date |
| Included Accessories | Newborn insert (depending on version), belt guide |
Frequently Asked Questions - Sicurofix JC-1292 Joycare
User questions about Sicurofix JC-1292 Joycare
0 question about this device. Answer the ones you know or ask your own.
Ask a new question about this device
Download the instructions for your Car seat in PDF format for free! Find your manual Sicurofix JC-1292 - Joycare and take your electronic device back in hand. On this page are published all the documents necessary for the use of your device. Sicurofix JC-1292 by Joycare.
USER MANUAL Sicurofix JC-1292 Joycare
JOYCARE
SICUROFIX
Manuale d'uso
Child restraint device GROUP 1/2/3
Suitable for children weighing from 9 kg to 36 kg (from 9 months to 11 years)
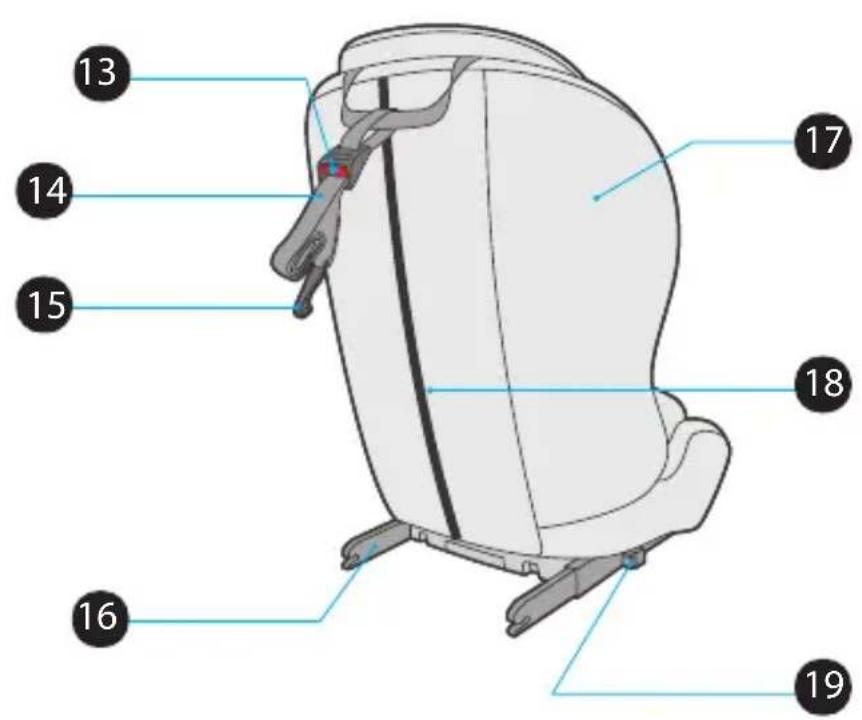
I - COMPONENTI
- Headrest adjusting handle
- Red belt guider
- Harness strap
- Shoulder pad
- Buckle pad
- Reclining adjustment knob
- Headrest
- Harness slots
- Baby insert
- Harness buckle
- Adjusting device
- Harness adjustment strap
- Top tether release button
- Top tether strap
- Top tether hook
- ISOFIX connector
- Cover
- Cover zipper
- ISOFIX release button
E - COMPONENTES



ATTENZIONE



Thank you for purchasing the baby car seat JOYCARE.
IMPORTANT: Please read these instructions carefully before use and keep them for future reference. for your child's safety, read these instructions carefully. Failure to follow the car seat installation instructions carefully could pose a risk to your baby.
WARNING! Before use, remove and dispose of all plastic bags and packaging materials and keep them out of reach of children. It is recommended to dispose of these items at an appropriate differentiated collection point, as required by the regulations in force.
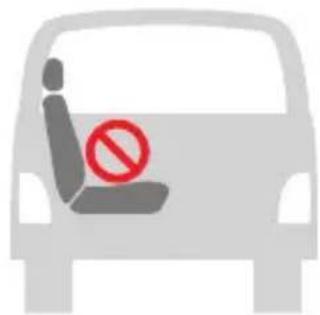
WARNING! HAXARD! Never fit this car seat on a front seat equipped with a front airbag. The child car seat can be fitted to a front seat only if the front airbag has been deactivated: check with the car manufacturer or see the owner's manual instructions on how to deactivate the airbag.
WARNING! This product is expressly intended to be used only as a child car seat; it should not be used indoors.
Read this instructions carefully before assembling and installing the product. The product must not be used by anybody who has not read these instructions.
Always keep this instruction manual with the child car seat, or in the vehicle in which you are carrying the child car seat. Some models of child car seat have a pocket to store the instructions.
Each country has different safety laws and regulations for the transportation of children in cars. For this reason, it is recommended that you should contact your local authority for further information.
WARNING! According to accident statistics, a vehicle's rear seat is generally safer than the front seat:
GB
JOYCARE
therefore, we suggest to install the car seat on the rear seat of the vehicle.
The installation and car seat adjustment operations must only be carried out by a competent adult.
The assembly and installation needs to be carried out without the baby in the car seat.
Make sure that all the passengers in the vehicle know how to release the child from the child car seat in case of an emergency.
Always use the child car seat, fitted correctly and with the safety harness fastened, including short journeys. Not using the child car seat constitutes a danger to your child's safety. In particular, check that the safety harness is tensioned correctly, is not twisted and that it is fastened in the correct position.
The lap belts of the harness system must be fitted as low down as possible so that the child's hips are held correctly.
Never use this child car seat on side-facing or rear-facing car seats.
Only fit the child car seat onto seats which are fastened to the car chassis and facing forwards. Make sure that all folding or rotating car seats are always securely fastened in place, If not, they could be dangerous.
When fitting the child car seat in the car make sure that no car seat or door can interfere with it.
No car seat can guarantee the total safety of your child in the event of accident, but the use of this product reduces the risk of serious injuries.
The risk of serious injuries to the child increases, not only in the case of accidents, but also in other circumstances (i.e.: sudden braking, etc.) if these instructions are not followed carefully: always check that the child car seat is secured correctly to the vehicle's seat.
If the car seat is damaged, deformed or worn out, it must be replaced: it may no longer meet the original safety standards.
This product must not be modified in any way unless approved by manufacturer.
Do not fit any accessories, spare parts or components not supplied or approved by the manufacturer.
Never leave your child unsupervised in the car seat whether harnessed or not.
Always ensure that the child car seat is securely fastened to the car seat; if not, it could hurt or harm passengers.
Do not insert anything between the car seat and the child car seat, or between the child car seat and the child, unless it is an accessory approved by the manufacturer: in the event of an accident, the child car seat may not work properly.
Do not use anything, for example pillows, blankets, etc., to distance the child car seat from the car seat or to distance the child from the child car seat: in the event of an accident, the child car seat may not operate correctly.
Do not let children play with the components or parts of the child car seat.
Do not carry more than one child at a time in the child car seat.
After an accident, even a minor one, the child seat incurs damage, even if it is not visible to the naked eye. It must be therefore be replaced.
Do not use second-hand child car seats: they may have suffered structural damage not visible to the naked eye but liable of compromising the safety of the product.
Do not use the car seat without its fabric cover; this must not be replaced with one not approved by the manufacturer since it is an integral part of the car seat and the safety system.
JOYCARE
GB
Do not use the car seat without the protective shoulder pads as they are an integral part of the car seat and the safety system.
If in doubt refer to the manufacturer or retailer of the car seat.
Check that the safety harness strap is not twisted to avoid that straps or any parts of the child car seat remain trapped between the car doors, or rub against cutting edges.
If the safety harness is cut or frayed, it must be replaced.
Do not transport loose or unsecured objects or baggage on the back shelf of the vehicle: they may injure the passengers in case of accident or sudden braking.
Ensure that all car passengers fasten their seat belts, for their own safety and also because, during the journey, they may injure the child in the event of an accident or the sudden braking of the car.
WARNING! Ensure that during the adjustment operations (of the headrest and safety belts) the movable parts of the child car seat do not come into contact with your child.
When travelling, stop the vehicle in a safe place before carrying out any adjustment operations on the child car seat or for the child.
Check periodically that your child does not unfasten the buckle of the safety harness, or that it does not tamper with the child car seat or any of its parts.
Avoid giving food to your child while travelling, in particular lollypops, ice lollies or other foods on sticks: it may injure your child in the event of an accident or sudden braking.
Do not remove the adhesive and stitched labels since this might make the product non compliant with legal requirements.
Prolonged exposure of the child car seat to direct sunlight may cause the materials or fabric to fade.
If the vehicle has been left in the sun, check that the different parts of the child car seat are not too hot: in such an event, let the child car seat cool down first before placing the child into it, in order to avoid burns.
Check to make sure that all the components of the child car seat are properly hooked before every trip and/or if the vehicle has undergone periodical tune-ups, maintenance or cleaning. Someone could have tampered with and/or unhooked the car seat and not repositioned it correctly according to the instructions.
NOTICE
- This is a "Universal" child restraint. It is approved to Regulation No. 44, 04 series of amendments, for general use in vehicles and it will fit most, but not all, car seats.
- A correct fit is likely if the vehicle manufacturer has declared in the vehicle handbook that the vehicle is capable of accepting a “Universal” child restraint for this age group.
- This child restraint has been classified as "Universal" under more stringent conditions than those which applied to earlier designs which do not carry this notice.
- This is an ISOFIX CHILD RESTRAINT SYSTEM. It is approved to Regulation No.44, 04 series of amendments for general use in vehicles fitted with ISOFIX anchorages systems.
- It will fit vehicles with positions approved as ISOFIX positions (as detailed in the vehicle handbook), depending on the category of the child seat and of the fixture.
• The mass group and the ISOFIX size class for which this device is intended is: Group I (9-18KG), ISOFIX
size class B1.
- Only suitable if the approved vehicles are fitted with 3 point static/with retractor safety-belts, approved to UN/ECE Regulation No. 16 or other equivalent standards.
- If in doubt, consult either the child restraint manufacturer or the retailer.
The correct fitting of the ISOFIX and Top Tether anchoring systems or 3-point belt is of vital importance for the safety of your child.
The product must only be used on a forward facing seat that is fitted with the ISOFIX and Top Tether anchoring systems or 3-point belt which is approved according to ECE R16 or an equivalent standard.
The product may be used on either the front or the back seat. However, we recommend that it is fitted on the back seat.
The product has been approved according to the strictest European safety standards (ECE R44/04) and is suitable for Group I (9-18kg) with the ISOFIX and Top Tether anchoring systems, Group II (15-25kg) and Group III (22-36kg) with 3-point belt, or 3-point belt and additional anchors.
1. SUITABILITY
1.1 Certification

... as a child safety seat installed in a vehicle.
| Joycare Child Safety SeatJC-1292 / JC-1293/JC-1294 | Tested and certified according to ECE R 44/04 | |
| Group Body | Weight | |
| I+II+III 9-36kg | ||
The child safety seat has been designed, tested and certified according to the requirements of the European Standard for Child Safety Equipment (ECE R 44/04).
The seal of approval E (in a circle) and the approval number are located on the approval label (sticker on the child safety seat).
This approval will be invalidated if you make any modifications to the child safety seat. Only the manufacturer is permitted to make modifications to the child safety seat.
2. USE IN THE VEHICLE
WARNING

DO NOT use with 2-point belt. Please install with the 3-point belt.

Please observe the regulations applicable to your particular country. The safety belt must be approved to ECE R 16 or a comparable standard.
Do not use with 2-point belt.
Can be used if the vehicle seat is equipped with a 3-point belt.
You can use your child car seat as follows:

| • In the direction of travel Yes | |
| • Against the direction of travel No | |
| • With 2-point belt | [45c6] No |
| The use of a 2-point belt substantially increases the risk of injury to your child in the event of an accident. | |
| • With 3-point belt | [WOX6] Yes |
| The safety belt must be approved to ECE R 16 or a comparable standard (see test label on belt with an "E" or "e" in a circle). | |
| • With the ISOFIX and Top Tether anchoring systems Yes | |
| If there is a front airbag: Slide the passenger seat a long way back and refer to any instructions in vehicle owner's manual. | |
| • On front passenger seat | [SWX6] Yes |
GB
JOYCARE
| Do not use on passenger seats with a front airbag! The front passenger seat may be used with or without ISOFIX, with the same notes as currently given for the ISOFIX ( slide the seat back and refer to vehicle instructions). | |
| • On outer rear seat Yes | |
| • On centre rear seat | 1447X0 Yes |
| Can be used if the vehicle seat is equipped with a 3-point belt. | |
(Please observe the regulations applicable to your particular country).
3. SECURING YOUR BABY
3.1 Securing your baby using the baby insert

For the protection of your baby
CAUTION
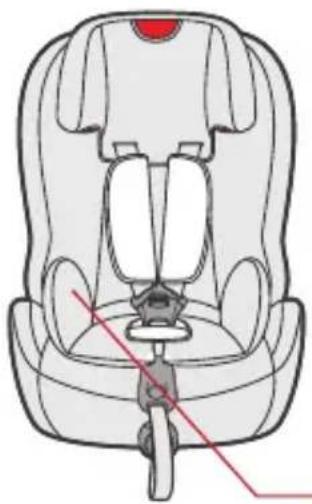
The baby cushion is used to provide extra comfort for very small babies, and it gives your baby the necessary support while he or she is
Baby insert
3.2 How to adjust the belts, headrest and seat positions
IMPORTANT
The correct belt height of the shoulder belts is attained when the belt disappears into the shell slightly above the shoulder of the child. Make sure that the shoulder belts fit properly over the shoulders of the child.
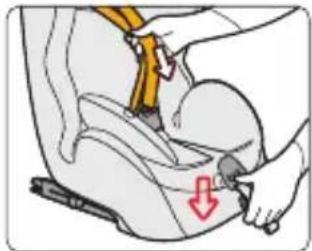
3.2-1 Adjusting the belts
- Loosen the harness straps by pressing the release button and pulling the harness straps as far as you can.
Note! Do not pull the shoulder pads.
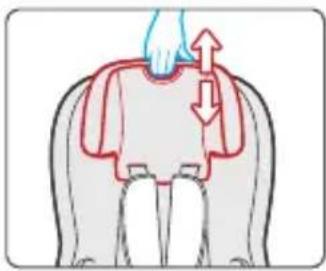
3.2-2 Ten heights of the headrest
- The headrest can be set at five different heights in group I mode with the shoulder belts axle in place. There are five additional positions in Group II & III mode once the shoulder belts axle and harness straps has been removed.

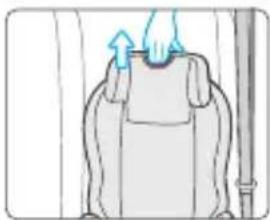
- Press the button on the headrest handle on the top of the seat. It is important to make sure the headrest fit properly to head.

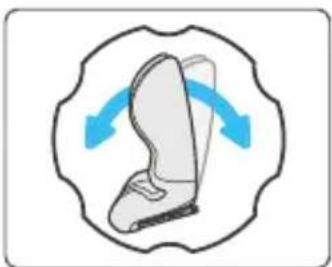
3.2-3 Stepless adjustment device
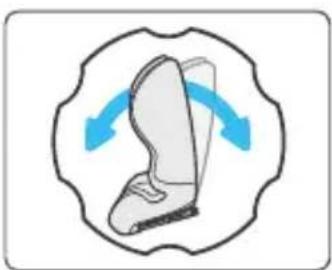
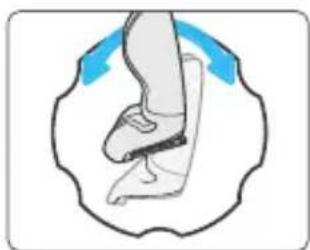
• The recline angles of the car seat can be adjusted by front knob.
Rotate clockwise to add the recline angles, to reduce in the opposite, as shown from the icon on the knob. (Only For Group I).
3.3 Securing your baby using the harness

- Loosen the harness straps by pressing the release button and pulling the harness straps as far as you can.
Note! Do not pull the shoulder pads.


- Open the harness buckle, then place the harness straps to the sides of the car seat. Put the baby into the car seat.
GB
JOYCARE

- The correct belt height of the shoulder pads is attained when the strap disappears into the shell slightly above the shoulder of the child. Make sure that the harness straps fit properly over the shoulders of the child.
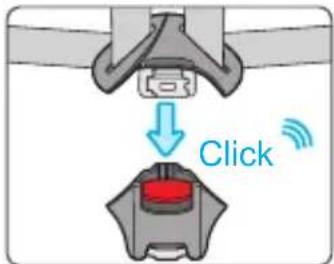
- Slide buckle tongues together and insert them in the buckle with an audible sound "click".

- Pull the straps tight by the harness adjustment strap, and make sure the tightness is comfortable to your kid.
CAUTION
Do not twist or interchange the harness straps.
3.4 Tightening the harness
CAUTION

Pull the straps end straight towards you, not upwards or downwards. Please pay attention to the strap end. Whilst traveling (especially outside the car) it should always be attached to the cover.
3.5 Checklist to ensure that your baby is buckle up correctly.
IMPORTANT

For the safety of your baby, please check that...
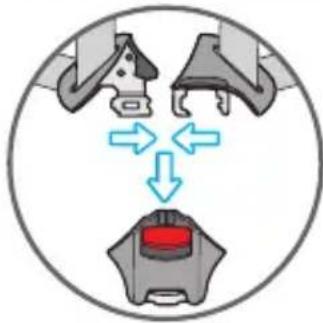
The harness straps of the car seat are comfortable but firm fit around your child.
The harness straps are adjusted correctly.
The harness straps are not twisted.
The buckle tongues are engaged in the harness buckle.
4. INSTALLATION IN THE VEHICLE

Please do not leave your child unattended in the child safety seat in the vehicle.

For the protection of all vehicle occupants
In the case of an emergency stop or an accident unsecured persons or objects may cause injury to other vehicle occupants. Please always check that...
- The backrests of the vehicle seats are locked (i.e. that a foldable rear seat bench latch is engaged).
- All heavy or sharp-edged objects in the vehicle(e.g. on the parcel shelf) are secured.
- All persons in the vehicle have their seat belts fastened.
• The child safety seat is always secured when it is in the vehicle, even if no child is being transported.
To protect your vehicle
Some vehicle seat covers of sensitive materials(e.g. velour, leather, etc.) may develop wear marks when child seats are used. This can be avoided by placing a blanket or towel under the child seat.
4.1 Installation of Group I for the children whose weight between 9-18kg with ISOFIX and Top tether.
IMPORTANT
First please check if there are 2 ISOFIX anchorages in the perpendicular intersection of the vehicle seat back and seat cushion, and the user-ready tether anchorage behind the vehicle seat.
Tips: the user-ready tether anchorage usually permanently installed on the inner rear luggage shelf or on the vehicle floor. Details you could read your vehicle guidelines or contact the vehicle manufacturer.
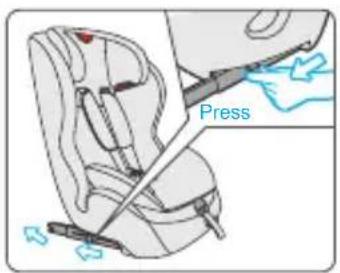
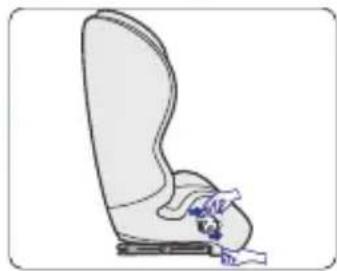
- Press the ISOFIX release button and push the ISOFIX connectors forward as far as possible.


- Push the ISOFIX connectors directly into the anchorages until heard an audible sound "click".

- Grasp the seat body to check the seat if it is fastened tightly or shakes. If the seat shakes and the ISOFIX connectors are pulled out, please repeat the above steps and install it again.


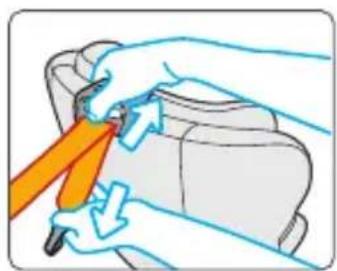
- Pull out the top tether and press the tether strap release button to extend the strap until it is long enough to hook the user-ready tether anchorage behind.

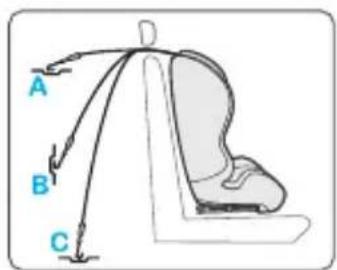
- Hook the tether strap hook onto the user-ready anchorages. Check there maybe are 3 anchorages for the hook, please find one in your favor.

- Pull the tether strap on another end back to tighten the top tether.

CAUTION
If the top tether is tightened favorably and correctly, a green mark will turn up on the other end of the strap release button, please do check it.
4-2 Group I Car Belt Installation For Children weight between 9-18KG)
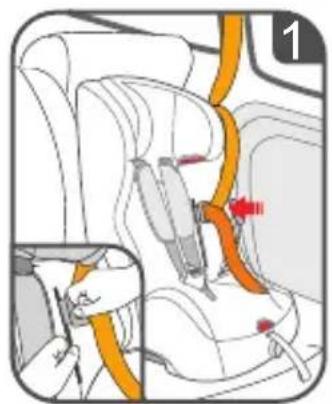


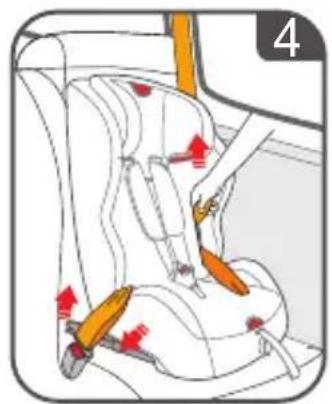


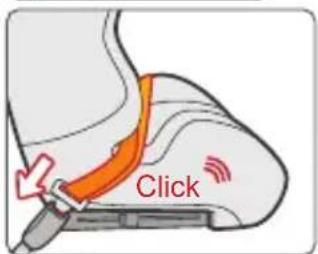
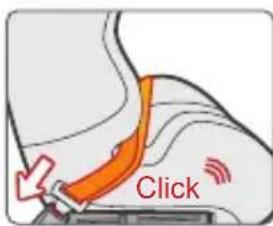
- Pull the car belt and insert belt buckle into the cover hole from one side of seat (picture 1), then across seat back and took out from the other side of cover hole (picture 2), finally buckle up until heard "click" sound (picture 3).
- Please make sure car belt should be through red waist belt guide without no twist.
After installation, tighten car belt as arrow indicator direction (picture4).
- Pull the harness strap as far as you can, and open safety buckle of car seat, then put children inside 5-point harness system and joint buckle clips until heard "click" sound (picture 5).
- Watch your children's feeling, adjust suitable harness tightness by pulling adjusting strap and adjust headrest to right height.(picture6).
4-3 Installation of Group II/III and it is for the children whose weight between 15-36kg.

- Before the installation, please take away the Harness system of baby car seat.
Note: The Baby insert, Harness strap, Harness buckle, Buckle pads& Shoulder pads should be stored away safely for future use (see 5.1 Removing the 5-point harness system and cover).
WARNING
Do not to use any load bearing contact points other than those described in the instructions and marked in the child restraint.
The belt must be routed as shown in the instructions.

- Adjust the height of the headrest to suit your child.

- Put the shoulder belt through the shoulder belt guide under the headrest.

- Place your child into the car seat and pass the belts through the bottom of the armrest. Fasten the car belt with an audible sound "click".

- Make sure the Lap belt is stretched as low as possible over the child's hips, within the Belt guides, and fastened into the buckle. the Shoulder belt must cross midway between child's shoulder and neck.
4-4 Installation of Group II/III with car belt and additional connector for the children whose weight between 15-36kg.
This car seat also allows to install with the ISOFIX, please operate as following:

- Before the installation, please take away the Harness system of baby car seat.
Note: The Baby inserti, Harness strap, Harness buckle, Buckle pads & Shoulder pads should be stored away safely for future use (see 5.1 Removing the 5-point harness system and cover).
WARNING
Do not to use any load bearing contact points other than those described in the instructions and marked in the child restraint.
The belt must be routed as shown in the instructions.
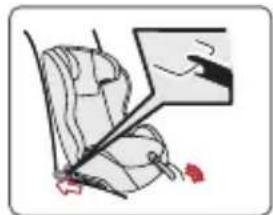

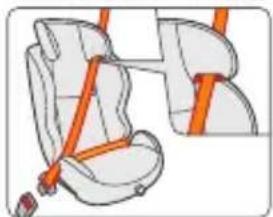
- Press the ISOFIX release button and push the ISOFIX connectors forward as far as possible. Push the ISOFIX connectors directly into the anchorages until heard an audible sound "click".
- Adjust the height of the headrest to suit your child.
- Put the shoulder belt through the shoulder belt guide under the headrest.

- Place your child into the car seat and pass the belts through the bottom of the armrest. Fasten the car belt with an audible sound "click".
- Make sure the Lap belt is stretched as low as possible over the child's hips, within the Belt guides, and fasted into the buckle. The Shoulder bel must cross midway between child's shoulder and neck.
5. CARE INSTRUCTIONS
5.1 Removing the 5-point harness system and cover

- Pull the zipper at the bottom of seat back up, then raise the cover as shown in the picture.

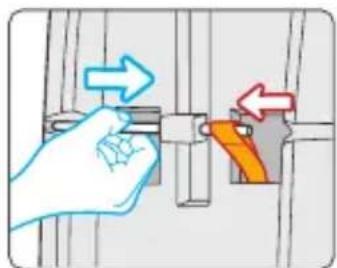
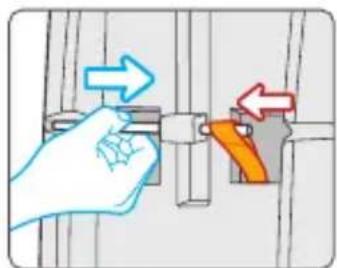
- Press the adjustment device and pull the harness strap out off the strap yoke to unlock it.


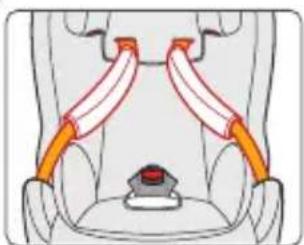
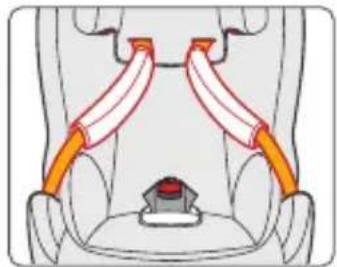
- Pull the shoulder strap axle out from the gap of the shell. Then untie the shoulder strap and pull it out from the harness slots.
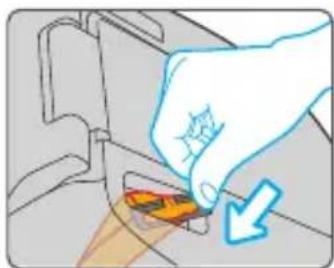

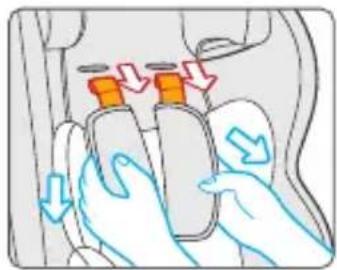
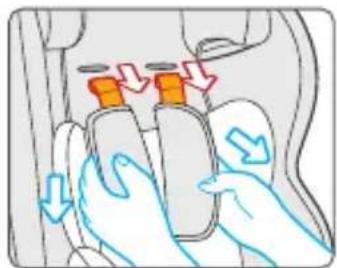
- Loosen the cover of seat base and push the strap clip through the strap clip slot. Then, take covers around both holders out along the edge of holders as shown in picture.

• After the above steps, pull the cover around adjusting device down, and take the cover out from the edge of adjusting device, then remove the 5-point harness system, headrest cover and shell cover.
5.2 Refitting the 5-point harness system and cover

• After washing, place the cover on the shell, pull the cover around adjusting device down and insert the cover around the edge of adjusting device.
JOYCARE
GB


• Pass the strap clip through the strap clip slot. Then, pull both sides of covers as shown in picture and cover both sides of holders.


• Pass the end of the shoulder strap through the harness slot, fix into shoulder strap axle, and lock the shoulder strap axle to the seat shell.

- Also put the end of the harness strap through the harness strap slot and shell, fix into the strap yoke. Make sure the seat straps can not be rotated.
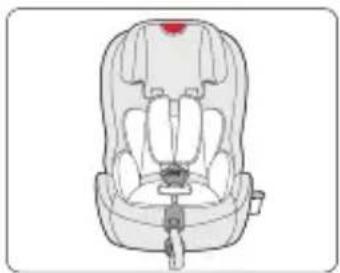
- Close the buckle, then fasten the cover all around. Close the snap buttons on the back. Check that it works!
5.3 Cleaning
Please be sure to use only original seat covers, as the seat cover is important to the proper functioning of the system. Replacement seat covers are available from your retailer and or at branches.

The child seat must not be used without the seat cover.
- The seat cover should not be replaced with any other than the one recommended by the manufacturer, because the cover constitutes an integral part of the restraint performance.
- The cover can be removed and washed with a mild detergent using the washing machine's cycle for delicate items (30°C). Please observe the instructions on the washing label of the cover. The colours of the cover may fade if washed at more than 30°C. Do not spin, and never tumble dry in an electric clothes dryer (the fabric may separate from the padding).
• The plastic parts can be cleaned using soapy water. Do not use harsh cleaning agents (such as
GB
JOYCARE
solvents).
• The harness can be removed and washed in lukewarm soapy water.
Caution! Never remove the buckle tongues from the straps.

Wash cold water 30° C

Do not beach

Do not iron
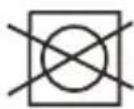
Do not dry clean
5.4 Checklist
For safety's sake read through this checklist before you set off.
Check that the harness belt system fits properly and tightly around your child and that the shoulder belts are at the correct height.
Check regularly that the belt in the baby car seat is not damaged. If it is damaged do not use your product in any circumstances and contact your supplier or importer (see address list in the service card).
Check that you have secured your baby car seat with the seat belt.
ES


PRECAUCION






ATTENTION








ACHTUNG


- JOYCARE
- I - COMPONENTI
- E - COMPONENTES
- ATTENZIONE
- IMPORTANT: PLEASE READ THESE INSTRUCTIONS CAREFULLY BEFORE USE AND KEEP THEM FOR FUTURE REFERENCE. FOR YOUR CHILD'S SAFETY, READ THESE INSTRUCTIONS CAREFULLY. FAILURE TO FOLLOW THE CAR SEAT INSTALLATION INSTRUCTIONS CAREFULLY COULD POSE A RISK TO YOUR BABY
- GB
- NOTICE
- SUITABILITY
- 1.1 CERTIFICATION
- USE IN THE VEHICLE
- WARNING
- SECURING YOUR BABY
- 3.1 SECURING YOUR BABY USING THE BABY INSERT
- 3.2 HOW TO ADJUST THE BELTS, HEADREST AND SEAT POSITIONS
- IMPORTANT
- 3.2-1 ADJUSTING THE BELTS
- 3.2-2 TEN HEIGHTS OF THE HEADREST
- 3.2-3 STEPLESS ADJUSTMENT DEVICE
- 3.3 SECURING YOUR BABY USING THE HARNESS
- CAUTION
- 3.4 TIGHTENING THE HARNESS
- 3.5 CHECKLIST TO ENSURE THAT YOUR BABY IS BUCKLE UP CORRECTLY
- INSTALLATION IN THE VEHICLE
- TO PROTECT YOUR VEHICLE
- 4.1 INSTALLATION OF GROUP I FOR THE CHILDREN WHOSE WEIGHT BETWEEN 9-18KG WITH ISOFIX AND TOP TETHER
- GROUP I CAR BELT INSTALLATION FOR CHILDREN WEIGHT BETWEEN 9-18KG)
- INSTALLATION OF GROUP II/III AND IT IS FOR THE CHILDREN WHOSE WEIGHT BETWEEN 15-36KG
- INSTALLATION OF GROUP II/III WITH CAR BELT AND ADDITIONAL CONNECTOR FOR THE CHILDREN WHOSE WEIGHT BETWEEN 15-36KG
- CARE INSTRUCTIONS
- 5.1 REMOVING THE 5-POINT HARNESS SYSTEM AND COVER
- 5.2 REFITTING THE 5-POINT HARNESS SYSTEM AND COVER
- 5.3 CLEANING
- THE CHILD SEAT MUST NOT BE USED WITHOUT THE SEAT COVER
- 5.4 CHECKLIST
- ES
- PRECAUCION
- ATTENTION
- ACHTUNG
Brand : Joycare
Model : Sicurofix JC-1292
Category : Car seat