QGAS740RMSS - Cooker HAIER - Free user manual and instructions
Find the device manual for free QGAS740RMSS HAIER in PDF.

| Product Type | Freestanding Gas Cooker |
| Brand | Haier |
| Model | QGAS740RMSS |
| Overall Width | 30 inches (76.2 cm) |
| Overall Depth | 26 inches (66 cm) |
| Overall Height | 36 inches (91.4 cm) with backguard |
| Weight | Approximately 150 lbs (68 kg) |
| Power Supply | 120V, 60 Hz, 15 A electrical connection; Natural gas or propane (convertible) |
| Cooktop Burners | 4 sealed gas burners including a high-output burner |
| Oven Type | Gas oven with bake and broil functions |
| Oven Capacity | 5.0 cubic feet (142 L) |
| Cleaning Method | Self-cleaning (pyrolytic) cycle |
| Safety Features | Flame failure safety device on all burners; child lock control; auto shut-off |
| Spare Parts Availability | Replacement burners, grates, knobs, and oven components available through Haier service |
| Warranty | Limited 1-year parts and labor |
| Energy Efficiency | Energy Star certified for gas ranges |
Frequently Asked Questions - QGAS740RMSS HAIER
User questions about QGAS740RMSS HAIER
0 question about this device. Answer the ones you know or ask your own.
Ask a new question about this device
Download the instructions for your Cooker in PDF format for free! Find your manual QGAS740RMSS - HAIER and take your electronic device back in hand. On this page are published all the documents necessary for the use of your device. QGAS740RMSS by HAIER.
USER MANUAL QGAS740RMSS HAIER
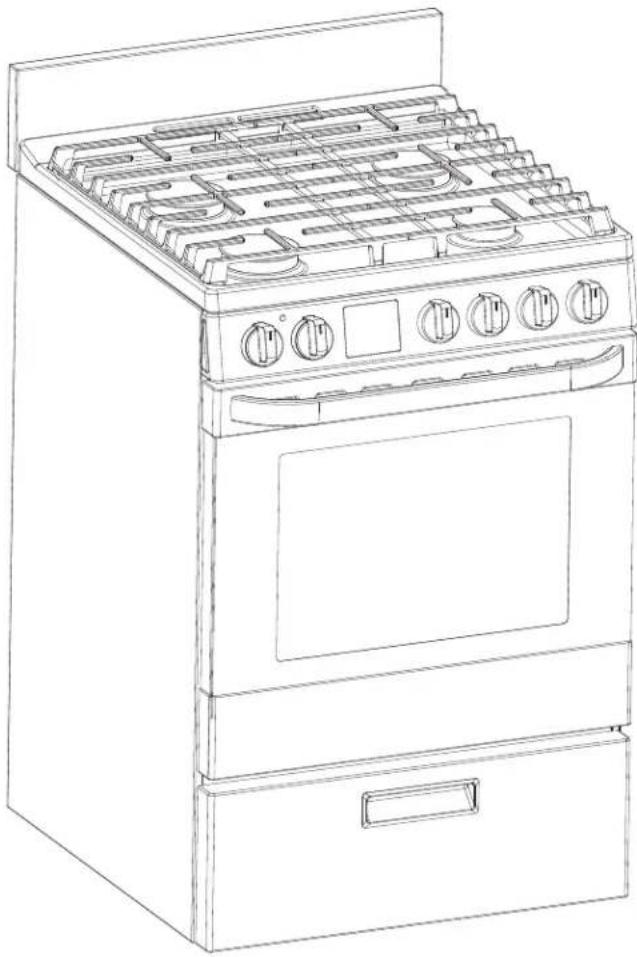
Gas Compact Ranges Cocinas Compacta a Gas
natural_image
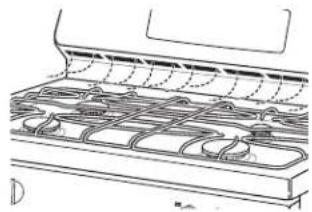
Line drawing of a standard open-plan kitchen oven with multiple gas stove covers (no text or symbols)TABLE OF CONTENTS
SAFETY INFORMATION .... 4
USING THE RANGE 8
In Case Of a Power Failure 8
Surface Burners 8
Oven Controls 9
Sabbath Mode 10
Cookware Guidelines....11
Cooking Modes 11
Oven Racks 12
Oven Air Vents....12
Aluminum Foil and Oven Liners 12
Cooking Guide....13
CARE AND CLEANING ....14
Oven 14
Cooktop....14
Door and Drawer....16
Oven Light....17
Oven Door....17
TROUBLESHOOTING TIPS ....18
WARRANTY 20
ACCESSORIES 21
RECORD KEEPING
Thank you for purchasing this Haier product. This user manual will help you get the best performance from your new range.
For future reference, record the model and serial number located on the front behind the range storage drawer, and the date of purchase.
Staple your proof of purchase to this manual to aid in obtaining warranty service if needed.
Model number
Serial number
Date of purchase
HAIER WEBSITE
Have a question or need assistance with your appliance? Try the Haier Website 24 hours a day, any day of the year! You can also shop for more great Haier products and take advantage of all our on-line support services designed for your convenience. In the US: Haierappliances.com
IMPORTANT SAFETY INFORMATION READ ALL INSTRUCTIONS BEFORE USING THE APPLIANCE
WARNING
Read all safety instructions before using the product. Failure to follow these instructions may result in fire, electrical shock, serious injury or death.
WARNING
If the information in this manual is not followed exactly, a fire or explosion may bring property damage, personal injury or death.
- Do not store or use gasoline or other flammable vapors and liquids in the vicinity of this or any other appliance.
- WHAT TO DO IF YOU SMELL GAS
- Do not try to light any appliance.
- Do not touch any electrical switch; do not use any phone in your building.
- Immediately call your gas supplier from a neighbor's phone. Follow the gas supplier's instructions.
- If you cannot reach your gas supplier, call the fire department.
- Installation and service must be performed by a qualified installer, service agency or the gas supplier.
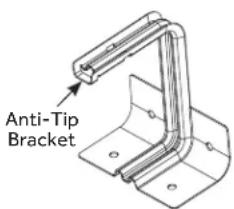
ANTI-TIP DEVICE
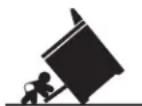
WARNING
Tip-Over Hazard
- A child or adult can tip the range and be killed.
- Verify the anti-tip bracket has been properly installed and engaged.
- Ensure the anti-tip bracket is re-engaged when the range is moved.
- Do not operate the range without the anti-tip bracket in place and engaged.
- Failure to do so can result in death or serious burns to children or adults.
To reduce the risk of tipping the range, the range must be secured by a properly installed anti-tip bracket. See installation instructions shipped with the bracket for complete details before attempting to install.
For Free-Standing Ranges
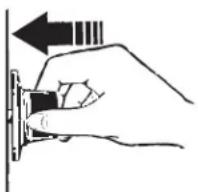
To check if the bracket is installed, ensure there is no cookware on top of the range and all surfaces are cool to the touch. Carefully slide out the range from the wall approximately three inches. Look behind the range to see if there is a metal bracket attached to the floor or the wall. To check if the bracket is installed correctly,
grasp the back of the range, being careful not to grab or bend the rear trim piece. Tilt the range forward slightly and confirm
the anti-tip bracket engages the back of the range, limiting the forward tip of the range. If the anti-tip bracket does not engage the range and prevent it from tipping, verify the anti-tip bracket has been properly installed. If this does not solve the problem or the anti-tip bracket is not present, call 800.626.8774 in the US or 800.561.3344 in Canada.
If the range is pulled from the wall for any reason, always repeat this procedure to verify the range is properly secured by the anti-tip bracket.
Never completely remove the leveling legs or the range will not be secured to the anti-tip device properly.
Free-Standing Ranges
READ AND SAVE THESE INSTRUCTIONS
IMPORTANT SAFETY INFORMATION READ ALL INSTRUCTIONS BEFORE USING THE APPLIANCE
WARNING
GENERAL SAFETY INSTRUCTIONS
WARNING
NEVER use this appliance as a space heater to heat or warm the room. Doing so may result in carbon monoxide poisoning and overheating of the oven.
- Use this appliance for its intended purpose as described in this owner's manual.
- Have your range installed and properly grounded by a qualified installer in accordance with the provided installation instructions.
- Any adjustment and service should be performed only by a qualified gas range installer or service technician. Do not attempt to repair or replace any part of your range unless it is specifically recommended in this manual.
- Your range is shipped from the factory set for use with natural gas. It can be converted for use with propane gas. If required, these adjustments must be made by a qualified technician in accordance with the installation instructions and local codes. The agency performing this work assumes responsibility for the conversion.
- Have the installer show you the location of the range gas shut-off valve and how to turn it off if necessary.
- Plug your range into a 120-volt grounded outlet only. Do not remove the round grounding prong from the plug. If in doubt about the grounding of the home electrical system, it is your responsibility and obligation to have an ungrounded outlet replaced with a properly grounded, three prong outlet in accordance with the National Electrical Code. Do not use an extension cord with this appliance.
- Before performing any service, unplug the range or disconnect the power supply at the household distribution panel by removing the fuse or switching off the circuit breaker.
- Be sure all packing materials are removed from the range before operating to prevent ignition of these materials.
- Avoid scratching or impacting glass doors, cooktops, or control panels. Doing so may lead to glass breakage. Do
not cook on a product with broken glass. Shock, fire, or cuts may occur.
- Do not leave children alone or unattended in an area where an appliance is in use. They should never be allowed to climb, sit or stand on any part of the appliance.
CAUTION
Do not store items of interest to
ts above an oven - children climbing on
items could be seriously injured.
- Never block the vents (air openings) of the range. They provide the air inlets and outlets that are necessary for the range to operate properly with correct combustion. Air openings are located at the rear of the cooktop, at the top and bottom of the oven door, and at the bottom of the range under the warming drawer, lower oven drawer or kick panel.
- Use only dry pot holders—moist or damp pot holders on hot surfaces may result in burns from steam. Do not let pot holders touch surface burners, burner grate, or oven heating element. Do not use a towel or other bulky cloth in place of pot holders.
- Do not touch the heating elements or the interior surface of the oven. These surfaces may be hot enough to burn even though they are dark in color. During and after use, do not touch, or let clothing or other flammable materials contact any interior area of the oven; allow sufficient time for cooling first. Other surfaces of the appliance may become hot enough to cause burns. Potentially hot surfaces include the burners, grates, oven vent opening, surfaces near the opening, and crevices around the oven door.
- Do not heat unopened food containers. Pressure could build up and the container could burst, causing an injury.
- Cook food thoroughly to help protect against foodborne illness. Minimum safe food temperature recommendations can be found at IsItDoneYet.gov and fsis.usda.gov. Use a food thermometer to take food temperatures and check several locations.
- Do not allow anyone to climb, stand or hang on the oven door, drawer or cooktop. They could damage the range or tip it over causing severe injury or death.
READ AND SAVE THESE INSTRUCTIONS
IMPORTANT SAFETY INFORMATION READ ALL INSTRUCTIONS BEFORE USING THE APPLIANCE
WARNING
KEEP FLAMMABLE MATERIALS AWAY FROM THE RANGE
Failure to do so may result in fire or personal injury.
- Do not store or use flammable materials in an oven or near the cooktop, including paper, plastic, pot holders, linens, wall coverings, curtains, drapes and gasoline or other flammable vapors and liquids.
- Never wear loose-fitting or hanging garments while using the appliance. These garments may ignite if they contact hot surfaces causing severe burns.
- Do not let cooking grease or other flammable materials accumulate in or near the range. Grease in the oven or on the cooktop may ignite.
WARNING
IN THE EVENT OF A FIRE, TAKE THE FOLLOWING STEPS TO PREVENT INJURY AND FIRE SPREADING
- Do not use water on grease fires. Never pick up a flaming pan. Turn the controls off. Smother a flaming pan on a surface unit by covering the pan completely with a well-fitting lid, cookie sheet or flat tray. Use a multi-purpose dry chemical or foam-type fire extinguisher.
- If there is a fire in the oven during baking, smother the fire by closing the oven door and turning the oven off or
by using a multi-purpose dry chemical or foam-type fire extinguisher.
- If there is a fire in the oven during self-clean, turn the oven off and wait for the fire to go out. Do not force the door open. Introduction of fresh air at self-clean temperatures may lead to a burst of flame from the oven. Failure to follow this instruction may result in severe burns.
WARNING
COOKTOP SAFETY INSTRUCTIONS
- Never leave the surface burners unattended at medium or high heat settings. Foods, especially oily foods, may ignite resulting in fire that could spread to surrounding cabinets.
- Never leave oil unattended while frying. If allowed to heat beyond its smoking point, oil may ignite resulting in fire that may spread to surrounding cabinets. Use a deep fat thermometer whenever possible to monitor oil temperature.
- To avoid oil spillover and fire, use the minimum amount of oil when using a shallow pan-frying and avoid cooking frozen foods with excessive amounts of ice.
-
Use proper pan size and avoid pans that are unstable or easily tipped. Select cookware that is matched to the size of the burner. Burner flames should be adjusted so that they do not extend beyond the bottom of the pan. Excessive flame may be hazardous.
• Always use the LITE position when igniting the top burners and make sure the burners have ignited. -
When using glass/ceramic cookware, make sure it is suitable for cooktop service; others may break because of sudden change in temperature.
- To minimize the possibility of burns, ignition of flammable materials and spillage, the handle of a container should be turned toward the center of the range without extending over nearby burners.
- Do not use a wok with a round metal support ring. The ring may trap heat and block air to the burner resulting in a carbon monoxide hazard.
- Do not attempt to lift the cooktop. Doing so may damage the gas tubing to the surface burners resulting in a gas leak and risk of fire.
- Do not use aluminum foil to cover the grates or line any part of the cooktop. Doing so may result in carbon monoxide poisoning, overheating of the cooktop surfaces, or a potential fire hazard.
READ AND SAVE THESE INSTRUCTIONS
IMPORTANT SAFETY INFORMATION READ ALL INSTRUCTIONS BEFORE USING THE APPLIANCE
WARNING
OVEN SAFETY INSTRUCTIONS
▲WARNING
NEVER cover any slots, holes, or passages in the oven bottom or cover an entire rack with materials such as aluminum foil or oven liners. Doing so blocks air flow through the oven and may cause carbon monoxide poisoning. Never place foil or oven liners on the oven bottom. They can trap heat causing risk of smoke or fire.
- Stand away from the range when opening the oven door. Hot air or steam which escapes can cause burns to hands, face and/or eyes.
-
Never place cooking utensils, pizza or baking stones, or any type of foil or liner on the oven floor. These items can trap heat or melt, resulting in damage to the product and risk of shock, smoke or fire.
-
Place oven racks in desired location while oven is cool. If rack must be moved while oven is hot, be careful to avoid touching hot surfaces.
- Do not leave items such as paper, cooking utensils, or food in the oven when not in use. Items stored in an oven can ignite.
- Do not leave items on the cooktop near the oven vent. Items may overheat resulting in a risk of fire or burns.
- Never broil with door open. Open-door broiling is not permitted due to overheating of control knobs.
How to Remove Protective Shipping Film and Packaging Tape
Carefully grasp a corner of the protective shipping film with your fingers and slowly peel it from the appliance surface. Do not use any sharp items to remove the film. Remove all of the film before using the appliance for the first time.
To assure no damage is done to the finish of the product, the safest way to remove the adhesive from packaging tape on new appliances is an application of a household liquid dishwashing detergent. Apply with a soft cloth and allow to soak.
NOTE: The adhesive must be removed from all parts. It cannot be removed if it is baked on.
READ AND SAVE THESE INSTRUCTIONS
USING THE RANGE
IN CASE OF A POWER FAILURE
In the event of a power failure, the oven is inoperable and no attempt should be made to operate it. However, the surface burners may be lit with a match. Using extreme caution, hold a lit match near the ports beneath the surface burner cap, then slowly turn the knob to the LITE position. Once lit, surface burners will continue to operate normally.
SURFACE BURNERS
Lighting a Surface Burner
WARNING
Burners should be operated only when covered by cookware. Burner flames not covered by cookware present a risk of fire or clothing ignition. Never let flames extend beyond the sides of the cookware. Failure to comply may result in serious injury.
Make sure all burners are in their correct locations and fully assembled before attempting to operate any burner.
Select a burner and find its control knob. Push the knob in and turn it to the LITE position.
You will hear a clicking noise—the sound of the electric spark igniting the burner. When one burner is turned to LITE, all burners will spark. Sparking will continue as long as the knob remains at LITE. Once gas is ignited, turn the knob to adjust the flame size.
Push the control knob in and turn it to the LITE position.
Selecting a Flame Size
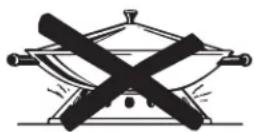
Watch the flame, not the knob, as you adjust heat. When rapid heating is desired, the flame size should match the size of the cookware you are using. Flames larger than the bottom of the cookware will not heat faster and may be hazardous.
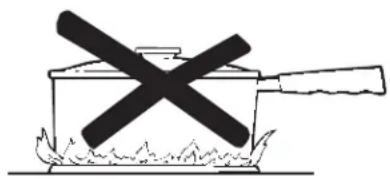
natural_image
Simple line drawing of a cooking pot with a crossed-out black X mark and flames on the base (no text or symbols)These flames are too large for the pot
Using the Surface Burners
NOTES:
- Do not operate the burner for an extended period of time without cookware on the grate. The finish on the grate may discolor or chip without cookware to absorb the heat.
- Do not attempt to disassemble any burner while another burner is on. Damage to the product may occur.
- Be sure the burners and grates are cool before you place your hand, a pot holder or cleaning materials on them.
Your rangetop has sealed gas burners that offer convenience, cleanability and flexibility for a wide range of cooking applications.
The smallest burner is the simmer burner. A simmer burner turned down to LO provides precise cooking performance for foods such as delicate sauces that require low heat for a long cooking time.
Surface Burner
The round burner is for general cooking purposes. Size cookware appropriately to the flames.
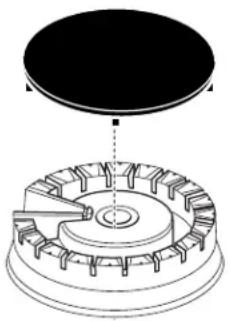
natural_image
Technical diagram of a mechanical assembly showing a circular component and a gear-like structure (no text or symbols)USING THE RANGE
SURFACE BURNERS (Cont.)
Top-of-Range Cookware
Aluminum: Medium-weight cookware is recommended because it heats quickly and evenly. Most foods brown evenly in an aluminum skillet. Use saucepans with tight-fitting lids when cooking with minimum amounts of water.
Stainless Steel: This metal alone has poor heating properties and is usually combined with copper, aluminum or other metals for improved heat distribution. Combination metal skillets usually work satisfactorily if they are used with medium heat or as the manufacturer recommends.
Cast-Iron: If heated slowly, most skillets will give satisfactory results.
Enamelware: Under some conditions, the enamel of some cookware may melt. Follow the cookware manufacturer's recommendations for cooking methods.
Glass: There are two types of glass cookware—those for oven use only and those for top-of-range cooking (saucepans, coffee and teapots). Glass conducts heat very slowly.
Heatproof Glass Ceramic: Can be used for either surface or oven cooking. It conducts heat very slowly and cools very slowly. Check the cookware manufacturer's directions to be sure it can be used on gas ranges.
Stove Top Grills
Do not use an after-market stove top grill on your gas surface burners. A stove top grill will cause incomplete combustion resulting in carbon monoxide levels above allowable standards. This could be hazardous to your health.
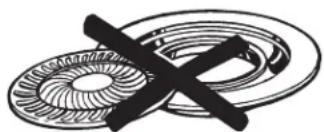
natural_image
Pure mechanical diagram showing a gear and a cross symbol without any text or labelsDo not use stove top grills
Using a Wok
Use only a flat-bottomed wok with a diameter of 14 inches or less. Make sure the wok bottom sits flat on the grate.
Do not use a wok support ring. Placing the ring over the burner or grate may cause the burner to work improperly, resulting in carbon monoxide levels above allowable standards. This could be hazardous to your health.
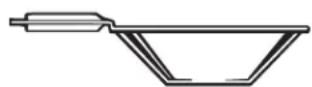
Use a flat-bottomed wok
OVEN CONTROLS
Oven Mode Selector Knob
Turn the Oven Mode Selector knob to the mode you want. Your oven has the following cooking modes: Bake Broil and Convection Bake. See Cooking Modes section and Steam Clean for more information.
- Bake
- Broil
- Convection Bake
- Steam Clean
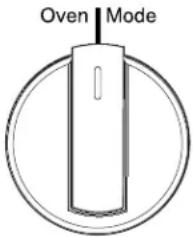
Oven Mode Selector Knob (knob appearance may vary)
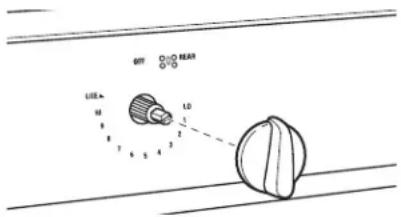
Oven Temperature Knob
Turn the Oven Temp knob to the setting you want until Oven/Cycle light turns off.
The Oven/Cycle light comes on when the burner is on. It will cycle on and off during cooking.
To Adjust the Thermostat:
-
Pull the Oven Temp knob off the range and look at the back side. To make an adjustment, loosen (approximately one turn), but do not completely remove, the two screws on the back of the knob.
-
With the back of the knob facing you, hold the outer edge of the knob with one hand and turn the front of the knob with the other hand.
To increase the oven temperature, move the top screw toward the right. You'll hear a click for each notch you move the knob.
To decrease the oven temperature, move the top screw toward the left.
Each click will change the oven temperature approximately 10^ F. (Range is plus or minus 30^ F from the arrow.) We suggest that you make the adjustment one click from the original setting and check oven performance before making any additional adjustments.
USING THE RANGE
OVEN CONTROLS (Cont.)
Oven Temperature Knob (Cont.)
- After the adjustment is made, retighten screws so they are snug, but be careful not to overtighten.
- Replace the knob, matching the flat area of the knob to the shaft, and check performance.
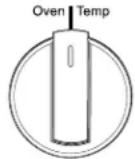
Front of OVEN TEMP knob (knob appearance may vary)
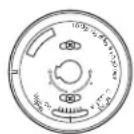
Back of OVEN TEMP knob (knob appearance may vary)
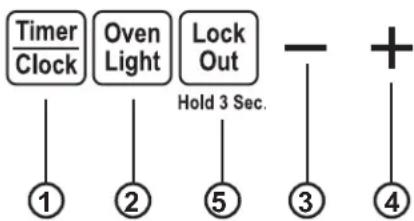
Timer/Clock Display
flowchart
graph TD
    A["Timer/Clock"] --> B["①"]
    C["Oven Light"] --> D["②"]
    E["Lock Out"] --> F["⑤"]
    G["-"] --> H["③"]
    I["+"] --> J["④"]
    B --> K["Hold 3 Sec."]
- Timer/Clock: Works as a countdown timer and a clock.
To set the countdown timer, press the Timer/Clock pad and use the + and - pads to set the time in hours and minutes. After seeing the time, press the Timer/Clock pad again and the ":" will stop blinking indicating the timer has started. To cancel the timer, press the Timer/Clock pad to ensure the ":" is blinking. Then change the time to 0:00 and press the Timer/Clock pad changing it back to the clock time.
To set the clock, press and hold the Timer/Clock pad several seconds and use the + and - pads to set the clock. After changing the time, hit the Timer/Clock pad to finalize the clock time.
- Oven Light: Turns the oven light on or off.
-
- Pad: Use to decrease time for the countdown timer and clock. Short taps to this pad will decrease the time by small amounts. Holding the pad down will decrease the time by large amounts.
-
- Pad: Use to increase time for the countdown timer and clock. Short taps to this pad will increase the time by small amounts. Holding the pad down will increase the time by large amounts.
- Lock Out: Locks out the timer and clock display so that pressing any of the pads will be disabled. Press and hold the Lock Out pad for three seconds to lock or unlock the display.
SABBATH MODE
Certain models comply with the Star-K Jewish Sabbath requirements for use during the Sabbath and holidays. For the latest list of models, see star-k.org.
Start Baking
To start baking, simply turn the thermostat knob to the desired temperature. Because a thermostat model will respond with a clicking sound when the thermostat knob is used to turn on the oven, this operation should take place before the Sabbath or Holidays begin.
Adjusting the Temperature
To adjust the oven temperature while in compliance with Sabbath requirements, the user must observe the oven ON indicator light:
- To adjust the oven temperature to a higher value, the user must first confirm the "OVEN ON" light is on. Only then, can the user turn the knob to a higher temperature than was previously set.
- To adjust the oven temperature to a lower value, the user must first confirm the "OVEN ON" light is off. Only then, can the user turn the knob to a lower temperature than was previously set.
Stop Baking
To stop baking, simply turn the thermostat knob to the off position. Because a thermostat model will respond with a clicking sound when the thermostat knob is used to turn off the oven, this operation should take place after the Sabbath or Holidays end.
Oven Light Operation
The oven light can be set to either on or off prior to the start of the Sabbath or the holiday. Opening and closing of the door will not change the state of the oven light.
Sabbath Mode Power Outage Note
If a power outage occurs during a Sabbath bake, the unit will return to Sabbath bake mode when power is restored and the oven will return to the same temperature as before the outage, without any intervention from the user.
USING THE RANGE
COOKWARE GUIDELINES
The material, finish, and size of cookware affect baking performance.
Dark, coated and dull pans absorb heat more readily than light, shiny pans. Pans that absorb heat more readily can result in a browner, crisper and thicker crust. If using dark and coated cookware check food earlier than the minimum cook time. If undesirable results are obtained with this type of cookware consider reducing oven temperature by 25^ F next time.
- Shiny pans can produce more evenly cooked baked goods such as cakes and cookies.
- Glass and ceramic pans heat slowly but retain heat well. These types of pans work well for dishes such as pies and custards.
- Air insulated pans heat slowly and can reduce bottom browning.
- Keep cookware clean to promote even heating.
COOKING MODES
Your new oven has a variety of cooking modes to help you get the best results. These modes are described below. Refer to the Cooking Guide section for recommendations for specific foods. Remember, your new oven may perform differently than the oven it is replacing.
Bake
The bake mode is for baking and roasting. When preparing baked goods such as cakes, cookies and pastries, always preheat the oven first. To use this mode turn the thermostat knob to the desired temperature.
Convection Bake Multi Rack
The Convection Bake mode is intended for baking on multiple racks at the same time. This mode uses air movement from the convection fan to enhance cooking evenness. Lower the temperature 25 degrees. Always preheat when using this mode. Baking times may be slightly longer for multiple racks than what would be expected for a single rack. To use this mode turn your Oven Mode Knob to Convection Bake and Oven Temperature Knob to the recommended temperature setting.
Warm
Warm mode is designed to keep hot foods hot. Cover foods that need to remain moist and do not cover foods that should be crisp. Preheating is not required. Do not use Warm to heat cold food. It is recommended that food not be kept warm for more than 2 hours. To use this mode turn the thermostat knob to Warm.
Broil
Always broil with the oven door and drawer closed. Monitor food closely while broiling. Use caution when broiling on the upper rack positions as placing food closer to the broil burner increases smoking, splattering, and the possibility of fats igniting.
Try broiling foods that you would normally grill. Adjust rack positions to adjust the intensity of the heat to the food. Place foods closer to the broil burner when a seared surface and rare interior is desired. Thicker foods and foods that need to be cooked through should be broiled on a lower rack position. To use this mode turn the thermostat knob to the Broil setting. NOTE: Remove unused racks from oven for faster preheat, improved efficiency, and optimal performance.
USING THE RANGE
OVEN RACKS
Rack Positions
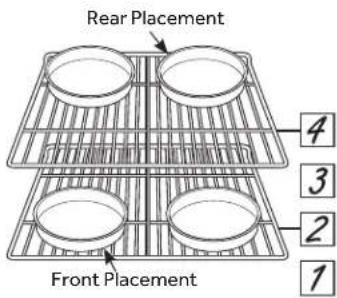
Your oven has four rack positions in the oven. Recommended rack positions for various types of foods are provided in the Cooking Guide. Adjusting the rack position is one way to impact cooking results. For example, if you would prefer darker tops on cakes, muffins or cookies, try moving food one rack position higher. If you find foods are too brown on top, try moving them down next time.
When baking with multiple pans and on multiple racks, ensure there is sufficient space between pans to allow air to flow. This may improve cooking evenness.
Removing and Replacing Flat Racks
When placing and removing cookware, pull the rack out to the bump (stop position) on the rack support.
To remove a rack, pull it toward you until it reaches the stop position, tilt up the front of the rack and pull it out.
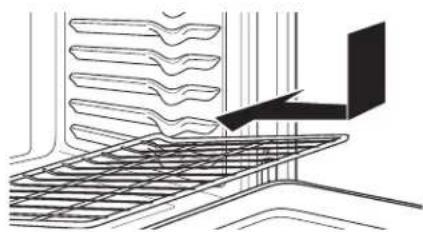
To replace a rack, place the curved end of the rack onto the rack supports. Tilt up the front of the rack and push the rack in until it stops. Then lay the rack flat and push it in until it is all the way into the oven.
Racks may become difficult to slide. To improve sliding conditions, use a soft cloth or paper towel to rub vegetable oil on the left and right edges of the racks and/or rack supports.
NOTE: Remove unused racks when using the oven for faster preheat, improved efficiency, and optimal cooking performance.
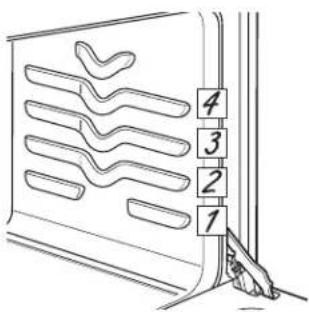
Rack positions
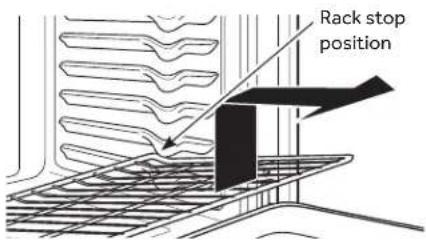
Removing racks
natural_image
Pure technical line drawing of a mechanical component without any text, numbers, or symbolsReplacing racks
OVEN AIR VENTS
Never block the vents (air openings) of the range. They provide the air inlet and outlet that are necessary for the range to keep cool and operate properly with correct combustion.
Air openings are located at the rear of the cooktop, at the top and bottom of the oven door, and at the bottom of the range.
natural_image
Line drawing of a kitchen appliance with multiple panes and a lid (no text or symbols)Vent appearance and location vary.
ALUMINUM FOIL AND OVEN LINERS
CAUTION
Do not use any type of foil or oven liner to cover the oven bottom. These items can trap heat or melt, resulting in damage to the product and risk of shock, smoke or fire. Damage from improper use of these items is not covered by the product warranty.
Foil may be used to catch spills by placing a sheet on a lower rack, several inches below the food. Do not use more foil than necessary and never entirely cover an oven rack with aluminum foil. Keep foil at least 1-1/2" from oven walls to prevent poor heat circulation.
USING THE RANGE
COOKING GUIDE
| FOOD TYPE | RECOMMENDED MODE(S) | RECOMMENDED RACK POSITION(S) ADDIT | ATIONAL SUGGESTIONS |
| Baked Goods | |||
| Layer cakes, sheet cakes, bundt cakes, muffins, quick breads on a Single Rack | Bake 3 Use shiny cookware. | ||
| Layer cakes* on Multiple Racks | Bake Convection Bake | 2 and 4 Ensure adequate airflow (see illustration below). | |
| Chiffon cakes (angel food) Bake 2 Use shiny cookware. | |||
| Cookies, biscuits, scones on a Single Rack | Bake 3 Use shiny cookware. | ||
| Cookies, biscuits, scones on Multiple Racks | Convection Bake Bake | 2 and 4 | Ensure adequate airflow. Switch food location partially through cooking for more even cooking results. |
| Beef & Pork | |||
| Hamburgers Broil 4 | Use a broil pan; move food down for more doneness/less searing. Watch food closely when broiling. Center food under burner. | ||
| Steaks & Chops Broil 4 | Use a broil pan; move food down for more doneness/less searing. Watch food closely when broiling. Center food under burner. | ||
| Roasts Bake 2 or 3 | Leave uncovered, use a low sided pan such as a broil pan.Preheating is not necessary. | ||
| Poultry | |||
| Whole chicken Bake 2 Leave uncovered, use a low sided pan such as a broil pan. | |||
| Bone-in chicken breasts, legs, thighs | Broil Bake | 2 or 3 | If breaded or coated in sauce avoid Broil modes. Broil skin side down first. Watch food closely when broiling. |
| Boneless chicken breasts | Broil Bake | 2 or 3 | Move food down for more doneness/less searing and up for greater searing/browning when broiling. |
| Whole turkey Bake 1 or 2 Leave uncovered, use a low sided pan such as a broil pan. | |||
| Turkey Breast | Bake 2 or 3 Leave uncovered, use a low sided pan such as a broil pan. | ||
| Fish | Broil | 4 | Watch food closely when broiling. |
| Casseroles | Bake 3 | ||
| Frozen Convenience Foods | |||
| Pizza, potato products, chicken nuggets, appetizers on a Single Rack | Bake 3 Use shiny cookware. | ||
*When baking four cake layers at a time, stagger the pans as shown to the right so that one pan is not directly above another.
Cook food thoroughly to help protect against foodborne illness. Minimum safe food temperature recommendations for food safety can be found at IsItDoneYet.gov. Make sure to use a food thermometer to take food temperatures.
NOTE: Remove unused racks when using the oven for faster preheat, improved efficiency and optimal cooking performance.
Rack positions
CARE AND CLEANING
OVEN
Be sure all controls are off and all surfaces are cool before cleaning any part of the oven.
Oven Interior
The interior of your new oven can be cleaned manually or by using the Steam Clean feature.
Spillage of marinades, fruit juices, tomato sauces and basting liquids containing acids may cause discoloration and should be wiped up as soon as hot surfaces cool, then clean and rinse.
Manual Cleaning
Do not use oven cleaners, strong liquid cleansers, steel wool, or scouring pads on the interior of the oven. For soils on the oven bottom and other enameled surfaces, use a gentle abrasive containing oxalic acid, such as Bar Keepers Friend ^® , with a non-scratch sponge. Take care not to apply any abrasive cleaners or sponges to the door glass, as it will scratch the reflective coating. The oven interior and door glass may be cleaned using a soft cloth with a mild soap and water, or vinegar and water solution. After cleaning, rinse with clean water and dry with a soft cloth.
Steam Clean
The Steam Clean feature is for cleaning light soil from your oven.
To use the Steam Clean feature:
- Start with the oven at room temperature.
- Wipe excess grease and soils from the oven.
- Pour 1/2 cup of water onto the bottom of the oven.
- Close the door.
- Turn both your Oven Mode Knob and Oven Temperature Knob to Steam Clean Setting.
Do not open the door during the Steam Cleaning cycle. At the end of the Steam Clean cycle, soak up the remaining water, and wipe the moisture-softened soil from the oven walls and door.
Oven Exterior
Do not use oven cleaners, abrasive cleansers, strong liquid cleansers, steel wool, plastic scouring pads or cleaning powders on the interior or exterior of the oven. Clean with a mild soap and water or a 50/50 solution of vinegar and water. Rinse with clean water and dry with a soft cloth. When cleaning surfaces, make sure that they are at room temperature and not in direct sunlight.
Spillage of marinades, fruit juices, tomato sauces and basting liquids containing acids may cause discoloration and should be wiped up as soon as hot surfaces cool, then clean and rinse.
Oven Racks
All oven racks may be cleaned by hand with an abrasive cleaner or steel wool.
After cleaning the racks, use a soft cloth or paper towel to rub a small amount of vegetable oil on the left and right edges of the rack. This will ensure the racks are easy to slide in and out of the oven.
COOKTOP
Control Panel and Knobs
Wipe the control panel after each use of the oven with a damp cloth. For cleaning, use mild soap and water or a 50/50 solution of vinegar and water. Rinse with clean water. Polish dry with a soft cloth.
Do not use abrasive cleansers, strong liquid cleansers, plastic scouring pads or oven cleaners on the control panel—they will damage the finish.
Stainless Steel Surfaces (on some models)
Do not use a steel wool pad; it will scratch the surface.
To clean the stainless steel surface, use warm sudsy water or a stainless steel cleaner or polish. Always wipe the surface in the direction of the grain. Follow the cleaner instructions for cleaning the stainless steel surface.
Cleaners with oxalic acid such as Bar Keepers Friend Soft Cleanser™ will remove surface rust, tarnish and small blemishes. Use only a liquid cleanser free of grit and rub in the direction of the brush lines with a damp, soft sponge.
To inquire about purchasing cleaning products including stainless steel appliance cleaner or polish, see the Accessories and Consumer Support sections at the end of this manual.
For easier cleaning, the control knobs may be removed by pulling them directly outwards once the knobs are in the OFF position. Do not pull knobs up or down or hang objects on them. This can damage the gas valve shaft. When removing the tri-ring (on some models) and the dual-oval (on some models) burner knobs, remember their location. While all other knobs are interchangeable, these knobs must be placed in the same location after cleaning. See the Surface Burner section for a detailed view of these knobs. The knobs can be washed by hand with soap and water or in a dishwasher.
CARE AND CLEANING
COOKTOP (Cont)
Control Panel and Knobs (Cont)
To replace knobs after cleaning, align the hole on the knob backside with the gas valve shaft and push inward until the knob is securely fastened. All knobs are interchangeable.
Surface burner knob
Cooktop Surface
Do not use oven cleaners, abrasive cleansers, strong liquid cleansers, steel wool, plastic scouring pads, or cleaning powders on the cooktop surface. Clean with a mild soap and water or a 50/50 solution of vinegar and water. Rinse with clean water and dry with a soft cloth. When cleaning surfaces, make sure that they are at room temperature and not in direct sunlight.
Spillage of marinades, fruit juices, tomato sauces and basting liquids containing acids may cause discoloration and should be wiped up as soon as hot surfaces cool, then clean and rinse.
If your model has a stainless steel cooktop surface, refer to the Stainless Steel Surface cleaning instructions featured in the Control Panel and Knobs section.
Removal of Surface Burners for Cleaning
Turn all controls OFF. Allow cooktop to cool before removing grates and burner parts. When removing the burner caps and heads, remember their size and location. Replace them in the same location after cleaning.
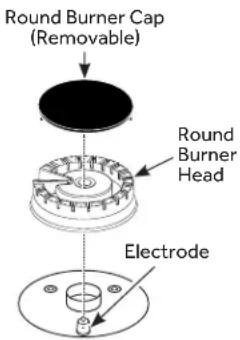
Round Burner
Cleaning the Surface Burners
Cleaning the Burner Caps
Wash burner caps in hot, soapy water and rinse with clean water. You may scour with a plastic scouring pad to remove burned-on food particles. The round burner caps may also be cleaned in your dishwasher.
Cleaning the Burner Heads
Wash the burner heads routinely, especially after bad spillovers which could clog the burner openings. Lift burners off when cool. Wash with hot, soapy water. Rinse with clean water. For more stubborn stains, use a brush with plastic bristles.
NOTE: Do not use steel wool or scouring pads to clean the burner parts as these may clog the openings. Never wash burner heads in your dishwasher as dishwasher. Doing so may cause them to discolor.
The ports in the burner heads must be kept clean at all times for an even, unhampered flame.
Clogged or dirty burner ports or electrodes will not allow the burner to operate properly.
Replacing Surface Burners
Before replacing the burner caps, heads and oval head/cap assembly, shake out excess water and allow them to dry thoroughly.
Replace burner heads in the correct locations according to size. Ensure each cap is properly seated on the burner head, as pictured below.
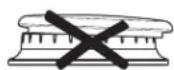
Burner cap is NOT properly seated.
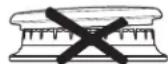
Burner cap is NOT properly seated.
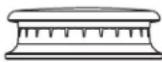
Burner cap is properly seated.
CAUTION
Do not operate the cooktop without all
burner parts and grates in place.
Any spill on or around an electrode must be carefully cleaned. Avoid hitting the electrode with anything hard or it could be damaged.
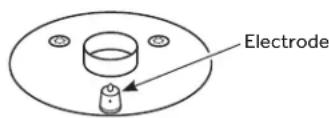
The electrode of the spark igniter is exposed when the burner head is removed. When one burner is turned to LITE, all the burners spark. Do not attempt to disassemble or clean around any burner while another burner is on.
CARE AND CLEANING
COOKTOP (Cont)
Burner Grates
Grates should be washed in hot, soapy water and rinsed with clean water. To soften burned-on food, place grates in a solution containing 14 -cup of household ammonia for several hours. Afterward, scrub grates with a plastic scouring pad soaked in hot, soapy water. Rinse well and dry.
DOOR AND DRAWER
Cleaning the Oven Door
Cleaning the Door Interior
Do not allow excess water to run into any holes or slots in the door.
Wipe dish soap over any baked-on spatters on the glass. Use a single sided safety razor blade to clean it off. Then wipe over the glass with a soapy cloth to remove any residue and dry off.
The area outside the gasket can be cleaned with a soap-filled plastic scouring pad. Do not rub or clean the door gasket - it has an extremely low resistance to abrasion.
If you notice the gasket becoming worn, frayed or damaged in any way or if it has become displaced on the door, you should have it replaced.
Cleaning the Door Exterior
If a stain on the door vent trim is persistent, use a mild abrasive cleaner and a sponge-scrubber for best results. Do not use this method on any other surface.
Stainless Steel Surfaces (on some models)
Do not use a steel wool pad; it will scratch the surface.
To clean the stainless steel surface, use warm sudsy water or a stainless steel cleaner or polish. Always wipe the surface in the direction of the grain. Follow the cleaner instructions for cleaning the stainless steel surface.
To inquire about purchasing cleaning products including stainless steel appliance cleaner or polish, see the Accessories and Consumer Support sections at the end of this manual.
Removable Storage Drawer
The storage drawer is a good place to store cookware and bakeware. Do not store plastics or flammable material in the drawer.
The storage drawer may be removed for cleaning under the range. Clean the storage drawer with a damp cloth or sponge. Never use harsh abrasives or scouring pads.
Your storage drawer may have plastic slides (shown to the right) or metal rails. Follow the respective removal and replacement instructions for your model's configuration.
Removing the Storage Drawer:
- Pull drawer straight out until it stops.
- Continue to pull the drawer until it is detached from the oven.
Replacing the Storage Drawer:
- Rest the left drawer rail around the inner left rail guide and slide it in slightly.
- Place the right drawer rail around the inner right rail guide and slide it in slightly.
- Slide the drawer all the way in.
CARE AND CLEANING
OVEN LIGHT
▲WARNING
SHOCK OR BURN HAZARD: Before
replacing oven light bulb, disconnect the electrical power to the range at the main fuse or circuit breaker panel. Failure to do so may result in electric shock or burn.
CAUTION
BURN HAZARD: The glass cover and bulb
should be removed when cool. Touching hot glass with bare hands or a damp cloth can cause burns.
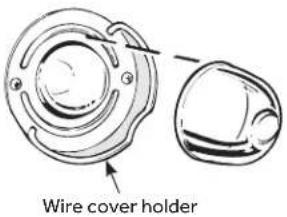
Oven Light Replacement
Be sure to let the light cover and bulb cool completely.
To remove the cover:
- Hold a hand under the cover so it doesn't fall when released. With fingers of the same hand, firmly push back the wire cover holder. Lift off the cover.
Do not remove any screws to remove the cover.
- Replace bulb with a 40-watt appliance bulb.
To replace the cover:
-
Place it into groove of the light receptacle. Pull wire forward to the center of the cover until it snaps into place.
-
Connect electrical power to the range.
OVEN DOOR
The door is very heavy. Be careful when removing and lifting the door. Do not lift door by the handle.
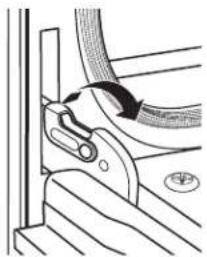
To Remove the Door:
- Fully open the door.
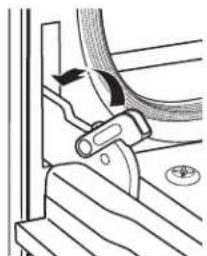
- Pull the hinge locks up and away from the range frame to the unlocked position.
-
Firmly grasp both sides of the door near the top.
-
Close door until the top of the door is approximately 6" from the range frame.
-
Lift door up and away from the range until both hinge arms are clear of the slots in the range frame.
natural_image
Technical line drawing of a mechanical clamp or bracket assembly (no text or symbols)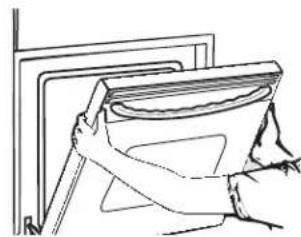
natural_image
Line drawing of a hand holding a large cylindrical object inside a container (no text or symbols)Removal positionPull hinge locks up tc
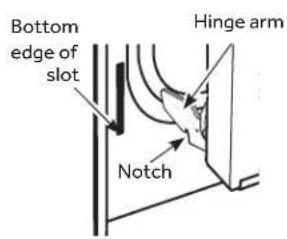
To Replace the Door:
- Firmly grasp both sides of the door near the top.
- With the door at the same angle as the removal position, rest the notch on the underside of the left hinge arm on the bottom edge of the left hinge slot. The notch in the hinge arm must be fully seated into the bottom of the slot. Repeat for the right side.
- Fully open the door. If the door will not fully open, the notches in the bottoms of the hinge arms have not seated correctly in the bottom edge of the slot. Lift the door off the range and repeat previous step.
-
Push the hinge locks toward the range cavity and down to the locked position.
-
Close the oven door.
of hinge slot
natural_image
Technical line drawing of a mechanical assembly with no visible text or symbolsPush hinge locks down to lockRest notch on t
TROUBLESHOOTING TIPS
Save time and money! Review the charts on the following pages first and you may not need to call for service.
| Problem Possible Cause What To Do | ||
| My new oven doesn't cook like my old one. Is something wrong with the temperature settings? | Your new oven has a different cooking system from your old oven and therefore may cook differently than your old oven. | For the first few uses, follow your recipe times and temperatures carefully and use rack positions recommended in the Cooking Guide. If you still think your new oven is too hot or too cold, you can adjust the temperature yourself to meet your specific cooking preference. See the Oven Controls section. |
| Food does not bake properly | Oven controls improperly set. See the Cooking Modes section. | |
| Rack position is incorrect or rack is not level. See the Cooking Modes section and Cooking Guide. | ||
| Incorrect cookware or cookware of improper size being used. | See the Cookware section. | |
| Oven temperature needs adjustment. See the Oven Controls section. | ||
| Food does not broil properly | Oven controls improperly set. Make sure you select the appropriate broil mode. | |
| Improper rack position being used. See Cooking Guide for rack location suggestions. | ||
| Cookware not suited for broiling. Use a pan specifically designed for broiling. | ||
| Aluminum foil on the broil pan has not been fitted properly or slit to drain grease. | If using aluminum foil on broil pan, wrap tightly and add slits conforming to those in the pan to allow grease to drain. | |
| Oven temperature too hot or too cold | Oven temperature needs adjustment. See the Oven Controls section. | |
| Oven appears not to work | A fuse in your home may be blown or the circuit breaker tripped. | Replace the fuse or reset the circuit breaker. |
| Oven controls improperly set. See the Using the Oven section. | ||
| Oven is in Sabbath Mode. Verify, that the oven is not in Sabbath Mode. See the Sabbath Mode section. | ||
| “Crackling” or “popping” sound | This is the sound of the metal heating and cooling during both the cooking and cleaning functions. | This is normal. |
| Why is my range making a "clicking" noise when using my oven? | Your range has been designed to maintain a tighter control over your oven's temperature. You may hear your oven's heating elements "click" on and off more frequently than in older ovens to achieve better results during baking, broiling, and self-clean cycles. | This is normal. |
| Sometimes the oven takes longer to preheat to the same temperature | Cookware, food, and/or number of racks in oven. | Cookware, food, and racks in the oven will cause differences in preheat times. Remove excess items to reduce preheat time. |
| Oven light does not work | Light bulb is loose or defective. Tighten or replace bulb. | See the Oven Light section for instructions on how to replace the bulb. |
TROUBLESHOOTING TIPS
| Problem Possible Cause | Cause What To Do | ||
| Burners do not light Plug on range is not completely inserted in the electrical outlet. | Make sure electrical plug is plugged into a live, properly grounded outlet. | ||
| Gas supply not connected or turned on. See the Installation Instructions that came with your range. | |||
| A fuse in your home may be blown or the circuit breaker tripped. | Replace the fuse or reset the circuit breaker. | ||
| Burner parts not replaced correctly. See the Care and Cleaning of the range section. | |||
| Burner slots near the electrode may be clogged. Remove the burners and clean them. Check the electrode area for burned-on food or grease. See the Care and Cleaning of the range section. | |||
| Food residue on electrode Lightly polish flat tip of electrode with nail file or sandpaper until shiny. | |||
| Top burners do not burn evenly | Improper burner assembly. Make sure the burner caps are seated correctly. See the Care and Cleaning of the range section. | ||
| Burner slots on the side of the burner may be clogged. | Remove the burners for cleaning. See the Care and Cleaning of the range section. | ||
| Burner flames are very large or yellow | Improper air to gas ratio. If range is connected to Propane gas, contact the technician who installed your range or made the conversion. | ||
| Surface burners light but bake and broil burners do not. | Gas to the oven burners may have been shut off. | The oven gas shut-off is located on the gas regulator near the gas line attachment to your range. Locate it and flip the lever.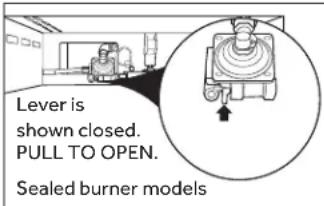 | |
| My oven door glass appears to be "tinted" or have a "rainbow" color. | The inner oven glass is coated with a heat barrier to reflect the heat back into the oven to prevent heat loss and keep the outer door cool while baking. | This is normal. Under certain light or angles, you may see this tint or rainbow color. | |
| Drawer does not slide smoothly or drags | The drawer is out of alignment. Fully extend the drawer and push it all the way in. See the Care and Cleaning of the range section. | ||
| Drawer is over-loaded or load is unbalanced. Reduce weight or redistribute drawer contents. | |||
LIMITED WARRANTY
Haierappliances.com
All warranty service is provided by our Factory Service Centers, or an authorized Customer Carétechnician. To schedule service online, visit us at Haierappliances.com, or call Haier at 1-877-337-3639. Please have your serial number and your model number available when calling for service.
Servicing your appliance may require the use of the onboard data port for diagnostics. This gives a Haier factory service technician the ability to quickly diagnose any issues with your appliance and helps Haier improve its products by providing Haier with information on your appliance. If you do not want your appliance data to be sent to Haier, please advise your technician not to submit the data to Haier at the time of service.
| For the period of Haier will replace | |
| One yearFrom the dateof the originalpurchase | Any part of the range which fails due to a defect in materials or workmanship. During this limited one-year warranty, Haier will provide, free of charge, all labor and in-home service to replace the defective part. |
What Haier will not cover:
- Service trips to your home to teach you how to use the product.
- Improper installation, delivery, or maintenance.
- Failure of the product if it is abused, misused, modified, or used for other than the intended purpose or used commercially.
- Replacement of house fuses or resetting of circuit breakers.
-
Damage to the product caused by accident, fire, floods, or acts of God.
-
Damage to finish, such as surface rust, tarnish, or small blemishes not reported within 48 hours of delivery.
- Incidental or consequential damage caused by possible defects with this appliance.
• Damage caused after delivery. - Product not accessible to provide required service.
- Service to repair or replace light bulbs, except for LED lamps.
EXCLUSION OF IMPLIED WARRANTIES
Your sole and exclusive remedy is product repair as provided in this Limited Warranty. Any implied warranties, including the implied warranties of merchantability or fitness for a particular purpose, are limited to one year or the shortest period allowed by law.
This limited warranty is extended to the original purchaser and any succeeding owner for products purchased for home use within the USA. If the product is located in an area where service by a Haier is not available, you may be responsible for a trip charge or you may be required to bring the product to an Authorized Haier Service location for service. In Alaska, the limited warranty excludes the cost of shipping or service calls to your home.
Some states do not allow the exclusion or limitation of incidental or consequential damages. This limited warranty gives you specific legal rights, and you may also have other rights which vary from state to state. To know what your legal rights are, consult your local or state consumer affairs office or your state's Attorney General.
Warrantor: GE Appliances, a Haier company
Louisville, KY 40225
Extended Warranties: Purchase a Haier extended warranty and learn about special discounts that are available while your warranty is still in effect. You can purchase it online anytime at
Haierappliances.com
or call 1-877-337-3639 during normal business hours. Haier Service will still be there after your warranty expires.
ACCESSORIES
Looking For Something More?
Haier offers a variety of accessories to improve your cooking and maintenance experiences!
Refer to the Consumer Support page for phone numbers and website information.
The following products and more are available:
Accessories
| Small Broiler Pan (8 3/4" x 1 1/4" x 13 1/2") |
Parts
| Oven | racks |
| Oven | burners |
| Light | bulbs |
Cleaning Supplies
| CitruShineTM Stainless Steel Wipes | |
| CERAMA | BRYTStainless Steel Appliance Cleaner |
| CERAMA | BRYTECleaning Pads for Ceramic Cooktops |
| CERAMA | BRYTECeramic Cooktop Cleaner |
| CERAMA | BRYTECeramic Cooktop Scraper |
| Kit (Kit includes cream and cooktop scraper) | |
| Graphite | Lubricant |
NOTES
ÍNDICE
natural_image
Simple line drawing of a cooking pot with a crossed-out black X mark and flames (no text or symbols)natural_image
Technical diagram of a mechanical assembly showing a circular component and a gear-like structure (no text or symbols)natural_image
Pure mechanical diagram showing concentric rings and a cross symbol (no text or labels)natural_image
Diagram of a mechanical or architectural component with layered structure and directional arrow (no text or symbols)natural_image
Diagram of a kitchen interior with a ladder and a black arrow pointing to a window (no text or symbols)natural_image
Line drawing of a kitchen appliance with multiple grilles and a handle (no text or symbols)Perilla del quemador superficial
natural_image
Technical line drawing of a mechanical component with two views: top shows circular features and side shows a rounded body (no text or symbols)natural_image
Technical line drawing of a mechanical clamp or bracket assembly (no text or symbols)natural_image
Line drawing of a hand holding a bucket next to a wall-mounted frame (no text or symbols)Posición de retiro
natural_image
Mechanical assembly diagram showing a belt buckle and mounting bracket (no text or symbols)If you have a problem with this product, please call 1-877-337-3639 for the name and telephone number of the nearest authorized service center.
DATED PROOF OF PURCHASE REQUIRED FOR WARRANTY SERVICE