ST-FP8095 - Chopper Saturn - Free user manual and instructions
Find the device manual for free ST-FP8095 Saturn in PDF.


| Product Type | Electric Meat Grinder/Mincer |
| Brand | Saturn |
| Model | ST-FP8095 |
| Power Consumption | 250 W |
| Voltage | 220-240 V, 50 Hz |
| Dimensions (L x W x H) | 20 cm x 15 cm x 15 cm |
| Weight | 2.5 kg |
| Housing Material | High-quality plastic with stainless steel blade |
| Capacity | Up to 1.2 kg per minute |
| Included Accessories | Cutting blade, 3 grinding discs (fine, medium, coarse), sausage stuffing tube, pusher, cleaning brush |
| Functions | Mincing, mixing, grinding, stuffing sausages |
| Safety Features | Overload protection, safety lock mechanism, non-slip feet |
| Cleaning & Maintenance | Removable parts (blade, discs, tray) are dishwasher safe; body wipe with damp cloth |
| Spare Parts Availability | Blade, grinding discs, and pusher are replaceable; contact Saturn customer service |
| Repairability | Modular design allows easy replacement of motor and electrical components |
| Certifications | CE, RoHS compliant |
Frequently Asked Questions - ST-FP8095 Saturn
User questions about ST-FP8095 Saturn
0 question about this device. Answer the ones you know or ask your own.
Ask a new question about this device
Download the instructions for your Chopper in PDF format for free! Find your manual ST-FP8095 - Saturn and take your electronic device back in hand. On this page are published all the documents necessary for the use of your device. ST-FP8095 by Saturn.
USER MANUAL ST-FP8095 Saturn
We congratulate you on having
bought the device under trade name
"Saturn". We are sure that our
devices will become faithful and
reliable assistance in your
housekeeping.
Please read thoroughly for important
safety
DESCRIPTION
- Food Pusher
- Hopper Tray
- Locking Butte
- Decorative Cover
- Motor Housing
- ON/OFF/Reverse Switch
- R / ON Switch
- Grinder Chassis
- Grinder Head
- Feed Screw
- Grinding Plate
- Grinding Plate (HRC) 12. Grinding Plate (medi
- Grinding Plate (medium)
- Grinding Plate (coarse)
- Grinding Mate (a) 14. Can
- Cap 15. Cut
- Cutting Blade 16. Kibhe Attach
- Ribbe Attachment
- Sausage Stuffer
- Sausage Stammer
- Grinder Head In
- Grinder Head Inlet
- Tray
- May 20. Can
- Cap
- Standard Level
- Feed Screw Bracket
- Covering Plate
- Wire Frame
- Feed Screw
- Food Pusher
- Slicer Housing
- Dise Slitting Knife (medium)
- Dise Slitting Knife (fine)
- Dise Slitting Knife (coarse)
IMPORTANT SAFEGUARDS
◆ Household use only. Do not use for industrial purpose.
- Read these instructions for use
carefully and look at the illustrations
before using the appliance
- Keep these instructions for use for future reference.
- Check, if the voltage indicated on
the appliance corresponds to the local
mains voltage before you connect the appliance.
♦ Never use any accessories or parts
from other manufactures. Your
guarantee will become invalid, if such
accessories or parts have been used.
- Never try to replace the parts and
repair the unit by yourself
• Do not use the appliance if the
- Do not use the appliance if the mains cord, the plug or other parts are damaged.
- If the mains cord of this appliance
is damaged. It must always be replaced
by manufacture or a service center
authorized, in order to avoid hazardous situations.
♦ Thoroughly clean the parts that
will come into contact with food before
you use the appliance for the first time.
♦ Unplug the appliance immediately
after use.
- Never use you finger or an object to push ingredients down the feed tube while the appliance is running. Only the pusher is to be used for this purpose.
♦ Keep the appliance out of the
reach of children
♦ Never let the appliance run
unattended
Switch the appliance off before
detaching and install any accessory. - Wait until moving parts have
stopped running before you remove the
parts of the appliance.
♦ Never immerse the motor unit in
water or any other liquid, nor rinse it
under the tan. Use only a moist cloth to
clean the motor unit.
Do not attempt to grind bones - Do not attempt to grill puts or other hard items
▲ Never reach into the cutter
▼ NEVER TEACH INTO THE CUTTER housing. Always use the push
▲ Continuous running of meat - Continuous running of meat grinder should be not more th
grinder should be not more than 10 min. Before it's used again, it must cool
min. Before it's used again, it must cool down enough about 10 min.
down enough, about 10 mm.
▼ Reverse function is prohibited while the appliance is operating (For
while the appliance is operating (For example, switch "ON" lock to "R" is
example, switch ON Knob to R Knob
or on the contrary), wait at least one
minute until grinder has come to a
complete stop. Otherwise it may
an abnormal noise, vibration or
transitory electric spark in the
appliance. It could result easily damage
to appliance and make a user
thightened
♦ To avoid jamming, do not apply
excessive pressure while operating
When the circuit breaker activates,
do not switch on.
♦ Do not dispose of electrical
appliances as unsorted municipal waste, use separate collection facilities. Contact your local government for information regarding the collection systems available. If electrical appliances are disposed of in landfills or dumps, hazardous substances can leak into the groundwater and get into the food chain, damaging your health and well-being.
♦ When the appliance is not in use
and before cleaning, unplug the
appliance from the outlet.
◆ To protect against the risk of
electrical shock, do not immerse the
unit, cord or plug in water or other
liquid. - This appliance is not intended for
use by persons (including children) with
reduced physical, sensory or mental
capabilities, or lack of experience and
knowledge, unless they have been given
supervision or instruction concerning use of the appliance by a person responsible for their safety.
Children should be supervised to ensure that they do not play with the appliance.
FOR THE FIRST TIME
♦ Check that voltage indicated on
the rating label corresponds to the
mains voltage in your home.
♦ Wash all parts (except body) in
warm soapy water
♦ Before plugging in, ensure the
"ON/OFF/ Reverse" switch is turned to
"OFF" position.
REVERSE FUNCTION
In case of jamming, switch the appliance off by turning the "R/ON" switch to "R" position and "ON/OFF/Reverse" switch to "R" position. Feed screw will be rotating in the opposite direction, and the head will get empty.
FOR USE ASSEMBLING
♦ Make sure the unit is unplugged
while assembling
♦ Insert the feed screw into the
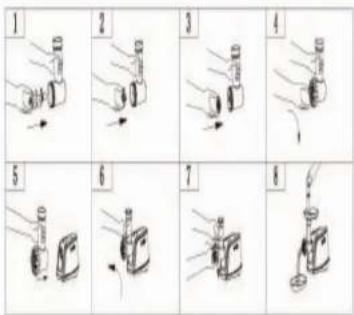
grinder tube, long end first (fig. 1).
♦ Position the cutting blade onto the
feed screw with the flat surface of the
blade facing you. NOTE: If it is not
fitted properly, meat will not be ground
the cutting plate may be damaged (fig.
2).
♦ Position the desired cutting plate
onto the feed screw, against the flat
sides of the cutting blade. Be sure the
notched on the cutting plate fit into the
slots in the grinder tube (fig. 3)
♦ Securely attach the cap to the end
of the grinder tube (fig. 4). Do not over
tighten.
◆ Press the lock button and insert
the grinder head into the opening of the
motor housing. Push in and turn counter
clockwise until the safety lock clicks
place
▲ Place the hopper tray on the feed
- Place the hopper tray on the red tube (fig. 8).
When you
- When you are ready, to grind, use the food pusher to push food gently.
one piece at a time into the feeding
one piece at a time into the feeding tube. Do not force the feed into the
tube. Do not force the food in tube.
MINCING MEAT
♦ Make sure the unit is unplugged
while assembling
♦ Before operating please assemble
the unit (fig. 1 to 8)
◆ Cut foods into pieces (sinewless,
boneless and fatless meat is
recommended, approximate size: 20 mm x 20 mm x 60 mm), so that they fit easily into the hopper. - Plug in and turn the "R/ON" switch to "ON" position. Turn the
"ON/OFF/ Reverse" switch to "ON". The ground meat will come out through the grinding plate in the head. Note: The grinder must be ON BEFORE adding food.
◆ Place food in the hopper tray and
use the food pusher to feed food into
the hopper opening. CAUTION: DO
NOT USE YOUR FINGERS TO FEED
FOOD THROUGH THE HOPPER. NOTE:
The grinder head may rotate slightly
during use, but it is normal. Do not over
during use, but it is normal. Do not be tighten to stop this movement. It may
cause damage (fig. 8).
- Turn the unit OFF when complete
MAKING KIBBE
- Make sure the unit is unplugged
while assembling

- Position the kebbe attachments A and B onto the feed screw. Be sure the kebbe attachments A and B fit into the slots in the grinder tube (fig. 9). - Securely attach the cap to the end of the grinder tube (fig. 10). Do not over tighten. - Place the hopper tray on the feed tube (fig. 11). - When you are ready to operating, use the food pusher to push food gently one piece at a time into the feeding tube. Do not force the food into the tube (fig. 11, 12).
♦ MAKING SAUSAGE

- Make sure the unit is unplugged while assembling. - Insert the feed screw into the grinder tube, long end first (fig. 13). - Position the cutting blade onto the feed screw with the flat surface of the blade facing you. NOTE: If it is not fitted properly, meat will not be ground, the cutting plate may be damaged (fig. 13). - Position the desired cutting plate onto the feed screw, against the flat sides of the cutting blade. Be sure the notched on the cutting plate fit into the slots in the grinder tube (fig. 13). - Position the sausage stuffer onto the feed screw. Be sure the sausage stuffer fit into the slots in the grinder tube (fig. 13). - Securely attach the cap to the end of the grinder tube (fig. 14). Do not over tighten. - Place the hopper tray on the feed tube (fig. 15). - When you are ready to operating, use the food pusher to push food gently, one piece at a time into the feeding tube. Do not force the food into the tube (fig. 15).
MAKE TOMATO JUICER
natural_image
Two-panel line drawing of a kitchen grater with arrows indicating motion (no text or symbols)
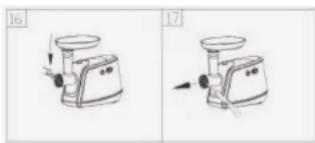
Make sure the unit is OFF and the motor has stopped complete before disassembling the unit. Unplug from the power outlet. Press the lock button. Turn the grinder head until you can remove the cap (fig. 16). To remove grinding plate easily, knock the head on the table with the cutting plate face up. If the grinding plate is not easily removed by hands, please use tools (fig. 16, 17). Insert the feed screw into the grinder tube, long end first (fig. 18). Position the wire frame onto the feed screw with the frew screw bracket facing bulgy seat. NOTE: If it is not fitted properly, juicer will not be assembling well (fig. 18). Position the standard level onto the feed screw bracket. Be sure the notched on the standard level fit into the feed screw bracket (fig. 18). Securely attach the cap to the end of the grinder tube. Do not over lighten (fig. 18). Place the hopper tray on the feed tube (fig. 18). When you are ready to operating, use the food pusher to push food gently, one piece at a time into the feeding tube. Do not force the food into the tube (fig. 18). And turn on the standard level for the tomato juice and tomato push out without delay (fig. 19).
MAKING SALAD

- Unplug from the power outlet. Press the lock button. Turn the grinder head until you can remove the cap (fig. 16). - To remove grinding plate easily, knock the head on the table with the cutting plate face up. If the grinding plate is not easily removed by hands, please use tools (fig. 16, 17). - Insert the slicer housing into the grinder head inlet, assembled well (fig. 20). - Position the dise slitting knife (medium) onto the slicer housing. NOTE: The die slitting knift onto the slicer housing with the flat surface of knife facing you (fig. 20). - When you are ready for operating, use the food pusher to push food gently (fig. 20).
CLEANING
♦ Make sure the unit is OFF and the motor has stopped complete before disassembling the unit
♦ Unplug from the power outlet. Press the lock button. Turn the grinder head until you can remove the can (fig. 6).
- To remove grinding plate easily, knock the head on the table with the cutting plate face up. If the grinding plate is not easily removed by hands, please use tools (fig. 16, 17).
♦ Wash each part in warm soapy water. Use care when handling the sharp blades. Note: Do not wash any parts in the dishwasher or use abrasive cleaning agents or cloths when cleaning. Bleaching solutions containing chlorine will discolor aluminum surfaces. Thinners and benzenes will crack or change the color of the unit.
♦ Wipe motor housing with a damp cloth. Do not immerse in water.
♦ Coat feed screw, cutting blade and cutting plate with salad oil after washing and drying. Note: The oil will keep parts lubricated.
RECIPES
Classic Italian Sausage
Servings: Makes 4 lbs of sausage or
16,4 oz patties
Ingredients:
4 lbs pork butt, cubed
3 tbsp fennel seeds, whole
2 tbsp kosher salt
I tbsp crushed red pepper flakes
1/2 cup cold water
Method:
♦ Combine all of the ingredients in
a bowl and mix well
♦ Use the coarse grinding plate and
follow operating instruction on MAKING SAUSAGE.
When you are finished grinding, remove the grinding plate and attach the large sausage stuffer to the meat grinder following the assembly instruction on MAKING SAUSAGE.
- Feed the mixture into the prepared casings (see as MAKING SAUSAGE). If making patties, take the ground meat and shape into 4 oz patties or large.
Beef Burgers
Serves: 4
1 lb beef chuck, cubed
1/2 cup oatmeal
1/2 cup diced onion
1/2 cup chopped parsley
3 tbsp ketchup
2 tsp Worcestershire sauce
2 tsp salt
1 tsp black pepper
Method:
- Follow operating instruction on MAKING SAUSAGE. Feed meat, oatmeal, onion, and parsley alternately through the grinder using the fine grinding plate. - Mix well and allow the mixture to sit for a few hours to enhance the flavors.
♦ Add the ketchup, Worcestershire sauce, salt and black pepper. Mix well.
♦ Shape into 4 patties and grill to desired doneness.
Specifications
Power supply: 1200 W Rated voltage: 220-230 V Rated frequency: 50 Hz Rated current: 2 A
Set
MEAT GRINDER 1
TOMATO JUICER 1
GRATER FOR POTATO PANCAKES 1
THIN SHREDDING DISC 1
THIN SHREDDING DISC 1 COARSE SHREDDING DISC 1
INSTRUCTION MANUAL 1
PACKAGE 1

ENVIRONMENT FRIENDLY DISPOSAL
You can help protect
the environment!
Please remember to respect the local
regulations: hand in the
non-working electrical
equipments to an
appropriate waste disposal centre. The manufacturer reserves the right to change the specification and design of goods.
RU
МЯСОРУБКА
natural_image
Illustration of a kitchen grater with a handle and lever mechanism (no text or symbols)
natural_image
Illustration of a hand mixer machine with control panel and side view (no text or symbols)natural_image
Line drawing of a kitchen appliance with exploded view and motor (no text or symbols)natural_image
Two line drawings of a kitchen grater with a handle and side view, no text or symbols present
natural_image
Line drawing of a kitchen appliance with a hand mixer and fan (no text or symbols)The Warranty is provided for the period of 2 years or more if the Law on User Right of the country where the appliance was bought provides for a greater minimum warranty period.
All terms of warranty comply with to the Law on Protection of the Consumer Rights and are governed by the legislation of the country where the product was bought.
The warranty and free of charge repair are provided in any country where the product is delivered to by Saturn Home Appliances or authorized representative thereof, and where no restriction of import or other legal provisions interfere with rendering of warranty services and free of charge repair.
Cases uncovered by the warranty and free of charge repair:
- Guarantee coupon is filled in improperly.
- The product has become inoperable because of the Buyer's non-observance of the service regulations indicated in the instruction.
- The product was used for professional, commercial or industrial purposes (except for the models, specially intended for this purpose that is indicated in the instruction).
- The product has external mechanical damage or damage caused by penetration of the liquid inside, dust, insects and other foreign objects.
- The product has damages caused by non-observance of the rules of power supply from batteries, mains or accumulators.
- The product was exposed to opening, repair or modification of design by the persons, unauthorized to repair; independent cleaning of internal mechanisms etc. was made.
- The product has natural wear of parts with limited service life, expendables etc.
- The product has deposits of scale inside or outside of fire-bar elements, irrespective of used water quality.
- The product has damages caused by effect of high (low) temperatures or fire on non-heat resistant parts of the product.
- The product has damages of accessories and nozzles which are included into the complete set of product shipment (filters, grids, bags, flasks, cups, covers, knives, sealing rings, graters, disks, plates, tubes, hoses, brushes, and also power cords, headphone cords etc.).
On the warranty service and repair, please contact the authorized service centers of Saturn Home Appliances.
CZ
MEZINÁRODNÍ ZÁRUKA
When purchasing the product,
please require its checking before you;
BE SURE
that the goods sold to you, are functional and complete
and that the warranty coupon is filled in correctly.
This warranty coupon confirms the absence of any defects in the product you purchased and provides for free of charge repair of the product failed through the fault of the manufacturer throughout the period of warranty service and free of charge repair.
Falling the presentation of this coupon, in case of its improper filling in, infringement of factory seals (if any), and also in cases indicated In the warranty obligations, the claims are not accepted, and no warranty service and free of charge repair is made! The warranty coupon is valid only in the original copy with the stamp of trading organization, signature of the seller, date of sale and signature of the buyer.
CZ
ZÁRUČNÍ LIST
Při koupí výrobku
- IMPORTANT SAFEGUARDS
- FOR THE FIRST TIME
- REVERSE FUNCTION
- FOR USE ASSEMBLING
- MINCING MEAT
- MAKING KIBBE
- CLEANING
- RECIPES
- Classic Italian Sausage
- Beef Burgers
- Specifications
- Set
- ENVIRONMENT FRIENDLY DISPOSAL
- RU
- МЯСОРУБКА
- Cases uncovered by the warranty and free of charge repair:
- MEZINÁRODNÍ ZÁRUKA
- ZÁRUČNÍ LIST
Brand : Saturn
Model : ST-FP8095
Category : Chopper