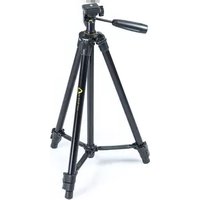
VK 203 APM - Tripod Vanguard - Free user manual and instructions
Find the device manual for free VK 203 APM Vanguard in PDF.


| Product Type | Tripod |
| Brand | Vanguard |
| Model | VK 203 APM |
| Maximum Height | 150 cm |
| Minimum Height | 40 cm |
| Folded Length | 45 cm |
| Weight | 1.5 kg |
| Load Capacity | 3 kg |
| Material | Aluminum |
| Number of Leg Sections | 3 |
| Leg Lock Type | Twist lock |
| Head Type | Ball head |
| Quick Release Plate | Yes |
| Bubble Level | Yes |
| Center Column | Geared |
| Feet | Rubber with spikes |
| Color | Black |
| Warranty | 2 years |
| In the Box | Tripod, carry bag, quick release plate |
| Care Instructions | Clean with dry cloth, avoid water and extreme temperatures |
Frequently Asked Questions - VK 203 APM Vanguard
User questions about VK 203 APM Vanguard
0 question about this device. Answer the ones you know or ask your own.
Ask a new question about this device
Download the instructions for your Tripod in PDF format for free! Find your manual VK 203 APM - Vanguard and take your electronic device back in hand. On this page are published all the documents necessary for the use of your device. VK 203 APM by Vanguard.
USER MANUAL VK 203 APM Vanguard

VANGUARD

www.vanguardworld.com

English
Tripod, increase height of the tripod by extending the leg sections successively from the top down. Begin with the section closest to the top of the tripod and work your way down until the desired height is attained.
NOTES BEFORE USE
-
Following the set-up of the tripod, confirm all legs are spread open and locked before mounting your camera. Failure to do so may cause the tripod to fall and your
-
Always comply with the weight restrictions. Going over the maximum load capacity may cause damage to equipment or personal injury.
-
Ensure all individual knobs and locks are tight to avoid movement, as movement may result in equipment damage or personal injury.
-
Carefully hold camera equipment stable when removing it from the tripod.
a) After use, remove the camera; fold the tripod completely; and ensure the tripod handle faces out when folding. b) DO NOT carry the tripod when the camera is still mounted. c) Clearing your tripod:
a) When necessary, wipe-tripod with a soft cloth and if required use a mild detergent. b) When used around salt water, first flush with fresh water, then wipe with a dry soft cloth.

Français
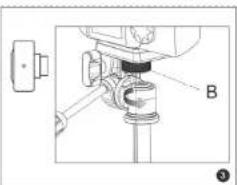
B: Seerage apparel photo
C: Sevrage-poor inclinatum verticale (90°)
Français
ATTENTION
PROTECTION OF YOUR CAMERA AND EQUIPMENT.
① SWITING PER SUBSTING
Thank you for purchasing a VANGUARD product.
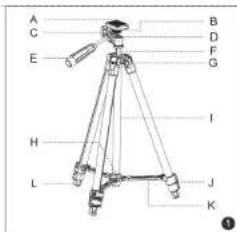
① PART DESCRIPTION
九、Birtform
E. Camera locking knob
C Locking knob for vertical tilt (50°)
(2) Center column tube
E: Handle for horizontal tilt (180") and pan (360")
7: Bubble level
- Center column
H: Base of brace
- Center column
2 Lever lock
E: Grace
L: Non-III-point
ANGLE ADJUSTMENT SYSTEM
⑤ FIX EQUIPMENT ON TO TOP OF THE PLATFORM
Align the screw on the panhead platform to the respective 1/4"–20 hole in the base of your camera gear. Turn the knob until gear is securely fastened to the panhead.
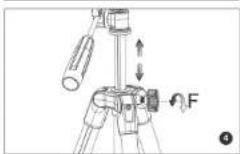
④ CENTRAL COLUMN ADJUSTMENT
© CENTRAL COLUMNAdjustment The control column I'll be elevated to reach the in-sicfr.
the central column (a) can be desired by height for your shoot.
Release the central column (inch knot) © by turnion country.
include. Adjust the heights of the central column as required
Lock central column by turning (a) clockwise until fully tightened
(2) 10.3.15. (2) 10.3.16. (2) 10.3.17. (2) 10.3.18. (2) 10.3.19. (2) 10.3.20. (2) 10.3.21. (2) 10.3.22. (2) 10.3.23. (2) 10.3.24. (2) 10.3.25. (2) 10.3.26. (2) 10.3.27. (2) 10.3.28. (2) 10.3.29. (2) 10.3.30. (2) 10.3.31. (2) 10.3.32. (2) 10.3.33. (2) 10.3.34. (2) 10.3.35. (2) 10.3.36. (2) 10.3.37. (2) 10.3.38. (2) 10.3.39. (2) 10.3.40. (2) 10.3.41. (2) 10.3.42. (2) 10.3.43. (2) 10.3.44. (2) 10.3.45. (2) 10.3.46. (2) 10.3.47. (2) 10.3.48. (2) 10.3.49. (2) 10.3.50. (2) 10.3.51. (2) 10.3.52. (2) 10.3.53. (2) 10.3.54. (2) 10.3.55. (2) 10.3.56. (2) 10.3.57. (2) 10.3.58. (2) 10.3.59,
⑤ LEG EXTENSION ADJUSTMENT
To adjust the height of the legs, each one has a telescopic section that can be extended by releasing the lever lock (J). Always start from top down (thinnest section last) to reach the desired height. Extending & using the larger leg section first will make your tripod more stable.
Release the locking lever lock (Ji. Then extend and shorten
the legs until the desired tripod height is attained. Lock
height into position by tightening [J].
Make sure all lever locks (J) are perfectly tightened to avoid
the potential of the tripsd from falling.
ATTENTION
PROTECTION OF YOUR CAMERA AND EQUIPMENT.
To help prevent damage to the tripod and your equipment.
do not use the tripod in hazardous weather conditions or
unstable ground, VANGUARD is not responsible for damage
to your camera or equipment incurred while using your
VANGUARD tripool. Remember for increased stability of your
Deutsch
ACHTUNG
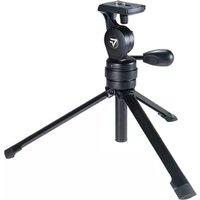


Brand : Vanguard
Model : VK 203 APM
Category : Tripod