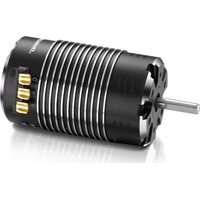
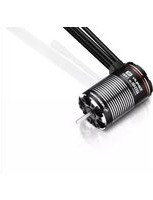
XeRun-4268SD-1600KV-G2 - Remote control toy Hobbywing - Free user manual and instructions
Find the device manual for free XeRun-4268SD-1600KV-G2 Hobbywing in PDF.


| Product Type | Brushless Motor for Remote Control Vehicles |
| Brand | Hobbywing |
| Model | XeRun-4268SD-1600KV-G2 |
| KV Rating | 1600 RPM per Volt |
| Motor Size | 4268 (42mm diameter, 68mm length) |
| Sensor Type | Sensored (with Hall sensors) |
| Max RPM | 50,000 RPM (estimated) |
| Power | Up to 1800W |
| Weight | Approximately 280g |
| Dimensions | 42 x 68 mm |
| Shaft Diameter | 5mm |
| Voltage Range | 2-4S LiPo (7.4V-14.8V) |
| Max Current | 80A |
| Recommended ESC | Hobbywing XeRun series ESC (e.g., XR10 Pro) |
| Application | 1:10 and 1:8 scale RC cars, buggies, trucks |
| Cooling | Passive (optional fan) |
| Connector Type | 4mm bullet connectors (pre-soldered) |
| Maintenance | Keep free of dirt and debris; inspect bearings periodically |
| Safety | Allow motor to cool between runs; use appropriate ESC settings |
Frequently Asked Questions - XeRun-4268SD-1600KV-G2 Hobbywing
User questions about XeRun-4268SD-1600KV-G2 Hobbywing
0 question about this device. Answer the ones you know or ask your own.
Ask a new question about this device
Download the instructions for your Remote control toy in PDF format for free! Find your manual XeRun-4268SD-1600KV-G2 - Hobbywing and take your electronic device back in hand. On this page are published all the documents necessary for the use of your device. XeRun-4268SD-1600KV-G2 by Hobbywing.
USER MANUAL XeRun-4268SD-1600KV-G2 Hobbywing
natural_image
Technical line drawing of a cylindrical electric motor with stator and rotor (no text or symbols)
Thank you for purchasing HOBBYWING XERUN 4268/4274 Sensored Brushless Motor. High power motor can be very dangerous, so please read through this manual carefully. Given that we have no control over the correct use, installation, application, or maintenance of our products, no liability shall be assumed nor accepted for any damages, losses or costs resulting from the use of the product. Any claims arising from the operating, failure or malfunction etc. will be denied. We assume no liability for personal injury and/or consequential damages resulting from our product or our workmanship. As far as is legally permitted, the obligation to compensation is limited to the invoice amount of the affected product.
01 Warnings

- Never leave this unit unsupervised when it is powered on.
- All wires and connections should be well insulated. Short circuits can possibly damage the products
- Avoid incorrect connections between the electronic speed controller (ESC) and the motor.
- Never allow this product to come in contact with water, oil, fuel or other electro-conductive liquids. If this happens, stop the use of your product immediately and let it dry carefully.
- Avoid overloading the motor due to wrong or too aggressive gear ratio. Different ESCs have different internal timings, follow the ESC instructions.
- Never apply full throttle if the pinion is not installed. Due to the extremely high RPMs without load, the motor can get damaged.
- Always wire up all the parts of the equipment carefully. If any of the connections come loose as a result of vibration, your model RC may lose control.
- Never allow the motor case to get over 100 degrees Celsius (212 degrees Fahrenheit) because the magnets maybe demagnetized by high temperature.
02 Features
- Built-in chip for being easily identified by HOBBYWING ESCs. When pairing with HW 1/8th scale Sensored ESCs (i.e. XR8 Plus), the motor can work in the "Sensored" mode at all times with great output linearity after it's identified by the ESC. And the Turbo timing is allowed to be activated for higher output.
- Magnetic ring on the rotor prevents the motor from signal interference and guarantees its super stability in the "sensored" mode.
- Low cogging torque for smooth and stable low-speed running of the vehicle.
- Selectable mechanical timing of 20 to 40 degrees for different power output.
- New-style "U" solder tabs for easy soldering/wiring and high durability
• CNC machined aluminum ribbed heatsink case with excellent coating.
• High temperature tolerance windings, high quality output shaft, high precision bearings, and rotor with a strong structure guarantees super durability.
03 Specifications
| Model | PN | KV(No-load) | LiPo R. (μ) | No-loadCurrent | Dimension(mm) | shaft *(mm) | Pole W (g) | Applicable | ||
| XERUN-4268SD-1600KV-BLACK-G2 | 30401900 | 1600 | 2-6s | 0.0151 | 2.8A | =42 / L=68 | =5 / L=18.5 | 4 | 322 | 1/8 Buggy |
| XERUN-4268SD-1900KV-BLACK-G2 | 30401901 | 1900 | 2-6s | 0.0084 | 4.5A | =42 / L=68 | 325 | |||
| XERUN-4268SD-2600KV-BLACK-G2 | 30401902 | 2600 | 2-4s | 0.0051 | 4.6A | =42 / L=68 | 328 | 1/8 On-road | ||
| XERUN-4274SD-2250KV-BLACK-G2 | 30405000 | 2250 | 2-6s | 0.0047 | 5.4A | =42 / L=74 | 396 | 1/8 Monster Truck/Truck | ||

XERUN 4268/4274

XERUN 4268
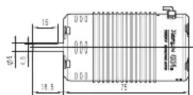
XERUN 4274
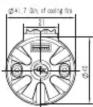
XERUN 4268/4274
04 Installation & Connection

• Install the motor in its mount using M3 & M4 screws no longer than 8mm. (*M3: 4PCS, M4: 2PCS)
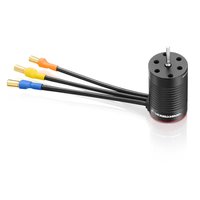
- There are 3 power wires coming from the ESC must be soldered to the motor. They are usually color coded as Blue for Wire A, Yellow for Wire B and Orange for Wire C. When connecting the power wires between the ESC and motor, please make sure that you match ESC Wire A to Motor Phase A, ESC Wire B to Motor Phase B and ESC wire C to Motor Phase C (This is VERY important).
- When using Sensored ESC, make sure the sensor cable is clean and reliable. Connect the sensor cable to both ESC and motor in the correct direction.
When using Sensorless ESC, swap any two wires if the motor runs in reverse.
- Double check you have all the connections correct before turning on the ESC (See connection diagram as below).
05 Timing Adjustment
- (With the motor direction set to CCW), take the graduation/value after "CCW" on the motor case as the starting point when adjusting the timing. (With the reversed triangle pointing at a value/graduation,
the smaller/bigger the value, the smaller/bigger the timing. The timing is 40 degrees in picture 1. - (With the motor direction set to CW), take the graduation/value after "CW" on the motor case as the starting point when adjusting the timing. (With the reversed triangle pointing at a value/graduation, the smaller/bigger the value, the smaller/bigger the timing. The timing is 20 degrees in picture 1.
- The motor timing is 30 degrees by default (as shown in picture 2). The motor timing should be with in 30 to 40 degrees if you want to activate the Turbo timing. And the timing can be within 20 to 40 degrees if you have no intention to activate the Turbo timing.
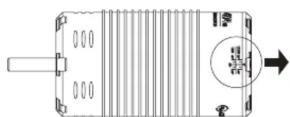

picture 1 picture 2
06 Gearing
- Attention! The motor temperature should be lower than 100 degrees Celsius (212 degrees Fahrenheit) in operation. Because high temperature may cause the magnets to get demagnetized, the coil to get melt and short circuited, and the ESC to get damaged. A suitable gearing can effectively prevent the motor from overheating.
- To avoid the possible damage to ESC and motor caused by the overheat, please start with a small pinion/a big FDR and check the motor temperature regularly. If the motor and ESC temperatures always stay at a low level during the operation, change a big pinion/a low FDR and also check the motor temperature regularly to ensure that the new FDR is suitable for your vehicle, local weather and track condition. (Note: For the safety of electric devices, please check the ESC and motor temperatures regularly.)
- Right is a very rough idea of starting gear ratios for the motors, please be aware that these are guide ratios for ESC with ZERO timing.
Recommended Power Configuration
| Model | LiPo | Buggy W/FDR | On-road W/FDR | Truck W/FDR | Monster Truck W/FDR |
| XERUN-4268SD-1600KV-BLACK-G2 | 4S | 4KG/8 | / | / | / |
| XERUN-4268SD-1900KV-BLACK-G2 | 4S | 4KG/9 | / | / | / |
| XERUN-4268SD-2600KV-BLACK-G2 | 4S | / | 3KG/6 | / | / |
| XERUN-4274SD-2250KV-BLACK-G2 | 6S | / | / | 5KG/12 | 6KG/16 |
07 Assembly and Disassembly
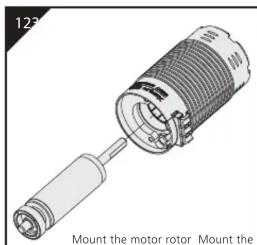
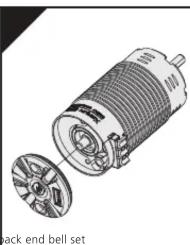
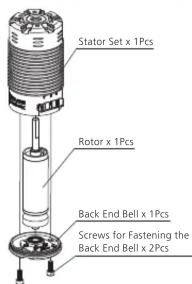
The XERUN 4268/4274 is very strong in construction but also easy to disassemble for maintenance. We recommend you check the bearings and clean the motor at regular intervals—depend on the frequency of usage and the track surface. Please follow the steps in below to assemble the motor. When disassembling the motor, the sequences are reversed.
natural_image
Technical illustration of a mechanical component with a separate close-up view showing internal structure (no text or symbols)

natural_image
Illustration of a coiled motor with visible stator and rotor (no text or symbols)Parts List

Brand : Hobbywing
Model : XeRun-4268SD-1600KV-G2
Category : Remote control toy