SL3334 - Sewing machine TOYOTA - Free user manual and instructions
Find the device manual for free SL3334 TOYOTA in PDF.

| Product Type | Sewing Machine |
| Brand | Toyota |
| Model | SL3334 |
| Dimensions (approx.) | 40 x 18 x 30 cm (15.7 x 7.1 x 11.8 in) |
| Weight (approx.) | 7.5 kg (16.5 lbs) |
| Power Supply | 100-240 V, 50/60 Hz |
| Power Consumption | 85 W |
| Built-in Stitches | 20 |
| Buttonhole Type | Automatic 1-step buttonhole |
| Free Arm | Yes |
| Needle Threader | Automatic |
| Bobbin Winding | Independent motor |
| Stitch Length | Adjustable (0-4 mm) |
| Stitch Width | Adjustable (0-5 mm) |
| Reverse Sewing | Yes |
| Speed Control | Foot pedal with variable speed |
| Lighting | LED sewing light |
| Accessories Included | Needles (5), bobbins (4), seam ripper, screwdriver, oil bottle, dust cover |
| Maintenance | Clean lint and oil regularly; refer to manual for guidance |
| Safety Features | Unplug before cleaning or maintenance; keep away from water |
| Spare Parts Availability | Standard needles and bobbins widely available; contact Toyota support for other parts |
| Repairability | Authorized service centers; DIY for minor issues |
Frequently Asked Questions - SL3334 TOYOTA
User questions about SL3334 TOYOTA
0 question about this device. Answer the ones you know or ask your own.
Ask a new question about this device
Download the instructions for your Sewing machine in PDF format for free! Find your manual SL3334 - TOYOTA and take your electronic device back in hand. On this page are published all the documents necessary for the use of your device. SL3334 by TOYOTA.
USER MANUAL SL3334 TOYOTA
natural_image
Line drawing of a sewing machine with no visible text or symbolsSL1/SL1T/SL1T-X Series All Models
natural_image
Line drawing of a sewing machine with no visible text or symbolsSL1A Series All Models
TOYOTA
English
UK ONLY
IMPORTANT
PLEASE READ CAREFULLY
The wires in this mains lead are coloured in accordance with the following code:
BLUE-NEUTRAL
BROWN-LIVE (OR ACTIVE)
As the colours of the mains lead of this appliance may not correspond with the coloured markings identifying the terminals in your plug — PROCEED AS FOLLOWS: The earth plug pin is unnecessary. As the Machine is designed under double insulation structure, the earth wire is removed from the machine. The wire coloured BROWN must be connected to the terminal marked L or A or coloured RED. The wire coloured BLUE must be connected to the terminal marked N or coloured BLACK. Neither core is to be connected to the earth terminal of a three-pin plug.
English
IMPORTANT SAFETY INSTRUCTIONS
When using an electrical appliance, basic safety precautions should always be followed, including the following:
Read all instructions before using (this appliance).
DANGER — To reduce the risk of electric shock:
An appliance should never be left unattended when plugged in. Always unplug this appliance from the electric outlet immediately after using and before cleaning.
WARNING — To reduce the risk of burns, fire, electric shock, or injury to persons:
- Do not allow to be used as a toy. Close attention is necessary when this appliance is used by or near children.
- Use this appliance only for its intended use as described in this manual. Use only attachments recommended by the manufacturer as contained in this manual.
- Never operate this appliance if it has a damaged cord or plug, if it is not working properly, if it has been dropped or damaged, or dropped into water. Return the appliance to the nearest authorized dealer or service center for examination, repair, electrical or mechanical adjustment.
- Never operate the appliance with any air openings blocked. Keep ventilation openings of the sewing machine and foot controller free from the accumulation of lint, dust, and loose cloth.
- Never drop or insert any object into any opening.
- Do not use outdoors.
- Do not operate where aerosol (spray) products are being used or where oxygen is being administered.
- To disconnect, turn all controls to the off ("O") position, then remove plug from outlet.
- Do not unplug by pulling on cord. To unplug, grasp the plug, not the cord.
DANGER
- Always unplug before relamping. Replace the bulb with same type rated 15 watts.
- Do not reach for an appliance that has fallen into water. Unplug immediately.
- Do not place or store appliance where it can fall or be pulled into a tub or sink. Do not place or drop into water or other liquid.
English
WARNING
- Keep fingers away from all moving parts. Special care is required around the sewing machine needle.
- Always use proper needle plate. The wrong plate can cause the needle to break.
- Do not use bent needles.
- Do not pull or push fabric while stitching. It may deflect the needle causing it to break.
- Switch the sewing machine off ("O") when making any adjustments in the needle area, such as threading needle, changing needle, threading bobbin, or changing presser foot, etc.
- Always unplug sewing machine from the electrical outlet when removing covers, lubricating, or when making any other user servicing adjustments mentioned in the instruction manual.
- Never operate on a soft surface such as a bed or couch where the air openings may be blocked.
SAVE THESE INSTRUCTIONS
English
CONTENTS
- NAMES OF PARTS .... 1
- PREPARATION FOR SEWING 5
Connecting Power Cord 5
Setting Telescopic Thread Stand 7
Opening The Front Panel and Side Cover 9
How to Change Threads 11
Replacing Needles 13
Threading (SL1/SL1T/SL1T-X) 15
Threading (SL1A) 21
Preparation for Sewing and Checking 27
- FOUR THREAD OVEREDGING STITCH USING 2 NEEDLES ..... 29
Before Sewing 29
Presser Foot Lifter 29
Beginning and Ending of Sewing 31
Adjustment of The Presser Foot Pressure 33
Thread Tension Adjustment (SL1/SL1T/SL1T-X) 33
Thread Tension Adjustment (SL1A) 45
Adjustments for the Differential Feed 57
Adjustments for Size of Bight (SL1/SL1T/SL1A) 63
Adjustments for Size of Bight (SL1T-X) 65
How to Adjust Stitch Length 67
Sewing for Curved Seams 67
Standard Chart for the Thread Tension (SL1/SL1T/SL1T-X) 69
- SETTING WASTE TRAY 71
- THREE THREAD OVEREDGING STITCH USING ONE NEEDLE
(SL1/SL1T/SL1T-X) 73
THREE THREAD OVEREDGING STITCH USING ONE NEEDLE
(SL1A) 75
TWO THREAD OVERLOCK (SL1T-X) 77
- ROLL HEMMING (SL1/SL1T/SL1T-X) 79
HOW TO ROLL HEM (SL1A) 85 - PIN TUCKING (SL1/SL1T/SL1T-X) 87
- CORDED OVERLOCK 91
- REPLACING THE CUTTING KNIVES 93
- CHANGING THE LIGHT BULB 97
- LUBRICATION 99
- TABLE OF SEWING MATERIALS, NEEDLES AND
THREAD 101
- ACCESSORIES 107
- SPECIFICATIONS 109
Español
text_image
Technical diagram of a sewing machine with numbered parts for identificationSection
1
| English | Français | Nederlands |
| 1. Spool pin2. Presser foot litter3. Pressure regulator screw4. Telescopic thread island5. Thread take up lever6. Thread tension support7. Thread tension dials8. Front panel9. Differential feed dial10. Side cover11. Stitch length adjuster12. Presser foot13. Bite wicith adjusting dial14. Upper knife15. Front cover16. Handwheel (Right side of machine)17. Stitch finger lever (SL1T-X) | 1. Tige porte bobine2. Levier du pied de biche3. Vis de réglage de prassion du pied de biche4. Guide fil à tube teloscopique5. Levier relieveur de fil6. Support de tension de fil7. Boutons régulateurs de tension8. Cache avant9. Bouton d'entraînement (différentiel)10. Couvercle lateral11. Réglage de longueur de point12. Pied de biche13. Bouton de réglage de largeur de point14. Couteau superieur15. Couvercle frontal16. Volant (à croite de la machine)17. Languette d'escamotage du doigt maillieur (SL1T-X) | 1. Kloshouder2. Hendel van het persvoetje3. Schroef voor het regelen van de persvoetdruk4. Telescopische draadgeleider5. Hendel draadgeleider6. Draadgeleider7. Knoppen draadspanning8. Voorpaneel9. Knop voor het differentieel transport10. Zij-afdekplaat11. Steeklengte regelaar12. Persvoetje13. Instelknop sleekbreedte14. Bovenste mes15. Voor-afdekplaat16. Handwiel (aan de rechterzijdevan de machine)17. Naaitongschuitje (SL1T-X) |
| Español | Deutsch | Italiano |
| 1. Vástago porta carrete.2. Palanca alzadora.3. Tornillo ajustador de presión.4. Porta hilo telescopico (Guía hilo telescopico).5. Palanca de elevacion del hilo.6. Soporte de tensión del hilo.7. Reguladores de tensión.8. Panel frontal.9. Botón de arrastre de suministro diferencial.10. Tapa lateral.11. Botón de ajuste pie largo de puntada.12. Prensatales.13. Botón de ajuste del ancho de la puntada.14. Cuchillo superior.15. Tapa frontal.16. Volante, lado derecho de la máquina.17. Tacón de la lengüela de puntada (SL1T-X) | 1. Garrollenstift2. Nähfuß Lüfterhebel3. Fußchendruck-Regulierung4. Teleskop-Fadenführung5. Gelenkfadenhebel6. Fadenführungen7. Fadenspannungen8. Vordere Verkleidung9. Differential-Transport Einstellknopf10. Seitenklappe11. Stichlängenregulierung12. Nahfuß13. Stichbreiten-Einstellung14. Beweglicher Abschneider15. Frontklappe16. Handrad (rechts an der Maschine)17. Rolisaumhebel (Kottelzungen-Einstellung) (SL1T-X) | 1. Perno portarcochetti2. Leva di sollevamento piedino premistoffa3. Vite di regolazione pressione premistoffa4. Guida-filo a tubo telescopico5. Leva di sollevamento filo6. Supporto di tensione filo7. Bottoni regolatori di tensione8. Coperchio anteriore9. Bottone di trasporto (differenziale)10. Coperchio laterale11. Regolazione lunghezza punto12. Piedino premistoffa13. Bottone di regolazione lunghezza punto14. Coltello superiore lame15. Coperchio frontale16. Volantino (a destra della macchina)17. Cursore dell'indice (SL1T-X) |
SL1A
- NAMES OF PARTS / NOMBRE DE LAS PARTES / NOM DES PIECES / HAUPTTEILE DER MASCHINE / VOORNAAMSTE ONDERDELEN / ELENCO DEI COMPONENTI

text_image
Technical diagram of a sewing machine with numbered parts for identificationSL1A
| English | Français | Nederlands |
| 1. Spoof pin2. Presser foot litter3. Thread take up lever4. Pressure regulator screw5. Thread tension support6. Telescopic thread stand7-1 Left needle thread tension dial7-2 Right needle thread tension dial7-3 Upper looper thread tension dial7-4 Lower looper thread tension dial8. Front panel9. Side cover10. Stitch length adjustier11. Presserfoot12. Stitch width adjusting dial13. Upper knife14. Tweezers15. Front cover16. Handwheel (Right side of machine)17. Differential feed dial (For mode 1800, 3404D and 3404DE only) | 1. Tige porte bobine2. Levier du pied de biche3. Levier releveur de fil4. Vis de réglage de pression du pied de biche5. Support de tension de fit6. Guide fil à tube télascopique7-1 Bouton de tension du fil de l'aiguille gauche7-2 Bouton de tension du fil de l'aiguille droite7-3 Bouton de tension du fil du boucleur supérieur7-4 Bouton de tension du fil du boucleur inférieur8. Panneau frontal9. Couvercle latérat10. Curseur de réglage de la longueur de point11. Pied de biche12. Bouton régulateur de largeur de point13. Couteau supérieur14. Pinces15. Couvercle frontal16. Volant manuelle (côté droit de la machine)17. Bouton entraînement différentiel(Four le modèle 3404D / 3404DE seulement) | 1. Kloshouder2. Persvoethandel3. Draadhelfboom4. Persvoetdruk Regelknop5. Garenspannings Geleider6. Telescopische Garenstandaard7-1 Instelknop Garenspanning Linker Naald7-2 Instelknop Garenspanning Rechter Naald7-3 Instelknop Garenspanning Bovengrijper7-4 Instelknop Garenspanning Ondergrijper8. Voorpaneel9. Zijklep10. Steeldengte Regelaar11. Persvoet12. Steekbreedte Instelknop13. Bovenmes14. Pincet15. Afdekklep16. Handwiel (Rechterkant van de machine)17. Instelknop Differentieel Transport |
| Espanol | Deutsch | Italiano |
| 1. Vástago porta carreteDallanca del pie prensatela3. Palanca de elevación del hilo4. Tomilio de regulación de prasión5. Soporte de tensión del hilo6. Guía telescópico del hilo7-1 Botón de tensión del hilo de aguja izquierda7-2 Botón de tensión del hilo de aguja derecha7-3 Botón de tensión del hilo del gancho superior7-4 Botón de tensión del hilo del gancho inferior8. Panel frontal9. Tapa lateral10. Ajuste de la longitud de puntada11. Pie Prensatelas12. Botón de Ajuste del ancho de puntada13. Cuchillo superior14. Pinzas15. Tapa frontal16. Volante de mano (lado derecho de la máquina)17. Botón de arrastre diferencial(For model 3404D y 3404DE sólo) | 1. Garnrollenstift2. Nähluß Lüfterhebel3. Gelenkladenhebel4. Fußchandruck-Regullerung5. Fadenführung6. Teleskop-Fadenführung7-1 Fadenspannungs-Einstellung linke Nadel7-2 Fadenspannungs-Einstellung rechte Nadel7-3 Fadenspannungs-Einstellung Obergreifer7-4 Fadenspannungs-Einstellung Untergreifer8. Vordere Verkleidung9. Seitenklappe10. Stichtängenregulierung11. Nähluß12. Sichbreiten-Einstellung13. Beweglicher Abschneider14. Pinzette15. Frontklappe16. Handrad (rechts an der Maschine)17. Differential-Transport Einstellknopf(SL3404D und SL3404DE) | 1. Perno portarocchetti2. Leva di sollevamento piedino premistofla3. Leva di sollevamento lili4. Vite di regolazione pressione premistofla5. Supporto di tensione filo6. Guida filo a tubo telescópico7-1 Bottone regolatore di tensione sinistro7-2 Bottone regolatore di tensione destro7-3 Bottone regolatore di tensione superiore7-4 Bottone regolatore di tensione inferiore8. Coperchio frontale9. Coperchio laterale10. Regolazione lunghezza punto11. Piedino premistofla12. Bottone regolazione ampiezza punto13. Coltolio superiore14. Pinzette15. Coperchio frontale16. Volantino (a destra della macchina)17. Bottone di trasporto differenziale |
English
PREPARATION FOR SEWING
Connecting Power Cord
Connect foot controller and power cord
□ □
Before plugging in your machine, be sure that the voltage is same as that of your machine.
(written on a plate at back of machine).
☐ Specifications vary from country to country.
Press the switch on the machine to turn on the power and the sewing light.
Always switch off or unplug machine when not in use.
The more you press fool controller, the
faster the machine runs. When the power switch is turned off, the machine will not operate even by pressure on the tool controller.
Electronic type of controller
This foot controller is powerful and stable, even at a slow speed. It is possible to operate simply and produce neat finish, even detailed operation.
Español
PREPARACION PARA LA COSTURA
text_image
Diagram showing connections between a device and a wall-mounted device, with an inset magnified view highlighting the connection detail.
text_image
Diagram showing two identical electronic devices with labeled buttons and display screens, likely for phone or device selection.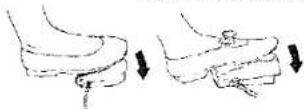
English: Electronic type of foot controller Español: Control de tipo electrónico
Extend the telescopic thread stand to its full height, then turn it until the shaft clicks into its locked position.
Instalacion Del Guía Hilos Telescópico
Opening The Front Panel and Side Cover
- How to Open the Front Panel:
a. Push panel to the right as far as it will go, and b. Pull panel down towards you.
• How to Open Side Cover:
a. Push cover to the left to unlock, and b. Swing cover back away from you.
• How to Close Side Cover:
a. Push cover to the right, and b. Lock into place.
- Setting the Tweezers (SL1A)
Take out the tweezers from accessory box to set it inside of front panel.
natural_image
Hand holding a pen or tool, pointing at a mechanical component (no visible text or symbols)
natural_image
Technical line drawing of a mechanical assembly (no visible text or symbols)English: Tweezers Español: Pinzas Français: Pincos Deutsch: Pinzette Nederlands: Pincet Italiano: Pinzette
| Français | Deutsch | Nederlands | Italiano |
| Ouverture Du Panneau Frontala. Pousser le panneau vers la droite aussi loin que possible et.b. Tirer le panneau vers le bas vers sol. | Öffnen der Frontklappe bzw. des SeitenteilsÖffnen der Frontklappea.Drehen Sie die Frontklappe soweit wie möglich nach rechts undb.klappen Sie die Klappe nach unten. | Het Openen Van De AfdekklepEn Van De ZijklepHoe wordt de afdekklep geopend:a. Druk de klep zo ver mogelijk naarrechts.b. Trek dan de klep naar voren. | Apertura del coperchio frontale e del coperchio lateraleCome aprire il coperchio frontalea. Spingete, o il coperchio verso destra ab. Tiratelo verso di voi. |
| Comment ouvrir le couvercle latérala. Pousser le couvercle vers la gauche pour déverrouiller.b. Faire pivoter le couvercle.Comment fermer le couvercle latérala. Pousser le couvercle vers la droite.b. Verrouiller en place. | Öffnen des SeitenteilsKlappen Sie das Seitenteil nach links bis zum Anschlag.Beim Schließen des Seitenteils achten Sie bitte darauf, daß es einrastel. | Hoe wordt de zijklep geopenda. Druk de klep naar links om te ontgrendelen.b. Duw daarna de klep van U af.Hoe wordt de zijklep gesloten:a. Duw de klep naar rechts.b. Druk hem dan in de vergrendeling. | Come aprire il coperchio lateralea. Spingete il coperchio verso sinistra fino a sbloccarto eb. Muovetelo come indicato dalla frecciaCome richiudere il coperchio lateralea. Spingete il coperchio verso destra ab. Riportatelo nella posizione di blocco |
| Fixation des pinces (SL1A)Retirer les pinces de la boîte d'accessoires afin de les mettre à l'intérieur du panneau central. | Pinzette (SL1A)Entnehmen Sie die Pinzette der Zubehör-Box und legen Sie sie in die Frontklappe. | Opbergen van het pincet. (SL1A)Neem het pincet uit de accessoires box en bevestig deze in de afdekklep. | Collocazione delle pinzette (SL1A)Estraele le pinzette dalla scatola accessori e collocatele all'interno dei pannello frontale |
English
Español
How to Change Threads
The machine is supplied with thread but the following is an easy way to change them:
(1) Cut the thread in use near the cone spool (behind the telescopic thread stand). Place the new thread on the spindle and tie it to the end of the original thread.
(2) Lower the presser loot lifter to lift up the presser loot.
(3) Set tensions to "0" so that the thread knot can pass through smoothly, draw out the looper thread until the thread knot comes to about 10 cm past the presser fool.
(4) When changing the needle thread, cut off the thread knot before it reaches the eye of the needle to avoid bending the needle as the knot is pulled and caught in the needle's eye. To make the above threading easier, use tweezers.
Cambio De Hilos
English: Tie threads
Español: Are los hilos Français: Nouer les fil
natural_image
Mechanical assembly diagram showing a rotating mechanism with arrows indicating motion (no text or labels)English: Needle eye
Cover the spool with the "NET" as chemical fibers (fibres) and the like are easily frayed.
Español
When using a real type thread spool, insert the spool adapter (supplied with the machine) (as shown).
natural_image
Illustration of a hand using a tool to lift a cylindrical component, then adding a separate cylindrical component (no text or symbols present)Replacing Needles
Replace needles in the following way. Note: be sure to take out the power supply plug before replacing needles. (1) Bring needles to their highest position by turning handwheel towards you. (2) Loosen the needle clamp screw and remove the two needles together. (3) With the flat side away from you, insert the new two needles together into the groove of needle bar as far as it will go.
Use "HA ☐ ISP (705/130)" #11(80) or #14(90) or ones the same as for home-use sewing machine.
Cambio De Agujas
When threading the machine from, the beginning, threading must be carried out in the following sequence:
First: Lower looper threading (A) Second: Upper looper threading (B) Finally: Needle threading (C,D)
Lower looper threading
Push the front cover to the right, and fold it down towards you. Take the thread drawn from the spool and pass it, through guide □ of the thread stand and then, in order, through guides □, □, □ and thread tension dial □. (Fig. A)
Español
Enhebrado Del Hilo (SL1/SL1T/SL1T-X)
Right needle threading
- For ease in threading, push the upper knife holder screw from Ⓞ side with the forefinger of your left hand ☐ and grasp the right end of the holder © and turn it in the direction of arrow ® with your right hand. (Fig. F)
- Take the thread drawn from spool, and pass it through thread guide - , then thread to the right-hand needle's eye from front to back. Cut the thread leaving about 10cm (4") of spare thread. (Fig. A)
Left needle threading
- Take the thread drawn from spool, and pass it through thread guides □ - □, □ - □, and thread the left-hand needle's eye □ from front to back. (Fig. A, F)
Español
text_image
F A B C Upper knife☐ As the upper knife is sharpened, care should be taken when moving this part.

text_image
F Cuchilo superiorBring the lower looper to the far left position by turning handwheel towards you, and pass the thread through lower looper thread guide □. Pass thread through lower looper slit □ from behind.(Fig. B)
Then move the lower looper slightly to the right by turning the handwheel towards you.
Then thread the hole of lower looper using tweezers. Cut the thread leaving about 10cm (4") of spare thread. (Fig. C)
Upper looper threading
- Bring the upper looper to its lowest position by turning handwheel towards you.
- Draw thread from spool and pass it, through guide [] of the thread stand and then, in order, through guides [] - [] (Fig. A)
- Thread the hole of upper looper [] using tweezers. Cut the thread leaving about 10cm (4") of spare thread. (Fig. D).
- Close the front cover.
Español
Right needle threading
- For ease in threading, turn the moveable knife to the non-operating position. Push the upper knife holder screw from Ⓐ with the forefinger of your left hand [] and grasp the right end of the holder Ⓞ and turn it in the direction of arrow Ⓥ with your right hand. (Fig. E)
- Take the thread drawn from spoof, and pass it through thread guide . Then thread the eye of right-hand needle's eye from front to back using tweezers. Cut the thread leaving about 10cm (4") of spare thread. (Fig. E)
Left needle threading
• Take the thread drawn from spool, and pass it through thread guides □ \~ □, □ \~ □, and thread the lelthand needle's eye □ from front to back. (Fig. A, E)
- Return the moveable knife to the cutting position.
Español
text_image
E Non-operating position Upper knife 10 cm☐ As the upper knife is sharpened, care should be taken when moving this part.

text_image
E 10 cm ⑦ ⑧ ⑨ Cuchilla SuperiorPreparation for Sewing and Checking
- Check that no thread slips off or snaps.
- Confirm that the upper knife moves against the lower knife correctly by turning the handwheel slowly towards you. If it is not correct, check if there is any fabric or waste thread between knives.
- Turn the handwheel towards you with your right hand to check that the thread winds around the stitch finger of the needle plate.
If the thread doesn't wind around the stitch finger of the needle plate, check if any threads are threaded incorrectly.
Español
Revision Y Preparacion Para La Costura
natural_image
Line drawing of a sewing machine needle insertion into a slot (no text or symbols)FOUR THREAD OVEREDGING STITCH USING 2 NEEDLES Before Sewing
After threading is completed, and when the threads are not wound around the stitch finger, gently draw out the four threads under and behind the presser foot, and turn the handwheel towards you by hand two or three times to make the thread wind on to the needle plate.
Presser Foot Lifter
For setting average material, there is no need to lower the presser foot lifter. When beginning to sew, push the material just in front of the presser foot and it will be fed through. For the thick material, lower the presser foot lifter, place the material under the presser foot, then raise the presser foot lifter.
Español
natural_image
Line drawing of a hand using a tool to adjust or install a mechanical component (no text or symbols present)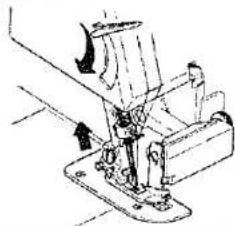
natural_image
Technical line drawing of a sewing machine with no visible text or symbolsBeginning and Ending of Sewing
Beginning to sew
Just put your left hand on the material to push it slightly until the tip of the fabric comes exactly behind the presser foot.
Español
natural_image
Illustration of hands using a sewing machine to cut fabric (no text or symbols visible)Ending of sewing
Make chain-stitches at the end of the sewing to prevent the thread from untying and to prepare for the next sewing.
Fin de la costura
natural_image
Illustration of a hand using a sewing machine to trim a piece of hair (no text or symbols present)Draw the finished fabric gently backwards and to the left as the machine is operating and make chain-stitches. This is called chain-stitch sewing. Then cut the thread 2 \~ 5cm (1-2") from the presser foot.
Do not pull it out roughly as the needle will bend and break.
natural_image
Illustration of a hand using a tool to cut or trim a small object, no text or symbols present| Français | Deutsch | Nederlands | Italiano |
| Commencer Et Finir Une Couture | Nähbeginn und Nahtende | Beginnen En Eindigen Met Naaien | Come si inizia e finisce una cucitura |
| Commencer à coudre | Nähbeginn: | Beginnen met naaien | Come si inizia a cucire |
| Placer votre main sur le tissu afin de le maintenir jusqu'à ce qu'il apparaisse derrière le pied de biche. | Führen Sie den Stoff leicht mit der linken Hand. Niemals am Nahgut ziehen oder den Stoff festhalten, da dadurch der Material-Transport verändert wird. | Leg uw linkerhand op de stof en duw deze zachijos naar voren toldat het uiteinde van de stof precies achter het persvoetje ligt. | Appoggiale la mano sul tessulo in modo da tenerlo farmo fino a quando appare dietro il piedl'ino premistoffa. |
| Finir une couture | Nahtende | Eindigen met naaien | Come si finisce una cucitura |
| A la fin de chaque couture laisser une chainette de plusieurs centimètres avant de couper le fit.Pour réaliser la chainette, tirer le tissu doucement en arrière et à gauche en continuant de faire fonctionner la machine. | Verriegeln Sie die Naht mit einigen Stichen. Sie vermeiden dadurch, daß sich die Naht löst und bereiten die Maschine gleichzeitig für den nächsten Nähvorgang vor. | Maak aan het eind kettingsleken om te voorkomen dat de draden losgaan en als voorbereiding voor de volgende kaer naaien. | Alla fine di ogni cucitura lasciate una catenella di alcuni centrimetri prima di tagliare il filo. |
| Pour réaliser la chainette, tirer le tissu doucement en arrière et à gauche en continuant de faire fonctionner la machine. | Ziehen Sie den Stoff zuerst nach hinten und dann nach links aus der Maschine. Lassen Sie die Naht noch ca. 5 cm Überstehen und schneiden dann die Fäden ab.Bitte beachten Sie, daß Sie den Stoff nicht herausziehen, solange noch die Nadal darin steckt, da sich diese sonst verbiegen könnte. | Trek als u klaar bent de stof voorzichtig naar achteren en naar links terwijl de machine locpt en maak kettingsteken Dit heet kettingsteek-naaien. Knip dan de draden 2 à 5 cm vanaf het persvoetje af.Trek niet hard aan de stof, want dan verbulgen of breken de naalden. | Per realizzare la catenella tirate il tessuto delicatamente verso il retro della macchina e a sinistra, continuando a far funzionare la macchina.Tagliate il filo a 2-5 cm. dal piedino premistoffa. Non tiratelo violentemente, potreste danneggiare o rompara l'ago. |
English
Adjustment of the Presser Foot Pressure
The presser fool pressure is pre-adjusted for materials of medium (standard) thickness. Adjustment is necessary only when you work on very thin or very thick materials. Accordingly, sew thinner materials with less pressure and thicker materials with more pressure. Increase the pressure of the presser foot by tightening the adjustment screw.
Thread Tension Adjustment (SL1/SL1T/SL1T-X)
Set the balance of the tension as weak as possible. Balance of the Loopwer thread:
When the lower looper thread is pulled to the top of material, loosen tension dial □ counterclockwise. (or tighten tension dial □ clockwise.) When the upper looper thread is pulled to the underside, tighten tension dial □ clockwise. (or loosen tension dial □ counterclockwise.)
Español
text_image
Diagram showing labeled circular components with numbered indicators, likely representing a mechanical or electrical component layout.- Lower looper thread and upper thread should be well balanced with same tension. (Both looper threads should make crosses at the edge of the fabric.)
- Needle thread should not be slacken, or pulled
Español
Tension correcta (SL1/SL1T/SL1T-X)
text_image
Wrong side Lower looper thread Right-hand needle thread Right side Upper looper thread Left-hand needle thread
Unbalanced upper looper thread wraps round and over the back (SL1/SL1T/SL1T-X)
Tighten the thread tension of the upper looper (Dial [] or loosen the thread tension of the lower looper (Dial []).
Español
text_image
Wrong side Lower looper thread Right side Upper looper thread Left-hand needle thread Right-hand needle thread ① ② Tighten ③ Loosen ④
Unbalanced lower looper thread wraps round and over the face (SL1/SL1T/SL1T-X)
Tighten the thread tension of the lower looper (Dial □) or loosen the thread tension of the upper looper (Dial □).
Español
text_image
Wrong side Right side Upper looper thread Left-hand needle thread Right-hand needle thread Lower Looper Thread ① ② Loosen ③ Tighten ④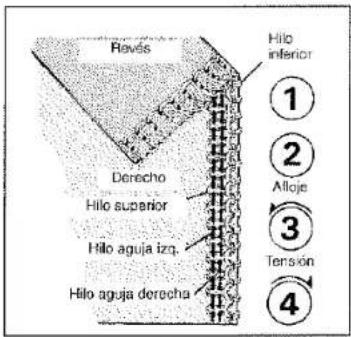
Unbalanced left needle thread too loose (SL1/SL1T/SL1T-X)
Tighten the thread tension of the left needle (Dial☐) or loosen both looper thread (Dial☐ and☐).
text_image
Wrong side Left-hand needle thread Lower looper thread Right side Upper looper thread Right-hand needle thread Tighten 1 2 Loosen 3 Loosen 4
text_image
Wrong side Lower looper thread Right side Upper looper thread Left-hand needle thread Right-hand needle thread ① Tighten ② ③ ④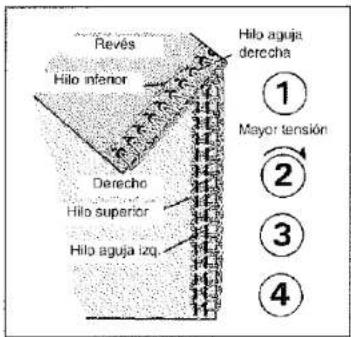
Thread Tension Adjustment (SL1A)
Adjust thread tension to suit the type of material and size of thread used. As the number on the thread tension discs increases, the thread tension becomes tighter.
Tension Guide
- Adjust thread tensions using guide as below. Test sew on scrap of fabric. Adjust finely to perfect seam.
Ajuste de la Tension del Hilo (SL1A)
natural_image
Technical line drawing of a mechanical device with no visible text or symbols| Français | Deutsch | Nederlands | Italiano |
| Réglage De La Tension Du Fil (SL1A)Equilibrage des tensions.Tension des fils de boucleurs:Lorsque le fil du boucleur inférieur est trop tiré sur le dessus du tissu desserrer le bouton de tension □ (ou resserrer le □).Si le fil du boucleur supérieur est trop tiré sur le dessous, resserrer le bouton de tension □ (ou desserrer le □). | Einstellung der Fadenspannung (SL1A)Die Fadenspannung hängt ab von der Art des Nähgutes und von der Art und Stärke des Nähgarnes.Höhere Einstellung des Fadenspannungsreglers bedeutet lestere Fadenspannung. | Garenspannings Afstelling (SL1A)Stel de garenspanning zocanig af, dat deze past bij de gebruikte stofsoort en garendikte.Wanneer de cijfera op de garenspannings-knoppen hoger worden, wordt de garenspanning strakker. | Regolazione tensione filio (SL1A)Regolate la tensione del filio in accordo con il tipo di tessuto e di titato che usate.Più il numero sul disco tensione aumenta più la tensione del filio diventa tesa. |
English
Correct tension (SL1A)
- Lower looper thread and upper thread should be well balanced with same tension. (Both looper threads should make crosses at the edge of the fabric.)
- Needle thread should not be loose or tight, but of average tension.
Español
text_image
Wrong side Lower looper thread Right-hand needle thread Right side Upper looper thread Left-hand needle thread
When the upper looper thread is unbalanced and lies on the under side of fabric (SL1A)
Tighten the thread tension of the upper looper (Dial [] or loosen the thread tension of the lower looper (Dial []).
Español
text_image
1 2 3 4 Wrong side Lower looper thread Left-hand needle thread Right-hand needle thread Right side Upper looper thread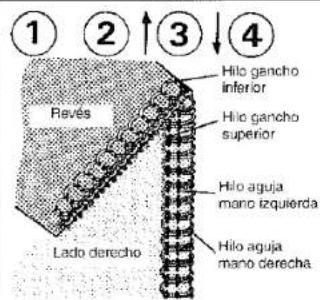
text_image
1 2 3 4 Wrong side Lower looper thread Left-hand needle thread Right-hand needle thread Right side Upper looper thread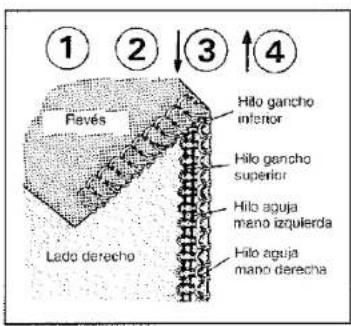
text_image
1 2 3 4 Wrong side Lower looper thread Left-hand needle thread Right-hand needle thread Upper looper thread Right side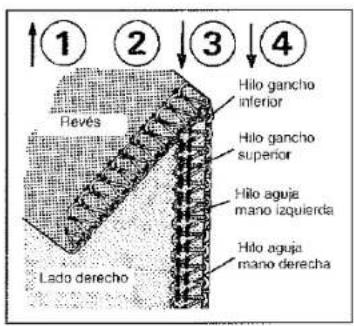
text_image
① ↑② ③ ④ Wrong side Lower looper thread Left-hand needle thread Right-hand needle thread Upper looper thread Right side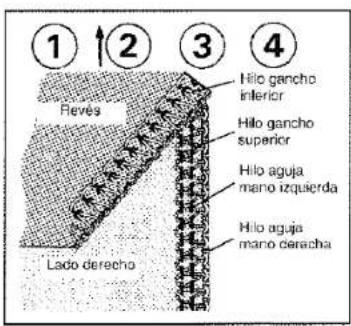
Adjustments For The Differential Feed
Differential feeding performs the function of stretching or condensing the edge of the fabric, since two independent feed dogs, one in front and one behind the needles, can be adjusted to feed at different ratio.
The function has the effect of producing a neat finish of overedging for stretchable and condensable fabrics.
□ "N" indicates the neutral position.
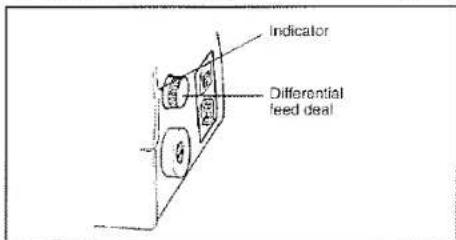
text_image
Indicator Differential feed dealRefer to the below chart and test stitch performance on a scrap of material you are going to use.
| Fabric | Differential feed ratio is set "N" | Differential feed ratio | Result of adjustment | |||
| Stretchable materials | Knit Jersey |  | N-2 |  | ||
| Unstretchable and uncondensable materials | Medium woven fabrics |  | N |  | ||
| Condensable materials | Georgetta |  | 0.7-N | |||
Español
Ajuste De La Alimentacion De La Tela
Adjustments for Size of Bight (SL1/SL1T/SL1A)
- Adjust the size of the bight from 4.2mm (0.16") to 8.0mm (0.23") according to the kind of material.
- The standard bight size is 4.5mm (0.17")
- Open the side cover to adjust the bight size.
(1) If the cutting width is narrower than the bight size, turn the bite width adjusting dial to the direction of arrow. (To bigger number)
(2) if the cutting width is wider than the bight size, turn the bite width adjusting dial to the direction of the arrow. (a smaller number)
The right figure shows that the size of the bite between the left needle and the edge of the material 4.5mm.
text_image
Technical diagram showing a mechanical device with a directional arrow indicating rotation or movement, alongside a vertical panel labeled '书' (Book).
Adjustments for Size of Bight (SL1T-X)
- Adjust the size of the bight from 5 mm (0.2") to 7 mm (0.28") according to the kind of material
• The standard bight size is 5 mm (0.2") - Open the side cover to adjust the bight size.
(1) if the cutting width is narrower than the bight size, turn the bite width adjusting dial to the direction of arrow. (To bigger number)
(2) If the cutting width is wider than the bight size, turn the bite width adjusting dial to the direction of the arrow. (a smaller number)
The right figure shows that the size of the bite between the left needle and the edge of the material 5 mm.
Español
text_image
Technical diagram showing a mechanical device with a close-up view of its internal components and directional arrow indicating rotation or movement.
How to Adjust Stitch Length
The machine is pre-set to a 2.5mm stitch length for regular seaming and overedging. You may adjust the stitch length from 1 mm (Narrow rolled hemming) to 5 mm by one-touch of the stitch length adjustment lever.
For normal overedging set the stitch length from 2.5mm to 5mm. A stitch length less than 2.5mm is used only for rolled hemming.
Sewing for Curved Seams
For a neat and clean finish of curved seams:
For inside curves, guide the fabric gently with the trimming line of the fabric under the right front of the presser foot, applying pressure to the fabric with your left hand, at the same time, apply a little pressure in the opposite direction with your right hand as shown.
For outside curves, apply pressure in the opposite directions of the above.
Español
natural_image
Line drawing of a mechanical component with a handle and internal components (no text or symbols)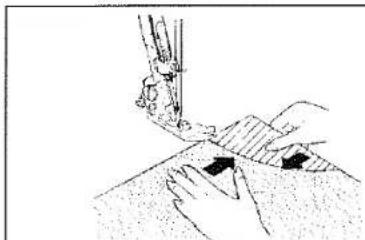
natural_image
Illustration of a sewing machine needle stitching fabric (no text or symbols)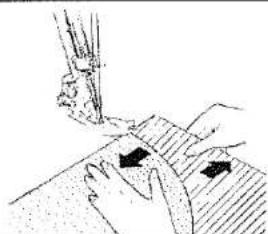
natural_image
Illustration of hands performing a sewing or sewing process with fabric bands (no text or symbols)| Français | Deutsch | Nederlands | Italiano |
| Réglage De La Longueur De PointCette machine est pré-régiée sur une longueur de point de 2,5mm pour la couture régulière et le surillage. Vous pouvez régler la longueur de point de 0,7mm (pour l'ourlet rouloité étroit) jusqu'à 5mm en poussant simplement le levier. | Einstellung Der StichlängeDie Stichlänge ist werkseitig auf 2,5mm für normales Nahen und zum Anfertigen von Überwendingnähten eingestellt. Sie können die Stichlänge jedoch von 0,7mm (Rolisaum) bis 5mm mittels des stufenlosregulier-baren Hebels verandern. | Het instellen Van De SteeklengteDe steeklengte van de machine is van tevoren ingesteld op 2,5mm voor standaard naaien en afwerken. U kunt de steeklengte instellen tussen 0,7mm (snalle rolzomen) en 5mm door middel van de hendel. | Regolazione lunghezza puntoQuesta macchina à pre-regolata su una lunghezza del punto di 2,5mm per la cucitura regolare e il sopraggitto. La lunghezza del punto può essere regolata da 0,7mm (per l'orlo arrotolato stretto) a 5mm, semplicemente premende la leva.☐ Per il sopraggitto normale regolate la lunghezza del punto da 2,5 a 5 mm. Una lunghezza inferiore a questa è usala solo per l'orlo arrotolato. |
| Coutures ArrondiesPour une finition claire et nette des coutures arrondies:Pour les courbas vers l'intérieur, guider le tissu doucement avec la ligne de coupe du tissu sous l'avant droit du pied de biche, en exerçant une légère pression sur le tissu avec votre main gauche et en même temps une légère pression dans la direction opposée avec la main droite, comme indiqué. | Nähen Von KurvenFür nach Innen gebogene Kurven führen Sie den Stoff mit der Schnittkante rechts unter der Vorderseite des Nährubes.Dabei drücken Sie den Stoff bei Punkt A mit der linken Hand etwas in Pfleitrichtung und gleichzeitig mit der rechten Hand bei Punkt B in die Gegenrichtung. | Het Naaien Van Ronde NadenVoor het neljes afwerken van ronde raden:Voor bochten naar binnen ce stof voorzichtig met de snijilin van de stof onder de rechterkant van het persvoetje leiden, met uw linkerhand druk op de stof uitoefenen en tegelijkertijd met uw rechterhand lichte druk uitoefenen in tegengestelde richting. | Cuciture arrotondatePer una finitura accurata e precisa delle cuciture arrotondate procedete come segue.Per le curve verso l'interno guidate il tessuto delicatamente con la linea di taglio del tessuto sotto la parte anteriore destra del piedino premiscità, esercitando con la mano sinistra una laggera pressione sul tessuto, e con la mano destra una leggera pressione nella direzione opposta come indicato nella figura. |
| Pour les courbas vers l'extérieur, exercer une pression des mains à l'inverse du cas précédenti. | Für nach außen gebogene Kurven legen Sie den Stoff in der gleichen Weise unter den Nährluß, crücken aber den Stoff jeweils in die entgegengesetzte Richtung. | Voor bochten naar buiten druk uitoefenen in tegengestelde richting als hierboven vermeld. | Per le curve verso l'esterno esercitate con le mani una pressione inversa a quella considerata nel caso precedente. |
English
Standard Chart for the Thread Tension (SL1/SL1T/SL1T-X)
The tension for each of the thread tension dials should be different according to the pattern stitches as in the chart on the right. Since the figures in the chart are for average strength of threads tension, it may be necessary to adjust the thread tension a little. Thread tensions will differ according to the kind of fabric and the thread. The differential feed ratio is normally "N". (See p.57)
Español
Guía Standard Para Tension Del Hilo (SL1/SL1T/SL1T-X)
| PATTERNSTITCHES | OVEREDGING | ROLLHEMMING | FINE ROLLHEMMING | |
| STITCH LENGTH | 2.5-5mm | 1-1.5mm | 1-1.5mm | |
| THREADTENSION | NEEDLETHEAD | 2-4 | 1-4 | 1-4 |
| UPPERLOOPERTHREAD | 1-4 | 1-4 | 2-4 | |
| LOWERLOOPERTHREAD | 2-4 | 5-8 | 2-4 | |
| PUNTADAS | DRILLADO | CRILLADO DOBLE | ORILLADO DOBLE FIND | |
| LARGO PUNTADA | 2.5 - 5 mm | 1 - 1.6 mm | 1 - 1.5 mm | |
| TENSION DE HLO | HLO AGUA | 2 - 4 | 1 - 4 | 1 - 4 |
| HLO SUPERIOR | 1 - 4 | 1 - 4 | 2 - 4 | |
| HLO INFERIOR | 2 - 4 | 6 - 8 | 2 - 4 | |
SETTING WASTE TRAY (Option on some models)
(1) Insert the right guide @ of the waste tray to the right leg of the overlock machine as illustrated. Turn the waste tray in the direction of arrow.
(2) Push the left end of the waste tray in the direction of arrow.
Español
INSTALANDO LA BANDEJA DE RECORTES
natural_image
Diagram of a mechanical or architectural component with directional arrows and labeled parts (no readable text or symbols)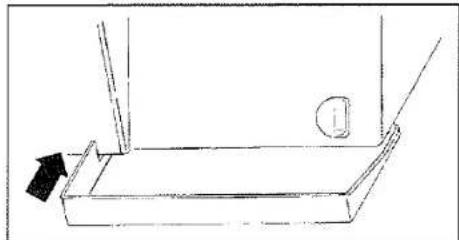
natural_image
Simple line drawing of a container with an arrow pointing to the side (no text or symbols)| Français | Deutsch | Nederlands | Italiano |
| INSTALLATION DU BAC A DECHETS(En option sur certains modèles) | EINSETZEN DER FLUSEN-SCHALE(Unterschiede bei diversen modellen) | HET PLAATSEN VAN HETAFVALBAKJE(Optional op sommige modellen) | INSTALLAZIONE DELLA VASCHETTARACCOGLI POLVERE(Optional su alcuni modelli) |
| (1) Insérez le guide droit a du bac à déchets sur le pied droit de la machine comme indiqué.Toumez le bac à déchets dans la direction de la flèche. | (1) Schieben Sie zuerst die rechte Hallekiammer um den rechten Standfuß der Maschine, wie die Abbildung zeigt.Drehen Sie die Schale in Pfeilrichtung. | (1) Schuif de rechter geleider van het afvalbakje over het rechter pootje van de overlockmachine zoals op de tekening.Draai het afvalbakje in de richting van de pijl. | (1) Insente la guida destra @ della vaschetta raccoglipolvere sul pieclino destro della macchina come indicato nella figura.Ruotate la vaschetta raccoglipolvere nella direzione della freccia. |
| (2) Poussez l'extrémité gauche du bac à déchets en direction de la flèche. | (2) Drücken Sie die Schale an der linken Seite bix zum Anschlag an die Maschine an. | (2) Duw de linkerkant van het afvalbakje in de richting van de pijl. | (2) Spingete l'estremità sinistra della vaschetta raccogli polvere nella direzione della freccia. |
English
THREE THREAD OVEREDGING STITCH USING ONE NEEDLE (SL1/SL1T/SL1T-X)
Though this machine is made mainly for 4 thread stitch overedging using 2 needles, three-thread stitch overedging using 1 needle can be easily operated by just removing 1 needle.
(1) By removing the right needle
Three-thread overedging stitch using 1 needle for as wide as a 4-thread overedging stitch using 2 needles can be achieved. Use the left thread tension. (Dial☐), the bite width is normally 4.5mm. (5 mm for SL1T-X)
☐ The differential feed ratio is normally "N". (See p.57)
(2) By removing the left needle
The right needle sews with a narrow width bite. Use the right thread tension. (Dial []) The bite width is normally 2.5mm. (3 mm for SL1T-X)
☐ The differential feed ratio is normally "N". (See p.57)
Español
ORILLADO CON TRES HILOS UTILIZANDO UNA AGUJA (SL1/SL1T/SL1T-X)
natural_image
Technical line drawing of a mechanical assembly with no visible text or symbolsEnglish: Left needle Español: Aguja izquierda Français: Aiguille gauche Deutsch: Linke nadel Nederlands: Linkernaald Italiano: Ago destro
natural_image
Technical line drawing of a mechanical device with no visible text or symbolsEnglish: Right needle Español: Aguja derecha Français: Aiguille droite Deutsch: Rechte nadel Nederlands: Rechtemaald
natural_image
Technical line drawing of a mechanical device with no visible text or symbols| Français | Deutsch | Nederlands | Italiano |
| SURJET A 3 FILS AVEC 1 AIGUILLE (SL1/SL1T/SL1T-X)Bien que cette machine soit conçue principalement pour un surjet à 4 fils avec 2 aiguilles, un surjet à 3 fils avec 1 aiguille peut être facilement réalisé en otant 1 aiguille. | DREIFÄDIGE ÜBERWENDLINGNAHT MIT EINER NADEL (SL1/SL1T/SL1T-X)Obwohl diese Maschine hauptsächlich zum Nahen der vierlädigen Überwendingnaht mit 2 Nadein konzipiert wurde, können Sie selbstverständlich auch die dreifädige Überwendingnaht berutzen. Sie brauchen lediglich 1 Nadel entfernen. | HET AFWERKEN MET DRIE DRADEN EN EEN NAALD (SL1/SL1T/SL1T-X)Hoewel deze machine voornamelijk bedeld is voor het afwerken met vier draden en twee naalden, is afwerken met drie draden en een naald ook gemakkelijk mogelijk door een naald te verwijderen. | SOPRAGGITTO A 3 FILI CON 1 AGO (SL1/SL1T/SL1T-X)Benché questa macchina sia principalmente progettata per l'esecuzione di un sopraggitto a 4 fili con 2 aghi, togliendo 1 ago è possibile eseguire un sopraggitto a 3 fili con 1 ago. |
| (1) En otant l'aiguille de droiteUn surjet à 3 fils avec 1 aiguille aussi, large qu'un surjet à 4 fils avec 2 aiguilles peut être réalisé.Utiliser la tension de fil gauche (bouton []). La largeur do point est normalement de 4,5mm.☐ Le ratio d'entraînement différentiel est (normalement) "N". (voir p.69) | (1) Nähen mit der linken nadelDie dreifädige Überwendingnaht mit einer Nadel hat dieselbe Breite wie die vierfädige Überwendingnaht mit 2 Nadeln. Verwenden Sie die linke Fadenspannung []. Die Schnittbreite beträgt normalerweise 4,5mmDas Differential-Transport-Verhältnis ist normalerweise "N". (Siehe Seite.60) | (1) Door het verwijderen van de rechternaaldAlwerken met drie draden en een naald voor dezellde breedte als afwerken met vier draden en twee naalden is mogelijk.Gabruik de linker draadspanning (knop []). De steekbreedte is normaliter 4,5 mm.☐ De differentieal transport afstelling is normaliter "N". (zie blz.61) | (1) Togliendo l'ago di destraE' possibile eseguire un sopraggitto a 3 fili con 1 ago di larghezza uguale ad un sopraggitto a 4 fili con 2 aghi.☐ Il rapporto di trasporto differenziale è normalmente "N". (vedi p.62) |
| (2) En otant l'aiguille gaucheL'aiguille droite coud avec une largeur de point étroite. Utiliser la tension de fil droit (bouton []). La largeur de point est normalement de 2,5mm.☐ Le ratio d'entraînement différentiel est (normalement) "N" (voir p.59) | (2) Nähen mit der rechten nadelDie rechte Nadel näht mit einer schmäteren Breite. Verwenden Sie die rechte Spannung [ ] Die Schnittbreite beträgt ca. 2,5mmDas Differential-Transport-Verhältnis ist normalerweise "N". (Siehe Seite.60) | (2) Door het verwijderen van de inkernaaldDe rechternaald naait met een smalle steekbreedte. Gebruik de rechter draadspanning (knop [ ]). De steekbreedte is normaliter 2,5 mm.☐ De differentieal transport afstelling is normaliter "N". (zie blz.61) | (2) Togliendo l'ago sinistroL'ago destro cuce con un punto streto. Utilizzate la tensione del filo destro (bottone []). La larghezza del punto è normalmente pari a 2,5mm. Il rapporto di trasporto differenziale è normalmente pari a 2,5mm.☐ Il rapporto di trasporto differenziale è normalmente pari a "N". (vedi p.62).Ago destro |
English
THREE THREAD OVEREDGE STITCH USING ONE NEEDLE (SL1A)
Though this machine is used mainly for 4 thread overedging using 2 needles, three-thread overedging using 1 needle can be easily operated by just removing 1 needle.
(1) By removing the right needle
When using only the left needle and the left thread tension (Dial []), a wide stitch (normally 4.5mm) can be achieved.
☐ The differential feed ratio is normally "N". (See p.57)
(2) By removing the left needle
When using only the right needle and the right thread tension (Dial ), a narrow stitch (normally 2.5mm) can be achieved.
☐ The differential feed ratio is normally "N". (See p.57)
Español
natural_image
Technical line drawing of a sewing machine with no visible text or symbolsEnglish: Right needle Español: Aguja derecha Français: Aiguille droite Deutsch: Rechte nadel Nederlands: Rechternaald

natural_image
Technical line drawing of a sewing machine with no visible text or symbols| Français | Deutsch | Nederlands | Italiano |
| SURJET A 3 FILS AVEC 1 AIGUILLE (SL1A)Bien que cette machine soit conçue principalement pour un surjet à 4 fils avec 2 aiguilles, un surjet à 3 fils avec 1 aiguille peut être facilement réalisé en ontant 1 aiguille. | DREIFÄDIGEÜBERWENDLINGSNAHT MIT EINER NADEL (SL1A)Obwohl diese Maschine hauptsächlich zum Nähen der vierfädigen überwendlingsnahlt mit 2 Nadeln konzipiert wurde, können Sie selbstverständlich auch die dreitadige überwendlingsnahlt benutzen. Sie brauchen lediglich 1 Nadel entfernen. | HET AFWERKEN MET DRIE DRADEN EN EEN NAALD (SL1A)Hoewel deze machine voornamelijk bedoeld is voor het afwerken met vier draden on twee naalden, is afwerken met drie draden en één naald ook gemakkelijk mogelijk door één naald te verwijderen. | SOPRAGGITTO A 3 FILI CON 1 AGO (SL1A)Benché questa macchina sia principalmente progettata per l'esecuzione di un sopraggitto a 4 fili con 2 aghi, togliendo 1 ago è possibile eseguire un sopraggitto a 3 fili con 1 ago. |
| (1) En otant l'aiguille de droitoUn surjet à 3 fils avec 1 aiguille aussi large qu'un surjet à 4 fils avec 2 aiguilles peut être réalisé.Utiliser la tension de fil gauche (bouton [☐]). La largeur de point est normalement de 4.5mm.☐ Le ratio d'entrainment différentiel est (normalement) "N". (voir p.59) | (1) Nähen mit der linken NadelWenn Sie nur die linke Nadel und die linke Fadenspannung (Regier [☐]) benutzen, erzielen Sie einen breiten Stich. (normalerweise 4.5mm)☐ Das Differential-Transport-Verhältnis ist normalerweise "N". (Siehe Seite.60) | (1) Door het verwijderen van de rechternaaidAfwerken met drie draden en één naald voor dezelfde bredtie als afwerken met vier draden en twee naalden is mogelijk. Gebruik de linker draadspanning (knop [☐]). De steekbrepte is normaliter 4.5 mm.☐ De differentieel transport afstelling is normaliter "N". (zie blz.61) | (1) Togliendo l'ago di destraE' possibile eseguire un sopraggitto a 3 fili con 1 ago di larghezza uguate ad un sopraggitto a 4 fili con 2 aghi.☐ Il rapporto di trasporto differenziale è normalmente "N". (vedi p.62). |
| (2) En otant l'aiguille gaucheL'aguille droite coud avec une largeur de point étroite. Utiliser la tension de fili droit (bouton [☐]). La largeur de point est normalement de 2.5mm.☐ Le ratio d'entrainment différentiel est (normalement) "N". (voir p.59) | (2) Nähen mit der rechten NadelWenn Sie nur die rechte Nadel und die rechte Fadenspannung (Regier [☐]) benutzen, erzielen Sie eine schmale Schnittkante. (normalerweise 2.5 mm)☐ Das Differential-Transport-Vernältnis ist normalerweise "N". (Siehe Seite.60) | (2) Door het verwijderen van de linkernaaidDe rechternaald naalit met een smalle steekbreedte. Gebruik de rechter draadspanning (knop [☐]). De steekbreedtp is normaliter 2.5mm.☐ De differentieel transport afstelling is normaliter "N". (zie blz.61) | (2) Togliendo l'ago sinistroL'ago destro cuce con un punto stretto. Utilizzate la tensione del fili destro (bottone [☐]). La larghezza del punto è normalmente pari a 2.5mm. Il rapporto di trasporto differenziale è normalmente pari a 2.5mm.☐ Il rapporto di trasporto differenziale è normalmente pari a "N". (vedi p.62).Ago destro |
ROLL HEMMING (SL1/SL1T/SL1T-X) (Option on some models)
Roll hemming is achieved by rolling the fabric and overlocking, the 2 types as illustrated on left is ideal for use with thin materials.
Español
The fabric is rolled by adjusting. The thread tension and is overlocked with upper looper thread.

The fabric is rolled and overlocked with upper and lower looper thread.
Orillado doble fino

text_image
① ② ③ 2 mmtext_image
① ② ③ 2 mm(1) Remove the left needle, (Sew only with the right needle)
(2) Change the presser foot and the needle plate for roll hemming.
For roll hemming sewing, use the presser foot marked "B" and the needle plate "B". (The presser foot "A" and the needle plate "A" are for normal sewing).
SL1/SL1T
☐ Raise up the upper knife. (See p.19)
☐ Set the needle to the highest position by turning the hand wheel toward you.
☐ Lower the presser foot letter.
☐ Loosen the presser foot thumb. Screw in the direction of arrow and remove the presser foot.
☐ Lopsen the screw ⓐ and Ⓤ on the needle plate with the larger screw driver and remove them.
☐ Set the needle plate for roll hemming and tighten the screw (a) and (b) on it
☐ Set the presser foot for roll hemming and tighten the presser foot thumb screw in the direction of arrow.
☐ Put the upper knife back where it was.
SL1T-X
(1) Remove the left needle.
(2) Pull the stitch finger lever towards you.
(3) Set the stitch width adjusting dial to 5.
(4) Set the stitch length adjuster to 1.
text_image
SL1 SL1T (1) (2)
text_image
Technical diagram of a sewing machine with labeled parts (a) and (b)
text_image
SL1T-X (1) (2)☐ The figures in the above chart may be a little different according to the kind of the fabric and the threads. (See p.57 and p.101)
For roll hem sewing, pass the needle thread to the left side (solid line) of thread guide @ as illustrated. (For normal sewing, pass it to the right side (dotted line) of thread guide @)
(3) At the beginning of sewing, gently pull the end of the thread chain.
For roll hem sewing, pull the material gently towards the rear of the machine, and you'll get neater stitches.
Español
text_image
(5) ① ② ③ ④
natural_image
Technical line drawing of a mechanical assembly with a foot and base (no text or symbols)| Français | Deutsch | Nederlands | Italiano | ||||||||||
| Tableau standard pour ourlet routé | Standard-tabelle für rollsaum | Standaard tabel voor het rolzomen | Tabella standard per orlo arrotolato | ||||||||||
| OURLET ROULE | OURLET ROULE FIN | Rohort | Schmaler Rotexen | ROLZCOM | PUNEROLZCOM | ORLO ARROTOLATO | ORLO ARROTOLATO FINE | ||||||
| LARGHEZZA DI TAGLIO | 5 - 5 mm | 5 - 6 mm | Schnifbiete | 5 - 5 mm | 5 - 5 mm | AFSNURBREDTE | 5 - 6 mm | 5 - 6 mm | LARGHEZZA DI TAGLIO | 5 - 5 mm | 5 - 6 mm | ||
| LONGHEZZA DEL PUNTO | 1 - 1.5 mm | 1 - 1.5 mm | Sichtänge | 1 - 1.5 mm | 1 - 1.5 mm | STERELLENGTE | 1 - 1.5 mm | 1 - 1.5 mm | LUNGHEZZA DEL PUNTO | 1 - 1.5 mm | 1 - 1.5 mm | ||
| RATIO D'ENTRAVEMENT DIFFERENTEL | N | N | Differendel-Transport-Verhältnis | N | N | DIFFERENTEEL TRANSPORT AFSTELLING | N | N | RAPPORTO D'TRASPORTO DIFFERENZIALE | N | N | ||
| TENSION DES FILS | FIL D'A GUILLE | 1 - 4 | 1 - 4 | Faden-Spannung | Nodal-Faden | 1 - 4 | 1 - 4 | BRAAD,SPAN-KING | NAALDORAAD | 1 - 4 | 1 - 4 | FILD D'ELL AGO | 1 - 4 |
| FIL DE BOUCLEUR SUPERIOR | 1 - 4 | 2 - 4 | Faden für obven Gellerinkale | 1 - 4 | 2 - 4 | BOVENDRULPERORAAD | 1 - 4 | 2 - 4 | FILD SUPERIORE | 1 - 4 | |||
| FIL DE BOUCLEUR INFERIOR | 5 - 3 | 2 - 4 | Faden für unteren Gellerinken | 5 - 3 | 2 - 4 | ONDERSLUPERORAAD | 5 - 3 | 2 - 4 | FILD INFERIORE | 6 - 3 | |||
English
HOW TO ROLL HEM (SL1A)
Roll hemming is achieved by adjusting the thread tensions so that the fabric is overlocked and folded under to 1.5mm width.
This is ideal for use with thin materials.
(1) Remove the left needle.
(2) Change the pressor foot and the needle plate for roll hemming. (Supplied with the machine).
For roll hemming sewing, use the presser foot marked "B" and the needle plate "B". (The presser foot "A" and the needle plate "A" are for normal sewing).
(3) Set the stitch width dial between 4.5 and 5.5
(4) Set the stitch length adjustment lever to 1.
(5) The standard thread tensions are as follows:
Dia#:Needle thread....4-7
tension.
Dia: Upper looper thread....4\~7
tension.
Dia[]:Lower looper thread....5\~8 tension.
At the beginning of sewing, gently pull the end of the thread chain.
For roll hem sewing, pull the material gently towards the rear of the machine, and you'll get neater stitches.
Español
DOBLADILLO RIBETEADO (SL1A)
text_image
② ③ ④ 1.5mm(1)

(2)

(3)

(4)

(5)
| Français | Deutsch | Nederlands | Italiano |
| OURLET ROULE (SL1A) | ROLLSAUM-NÄHEN (SL1A) | ROLZOMEN (SL1A) | ORLO ARROTOLATO (SL1A) |
| L'ourlet roulé est effectué par roulement du tissu et surjet. Les 2 types d'ourlets roulés illustrés cl-contre sont idéaux pour une utilisation sur tissus fins. | Diese spezielle Naht signet sich vor altern für dunne, leichte Stoffe wie Seide, Georgette usw. Dar Rollsaum wird wie eine normale.Überwendingsnaht gonäht, jedoch rollt der Greiferladen, bei erhöhter Spannung, die Stoffkante zu einem Rollsaum. | Roizomen wordt baraikt doordat de stof eerst omgerold en daarna afgewerkt wordt.De twee zomen zoals links afgebeeld zijn ideaal voor dunne materialen. | L'orlo arrotolato si esegue mediante arrotolamento del tessuto.I 2 tipi di orlo arrotolato illustrati nella figura sono ideali per l'applicazione su tessuti fini. |
| (1) Oter l'aiguille gauche.(ne coudre qu'avec l'aiguille droite) | (1) Entlernen Sie die linke Nadel.(2) Wechseln Sie die Stichplatte und Nähluß gegen das spezielle Rollsaum-Zubehör (Stichplatte und Nähluß in Zubehör-Box) aus. | (1) Verwijder de linkernaald(Naai slechts met de rechternaald).(2) Verwissel het persvoetje en de naaldplaat voor die om le rolzornen.Voor het maken van rolzomen, moet altijd de met "B" gemerktis persvoet en naaldplaat worden gebruikt. De met "A" gemerkte persvoet en naaldplaat moet voor normaal allocken worden gebruikt. | (1) Toglieta l'ago sinistro.(cucite soltanto con l'ago destro)(2) Cambiate il piedino premistoffa e la placca ago per l'orio arrotolato.Per la cucitura dell'orlo arrotolato utilizzate il piedino premistoffa e la placca ago "B". (il piedino premistoffa e la placca ago "A" sono destinati alla cucitura normale). |
| (2) Changer le pied de biche et la plaque aiguille pour l'ourlet roulotte .Pour la couture de l'ourlet roulé, utilisaz le piedde-biche et la plaque-aiguille "A" sont destinés à la couture normale). | Bei allen Rollsaum-Nährarbeiten ist der mit "B" gekennzeichnete Nähluß und die mit "B" gekennzeichnete Stichplatte einzusetzen. Bei normalam Overlock-Nähen die mit "A" gekennzeichneten Teile einsetzen.(3) Stellen Sie den Stichbraiten-Hebel zwischen 4.5 und 5.5.(4) Stellen Sie den Stichlängen-Regullerungshebel auf 1. | (3) Zet de steekbreedte knop tussen 4.5 en 5.5.(4) Zet de steeklengie instelhendel op 1. | (3) Mettere il bottope per la larghezza del punto tra 4.5 e 5.5.(4) Mettere il bottope per la lunghezza del punto sul n°1. |
| (3) Régler la largeur de point entre 4,5 et 5,5.(4) Régler la longueur de point à 1. | |||
| (5) Les tensions de fills standards sont comme suit.Bouton[]:Fil de l'aiguille......tension 4~7Bouton[]:Boucleur supérieur......tension 4~7Bouton[]:Boucleur inférieur......tension 5~8En. début de de la chaînette, couture tirer doucement Sur l'extrémitéEn. début de Couture tirer doucement sur l'extrémité de la chaînette.Pour la couture de l'ourlet roulé tirer sur le tissu doucement vers l'amère de la machine ainsi vous obtiendrez des points plus soignés. | (5) Die Standard-Fadenspannungen sind wie folgt:Regler[]:Nadelladen......Spannung 4~7Regler[]:Obergreifer-Faden ...Spannung 4~7Regler[]:Untergreifer-Faden...Spannung 5~8Wenn Sie zu nähen beginnen, ziehen Sie das Ende des Kettelladens leicht an.Wenn Sie zum Nähen von Rollsäumen den Stoff leicht nach hinten ziehen, erhalten Sie ein schöneres Stichbild. | (5) De standaard garenspanningen zijn als volgt.Knop[]: Draad van de naaid......4~7Knop[]: Bovengrijper draad......4~7Knop[]: Ondergniper draad......5~8Voor het maken van een rolzoom, trekt U het materiaal voorzichtig naar achteren en U krijgt het mooiste stiksel.Wanneer U met naaien beginni, voorzichtig aan de ketting van draden trekken. | (5) Le tensioni medie dei fili sono:Bottone[]:filo dell'agotensione......4~7Bottone[]:filo parte superiore......4~7Bottone[]:filo parte superiore......5~8Per l'esecuzione dell'orlo tirale delicatamente il tessuto verso i retro della macchina in modo da ottenere punti più precisj.Quando iniziate a cucire tirate con delicatezza l'estremità della catenella. |
English
Español
PIN TUCKING (SL1/SL1T/SL1T-X)
Pin tucking is overlocked so avoid culting the fabric by raising the upper knife. Pin tucking is suited to the design of a child's clothing and a lady's blouse.
☐ Use the presser foot marked "A" and needle plate "A".
(1) Remove the left or right needle to your required width. (Sew only with the one needle.)
(2) Raise the upper knife. (See p.19)
☐ Lower the presser foot lifter.
(3) The tension is set the same as the one for overedging. (See p.69)
The fabric is ironed along the line of the pin tucking in advance.
☐ The differential feed ratio is normally "N".
PINZAS, PESPUNTES (SL1/SL1T/SL1T-X)
natural_image
Mechanical assembly diagram showing a lever mechanism with rotating components (no text or labels)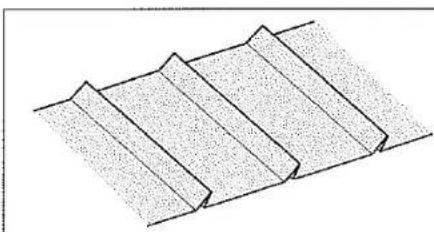
natural_image
Pure diagram of layered material with no text, numbers, or symbols| Françals | Deutsch | Nederlands | Italiano |
| PLI PIQUE (SL1/SL1T/SL1T-X)Le pli piqué est surfilé donc faites en sorte que le tissu ne soit pas coupé, en relevant le couleau supérieur.Le pli piqué convient pour les vêtements d'enfant et les chemisiers de femme. Le pli piqué convient pour les vêtements d'enfant et les chemisiers de femme.Utilisez le pied de biche marqué "A" et la plaque aiguille marquée "A".(1) Otoz l'aiguille droite ou gauche selon la largeur désirée. (couture avec 1 aiguit seulement)(2) Ralevez le couteau supérieur (voir p.19)Descendez le releveur de pied de biche.(3) La tension est la même que celle pour le surjet.Repassez les plis piqués à l'avance.Le ratio d'entraînement différentiel est (normalement) "N". (voir p.69) | NÄHEN VON BIESEN (SL1/SL1T/SL1T-X)Bel dieser Naht handelt es sich um eine äußerst dekorative Überwendungnaht, die sich vor allem für Kinderkleidung oder Damenblusen hervorragend eignet. Damit jedoch der Stoff nicht abgeschnitten wird, muß der obare Abschneider außer Funktion sein.Verwenden Sie Nähfuß und Stichplatte mit der Markierung "A".Entlernen Sie die linke oder rechte Nadel, entsprechend der gewünschten Breite. (Nahen Sie nur mit einer Nadel)Drehen Sie den oberen Abschneider, wie auf Seite 20 beschrieben, nach oben.Drücken Sie den Nählußheber nach unten.Die Spannung stellen Sie wie beim Überwendungnähen ein.Das Differential-Transport-Verhältnis ist normalerweise "N". (siehe Seite.70) | SMALLE PLOOITJES STIKKEN (SL1/SL1T/SL1T-X)De plooitjes worden algewerkt zonder de stof at te snijden door het bovenmes omhoog te draalen. De plooitjes zijn geschikt voor kinderkleding an damesclouses.Gabruik persvoet "A" en naaldplaat "A".Verwijder de linker of rechter naald voor de gewensle breedte. (nası slechts met één naald)Draai het bovenmes omhoog. (zie blz. 20)Zet de persvoethendel omlaag.De spanning is hetzelfde als bij afwerken. (zie blz.70)De plooitjes worden over de gehele breedte in de stof gestreken.De differentieel transport afstelling is normaliter "N". | PIEGHE CUCITE ORNAMENTALI (SL1/SL1T/SL1T-X)Le pieghe cucite ornamentali sono surflate e quindi realizzate senza tagliare if tessuto sollevando il coitello superiore.Le pieghe cucite ornamentali sono particolarmente adatte all'abbigliamento per bambini e agli abiti da donna tipo "chemisler".Utilizzate il piedino premistoffa "A" e la piacca ago "A".(1) Togliete l'ago destro o sinistro a seconda della larghezza desiderata (cucitura con 1 solo ago).(2) Sollevate il coltello superiore. (vedi pag.20).Abbassate la leve al'za piepino premistoffa.(3) La tensione è uguale a quella utilizzata per il sopraggitto.Le pieghe cucite ornamentali vanno precedentemente stirate. Il rapporto di trasporto differenziale è normalmente pari a "N". (vedi pag.70)."N" indica la posizione di neutro. |
English
(4) Place the fabric under the presser foot with the hem edge in line with the side of the needle plate and start to sew. Raise up the presser lifter.
☐ Make chain-sitch at the end of the sewing.
(5) The hem edge is ironed to one side when your sewing is finished.
Español
text_image
Hem edge The side of the needle plate.
natural_image
Diagram of three coiled spring-like structures on a textured surface (no text or symbols)
natural_image
Diagram of three parallel grooves or clips on a textured surface (no text or symbols)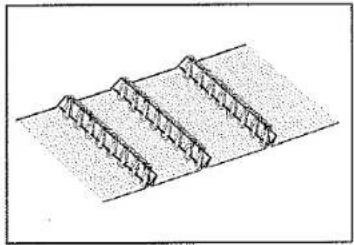
natural_image
Diagram of three parallel grooves or grout strips on a textured surface (no text or symbols)Deutsch
natural_image
Diagram of three parallel grooves or grout strips on a textured surface (no text or symbols)
natural_image
Diagram of three parallel grooves or clips on a textured surface (no text or symbols)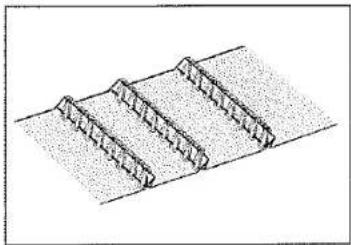
natural_image
Diagram of three corrugated metal strips on a flat surface (no text or symbols)English
Español
CORDED OVERLOCK
Corded overlock can be used to strengthen stitches when joining elastic materials such as knitted fabrics. There are two ways of corded overlock. Thread cord through hole on front of foot:
(1) Place the slightly wide cord (about 3mm) under the right needle, and sew on.
(2) Sew a narrow cord, positioning it on the edge of the overlocked stitch.
COSTURA OVERLOCK ENCORDELADA
natural_image
Two-step sewing process diagram showing stitching technique (1) and detail view (2), no text or symbols present.| Français | Deutsch | Nederlands | Italiano |
| SURJET AVEC CORDONNET | ÜBERWENDLINGNAHT MIT KORDEL | OVERLOCK MET KOORDJE | SOPRAGGITTO CON CORDONETTO |
| Le surjet avec cordonnet peut être réalisé pour renforcer les points lors de l'assemblage de tissus élastiques tels que les tissus à mailles. Il y a 2 manières de réaliser un surjet avec cordonnet: | Dieser spezielle Stich ist zum Verstärken der Naht gedacht, besonders dann, wenn Sie elastische Stoffe verarbeiten. Es gibt zwei Möglichkeiten:(1) Führen Sie ein schmales Band (Breite ca. 3mm) durch den Nähluß (wie die Abb. zeigt), legen es flach auf den Stoff und übernahen es. | De overlock met een koordje kan gebruikt worden voor het aan elkaar naalen van elastische materialen, zoals gebreide stoffen.Er zijn twee manieren van overlock met een koordje:(1) Plaats een koordje van ± 3 mm bread onder de rechternaalci en naar dit mee.(2) Naat een smal koordje mee en plaats dit aan de rand van de overlock steek. | Il sopraggitto con cordonetto può essere realizzato per rinforzare i punti in fase di assemblaggio di tessuti elastici quali, ad esempio, i tessuti a maglia. Vi sono 2 metodi per eseguire il sopraggitto con cordonetto:(1) Collocate un cordonetto di larghezza pari a 3mm sotto l'ago destro, ed eseguite la cucitura sopra.(2) Cucite un cordonetto stretto posizionandolo sul bordo del sopraggitto. |
| (1) Placer un cordonnet d'environ 3mm de large sous l'aiguille droite et coudre dessus.(2) Coudre un cordonnet étroit en le positionnant sur le bord du surjet. | (2) Legen Sie eine Kordel direkt unter die Nadel zwischen den Stoff und übernahen sie. |
English
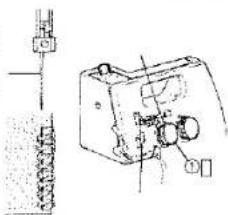
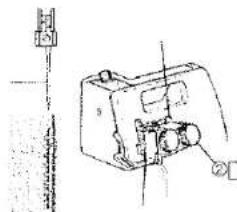
REPLACING THE CUTTING KNIVES
The upper knife and lower knife are made of a special long-lasting steel and will seldom have to be replaced. However, when they do not cut the fabric even though they are set in the right position. Replace them in the following way: Before replacing the knife, be sure the power supply plug is take out. Move the front cover to the right, then open it toward you.
Español
REEMPLAZANDO LOS CUCHILLOS
Lower knife clamp screw

text_image
Align Needle plate Lower knifetext_image
1~1.5 Upper knife Needle plate 0.5~1 Lowest position Lower knife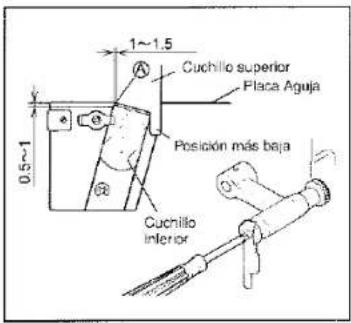
CHANGING THE LIGHT BULB
When the light does not come on even though it is switched on:
(1) Take out the power supply plug.
(2) Remove the lamp cover.
(3) Change the light bulb.
(4) Replace the lamp cover.
CAMBIANDO LA AMPOLLETA
natural_image
Technical line drawing of a mechanical device with a lever and adjustment knob (no text or symbols)| Français | Deutsch | Nederlands | Italiano |
| REMPLACEMENT DE L'AMPOULE | AUSWECHSELN DER GLÜHBIRNE | HET VERVANGEN VAN HET LAMPJE | SOSTITUZIONE DELLA LAMPADINA |
| Lorsque l'ampoule ne s'allume pas même lorsque vous mettez l'interrupteur sur en: | Beim Wechsel der Glühbime gehen Sie wie folgt vor: | Als het lampje niet gaat branden als het wordt ingeschakéd: | Se la lampadina non si accende quando positzionate l'interrutore su on: |
| (1) Débranchez la machine(2) Otez le capot de la lampe(3) Changez l'ampoule(4) Remetre le capot de la lampe | (1) Trennen Sie die Maschine durch Herausziehen dos Netzsteckors aus der Stecklose vom Netz.(2) Entfernen Sie die Lampenabdeckung mittels des im Zubenhör belgetögten Schraubenziehers.(3) Ersetzen Sie die defekte gegen eine neue Glühbirne. | (1) Neem dan de stekker uit het contact.(2) Verwijder het aldekkapje van de lamp.(3) Vorwissel het lampje.(4) Plaats het aldekkapje er weer op. | (1) Disinserte la macchina.(2) Togliete il coperchio della lampadina.(3) Sostituite la lampadina.(4) Ricollocate la placca frontale della lampadina. |
English
LUBRICATION
Lubrication is not necessary for this machine since the important parts are all made of a special oil impregnated sintered metal. However, one or two drops of oil will increase durability.
CLEANING
First disconnect machine from power supply by removing plug from the electric outlet.
-
Open front cover and side cover.
-
Using a brush which may or may not be supplied with your machine.
STORAGE
(Option on some models)
- When the machine is not in use, please disconnect it from the power supply by removing plug from the electric outlet.
- Using a vinyl cover which may or may not be supplied with your machine.
- Store away from bright and damp places.
SERVICING
Any questions regarding service and or operation is to be addressed to the store where the machine was purchased.
Español
LUBRICACIÓN
text_image
SL1 SL1T SL1A SL1T-X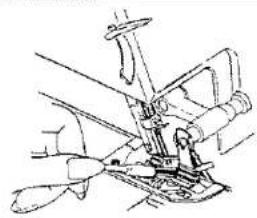
natural_image
Technical line drawing of a mechanical assembly with no visible text or symbols| Français | Deutsch | Nederlands | Italiano |
| LUBRIFICATIONLa lubrification de cette machine n'est pas nécessaire étant donné que les pièces importantes sont faites d'un métal spécial impregné d'huile.De toutes façons, une ou deux gouties d'huile augmenteront sa durée. | ÖLEN DER MASCHINEDa alle wichtigen Bauteïe aus hochwertigen, selbstschmierenden speziellen Metallen, sog Sinter-Metallen hergestellt sind, ist ein Olen der maschine eigentlich nicht erforderlich.Ein oder zwei Troplen Öl schaden jedoch nicht, sondern erhöhen die Lebensdauer. | HET OLICNDeze machine behoeft niet geolied te worden omdat de belangrijke delen allemaal gemaakt zijn van speciaal met olie geïmpregneerd gesinterd metaal.Eén of twee druppels olie zullen echter de duurzaarmheid verhogen. | LUBRIFICAZIONELa macchina non necessita di lubrificazione poiché i componenti principali sono realizzati in un metallo speciale autolubrificante.Una o due gocce di olio, tuttavia,aumenteranno la durata della macchina. |
| NETTOYAGERettez tout d'abord la machine hors tension depuis le transformateur, en relirant la fiche de la prise de courant.1. Ouvrez le couvercie frontal et latéral.2. Utilisez une brosse qui peut être ou non fournie avec votre machine, veillez, s'il vous plaît, à enlever toutes les poussières et les peluches qui se sont accumulées.RANGEMENT(en option sur certains modèles)1. Lorsque la machine ne travaille pas, veuillez, s'il vous plaît, la mettre hors tension depuis le transformateur, en relirant la fiche de la prise de courant.2. Utilisez uns housse en vinyle qui peut être ou non fournie avec votre machine, couvrez, s'il vous plaît votre machine quand vous avez fini de coudre.3. Rangez la machine à l'abri de la lumière et de l'humidité.SERVICEPour toute question concernant la maintenance ou l'utilisation de la machine, vous pouvez vous adresser au magasin ou vous l'avez achetée. | REINIGUNGAls erstes schahen Slo bitte die Maschine ab und ziehen den Stecker aus der Steckdose.1. Offnen Sie die Frontund die Seitenabdeckung.2. Benützen Sie eine Bürste (bei manchen Modellen wird diese im Zubehör mitgeliefert) und entfernen Sie Staub als auch Fadenrestie die sich angesammelt haben.ACHTUNG(Option bei manchen modellen)1. Allemal wenn die Maschine nicht benützt wird, ziehen Sie bitte den Stecker aus der Steckdose und unterbrechen so die Stromzufuhr.2. Benützen Sie die Vinylabdeckhaube welche mit den meisten Modellen mitgeliefert wird, wenn Sie Ihre Maschine nach Beendigung der Naharbeit aufbewahren.3. Setzen Sie ihre Nahmaschine nicht direkter Sonnenbestrahlung oder Feuchtigkeit (Dampf) aus.SERVICEBei allen Fragen bezüglich Service und Handhabung wenden Sie sich bitte an das Unternehmen bei welchem Sie die Maschine gekauft haben. | SCHOONMAKENOntkoppel eerst de machine van het lichtnet door de steker uit het stopcontact te nemen.1. Open de voor-an zijkap.2. Door gebruikmaking van een al of niet bij uw machine bigeleverd borstellige kunt u stof en garenresten die zich opgehoopt hebben verwijderen.OPBERGEN(Optioneel op sommige modellen)1. Als de machine niet in gebruik is ontkoppel dan de machine van het lichtnet door de steker uit het stopcontact te nemen.2. Door gebruikmaking van een al of niet bij uw machine bigeleverde vinyl afdekhoes kunt u de machine na gebruik afdekken.3. De machine na gebruik niet opbergen in helder zonlicht of op een vochtige plaats.SERVICEVragen met betrekking tot onderhoud en/ol gebruik van de machine dient u te richten aan de winkel waar u de machine heeft aangeschaft. | PULIZIAPrima di staccare la macchina dalla corrente.1. Aprite il coperchio frontale e laterale2. Usando lo spazzolino in dotazione, eliminate tutta la polvere e i fill che si sono accumulati.CUSTODIA1. Quando non usate la macchina, staccatela sempre dalla corrente.2. Usando la custodia di plastica, coprite la macchina quando avete terminato la cucitura.3. Non conservate la macchina in luoghi umidi e molto luminosi.SERVIZIOPer qualsiasi informazione riguardo il funzionamento ed il mantenimento della macchina, rivolgetevi al concessionario dove l'avete acquislata. |
English
TABLE OF SEWING MATERIALS NEEDLES AND THREAD
| HA × 1SPNeedle HA × 1T(705/130)(For home-use sewing machine) | Thread | Thread tension(Needle thread) | Overedging width(Between left needle and edge) | Stitch length | |
| Thin material(crept, georgette) | #11(80) | Polyestel (spun, filament)#60/2 Twisted thread~ #80/2 twisted thread(#80/3 Twisted thread~ #100/3 twisted thread)(Three-thread overedging stitch). | Loose | 5 mm(SL1T-X)4.2 ~ 4.5 mm | 2 ~ 2.5 mm |
| Medium to thick material(Serge, gabardine, etc.) | #11 or #14(80) or (90) | #60/2 Twisted thread(Three or four-threadoveredging stitch ). | Medium | 5 mm(SL1T-X)4.2 ~ 4.5 mm | 2.5 ~ 3 mm(SL1/SL1T/SL1T-X)2.5 ~ 3.5 mm(SL1A) |
| Thick material(thick denim) | #14(90) | #50/2 Twisted thread~ #60/2 twisted thread(Three or four-threadoveredging stitch ). | Tight | 5 mm(SL1T-X)4.2 ~ 5 mm | 2.5 ~ 3 mm(SL1/SL1T/SL1T-X)3 ~ 5 mm(SL1A) |
☐ Use ball point needles for Man-Made fibres or stretch fabrics
Español
| Number of threads | 4 Threads (3 threads, 2 threads) | Stitch length | 0.8~5 mm(SL1T-X)1~5 mm(SL1/SL1T/SL1A) |
| Number of needles | 2 Needles (1 needle) | Differential feed ratio | 1:0.7~2(SL1/SL1T/SL1T-X)Standard N (Neutral position)(SL1A) |
| Needles | Standard HA × 1SPorHA × 1T (705/130) #11(80)#14(90) | Maximum sewing speed | 1500 RPM |
| Width between two needles | 2 mm | Machine dimensions | Width 300mm (Max. 320mm)Depth 220mm (Max. 245mm)Depth 230mm (Max. 255mm)(SL1T/SL1T-X)Height 290mm (Max. 340mm~555mm) |
| Overedge widthSize of bight | Standard 5mm (Range 5~7mm)(SL1T-X)Standard 4.5mm (Range 4.2~6mm)(SL1/SL1T/SL1A) | Weight (Head only) | 8.1 kg |
Español
ESPECIFICACIONES
| Número de hilos | 4 Hilos (3 hilos, 2 hilos) | Largo de puntada | 0.8~5 mm(SL1T-X)1~5 mm(SL1/SL1T/SL1A) |
| Número de agujas | 2 Agujas (1 aguja) | Proporción diferencial | 1:0.7~2(SL1/SL1T/SL1T-X)Standard N (Posición neutral)(SL1A) |
| Agujas | Standard HA x 1SPóHA x 1T (705/130) #11(80)#14(90) | Velocidad máxima de costura | 1500 RPM |
| Ancho entre dos agujas | 2 mm | Dimensiones de máquina | Ancho 300mm (Max. 320mm)Prolundidad 220mm (Max. 245mm)Profundidad 230mm (Max. 256mm)(SL1T/SL1T-X)Altura 290mm (Max. 340mm~555mm) |
| Ancho sufilado Tamaño del lazo | Standard 5mm (Oscila entre 5~7mm)(SL1T-X)Standard 4.5mm (Oscila entre 4.2~6mm)(SL1/SL1T/SL1A) | Peso (sólo cabezal) | 8.1 kg |
Français
CARACTERISTIQUES
Styk 2. Harmonisering. Styk 3. Vekslende Stromstyrke. To my knowledge this is correct. Best regards. Tommy Rasmussen.
EN55104:1995
Declaration of Conformity to EC-directive (en)
We declare that household sewing machine Model detailed below is in conformity with 89/336/EEC-EMC Directive and 73/23/EEC-LV Directive
EN55014:1993
Limits and methods of measurement of radio disturbance characteristics of electrical motor-operated and thermal appliances for household and similar purposes, electric tools and similar electric apparatus.
EN55022:1995
Limits and methods of measurement of radio interference characteristics of information technology equipment. Disturbances in supply systems caused by household appliances and similar electrical equipment.
EN60555:1987
Part 2. Harmoniss Part 3. Voltage Flutuations Electromagnetic compatibility, Immunity requirements for household appliances, tools and similar apparatus. Product family standard.
EN55104:1995
Safety of household and similar electrical appliances Part1. General requirements.
EN60335-1:1988
Safety of household and similar electrical appliances Part 2. Particular requirements. Section 2.28 Sowing machines.
Person in charge of safety:
Date: 15th November 1995 Name: Mr. P. R. Voogh Position:Manger Q. C.for EC
Signature:

EEC IMPORTERS / DISTRIBUTORS
AISIN EUROPE S.A.
Technical Department
AISIN EUROPE S. A. (UK) Branch
Unit 4 Swan Business Park, Sandpit Road, Dartford, Kent DA1 5ED, United Kingdom
TEL (01322) 291137
TOYOTA
"TOYOTA" FASHIONS YOUR FUTURE
AISIN SEIKI CO., LTD.
Kariya City 448-8650, Japan
1257149-111-C
Printed in Taiwan