USER MANUAL KSV26CRC KELVINATOR
Congratulations Contents
Congratulations and thank you for choosing our Inverter split-type room air conditioner. We are sure you will find your new air conditioner a pleasure to use. Before you use the air conditioner, we recommend that you read through the entire user manual, which provides the description of the air conditioner and its functions.
To avoid the risks that are always present when you use an electrical appliance, it is important that the air conditioner is installed correctly and that you read the safety instructions carefully to avoid misuse and hazards.
We recommend that you keep this instruction booklet for future reference and pass it on to any future owners.
After unpacking the air conditioner please check it is not damaged. If in doubt, do not use the air conditioner but contact your local Electrolux Customer Care Centre.

environmental tip
• Most of the packing materials are recyclable.
Please dispose of those materials through your local recycling depot or by placing them in appropriate collection containers.
- If you wish to discard this air conditioner, please contact your local authorities and ask for the correct method of disposal.

caution
- The air conditioner is not intended for use by young children or infirmed persons without supervision.
- Young children should be supervised to ensure that they do not play with the air conditioner.
- Contact an authorised installer for installation of this unit.
- Contact an authorised service technician for repair or maintenance of this unit.
- If the power cord is to be replaced, replacement work shall be performed by authorised personnel only.
- Installation work must be performed in accordance with the national wiring Standards by authorised personnel only.
Conditions of use
This appliance is intended to be used in household and similar applications such as:
- Staff kitchen areas in shops, offices and other working environments
- Farm houses
- By clients in hotels, motels, and other residential type environments
• Bed and breakfast type environments
Contents......i
Quickstart guide ...... ii
Parts identification....iii
Safety precautions 1
Warning....1
Caution....1
Using the remote control 2
Features of the remote control....3
Clock button....4
Light button....4
Turbo button....4
X-Fan button....4
Time On/Off buttons....4
Swing buttons....4
I Feel button 5
Quiet button....5
Sleep button....5
Changing batteries 6
Emergency operation....6
Care and cleaning 7
Operation tips....8
Troubleshooting....9
Installation checklist....12
Important notes
- Contact an authorised installer for installation of this unit.
- Contact an authorised service technician for repair or maintenance of this unit.
- The socket outlet required to supply power must be connected and commissioned by a licenced contractor.
- This appliance is not intended for use by persons (including children) with reduced physical, sensory or mental capabilities, or lack of experience and knowledge, unless they have been given supervision or instruction concerning use of the appliance by a person responsible for their safety.
- Young children should be supervised to ensure that they do not play with the air conditioner.
- If the power cord is to be replaced, replacement work shall be performed by authorised personnel only.
- Installation work must be performed in accordance with the national wiring standards and the electricity suppliers service rules by authorised personnel only.
- If the system is to be moved to another location or disposed of, only a suitably qualified person is permitted to undertake such work.
• Take care not to catch fingers on the fan blade when adjusting vertical louvres.
- This air conditioner uses R410A refrigerant (Confirm before installation).
Quickstart guide

The icons displayed on the indoor unit:

: Cool

: Power

: Dry

: Set temp

: Heat
General operation
- Once power is connected, press the ON/OFF button (1) and the air conditioner will start to run.
Note: When the power is connected the main louver will close automatically
- Press the mode button (2) to select the desired running mode (heating, cooling, fan only or dehumidify).
- Pressing ∧ or √ button (3) to select the desired temperature. (It is unnecessary to set the temperature in AUTO MODE.)
- Pressing the fan button (4) will allow you to select from 6 different fan speeds from high to low, including an AUTO setting.
- The swing buttons (5) will allow you to select horizontal (H) or vertical (V) swing of the air guding louvers.
Optional operations
- Press the SLEEP button (6) to select the sleep mode.
- The TIMER ON and TIMER OFF buttons (7) can be used to set automatic start and stop for the air conditioner, (see detailed instructions for more information)
- The light button (8) can be used to switch on or off the display on the front panel of the indoor unit.
- Press TURBO button, can realize the ON and OFF of TURBO function.
Special functions
This function indicates that moisture on evaporator of indoor unit will be blown after the unit is stopped to avoid mould.
X-FAN (Air Purge)
When the X-fan function is on, the fan will continue to run for 10 minutes at low speed after the off button is pressed in order to purge the air conditioner of all moisture to avoid the growth of mould.
About AUTO RUN
When AUTO RUN mode is selected, the set temperature will not be displayed on the LCD, the unit will be in accordance with the room temperature automatically to select the suitable running method and to make ambient comfortable.
Turbo function
The Turbo function operates a higher than normal fan speed to allow for rapid heating or cooling.
Remote lock
Press SWING-V and ION-FILTER buttons simultaneously to lock or unlock the keyboard. If the remote control is locked, the icon 📋 will be displayed on it, in which case, press any button, the mark will flicker three times. If the keyboard is unlocked, the mark will disappear.
Switch between Centigrade and Farenheit
With the air conditioner switched off, press the SWING-H and ION-FILTER buttons simultaneously to switch between irc C and irc F.
Energy saving
Press ION-FILTER and CLOCK simultaneously to start or stop enegry saving funtion. The remote control display will show "SE" when this function is active.
Low heat mode
In heating mode, pressing ION-FILTER and CLOCK simultaneously will put the air conditioner into a low heat mode that will operate to a temperature of 8irc C. Repeat the operation to quit the function.
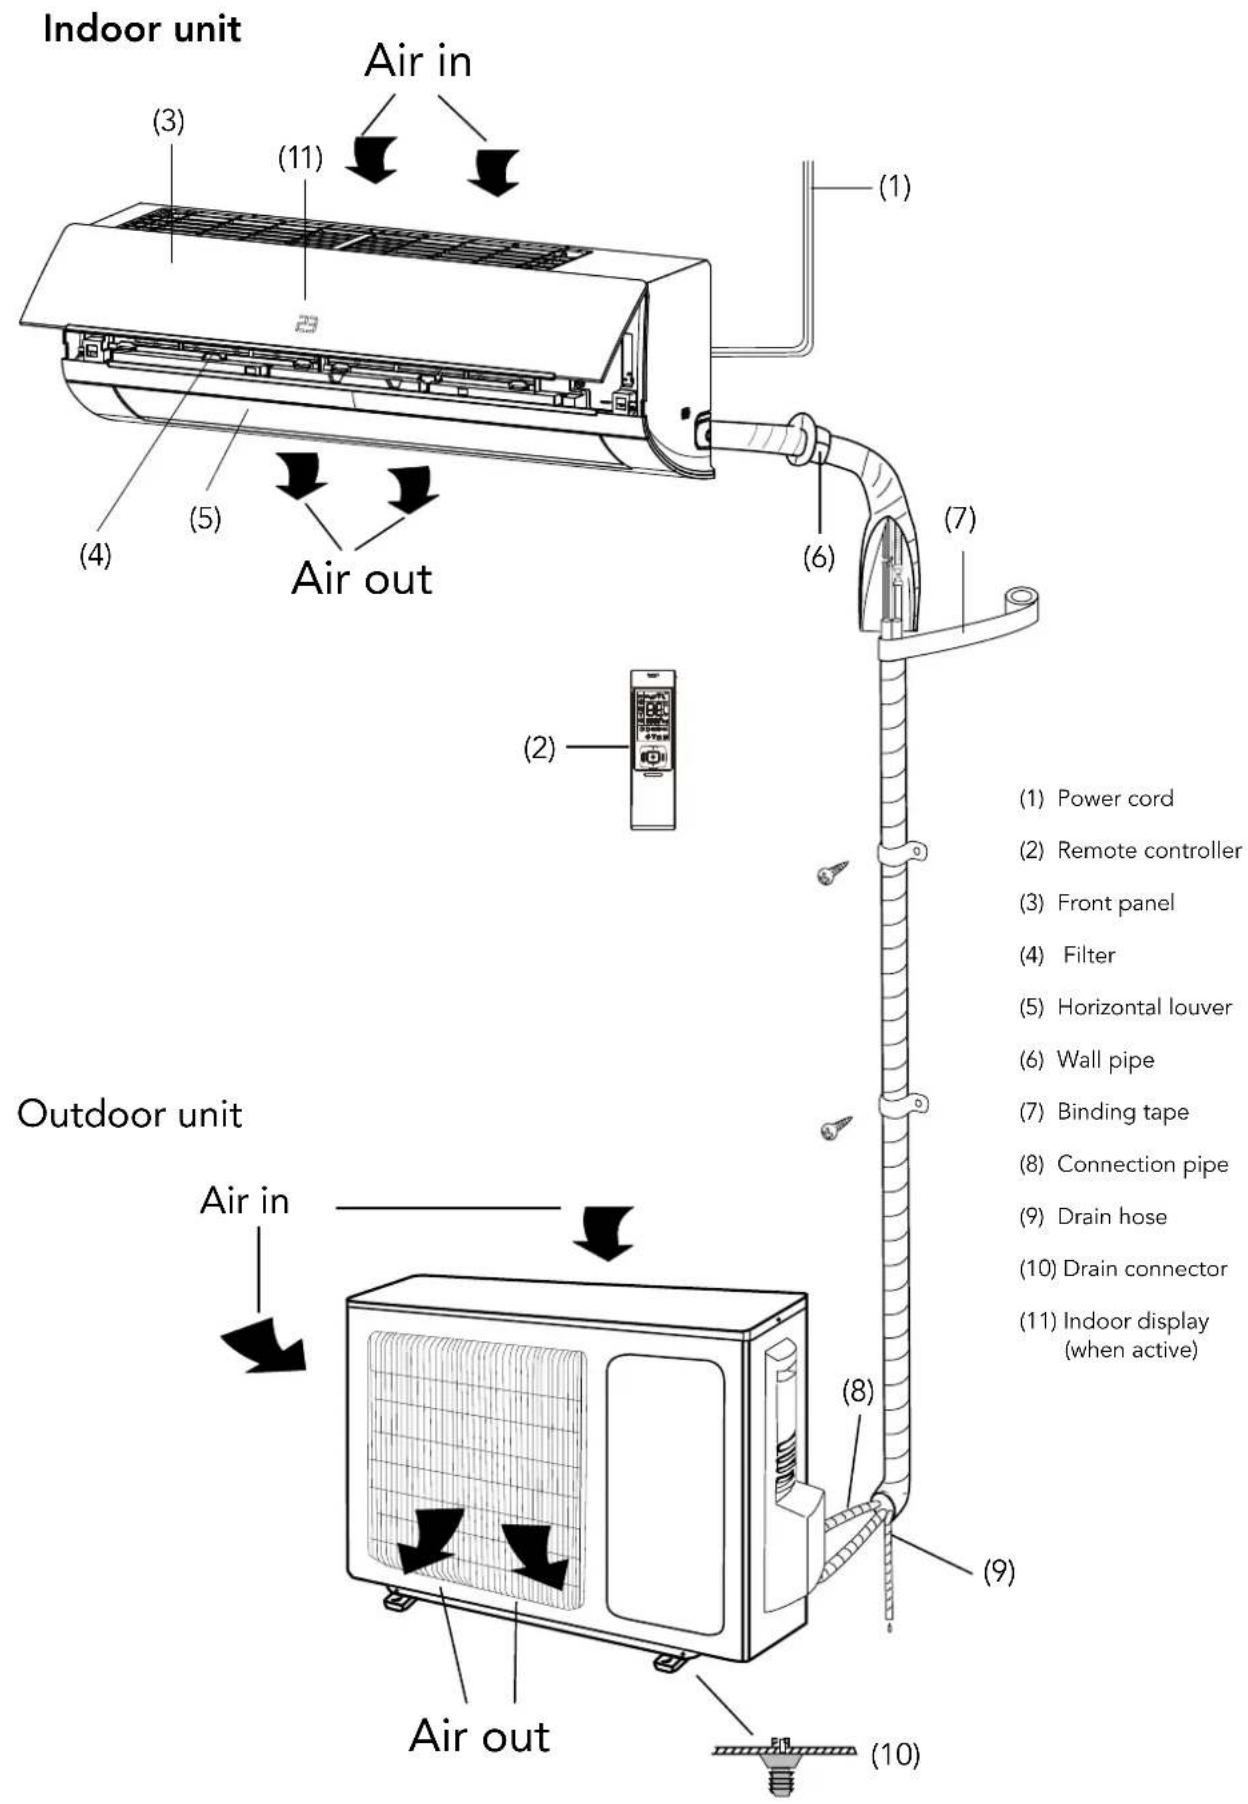
Name of parts
Safety precautions
Inside this manual you will find many helpful hints on how to use and maintain your air conditioner properly.
Just a little preventive care on your part can save you a great deal of time and money over the life of your air conditioner.
You'll find many answers to common problems in the chart of troubleshooting tips on page 8. If you review the chart of troubleshooting tips first, you may not need to call for service.
Meanings of symbols used in this manual are shown below:

caution
This indicates information concerning your personal safety and how to avoid damaging the appliance

This symbol indicates tips and information about use of the appliance

environmental tip
This symbol indicates tips and information about economical and ecological use of the appliance

This symbol indicates never to do this

Always do this
Important notes:
1 Do not operate unit with horizontal louvre in closed position.
2 Do not operate unit without the air filter.

warning

If you notice an unusual situation, such as a burning smell, please switch off the power to the air conditioner and contact an Electrolux service agent. If this abnormal status continues the air conditioner may be damaged or even cause electric shock or fire.

Do not operate the air conditioner with wet hands. This may cause electric shock.

Do not damage or cut off the power cord or other wires. If this occurs, please have it repaired or replaced by an accredited technician.

Do not connect this air conditioner to a multi outlet powerboard.

Please switch off the power supply to the air conditioner if it is not to be used for an extended period. Otherwise, it will accumulate dust and may cause a fire.

Before cleaning the air conditioner, please disconnect the power supply in order to eliminate the possibility of electric shock.

The power supply should be matched with the air conditioner according to the installation manual. Air conditioners provided with a supply cord should be connected directly to a power outlet with a suitable safety switch. Air conditioners that are hard wired must be connected to a suitable safety circuit breaker according to the installation manual.

Please ensure that the power supply to the air conditioner is stable and meets the requirements set out in the installation manual.

Always ensure the product is installed with appropriate earthing.

For safety, be sure to turn off the circuit breaker before performing any maintenance or cleaning or when the product is not used for an extended period of time. Accumulated dust may cause fire or electric shock.

caution
 | Select the most appropriate temperature.It can save electricity. |
 | Do not keep windows and doors open for a long time during operation.It will result in insufficient performance. |
| [ST7W] | Do not block the air inlet or outlet.It will result in insufficient performance and cause malfunctions. |
| [6073] | Keep combustible materials away from the units at least 1m.It may cause fire. |
 | Do not step on the top of the outdoor unit or place heavy things on it.It may cause damage or injury. |
| [A053] | Do not attempt to repair the air conditioner yourself.Incorrect repairs may cause electric shock or fire.Please contact your local authorised service centre. |
| [807D] | Do not insert your hands or objects into the air inlet or outlet.It may cause injury. |
 | Do not expose animals or plants directly to the air flow. |
| [4KS3] | Do not use the unit for any other purpose, such as preserving food or drying clothes. |
 | Do not splash water on the air conditioner.It may cause electric shock or malfunction. |
Using the remote control
Location of the remote control
- Keep the remote control where its signal can reach the receiver of the indoor unit. (a maximum distance of 8m is allowed).
- When you select the timer operation, the remote control automatically transmits a signal to the indoor unit at the specified time.
- If you keep the remote control in a position that hinders proper signal transmission, a time lag of up to 15 minutes may occur.
- When the remote control sends out a signal, the symbol 📋 will flicker for about 1 second on the display. The indoor unit will acknowledge the signal with a beep when it receives an effective signal.


caution
- The air conditioner will not operate if curtains, doors or other materials block the signals from the remote control to the indoor unit.
- Prevent any liquid from falling into the remote control. Do not expose the remote control to direct sunlight or heat.
- If the infrared signal receiver on the indoor unit is exposed to direct sunlight, the air conditioner may not function properly. Use curtains to prevent the sunlight from falling on the receiver.
- If other electrical appliances react to the remote control, either move these appliances or consult your local dealer.
Prior to Operation
1 Contact an installation qualified for installation.
2 Plug in the power plug properly.
3 Do not use a damaged or non-standard power cord.
4 Do not share the same outlet with other appliances.
5 Do not use an extension cord.
6 Do not start/stop operation by plugging /unplugging the power cord.
Usage
Exposure to direct airflow from the air conditioner for an extended period of time could be hazardous to your health. Do not expose people, pets or plants to the direct airflow for an extended period.
Cleaning and maintenance
1 Do not touch the metal parts of the unit when removing the filters. Injuries can occur when handling sharp metal edges.
2 Do not use water to clean inside the air conditioner. Exposure to water can destroy the insulation, leading to possible electric shock.
3 When cleaning the unit, first make sure that the power and circuit breaker are turned off.
Service
For repair and maintenance, contact your authorised service dealer.
Features of the remote control
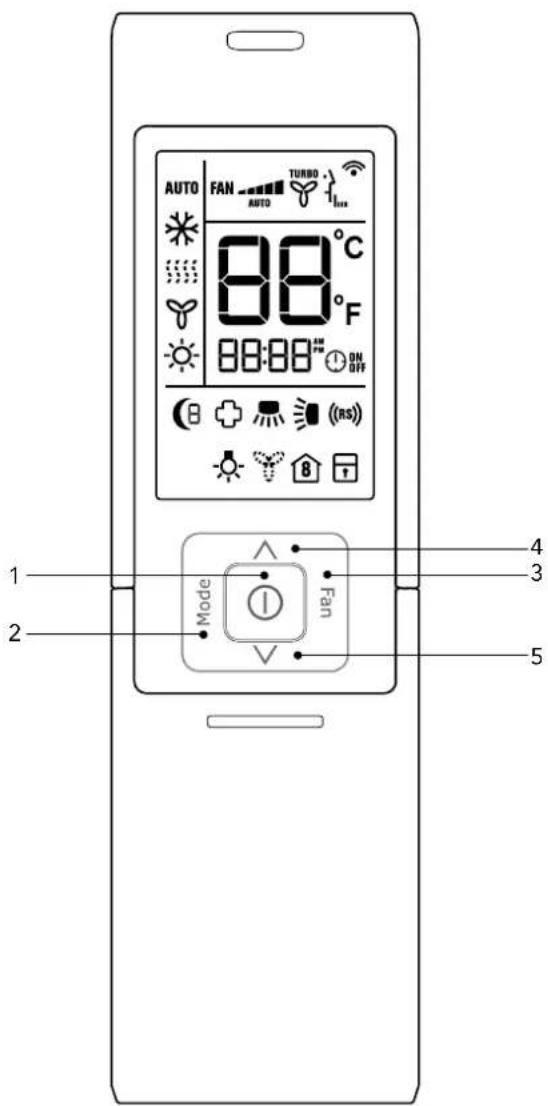
Press this button, the unit will be turned on, press it once more, the unit will be turned off. Sleep function will be cancelled while the unit is switched off.
By pressing this button, Auto, Cool, Dry, Fan, Heat mode can be selected progressively. Auto mode is default while power on. Under Auto mode, the temperature will not be displayed; Under Heat mode, the initial value is 28irc C; Under other modes, the initial value is 25irc C.

M
AUTO
[Figure 1]
DRY

HEAT (Reverse cycle model only)

COOL

FAN
By pressing this button, Auto, Low, Medium-low, Medium, Medium-high, High speed can be progressively selected. When the unit is turned on, Auto fan speed is the default. Under DRY mode only, Low fan speed can be set up.

flowchart
graph LR
    A["ACTO"] --> B["Low fan"]
    A --> C["Medium-low fan"]
    A --> D["Medium high fan"]
    A --> E["High fan"]
    B --> F["Bar at ACTO=1"]
    C --> G["Bar at ACTO=2"]
    D --> H["Bar at ACTO=3"]
    E --> I["Bar at ACTO=4"]
Pressing this button will increase the temperature setting, holding this button down for 2 seconds and more will increase the temperature setting more quickly. Maximum setting is 30°C.
Pressing this button will decrease the temperature setting, holding the button down for 2 seconds and more will decrease the temperature setting more. The minimum setting is 16°C
Features of the remote control
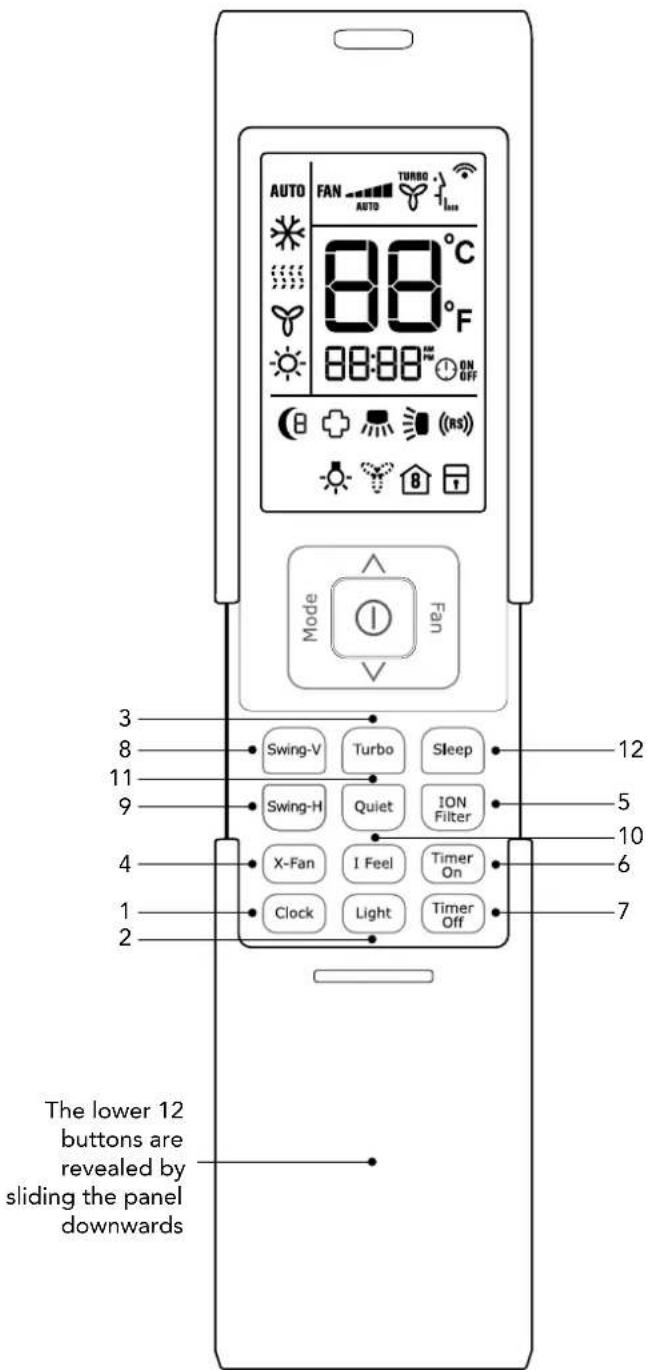
The clock timer uses a 12 hour clock mode.
Press this button to set the clock. When the clock signal blinks, you can press ▲ or ▼button to set the time you want, when hold the ▲ or ▼button more than 2 seconds, the numbers increase or decrease by 10 per 0.5 seconds. While the clock symbol is blinking, press the clock button again or after 5 seconds with no operation, the clock symbol will stop blinking and the time is set. Please note the default time for the remote is 12:00 pm and it will revert to this when the battery is changed. When the clock symbol ⏻ shows, the numbers are the actual time, when the symbol is not shown, the numbers are for the timer.
Press this button while the air conditioner is operating to switch the indicating lights of the indoor unit on or off. The normal condition at start up is on.
Pressing this button while the air conditioner is operating will put the fan into the high speed turbo mode. The indicator on the remote control will show. Turbo mode will be cancelled if the mode or fan speed is changed.
Pressing X -FAN button in COOL or DRY mode, the icon 🎨 is displayed and the indoor fan will continue operation for 10 minutes in order to dry the indoor unit even though you have turned off the unit.
Press this button to turn the cold plasma function on and off.
Setting the Timer On or start time, press the Timer On button and the "ON" symbol will flash in the display. Press the ▲ or ▼ symbol to adjust the start time. Holding the button down will scroll more rapidly through the start time display. Pressing the Timer On button again will cancel the timer on function.
Note:
After selecting the desired time wait 5 seconds and the ON symbol will display permanently.
Default times for timer on and off are 8:00am and 5:00pm.
Press this key to enter into TIMER OFF setup, in which case the OFF icon will blink. The method of setting is the same as for TIMER ON.
Press this button to enable or disable the vertical swing function. When disabling the vertical swing function the guiding louver will stay at its last position.
Press this button to enable or disable the horizontal swing function. When disabling the horizontal swing function the guiding louver will stay at its last position.
Press this button once, to turn on the I FEEL function, then the symbol of "I FEEL" will be displayed. The air conditioner will then operate to reach the set temperature at the location of the remote control. After this function has started, the remote control will send temperature to the main unit every 10 minutes. Once the button has been pressed again, the function will be cancelled.
During operation press the Quiet button in order to use the Quietest fan mode in AUTO, COOL, DRY, FAN or HEAT mode.
Pressing this button to select sleep mode (1), sleep mode (2), Sleep mode (3) and cancel the Sleep mode. Circulate between these modes after the air conditioner is switched on.
Sleep mode 1
In Cool and Dry modes, the set temperature will increase 1irc C after an hour, after 2 hours the set temperature will increase another 1irc C, then continue to run at this setting. In Heat mode: the set temperature will decrease 1irc C, after 2 hours the set temperature will decrease another 1irc C, then continue to run at this setting.
Sleep mode 2
In this mode, the air conditioner will run according to a preset sleep temperature curve.
In Cool mode
(1) When setting the initial temperature between 16-23°C, after turning on the Sleep function, the temperature will increase 1°C every hour, after 3°C the temperature will be maintained, after 7 hours, the temperature will be decreased a further 1°C, after that the unit will keep running at this temperature;
(2) When setting the initial temperature between 24irc C- 27irc C, after turning on the Sleep function, the temperature will increase 1irc C in every hour, after 2irc C the temperature will be maintained, after 7 hours, the temperature will be decreased a further 1irc C, after that the unit will keep running at this temperature;
(3) When setting the initial temperature between 28irc C- 29irc C, after turning on the Sleep function, the temperature will increase 1irc C in the first hour, after 7 hours, the temperature will be decreased a further 1irc C, after that the unit will keep running at this temperature;
(4) When setting the initial temperature to 30irc C, after 7 hours the temperature will be decreased 1irc C, after that the unit will keep running at this temperature.
In Heat mode
(1) When the initial temperature is set at 16irc C, the air conditioner will continue to run at this setting.
(2) When the initial temperature is set at between 17irc C- 20irc C, after Sleep function is selected, the set temperature will decrease 1irc C at the end of the first hour and continue to run at this setting.
(3) When the initial temperature is set between 21irc C- 27irc C, after this Sleep function is selected, the temperature will decrease 1irc C in every hour, after 2 hours the air conditioner will continue to run at this setting.
(4) When the initial temperature is set between 28irc C- 30irc C, after this Sleep function is selected the temperature will decrease 1irc C in every hour, after 3 hours the air conditioner will continue to run at this setting.
Sleep Mode 3
In this mode the sleep temperature curve is manually set (DIY).
(1) After selecting Sleep mode 3, press and hold the Turbo button until the remote control enters into user defined sleep setting status. The remote control will display "1 hour", temperature display will show the corresponding temperature of last setting sleep curve and blink (The first use will display the original factory setting).
(2) Adjust " ^" and "▼" buttons will change the setting temperature for the first hour of sleep, after setting the temperature, press the Turbo button for confirmation.
(3) The hour of sleep mode will be automatically increased on the remote control, to the 2nd, 3rd hour of sleep mode and so on with each press of the Turbo button.
(4) Repeat the above step (2)-(3) operation, until 8 hours of sleep temperature setting is finished. The sleep curve program is finished. The remote control will resume the original timer display. The temperature display will return to the original setting.
The sleep program can be checked by selecting sleep mode 3, pressing and holding the Turbo button and then repeat pressing the turbo button to review the sleep program temperatures without pressing the " ∧" or " √" buttons. In this mode, if the no button were to be pressed for 10 seconds, the display will revert to normal operation.
Emergency operationChanging batteries ar
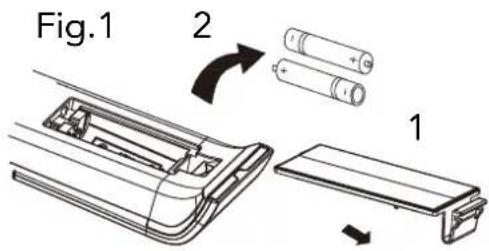
1 Push the back cover of wireless remote control. (As shown in Fig 1.)
2 Take out the old batteries.
3 Insert two new AAA1.5V dry batteries, and pay attention to the polarity. (As shown in Fig 2.)
4 Attach the back cover of wireless remote control.
Note:
- When changing the batteries, do not use old or varied batteries, otherwise, it may cause problems with the remote control.
- If the remote control is not used for a long time, please remove the batteries as old batteries may leak or corrode and damage the remote controller.
- To avoid interference, the remote should be placed 1m away from the TV or stereo equipment.
- For correct operation the remote control should be placed within visible range of the air conditioner.
- If the remote control does not operate normally, please remove and refit the batteries. If abnormal operation continues, replace with new batteries.
- To operate the air conditioner, please point the remote control at the indoor unit in order to improve the sensitivity of the main unit.

When the remote control is lost or damaged, please use the manual switch on the main unit. In that case, the unit will operate in AUTO mode and the temperature setting or fan speed can not be changed.
The manual switch can be operated as below:
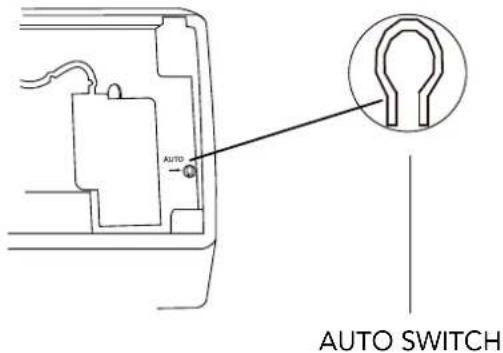
Turn on the unit
Press AUTO/STOP button to enter AUTO mode.
The air conditioner will select the mode (COOL, HEAT, FAN) automatically according to the room temperature for reaching best comfort.
Turn off the unit
Press the AUTO/STOP button to switch off the unit.
The operation mode is seen in the following table.
| Mode | Model | Temperature setting | Airflow rate |
| AUTO | COOLING | 25°C (COOL, FAN) | AUTO |
| AUTO | HEATING PUMP | 25°C (COOL, FAN) | AUTO |
| AUTO | HEATING PUMP | 20°C (HEAT) | AUTO |
This switch is to be used only when the remote control is missing.
Care and cleaning

caution
- Disconnect the power supply before cleaning and maintenance.
- Do not splash water on the units for cleaning, as electric shocks may occur.
- Wipe the units with a dry soft cloth, or a cloth slightly moistened with water or cleaner (not with volatile liquid such as thinner or gasoline).
Cleaning the Front Panel
Remove the front panel. Then wipe the front panel with a soft cloth moistened with water to remove any marks.
Note:
Do not immerse the front panel into water so as to protect microcomputer components and circuit diagram on the front panel.
Cleaning the Air Filter (every 3 months)
Note:
Do not touch the fin of indoor unit during cleaning to avoid personal injury.

natural_image
Illustration of hands lifting a rectangular panel with arrows indicating motion (no text or symbols)
Fig. a

natural_image
Line drawing of a hand placing a component into a container (no text or symbols)
Fig. b
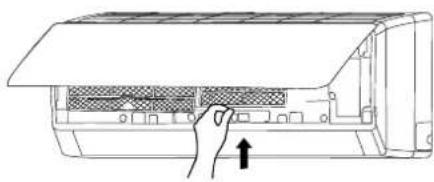
To remove the air filter
Lift up the front panel.
Pull the air filter downwards to take it off, as shown in Fig. (a, b).

natural_image
Illustration of two hands holding a grid-patterned sheet with a knife, no text or symbols present
Replace the air filter
Replace the filters in the direction of the arrowhead.
natural_image
Line drawing of a door panel with a hand pressing a button (no text or symbols)
Check before Use
1 Be sure that nothing obstructs the air outlet and inlet.
2 Check if the batteries of remote control are installed.
3 Check if the installation of the outdoor unit is damaged. If damaged, consult the installers.
Maintenance after Use
1 Switch off the power supply.
2 Clean the filter and bodies of indoor and outdoor units.
3 Clear obstructions from the outdoor unit.
Operation tips
Cooling Operation
Principle
Air conditioners absorb heat from the room and transmit it to the outdoor unit, so that the room temperature is decreased. The cooling capacity will increase or decrease according to the outdoor ambient temperature.
Antifreezing Function
If the unit is operating in COOL mode and in low ambient temperature, frost may be formed on the heat exchanger. When indoor heat exchanger temperature decreases below zero, compressor will stop operation to protect the unit.
Heating Operation
Principle
Air conditioners absorb heat from outdoors and transmit it to the indoor unit, increasing the indoor room temperature. The heating capacity will decrease at low ambient temperature.
Defrosting
When outdoor temperature is low but humidity is high, ice may form on the outdoor unit during extended operation, affecting the heating efficiency. The air conditioner may stop operation during an auto defrosting operation to remove this ice. During auto defrosting, the fan motors of indoor unit and outdoor unit will stop. During defrosting, the indoor indicator flashes "H1" and the outdoor unit may emit water vapor. This is not a malfunction. After defrosting is finished, the heating operation will recover automatically.
Anti-cold Air Function
In HEAT mode, the indoor fan will not operate in order to prevent cold air being blown into the room (within 2 minutes). If the indoor heat exchanger doesn't reach a minimum temperature under the following three states:
1 Heating operation starts;
2 After Auto Defrosting is finished;
3 Heating at low temperature.
Gentle Breeze
In the following situations, the indoor unit may blow a gentle breeze, and the horizontal louver rotates to a certain position:
1 In HEAT mode, the compressor does not start operation after the unit is turned on.
2 In HEAT mode, the temperature reaches the setting value and the compressor has stopped operation for about 1 minute.
Operating temperature range
| Indoor side DB/WB(°C) | Outdoor side DB/WB(°C) |
| Maximum cooling 32/23 48/26 | | |
| Minimum cooling 21/15 21/- | | |
| Maximum heating 27/- 24/18 | | |
| Minimum heating 20/- -5/-6 | | |
The operating temperature range (outdoor temperature) for cooling only unit is 16irc C- 48irc C for heat pump unit is -15irc C- 24irc C.
Tips for energy saving
- Do not overcool or overheat.
Setting temperature at a moderate level helps energy saving.
• Cover windows with a blind or a curtain.
Blocking sunlight and air from outdoors is favourable for cooling (heating).
- Clean air filters once a month.
Clogged air filters lead to inefficient operation and energy waste.
Tip for relative humidity
Condensate water is likely to form at the air outlet if cooling or drying for a long time when the relative humidity is more than 80% (with doors and windows open).
Demand Response
- This unit is Demand Response - enabled. This means it can be in terfaced with your electricity supplier to utilise Demand Response if available. A separate arrangement needs to be made for this. Contact your energy supplier to determine if there is an Air Conditioning Demand Response program available in your area
- When your energy supplier activates one of the 3 possible Demand Response modes, the display of the indoor unit will show d1, d2 or d2 as described below:
| Demand response mode | Description of operation in this mode |
| d1 | Compressor off |
| d2 | The air conditioner continues to cool or heat during the demand response event, but the electrical energy consumed by the air conditioner in a half your period is not more than 50% of the total electrical energy that would be consumed if operating at the rated capacity in a half hour period. |
| d3 | The air conditioner continues to cool or heat during the demand response event, but the electrical energy consumed by the air conditioner in a half your period is not more than 75% of the total electrical energy that would be consumed if operating at the rated capacity in a half hour period. |
- When the unit goes into a Demand Response mode, the effect of cooling or heating may be reduced, the unit will run as designed. You can not reverse this function by remote control by change setting temperature or other actions unless the unit finishes the function.
- Refer to your electricity supplier if you have problems with the operation of the Demand Response Modes of your Air Conditioner.
Troubleshooting
The air conditioner is not user serviceable. Incorrect repair may cause electric shock or fire, so please contact an authorised service center for professional repair.
The following checks prior to contact may save you time and money.
| Problem Cause | |
| The unit does not operate | The unit does not operate if it is turned on immediately after it is turned off. This is to protect the unit. You should wait about 3 minutes. |
| Odours are emitted | Some odours may be emitted from the indoor unit. This is the result of room smells (such as furniture,tobacco,etc.) which have been taken into the air conditioner.Consult authorised service centre for cleaning if the odours persist. |
| "Water flowing" noise | The swishing noise like water flowing is the refrigerant flowing inside the unit. |
| Mist is emitted in COOL mode | During cooling operation, a thin mist may be seen emitted from the indoor unit due to high room temperature and humidity.After a period of time, the mist will disappear as the decrease of room temperature and humidity decreases. |
| Cracking noise | This is the sound of friction caused by expansion and/or contraction of panel or other parts due to the change of temperature. |
| The unit can not be started up | Is the power cut off?Is the power plug loose?(if applicable)Is the circuit protection device tripped off?Is voltage higher or lower?(Tested by professionals)Is the TIMER correctly used? |
| Cooling/Heating effect is poor | Is temperature setting appropriate?Is the inlet or outlet blocked?Is the filter dirty?Is the window or the door open?Is low fan speed set?Are there heat sources in the room? |
| Remote control does not transmit signals | Check if there is magnetic or electrical interference near the unit that may affecting operation of the remote control. In this case, pull the plug out and reinsert it.Is the remote control within its operating range or obstructed?Check the condition of the batteries and replace them if necessary.Check if the remote control is damaged. |
| Water leakage of indoor unit | The humidity is high.Condensing water overflows.Drain hose is loose or obstructed. |
| Problem Cause | |
| Water leakage of outdoor unit | During cooling operation, water condensates around the pipes and connection joints.During defrosting operation, thawed water flows out.During heating operation, water on the heat exchanger drips out. |
| Noise from indoor unit. | The noise emitted when the fan or compressor relay is switched on or off.When the defrosting operation is started or stopped, there is a sound of refrigerant flowing in the reverse direction. |
| Indoor unit can not blow air | In HEAT mode, when the temperature of indoor heat exchanger is very low, air flow is stopped in order to prevent cold air. (within 2 minutes)In HEAT mode, when the outdoor temperature is low or humidity is high, frost will be formed on the outdoor heat exchanger. The unit will defrost automatically and indoor unit will stop blowing air for 3-12 minutes.During defrosting operation, water or vapour may be emitted.In DRY mode, the indoor fan will stop blowing air for 3-12 minutes in order to avoid condensing water being vaporised again. |
| Moisture on air outlet | If the unit operates at high humidity for a long time, moisture will be generated on the air outlet grill and then drip off. |
| H1: Defrosting | It is normal. The unit is in defrosting mode and heating will recommence soon. |
| E3: Low pressure warning | Your air conditioner has lost refrigerant. Contact your installer to check for potential leaks. |
The pressure in the refrigeration system is low and could result in the unit breaking down. Ask a certified installer to control it. If any one of the following situations occurs, immediately stop all operations, disconnect the power supply, and contact the authorised personnel.
• There is a harsh sound during operation.
• Strong odours are emitted during operation.
• Water is leaking from the unit.
• The circuit breaker often trips.
• Water or other liquid is splashed into the unit.
• Power cord and power plug is overheating.
Notes
Notes
Important
- If your appliance is damaged due to improper installation your warranty may be void.
- Proper installation requires the use of a licensed installer.
- You must keep full details of the installer including the license number and provide those details whenever you request a service for your appliance.
Installation checklist
Question
☐ Does the unit have adequate clearance from walls and ceiling in accordance to installation instructions?
Is the unit mounted to allow condensate to flow freely toward the outside?
Does outdoor section have adequate clearance in accordance to installation instructions?
Is the unit securely mounted?
Is the unit readily accessible without special equipment?
☐ Has the appropriate size circuit and fuse/circuit breaker been fitted?
☐ Has the unit been tested and confirmed to operate correctly?
Has the user of the air conditioner been shown how to use the air conditioner?
CUSTOMER: PLEASE RETAIN WITH YOUR PURCHASE DOCUMENTS IN A SAFE PLACE
Model Number
Serial Number
Installers name ____ Refrigerant handling license no.
Installers address ____ Phone
Installers signature Date of installation
This document sets out the terms and conditions of the product warranties for Electrolux Appliances. It is an important document. Please keep it with your proof of purchase documents in a safe place for future reference should you require service for your Appliance.
- In this warranty
(a) 'acceptable quality' as referred to in clause 10 of this warranty has the same meaning referred to in the ACL;
(b) 'ACL' means Trade Practices Amendment (Australian Consumer Law) Act (No.2) 2010;
(c) 'Appliance' means any Electrolux product purchased by you accompanied by this document;
(d) 'ASC' means Electrolux' authorised serviced centres;
(e) 'Electrolux' means Electrolux Home Products Pty Ltd of 163 O'Riordan Street, Mascot, NSW 2020, ABN 51 004 762 341 in respect of Appliances purchased in Australia and Electrolux (NZ) Limited of 3-5 Niall Burgess Road, Mount Wellington, in respect of Appliances purchased in New Zealand;
(f) ‘major failure’ as referred to in clause 10 of this warranty has the same meaning referred to in the ACL and includes a situation when an Appliance cannot be repaired or it is uneconomic for Electrolux, at its discretion, to repair an Appliance during the Warranty Period;
(g) 'Warranty Period' means:
(i) where the Appliance is used for personal, domestic or household use (i.e. normal single family use) as set out in the instruction manual, the Appliance is warranted against manufacturing defects in Australia for 24 months and in New Zealand for the period of 24 months, following the date of original purchase of the Appliance and a further 36 months; in Australia if there is evidence provided to Electrolux that the appliance was installed by a licensed room air conditioner installer; in New Zealand if there is evidence that the Appliance was installed according to the Electrolux installation guidelines which can be inspected on the Kelvinator website;
(ii) where the Appliance is used for commercial purposes (including being used to directly assist a business or where the Appliance is used in a multi-family communal or share type environment), the Appliance will then be warranted against manufacturing defects in Australia for 3 months and in New Zealand for 0 months, following the date of original purchase of the Appliance.
(h) 'you' means the purchaser of the Appliance not having purchased the Appliance for re-sale, and 'your' has a corresponding meaning.
- This warranty only applies to Appliances purchased and used in Australia or New Zealand and is in addition to (and does not exclude, restrict, or modify in any way) any non-excludable statutory warranties in Australia or New Zealand.
- During the Warranty Period Electrolux or its ASC will, at no extra charge if your Appliance is readily accessible for service, without special equipment and subject to these terms and conditions, repair or replace any parts which it considers to be defective. Electrolux or its ASC may use remanufactured parts to repair your Appliance. You agree that any replaced Appliances or parts become the property of Electrolux. This warranty does not apply to light globes, batteries, filters or similar perishable parts.
- Parts and Appliances not supplied by Electrolux are not covered by this warranty.
- You will bear the cost of transportation, travel and delivery of the Appliance to and from Electrolux or its ASC. If you reside outside of the service area, you will bear the cost of:
(a) travel of an authorised representative;
(b) transportation and delivery of the Appliance to and from Electrolux or its ASC,
In all instances, unless the Appliance is transported by Electrolux or an Electrolux authorised representative, the Appliance is transported at the owner's cost and risk while in transit to and from Electrolux or its ASC.
-
Proof of purchase is required before you can make a claim under this warranty.
-
You may not make a claim under this warranty unless the defect claimed is due to faulty or defective parts or workmanship. Electrolux is not liable in the following situations (which are not exhaustive):
(a) the Appliance is damaged by:
(i) accident
(ii) misuse or abuse, including failure to properly maintain or service
(iii) normal wear and tear
(iv) power surges, electrical storm damage or incorrect power supply
(v) incomplete or improper installation
(vi) incorrect, improper or inappropriate operation
(vii) insect or vermin infestation
(viii) failure to comply with any additional instructions supplied with the Appliance;
(b) the Appliance is modified without authority from Electrolux in writing;
(c) the Appliance's serial number or warranty seal has been removed or defaced;
(d) the Appliance was serviced or repaired by anyone other than Electrolux, an authorised repairer or ASC.
- This warranty, the contract to which it relates and the relationship between you and Electrolux are governed by the law applicable where the Appliance was purchased. Where the Appliance was purchased in New Zealand for business purposes the Consumer Guarantee Act does not apply.
- To the extent permitted by law, Electrolux excludes all warranties and liabilities (other than as contained in this document) including liability for any loss or damage whether direct or indirect arising from your purchase, use or non use of the Appliance.
- For Appliances and services provided by Electrolux in Australia, the Appliances come with a guarantee by Electrolux that cannot be excluded under the Australian Consumer Law. You are entitled to a replacement or refund for a major failure and for compensation for any other reasonably foreseeable loss or damage. You are also entitled to have the Appliance repaired or replaced if the Appliance fails to be of acceptable quality and the failure does not amount to a major failure. The benefits to you given by this warranty are in addition to your other rights and remedies under a law in relation to the Appliances or services to which the warranty relates.
- At all times during the Warranty Period, Electrolux shall, at its discretion, determine whether repair, replacement or refund will apply if an Appliance has a valid warranty claim applicable to it.
- For Appliances and services provided by Electrolux in New Zealand, the Appliances come with a guarantee by Electrolux pursuant to the provisions of the Consumer Guarantees Act, the Sale of Goods Act and the Fair Trading Act.
- To enquire about claiming under this warranty, please follow these steps:
(a) carefully check the operating instructions, user manual and the terms of this warranty;
(b) have the model and serial number of the Appliance available;
(c) have the proof of purchase (eg an invoice) available;
(d) telephone the numbers shown below.
- You accept that if you make a warranty claim, Electrolux and its ASC may exchange information in relation to you to enable Electrolux to meet its obligations under this warranty.
Important Notice
Before calling for service, please ensure that the steps listed in point 13 above have been followed.
| FOR SERVICEor to find the address of your nearest state service centre in AustraliaPLEASE CALL 13 13 49For the cost of a local call (Australia only) | SERVICE AUSTRALIAElectroluxELECTROLUX HOME PRODUCTSwww.electrolux.com.au | FOR SPARE PARTSor to find the address of your nearest state spare parts centre in AustraliaPLEASE CALL 13 13 50For the cost of a local call (Australia only) |
| FOR SERVICEor to find the address of your nearest authorised service centre in New ZealandFREE CALL 0800 10 66 10(New Zealand only) | SERVICE NEW ZEALANDElectroluxELECTROLUX HOME PRODUCTSwww.electrolux.co.nz | FOR SPARE PARTSor to find the address of your nearest state spare parts centre in New ZealandFREE CALL 0800 10 66 20(New Zealand only) |
If you'd like further information about Kelvinator appliances, please visit your retailer, phone or email our Customer Care team or visit our website.
telephone: 1300 363 640
fax: 1800 350 067
email: customercare@electrolux.com.au
web: www.kelvinator.com.au
Kelvinator. We are part of the Electrolux family.
Share more of our thinking at www.electrolux.com.au