
Saeco RI8329 - Coffee maker PHILIPS - Free user manual and instructions
Find the device manual for free Saeco RI8329 PHILIPS in PDF.


| Product Type | Coffee Maker |
| Brand | Philips |
| Model | Saeco RI8329 |
| Dimensions (W x H x D) | 210 x 300 x 280 mm |
| Weight | 3.9 kg |
| Housing Material | Plastic |
| Water Tank Capacity | 1.25 L (removable) |
| Pump Pressure | 15 bar |
| Power Supply | 220-240 V, 50/60 Hz, 1450 W |
| Control Panel | Front side with illuminated buttons |
| Filter Holder Type | Pressurized |
| Safety Device | Thermal fuse |
| Functions | Espresso brewing, steam wand for cappuccino, hot water dispensing |
| Cleaning | Daily: clean filter holder, steam wand, drip tray; descale every 1-2 months |
| Descaling | Use Saeco descaling solution only; never use vinegar |
| Accessories Included | Pressurized filter holder, measuring scoop, filters, steam wand |
Frequently Asked Questions - Saeco RI8329 PHILIPS
User questions about Saeco RI8329 PHILIPS
0 question about this device. Answer the ones you know or ask your own.
Ask a new question about this device
Download the instructions for your Coffee maker in PDF format for free! Find your manual Saeco RI8329 - PHILIPS and take your electronic device back in hand. On this page are published all the documents necessary for the use of your device. Saeco RI8329 by PHILIPS.
USER MANUAL Saeco RI8329 PHILIPS
Register your product and get support at
www.philips.com/welcome
Type RI8329
OPERATING INSTRUCTIONS INSTRUKCJA OBSŁUGI ИНСТРУКЦИЯ ПО ЭКСПЛУАТАЦИИ НАСТАНОВА З ЕКСПЛУАТАЦІЇ ПАЙДАЛАНУ НУСКАУЛАРЫ
natural_image
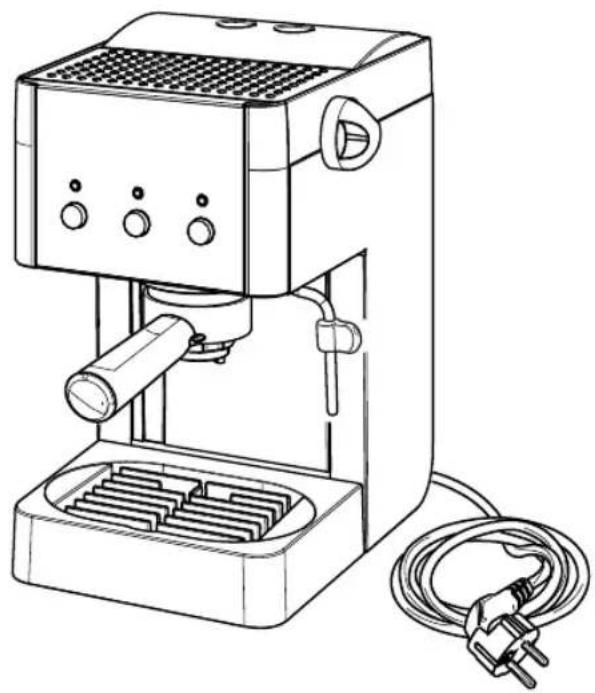
Line drawing of a standard espresso machine with control panel and power cord (no text or symbols)PLEASE READ THIS USER MANUAL CAREFULLY BEFORE USING THE MACHINE. PRZECZYTAĆ UWAŻNIE NINIEJSZĄ INSTRUKCJĘ OBSŁUGI PRZED ROZPOCZĘCIEM UŻYTKOWANIA URZĄDZENIA. ПЕРЕД ИСПÓЛЬЗОВАНИЕМ МАШИНЫ ВНИМАТЕЛЬНО ПРОЧИТАЙТЕ ДАННОЕ РУКОВОДСТВО ПО ЭКСПЛУАТАЦИИ. ПЕРШ НІЖ КОРИСТУВАТИСЯ МАШИНОЮ, УВАЖНО ПРОЧИТАЙТЕ ЦЮ НАСТАНОВУ З ЕКСПЛУАТАЦІЇ. ҚұРЫЛҒЫНЫ ПАЙДАЛАНУ АЛДЫНДА ОСЫ ПАЙДАЛАНУШЫ НУСКАУЛЫГЫН МУҚИЯТ ОҚЫП ШЫҒЫНЫЗ.
CE
Saeco

natural_image
Diagram showing two mechanical components labeled A and B, with arrows indicating movement or assembly (no text or symbols present)natural_image
Line drawing of a container being inserted into a plastic container using tweezers (no text or symbols)natural_image
Illustration of a hand using a tool to adjust or install a component on a tray (no text or symbols visible)Fig.-Rys.-Рис.-Мал.-Сур.(3)
natural_image
Diagram of a computer keyboard with directional arrows indicating movement or process (no text or symbols present)natural_image
Line drawing of a coffee maker with a cup and spoon, showing mechanical components and a rotating knob (no text or symbols)Fig.-Rys.-Рис.-Мал.-Сур.(6)

natural_image
Line drawing of a coffee maker with a cup and side arm, showing mechanical components and motion arrows (no text or symbols)Fig.-Rys.-Рис.-Мал.-Сур.(8)

natural_image
Line drawing of a hand holding a cylindrical object with a small protrusion, no text or symbols presentFig.-Rys.-Рис.-Мал.-Сур.(9)

natural_image
Simple line drawing of a container with granular material being poured into it, no text or symbols presentFig.-Rys.-Рис.-Мал.-Сур.(10)
natural_image
Line drawing of a kitchen utensil with a spoon lifting a pan (no text or symbols)Fig.-Rys.-Рис.-Мал.-Сур.(11)

natural_image
Line drawing of a hand using a coffee machine to press or<|rotate_right|> (no text or symbols present)natural_image
Illustration of a hand using a self-service kitchen machine to press or install a grater (no text or symbols visible)Fig.-Rys.-Рис.-Мал.-Сур.(13)

natural_image
Line drawing of a coffee machine with a cup and a roll of milk being processed (no text or symbols)Fig.-Rys.-Рис.-Мал.-Сур.(14)
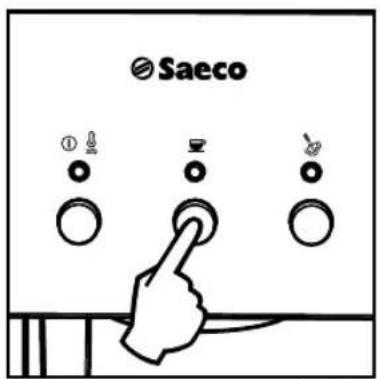
Fig.-Rys.-Рис.-Мал.-Сур.(15)

natural_image
Line drawing of a coffee machine with two cups on a stovetop (no text or symbols)Fig.-Rys.-Рис.-Мал.-Сур.(16)

natural_image
Illustration of a hand pressing down on a device with a curved arrow indicating rotation (no text or symbols present)Fig.-Rys.-Рис.-Мал.-Сур.(17)

natural_image
Technical line drawing showing hands using a valve to adjust or install a pipe (no text or symbols present)Fig.-Rys.-Рис.-Мал.-Сур.(18)

natural_image
Line drawing of a kitchen setup with a steamer and a pot, showing control panel and fan (no text or symbols)Fig.-Rys.-Рис.-Мал.-Сур.(19)
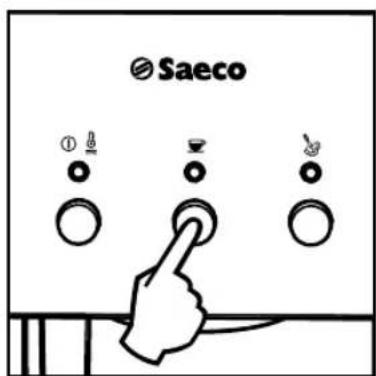
Fig.-Rys.-Рис.-Мал.-Сур. (20)
natural_image
Line drawing of a coffee maker with a cup and side arm, showing a rotating fan (no text or symbols)Fig.-Rys.-Рис.-Мал.-Сур. (21)

natural_image
Line drawing of a coffee maker with a lid and side-mounted stand, showing mechanical components and a rotating knob (no text or symbols)Fig.-Rys.-Рис.-Мал.-Сур.(23)

natural_image
Line drawing of a coffee maker with a side panel and a cup, showing a cooking process (no text or symbols)Fig.-Rys.-Рис.-Мал.-Сур. (24)

natural_image
Line drawing of a hand pouring liquid into a small bowl using a coffee maker (no text or symbols)Fig.-Rys.-Рис.-Мал.-Сур.(25)
natural_image
Illustration of a hand pouring liquid into a coffee maker using a stand mixer (no text or symbols visible)Fig.-Rys.-Рис.-Мал.-Сур.(26)

Fig.-Rys.-Рис.-Мал.-Сур. (27)

natural_image
Line drawing of a hand using a tool to adjust or install a grid-like device (no text or symbols visible)Fig.-Rys.-Рис.-Мал.-Сур.(28)

natural_image
Line drawing of a hand inserting a small cylindrical component into a container with a perforated tray (no text or symbols)Fig.-Rys.-Рис.-Мал.-Сур.(29)
1 GENERAL INFORMATION
The coff ee machine is suitable for preparing 1 or 2 cups of espresso coff ee and is provided with a swivel steam and hot water wand. The controls on the front side of the machine are labelled with easy-to-read icons.
The machine has been designed for domestic use and is not suitable for professional, continuous use.

Warning. No liability is held for damage caused by:
- Incorrect use not in accordance with the intended purposes;
• Repairs not carried out in authorised service centres;
• Tampering with the power cord;
• Tampering with any part of the machine; - Use of non-original spare parts and accessories;
- Failure to descale the machine and storage at temperatures below 0°C.
In these cases, the warranty is void.
1.1 How to Read the Manual


The warning triangle indicates all important instructions for the user's safety. Carefully follow these
instructions to avoid serious injury!
References to illustrations, parts of the appliance or controls, etc. are indicated by numbers or letters. Whenever possible, refer to the illustration.

This icon is used to highlight information that is particularly important to ensure optimal use machine.
The illustrations corresponding to the text can be found on the first pages of the manual. Please refer to these pages while reading the operating instructions.
1.2 How to Use these Operating Instructions
Keep these operating instructions in a safe place and make them available to anyone who may use the coffee machine. For further information or in case of problems, please refer to an authorised service centre.
2 TECHNICAL SPECIFICATIONS
The manufacturer reserves the right to make changes to the technical specifications of the product.
| Nominal voltage - Power rating - Power supplySee data plate on the appliance | |
| Housing material | Plastic |
| Size (w x h x d) (mm) | 210 x 300 x 280 |
| Weight | 3.9 kg |
| Control panel | Front side |
| Filter holder | Pressurized type |
| Water tank | 1.25 litres - Removable type |
| Pump pressure | 15 bar |
| Safety devices | Thermal fuse |
3 SAFETY INSTRUCTIONS

Never allow water to come into contact with any of the electrical parts of the machine: Danger of short circuit! Overheated steam and hot water may cause burning! Never direct the steam or hot water jet towards body parts. Handle the steam/hot water spout with care: Danger of scalding!
Intended Use
This coffe machine is intended for domestic use only. Do not make any technical changes or use the appliance for unauthorised purposes since this would create serious hazards! The appliance is not to be used by persons (including children) with reduced physical, mental or sensory abilities or with scarce experience and/or expertise, unless they are supervised by a person responsible for their safety, or they are instructed by this person on how to properly use the appliance.
Power Supply
Connect the coffee machine only to a suitable socket. The voltage must correspond to that indicated on the appliance data plate.
Power Cord
Never use the coffe machine if the power cord is defective or damaged. If the power cord is damaged, it must be replaced by the manufacturer or by an authorised service centre. Do not pass the power cord around corners, over sharp edges or over hot objects and keep it away from oil.
Do not use the power cord to carry or pull the coffee machine.
Do not pull out the plug by the power cord or touch it with wet hands.
Do not let the power cord hang freely from tables or shelves.
For the Safety of Others
Supervise children at all times and do not allow them to play with the appliance.
Children are not aware of the risks related to electrical household appliances.
Do not leave the machine packaging materials within the reach of children.
Danger of Burns
Never direct jets of overheated steam and/or hot water towards yourself or others. Always use the handles or knobs provided.
Do not disconnect (remove) the fi lter holder during coff ee brewing. Hot water drips may spill out of the brew unit during the warm-up phase.
Never brew coff ee when button (18 - 📋) is pressed because the steam function is on and the temperature of the boiler is too high.
Location
Place the coffee machine in a safe place, where there will be no danger of overturning or injury.
Hot water or overheated steam may spill out of the machine:
Danger of burns!
Do not keep the machine at a temperature below 0^ C. Frost may damage it.
Do not use the coffee machine outdoors.
In order to prevent its housing from melting or being damaged, do not place the machine on very hot surfaces and close to open flames.
Cleaning
Before cleaning the machine, turn it off by pressing the ON/OFF button, then pull out the plug from the socket.
Wait also for the machine to cool down. Never immerse the machine in water!
It is strictly forbidden to tamper with the internal parts of the machine.
Water left in the tank for several days should not be consumed.
Wash the tank and fill it with fresh drinking water.
Suitable Location for Operation and Maintenance
In order to ensure correct and efficient performance of the coffee machine, we recommend following the instructions below:
- Choose a level surface.
- Choose a location that is sufficiently well-lit, clean and near an easily reachable socket.
- Allow for a minimum distance from the sides of the machine as shown in the figure (Fig.A).
Storing the Machine
If the machine is to remain inactive for a long time, turn it off and unplug it. Store the machine in a dry place, out of the reach of children. Keep it protected from dust and dirt.
Repairs / Maintenance
In case of failure, problems or a suspected fault resulting from the falling of the machine, immediately remove the plug from the socket. Never attempt to operate a faulty machine. Servicing and repairs may only be carried out by Authorised Service Centres. All liability for damages resulting from work not carried out by professionals is declined.
Fire Safety Precautions
In case of fi re, use carbon dioxide (CQ) extinguishers. Do not use water or dry powder extinguishers.
Key to Machine Parts (Page 2)
1 Control panel
2 Water tank lid
3 Hot water / steam knob
4 Seat for accessories
5 Water tank
6 Cup holder surface
7 Water recovery tray + grill (if any)
8 Coff ee brew unit
9 Steam wand
10 Power cord
11 Pressurized fi Iter holder
12 Ground coff ee measuring scoop
13 Ground coff ee fi lter (single piece for 1 or 2 coff ee(s))
14 ON/OFF button
15 "Machine on" indicator light
Light ON = the machine is on
Light OFF = the machine is off
16 Coff ee brew button
18 Steam button
19 "Steam ready" indicator light
Light ON = OK for steam dispensing
17 Coff ee/water - "Machine ready" indicator light Light ON = OK for coff ee brewing / hot water dispensing Light OFF = temperature is too low for coff ee brewing / hot water dispensing
Light OFF = temperature is too low for steam dispensing
4 INSTALLATION
For your own and other people safety, carefully follow the "Safety Regulations" indicated in chapter 3.
4.1 Packaging
The original packaging has been designed and manufactured to protect the machine during transport. We recommend keeping the packaging material for possible future transport.
4.2 Installation Precautions
Before installing the machine, read the following safety precautions carefully:
- Place the machine in a safe place.
- Make sure children cannot play with the machine.
- Do not place the machine on hot surfaces or near open flames.
The coffee machine is now ready to be connected to the electric network.
Note: We recommend washing the components before using them for the first time and/or after they have not been used for a certain period of time.
4.3 Water Tank
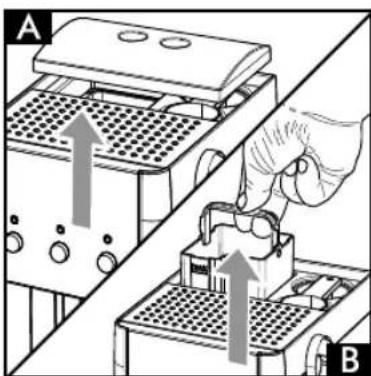
• (Fig.1A) - Remove the lid from the water tank (2) by lifting it.
• (Fig.1B) - Remove the water tank (5).
Note: The machine accessories are placed on the water tank's (5) side.
- (Fig.2) - Rinse the water tank and fi II it with fresh drinking water: do not exceed the (MAX) level indicated on the water tank.
Fill the tank only with fresh, non-sparkling, drinking water. Hot water or any other liquid may damage the tank. Do not operate the machine without water: make sure that there is enough water in the tank.
- (Fig.3) - Insert the water tank making sure that it has been properly repositioned in its former seat and then reposition the lid (2).
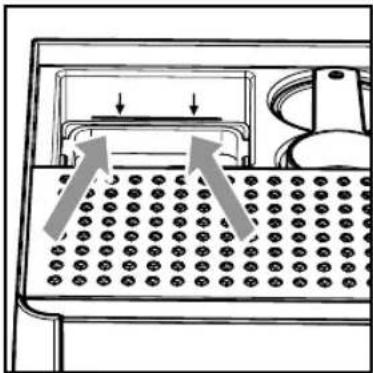
Make sure that the tank is fully inserted in the machine by pressing it gently up to its limit stop (THE REFERENCE MARK SHOWN IN FIG.4 MUST BE COMPLETELY VISIBLE). This is to avoid water leaks from its bottom.
4.4 Machine Connection
Electric power may be very dangerous! It is therefore necessary to strictly follow the safety regulations. Do not use faulty power cords! Faulty cords and plugs must be replaced immediately by Authorised Service Centres.
The voltage of the appliance has been pre-set by the manufacturer. Check that the voltage matches the indication on the identifying data plate at the bottom of the appliance.
- Insert the plug into a wall socket with suitable power voltage.
4.5 Circuit Priming
Upon first use, after dispensing steam or when the water tank is empty, the machine's circuit must always be primed.
- (Fig.5) - Press the ON/OFF button (14); the indicator light (15) will turn on to indicate that the machine is on.
- (Fig.6) - Place a container under the steam wand. Open the "hot water/steam" knob (3) by turning it counterclockwise.
• (Fig.7) - Press the brew button (16). - Wait until a steady jet of water flows out of the steam wand.
- (Fig.7) - Press the brew button (16) again to end the operation.
- (Fig.8) - Close the "hot water/steam" knob (3) by turning it clockwise. Remove the container.
The machine is now ready to brew coff ee and dispense steam. Please see related chapters for operating details.
4.6 Using the Machine for the First Time or After a Period of Inactivity
This simple operation ensures optimal brewing and must be performed:
- At first start-up.
- When the machine remains inactive for a long time (more than 2 weeks).
Water dispensed during this process must be emptied into an adequate drain and is not suitable for food use. If the container fills up during the cycle, stop dispensing water and empty the container before resuming the operation.
A (Fig.2) - Rinse the tank and fill it again with fresh drinking water.
B (Fig.6) - Place a container under the steam wand. Open the knob (3) slowly by turning it counter-clockwise.
(Fig.7) - Press the brew button (16).
C Dispense the whole water tank content from the steam/hot water wand.
(Fig.7) - Press the brew button (16) again to end the operation.
(Fig.8) - Close the knob (3) by turning it clockwise.
D (Fig.2) - Fill the tank with fresh drinking water.
E (Fig.12-13) - Insert the filter holder into the brew unit (8) from the bottom and turn it from left to right until it locks into place.
F Place a suitable container under the fi Iter holder.
G (Fig.15) - Press the brew button (16) and dispense all the water in the tank. Once the water tank is empty, stop dispensing by pressing the brew button (16) again.
At the end, empty the container.
H (Fig.17) - Remove the filter holder from the unit by turning it from right to left and rinse it with fresh drinking water.
The machine is now ready to be used.
5 COFFEE BREWING
Warning! During the coff ee brewing it is forbidden to remove the pressurized fi Iter holder by manually turning it clockwise. Danger of burns!
- During this operation the "machine ready" light (17) may flash. This should be considered a standard operation, not a fault.
- Before using the machine, make sure that the hot water/steam knob (3) is closed and that there is enough water in the machine tank.
- (Fig.5) - Press the ON/OFF button (14); the indicator light (15) will turn on to indicate that the machine is on.
- Wait until the "machine ready" light (17) turns on. The machine is now ready to brew coffee.
i Accessories for coffee brewing are placed in a specially designed seat to make operations easy and immediate.
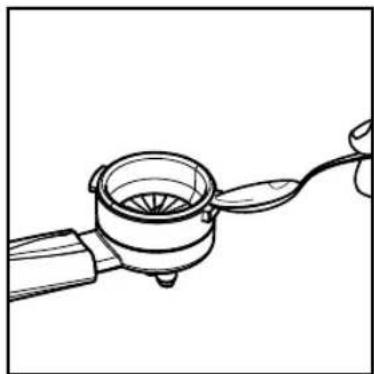
If the ground coffee measuring scoop and/or the filters are required, lift the lid (2) and take what you need (Fig.29).
If coffee is NOT brewed after pressing the brew button (16), press the brew button (16) again and check the "Troubleshooting" table before removing the filter holder.
- (Fig.9) - Insert the filter (13) in the pressurized filter holder (11). The fi Iter is already inserted when using the machine for the first time.
- (Fig.12) - Insert the pressurized filter holder into the brew unit (8) from the bottom.
- (Fig.13) - Turn the fi Iter holder from left to right until it locks into place. Release the grip from the pressurized fi Iter holder handle. The handle is automatically slightly turned leftwards.
This movement guarantees proper pressurized filter holder performance.
- (Fig.15) - Preheat the pressurized fi Iter holder by pressing the brew button (16). Some water will flow out of the pressurized fi Iter holder (this operation is only necessary for the first coffee).
- After 150cc of water has flowed out, press the brew button (16) again to stop hot water dispensing.
• (Fig.17) - Remove the fi Iter holder from the machine by turning it from right to left and pour out any water left. - (Fig.29) - Remove the measuring scoop from the machine.
- (Fig.10) - Add 1-1.5 measuring scoop(s) for single coff ee and 2 measuring scoops for double coff ee. Remove any coff ee residues from the rim of the filter holder.
• (Fig.12) - Insert the filter holder (11) into the brew unit (8) from the bottom. - (Fig.13) - Turn the filter holder from left to right until it locks into place.
- (Fig.14) - Take 1 or 2 preheated cups and place them under the fi Iter holder. Make sure that they are correctly placed under the coffee brewing nozzles.
• (Fig.15) - Press the brew button (16). - When the desired quantity of coff ee has been obtained, press the brew button (16) again to stop brewing and remove the cups of coff ee (Fig.16).
- (Fig.17) - Wait a few seconds after completing the brewing. Then remove the filter holder and empty the remaining coffee grounds out.
Note: if a small quantity of water remains in the fi Iter holder, this has to be considered as absolutely normal and is due to the fi Iter holder features.
i Important note: The filter (13) should be kept clean to guarantee perfect results. Clean daily after use (Fig.18).
6 TIPS FOR CHOOSING COFFEE
As a general rule, any type of coffee available on the market can be used.
However, coff ee is a natural product and its fl avour changes according to its origin and blend. It is therefore a good idea to try different types of coff ee in order to fi nd the most suited to your personal taste. For optimal results, we recommend using espresso machine blends. As a rule, coff ee should always come out of the pressurized fi Iter holder, without dripping.
The coff ee brewing speed can be modified by slightly changing the amount of coff ee in the filter and/or using a different coff ee grind.
BEFORE PERFORMING ANY OPERATIONS RELATED TO HOT WATER/STEAM DISPENSING, MAKE SURE THAT THE STEAM WAND IS DIRECTED OVER THE WATER RECOVERY TRAY.
7 HOT WATER
Danger of burns! Dispensing may be preceded by small jets of hot water. The steam wand may reach high temperatures: never touch it with bare hands.
- Before using the machine, make sure that the hot water/steam knob (3) is closed and that there is enough water in the machine tank.
• (Fig.5) - Press the ON/OFF button (14); the indicator light (15) will turn on to indicate that the machine is on. - Wait until the "machine ready" indicator light (17) turns on. The machine is now ready.
- During this operation the "machine ready" light (17) may flash. This should be considered a standard operation, not a fault.
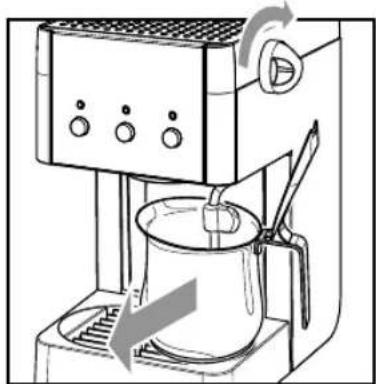
- (Fig.19) - Place a container under the steam wand. Open the "hot water/steam" knob (3) by turning it counterclockwise.
• (Fig.20) - Press the brew button (16).
• (Fig.20) - When the required amount of hot water has been dispensed, press the brew button (16) again. - (Fig.21) - Close the "hot water/steam" knob (3) by turning it clockwise. Remove the container.
8 STEAM / CAPPUCCINO

Danger of burns! Dispensing may be preceded by small jets of hot water. The steam wand may reach high temperatures: never touch it with bare hands.

Warning! Never brew coff ee when the steam function is on, as the temperature is too high ere is a risk of burns.

Warning! During coff ee brewing, do not remove the filter holder (if inserted) by manually turning it clockwise. Danger of burns! The fi lter holder can only be disconnected after deactivating the steam function by pressing the (18) button and letting the machine cool down as described in section 4.5.
- During this operation the "machine ready" light (17) may flash. This should be considered a standard operation, not a fault.
• (Fig.5) - Press the ON/OFF button (14); the indicator light (15) will turn on to indicate that the machine is on. - Wait until the "machine ready" light (17) turns on.
- (Fig.22) - Press the steam button (18). The "machine ready" light (17) turns off.
- Wait until the "machine ready" light (17) and the "steam ready" light (19) turn on. The machine is now ready for steam dispensing.
- During this operation, the indicator lights (17) and (19) may flash. This should be considered a standard operation, not a fault.
- (Fig.23) - Insert a container under the steam wand and open the knob (3) for a few seconds, so that remaining water can flow out of the steam wand. In a short time only steam will come out.
• (Fig.24) - Close the knob (3) and remove the container. - Fill 1/3 of the container - the one you wish to use to prepare the cappuccino - with cold milk.

Use cold milk to get a better result.
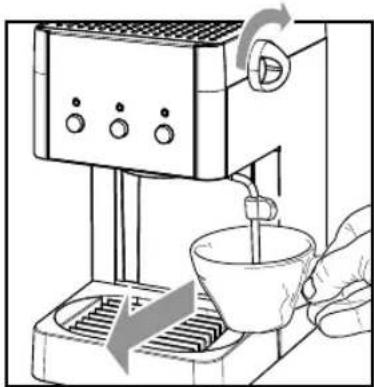
- (Fig.25) - Immerse the steam wand in the milk and open the knob (3) by turning it counter-clockwise. Turn the milk container with slow upward movements so that it warms up evenly.
• (Fig.26) - At the end, close the knob (3) and take the cup with milk froth.
• (Fig.27) - Press the steam button (18) again.
- Prime the circuit as described in section 4.5 to make the machine ready for use.

Never brew coff ee when the 📋 button is pressed or when the 19 indicator light is on, be- this means that the steam function is on and the rature of the boiler is too high.
Wait for the coff ee ready condition to be active (17 indicator light on) before brewing coff ee.

Note: The machine is ready when the "machine ready" light (17) is permanently on.

Important note: If it is not possible to brew a cappuccino as described, prime the circuit as lined in section 4.5 and then repeat the steps.

The same procedure can be used to heat other beverages.
• After this operation, clean the steam wand with a wet cloth.
9 CLEANING
Maintenance and cleaning can only be carried out when the machine is cold and disconnected from the electric network.
- Do not immerse the machine in water or place any of its parts in a dishwasher.
- Do not use spirits, solvents and/or aggressive chemical agents.
- We recommend cleaning the water tank and refi lling it with fresh water every day.
- Clean the steam wand daily. To perform this operation, wash the steam wand with a wet cloth and remove any milk residue.
• (Fig.28) - Empty and clean the drip tray daily.
- Use a soft, dampened cloth to clean the appliance.
• (Fig.18) - Perform the following operations to clean the pressurized filter holder:
- (Fig.11) - Remove the filter and wash it thoroughly with hot water.
- Remove the adapter (if any) and wash it thoroughly with hot water.
- Wash the internal part of the pressurized filter holder.
- Do not dry the machine and/or its parts using a microwave and/or standard oven.
10 DESCALING
Limescale normally builds up with the use of the appliance. The machine needs descaling every 1–2 months (if used) and/or whenever a reduction in water flow is noticed. Use the Saeco descaling product only.
In case of conflict, priority must be given to what is indicated in the operation and maintenance manual over the instructions provided on separately sold accessories and materials.
Use the Saeco descaling solution only. Its formula has been designed to ensure better machine performance and operation for its whole operating life. If correctly used, it also avoids alterations in the brewed product. The descaling solution is to be disposed of according to the manufacturer's instructions and/or the regulations in force in the country of use.
Never drink the descaling solution or any products dispensed until the cycle has been completed. Never use vinegar as a descaling solution.

1 (Fig.12-13) - Insert the fi I holder (without coff ee) into the brew unit (8) from the bottom and turn it from left to right until it locks into place.
2 (Fig.1) - Remove and empty the water tank.
3 (Fig.2) - Pour THE ENTIRE content of the Saeco concentrated descaling solution into the water tank, and then fi ll the tank with fresh drinking water up to the MAX level.
4 Turn on the machine by pressing the ON/OFF button (14). The (15) indicator light will turn on to indicate that the machine is on.
Fill up (as described in the "HOT WATER" chapter of the manual) 2 cups of water (about 150 ml each) from the steam/hot water wand and turn off the machine by pressing the ON/OFF button (14). The indicator light (15) turns off.
5 Let the descaling solution take effect for approx.15-20 minutes with the machine turned off.
6 Turn on the machine by pressing the ON/OFF button (14). The (15) indicator light will turn on to indicate that the
machine is on.
Fill up (as described in the "HOT WATER" chapter of the manual) 2 cups of water (about 150 ml each) from the steam/hot water wand. Turn off the machine by pressing the ON/OFF button (14) and leave it off for 3 minutes.
7 Repeat the operations described in step 6 until the water tank is completely empty.
8 (Fig.2) - Rinse the water tank and fill it with fresh drinking water. Turn on the machine by pressing the ON/OFF button (14). The (15) indicator light will turn on to indicate that the machine is on.
9 (Fig.6) - Place a container under the steam wand. Open the knob (3) slowly by turning it counter-clockwise.
(Fig.7) - Press the brew button (16).
10 Dispense the whole water tank content through the steam/hot water wand.
(Fig.7) - Press the brew button (16) again to end the operation.
(Fig.8) - Close the knob (3) by turning it clockwise.
11 (Fig.2) - Fill the water tank with fresh drinking water.
12 (Fig.14) - Place a suitable container under the fi Iter holder.
13 (Fig.15) - Press the brew button (16) and dispense all the water in the tank. Once the water tank is empty, stop dispensing by pressing the brew button (16) again. At the end, empty the container.
14 Repeat the operations from step (8) once again, for a total of 4 tanks. The machine is now ready to be used.
(Fig.17) - Remove the filter holder from the unit by turning it from right to left and rinse it with fresh drinking water.
The descaling cycle is now complete.
(Fig.2) - Fill the tank again with fresh water. If necessary, prime the circuit as described in section 4.5 of the manual.
11 DISPOSAL
INFORMATION FOR THE USER: In compliance with art. 13 of the Italian Legislative Decree dated 25 July 2005, no. 151 "Implementation of the Directives 2002/95/EC, 2002/96/EC and 2003/108/EC on the restriction of the use of certain hazardous substances in electrical and electronic equipment, as well as waste disposal".

The icon of the crossed-out wheeled bin on the appliance or its packaging indicates that the product must be disposed of separately from other waste at the end of its operational life.
The user must therefore take the appliance to be disposed of to a suitable recycling centre for electronic and electrotechnical equipment, or alternatively hand it over to the vendor on a one on one exchange, when purchasing a new appliance of similar type.
Separating this product for subsequent recycling, treatment and environmentally-friendly disposal will help prevent potential environmental and health risks, and allow the materials which make up the appliance to be re-used and/or recycled.
Specific administrative sanctions provided for by current regulations will be applied for illicit disposal of the product by the user.
12 TROUBLESHOOTING
| Problem Possible Causes Solution | ||
| The machine does not switch on. | The machine is not connected to the electric network. | Connect the machine to the electric network. |
| The pump is very noisy. No water in the tank. | Fill the water tank and prime the circuit again (section 4.5). | |
| No coff ee is brewed after pressing the brew button (16). | Filter holder is clogged. | Press the brew button (16) again. Turn the machine off and let it cool down (approx. 1 hour). Then remove and wash the fi Iter holder thoroughly. If the problem persists, contact the authorised service centre. |
| Coff ee is too cold. | The "coff ee ready" indicator light (17) was off when the button was pressed (16) | Wait until the "coff ee ready" indicator light (17) turns on. |
| The fi Iter holder is not inserted for preheat-ing (chapter 5). | Preheat the fi Iter holder. | |
| The cups are cold. Preheat the cups with hot water. | ||
| The milk does not froth. | The milk is not suitable: powdered milk, low-fat milk. | Use whole milk. |
| It is not possible to prepare a cap-puccino. | The steam wand is dirty. | Clean the steam wand as described in Chapter 10. |
| There is no more steam in the boiler. | Prime the circuit (section 4.5) and repeat the steps described in Chapter 8. | |
| Coff ee is brewed too fast, crema does not form. | There is too little coff ee in the fi Iter holder. | Add coff ee (chapter 5). |
| The grind is too coarse. Use a different blend (chapter 6). | ||
| Coff ee is old or not suitable. Use a different blend (chapter 6). | ||
| Coff ee does not come out or drips only. | No water. | Fill the water tank and prime the circuit again (section 4.5). |
| The grind is too fine. Use a different blend (chapter 6). | ||
| Coff ee tamped in the fi Iter holder. Shake the ground coff ee. | ||
| There is too much coff ee in the fi Iter holder. Reduce the quantity of coff ee in the fi Iter holder. | ||
| Knob (3) is open. | Close the knob (3). | |
| The machine has limescale build-up. | Descale the machine (chapter 11). | |
| The fi Iter in the fi Iter holder is clogged. | Clean the fi Iter (chapter 10). | |
| Coff ee flows out of the edges. | The fi Iter holder is not correctly inserted in the brew unit. | Insert the fi Iter holder correctly (chapter 5). |
| The upper rim of the fi Iter holder is dirty. | Clean the rim of the fi Iter holder. | |
| There is too much coff ee in the fi Iter holder. | Reduce the quantity of coff ee using the measuring scoop. | |
Please contact an authorised service centre for any problems not covered in the above table or when the suggested solutions do not solve the problem.
English
1 UWAGI OGÓLNE
The manufacturer reserves the right to make changes without prior notice.
- GENERAL INFORMATION
- Warning. No liability is held for damage caused by:
- How to Read the Manual
- This icon is used to highlight information that is particularly important to ensure optimal use machine.
- How to Use these Operating Instructions
- TECHNICAL SPECIFICATIONS
- SAFETY INSTRUCTIONS
- Intended Use
- Power Supply
- Power Cord
- For the Safety of Others
- Danger of Burns
- Location
- Danger of burns!
- Cleaning
- Suitable Location for Operation and Maintenance
- Storing the Machine
- Repairs / Maintenance
- Fire Safety Precautions
- Key to Machine Parts (Page 2)
- INSTALLATION
- Packaging
- Installation Precautions
- Water Tank
- Machine Connection
- Circuit Priming
- Using the Machine for the First Time or After a Period of Inactivity
- COFFEE BREWING
- TIPS FOR CHOOSING COFFEE
- HOT WATER
- STEAM / CAPPUCCINO
- Use cold milk to get a better result.
- CLEANING
- DESCALING
- DISPOSAL
- TROUBLESHOOTING
- UWAGI OGÓLNE
Brand : PHILIPS
Model : Saeco RI8329
Category : Coffee maker