
ZEW3003 - Access Point Zonet - Free user manual and instructions
Find the device manual for free ZEW3003 Zonet in PDF.


| Product Type | Wireless Access Point |
| Model | ZEW3003 |
| Brand | Zonet |
| Wireless Standards | IEEE 802.11b/g/n |
| Frequency Band | 2.4 GHz |
| Maximum Data Rate | 300 Mbps |
| Ethernet Port | 1 x 10/100 Mbps RJ-45 |
| Power Supply | DC 5V, 1A (via micro USB) |
| Dimensions (L x W x H) | 150 x 110 x 30 mm |
| Weight | 200 g |
| Antenna | 2 x external 5dBi omnidirectional |
| Security | WPA/WPA2-PSK, WEP |
| Management | Web-based setup, PoE support |
| Operating Temperature | 0°C to 40°C |
| Storage Temperature | -20°C to 60°C |
| Humidity | 10% to 90% (non-condensing) |
| LED Indicators | Power, LAN, WLAN |
| Reset Button | Yes |
| Mounting | Wall mountable, desktop |
| Package Contents | Access Point, Power Adapter, Ethernet Cable, Manual |
Frequently Asked Questions - ZEW3003 Zonet
User questions about ZEW3003 Zonet
0 question about this device. Answer the ones you know or ask your own.
Ask a new question about this device
Download the instructions for your Access Point in PDF format for free! Find your manual ZEW3003 - Zonet and take your electronic device back in hand. On this page are published all the documents necessary for the use of your device. ZEW3003 by Zonet.
USER MANUAL ZEW3003 Zonet
802.11g Wireless Access Point

USER MANUAL
Copyright Statement
Zonet is the registered trademark of Zonet Technology Inc. All the products and product names mentioned herein are the trademarks or registered trademarks of their respective holders. Copyright of the whole product as integration, including its accessories and software, belongs to Zonet Technology Inc. Without the permission of Zonet Technology Inc., any individual or party is not allowed to copy, plagiarize, imitate or translate it into other languages.
All the photos and product specifications mentioned in this manual are for references only. As the upgrade of software and hardware, there will be changes. And if there are changes, Zonet is not responsible for informing in advance. If you want to know more about our product information, please visit our website at www.zonetusa.com.
Table of Contents
Chapter 1 Introduction......2
1.1 Welcome....2
1.2 Features....2
1.3 Package contents....2
Chapter 2 Hardware Installation....3
2.1 Panel Layout ....3
2.1.1 Top Panel....3
2.1.2 Rear Panel....4
2.2 System Requirements....4
2.3 Installation Environment Requirements....4
2.4 Hardware Connection....5
Chapter 3 Configure your Computer....6
3.1 TCP/IP Address Setting....6
Chapter 4 Configure your ZEW3003....8
4.1 Log in....8
4.2 Status....9
4.2.1 Status....9
4.2.2 Statistics....9
4.3 LAN Setup....10
4.3.1 LAN Setup....10
4.3.2 DHCP Info....10
4.4 Radio....11
4.4.1 AP....12
4.4.2 Client....13
4.4.3 WDS....14
4.4.4 AP+WDS....15
4.4.5 Repeater....16
4.5 Security....17
4.4.1 None....17
4.4.2 WEP....17
4.4.3 802.1X Enterprise....18
4.4.4 WPA Personal....19
4.4.5 WPA Enterprise....19
4.4.6 WPA2 Personal....20
4.4.7 WPA2 Enterprise....20
4.4.8 WPA & WPA2 Personal....21
4.4.9 WPA & WPA2 Enterprise....21
4.6 WDS....22
4.7 MAC Filter....22
4.8 Site Survey....23
4.9 Client Info....23
4.10 Advanced....24
4.11 MISC....25
Chapter 5 Troubleshooting....27
Chapter 1 Introduction
1.1 Welcome
ZEW3003 is fully compliant with IEEE802.11g/b standards. It can help you extend from the wired network to the wireless network, free from the cabling troubles. It is the best choice for SOHO and small enterprise users. ZEW3003 provides five work modes: AP, WDS, AP+WDS, Repeater Client Ad-hoc and Client Infrastructure. It also supports 64/128-bit WEP, WPA, WPA2. The MAC address filter can protect your network against any malicious intrusion. Moreover, the Web management utility can benefit you to manage the device easily.
1.2 Features
● Supports IEEE 802.11g, IEEE 802.11b standards
● Provide wireless AP, Client, WDS, AP+WDS, Repeater mode
● Provide 1 LAN port, 10/100M Auto-Negotiation, supports Auto MDI/MDIX
● Support 54/48/36/24/18/12/11/9/6/5.5/2/1 wireless data transfer rates
● Support basic DHCP server settings
- Support remote and Web management.
● Support 64/128 bits WEP and WPA/WPA2 wireless security standard
● Supports firmware upgrade
- Detachable Antenna (reverse SMA connector)
● External power adapter
1.3 Package Contents
- One ZEW3003
- One User Manual CD
- One Quick Installation Guide
● One Detachable Antenna - One Power Adapter
Chapter 2 Hardware Installation
2.1 Panel Layout
2.1.1 Front Panel
The front panel of ZEW3003 consists of several LED indicators.
Zonet
802.11g Wireless Access Point
ZEW3003
PWR SYS Tx Rx LAN/100M LAN/10M

| Name Action | Description | |
| Power | ON Power on | |
| OFF | No Power | |
| SYS | ON CPU on | |
| OFF CPU off | ||
| Tx | Flashing | ZEW3003 is transmitting data |
| OFF There is no data transmitting | ||
| Rx | Flashing | ZEW3003 is receiving data |
| OFF | There is no data receiving | |
| Link/100M | ON ZEW3003 is working on 100M mode | |
| OFF There is no activity on 100M mode | ||
| Link/10M | ON ZEW3003 is working on 10M mode | |
| OFF There is no activity on 10M mode | ||
2.1.2 Rear Panel
The rear panel contains the following features. (Viewed from left to right)

| Name Description | |
| Power Connector | Power Jack only use the power adapter applied with ZEW3003 to prevent damage |
| RJ-45 Connector | One LAN 10/100Mbps RJ45 port for connecting to the router/modem, local PC or switch/hub. |
| Reset Button Factory Default Reset button | |
| Antenna Connector One external dipole antenna | |
There is a way to reset the ZEW3003's factory defaults by using the Factory Default Reset button:
- Turn off ZEW3003's power
- Press and hold the default reset button and turn on ZEW3003 at the same time.
- Hold the button until the system LED lights up (about 10 seconds)
- Release the reset button and wait for ZEW3003 to reboot.
Note: Ensure ZEW3003 is powered on before it restarts completely.
2.2 System Requirements
● Computer or network devices with wired or wireless network interface card
- TCP/IP protocol must be installed on each PC
- Web browser Microsoft Internet Explorer 6.0 or later
● An available power socket (100-240V, 50/60Hz)
2.3 Installation Environment Requirements
- Do not in direct sunlight or near a heater or heating vent
- Do not in cluttered or crowded place. There should be at least 2 inches (5 cm) of clear space on all sides of ZEW3003
● Well ventilated (especially if it is in a closet) - Operating temperature: 0^ 40^
- Operating Humidity: 10%\~90%RH, Non-condensing
2.4 Hardware Connection
Note: Before connecting ZEW3003, be sure to power off your computer, DSL/Cable modem, and ZEW3003. To achieve maximum wireless coverage, tilt ZEW3003's antenna outward at 45° angle.
- Connect one end of the cable to your broadband router, PC or Switch/Hub port and connect the other end to the LAN port of ZEW3003.

- Power on ZEW3003 by connecting one end of the supplied power adapter to the power jack of ZEW3003 and connecting the other end to an electrical outlet.
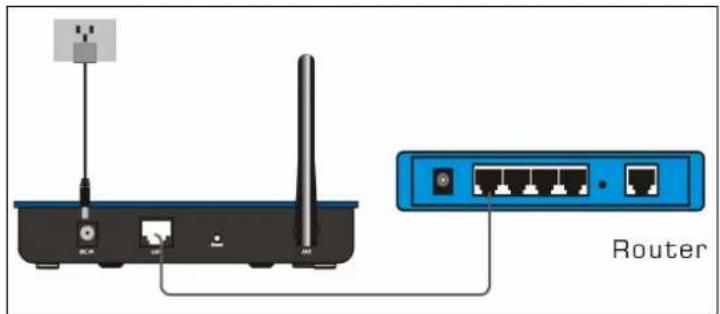
- Power on your wireless device.

- Make sure the LEDs of ZEW3003 are lit. If not, try the above steps again, or jump to "Troubleshooting" for possible reasons and solution
Chapter 3 Configure your computer
3.1 TCP/IP Address Setting
Default IP Address: 192.168.1.1
Default Subnet Mask: 255.255.255.0
- Click Start → Control Panel

- Click Network and Internet Connections → Network Connections.
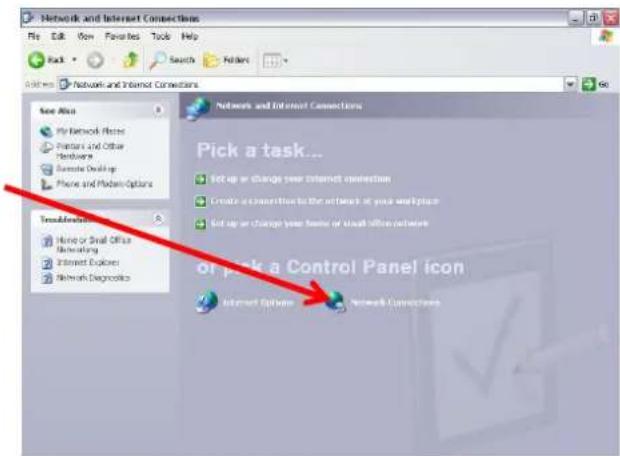
- Right click Local Area Connection and select Properties.

- Select Internet Protocol (TCP/IP) and click Properties.

- Select Obtain an IP address automatically and Obtain DNS server address automatically. Click OK to save the configurations.

- Or select Use the following IP address and enter the IP address as 192.168.1.X (X is from 1 to 253), Subnet mask. Of course, you need to input the DNS server address provided by your ISP. Otherwise, you can use the ZEW3003's default gateway as the DNS proxy server. Click OK to save the configurations.

- Click OK to apply and return to Local Area Connection Properties page and then click OK to exit the setting window.
Chapter 4 Configure your ZEW3003
4.1 Log in
ZEW3003 provides Web based configuration scheme configuring by Internet Explorer.
-
Open an Internet Explorer, type 192.168.1.1 in the address bar, and then press Enter.
-
Input user name and password and then press OK. Default User Name: guest Default Password: guest

- After login successfully, home page will be displayed.

4.2 Status
Status page allows you to monitor the current status of ZEW3003 and view the statistics of packets sent and received on LAN and WLAN.
4.2.1 Status

4.2.2 Statistics

4.3 LAN Setup
4.3.1 LAN Setup

- System IP address: ZEW3003's LAN IP address (not your PC's IP address). Once you modify the IP address, you need to remember it for the Web-based Utility login next time. Default value is 192.168.1.1.
- Subnet mask: ZEW3003's subnet mask for measurement of the network size. Default value is 255.255.255.0.
-
DHCP Server:
-
Status: Enable or Disable DHCP Server by selecting checkbox.
- DHCP Client Range: Enter the range of IP address for DHCP server distribution.
- Gateway Address: Default value is blank.
Note: If the IP address changed, the login IP address to the Web-based management interface will change correspondingly.
4.3.2 DHCP Info
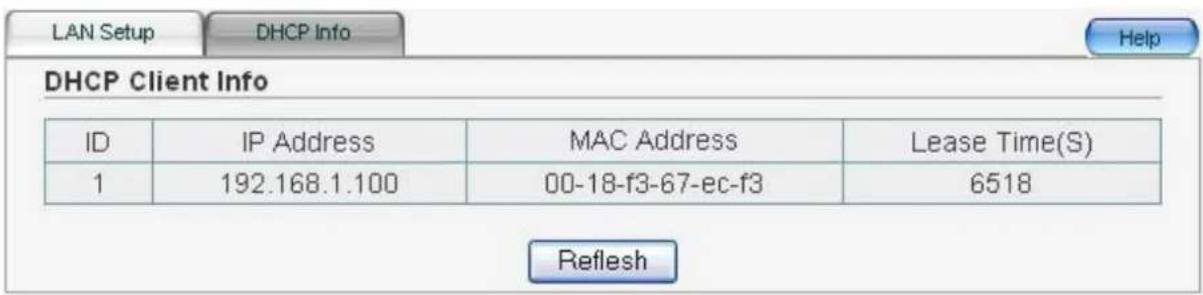
4.4 Radio
Radio page contains five modes, including AP, Client, WDS, AP+WDS and Repeater.
Here are some basic settings:
● Radio Band: Select from 802.11b, 802.11g, 802.11b/g
- Radio Mode: Select from AP, Client, WDS, AP+WDS and Repeater. Default value is AP mode.
- Booster mode: Boost Mode enhances throughput an additional 30% at 54Mbps.
- SSID: SSID is the unique ID name of your wireless network. Default value is zonet.
- Broadcast SSID: Enable/disable the SSID broadcast
● Region: Select from Asia, USA and Europe.
- ABS: After select ABS(Auto Best Space) mode, ZEW3003 will search best channel in current wireless environment when starting up.
- Channel: Select the operating channel for your wireless network.
4.4.1 AP

- IAPP: Enable it to allow wireless station roaming between IAPP enabled access points within the same wireless LAN.
In AP mode, ZEW3003 will act as a central hub for different wireless LAN clients. For example, when traveling to a hotel that has high-speed internet access, you can connect to the internet through ZEW3003 which is connected to an Ethernet cable in the room.
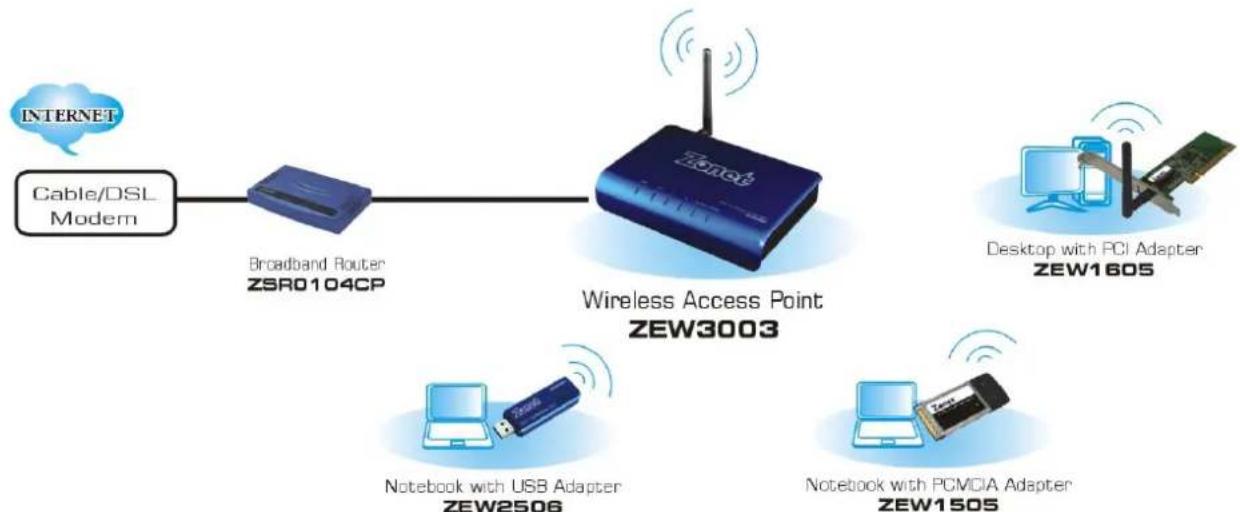
flowchart
graph LR
    A["INTERNET"] --> B["Cable/DSL Modern"]
    B --> C["Broadband Router ZSR0104CP"]
    C --> D["Wireless Access Point ZEW3003"]
    D --> E["Desktop with PCI Adapter ZEW1605"]
    D --> F["Notebook with USB Adapter ZEW2506"]
    D --> G["Notebook with PCMCIA Adapter ZEW1505"]
4.4.2 Client
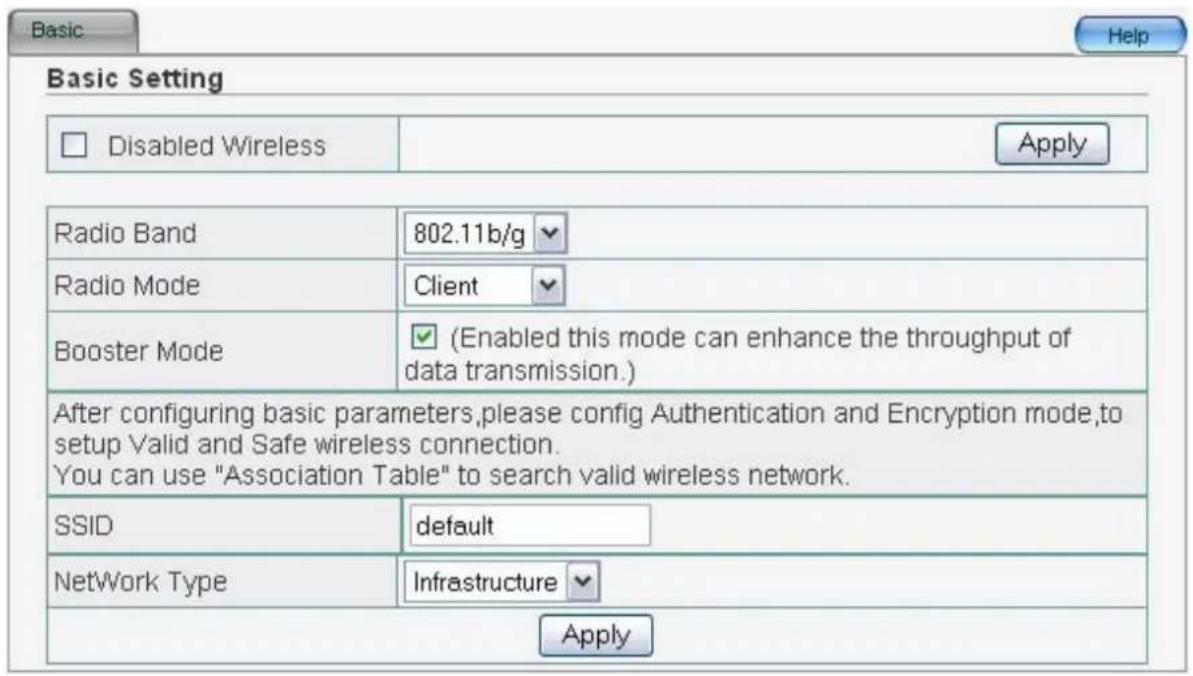
- SSID: Default value is default.
- Network Type: Select from Infrastructure and Ad-Hoc. Default setting is Infrastructure.
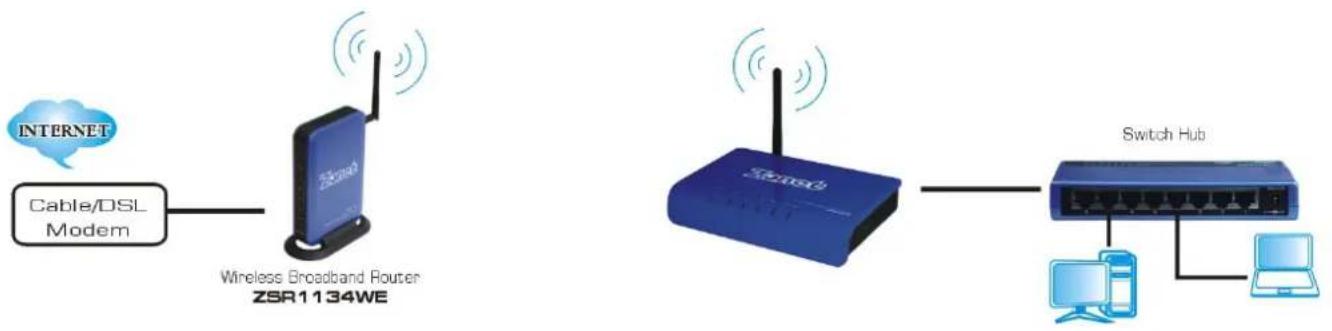
In Client mode, ZEW3003 associates with another AP within its range. The device behaves like a wireless network adapter.
Figure below shows the Client mode ZEW3003 as a wireless client in infrastructure mode. Connect the LAN port of the ZEW3003 with Ethernet interface of the wired network.
flowchart
graph LR
    A["INTERNET"] --> B["Cable/DSL Modem"]
    B --> C["Wireless Broadband Router ZSR1134WE"]
    C --> D["Switch Hub"]
    D --> E["Computer"]
    D --> F["Laptop"]
    C --> G["Wireless Broadband Router ZSR1134WE"]
    G --> H["Switch Hub"]
4.4.3 WDS

In WDS mode, two ZEW3003 in two remote locations connect with each other to provide a wireless bridge between 2 wired networks. The two ZEW3003 operating in WDS mode do not allow client associations. It is mostly used by enterprise to connect 2 remote office's network together.
Note: WDS mode only can be enabled on two or more ZEW3003 networking environment.

flowchart
graph LR
    A["Switch Hub"] --> B["WDS"]
    B --> C["Switch Hub"]
    A --> D["Computer"]
    A --> E["Computer"]
    B --> F["Switch Hub"]
    C --> G["Switch Hub"]
    style A fill:#4CAF50,stroke:#388E3C
    style B fill:#4CAF50,stroke:#388E3C
    style C fill:#4CAF50,stroke:#388E3C
    style D fill:#2196F3,stroke:#1976D4
    style E fill:#2196F3,stroke:#1976D4
    style F fill:#2196F3,stroke:#1976D4
4.4.4 AP+WDS

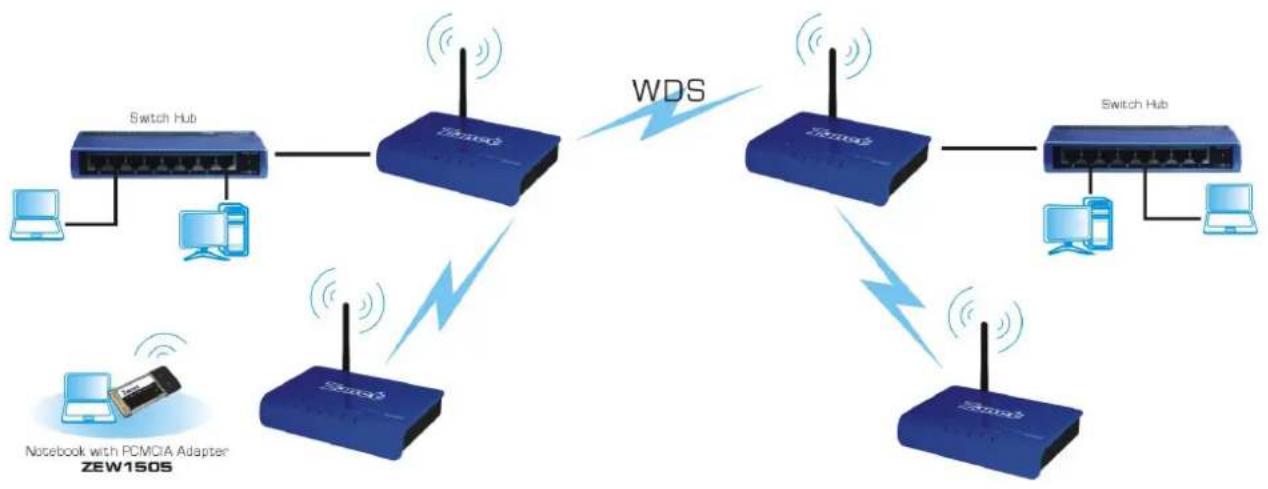
In AP+WDS mode, ZEW3003 will work both in AP mode and WDS mode. It supports the wireless bridge between the two wired networks; the connection of wireless network is also supported at the same time. The part of AP's encryption in accordance with the encryption of AP mode. The part of WDS' encryption in accordance with the encryption of WDS mode.
Note: Steps to configured AP+WDS mode:
- Configured AP mode parameters.
- Configured WDS mode parameters.
- Enabled AP+WDS mode.
flowchart
graph TD
    A["Switch Hub"] -->|WDS| B["Switch"]
    B --> C["Switch Hub"]
    C --> D["Switch Hub"]
    D --> E["Switch"]
    E --> F["Switch Hub"]
    F --> G["Switch Hub"]
    H["Notebook with PCMCIA Adapter ZEW1505"] --> A
    H --> B
    H --> C
    H --> D
4.4.5 Repeater
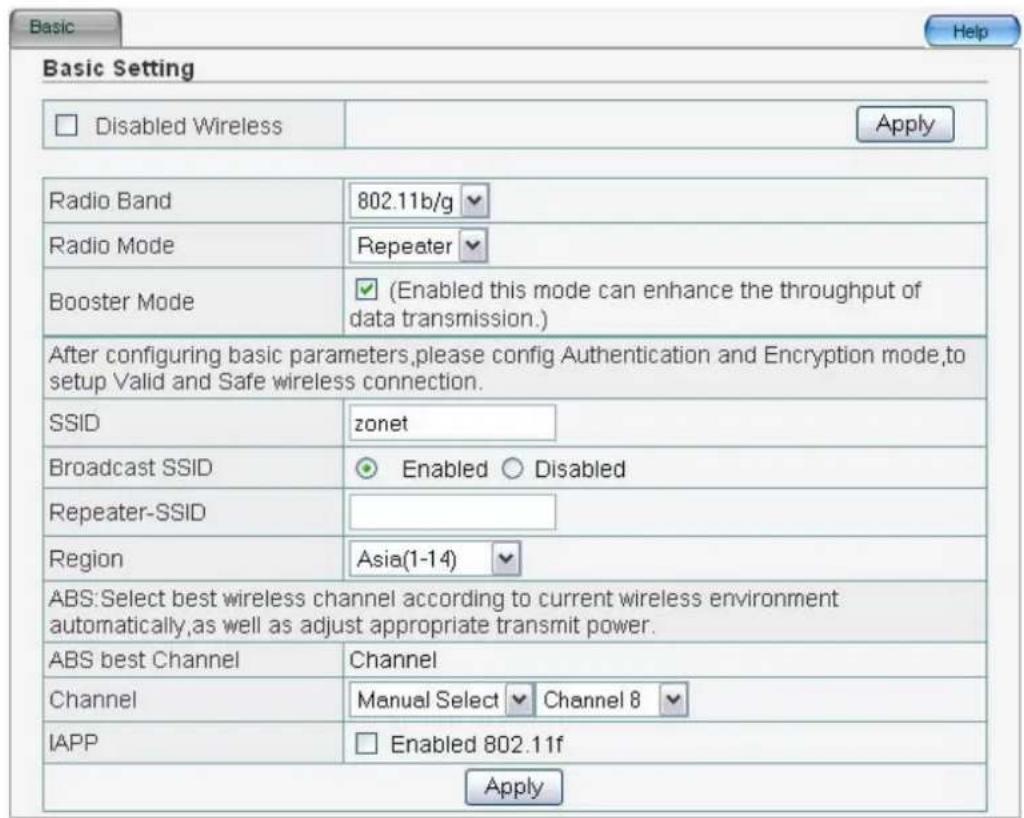
- Repeater-SSID: The name for your repeater.
- IAPP: Enable it to allow wireless station roaming between IAPP enabled access points within the same wireless LAN.
A repeater is placed between an AP and a client to extend the distance between the two WLAN devices. Functioning as a repeater, ZEW3003 connects to both a client card as an AP and to another AP. In typical repeater applications, APs connecting to other APs equipped with WDS functionality must also support WDS.
Figure below shows an example of a Repeater network with two ZEW3003 Repeaters connected to a ZEW3003 (AP mode), with each Repeater allowing wireless clients to associate.
Note: Repeater mode only can be enabled on two or more ZEW3003 networking environment.

Security page contains eight Authentication Types, including None, WEP, WPA SOHO USER, WPA2 SOHO USER, and WPA&WPA2 SOHO USER.
4.5.1 None
Default setting is None.

4.5.2 WEP
WEP (Wired Equivalent Privacy) is an encryption method used to protect your wireless data communications. WEP uses a combination of 64-bit or 128-bit keys to provide access control to your network and encryption security for every data transmission.

- Accessorial Authentication & Encryption: Select from Open System, Shared Key and Auto Select. Shared Key requires the same WEP keys between ZEW3003 and work station.
● Key Length: The higher the encryption bit, the more secure your network.
- WEP Mode:
ASCII: Enter 13 characters with case sensitive ("a-z", "A-Z" and "0-9").
Hex: enter 26 Hex characters ("A-F", "a-f" and "0\~9").
● Key1, 2, 3, 4: Input WEP key characters here, the number of characters must be the same as the number displayed at WEP Mode. You must enter at least one encryption key here, and if you entered multiple WEP keys, they should not be same with each other.
4.5.3 802.1X Enterprise
This security mode is used when a RADIUS server is connected to ZEW3003. IEEE 802.1x is an authentication protocol. Every user must use a valid account to login to ZEW3003 before accessing the wireless LAN. The authentication is processed by a RADIUS server. This mode only authenticates user by IEEE 802.1x, but it does not encryption the data during communication.
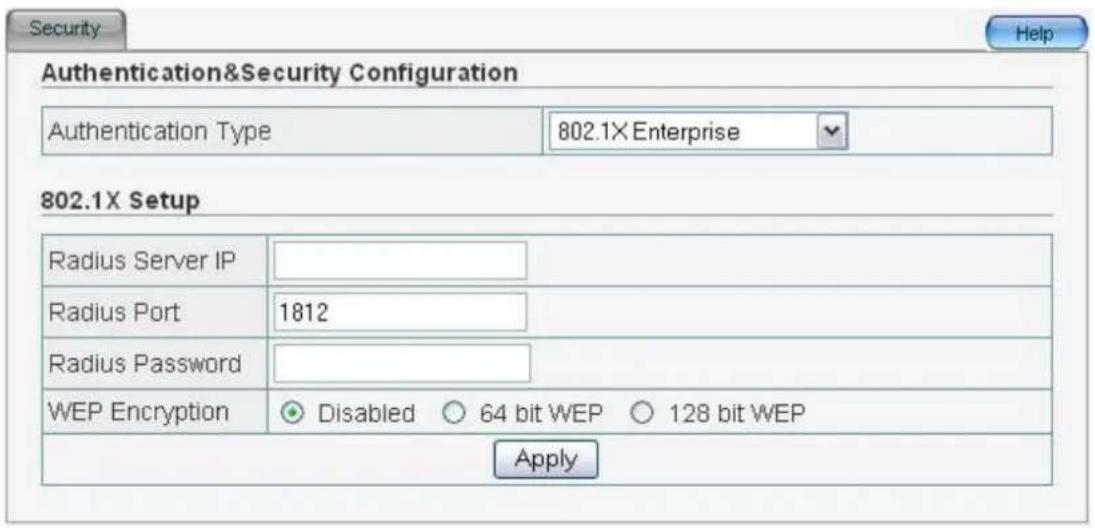
- Radius Server IP: Input the IP address of Radius server here.
- Radius Port: Input the port number of the Radius server here. Default value is 1812.
- Radius Password: Input the password of Radius server here.
- WEP: Select enable 64 bit WEP, 128 bit WEP or Disable WEP encryption which indicates the authentication process between wireless adapter and ZEW3003.
4.5.4 WPA Personal
Wi-Fi Protected Access (WPA) is an advanced security standard. It uses TKIP and AES to change the encryption key frequently.
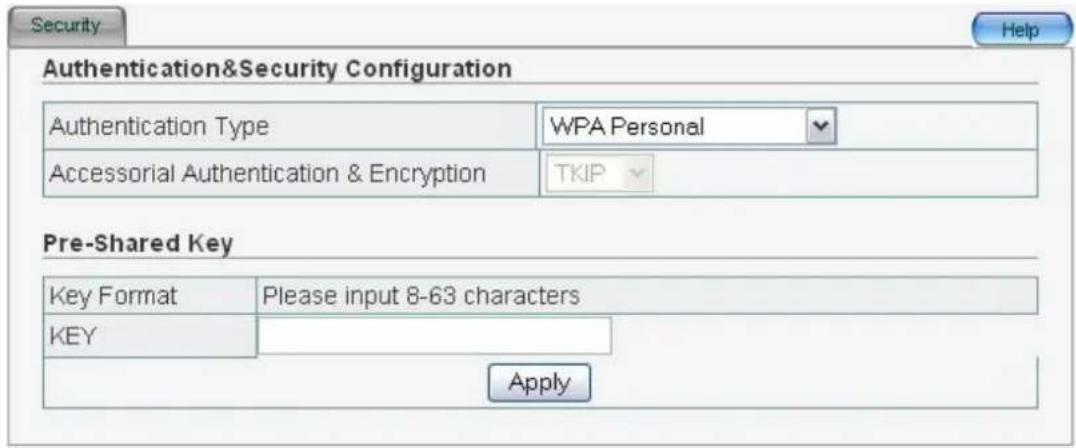
- Accessorial Authentication & Encryption: Default setting is TKIP.
● Key: Enter the key which must have 8-63 ASCII characters.
4.5.5 WPA Enterprise
This security mode is used when a RADIUS server is connected to ZEW3003.

- Accessorial Authentication & Encryption: Default setting is TKIP.
- Radius Server IP: Input the IP address of Radius server here.
- Radius Port: Input the port number of the Radius server here. Default value is 1812.
- Radius Password: Input the password of Radius server here.
4.5.6 WPA2 Personal
WPA2 is a stronger version of WPA.
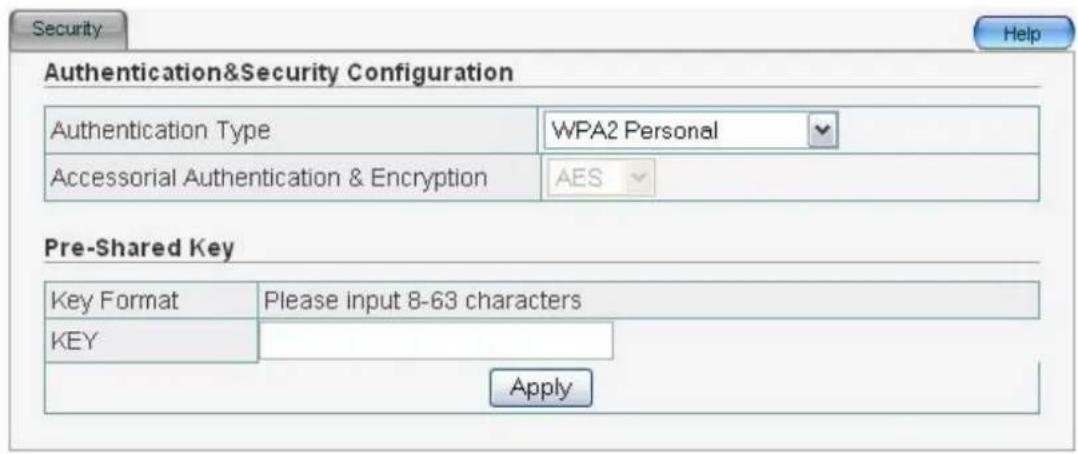
- Accessorial Authentication & Encryption: Default setting is AES.
● Key: Enter the key which must have 8-63 ASCII characters.
4.5.7 WPA2 Enterprise
This security mode is used when a RADIUS server is connected to ZEW3003.

- Accessorial Authentication & Encryption: Default setting is AES.
- Radius Server IP: Input the IP address of Radius server here.
- Radius Port: Input the port number of the Radius server here. Default value is 1812.
- Radius Password: Input the password of Radius server here.
4.5.8 WPA&WPA2 Personal

● Pre-Shared Key: For WPA, default setting is TKIP; for WPA2, default setting is AES.
● Key: Enter the key which must have 8-63 ASCII characters.
4.5.9 WPA&WPA2 Enterprise
This security mode is used when a RADIUS server is connected to ZEW3003.
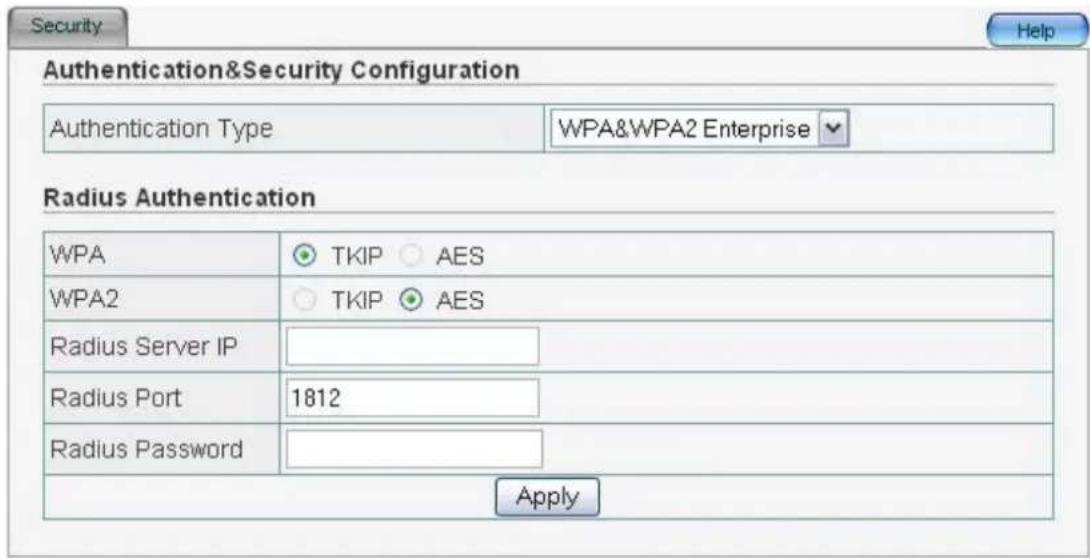
● Pre-Shared Key: For WPA, default setting is TKIP; for WPA2, default setting is AES.
- Radius Server IP: Input the IP address of Radius server here.
- Radius Port: Input the port number of the Radius server here. Default value is 1812.
- Radius Password: Input the password of Radius server here.
4.6 WDS
Wireless Distribution System uses wireless media to communicate with other access points, like the Ethernet does. To do this, you must set these access points in the same channel and set the MAC address of other access points you want to communicate with in the table.
Note: You need to configure WDS setting when selecting AP or AP+WDS radio mode.

● Wireless Bridge MAC: Input the MAC address of another access point.
• Description: The description of wireless bridge.
● Current Wireless Bridge Information: The added MAC addresses are listed here.
4.7 MAC Filter

- Enable Wireless Access Control: Enable it to select one button to Permit or Deny the wireless connection from MAC address list.
- MAC: To specify an external IP address, please add the MAC address manually and click Add.
• Description: The description of this setting. - MAC Address List: The added MAC addresses are listed here. Click Delete to delete the filter management for this MAC address.
4.8 Site Survey
Site Survey page provides tool to scan the wireless network. If any Access Point or IBSS is found, you could choose to connect it manually when client mode is enabled.

4.9 Client Info
You can see the status of all active wireless stations connecting to ZEW3003.
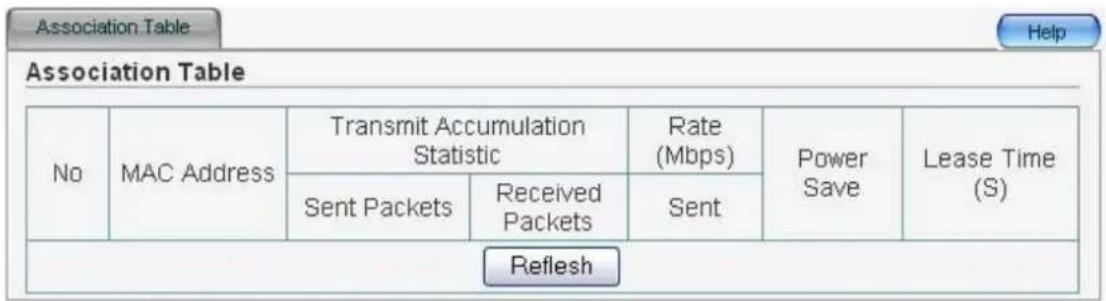
- Refresh: Click to update the message.
4.10 Advanced

- Frag Threshold: Specify the maximum size of packet during the fragmentation of data to be transmitted. Default value is 2346.
- RTS Threshold: When the packet size is smaller the RTS threshold, ZEW3003 will not use the RTS/CTS mechanism to send this packet. Default value is 2347.
- Beacon Interval: The interval of time ZEW3003 broadcast a beacon. Beacon is used to synchronize the wireless network. Default value is 100.
● Transmit Rate: For different requirement, you can select one of the suitable Basic Data Rates. Default value is Auto. - Preamble Type
- Long can provide better wireless LAN compatibility.
- Short can provide better wireless LAN performance.
- 802.11g Protection: It also called CTS Protection. It is recommended to Enable the protection mechanism. This mechanism can decrease the rate of data collision between 802.11b and 802.11g wireless stations. When the protection mode is enabled, the throughput of ZEW3003 will be a little lower due to many of frame traffic should be transmitted
● Wireless VLAN: Default value is Disabled.
4.11 MISC

- Login ID & Password Setup: Users can setup the Password for the next login in.
- Restore Default / Restart System:
- Restore Default: Click it to restore the factory defaults back configuration to factory default.
- Restart System: Click it to restart your ZEW3003.
- Firmware Upgrade: Click Browse to browse to the new firmware, and click Upgrade.
Note: During the firmware upgrade, please make sure ZEW3003 is powered on. Otherwise, power failure will result in a fatal damage to ZEW3003. After the process is completed, ZEW3003 will reboot automatically. It will take about several minutes, please wait patiently.
| ZEW3003's Default Values | |
| Working mode AP mode | |
| user name guest | |
| password guest | |
| IP address 192.168.1.1 | |
| subnet mask 255.255 | 255.0 |
Chapter 5. Troubleshooting
Q1: If you have trouble connecting to the Internet, try the following steps.
- Power off the Cable/DSL modem, ZEW3003, and computer and wait for 5 minutes.
- Turn on the Cable/DSL modem and wait for the lights on to settle down.
- Turn on ZEW3003 and wait for the lights on to settle down.
- Turn on the computer.
- Reconfigure ZEW3003 as described in Chapter 4.
- Login to ZEW3003 and select the System Status tab.
- Verify the IP Address, Default Gateway, have valid numbers assigned to them.
Q2: If my network's IP is different than the Access Point's range, what should I do?
You should still configure ZEW3003 first. After all the settings are applied, go to the ZEW3003's configuration page, click on TCP/IP settings and change the IP address of ZEW3003 to match your network's IP.


- 802.11g Wireless Access Point
- Copyright Statement
- Table of Contents
- Chapter 1 Introduction......2
- Chapter 2 Hardware Installation....3
- Chapter 3 Configure your Computer....6
- Chapter 4 Configure your ZEW3003....8
- Chapter 5 Troubleshooting....27
- Chapter 1 Introduction
- Welcome
- Features
- Package Contents
- Chapter 2 Hardware Installation
- Panel Layout
- Front Panel
- Zonet
- Rear Panel
- System Requirements
- Installation Environment Requirements
- Hardware Connection
- Chapter 3 Configure your computer
- TCP/IP Address Setting
- Chapter 4 Configure your ZEW3003
- Log in
- Status
- Status
- Statistics
- LAN Setup
- LAN Setup
- DHCP Info
- Radio
- AP
- Client
- WDS
- AP+WDS
- Repeater
- None
- WEP
- 802.1X Enterprise
- WPA Personal
- WPA Enterprise
- WPA2 Personal
- WPA2 Enterprise
- WPA&WPA2 Personal
- WPA&WPA2 Enterprise
- WDS
- MAC Filter
- Site Survey
- Client Info
- Advanced
- MISC
- Chapter 5. Troubleshooting
- Q1: If you have trouble connecting to the Internet, try the following steps.
- Q2: If my network's IP is different than the Access Point's range, what should I do?
Brand : Zonet
Model : ZEW3003
Category : Access Point