USER MANUAL HDB700LED iconBIT
Table of Contents
Disclaimer 2
Introduction 2
Package Contents 2
Getting Started 3
Parts and Controls 3
Power On and Off the Reader 4
Charging the Reader 4
Inserting Memory Card 5
Starting from Home Menu 6
Entering Option Menu 7
Importing and Transferring Content 8
Importing Content 8
Importing DRM Contents 8
Installing Adobe Digital Editions (ADE) 8
Authorizing PC and Reader 9
Transferring DRM ebooks to Reader 10
Reading Books 11
Opening Book 11
Book Page Interface 11
Turning book page 11
Adjusting Font Size 12
Zooming In/Out 12
Using Option Menu in Reading 13
Adding Bookmark 13
Deleting Bookmark 13
Read from Bookmarks in Home Menu 14
Read from Bookmarks in Current Book 14
Go to Page 14
Auto Flip 15
Book Information 15
Rotate 15
Display Settings 16
Add to Favorite 17
Background Music Playback in Book page 17
Playing Audio Files 18
Music Player 18
Using Option Menu in Music Player 18
Playing Video Files 19
Using Option Menu During Video Playback 19
Viewing Pictures 20
Zoom In/Out Picture 20
Slideshow 20
Thumbnail view 21
File Explorer 21
Copy / Paste file 21
Deleting File 21
Settings 22
Troubleshooting 23
Precautions and Maintenance 24
Product Specifications 26
Copyrights and Trademark Notice 27
Disclaimer
All the information, design and specifications contained in this manual were correct at the time of publication. However, as the product is under development and upgrading, the final device may have a slightly difference in appearance or modified functionality than presented in this manual.
Introduction
HDB700LED is an ebook reader with full color display screen. HDB700LED supports ebooks encrypted with Adobe DRM.
Package Contents
- Ebook Reader
- USB cable
- Leather Cover
- Instruction Manual
Getting Started
Parts and Controls
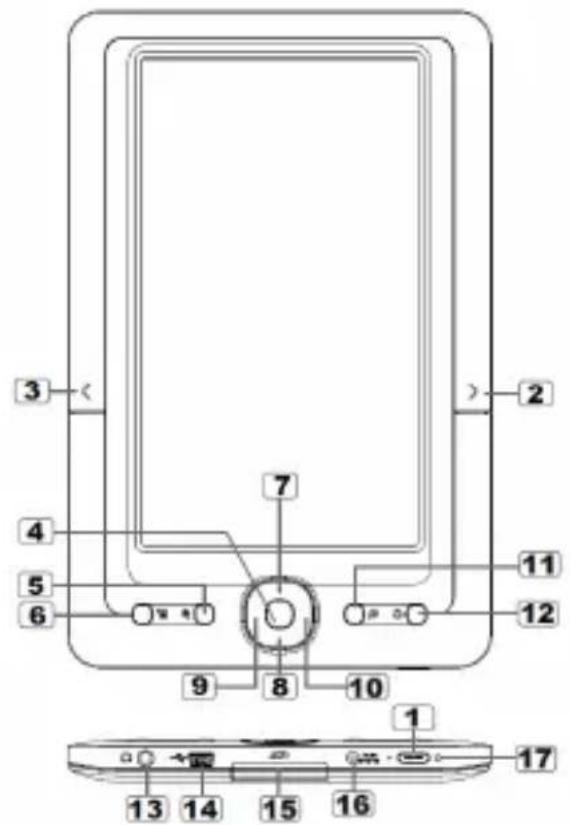
1 Power button – press and hold for 3 second to turn on/off, press and hold 6 seconds to reset
2 Next pg button – press to turn to next page
3 Previous pg button – press to turn to previous page
4 OK / Enter Button
5 Zoom button - press to adjust font size or to zoom in/out
6 Menu button – press to display Option Menu
7 8 9 10 Directional buttons – to move cursor
11 Music button – to enter into music playing menu
12 Return button – press once to return to previous menu, press and hold to return to Home menu
13 Earphone jack
14 Mini USB jack – for data transfer and emergency charging
15 SD cart slot – supports SD/SDHC/MMC card
16 DC jack – for charging
17 LED indicator
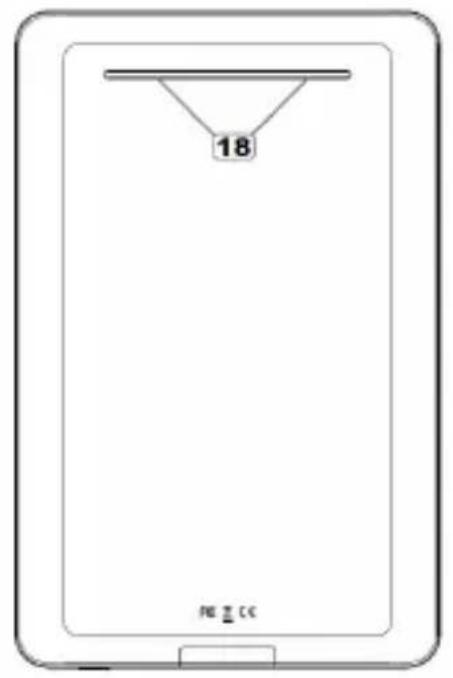
18 Speaker – do not block this area during music playing
Power On and Off the Reader
- Press and hold the [Power] button for 2 seconds to turn on Reader.
- It may take a few moments for reader to turn on and loading the content.
- If Reader does not turn on, charging is required.
- To turn off Reader, press and hold [Power] button for 2 seconds.
Charging the Reader
- You need to charge the Reader prior to using it for the first time or when battery power is low.
-
You can charge the Reader via:
-
Connect to AC source via supplied AC adapter
-
Connect to PC or other USB adapter via applied USB cable.
-
When charging through PC, you cannot operate the Reader. To operate the reader during charging, click the Safely Remove Hardware from your desktop with the Reader remains connection to PC. Upon Reader is safely removed, you can operate it while charging.
- Please turn the Reader to standby mode to shorten the charging process.
- It will take about 6 hours to fully charger the reader in standby mode (LCD off)
- When DC /USB power cable is connected to the reader for charging, the reader will enter into standby mode after remains idle for 60 s. Press the [Power] button to wake up the reader.
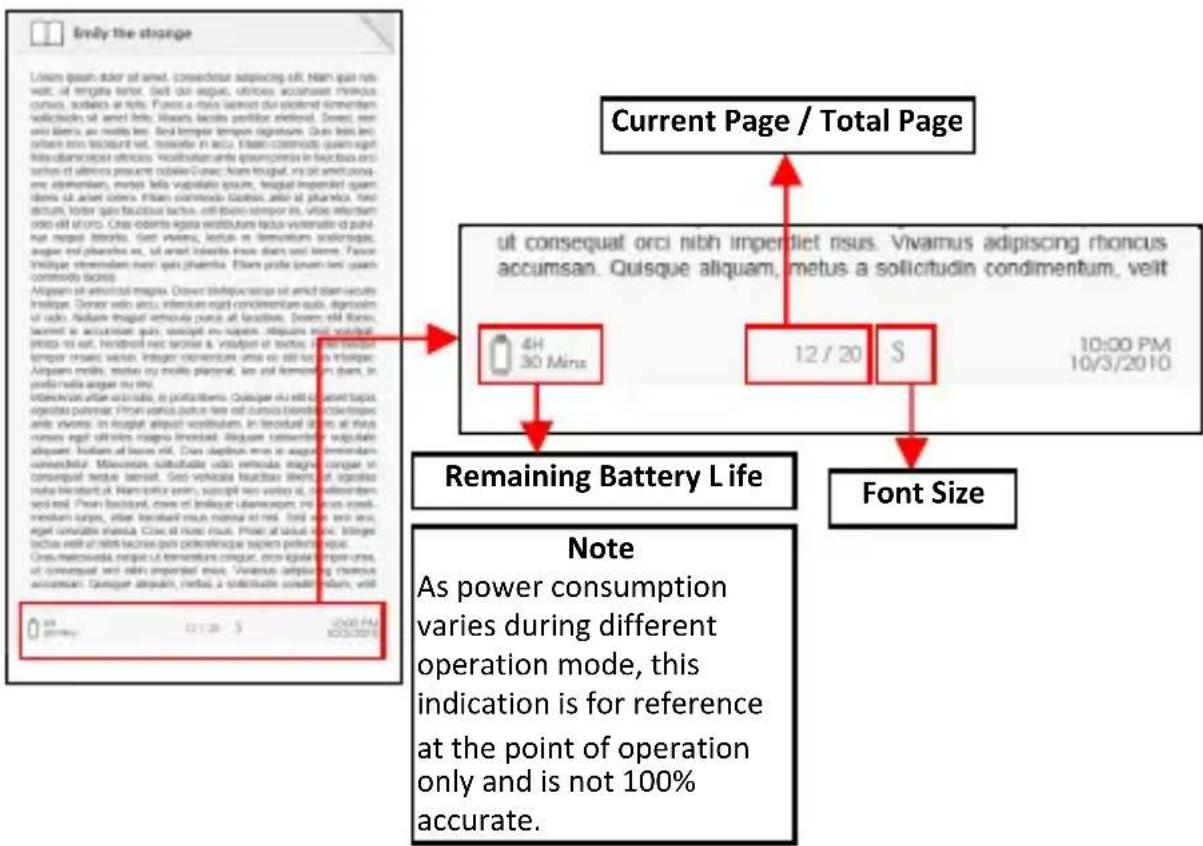
- The battery status is displayed at the bottom left corner. The remaining battery playback time is displayed right next to the battery icon.
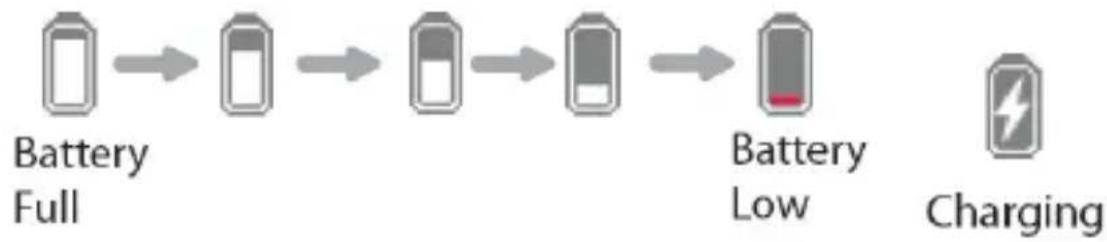
flowchart
graph LR
    A["Battery Full"] --> B["Battery Low"]
    B --> C["Battery Low"]
    C --> D["Battery Low"]
    D --> E["Charging"]
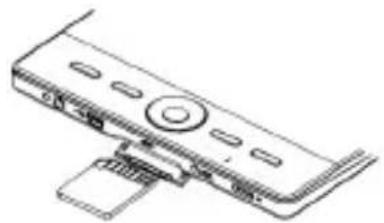
Inserting Memory Card
The Reader supports SD/SDHC/MMC card. To insert a Memory card:
- Open the SD cover.
- Check that the SD card is in the correct position with the contact pin facing upwards as illustrated below. You may damage the card and the reader if SD card is not inserted in correct position.
natural_image
Line drawing of a computer monitor with an attached cable (no text or symbols)
- Push the SD card into the card slot until it clicks.
- To remove SD card, push the SD card once again until it clicks.
- When a SD card is inserted in or ejected from the reader, it may take few seconds for the reader to update the content.
- Please avoid inserting or ejecting SD card when other operation is running as this may cause the system hang.
- Do Not remove the card if the content inside the card is being played. This will halt the operation of the reader and cause the reader to restart.
- If the system is not responding, press and hold the button for 6 seconds to reset and turn it off.
When the Reader is turn on, you will enter into the Home Menu.
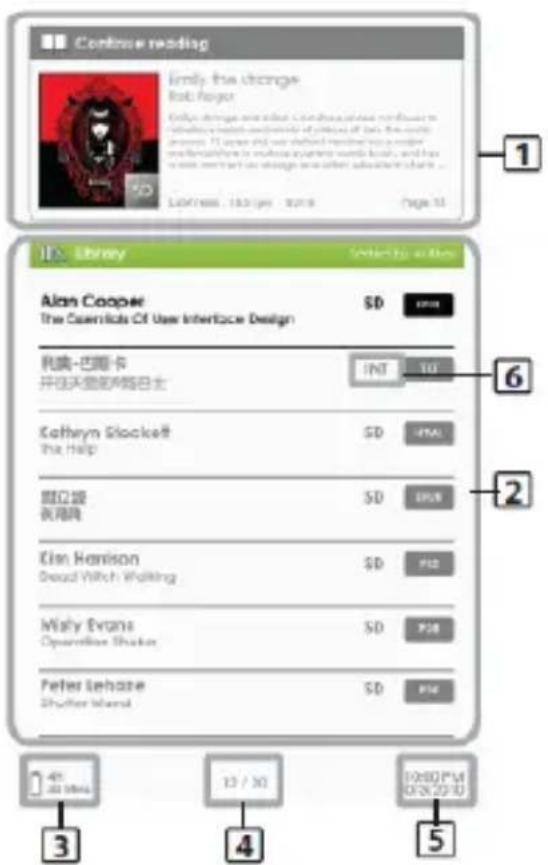
1. Continue Reading
- display the page of the last read book. Press button to open the last read page.
2. Library
- display the list of books available. Move the cursor to desired book and press to open it.
3. Battery Indicator
- displays remaining battery life during operation
- displays remaining charging time during charging
4. Page Number
- displays current page number and total available pages.
5. Time & Date
- display current time and date, you can set this from the [Settings]
6. File Directory
- indicates the location where the file is stored. SD - SD card, INT - internal memory
To access extra functions available, press [Menu] button to display the Option Menu as illustrated.
Press the directional key to move cursor to desired item. Selected item will be highlighted in dark. Press to enter.
To exit from Option menu, move cursor to and press to confirm.
Alternatively, press the button to exit.
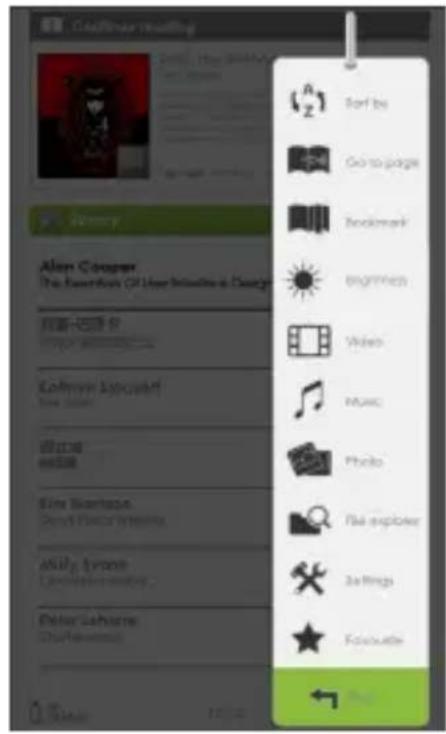
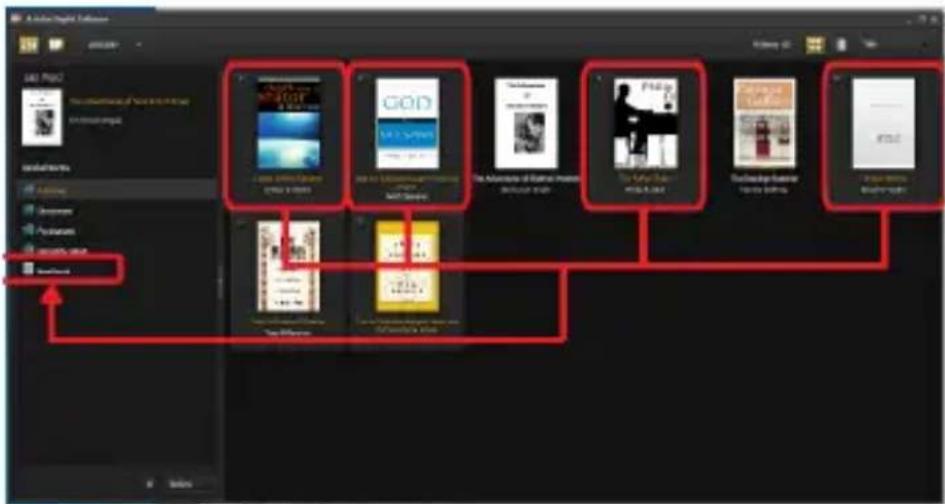
To sort books by different categories: Title, Author, Category, Date, Format
Jump to a specific page
Read from previously added bookmarks
Adjust brightness of the display screen
Enter into Video Player
Enter into Music Player
Enter into Photo Viewer
file Explorer
Enter into File Explorer for advance file management
Settings
Enter into System settings and to read user guide
Favourite Open your favorite book list.
Importing and Transferring Content
Importing Content
- The Reader supports USB Mass Storage Device function.
- To import contents (ebooks, video, audio, photo etc) into the reader, connect the reader to PC via the supplied USB cable.
- Upon successful connection to PC, the reader will enter USB mode and all operation will be halted.
- Go to [My Computer], double click on the reader's disk to open.
- Perform normal file management operation like other USB device.
Importing DRM Contents
The Reader supports Adobe DRM contents. Adobe Digital Editions (ADE) is required.
Installing Adobe Digital Editions (ADE)
- The ADE installer is preloaded into the Reader.
- Connect the Reader to PC via the supplied USB cable and open the reader as removable disk. Go to [My Computer], double click on the reader's disk to open.
- Make sure your computer is connected to internet
- Double click on the [digitaleditions_172] file to open the installer.
• Alternatively, you can download the installer from http://www.adobe.com/products/digitaleditions/#fp.
- For first time user, you will need to get a free adobe ID from adobe website. Click on the [get an Adobe ID online] link as illustrated:
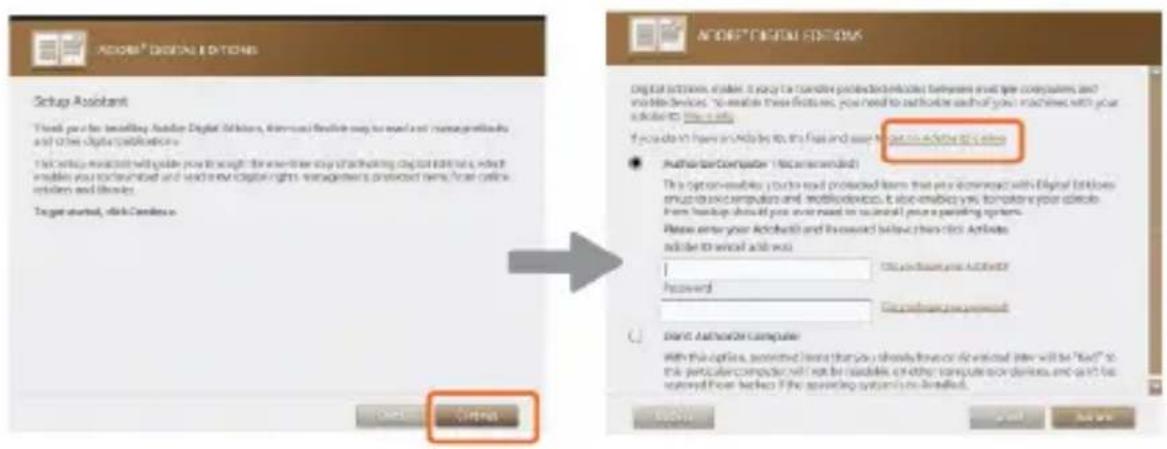
- Enter your email address and complete the online form as per instructed.
Authorizing PC and Reader
- Upon registration, return to the ADE window. Enter the username and password to activate your Adobe account.
- After activation, connect the Reader to PC. ADE will detect the Reader and you are prompted to authorize device.
- After authorization, you will be able to find the Reader recognized in ADE as below. Contents inside the Reader will be displayed on the right hand windows.
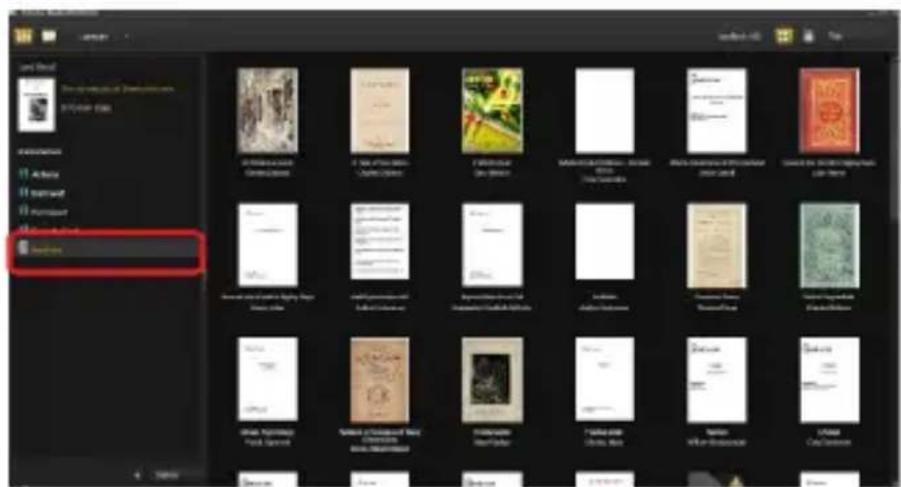
- You can now start downloading or buying ebooks from online ebook stores supporting Adobe DRM.
- Purchased or downloaded ebooks will be stored in [My Digital Editions] in [My Documents].
Transferring DRM ebooks to Reader
- From ADE menu, click on [All Items] on the left hand column
- Items in [My Digital Editions] will be listed down in right window.
- Select the desired item(s) to be transferred, + to select multiple files.
- Drag and drop the selected item(s) into the Reader's Drive located on the last row of the left side column as illustrated below.
Reading Books
Opening Book
• Books transferred to Reader will be listed in Home Menu.
- Reader supports ebooks in epub, pdf, txt, pdb, html format.
- Use the buttons to move the cursor to select book and press to open.
Book Page Interface
Turning book page
- On reading page, press or button to turn to next page. To turn to previous page, press or button.
Adjusting Font Size
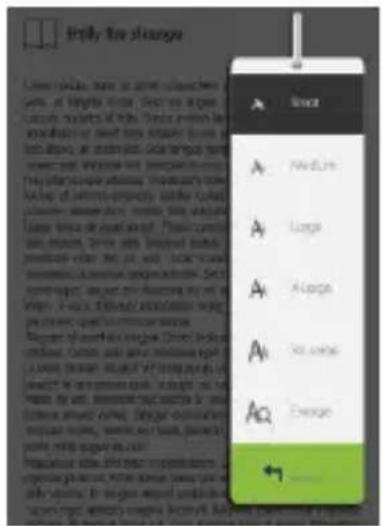
- In reading page, press button to enter the font size menu.
- There a 5 font sizes available: Small, Medium, Large, XLarge, XXLarge.
- Move the cursor to the desired font size then press to confirm.
- It may take some time for the fonts to be resized.
Zooming In/Out
- You will need to use zooming function to enlarge images available in the ebook (epub & pdf file)
- From the size menu, select [Enlarge]
- Zoom menu will appear.

- Move the cursor to the desired zoom level and press .
- In zoom mode, use buttons to pan across the zoomed page.
• Page turning is disabled in zoom mode.
- Press to exit zoom mode and return to original size and resume normal book reading functions.
In Reading page, press
