
XDS73D - Media player iconBIT - Free user manual and instructions
Find the device manual for free XDS73D iconBIT in PDF.


| Product Type | Network Media Player |
| Model | XDS73D |
| Brand | iconBIT |
| Dimensions (approx.) | 130 x 90 x 25 mm |
| Weight | 200 g |
| Power Supply | DC 5V / 2A |
| Video Output | HDMI 1.4, Composite AV |
| Audio Output | HDMI, Optical, Analog Stereo |
| Storage Expansion | USB 2.0 Host, SD Card Slot |
| Network | Ethernet 10/100, Wi-Fi 802.11 b/g/n |
| Supported Video Formats | MKV, AVI, MP4, MOV, TS, M2TS, VOB, ISO, etc. |
| Supported Audio Formats | MP3, WMA, AAC, FLAC, OGG, WAV, etc. |
| Supported Subtitles | SRT, SSA, SUB, IDX, etc. |
| Photo Formats | JPEG, BMP, PNG, GIF |
| Media Streaming | UPnP, Samba, NFS, Online services (YouTube, etc.) |
| File System Support | FAT32, NTFS, exFAT, EXT3 |
| Remote Control | Infrared remote included |
| Care Instructions | Clean with a soft, dry cloth. Do not use liquids or solvents. |
| Safety Warnings | Keep away from moisture and heat sources. Do not disassemble. |
| Spare Parts Availability | Remote control and power adapter available from iconBIT support. |
Frequently Asked Questions - XDS73D iconBIT
User questions about XDS73D iconBIT
0 question about this device. Answer the ones you know or ask your own.
Ask a new question about this device
Download the instructions for your Media player in PDF format for free! Find your manual XDS73D - iconBIT and take your electronic device back in hand. On this page are published all the documents necessary for the use of your device. XDS73D by iconBIT.
USER MANUAL XDS73D iconBIT
2. About the Player ....6
2.1. Remote Control 6
2.2. Front Panel 8
2.3. Back Panel 8
2.4. Connection 9
2.4.1. TV Connection 9
2.4.2. Digital Audio Device Connection 9
3. Main Functions.... 10
3.1. Setup Menu 10
3.1.1. Changing System Settings 10
3.1.2. Changing Audio Settings 11
3.1.3. Changing Video Settings.... 12
3.1.4. Changing Network Settings.... 13
3.1.5. Miscellaneous 14
3.2. Browsing Files and Media Playback.... 15
3.2.1. Browse via File Manager.... 15
3.2.2. Browse via Media Library 15
3.2.3. Playback Option 16
3.3. Favorites Manager 16
3.4. 3D Movie Playback 17
3.5. Internet Media 17
3.6. Web Browser of Casablanca 17
3.7. Android Apps.... 18
3.7.1. APK Installation 19
3.7.2. APK Uninstallation 19
3.7.3. Screen Size setting.... 20
3.8. Weather on Home menu 20
3.9. DLNA DMR 20
3.10. A/V Streaming via Network 21
3.11. A/V Streaming via UPnP-server.... 21
3.12. Music Playlist & Photo Album Management 22
3.13. File Copy/Delete/Move/Rename 22
3.14. BT Download.... 23
3.14.1. Add New Torrent.... 23
3.14.2.Managing the Downloads 24
3.15. NAS Function 24
- Upgrading the Firmware 26
- Frequently Asked Questions.... 27
- Appendices.... 28
6.1. Warranty Information.... 28
6.2. GNU General Public License ("GPL") 28
6.3. Copyrights and Trademarks ...... 32
1. Introduction
1.1. General Information
Dear Customer!
Thank you for choosing the iconBIT device. We hope that you will be satisfied by using our device for home entertainment. The iconBIT multimedia HD-player allows playing high-quality digital video, audio and photo from different sources on an analogue TV, HDTV (TV supporting high-definition video), home theater and other devices.
1.2. Key Features
This iconBIT Multimedia HD-player has the following functions:
Audio/ Video outputs
• HDMI V1.4 for high-definition video and digital audio
• Composite & component video and stereo audio for analog audio-visual connection
- S/PDIF optical interface for high-fidelity digital audio
- Adjustable video output resolution (NTSC, PAL, 480p, 576p, 720p, 1080i, 1080p)
Multimedia Playback
• Supports major audio, video and image file formats (1080p HD video decoding)
- Movie format: AVI/MKV/TS/MPG/MP4/MOV/VOB/ISO/IFO/DAT/WMV/RM/RMVB/BD ISO/BD MV
• Music format: MP3/OGG/WMA/WAV/FLAC/APE
• Photo format: HD JPEG/BMP/PNG
- Photo slide show with background music
Interfaces Support
• USB 2.0 HOST port (for external USB storage devices)
• USB 3.0 HOST port (for external USB storage devices)
Network Feature
- A/V streaming/transmission via Ethernet (10M/100M/1000M) & Wi-Fi (802.11b/g/n, optional)
• A/V streaming via UPnP Media Server - BitTorrent download (controlled and managed via web server)
File operation
- File system supported: FAT/FAT32/NTFS/HFS+/EXT3
• Supports copying & moving files among USB, HDD, and Network.
Note: All the information contained in this manual was correct at the time of publication. However, as our engineers are always updating and improving the product, your device's software may have a slightly different appearance or modified functionality than presented in this manual.
1.3. Packing List
| Part Quantity | |
| Multimedia player 1 | |
| Remote Control 1 | |
| A/V cable 1 | |
| AC/DC adaptor 1 | |
| User manual (printed) 1 |
Note: The actual contents in the package might be different from the packing list in this manual.
1.4. Safety Instructions
Please read the safety instructions carefully prior to using the device. Keep the instructions in an easily accessible location for further use.
Warning signs

natural_image
Black triangular warning symbol with white lightning bolt inside (no text or numbers)The lightning flash with arrowhead symbol, within an equilateral triangle, is intended to alert the user to the presence of uninsulated dangerous voltage within the product's enclosure the may be of sufficient magnitude to constitute a risk of electric shock to persons.
CAUTION
RISK OF ELECTRIC SHOCK DO NOT OPEN
ALERT: To reduce the risk of electric shock, do not remove the back cover. No user serviceable parts inside. Refer servicing to qualified service personnel.

natural_image
Black triangular warning symbol with white exclamation mark (no text or numbers)The exclamation point within an equilateral triangle, is intended to alert the user to the presence of important and maintenance (servicing) instructions in the literature accompanying the appliance.
Precautions concerning power supply:
- Do not plug many devices into one electric socket. This may lead to an overcharge, combustion or electrical trauma.
- Do not touch the plug with wet hands. This may lead to electrical trauma, short circuiting and combustion.
- When connecting an electric cable, make sure that the cable is protected from damaging and is not being subject to any tension.
- It is essential to use the recommended power unit type with characteristics that comply with the specification.
- If you are not planning to use the media player for a long time, you should disconnect it from the power system in terms of safety and energy saving. Keep in mind, that even being in standby mode the device consumes electric energy.
- You should not connect the device to the power system immediately after bringing it from a cold surrounding to a warm one. Unpack the device and leave it in the warm environment for 2 to 3 hours to let the condensate evaporate from the inner parts of the device.
Effect of radio interference and magnetic field:
- In case of absence of adequate screening virtually any electronic device becomes subject to radio interference. In some conditions the radio interferences may affect the operation of the media player.
- The iconBIT media player is designed in compliance with the FCC/CE standard, as well as the following statements:
a. This player does not produce any harmful interference or emission;
b. When placed close to a source of strong radio interference the player may not be able to function properly.
- Do not locate the device close to sources of strong magnetic fields. Such field may damage data on your hard disk. In such case we will not be responsible for integrity of data on your hard disk.
Installation precautions:
- The device is designed for indoor usage. Do not expose it to direct sunlight; do not locate it next to any heat sources, heaters, radiators or refrigerating equipment. The operational temperature should be within the range of +5°C to +35°C.
- Protect the device from getting wet as this may lead to combustion or electrical trauma.
- Do not place any containers with liquid on top or next to the player.
- Do not use the device in high humidity, e.g. in a bathroom or a swimming pool.
- When installing the device in an enclosed space, make sure there is enough space for the device to cool via heat emission. Do not cover vent holes of the device, so that sufficient amounts of air could enter the device body.
- Do not place the device on an uneven or unsteady surface. Do not drop the device and protect it from other objects getting dropped onto it.
Comments on the use of the remote control (RC):
-Point the RC directly at the infrared receiver of the device. Otherwise the RC may not function properly.
-Handle the RC with care. In case of loss of RC, contact the service centre to order a new one. A large portion of functions of the device is accessible only via the RC.
Operation precautions:
- Other devices and associated equipment should be connected via audio and video cables only when the devices are switched off.
- Do not use the device during thunder to prevent breakdown.
- Do not use the player together with any devices, which it does not support – this may lead to player breakdown.
- Do not push the player buttons to hard.
- When disconnecting the device from PC USB hub, always use the "Safely Remove Hardware" functionality to prevent data loss.
Maintenance:
- When cleaning the device, always unplug the power cable. Use a soft cotton tissue or similar, that does not produce electrostatic charge.
- Never use gasoline or any other dissolvent for cleaning the player, as they might damage the device.
- In case of severe dirtying wet wipes for computers may be used.
Comments on equipment repairs:
- It is forbidden for users to modify the design of the device. Do not disassemble the player. In case of device breakdown due to self-performed repairs or modification, no warranty service will be provided.
- Should any malfunction appear, the device must be taken to an authorized service centre, where personnel will perform diagnostics and repair.
 | Do not dispose the device. The product is recyclable. Utilization requirements should be met. In some countries utilization of electronic devices is in the scope of specialized guidelines; please refer to relevant local organizations for additional information. |
2. About the Player
2.1. Remote Control
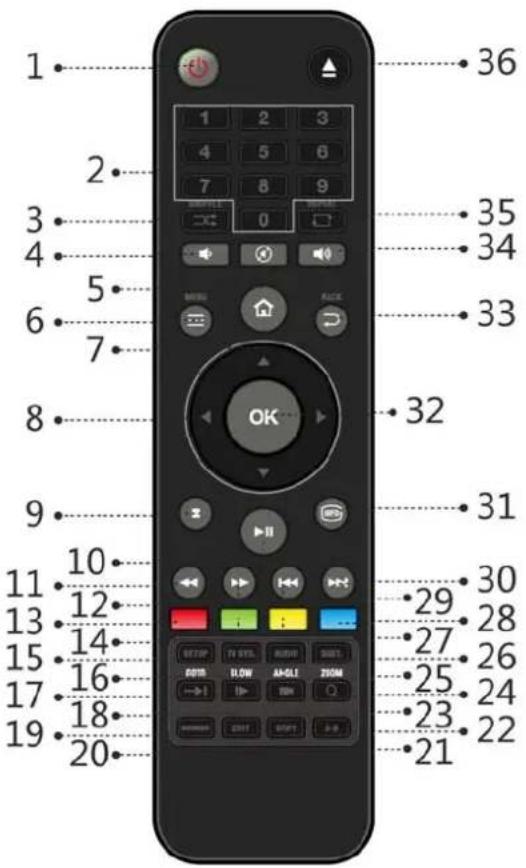
- Power
-
Numeric buttons
-
Shuffle 4. VOL-
-
Mute 6. Menu
-
Home 8. Navigational buttons
-
Stop 10. Play/Pause
-
FR 12. FF
-
Red 14. Green
-
Setup 16. TV SYS
-
Goto 18. Slow
-
Browser 20. Edit
-
Copy 22. A-B
-
Angle 24. Zoom
-
Audio 26. Subtitle
-
Yellow 28. Blue
-
Prev 30. Next
-
Info 32. OK
-
Back 34. VOL+
-
Repeat 36. Eject
| No. | Button | Function |
| 1 | Power | Press to enter standby mode or wake up. |
| 2 | Numeric buttons | Press to enter channel numbers or numeric input when changing settings. |
| 3 | Shuffle | Press to select shuffle mode during music playback. |
| 4 | VOL- | Press to decrease the volume. |
| 5 | Mute | Press to mute audio output, and press again to resume. |
| 6 | Menu | Press to enable the option menu, where you can change the review mode of file manager and media library;Press to display or hide the option menu during playback. |
| 7 | Home | Press to enter the home screen. |
| 8 | Navigational buttons | Press the arrow buttons to select menu options, and the OK button to confirm.Press Up/Down to rotate a photo during photo playback. |
| 9 | Stop | Press to stop playback. |
| 10 | Play/ Pause Press to begin/pause playback. | |
| 11 | FR | Press to fast rewind the current playback. Press repeatedly to select speeds. |
| 12 | FF | Press to fast forward the current playback. Press repeatedly to select speeds. |
| 13 | Red Function is available in virtual keyboard. | |
| 14 | Green Function is available in virtual keyboard. | |
| 15 | Setup Press to enter the setup menu. | |
| 16 | TV SYS. | Press to switch between NTSC, PAL, 480P, 576P, 720P, 1080I, and 1080P. |
| 17 | Goto | Press to jump to a specific point on a title. Specify the point using Title, Chapter and Time. |
| 18 | Slow | Press to play back in slow motion. Press the Play button to resume regular playback. |
| 19 | Browser Press to enter file manager. | |
| 20 | Edit | Press to copy/delete/rename/move file in file manager. |
| 21 | Copy Press to enter file selecting menu. | |
| 22 | A-B | Press to set the beginning and end points of a section to repeat. |
| 23 | Angle | Press to change the view angle during DVD (with multi-angle) playback. |
| 24 | Zoom | Press to zoom the image (photo or video). |
| 25 | Audio Press to select an audio track. | |
| 26 | Subtitle | Press to set subtitle options. You can change the color/size/offset/ text encoding of subtitle. |
| 27 | Yellow | Reserved button. No function has been assigned to it yet. |
| 28 | Blue | Press to open/close USB DVD-ROM. |
| 29 | Prev | Press to view the previous file / page up. |
| 30 | Next Press to view the next file / page down. | |
| 31 | Info | Press to display current status. Press during playback, an onscreen display appears showing track number and time elapsed/remaining. |
| 32 | OK | Press OK button to confirm. |
| 33 | Back | Press to return to the previous screen while navigating menus. |
| 34 | VOL+ | Press to increase the volume. |
| 35 | Repeat | Press to set repeat option. |
| 36 | Eject Press to safely remove the USB device. | |
2.2. Front Panel

- Power indicator & button
- USB indicator
- Infrared receiver window
| Mode Status | |
| Working | Blue |
| Standby | Red |
2.3. Back Panel
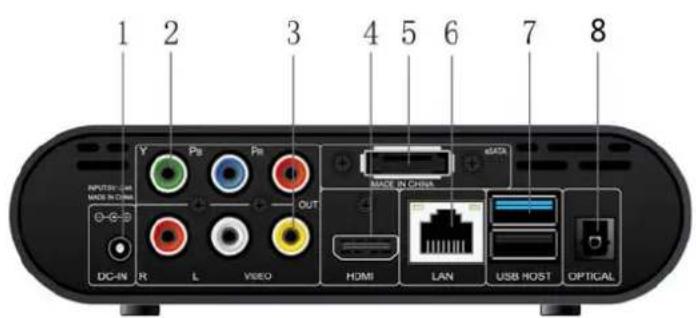
- Power input
- Y/Pb/Pr OUT jack
- A/V OUT jack
- HDMI interface
- eSATA port
- Gigabit LAN socket
- USB 3.0 & 2.0 Host port
- S/PDIF Optical jack
2.4. Connection
2.4.1. TV Connection
Depending on the jacks on your TV, select the connection mode. We suggest you to use HDMI output (High Definition, up to 1080p). Picture quality will be improved compared to using the component video output (use Y/Pb/Pr OUT jack) or the composite video output (Standard Definition, use A/V OUT jack).

natural_image
Diagram showing a desktop computer connected to an attached device via cable, with no visible text or symbols.Turn on your TV and select the input
Make sure the input setting you're selected on your TV matches the input you connected the cables to your TV.
Connect the power cord
Use the power adapter to connect the player to the power outlet. Then the player boot automatically.

natural_image
Diagram showing a wall-mounted power plug connected to an AC input device (no text or symbols present)2.4.2. Digital Audio Device Connection
Except for HDMI jack, this player can output digital audio to amplifier though SPDIF optical jack. Please refer to '3.1.2 Changing Audio settings' for more details.

natural_image
Diagram showing audio equipment connections: two speakers connected to a CD and connected via USB cable to an optical device (no text or symbols present)3. Main Functions
3.1. Setup Menu
The Setup menu allows you to personalize and configure the preferences for your player.
To select a Setup option:
- Select the Setup icon on the home screen, or press Setup button on the remote control.
- Use the Left/Right navigational buttons to select an option, and then press OK.

3.1.1. Changing System Settings
Use this menu to configure system settings.
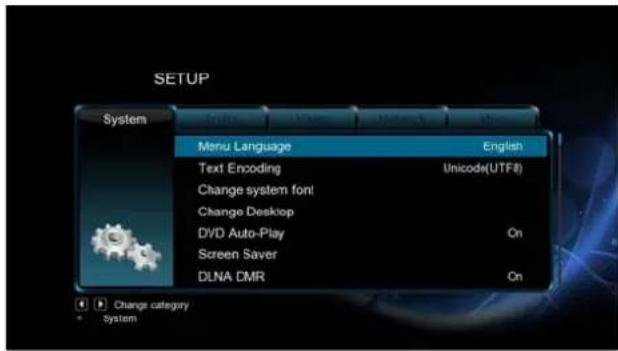
Menu Language
- Select to choose the OSD (On-Screen Display) language.
Text Encoding
- Select to set the text encoding option (subtitle display)
Time
- Select to set system time, you must choose the right time zone before time setting.
Screen Saver
- Here you can set the timing of screen saver and change screen saver.
DLNA DMR
- Digital Media Renderer, can play content received from a digital media controller (DMC), which will find content from a digital media server (DMS)
DLNA Device Name
- Select to name DLNA DMR.
Mini KBD Language
- Select to change the language of the mini keyboard.
Scan storage
- Select to set the scan mode of media library.
Format
- Select to format your HDD.
BD-Lite Menu
- Here you can open the BDMV menu during BDMV folder or BD ISO playback. BD-J is not supported.
Restore Default
- Select to restore factory defaults.
3.1.2. Changing Audio Settings
Use this menu to configure audio settings

Night Mode
- Choose among Off / On / Comfort. If the option is turned on, the audio output volume will be decreased to make you more comfortable.
HDMI Output
- Choose among LPCM, LPCM Multi-Ch and RAW.
SPDIF Output
- Choose among LPCM, RAW.
Note: In raw mode, Dolby TrueHD, Dolby Digital Plus, Dolby Digital, DTS sound can be by passed to the HDMI TV or Digital amplifier.
Due to the bandwidth requirement, Dolby TrueHD and Dolby Digital Plus sound only can be by passed though HDMI cable, also the TV system must up to 720p or above.
3.1.3. Changing Video Settings
Use this menu to configure video settings.

Aspect Ratio
- Pan Scan 4:3: Display a wide picture on the entire screen and cuts off the redundant portions. Select when a standard 4:3 TV is connected.
- Letter Box 4:3: Display a wide picture with two black borders on the top and bottom of 4:3 screen. Select when a standard 4:3 TV is connected.
- 16:9: Compress the image to convert the whole image. Select when a 16:9 TV is connected.
- 16:10: Select when a 16:10 TV is connected.
TV SYSTEM
- Select to adjust TV Type and video output resolution. This setting depends on your regional location. Include:
- NTSC – United States, Canada, Japan, Mexico, the Philippines, South Korea, and Taiwan.
- PAL – Europe, Greenland, parts of Africa and South America, the Mideast, China, India, Australia, and Indonesia.
1080p 24Hz
- Choose this option to enable or disable 1080P 24HZ support. A TV set with 1080P 24HZ (24P) mode is needed.
Deep Color
- Help to perform more detailed level of color depth, make continuous color change smoother. You can get more vivid color effects. A TV set with deep color support is needed.
Screen Size
- Adjust the video output size according to the size of TV screen. Press Left/ Right button to adjust the width of the screen, and Up/ Down button to adjust the height of the screen.
- In Casablanca, this option is used to adjust the video image size during video playback. Press Zoom button to fit the screen size you have set.
- In Android, this option is used to adjust the UI image size.
3.1.4. Changing Network Settings

Wired Lan Setup
- DHCP IP (AUTO)
Select to obtain IP address automatically.
- FIX IP (MANUAL)
Select to manually input the IP Address, Subnet Mask, Default Gateway, and DNS Server IP Address.
Wireless Setup
There are 3 mode for you to select, Infrastructure (AP) and Peer to Peer (Ad Hoc) and WPS (AP) mode. Follow the prompting message on the screen and press Red button to choose Peer to Peer (Ad Hoc) or WPS (AP) mode.
Infrastructure (AP)
Infrastructure mode is used to connect computers with wireless network adapters, also known as wireless clients, to an existing wired network with the help from wireless router or access point. Please follow following steps to configure your wireless network.
Step 1: Scanning AP (Access Point) in your network
Follow the prompting message on the screen and press the Zoom button to select Infrastructure (AP) mode and update the access points list, and all SSID will be displayed on the screen.
Step 2: Input WEP / WPA key.
Press OK to input encryption keys via the virtual keyboard, OK to confirm and to start testing the connection.
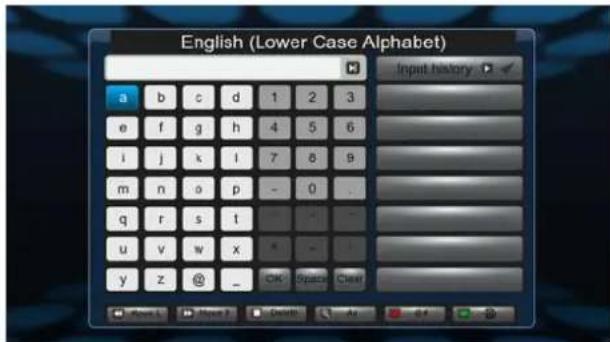
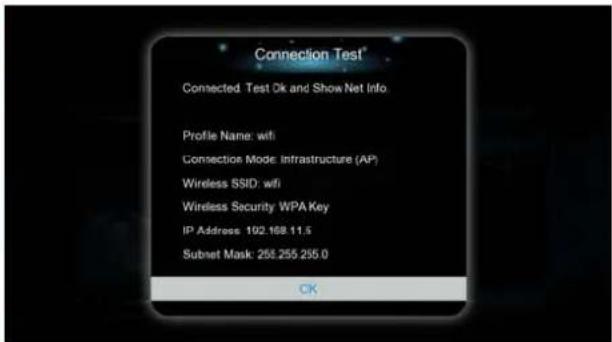
The testing process will take for a while, please be patient to wait. If the test is ok, the network information (Profile Name, IP address, Subnet Mask, Gateway, etc.) will be displayed on the screen.
Peer to Peer (Ad Hoc)
Peer to Peer mode, which is also called Ad Hoc mode or computer-to-computer mode, is used to connect wireless clients directly together, without the need for a wireless router or access point.
WPS (AP)
WPS, Wi-Fi Protected Setup, is used to connect a wireless router directly, without searching SSID and inputting password. In this mode, you just need to configure the parameters of your router which support WPS function. There are two modes for you to select, PBC mode and PIN mode.
PBC: First press the WPS button on the router or select the button mode in the configuration menu of the router, then select the PBC mode, the connection process will take for a while, please be patient to wait.
PIN: Input the pin code when configure your router, then select the PIN mode, the connection process will take for a while, please be patient to wait.
BT Process
- Please refer to '3.14 BT Download' for more details.
Samba Process
- Please refer to '3.15 NAS' for more details.
BT & Samba security
- Select to turn on / off password protect for the Web server (Neighbor Web) and Samba server. The default user name is 'admin', and the default password is '123'.
3.1.5. Miscellaneous
Use this menu to adjust miscellaneous settings.
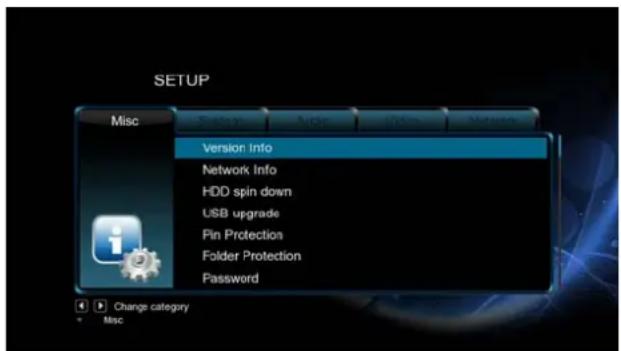
Version Info
- This tab shows you information about the software installed and about the material components of your player.
Network Info
- This tab shows you information about your network, MAC Address, IP address Gateway, Subnet.
USB Upgrade
- Please refer to '4. Firmware Upgrade' for more details.
Key Tone Volume
- Here you can adjust the volume of key tone.
3.2. Browsing Files and Media Playback
3.2.1. Browse via File Manager
The File Manager allows you to browse and play music, photo and movie files stored on an external USB device and network.

In File Manager, press Menu button, you can choose different review mode, Thumbnails, List or Preview.
3.2.2. Browse via Media Library
Enter into Movie/ Photo/ Music interface; only supported files will be displayed.

In media library, press Menu button to display the option menu, you can get following functions though the option menu.
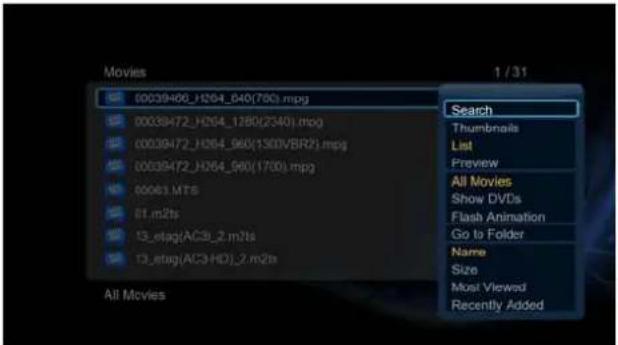
Quick-Search
- Choose the Search option in the option menu, you can search for a media file by filter media library to locate the specific media file.
Review Mode
- Choose a review mode among Thumbnails, List, Preview from option menu.
Sorting Mode
- Choose to sorting files by Name, Size, Most Viewed, Recently played or Recently Added from option menu.
Flash Animation
- Choose to display .swf files in media library.
BD/ DVD
- Choose to display DVD IFO, BD MV and ISO files directly in media library.
Go to Folder
- Choose to locate the file in file manager.
Folder Directory / Leaf Folder View / Date View
- Different mode to view photos in photo library.
3.2.3. Playback Option
Press Menu button during playback, you can get following functions though the Option menu.
Title menu
- Useful for DVD IFO and ISO playback. Return to the main menu of entire disc.
Root menu
- Useful for DVD IFO and ISO playback. Return to the root main of each title.
Video Setting
- Adjust Brightness, Contrast, Saturation and Hue.
Slide Timing / Slide Transition / Select Music
- With these three options, you can choose the Interval, Transition effect and background music during the photo playback.
3.3. Favorites Manager
This player is equipped with a powerful function that we call Favorites. Actually it is a list of Shortcuts that you the user easily create yourself. The Favorite Link works as a shortcut to show folder on your Local Hard Drive, hosted USB Drive, Samba network share.

Navigate to the file or folder in file manager, press the Menu button on the remote control. The menu dialogue will open and you will see the option "Add to Favorites". Select this and the folder will path will be added to the Favorites.
3.4. 3D Movie Playback
This player can support real 3D movie playback and bring you to the 3D world. Except for iconBIT XDS73D media player, a 3D TV, a pair of 3D glasses and a HDMI 1.4 cable are also needed.
To enjoy a 3D movie,
Step 1, Navigate to the file and press Play button to start movie playback.
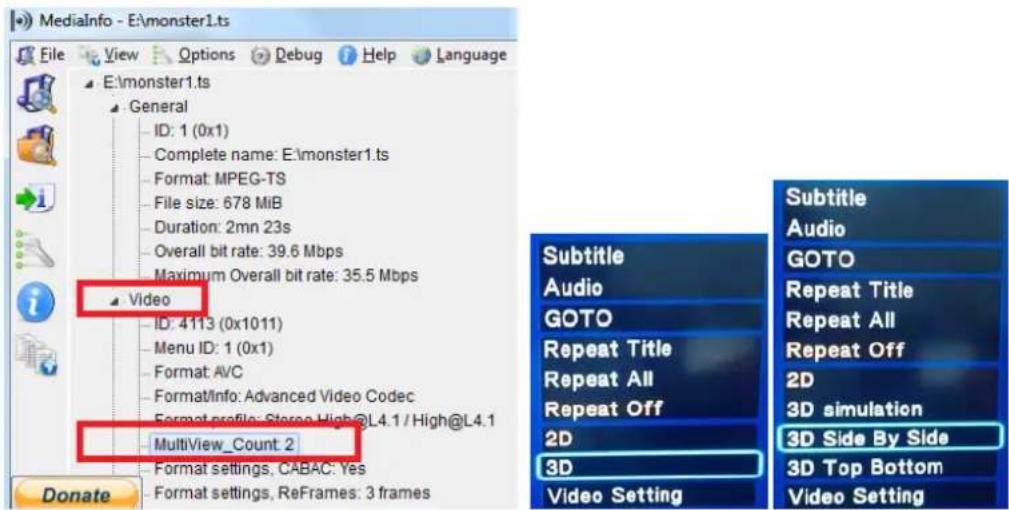
Step 2, Press the Menu button on the remote control. Different dialogue will be open according to different type of the movie. There are "3D", "3D simulation", "3D Side-by-side", "3D Top bottom" for you to select.
You can use Mediainfo to check whether your file is a real 3D movie. If the value of MultiView_Count is 2, you will get the option "3D", or else you will get "3D simulation", "3D Side-by-side", "3D Top bottom" options.
3.5. Internet Media
This feature is additional function. All contents and services under this feature are provided by third-party service providers, our company does not offer any contents and services of this feature and it not responsible for any contents and services provided under this feature. Our company is not responsible for any operational stability of the contents and services, for example, if you cannot access certain web site for video streaming or news broadcast, or the content of a web site has been changed etc, are all responsible and control by the third-party service providers. If you find that these features cannot operate properly, please contact our customer service or visit our company website to obtain the relevant information.

3.6. Web Browser of Casablanca
This product allows user to surf the internet via a built-in browser. Both remote control and USB keyboard & mouse can be used during webpage browsing. To use the web browser of
casablanca, enter into Internet Media → select RealPilot → Press Option button to display/hide the tool bar during webpage browsing.

The following functions are available from the tool bar.


Address bar
- Input the address of the website.
Go
- Load the webpage.
Previous page
- Back to the previous webpage.
Next page
- Forward to the next webpage.
Navigation/ Page mode
- There are navigation mode and page mode when using remote control to browse webpage, you can select one of them by pressing RED button. In navigation mode, remote control is used to move the cursor. While in page mode, remote control is used to page up and down.
Bookmarks
- Add the website to your bookmark.
Text encode
- Select the text encoding of the webpage.
Text Zoom
- Adjust the size of the text in the webpage.
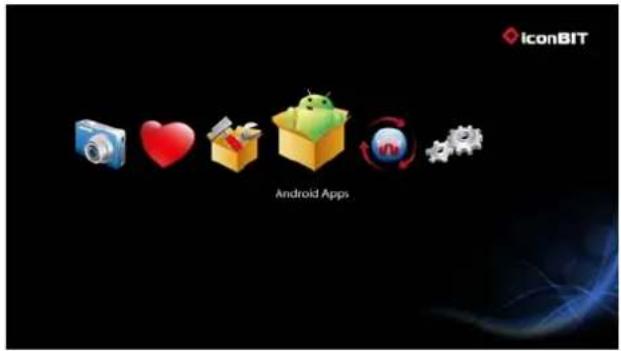
3.7. Android Apps
Except for Casablanca, this player also equipped with Android OS V2.2.1. Here you can browse and search internet, management Calendar, chat, email and other wonderful applications.
We suggest you to use an external USB keyboard & mouse under Android menu and during web page browsing. It will bring you much more convenience.
3.7.1. APK Installation
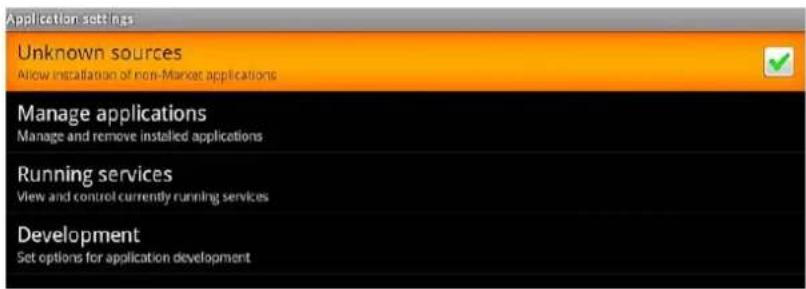
Step 1, Enter into Android → Settings → Applications, turn on Unknown Sources.
Step 2, Enter into OI File Manager → mnt → Usbmounts to find the .apk stored on your external USB device. Select and install the .apk.

3.7.2. APK Uninstallation
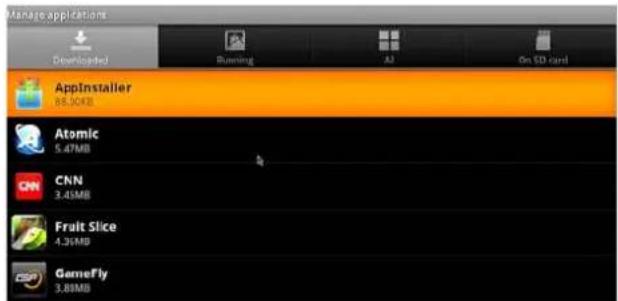
Enter into Android → Settings → Applications → Manage applications, All apk installed by yourself are list under Manage applications → Downloaded menu. Here you can uninstall the apk which you want.
3.7.3. Screen Size setting
Enter into Setup → Video → Screen Size menu, adjust the UI size of Android according to the size of TV screen.
Notice:
All APK will be removed after upgrade though press U button. To keep installed apk, please upgrade firmware though Setup→Misc→USB Upgrade menu.
3.8. Weather on Home menu
To display weather of the city on home menu,
Step 1, Enter into Setup→Network menu, connect your player to internet.
Step 2, Enter into Internet Media →select Accu Weather → Locations/ Settings, select the city as you wish.

3.9. DLNA DMR
This player can work as a Digital Media Renderer. It can play content received from a digital media controller (DMC), which will find content from a digital media server (DMS). With it, you can seamless stream multimedia on your large-screen TV.
Step 1, Enter into Setup→System menu, turn on DLNA DMR.
Step 2, Install a digital media controller on your iPhone/iPod/iPad or Android phone. And connect your phone to the same network with the player. There are several DMC applications are available, for instance, iMediaShare.
Step 3, Run iMediaShare→select the media stored on your phone or other Upnp server even media from internet→ select a digital media renderer, and then you can watch the media on your TV. Except the media stored on your phone, you also can select media form internet, like Picasa, Facebook, YouTube.

3.10. A/V Streaming via Network
To stream your media files shared on the home network,
Step 1, Enter into Setup→Network menu, connect your player to your home network.
Step 2, Enter into File Manager→Network, find your PC the workgroup list. Then you can select and play the shared media files that you want to browse.

Due to different network conditions, sometimes the workgroup might not be accessed or shown in the list. You can set 'Specific File Server IP' and access it from 'My_Shortcuts'.
- Press the Red button and a popup menu appears.

- Select Add to open a popup menu where you can input Label, Net User ID, Net Password, Domain, Host Name, and Specific File Server IP.
3.11. A/V Streaming via UPnP-server
A built-in UPnP (Universal Plug and Play) client has been integrated on the system, which enables the player to auto-detect UPnP Media Servers on the network to browse and stream media files from them. There're a lot of free and commercial UPnP Media Server software, such as Windows Media Connect, Windows Media Player 11, XBMC Media Center (Linux/Mac/Windows), MediaTek (Linux), etc. Please install one of them on your computer, and share the media files though it.
To stream your media files shared though a UPnP server,
Step 1, Enter into Setup→Network menu, connect your player to the home network.
Step 2, Visit Files Manager→UPnP menu on the player, select the UPnP-server, then you can browse the media library shared by UPnP server.

3.12. Music Playlist & Photo Album Management
Step 1, Enter into Music/ Photo interface.
Step 2, Press Copy button to enter file selecting menu, follow the on-screen information to finish creating music playlist or photo album.

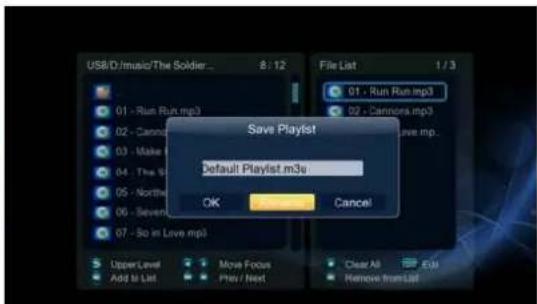
Step 3, Enter Music/ Photo interface, press Menu button and choose Playlists/ Albums to view your music playlists/ photo albums.

3.13. File Copy/Delete/Move/Rename
Step 1, Enter into File Manager.
Step 2, Locate the file or folder which you want to copy/delete/move/rename. Step 3, Press Edit button to enter file editing menu, or press Copy button to enter file selecting menu, then follow the on-screen information to finish file copy/delete/move/rename.


3.14. BT Download
To use BT download,
Step 1, Enter into Setup→Network menu, connect your player to internet.
Step 2, Enter into Setup→Network menu, turn on BT.
Step 3, On your PC, launch a web browser such as Internet Explorer, Firefox or Safari, and at the address bar, key in http://192.168.0.9/unicgi where 192.168.0.9 is the IP address of your product.

Click BitTorrent Download on the home page of Neighbor Web, then you will enter the BitTorrent Download page.
3.14.1. Add New Torrent
- Click Add new torrent on the BitTorrent Download page.
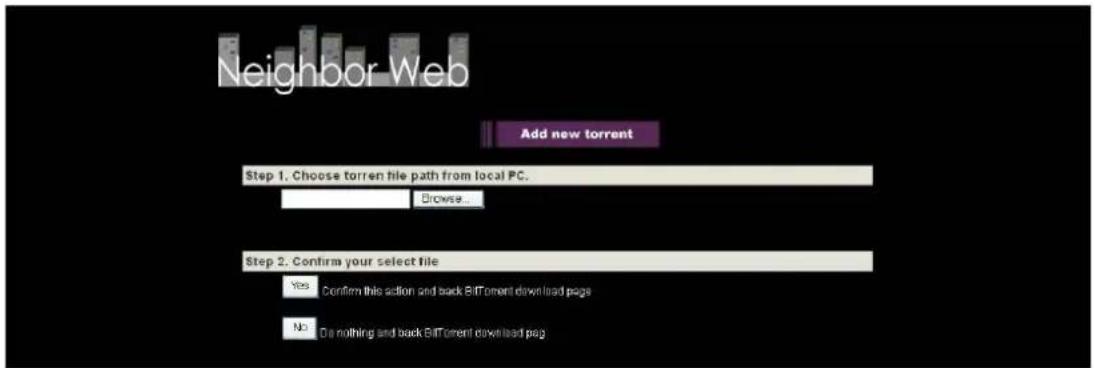
- Click Browse to upload a torrent file, and click Yes to confirm.
3.14.2. Managing the Downloads
The BitTorrent Download page also allows you to start, stop, delete torrents, and set priorities for torrents, as well as view the status of current torrents.
![Neighbor Web Start Stop Delete Refresh ↑ Setting +Add new torrent No Torrent file name Size(MB) Priority Percent Peers Speed(kb/s) □ Select 5.1km OPVv2_0246 1018016 HDD TV X-vd- 12L av 9.45 8% 0 31.31Ea 2 □ 50 Rock S01E16 HDTV X-vd- 12L av 175.80 2 0% 0 0.00 1Gb 3 □ 600 War Aircraft Wallpaper 1024 X 768 Great Collection (www.allwallspesfor.blogspot.com) 230.43 3 8% 19 18.63 MB 4 □ American Idel S08524 HDD TV XvD- 25LD av 349.80 4 0% 0 0.00 MB 5 □ State S03810 WS PDTV XvD- ENTER av 347.60 5 0% 0 0.00 1Gb Detail Priority 1 File name [Chinac]_Sekur_OPVAv2_0254[01DAE3YD] mkv Status douboeding Current size/File rate 35.14M/99.85M Time left 0:3:58 Storage Path HCC2 Unloaded av 2.26 GB](/content/2026/05/1017627/images/24f097a34a975c48f5bacc0e4f31920ccbd5fc9d9c827301a943d3da93d4b783.jpg)
- Click Start to begin download.
- Click Stop to stop download.
- Click Delete to delete the selected torrent.
- Click Refresh to refresh the current status.
- Click Down arrow to decrease the priority for the selected torrent.
- Click Up arrow to increase the priority for the selected torrent.
3.15. NAS Function
This product functions as a NAS (Network Attached Storage) device when it is attached to the home network via WLAN. This feature allows users to store and retrieve large amounts of data from their own local network.
Step 1, Enter into Setup→Network menu, connect your player to home network.
Step 2, Enter into Setup→Network menu, turn on NAS Mode.
Step 3,
On Win XP, key in: \IP Address or \Host name in the Run window (click Run in the start menu) or in the address bar of a web browser, for example Internet Explorer on your PC (if the IP address of the product is 192.168.0.9, please type in: \192.168.0.9), and click OK or press the Enter button on the keyboard.
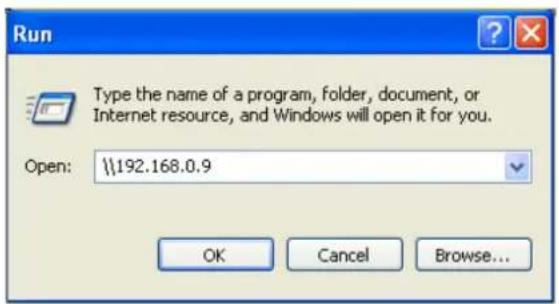
On Windows Vista or Windows 7, please key in \IP Address or \Host name at the search bar, then press the Enter button on the keyboard.

On Mac,
Finder→Go→ Connect to Server, key in smb://IP Address or smb://Host name and click Connect.
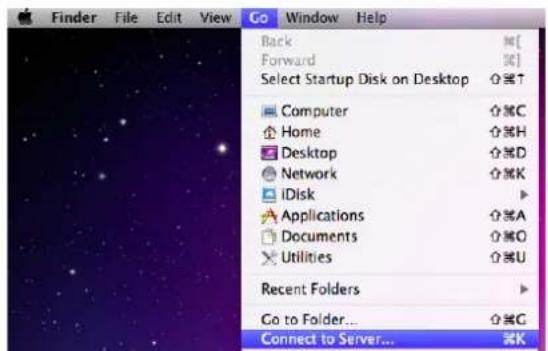
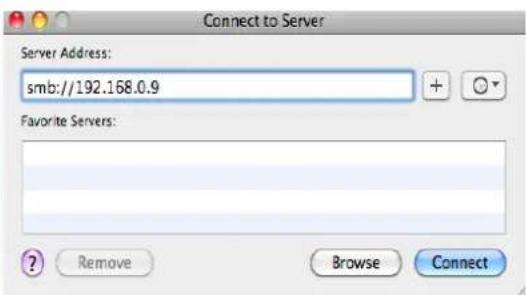
You can then manage the files stored on hard disk and USB drive that connected to the player.
4. Upgrading the Firmware
The firmware is the operating system (OS) installed on the device. Firmware upgrades can bring new features, improvements and bug fixes.
Method 1
Step 1: Copy 'install.img' to the root directory of a USB stick, and connect it to the USB HOST port of the player.
Step 2: Press and hold the Power button, and do not loosen.
Step 3: Plug the power cable into the DC IN jack, wait for about 5 seconds or more, and then loosen your finger on the Power button;
Firmware installation will start.
Method 2 :
Step 1, Copy 'install.img' to the root directory of a USB stick, and connect it to the USB HOST port of the player.
Step 2, Enter Setup → Misc menu, select USB Upgrade, firmware installation will start.
5. Frequently Asked Questions
Question 1. When I try to disconnect the USB device, I keep on getting "The device 'Generic volume' cannot be stopped right now. Try stopping the device again later." message, what should I do?
Answer:
Close any program that might be accessing data on the player, including Windows® Explorer. If it does not work, close all programs and wait for another 20 seconds, then try the green arrow icon again. If it still does not work, you should shut down the player and disconnect the USB cable.
Question 2. I find new file names and folder names that I never created before or they have strange gibberish names.
Answer:
Most likely, the player's file allocation table (FAT) has been corrupted. This might be due to the player shutting down (due to low battery power) while reading or writing to your computer by the USB connection. Windows and Macintosh often write extra files to the hard disk such as finder.def or System volume info. These are normal and will not do any harm to the player.
Question 3. I used my player to transfer files back and forth between different computers. Will defragmenting the player hard disk do any harm to it?
Answer:
Defragmenting the player hard disk may be useful after having transferred many files to and from the player. It is never harmful to use the defragment on the player. Make sure no other programs are running while using the Windows® defragment utility. Make sure you have connected the player with the external power adapter during this procedure.
Question 4. My files have disappeared from the player.
Answer:
Make sure that you browse your files via the correct browser mode which means correct filtered views such as Photos, Music, or Movies.
Question 5. During power on, why does the TV will have a short flashing, blue screen or screensaver?
Answer:
This is normal, when the system initializes, it will setup the corresponding parameters so it can output the correct video signal to the TV, during the initializing time, the TV will receive incorrect signals or the signals will not be stable and will cause the TV screen to flash, some TV's will treat this as no signal, and will display a blue screen or screensaver.
Question6. Why couldn't the player find the hard disc?
Answer:
You need format the hard disk on the player before usage. If hard disc failure occurs in file manager, please backup your data and format your HDD on the player.
Question7. Why the transmission speed of my HDD can't up to 3Gbps or higher when connected to PC?
Answer:
Make sure there is a USB 3.0 host controller installed on your PC, the transmission speed is related with HDD itself and also the configuration of PC.
Question8. Why I can't find my USB drive in file manager?
Answer:
Try to replace a short USB cable or plug in the power cable to your USB drive. You are suggested to plug in one USB drive at the same time.
6. Appendices
6.1. Warranty Information
Obtaining Service
iconBIT values your business and always attempts to provide you the very best of service. If this Product requires maintenance, either contact the dealer from whom you originally purchased the Product or visit our product support Web site at www.iconbit.com. Your original box and packaging materials should be kept for storing or shipping your iconBIT product. iconBIT shall have no liability for lost data regardless of the cause, recovery of lost data, or data contained in any Product placed in its possession.
Limited Warranty
iconBIT warrants that the Product, in the course of its normal use, will for the term defined below, be free from defects in material and workmanship and will conform to specification therefore. The term of your limited warranty is 1 (one) year. The term of your limited warranty period shall commence on the purchase date appearing on your purchase receipt. Subject to the limitations specified below, your sole and exclusive warranty shall be, during the period of warranty specified above and at iconBIT's option, the repair or replacement of the Product.
Warranty does not cover:
- Acts of nature, such as fire, static discharge.
- Damage from unauthorized repair, alteration or accident.
- Damage from misuse or neglect.
- A unit that has been modified or incorporated into other products or is used for institutional or other commercial purposes.
- Loss of customer's software, firmware, information, or memory data.
- Improper handling or installation.
- The serial number of the product is defaced or missing.
The foregoing limited warranty is iconBIT's sole warranty and is applicable only to products sold as new. The remedies provided herein are in lieu of a) any and all other remedies and warranties, whether expressed, implied or statutory, including but not limited to, any implied warranty of merchantability or fitness for a particular purpose, and b) any and all obligations and liabilities of iconBIT for damages including, but not limited to accidental, consequential, or special damages, or any financial loss, lost profits or expenses, or lost data arising out of or in connection with the purchase, use, or performance of the Product, even if iconBIT has been advised of the possibility of such damages.
6.2. GNU General Public License ("GPL")
Firmware incorporated into this product may include third party copyrighted software licensed under the GPL ("GPL Software"). The Free Software is copyrighted by Free Software Foundation, Inc. and the program is licensed "As is" without warranty of any kind.
You may re-use, re-distribute, and modify the GPL Software. Users are free to download the base source code of the iconBIT players at the following Address: www.iconbit.com. The source code can be sent to your address via mail for a charge of actual expense executed. Please contact us at support@iconbit.com.
GNU GENERAL PUBLIC LICENSE
Version 2, June 1991
Copyright (C) 1989, 1991 Free Software Foundation, Inc. 51 Franklin Street, Fifth Floor, Boston, MA 02110-1301, USA
Everyone is permitted to copy and distribute verbatim copies of this license document, but changing it is not allowed.
Preamble
The licenses for most software are designed to take away your freedom to share and change it. By contrast, the GNU General Public License is intended to guarantee your freedom to share and change free software--to make sure the software is free for all its users. This General Public License applies to most of the Free Software Foundation's software and to any other program whose authors commit to using it. (Some other Free Software Foundation software is covered by the GNU Lesser General Public License instead.) You can apply it to your programs, too.
When we speak of free software, we are referring to freedom, not price. Our General Public Licenses are designed to make sure that you have the freedom to distribute copies of free software (and charge for this service if you wish), that you receive source code or can get it if you want it, that you can change the software or use pieces of it in new free programs; and that you know you can do these things.
To protect your rights, we need to make restrictions that forbid anyone to deny you these rights or to ask you to surrender the rights. These restrictions translate to certain responsibilities for you if you distribute copies of the software, or if you modify it.
For example, if you distribute copies of such a program, whether gratis or for a fee, you must give the recipients all the rights that you have. You must make sure that they, too, receive or can get the source code. And you must show them these terms so they know their rights.
We protect your rights with two steps: (1) copyright the software, and (2) offer you this license which gives you legal permission to copy, distribute and/or modify the software.
Also, for each author's protection and ours, we want to make certain that everyone understands that there is no warranty for this free software. If the software is modified by someone else and passed on, we want its recipients to know that what they have is not the original, so that any problems introduced by others will not reflect on the original authors' reputations.
Finally, any free program is threatened constantly by software patents. We wish to avoid the danger that redistributors of a free program will individually obtain patent licenses, in effect making the program proprietary. To prevent this, we have made it clear that any patent must be licensed for everyone's free use or not licensed at all.
The precise terms and conditions for copying, distribution and modification follow.
TERMS AND CONDITIONS FOR COPYING, DISTRIBUTION AND MODIFICATION
- This License applies to any program or other work which contains a notice placed by the copyright holder saying it may be distributed under the terms of this General Public License. The "Program", below, refers to any such program or work, and a "work based on the Program" means either the Program or any derivative work under copyright law: that is to say, a work containing the Program or a portion of it, either verbatim or with modifications and/or translated into another language. (Hereinafter, translation is included without limitation in the term "modification".) Each licensee is addressed as "you".
Activities other than copying, distribution and modification are not covered by this License; they are outside its scope. The act of running the Program is not restricted, and the output from the Program is covered only if its contents constitute a work based on the Program (independent of having been made by running the Program). Whether that is true depends on what the Program does.
- You may copy and distribute verbatim copies of the Program's source code as you receive it, in any medium, provided that you conspicuously and appropriately publish on each copy an appropriate copyright notice and disclaimer of warranty; keep intact all the notices that refer to this License and to the absence of any warranty; and give any other recipients of the Program a copy of this License along with the Program.
You may charge a fee for the physical act of transferring a copy, and you may at your option offer warranty protection in exchange for a fee.
- You may modify your copy or copies of the Program or any portion of it, thus forming a work based on the Program, and copy and distribute such modifications or work under the terms of Section 1 above, provided that you also meet all of these conditions:
a) You must cause the modified files to carry prominent notices stating that you changed the files and the date of any change.
b) You must cause any work that you distribute or publish, that in whole or in part contains or is derived from the Program or any part thereof, to be licensed as a whole at no charge to all third parties under the terms License.
c) If the modified program normally reads commands interactively when run, you must cause it, when started running for such interactive use in the most ordinary way, to print or display an announcement including an appropriate copyright notice and a notice that there is no warranty (or else, saying that you provide a warranty) and that users may redistribute the program under these conditions, and telling the user how to view a copy of this License. (Exception: if the Program itself is interactive but does not normally print such an announcement, your work based on the Program is not required to print an announcement.)
These requirements apply to the modified work as a whole. If identifiable sections of that work are not derived from the Program, and can be reasonably considered independent and separate works in themselves, then this License, and its terms, do not apply to those sections when you distribute them as separate works. But when you distribute the same sections as part of a whole which is a work based on the Program, the distribution of the whole must be on the terms of this License, whose permissions for other licensees extend to the entire whole, and thus to each and every part regardless of who wrote it.
Thus, it is not the intent of this section to claim rights or contest your rights to work written entirely by you; rather, the intent is to exercise the right to control the distribution of derivative or collective works based on the Program.
In addition, mere aggregation of another work not based on the Program with the Program (or with a work based on the Program) on a volume of a storage or distribution medium does not bring the other work under the scope of this License.
- You may copy and distribute the Program (or a work based on it, under Section 2) in object code or executable form under the terms of Sections 1 and 2 above provided that you also do one of the following:
a) Accompany it with the complete corresponding machine-readable source code, which must be distributed under the terms of Sections 1 and 2 above on a medium customarily used for software interchange; or, b) Accompany it with a written offer, valid for at least three years, to give any third party, for a charge no more than your cost of physically performing source distribution, a complete machine-readable copy of the corresponding source code, to be distributed under the terms of Sections 1 and 2 above on a medium customarily used for software interchange; or,
c) Accompany it with the information you received as to the offer to distribute corresponding source code. (This alternative is allowed only for noncommercial distribution and only if you received the program in object code or executable form with such an offer, in accord with Subsection b above.)
The source code for a work means the preferred form of the work for making modifications to it. For an executable work, complete source code means all the source code for all modules it contains, plus any associated interface definition files, plus the scripts used to control compilation and installation of the executable. However, as a special exception, the source code distributed need not include anything that is normally distributed (in either source or binary form) with the major components (compiler, kernel, and so on) of the operating system on which the executable runs, unless that component itself accompanies the executable.
If distribution of executable or object code is made by offering access to copy from a designated place, then offering equivalent access to copy the source code from the same place counts as distribution of the source code, even though third parties are not compelled to copy the source along with the object code.
- You may not copy, modify, sublicense, or distribute the Program except as expressly provided under this License. Any attempt otherwise to copy, modify, sublicense or distribute the Program is void, and will automatically terminate your rights under this License. However, parties who have received copies, or rights, from you under this License will not have their licenses terminated so long as such parties remain in full compliance.
- You are not required to accept this License, since you have not signed it. However, nothing else grants you permission to modify or distribute the Program or its derivative works. These actions are prohibited by law if you do not accept this License. Therefore, by modifying or distributing the Program (or any work based on the Program), you indicate your acceptance of this License to do so, and all its terms and conditions for copying, distributing or modifying the Program or works based on it.
-
Each time you redistribute the Program (or any work based on the Program), the recipient automatically receives a license from the original licensor to copy, distribute or modify the Program subject to these terms and conditions. You may not impose any further restrictions on the recipients' exercise of the rights granted herein. You are not responsible for enforcing compliance by third parties to this License.
-
If, as a consequence of a court judgment or allegation of patent infringement or for any other reason (not limited to patent issues), conditions are imposed on you (whether by court order, agreement or otherwise) that contradict the conditions of this License, they do not excuse you from the conditions of this License. If you cannot distribute so as to satisfy simultaneously your obligations under this License and any other pertinent obligations, then as a consequence you may not distribute the Program at all. For example, if a patent license would not permit royalty-free redistribution of the Program by all those who receive copies directly or indirectly through you, then the only way you could satisfy both it and this License would be to refrain entirely from distribution of the Program.
If any portion of this section is held invalid or unenforceable under any particular circumstance, the balance of the section is intended to apply and the section as a whole is intended to apply in other circumstances.
It is not the purpose of this section to induce you to infringe any patents or other property right claims or to contest validity of any such claims; this section has the sole purpose of protecting the integrity of the free software distribution system, which is implemented by public license practices. Many people have made generous contributions to the wide range of software distributed through that system in reliance on consistent application of that system; it is up to the author/donor to decide if he or she is willing to distribute software through any other system and a licensee cannot impose that choice.
This section is intended to make thoroughly clear what is believed to be a consequence of the rest of this License.
-
If the distribution and/or use of the Program is restricted in certain countries either by patents or by copyrighted interfaces, the original copyright holder who places the Program under this License may add an explicit geographical distribution limitation excluding those countries, so that distribution is permitted only in or among countries not thus excluded. In such case, this License incorporates the limitation as if written in the body of this License.
-
The Free Software Foundation may publish revised and/or new versions of the General Public License from time to time. Such new versions will be similar in spirit to the present version, but may differ in detail to address new problems or concerns.
Each version is given a distinguishing version number. If the Program specifies a version number of this License which applies to it and "any later version", you have the option of following the terms and conditions either of that version or of any later version published by the Free Software Foundation. If the Program does not specify a version number of this License, you may choose any version ever published by the Free Software Foundation.
- If you wish to incorporate parts of the Program into other free programs whose distribution conditions are different, write to the author to ask for permission. For software which is copyrighted by the Free Software Foundation, write to the Free Software Foundation; we sometimes make exceptions for this. Our decision will be guided by the two goals of preserving the free status of all derivatives of our free software and of promoting the sharing and reuse of software generally.
NO WARRANTY
-
BECAUSE THE PROGRAM IS LICENSED FREE OF CHARGE, THERE IS NO WARRANTY FOR THE PROGRAM, TO THE EXTENT PERMITTED BY APPLICABLE LAW. EXCEPT WHEN OTHERWISE STATED IN WRITING THE COPYRIGHT HOLDERS AND/OR OTHER PARTIES PROVIDE THE PROGRAM "AS IS" WITHOUT WARRANTY OF ANY KIND, EITHER EXPRESSED OR IMPLIED, INCLUDING, BUT NOT LIMITED TO, THE IMPLIED WARRANTIES OF MERCHANTABILITY AND FITNESS FOR A PARTICULAR PURPOSE. THE ENTIRE RISK AS TO THE QUALITY AND PERFORMANCE OF THE PROGRAM IS WITH YOU. SHOULD THE PROGRAM PROVE DEFECTIVE, YOU ASSUME THE COST OF ALL NECESSARY SERVICING, REPAIR OR CORRECTION.
-
IN NO EVENT UNLESS REQUIRED BY APPLICABLE LAW OR AGREED TO IN WRITING WILL ANY COPYRIGHT HOLDER, OR ANY OTHER PARTY WHO MAY MODIFY AND/OR REDISTRIBUTE THE PROGRAM AS PERMITTED ABOVE, BE LIABLE TO YOU FOR DAMAGES, INCLUDING ANY GENERAL, SPECIAL, DAMAGES ARISING OUT OF THE USE OR INABILITY TO USE THE PROGRAM (INCLUDING BUT NOT LIMITED TO LOSS OF DATA OR DATA BEING RENDERED INACCURATE OR LOSSES SUSTAINED BY YOU OR THIRD PARTIES OR A FAILURE OF THE PROGRAM TO OPERATE WITH ANY OTHER PROGRAMS), EVEN IF SUCH HOLDER OR OTHER PARTY HAS BEEN ADVISED OF THE POSSIBILITY OF SUCH DAMAGES.
END OF TERMS AND CONDITIONS
6.3. Copyrights and Trademarks
Trademarks
Microsoft and Windows are registered trademarks of Microsoft Corporation. All other trademarks are property of their respective holders.

Manufactured under license under U.S. Patent #'s:5,451,942; 5,956,674; 5,974,380; 5,978,762; 6,487,535 & other U.S. and worldwide patents issued & pending. DTS and DTS 2.0 + Digital Out are registered trademarks and the DTS logos and Symbol are trademarks of DTS, Inc. © 1996-2008 DTS, Inc. All Rights Reserved
Manufactured under license from Dolby Laboratories. Dolby and the double-D symbol are trademarks of Dolby Laboratories.

HDMI, the HDMI logo and High-Definition Multimedia Interface are trademarks or registered trademarks of HDMI Licensing LLC.
Copyrights
All rights reserved. No part of this manual may be reproduced, or transmitted in any form or by any means, whether by electronically or mechanically, without the express written permission from the copyright holder. Copyrighted materials, such as software, music files, or movies, are protected by local law, and may not be illegally copied or used without permission from the copyright owner.
Information furnished by iconBIT is believed to be accurate and reliable; however, no responsibility is assumed by iconBIT for its use nor for any infringement of patents or other rights of third parties which may result from its use. iconBIT reserves the right to change specifications at any time without notice.
iconBIT - trademark of iconBIT Limited.
© 2011 iconBIT Limited. All rights reserved.
iconBI T Limited.
Suite 1604-5, Wilson House, 19-27 Wyndham Street, Central, Hong Kong.
Phone: (852) 2523 2167, Fax: (852) 2810 1957
www.iconbit.com


- About the Player ....6
- Main Functions.... 10
- Introduction
- General Information
- Dear Customer!
- Key Features
- Audio/ Video outputs
- Multimedia Playback
- Interfaces Support
- Network Feature
- File operation
- Packing List
- Safety Instructions
- CAUTION
- RISK OF ELECTRIC SHOCK DO NOT OPEN
- Precautions concerning power supply:
- Effect of radio interference and magnetic field:
- Installation precautions:
- Comments on the use of the remote control (RC):
- Operation precautions:
- Maintenance:
- Comments on equipment repairs:
- About the Player
- Remote Control
- Front Panel
- Back Panel
- Connection
- TV Connection
- Turn on your TV and select the input
- Connect the power cord
- Digital Audio Device Connection
- Main Functions
- Setup Menu
- Changing System Settings
- Menu Language
- Text Encoding
- Time
- Screen Saver
- DLNA DMR
- DLNA Device Name
- Mini KBD Language
- Scan storage
- Format
- BD-Lite Menu
- Restore Default
- Changing Audio Settings
- Night Mode
- HDMI Output
- SPDIF Output
- Changing Video Settings
- Aspect Ratio
- TV SYSTEM
- 1080p 24Hz
- Deep Color
- Screen Size
- Changing Network Settings
- Wired Lan Setup
- - DHCP IP (AUTO)
- - FIX IP (MANUAL)
- Wireless Setup
- Infrastructure (AP)
- Step 1: Scanning AP (Access Point) in your network
- Step 2: Input WEP / WPA key.
- Peer to Peer (Ad Hoc)
- WPS (AP)
- BT Process
- Samba Process
- BT & Samba security
- Miscellaneous
- Version Info
- Network Info
- USB Upgrade
- Key Tone Volume
- Browsing Files and Media Playback
- Browse via File Manager
- Browse via Media Library
- Quick-Search
- Review Mode
- Sorting Mode
- Flash Animation
- BD/ DVD
- Go to Folder
- Folder Directory / Leaf Folder View / Date View
- Playback Option
- Title menu
- Root menu
- Video Setting
- Slide Timing / Slide Transition / Select Music
- Favorites Manager
- 3D Movie Playback
- Internet Media
- Web Browser of Casablanca
- Address bar
- Go
- Previous page
- Next page
- Navigation/ Page mode
- Bookmarks
- Text encode
- Text Zoom
- Android Apps
- APK Installation
- APK Uninstallation
- Screen Size setting
- Notice:
- Weather on Home menu
- DLNA DMR
- A/V Streaming via Network
- A/V Streaming via UPnP-server
- Music Playlist & Photo Album Management
- File Copy/Delete/Move/Rename
- BT Download
- Add New Torrent
- Managing the Downloads
- NAS Function
- On Mac,
- Upgrading the Firmware
- Method 1
- Method 2 :
- Frequently Asked Questions
- Answer:
- Appendices
- Warranty Information
- Obtaining Service
- Limited Warranty
- Warranty does not cover:
- GNU General Public License ("GPL")
- GNU GENERAL PUBLIC LICENSE
- Preamble
- TERMS AND CONDITIONS FOR COPYING, DISTRIBUTION AND MODIFICATION
- NO WARRANTY
- Copyrights and Trademarks
- Trademarks
- Copyrights
Brand : iconBIT
Model : XDS73D
Category : Media player