
TFDVD7091 - Portable DVD Player COBY - Free user manual and instructions
Find the device manual for free TFDVD7091 COBY in PDF.


| Product Type | Portable DVD Player with 7" TFT Screen |
| Brand | Coby |
| Model | TFDVD7091 |
| Screen Size | 7 inches (16:9) |
| Screen Resolution | 480 x 234 pixels |
| Disc Compatibility | DVD, CD, CD-R, CD-RW, JPEG |
| TV System | ATSC/NTSC |
| Radio | AM/FM |
| Inputs | AV Input (RCA), AUX L/R, USB, SD Card |
| Outputs | AV Output (RCA), Coaxial Audio, Headphone Jack (3.5mm x2) |
| Power Supply | AC 100-240V, 50/60Hz; DC 12V (car adapter) |
| Power Consumption | < 70W |
| Audio Output Level | 1.2 Vrms (1 kHz, 0 dB) |
| Signal-to-Noise Ratio | 90 dB (typical) |
| Dynamic Range | 90 dB (typical) |
| Laser Wavelength | 650 nm |
| Operating Temperature | 0°C to 35°C |
| Remote Control | Included (coin lithium battery) |
| Functions | DVD playback, DTV (ATSC), AM/FM radio, JPEG photo viewer, USB/SD media playback, AV input/output |
| Cleaning | Use a dry, soft cloth; do not use liquids or chemicals |
| Safety | Do not open cover; laser radiation; keep away from moisture |
Frequently Asked Questions - TFDVD7091 COBY
User questions about TFDVD7091 COBY
0 question about this device. Answer the ones you know or ask your own.
Ask a new question about this device
Download the instructions for your Portable DVD Player in PDF format for free! Find your manual TFDVD7091 - COBY and take your electronic device back in hand. On this page are published all the documents necessary for the use of your device. TFDVD7091 by COBY.
USER MANUAL TFDVD7091 COBY
7" DTV/DVD/Radio Player with USB Port and Card Slot
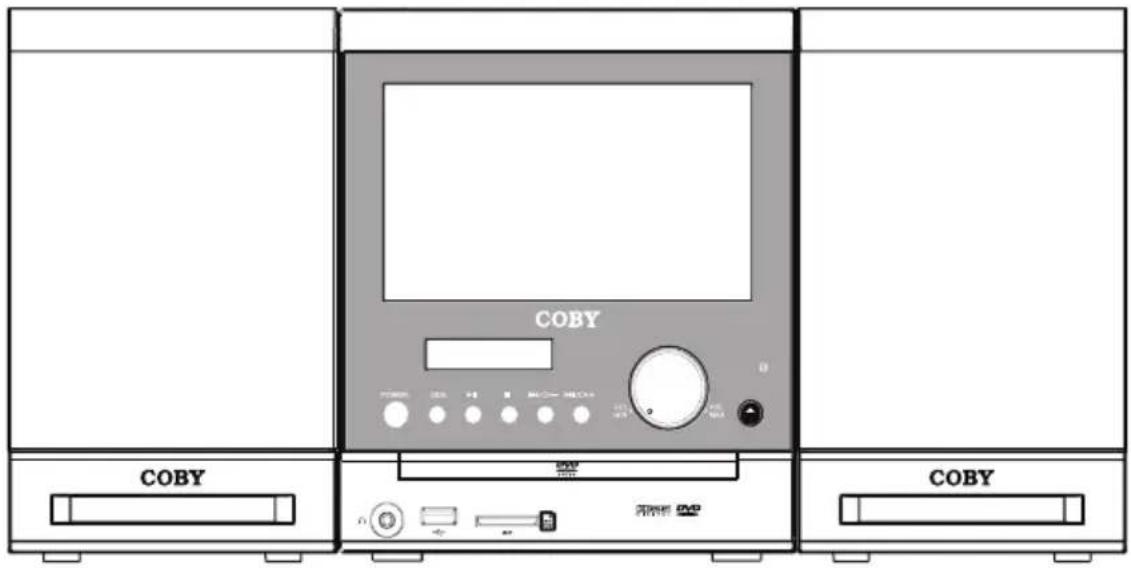
Instruction Manual

Please read this manual carefully before operation.
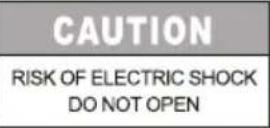
CAUTION
RISK OF ELECTRIC SHOCK
DO NOT OPEN
CAUTION: TO REDUCE THE RISK OF FIRE AND ELECTRIC SHOCK, DO NOT REMOVE THE COVER (OR BACK) OF THE UNIT. REFER SERVICING ONLY TO QUALIFIED SERVICE PERSONNEL.
For Customer Use:
Enter below the serial number that is located on the bottom of the unit. Retain this information for future reference.
Model No. TFDVD7091
Serial No.
The lightning flash with arrowhead symbol within an equilateral triangle is intended to alert the user to the presence of uninsulated “dangerous voltage” within the product’s enclosure that may be of sufficient magnitude to constitute a risk of electric shock.
The exclamation point within an equilateral triangle is intended to alert the user to the presence of important operation and servicing instructions in the literature accompanying the appliance.
WARNING:
To prevent fire or shock hazard, do not expose this device to rain or moisture. Dangerous high voltage is present inside the enclosure. Do not open the cabinet.
Handling the cords on this product will expose you to lead, a chemical known to the State of California to cause cancer, and birth defects or other reproductive harm. Wash hands after handling.
CAUTION:
This Digital Video Disc player employs a laser system. To prevent direct exposure to the laser beam, do not try to open the enclosure or defeat the safety interlocks. When open and the interlocks are defeated, visible laser radiation is present.
To prevent electric shock, match wide blade of plug to wide slot of outlet and fully insert.
Use of controls, adjustments, or performance of procedures other than those specified herein may result in hazardous radiation exposure. DO NOT STARE INTO THE BEAM.
NOTICE:
This product incorporates copyright protection technology that is protected by U.S. patents and other intellectual property rights. Use of this copyright protection technology must be authorized by Macrovision, and is intended for home and other limited viewing uses only unless otherwise authorized by Macrovision. Reverse engineering or disassembly is prohibited.
FCC Notice:
FCC Statement: this device complies with Part 15 of the FCC Rules. Operation is subject to the following two conditions:
(1) This device may not cause harmful interference, and(2) This device must accept any interference received, including interference that may cause undesired operation.
Note: This equipment has been tested and found to comply with the limits for Class B digital devices, pursuant to Part 15 of the FCC rules. These limits are designed to provide reasonable protection against harmful interference in a residential installation. This equipment generates, uses and can radiate radio frequency energy and, if not installed and used in accordance with the instructions, may cause harmful interference to radio communications. However, there is no guarantee that interference will not occur in a particular installation. If this equipment does cause harmful interference to radio or television reception, which can be determined by turning the equipment off and on, the user is encouraged to try to correct the interference by one or more of the following measures:
- Reorient or relocate the receiving antenna.- Increase the separation between the equipment and receiver.- Connect the equipment into an outlet on a circuit different from that to which the receiver is connected.- Consult the dealer or an experienced radio/TV technician for help.
Use of shielded cable is required to comply with Class B limits in Subpart B of Part 15 of the FCC rules.
PRECAUTIONS
Do not make any changes or modifications to the equipment unless otherwise specified in the manual. If such changes or modifications should be made, you could be required to stop operation of the equipment.
Manufactured under license from Dolby Laboratories. Dolby and the double-D symbol are trademarks of Dolby Laboratories. Confidential Unpublished Works.
© 1992-1997 Dolby Laboratories. All rights reserved.

This player has built-in copyright protection technology that prevents copying from a DVD disc to any media.
If a video recorder is connected to the player, the video output image will be distorted during recording.

natural_image
Recycling symbol composed of three chasing arrows (no text or labels)For recycling or disposal information about this product, please contact your local authorities or the Electronics Industries Alliance: www.eiae.org.
IMPORTANT SAFETY INSTRUCTIONS
- Read Instructions: All the safety and operating instructions should be read before the product is operated.
- Retain Instructions: The safety and operating instructions should be retained for future reference.
Heed Warnings: All warnings on the product and in the operating instructions should be 3. adhered to.
Follow Instructions: All operating and usage instructions should be followed.4.
- Cleaning: Unplug this product from the wall outlet before cleaning. Do not use liquid cleaners or aerosol cleaners. Use a damp cloth for cleaning.
Attachments: Use only attachments recommended by the manufacturer. Use of other attach-6. ments may be hazardous.
Water and Moisture: Do not use this product near water (e.g., near a bath tub, washbowl, 7. kitchen sink, laundry tub, in wet basements, or near a swimming pool and the like).
Heat: The product should be situated away from heat sources such as radiators, heat regis-8. ters, stoves, or other products (including amplifiers) that produce heat.
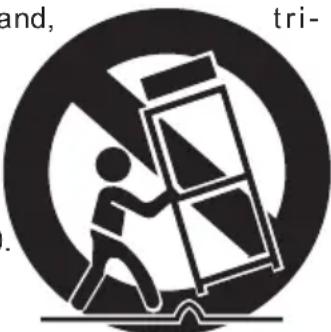
- Accessories: Do not place this product on an unstable cart, stand, pod, bracket, or table. Use only with carts, stands, tripods, brackets,
or tables recommended by the manufacturer or sold with the product. Any mounting of the product should follow the manufacturer's instructions and should use a mounting accessory recommended by the manufacturer.
A product and cart combination should be moved with care. Quick 10 stops, excessive force, and uneven surfaces may cause the product and cart combination to overturn.
natural_image
Symbolic illustration of a person climbing a ladder inside a circle, with partial text 'and,' and 'tri-' visible (no readable text or symbols)Ventilation: Slots and openings in the cabinet are provided for ventila-11. tion to ensure reliable operation of the product and to protect it from overheating. These openings should never be blocked by placing the product on a bed, sofa, rug, or other similar surface.
This product should not be placed in a built-in installation such as a bookcase or rack unless proper ventilation is provided or the manufacturer instructions have been adhered to.
- Power Sources: This product should be operated only from the type of power source indicated on the rating label. If you are not sure of the type of power supply to your home, consult your product dealer or local power company. For products intended to operate from battery power or other sources, refer to the operating instructions.
- Power Sources: Do not connect the power plug to a power outlet other than that which is indicated here and on the label as this may result in the risk of fire or electric shock. Do not handle the power plug with wet hands. Doing so may cause electric shock.
Power Lines: An outside antenna system should not be located in the vicinity of overhead 14. power lines or other electric light or power circuits, or where it can fall into such power lines or circuits. When installing an outside antenna system, extreme care should be taken to keep from touching such power lines or circuits, as contact with them might be fatal. - Battery: Danger of explosion if battery is incorrectly replaced. Replace only with the same or equivalent type. Battery pack or batteries installed shall not be exposed to excessive heat such as sunshine, fire or the like.
- 12V Car Power Adaptor: Disconnect this car power adaptor when not in use. Not for use in 24V vehicles.
- Using the unit in a Vehicle: On no account should this unit be used by the driver of a moving
IMPORTANT SAFETY INSTRUCTIONS
motor vehicle, or left unsecured in the vehicle whilst driving. If this unit is being used by a passenger in your vehicle, be sure that it is secured or held safely, and does not obstruct any safety device (i.e. airbag, seat belt etc.) that is fitted. All passengers should wear seat belts when using this unit in a moving vehicle. If in doubt, please contact your vehicle manufacturer for further advice. Using other car power adaptors could damage the unit.
Using 18. Headphones or Earphones: Hearing experts advise against the constant use of personal stereos played at high volume. Constant high volume use can lead to hearing loss. If you experience ringing in the ears or hearing loss, discontinue use and seek medical advise.
- Grounding or Polarization: This product may be equipped with a polarized alternating-current line plug that has one blade wider than the other. This plug will only fit into the power outlet in one direction. This is a safety feature. If you are unable to insert the plug fully into the outlet, try reversing the direction of the plug. If the plug should still fail to fit, contact an electrician to replace the obsolete outlet. Do not defeat the safety purpose of the polarized plug.
Power-Cord Protection: Power supply cords should be routed so that they are not likely to 20. be walked on or pinched by items placed upon or against them, paying particular attention to cords at plugs, convenience receptacles, and at the point which they exit from the product.
Protective Attachment Plug: The product may be equipped with an attachment plug with 21. overload protection. This is a safety feature. See the operating instructions for replacement or directions to reset the protective device. If replacement of the plug is required, be sure the service technician has used a replacement plug that has the same overload protection as the original plug as specified by the manufacturer.
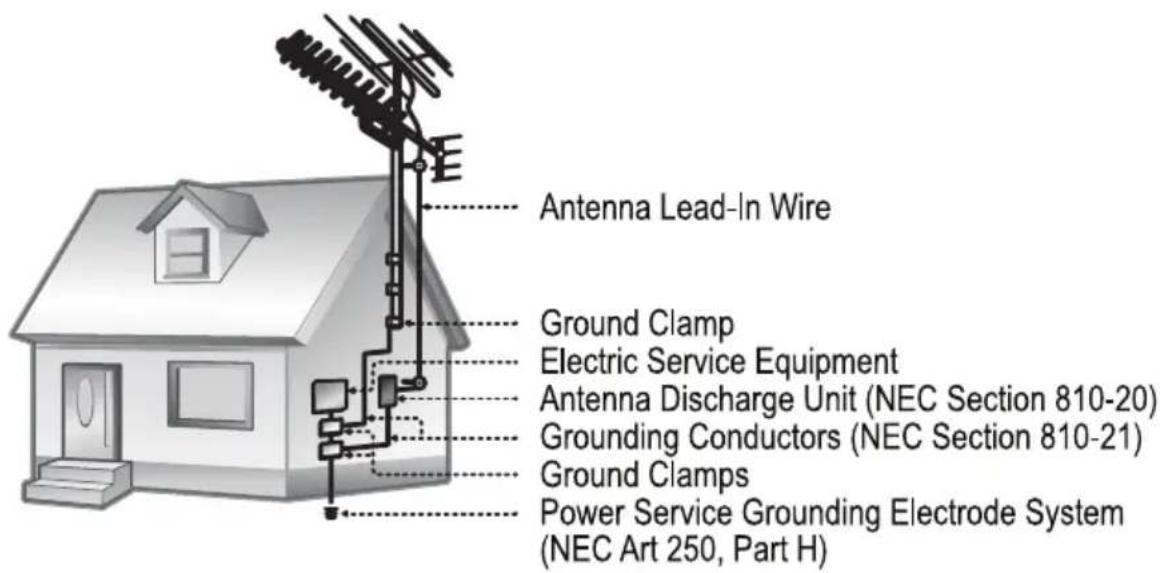
Outdoor Antenna Grounding: If an outside antenna is connected to the product, be sure the 22. antenna system is grounded so as to provide some protection against voltage surges and built-up static charges. Article 810 of the National Electrical Code, ANS/NFPA 70 provides information with regard to proper grounding of the mast and supporting structure, grounding of the lead-in wire to an antenna-discharge unit, size of grounding conductors, location of antenna-discharge unit, connection to grounding electrodes, and requirements for the grounding electrode (see figure).
- Lightning: For added protection for this product, unplug it from the wall outlet and disconnect the antenna or cable system during a lightning storm or when it is left unattended and unused
IMPORTANT SAFETY INSTRUCTIONS
for long periods of time. This will prevent damage to the product due to lightning or power-line surges.
If at any time in the future you should need to dispose of this product please note24.
that Waste electrical products should not be disposed of with household waste. Please recycle where facilities exist. Check with your Local Authority or retailer for recycling advice.(Waste Electrical and Electronic Equipment Directive)
Overloading: Do not overload wall outlets, extension cords, or integral convenience 25.
receptacles as this can result in a risk of fire or electric shock.
Object and Liquid Entry: Never push objects of any kind into this product through openings 26. as they may touch dangerous voltage points or shout-out parts that could result in a fire or electric shock. Never spill liquid of any kind on the product.
Servicing: Do not attempt to service this product yourself as opening or removing covers may 27. expose you to dangerous voltage or other hazards. Refer all servicing to qualified service personnel.
Damage Requiring Service: Unplug this product from the wall outlet and refer servicing to 28. qualified service personnel under the following conditions: a) when the power-supply or plug is damaged; b) if liquid has been spilled or if objects have fallen into the product; c) if the product has been exposed to rain or water; d) if the product does not operate normally by following the operating instructions. Adjust only those controls that are covered by the operating instructions as improper adjustment of other controls may result in damage and will often require extensive work by a qualified technician to restore the product to its normal operation; e) if the product has been dropped or damaged in any way; f) when the product exhibits a distinct change in performance—this indicates a need for service.
- Replacement Parts: When replacement parts are required, be sure that your service technician has used replacement parts specified by the manufacturer or have the same characteristics as the original part. Unauthorized substitutions may result in fire, electric shock, or other hazards.
- Safety Check: Upon completion of any service or repairs to this product, ask the service technician to perform safety checks to ensure that the product is in proper operating condition. Wall or Ceiling Mounting: The product should be mounted to a wall or ceiling only as recom-31. mended by the manufacturer.
TABLE OF CONTENTS
PRECAUTIONS
IMPORTANT SAFETY INSTRUCTIONS
PACKAGE CONTENTS....2
ABOUT OPTICAL DISCS....3
LOCATION OF CONTROLS....4
REMOTE CONTROL....6
CONNECTIONS 8
General Connection....8
AV Connection....9
Coaxial Connection 10
AUX IN Connection....10
USB/SD Card Connection 11
Headphones/Earphones Connection....12
BASIC OPERATIONS....13
Set Clock....13
Radio....13
DVD....13
DTV 14
AV Input/Output 14
JPEG Playback....14
DVD FUNCTION....15
DVD SETUP....17
DTV FUNCTION 20
SPECIFICATIONS 22
TROUBLESHOOTING....23
PACKAGE CONTENTS
Please make sure the following items are included in the package. If any item is missing, please contact your dealer.
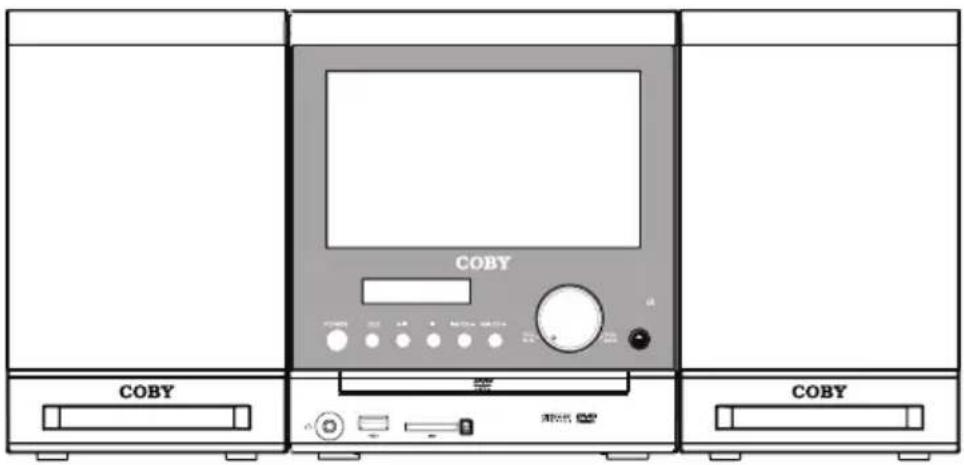
Main Unit
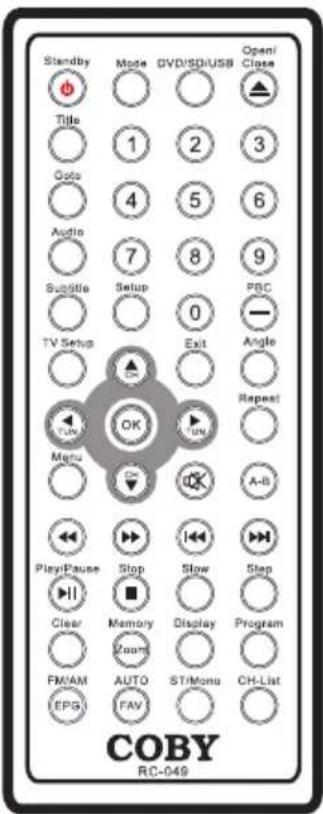
Remote
Disc Requirements
This player supports the following discs.
| Type Disc Mark Content Type | Disc Size Max. Playback Time | |||
| DVD-Video Discs |  | Audio + Video (moving picture) | 12 cm | 133 min (SS-SL) |
| 242 min (SS-DL) | ||||
| 266 min (DS-SL) | ||||
| 484 min (DS-DL) | ||||
| Audio Compact Discs (CDs) |  | Audio 12 cm | 74 min | |
| JPEG CDs -- Still Picture 12 cm -- | ||||
This unit can play back CD-R and CD-RW discs that contain JPEG picture files. Discs not listed above are not supported by this unit (eg, PC CD-ROM, CD-Extra, CD-G, CD-I, etc.)
Disc Care and Maintenance
Optical discs (DVDs, CDs) contain high-density compressed data and need proper handling.
Handling a Disc
Hold a DVD/CD by its edges. Avoid touching the recorded side of the disc. To remove a DVD/CD from its storage case, press down on the center retention mechanism of the case and lift the disc out.
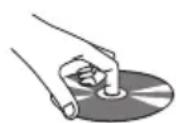
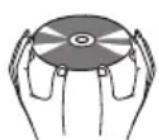
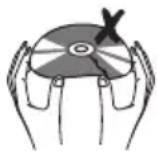
- Do not subject discs to prolonged exposure to direct sunlight, high humidity, or high temperatures.
• Do not bend or press discs.
• To reduce the risk of scratches, always put discs back in their case after use. Store discs vertically in a cabinet.
• Do not place stickers or labels on either side of a disc.
Cleaning a Disc
Use a dry, soft cloth to wipe off any fi ingerprints and dusts from the playing surface of the disc. Wipe in a straight line radially from the center to the outside edge of the disc. Small dust particles and light stains will not affect playback quality.
- Never use chemicals such as record sprays, anti-static sprays, benzene, or thinners to clean a disc. Doing so will damage the surface of the disc permanently.
Note: Do not attempt to remove a disc until it completely stopped.
LOCATION OF CONTROLS
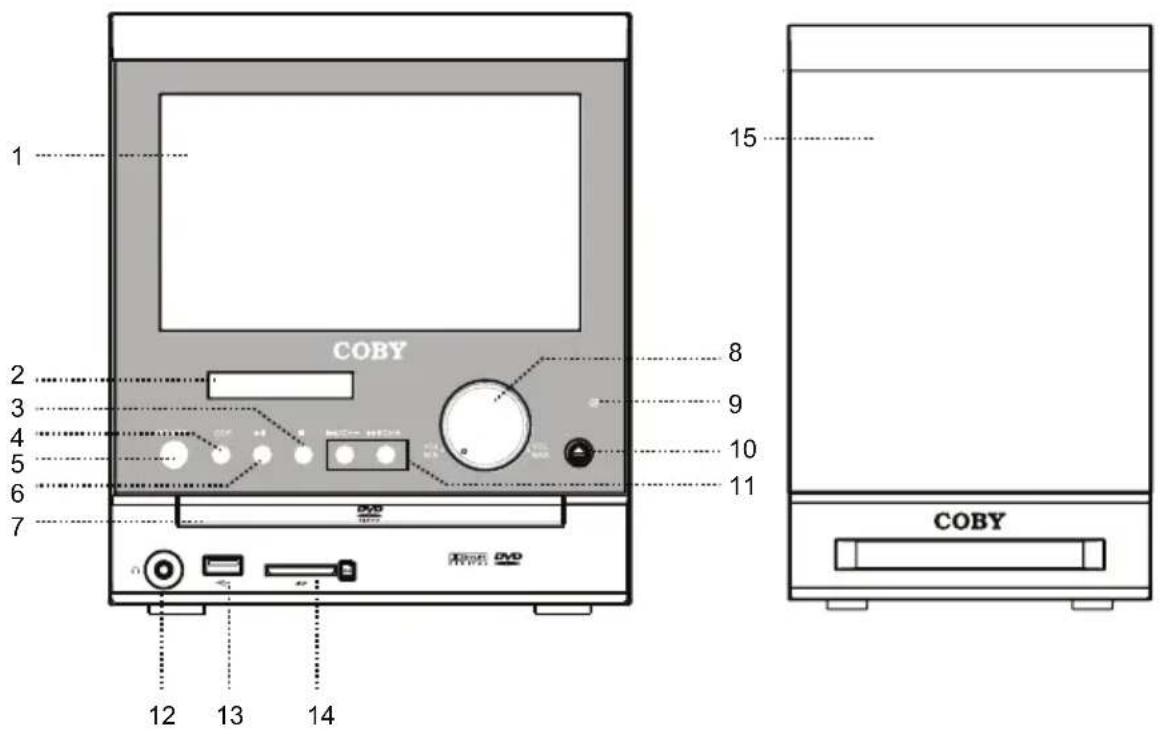
TFT Screen1.
VFD Display 2.
STOP3.
Stop disc playback.
- MODE
Repeatedly press the button to shift modes.
- POWER
Press to turn the unit on/off.
- PLAY/PAUSE
Start/hold playback.
- Disc Room
Hold a disc in a DVD mode.
- VOL
Adjust volume.
Remote Sensor9.
Sense remote signals.
Open/Close10.
Open/close the disc room in a DVD mode.
CH+/-11.
Skip DTV channels or radio stations, In the
DVD mode, press to skip to the next/previous
playback point.
Phone Jack12.
. Connects with a headphone/earphone.
USB Port13.
Connects with USB.
SD Slot14.
Connects with SD Card.
- Speaker
LOCATION OF CONTROLS
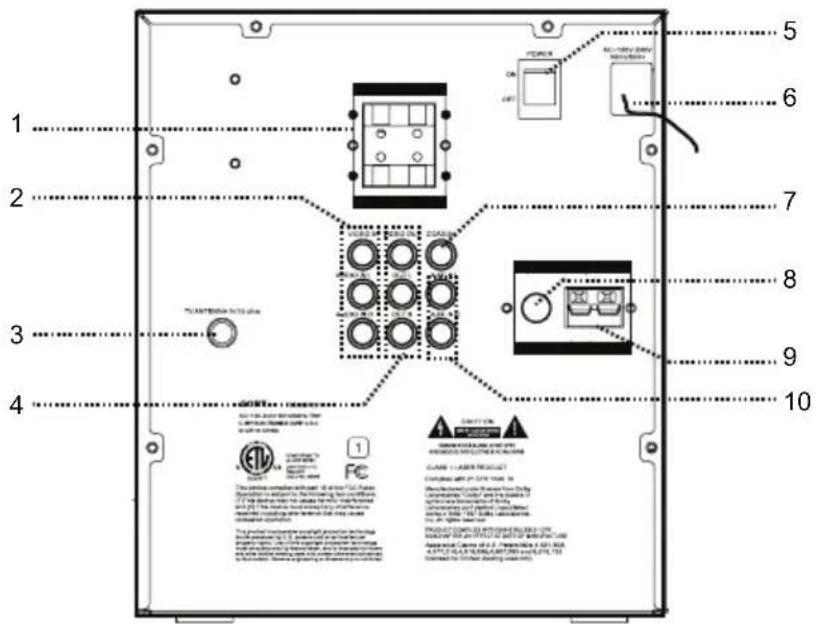
Speaker Connectors1.
RCA Input2.
Input external AV signals.
TV Antenna3.
Connects with TV RF source.
RCA Output4.
Output AV signals to an external monitor.
Power Switch5.
Switch on/off the unit.
Power Cord6.
Connects with an AC100V-240V,50Hz/60Hz power supply.
Coaxial Output7.
Output audio signals by a coaxial cable.
FM Radio Antenna Jack8.
AM Loop Antenna Jack9.
AUX L/R Input10.
Input audio signals.
REMOTE CONTROL
Remote Control
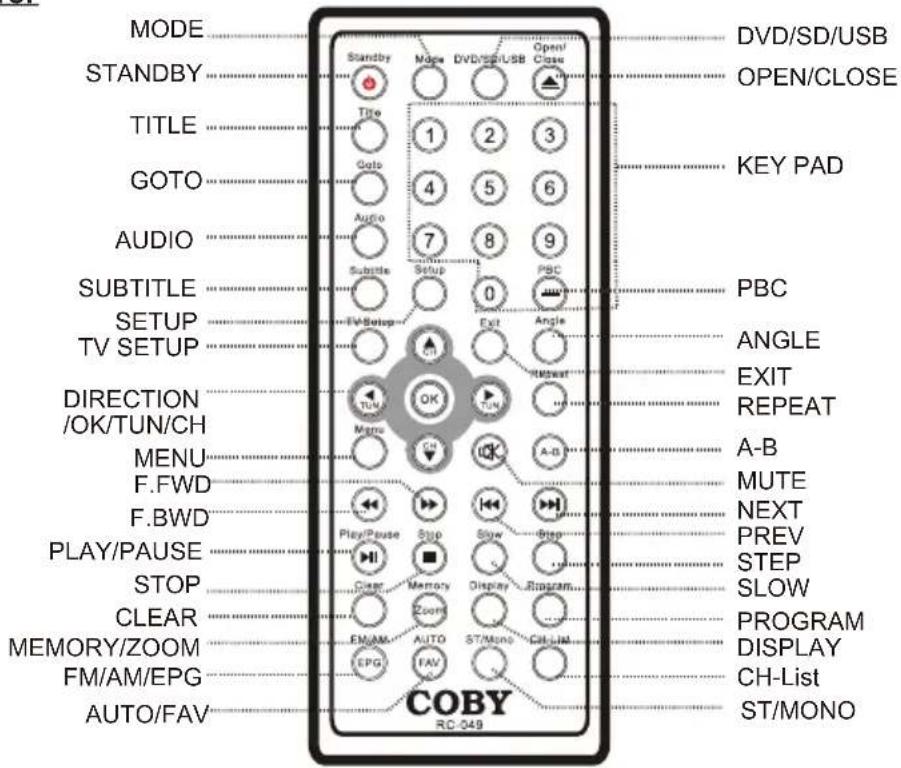
The remote control transmits a directional infrared beam. Be sure to aim the remote control directly at the infrared remote sensor during operation. The sensor may not be able to receive signals properly if the sensor is covered, if there is a large object between the remote control and the sensor, or if it is exposed to direct sunlight or a strong artificial light (e.g., fluorescent or strobe lights). In this case, change the direction of the light or reposition the unit to avoid direct lighting.
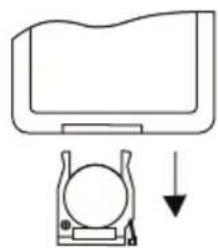
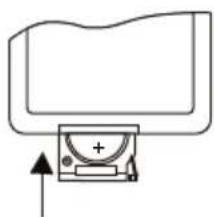
Using The Coin Lithium Battery
- Press to the arrow direction and take out the battery holder.
- Place the battery onto the holder with the positive side facing up.
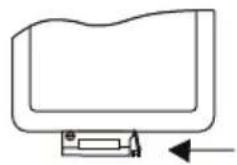
3. Push in the holder.
natural_image
Simple line drawing of a car air conditioner unit with a downward arrow indicating cooling effect (no text or symbols)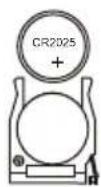
natural_image
Simple line drawing of a device with an upward arrow and plus symbol (no text or labels)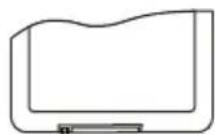
REMOTE CONTROL
- Mode
Press to shift modes.
Standby•
Access/exit the standby mode.
Title•
Display the DVD title menu.
Goto•
Locate a desired playback point in the DVD mode.
Audio•
Press to select the audio language in the DVD mode.
Subtitle•
Press to display the subtitle languages in the DVD mode.
Setup•
Press to display the DVD setup menu.
TV Setup•
Press to display the TV setup menu.
Direction/OK/TUN/CH•
Use direction buttons to move among menu options, press OK to confirm settings. The left/right direction button also works as a TUN-/+ button to tune radio stations. The up/down direction button works also as a CH+/- button to skip TV channels.
Menu•
Press to display a DVD start menu.
F.FWD
Press to search fast forward through a disc.
F.BWD
Press to search fast backward through a disc.
- Play/Pause
Press to start/hold disc playback.
- Stop
Press to stop/pre-stop disc playback.
- Clear
Erase an incorrect data input.
- Memory/Zoom
Zoom in/out an image in the DVD mode. It is also used to memorize stations in the radio mode.
FM/AM/EPG
Press to set band as AM/FM in the radio mode. Press to display the electronic program guide in the TV mode.
• DVD/SD/USB
Press to display the DVD/SD/USB option menu.
AUTO/FAV
Press to search stations automatically in the radio mode. Press to display favorite channels in the DTV mode.
- Open/Close
Open/close the DVD room.
Key Pad
Use the key pad to input numeric data.
“-” button is used to access DTV program in the DTV mode.
• PBC
Press to turn PBC on/off when play a VCD disc.
- Angel
Some discs are recorded with multi-angles, use the Angel button to select a desired viewing angel.
- Exit
Press to exit the system menu.
- Repeat
Repeat DVD chapters/titles or CD tracks.
A-B
Repeat playback of a customer-specified section A-B in a disc.
- Mute
Press to muffle/restore sound output.
NEXT
Skip to the next playback in the DVD mode.
- PREV
Skip to the previous playback in the DVD mode.
- Step
Repeatedly press Step to have playback advanced step by step.
- Slow
Press Slow to start slow motion playback.
- Program
Access the program menu in the DVD mode.
- Display
Show the current working information.
- CH-List
Display a channel list in the DTV mode.
• ST/Mono
Set the audio mode as Stereo or Mono in the radio mode.
CONNECTIONS
General Connection
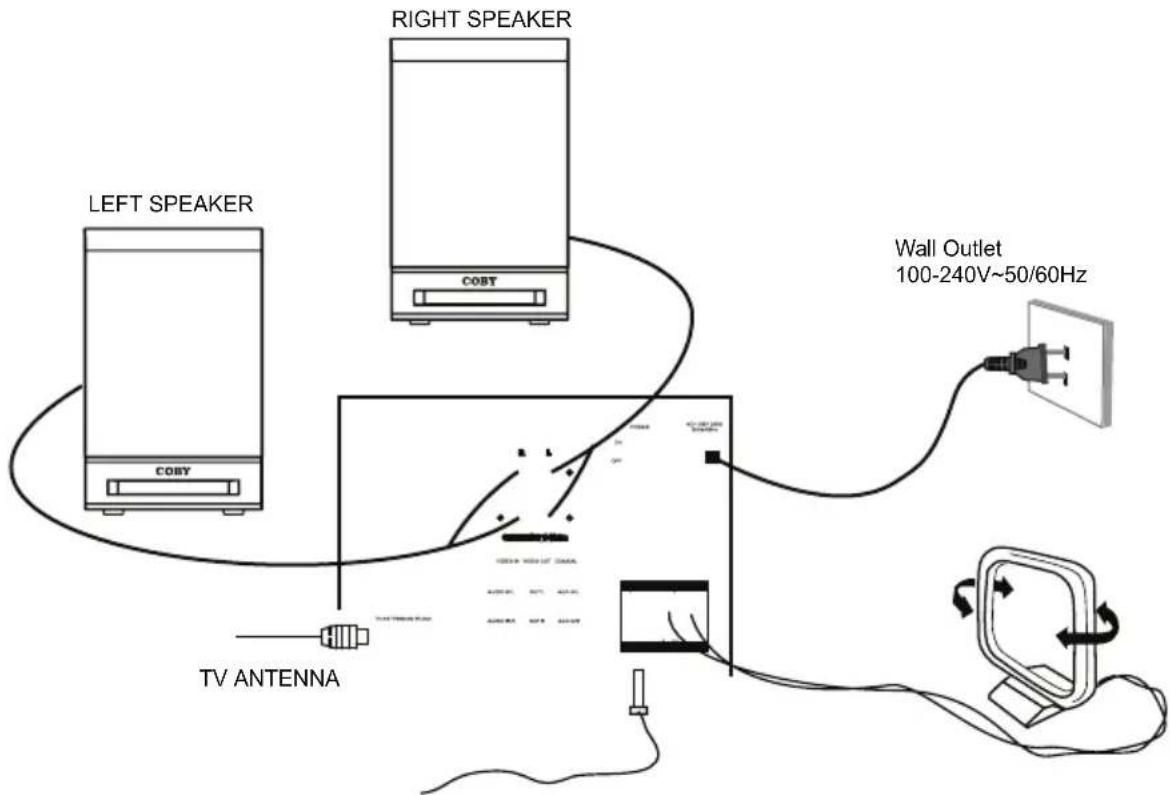
AM LOOP ANTENNAFM ANTENNA
Power Connection
Insert the power plug into a standard AC outlet with 100-240V, 50Hz/60Hz. If you have difficulty inserting the plug, turn it over and re-insert it.
Do not use wet hands when manage the power cord and plug.
Make sure all other neccessary connections have been properly made before connect the power.
If the unit will not be used for a long period of time, disconnect the prower.
TV Antenna Connection
Connect TV RF sources to the antenna port. TV RF signals include: receiving antenna/CATV net. You can use 75 Ohm coaxial cable to connect outdoor antenna.
Radio Antenna Connection
Connect the FM/AM antenna to the FM/AM connector.
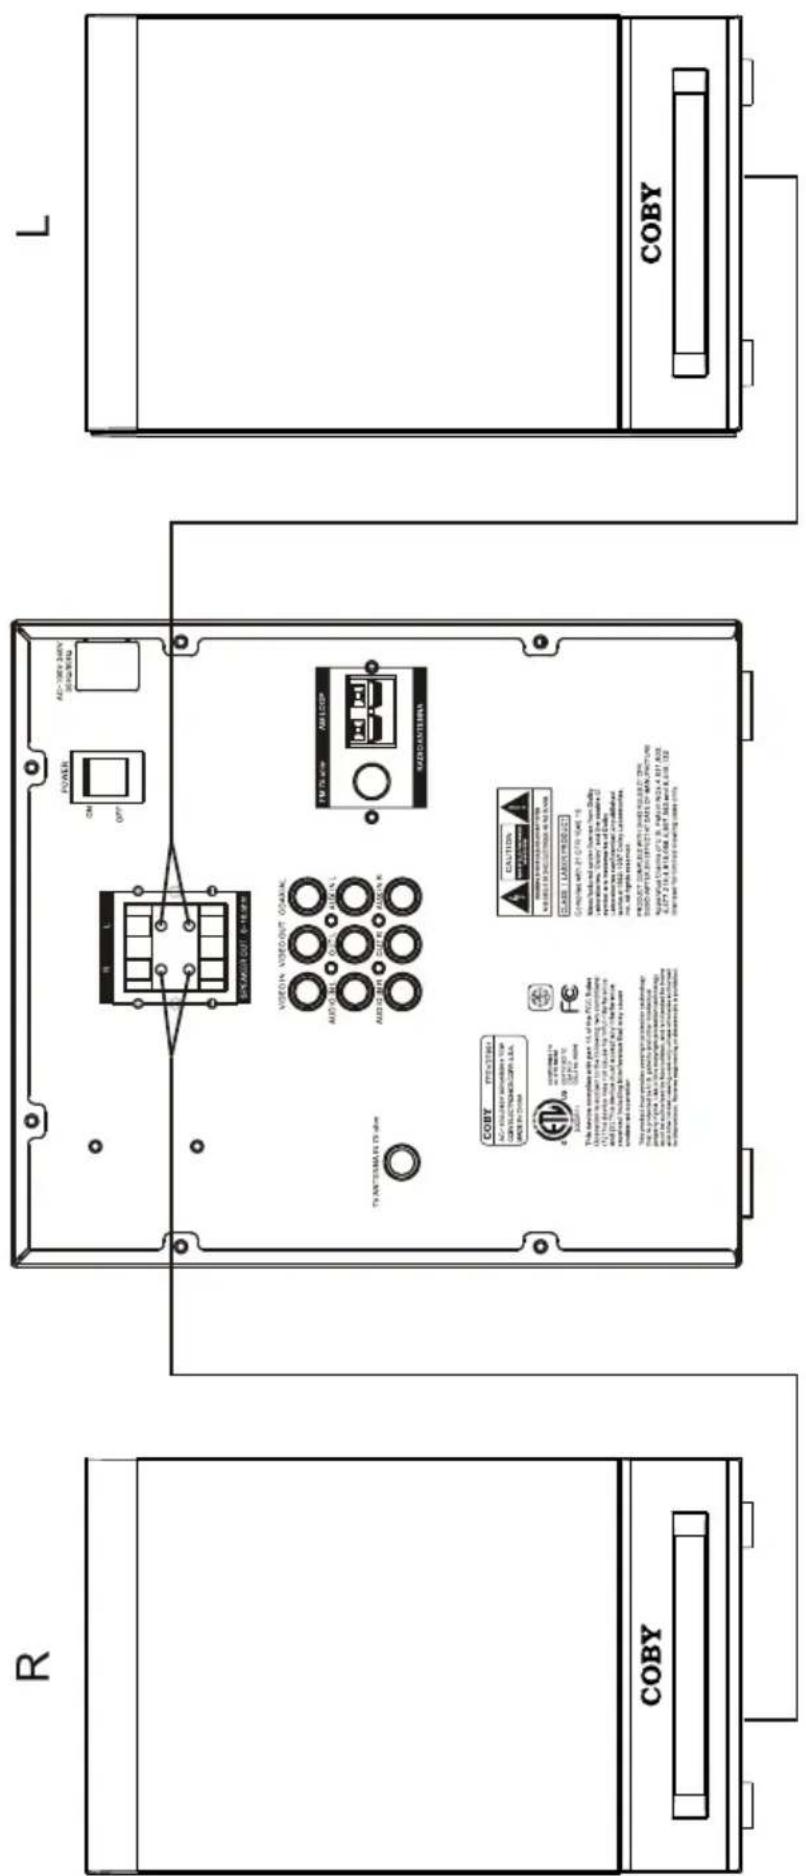
Speaker Connection
Connect the left/right speaker to speaker jacks, matching the color of cables to the color of connectors.
CONNECTIONS
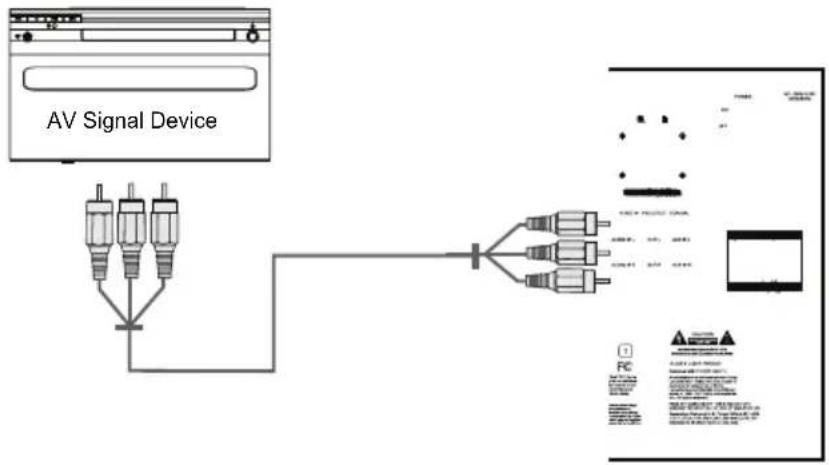
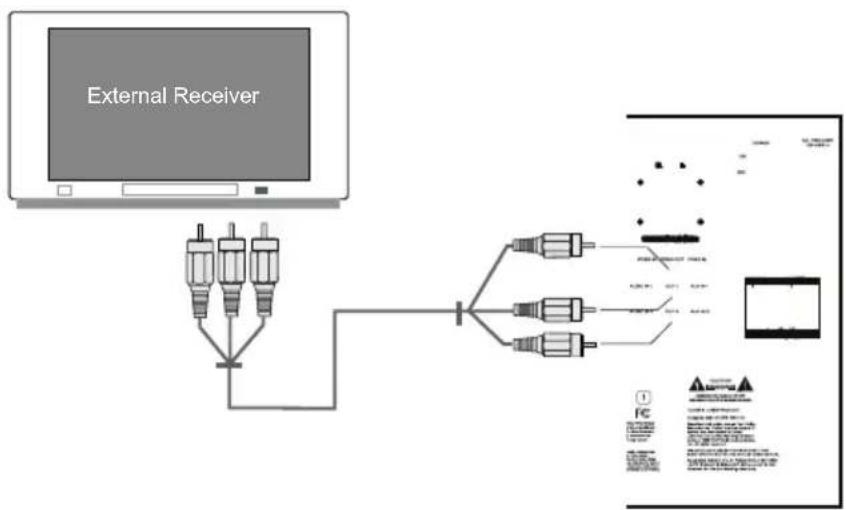
Audio and Video Signal Input/Output
Through the player's AV function, you can view programs from an external signal device as well as transmit the player's AV signal to an outer receiver.
Fig1 - AV signal input
flowchart
graph TD
    A["AV Signal Device"] --> B["Three ports"]
    B --> C["Output Module 1"]
    B --> D["Output Module 2"]
    B --> E["Output Module 3"]
    C --> F["Display Panel"]
    D --> F
    E --> F
Fig2 - AV signal output
flowchart
graph TD
    A["External Receiver"] --> B["Port 1"]
    A --> C["Port 2"]
    A --> D["Port 3"]
    A --> E["Port 4"]
    B --> F["Network Routing"]
    C --> F
    D --> F
    E --> F
    F --> G["Output Display"]
    style A fill:#f9f,stroke:#333
    style G fill:#ccf,stroke:#333
• Match the color of plugs to the color of connectors when use AV cables.
Refer to the owner's manual of the external device as well.
Make sure all necessary connections have been properly made before connect • the power.
If the player will not be used for a long period of time, disconnect the power and remove the battery from the remote control.
CONNECTIONS
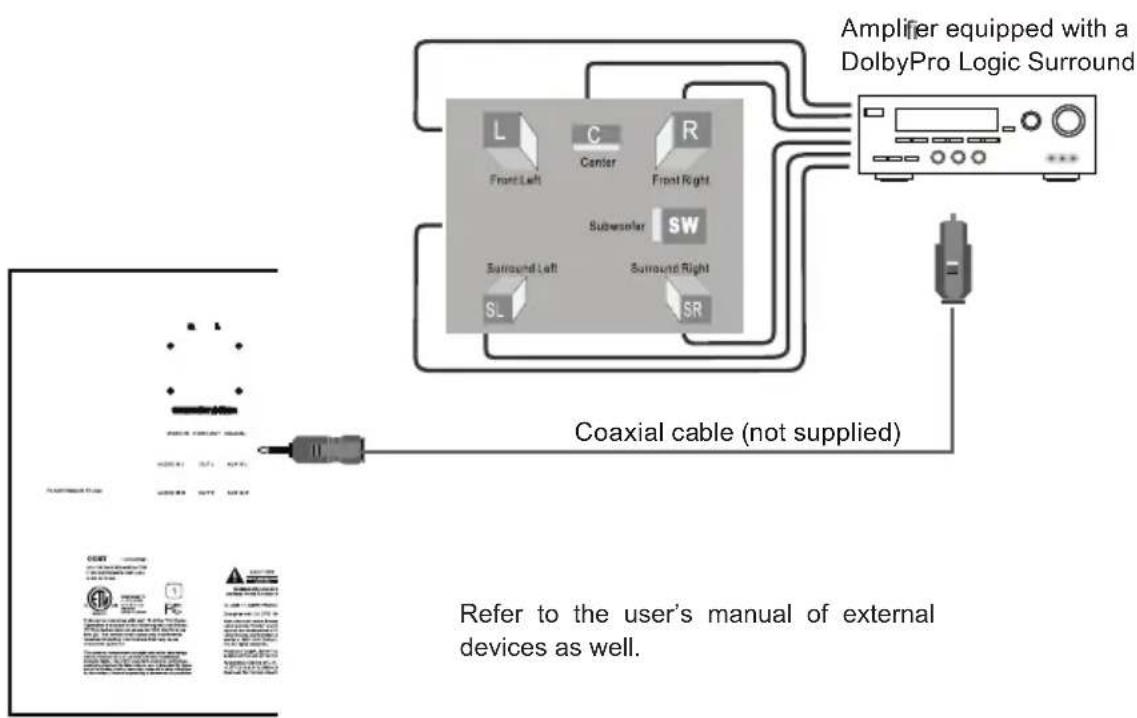
Connecting to an amplifier equipped with a Dolby Pro Logic Surround
flowchart
graph TD
    A["Amplifier equipped with a DolbyPro Logic Surround"] --> B["Coaxial cable (not supplied)"]
    B --> C["External Devices"]
    C --> D["Refer to the user's manual of external devices as well."]
    D --> E["External Device 1: L Front Left, Center R Front Right"]
    D --> F["External Device 2: Subwoofer SW Surround Left, Surround Right"]
    D --> G["External Device 3: SL Surround Left, Surround Right"]
    D --> H["External Device 4: SR Surround Right"]
AUX Audio Signal Input - Input external audio signals to the player's speaker system.
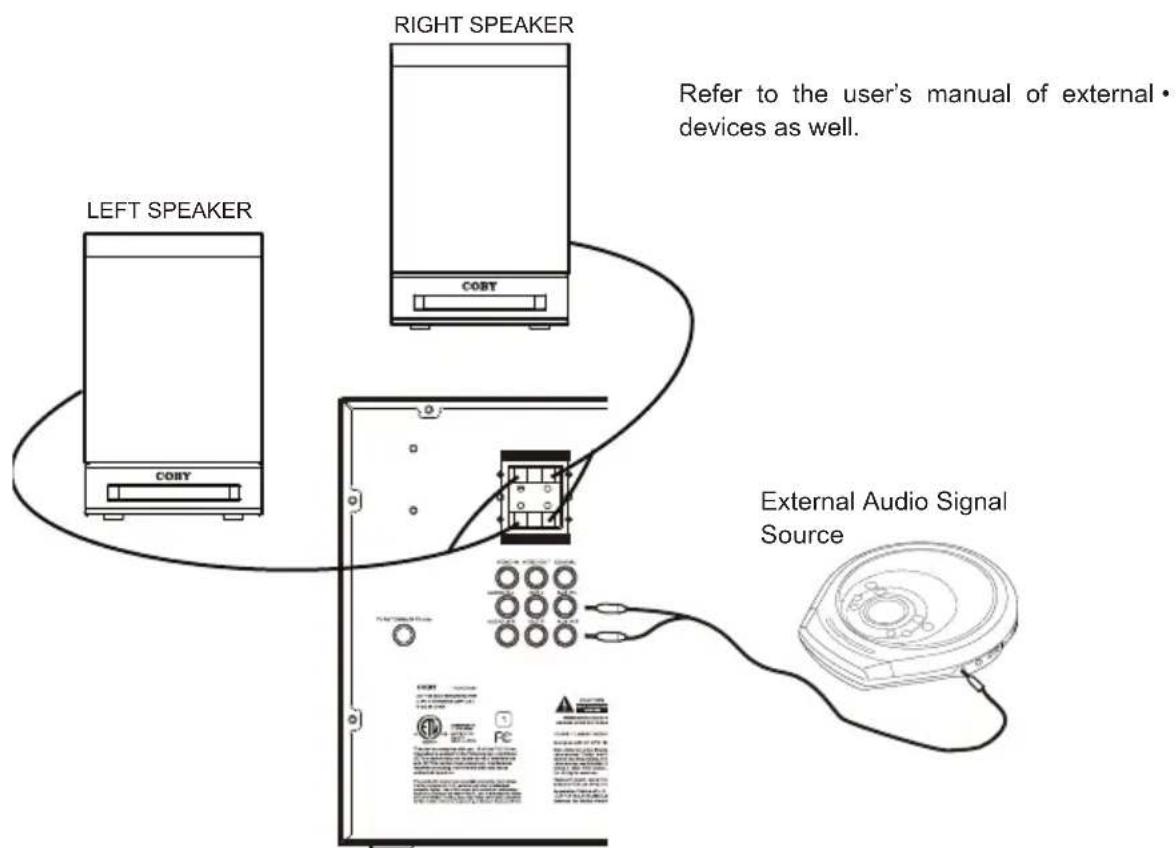
CONNECTIONS
USB/SD Card Connection
Insert a USB/card into the corresponding slot.
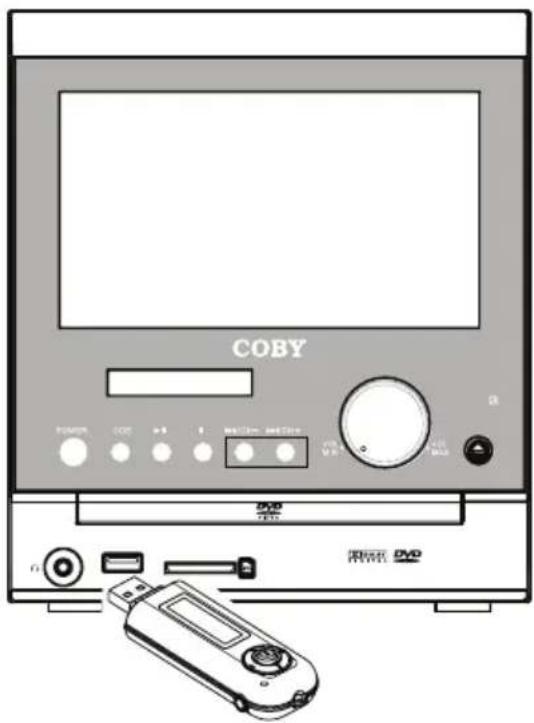
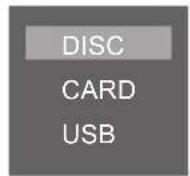
- In the DVD mode, press the DVD/SD/USB button on the remote to display the source option menu, use the up/down direction button to select USB/Card, press OK to access.
- It takes a short while for the systems's reading data, once the device is detected by the player, a working menu would appear on the screen, use the direction buttons to select a file, press OK or PLAY/PAUSE to start playback. Some discs are recorded without root menu and start playback automatically.
To exit USB /Card, select DVD from the source menu and press OK. Or just unplug it from the port 3. when it is not at work.
CONNECTIONS
Using Headphones / Earphones
Maximum output voltage ≤ 900mV
Be sure that your unit is set at a low volume level before connecting the headphone. Increase the volume gradually for your comfortable listening.
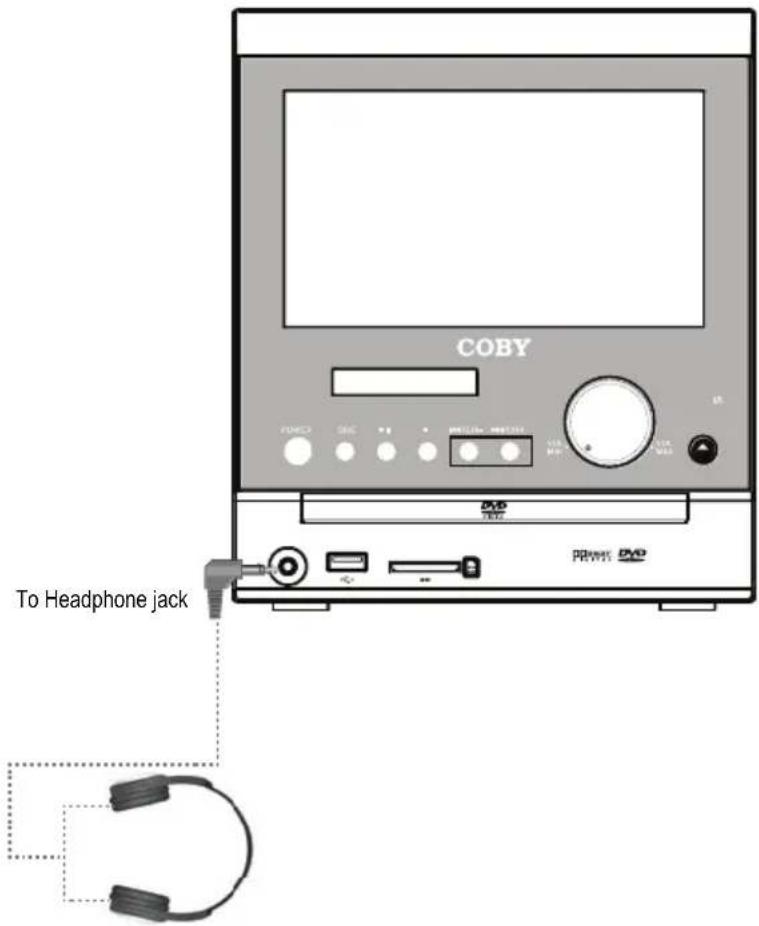
CAUTION:
Hearing experts advise against the constant use of personal stereos played at high volume. Constant high volume use can lead to hearing loss. If you experience ringing in the ears or hearing loss, discontinue use and seek medical advise.
BASIC OPERATIONS
Set Clock
In the standby mode, press the OPEN/CLOSE button on the main unit to display the active setting interface, press the STOP/PLAY/PAUSE button on the unit to move the cursor left/right, press CH+/- to change character, press MODE to confirm new time settings.
Press OPEN/CLOSE to display clock under any living mode.
Radio Operation
Basic Operation
- Connect the AM or FM attenna and the power source. Refer to the "Cable Connections" section for details Press MODE to select the radio mode. Press the FM/AM button on the remote or the PLAY/PAUSE 2. button on the main unit to select AM/FM band.
3. Tune Frequency
Repeatedly press TUN+/- on the remote or PLAY/PAUSE/STOP on the main unit to tune up/down frequency. Briefly press the STOP button on the remote or press and hold STOP button on the main unit to exit tuner mode. Search Through Band4.
Press and hold TUN+/- on the remote or CH+/- on the main unit to search the entire band and it will stop at the captured channel, or you can briefly press the TUN+/- button on the remote or the STOP button on the main unit to stop searching.
Listen to the preset channel.5.
Briefly press the CH+/- button on the remote /main unit to listen to the preset channels.
There is no channel preset in the memory location upon the initial use.
Refer to "Program Channels" section below for how to program channels.
Program Channels
Auto Program
Press Auto on the remote to start auto program. The captured channels will be saved automatically into the memory location overwriting the previous one.
Manual Program
Locate the station you want to save, using the TUN+/- button on the remote or the PLAY/PAUSE/STOP button on the main unit.
Press the Memory button on the remote or the OPEN/CLOSE button on the main unit to assign a channel number to the selected program, and then press the Memory button on the remote or the OPEN/CLOSE button on the main unit again to confirm. If you want to quit the attempt to save, briefly press the STOP button on the remote or press and hold the STOP button on the main unit.
To delete the preset channel, press CH+/- to locate the channel you want to erase, briefly press the • Clear button on the remote or press and hold the STOP button on the main unit to erase, and then press the OK button on the remote or the OPEN/CLOSE button on the main unit to confirm.
DVD Operation
Connect the power source, turn on the unit. Press MODE to set the player into the DVD mode.
- Press Open/Close to open the disc room. Place a disc onto the holder with the label side facing up, close the disc room.
Press PLAY/PAUSE to start playing. Press STOP to stop. Press VOL +/- to adjust the volume.
Usually a DVD disc contains a root menu. The root menu appears once the data is recognized by the player. Press the direction buttons to select a file in the root menu, press PLAY/PAUSE to start playing. Some discs are recorded without the root menu and start playing automatically.
During playback, press the MENU button to return to the root menu, press the TITLE button to access the title menu.
Use the AUDIO button to select the available audio language, use SUBTITLE button to display the • subtitle. Some discs are recorded with multi-angle, use the ANGLE button to access the desired viewing angle.
BASIC OPERATIONS
NOTE:
The player supports discs as follow: DVD, CDR, MP3, JPEG.
More DVD functions are listed clearly under the “DVD Function” section and the “DVD Setup” section, please read carefully.
TV Operation
Connect the cables. Press POWER to turn on the player. Refer to the "Cable Connections" section • for details.
Press MODE to set the unit into the TV mode.
For an initial use, you need to scan channels, using the "Channel Setup" menu. Refer to "Channel Setup" of the TV Function section for details. After completing channel search, press CH+/- to skip channels, press VOL+/- to adjust the volume.
- Various TV features are preset through the TV setup menu, please read the "TV Function" section carefully.
Audio and Video Signal Input /Output
The player AV function would enable the user to enjoy programs from an external device as well as transmit the player's AV signal to an outer receiver.
- Connect the AV cable and the power supply. See "Cable Connections" section.
- Set the player into the relevant AV mode by the MODE button.
NOTE: When input/output AV signals, please read the user's manual of the external devices as well. Be sure to have all necessary connections properly done before connecting the power.
JPEG Playback
JPEG is a common picture format that requires small amounts of storage per image and has low loss in resolution. Hundreds of pictures can be stored on a disc in this format. In order to view JPEG photo albums, you can ask your film development company to make a "PICTURE CD" when they develop your film.
Normal Playback
Access the DVD mode, load a JPEG disc in
Press the direction buttons to select the target file in the root menu and press OK to confirm.
Picture Rotation
There are four kinds of rotational modes: Inversion, Enantiomorphism, rotate left and rotate
right. Press direction buttons to select:
"UP" ---- Inversion/Normal
"DOWN" ---- Enantiomorphism/Normal
"LEFT" ---- Rotate left
"RIGHT" ---- Rotate right
Zoom
Press ZOOM button to zoom in/out picture, press direction buttons to move positon.
During playback, press the STOP button to return to the previous menu.
NOTE:
Depending on how the disc was made, a JPEG disc may allow playback, but not rotation or zooming of the images.
Start Playing
After correctly loaded a disc, press PLAY/PAUSE to start playback
Pause Playing
During playback, press PLAY/PAUSE once to pause playing, press it again to resume.
Stop Playing
Press STOP once to stop playback at a time point. (Pre-stop mode) It will resume from where it was stopped.
Press it twice to stop playback completely.
Fast Forward/Backward
Press F.FWD/F.BWD ▶▶/ ◀◀ on the remote to go fast forward/backward through a disc. Repeatedly press the button to change the search speed as below.

Repeat Function
Repeatedly press the REPEAT button to cycle through the repeat modes as below,
DVD - REP: CHAPTER -- > REP:TITLE -- > REP:ALL-- > REP:OFF
CD - REP: 1 --> REP:ALL --> REP:OFF
Use the A-B button on the remote to repeat a section A-B. Press A-B once to set the starting point A, press it twice to set the ending point B, the player starts repeating section A-B. To cancel, press A-B again.
NOTE: Some discs do not support the repeat function.
Search Function
You can easily locate a desired section in a disc through Search function.
Press GOTO to display active setting interface.
DVD - Search by title /chapter/time

CD/MP3 - Search by track / time

- Press the direction buttons to move among entries, press the numeric buttons to input data. Press the OK button to start searching.
Press GOTO once again to exit.2.
NOTE: Some DVD discs do not support the search function.
DVD FUNCTIONS
Slow Motion Playback
Press the SLOW button to have playback advanced in a slow motion. Repeatedly press the button to change the slow speed as below.

Step-by-Step Playback
During playback, repeatedly press the STEP button to go forward step by step.
Zoom Function
Repeatedly press the ZOOM button to achieve the following zoom effect.
ZOOM 2 - ZOOM3 - ZOOM 4 - ZOOM1/2 - ZOOM1/3 - ZOOM1/4 - ZOOM:OFF
NOTE: There is no zoom function for MP3 or CD discs.
Display the Current Working Information
Press the Display button to view current playback information, To quit the display mode, repeatedly press the Display button.
Programming Chapters/Tracks - You can store up to 16 programs.
Press the PROGRAM button to display the program menu.
e.g. DVD Mode
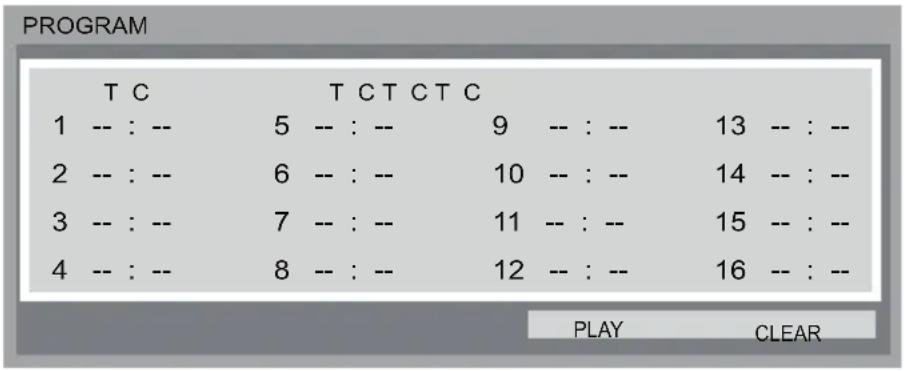
Press the direction buttons to move among the input fi elds and press the number buttons to input data. • Press direction buttons to select "Play" and press OK to start playback.
- To clear a wrong input, press the Clear button. To clear all, select "CLEAR" from the menu and press OK.
To quit, press the Program button.
Various features can be preset through the DVD setup menu. Press the Setup button to show the DVD menu.
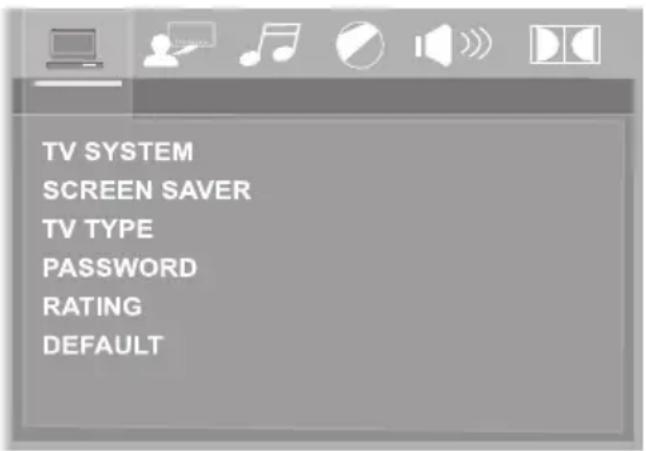
While working with the setup menu:
Press the direction buttons to select the desired item. Press the right direction button or the OK button to confirm. To exit, press DVD SETUP again.
System Setup
TV System - Select the TV System from NTSC/PAL/AUTO. The default setting is NTSC. (The TV System for north America is NTSC. AUTO should only be used if you have a Multi-System TV).
Screen Saver - Set the Screen Saver ON/OFF. The default setting is On.
The screen saver is useful to prevent your display from becoming damaged. If the Screen Saver is set ON, the screen saver picture appears when you leave the player in the stop mode for about three minutes. Press any button on the unit/remote to exit the screen saver.
TV Type - Set the screen aspect ratio as 4:3 PS(Pan Scan), 4:3 LB(Letter Box) or 16:9(Wide Screen).
4:3 LB(Letter Box): This is selected when the unit is connected to a normal TV. Wide-screen images are shown on the screen with black belt on the top and bottom.
4:3 PS(Pan Scan): This is selected when the unit is connected to anormal TV. Wide-screen images are shown on the screen with some parts cut out automatically.
Password - Move the cursor to the PASSWORD prompt and press OK to confirm. Input the password 8888, if it is the first use. After confirmation, you will be required to input a new 4-digit code, and verify again.
Rating - There are eight levels of Parental Control. Level one opens discs to people of all ages, level eight is suitable only for adults. To change the parental control setting, a 4-digit code is required to be input first. (The default code is 8888). When the input code is confirmed, the level setting menu will appear, select the appropriate level by the UP/DOWN button and press OK to confirm.
Default - This function allows you to set the unit back to the factory default.
DVD SETUP
Language Setup
| Item | Instruction | Default |
| OSD Language Setup the OSD language. English | ||
| Audio Language Setup the audio language. English | ||
| Subtitle Language Setup the subtitle language. When OFF is English selected, the subtitle will not be displayed. | ||
| Menu Language Setup the menu language. English |
Audio Out
Sets the audio output mode as RAW, PCM or OFF. The default setting is SPDIF/RAW.
RAW: When this item is selected, the optical output is turned on and is able to output a Dolby Digital signal. To output a Dolby Digital signal, the amplifier or the external device must have Dolby Digital signal, DTS and MPEG decoding.
PCM: Select this item when the DVD player is connected with a 2-channel digital stereo amplifier. When a Dolby Digital or MPEG disc is played, the digital port will output in PCM2-channel format.
OFF: When this item is selected, all digital coaxial and optical outputs are turned off.
Picture Setup - Adjust TFT Screen Effect
| Item | Instruction | Default |
| Brightness | Adjust the screen brightness 6 | |
| Contrast | Adjust the screen contrast 6 | |
| Hue | Adjust the screen color | 0 |
| Saturation | Adjust color saturation 0 | |
| Sharpness | Adjust the image sharpness 0 |
DVD SETUP
Speaker Setup
| item | Instruction | Default |
| Downmix | Set the audio downmix mode. | (LT/RT, STEREO,VSS) STEREO |
Digital Setup
| !tem | Instruction | Default |
| Dynamic Range | Adjust the dynamic range. OFF | |
| Dual Mono (STEREO, MONO L/R, MIX MONO) STEREO | Select the sound output mode. |
DTV FUNCTION
DTV Function
Preparations
Connect the antenna and the power supply. Press POWER to turn on the player.
See "Cable Connections" section.
Press MODE to select DTV.
Press the CH+/- button to skip channels, or use numeric buttons to input the channel directly.
When the channel number is greater than 9, press “-” button to display the digit input field, and then use the number buttons to input the channel.
- For the initial use, scan channels under the “Channel Setup” menu. See the “Channel Setup” section for details.
Setup Menu
Various features can be preset through the TV setup menu.
TV setup menu consists of Picture Setup, Audio Setup, Time Setup, Option Setup as well as Channel Setup.
While working with the menu,
Press TV-SETUP to display the menu.1.
Press the direction buttons to select and to adjust the option, press the TV-SETUP button to back-up 2. menu, press EXIT to quit the menu completely.
Picture Setup
| Item | Instruction |
| Picture Mode Setup | the picture mode (Personal, Standard, Soft, Dynamic). |
| Contrast Adjust the color contrast. | |
| Brightness Adjust the display brightness . | |
| Sharpness Adjust the display sharpness. | |
| Color Adjust the display color. | |
Audio Setup
| Item | Instruction |
| Sound Mode | Setup the sound mode. (Standard, Movie, Music, Personal). |
| Bass Setup the bass effect. | |
| Treble Setup the treble effect. | |
| Balance | Adjust the sound balance. |
| Audio Language Setup the audio language. | |
DTV FUNCITON
Time Setup
| Item | Instruction |
| Time Zone Select the time zone.(Central, Mountain, Pacific, Alaska, Hawaii, Atlantic, Eastern). | |
| Daylight Saving Set the time saving function on/off.Time | |
Option Setup
| Item | Instruction |
| Menu Language Setup the menu language. | |
| Color Mode Setup the color mode. (Normal, Warm, Cool) | |
| Zoom Mode Adjust the display mode. (Normal, 4:3). | |
| Restore Default | Restore settings to the factory default. |
Channel Setup.
| Item | Instruction |
| Antenna Setup the | antenna type as Air or CATV. |
| Auto Scan SearchPress the right d | channels automatically.rection button to start searching, press EXIT to quit. |
| Show/HidePress the up/down direction button to select the channel, press OK to set block,press OK again to release. | Skip the unwanted channels. |
| Favorite Make favorite channels collection.Press the up/down direction button to select the channel, press OK to set it as a favorite channel. Press OK again to quit. | |
| Channel No | Access the desired channel. |
| Channel Label | 1. Locate the channel you wish to put a label. |
| 2. Select this option, press the right direction button to show the edit menu. In the menu, press the left/right direction button to move left/right, Press the up/down direction button to change character. | |
| 3. To clear the label, repeatedly press the up/down direction button to display the blank input. | |
SPECIFICATION
| Power supply | AC100-240V,50Hz/60Hz |
| Power consumption | < 70W |
| Signal system | ATSC/NTSC |
| Video output | 1±0.2V (p-p), 75ohm |
| Audio output | 1.2 Vrms (1 KHz, 0dB) |
| Earphone terminal | 3.5mm stereo mini jack x2 |
| Signal /Noise ratio(audio) | 90dB typical |
| Dynamic range(audio) | 90dB typical |
| Panel size | 7 inch (16:9) |
| Resolution | 480(H) x 234 (V) |
| Laser | Wavelength 650 nm |
| Operating conditions | Temperature: 0°C to 35°C. Operation status : Horizontal |
Specifications and manual are subject to change without prior notice.
If you have a problem with this unit, please read the troubleshooting guide below and check our website at www.cobyusa.com for Frequently Asked Questions (FAQs) and firmware updates. If these resources do not resolve the problem, please contact Technical Support.
COBY Electronics Technical Support
150 Knowlton Way
Savannah, GA 31407
Email: techsupport@cobyusa.com
Web: www.cobyusa.com
Phone: 800-727-3592: Weekdays 8:30AM–9:00PM EST
Saturdays 9:00 AM-5:30PM EST
718-416-3197: Weekdays 8:00AM–5:30PM EST
Main Unit Troubleshooting
There is no power to the device.
Ensure that the AC adapter cord is securely connected to the player and the proper wall outlet.
The device will not play the disc.
Ensure that a supported disc is loaded in the player label-side up.
Ensure that the disc's rating level does not exceed the player's parental rating level.
Ensure that the disc is not damaged or too dirty.
Clean the disc or try another disc. Moisture may have condensed inside the player. Remove the disc and •
leave the player on for 1-2 hours and then try again.
There is no picture.
Ensure that the TV set has been powered on and is set to the correct AV mode.
Ensure that the connections between the player and the TV are secure and correct.
Check if the connection cables are damaged.
The picture is noisy or distorted.
The disc may be damaged or dirty. Clean the disc or try another one.
Reset your TV's color system.
Ensure that the player is connected directly to the TV (and not through a VCR, cable box, satellite re-•
ceiver, etc.)
The picture is not full-screen.
Change the aspect ratio setting of your player from the Setup menu.
- Select a different aspect ratio option from the DVD disc menu.
There is no sound or distorted sound.
• Ensure that the TV and amplifier have been turned on and properly set up.
• Ensure that the TV and amplifier connections are secure and correct.
TROUBLESHOOTING
Try a different Audio track of the DVD by pressing AUDIO.
Ensure that the MUTE function of the TV, Amplifier, or Player is not engaged.
The remote control doesn't work.
Ensure that there are no obstacles between the remote and the player.
Point the remote at the remote sensor on the main unit.
Ensure that the batteries in the remote retain a charge and have been installed correctly.
Try replacing the remote's batteries.
The player has malfunctioned.
Unplug the player. After 30 minutes, plug in and power on the player -- the restore function should reset • the player.
COBY Electronics Corp.
56-65 Rust Street
1771 Marcus Avenue, Suite 501
Lake Success, NY 11042
www.cobyusa.com
www.ecoby.com
Warning and Importance
Please DO NOT expose the unit to rain or moist environment in case of fire or electric shock!
 |  |  | ATTENTION: DO NOT OPEN THE COVER OF THE UNIT IN CASE OF FIRE AND ELECTRIC SHOCK. ANY MALFUNCTION SHOULD BE SERVICED BY PROFESSIONAL PERSON. |
 | THE LIGHTNING SIGN IN THE BLACK TRIGON REMINDS THE USER OF THE HIGH VOLTAGE OF THE UNIT. | ||
 | THE EXCLAMATORY PUNCTUATION IN THE BLACK TRIGON REMINDS THE USER OF THE INCIDENTAL MAIN OPERATION AND SERVICE NOTE WITH THE UNIT. | ||
| ITYPELASER PRODUCTION | LASER PRODUCTION SIGN: THE SIGN SHOWS ON THE BACK PANEL OF THE UNIT.DENOTE USER THE WEAK BEAM HAS NO NOCICEPTIVE STOCHASTIC. | ||
Notice:
* Please read through this manual before using the unit.
* The unit can only be used with the power source the manual and the unit itself specified.
* Make sure to hold the isolated terminal of the plug to operate when connecting or pulling out the power cord. Anyway to service or recreate the power cord is prohibited.
* Turn off the power if you don't use the unit. Make sure to pull out the power plug if the unit is not used for a long time or when thundering of lightening.
* Do not place the unit in high-temperature, vibrating, stuffy environment or directly expose to sunlight. Do not put this unit together with high-power electric appliance to ensure good ventilation.
* Make sure the unit is far away from fire, heating source and magnetic source. Do not use alcohol, gasoline or any other chemical solvent to clean the unit.
* Don't spray any liquid or insert any object into the unit. Don't disassembly the unit.
* Don't use the unit in watery place or put heavy objects on it.
* Take out the disk before moving the unit.
* Make sure to turn off the power and pull out the plug when there is smoke or unusual smell and make it serviced by professional person.
- Instruction Manual
- CAUTION
- For Customer Use:
- WARNING:
- CAUTION:
- NOTICE:
- FCC Notice:
- PRECAUTIONS
- IMPORTANT SAFETY INSTRUCTIONS
- TABLE OF CONTENTS
- PACKAGE CONTENTS
- Disc Requirements
- Disc Care and Maintenance
- Handling a Disc
- Cleaning a Disc
- LOCATION OF CONTROLS
- REMOTE CONTROL
- Using The Coin Lithium Battery
- - Mode
- Standby•
- Title•
- Goto•
- Audio•
- Subtitle•
- Setup•
- TV Setup•
- Direction/OK/TUN/CH•
- Menu•
- F.FWD
- F.BWD
- - Play/Pause
- - Stop
- - Clear
- - Memory/Zoom
- FM/AM/EPG
- • DVD/SD/USB
- AUTO/FAV
- - Open/Close
- Key Pad
- • PBC
- - Angel
- - Exit
- - Repeat
- A-B
- - Mute
- NEXT
- - PREV
- - Step
- - Slow
- - Program
- - Display
- - CH-List
- • ST/Mono
- CONNECTIONS
- General Connection
- Power Connection
- TV Antenna Connection
- Radio Antenna Connection
- Speaker Connection
- Audio and Video Signal Input/Output
- USB/SD Card Connection
- Using Headphones / Earphones
- BASIC OPERATIONS
- Set Clock
- Radio Operation
- Basic Operation
- Tune Frequency
- Program Channels
- Auto Program
- Manual Program
- DVD Operation
- NOTE:
- TV Operation
- Audio and Video Signal Input /Output
- JPEG Playback
- Normal Playback
- Picture Rotation
- Zoom
- Start Playing
- Pause Playing
- Stop Playing
- Fast Forward/Backward
- Repeat Function
- Search Function
- DVD FUNCTIONS
- Slow Motion Playback
- Step-by-Step Playback
- Zoom Function
- Display the Current Working Information
- Programming Chapters/Tracks - You can store up to 16 programs.
- While working with the setup menu:
- System Setup
- DVD SETUP
- Audio Out
- DTV FUNCTION
- Preparations
- Setup Menu
- DTV FUNCITON
- SPECIFICATION
- COBY Electronics Technical Support
- Main Unit Troubleshooting
- There is no power to the device.
- The device will not play the disc.
- There is no picture.
- The picture is noisy or distorted.
- The picture is not full-screen.
- There is no sound or distorted sound.
- TROUBLESHOOTING
- The remote control doesn't work.
- The player has malfunctioned.
- Warning and Importance
Brand : COBY
Model : TFDVD7091
Category : Portable DVD Player