
VeloDrive C - Computer accessory OCZ - Free user manual and instructions
Find the device manual for free VeloDrive C OCZ in PDF.


| Product Type | Solid State Drive (SSD) |
| Brand | OCZ |
| Model | VeloDrive C |
| Interface | PCI Express 2.0 x4 (NVMe) |
| Form Factor | Half-length, full-height PCIe add-in card |
| Capacity | 240 GB |
| Max Sequential Read | 1,560 MB/s |
| Max Sequential Write | 1,400 MB/s |
| NAND Type | MLC NAND Flash |
| Controller | Marvell 88SS9183 |
| Dimensions | 168 x 69 x 15 mm |
| Weight | 118 g |
| Power Consumption (Active) | 6.5 W |
| Power Consumption (Idle) | 1.1 W |
| Operating Temperature | 0°C to 70°C |
| Storage Temperature | -40°C to 85°C |
| Shock Resistance | 1500 G (max) |
| MTBF | 2,000,000 hours |
| Warranty | 5 years limited |
| Included Accessories | Low-profile bracket, driver CD, quick start guide |
Frequently Asked Questions - VeloDrive C OCZ
User questions about VeloDrive C OCZ
0 question about this device. Answer the ones you know or ask your own.
Ask a new question about this device
Download the instructions for your Computer accessory in PDF format for free! Find your manual VeloDrive C - OCZ and take your electronic device back in hand. On this page are published all the documents necessary for the use of your device. VeloDrive C by OCZ.
USER MANUAL VeloDrive C OCZ
List of Items in the VeloDrive Box 2
System Requirements 2
Supported Operating Systems 2
Microsoft Windows 2
Hardware Requirements 3
VeloDrive Minimum Hardware Requirements 3
VeloDrive Recommended Hardware Requirements 3
Hardware Installation 3
Switching the Bracket 4
VeloDrive Driver 6
Usage 1: Installation as a Boot Device 6
Installing Windows on VeloDrive 6
Setting the VeloDrive as a Boot Device 6
Usage 2: Installation as a Storage Drive ____ 7
Using the VeloDrive as a Storage Drive 7
RAID 0 or Non-RAID VeloDrive 8
Setting and Removing RAID 0 with VeloDrive 8
Configuration Procedure to Setup Hardware RAID 0 8
Configuration Procedure to Setup Software RAID 0 16
Configuration Procedure to Remove Hardware RAID 0 ____ 23
Configuration Procedure to Remove Software RAID 0 26
Configuration Procedure to Switch Hardware RAID 0 -> Software RAID 0 ____ 28
Configuration Procedure to Switch Software RAID 0 -> Hardware RAID 0 ____ 28
Extending the Life of the VeloDrive 29
Disable Defragmentation 29
Welcome!
The VeloDrive delivers the best-in-class performance in all performance criteria. With incredible, well-rounded speed (bandwidth, IOPS, and access latency), the VeloDrive optimizes any IT environment without the heavy burden on the CPU and large host memory footprint that plagues non-OCZ PCIe SSD solutions. In addition, the VeloDrive provides unparalleled flexibility with the ability to run either hardware or software RAID stacks depending on the application or unique needs.
At OCZ we have one primary goal, and that is to ensure that every customer is 100% satisfied. If the user should have any questions during or after the installation process, please contact our industry-leading support department:
Phone: 1 (800) 459-1816
Online: www.ocztechnology.com/NewTicket.html
24 Hour Support: www.ocztechnologyforum.com
The following instructions are a general guideline for installation and should act as a complement to your system's user manual.
List of Items in the VeloDrive Box
- VeloDrive x8 PCIe 2.0 card in full height bracket
- User guide
- Half height bracket
- Extra heat sink
- Extra heat pad
System Requirements
Supported Operating Systems
VeloDrive supports both Windows 32-bit and 64-bit and x86 architecture. Please update to the latest OS Service Pack/Release.
Microsoft Windows
- Windows 2008 Server
- Windows 7
- Windows Vista
Hardware Requirements
VeloDrive Minimum Hardware Requirements
- One PCIe Gen1 x8 slot.
- A system capable of accompanying a half height, half length PCIe card.
- Minimum system memory as required by the operating system.

NOTE: For optimal performance, please follow "VeloDrive Recommended Hardware Requirements".
VeloDrive Recommended Hardware Requirements
- One PCIe Gen2 x8 or x16 slot.
- Optimal system memory (See Table 1 and Figure 1).
| Average Written Block Size (bytes) | RAM Usage (MB) per 80GB of storage space |
| 8192 | 225 |
| 4096 | 425 |
| 2048 | 825 |
| 1024 | 1600 |
| 512 | 3175 |
Table 1: SSD Block Size and RAM Usage
Use this formula to calculate optimal system memory (See Figure 1).
$$ \left(\frac {\text { RAM_Usage }}{8 0 G B}\right) \times \text { Size of VeloDrive } = 0 \text { optimal System Memory } $$
Figure 1: Equation for Optimal System Memory
Hardware Installation
- Locate an available x8 or x16 PCI-Express slot and carefully seat the drive into the slot.
- The VeloDrive comes in a full height form, so users with half height systems must first switch to the half height bracket. Please follow the section "Switching the Bracket".
- Make certain that the drive board seats firmly into the slot. Screw the top of the board bracket into the system to ensure it remains in place.

Warning! With some operating systems, the VeloDrive PCIe SSD offers the option to utilize the drive as either a primary boot drive for the operating system or as a storage device. Users should choose one of the following usages below.
Switching the Bracket
The VeloDrive comes installed with the full height bracket. This bracket must be switched to the half height bracket (included) to be properly installed on half height systems. The necessary items required for installation are included: half height bracket, the heat sink, and the heat pad.
- Remove the protective tape on the heat sink to reveal the adhesive on the heat sink.
- With the adhesive side facing downward, insert the heat sink into the slot on the half height bracket with horizontal fins.


NOTE: For the best heat dissipation, the heat sink should be installed with widest fins lined up horizontally to the user.
- Unscrew the 3 screws attaching the full height bracket to the VeloDrive.

- Slide the full height bracket off the the VeloDrive.
- Remove the protective tape on both sides of the heat pad.
- Place the heat pad on the chip.

- Slide the half height bracket on.
- Secure the half height bracket by screwing the 3 screws back into the proper slots.

VeloDrive Driver
The VeloDrive Driver is included in the latest Windows update for the specific OS; please make sure the computer OS is updated for proper installation. Windows should automatically install the driver in Windows after the VeloDrive hardware has been installed.
Usage 1: Installation as a Boot Device
Installing Windows on VeloDrive
- Before installation, the user needs to decide whether to use the VeloDrive as a RAID 0 or non-RAID drive. Please read the section on "RAID 0 or Non-RAID VeloDrive" to help decide. Once RAID 0 or non-RAID mode is implemented, switching to the other will cause existing data on the drive to be lost.
- Users opting for RAID 0, please refer to the section "Configuration Procedure to Setup Hardware RAID 0" before installing Windows. To use the VeloDrive as a boot device with Windows installed, it must be configured through Hardware RAID 0. Configuration through software RAID 0 is not an option.

NOTE: Software RAID 0 on the VeloDrive uses Windows 7 "Disk Management", so it requires Windows 7 already installed. Thus, in software RAID 0 mode, it is not an option for VeloDrive used as a boot device to Windows 7.
- Make sure the boot order in the system BIOS is set to boot from the Windows installation CD in the CD drive.

NOTE: Please consult the system's user manual for further detailed instructions on how to access the BIOS and modify its settings.
-
After booting from the CD, follow the onscreen installation instructions from Windows.
-
The VeloDrive should appear in the window, "Where do you want to install Windows?". Select the VeloDrive to continue the installation as prompted.
-
After the installation is complete, follow the "Setting the VeloDrive as a Boot Device" section below.
Setting the VeloDrive as a Boot Device
- To set the VeloDrive as a boot device, the user must first change the boot order in the motherboard BIOS.

NOTE: Please consult the system's user manual for further detailed instructions on how to access the BIOS and modify its settings.
- Change the VeloDrive to the primary boot device.
- Save the settings and exit the BIOS.
- The VeloDrive should now be the boot device.
Usage 2: Installation as a Storage Drive
Using the VeloDrive as a Storage Drive
- The user needs to decide whether to use the VeloDrive as a RAID 0 or non-RAID drive before using the drive as a storage device. Please read the section on "RAID 0 or Non-RAID VeloDrive" to decide. Once RAID 0 or non-RAID mode is implemented, switching to the other will cause existing data on the drive to be lost.
- Users opting for RAID 0 should refer to the section "Configuration Procedure to Setup Hardware RAID 0" or "Configuration Procedure to Setup Software RAID 0" before using the VeloDrive as a storage device.
- Follow the "Hardware Installation" section to install the card into the computer.
- Turn on the computer and boot to Windows.
- Click on the Windows logo button, right click "Computer" and select "Manage" (See Figure 2).

Figure 2: Select Manage Option
- In the "Computer Management" window, select "Storage" and click on "Disk Management" on the left menu. Wait for the "Initialize Disk" window to load and click "OK" (See Figure 3).

NOTE: If the VeloDrive is already initialized, then this step can be skipped.

Figure 3: Disk Management
- After the disks initialize, right click on unallocated disks and select "New Simple Volume" to format the drive.
- Follow the onscreen instructions to finish formatting the drive.
RAID 0 or Non-RAID VeloDrive
The VeloDrive is by default in RAID 0 mode. The user has the option to delete the RAID 0 drive and run in the non-RAID mode. Running in non-RAID mode does not affect the functionality of the card. However, without RAID 0, the VeloDrive will run as four individual drives at standard performance.
Setting and Removing RAID 0 with VeloDrive
This section provides procedures to setup hardware or software RAID.

Warning! The VeloDrive PCIe SSD offers hardware or software RAID. Users can only choose one of these implementations. Switching between hardware and software RAID might cause loss of existing data.
Configuration Procedure to Setup Hardware RAID 0
- Make sure the VeloDrive is installed on the computer. Follow the "Hardware Installation" section.
- Turn the system on and wait for the prompt, "Press Ctrl+C to start...", and press Ctrl+C to enter the RAID array configuration (See Figure 4).
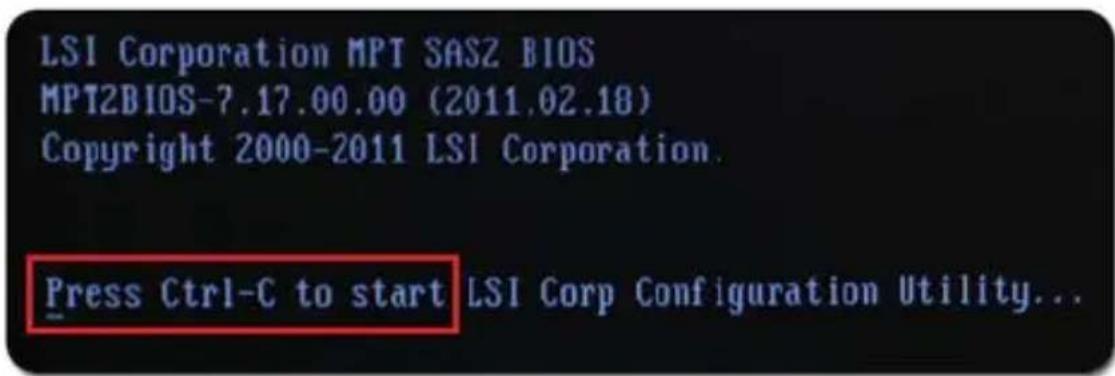
Figure 4: BIOS "Press Ctrl-C" Screen
- Select the "OCZ-VeloDrive" from the adapter list by moving the highlight bar to the adapter and pressing Enter (See Figure 5).
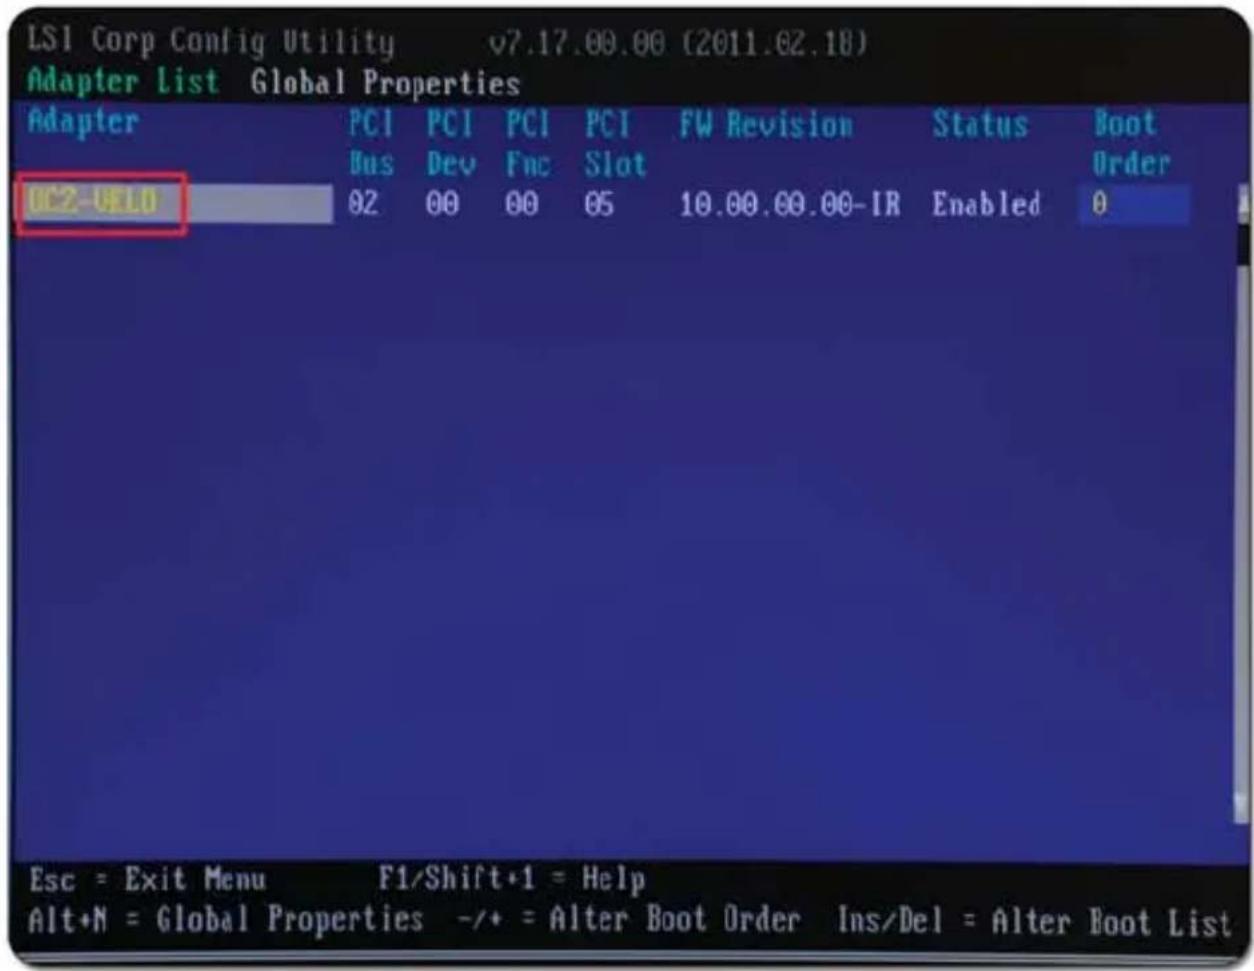
Figure 5: Select OCZ-VeloDrive
- Select "RAID Properties" by moving the highlight bar and pressing Enter (See Figure 6).
![LS1 Corp Config Utility v7.17.00.00 (2011.02.18) Adapter Properties -- SAS2004 Adapter 0CZ-UELO PCI Slot 05 PCI Address(Bus/Dev) 02:00 MPT Firmware Revision 10.00.00.00-IR SAS Address 5E03A970:000025C4 NUDATA Version 0A.62.00.02 Status Enabled Boot Order 0 Boot Support [Enabled BIOS & OS] SAS Properties SAS Topology Advanced Adapter Properties Esc = Exit Menu F1/Shift+1 = Help Enter = Select Item -*/Enter = Change Item](/content/2026/05/1046122/images/3da917aa3ed04984027dfd199d2170d9f103d406405528cdbf7ec7722eb0e052.jpg)
Figure 6: Select RAID Properties
5. Select "Create RAID 0 Volume" (See Figure 7).

Warning! The process of creating a RAID 0 Volume will destroy all data currently on the disks.
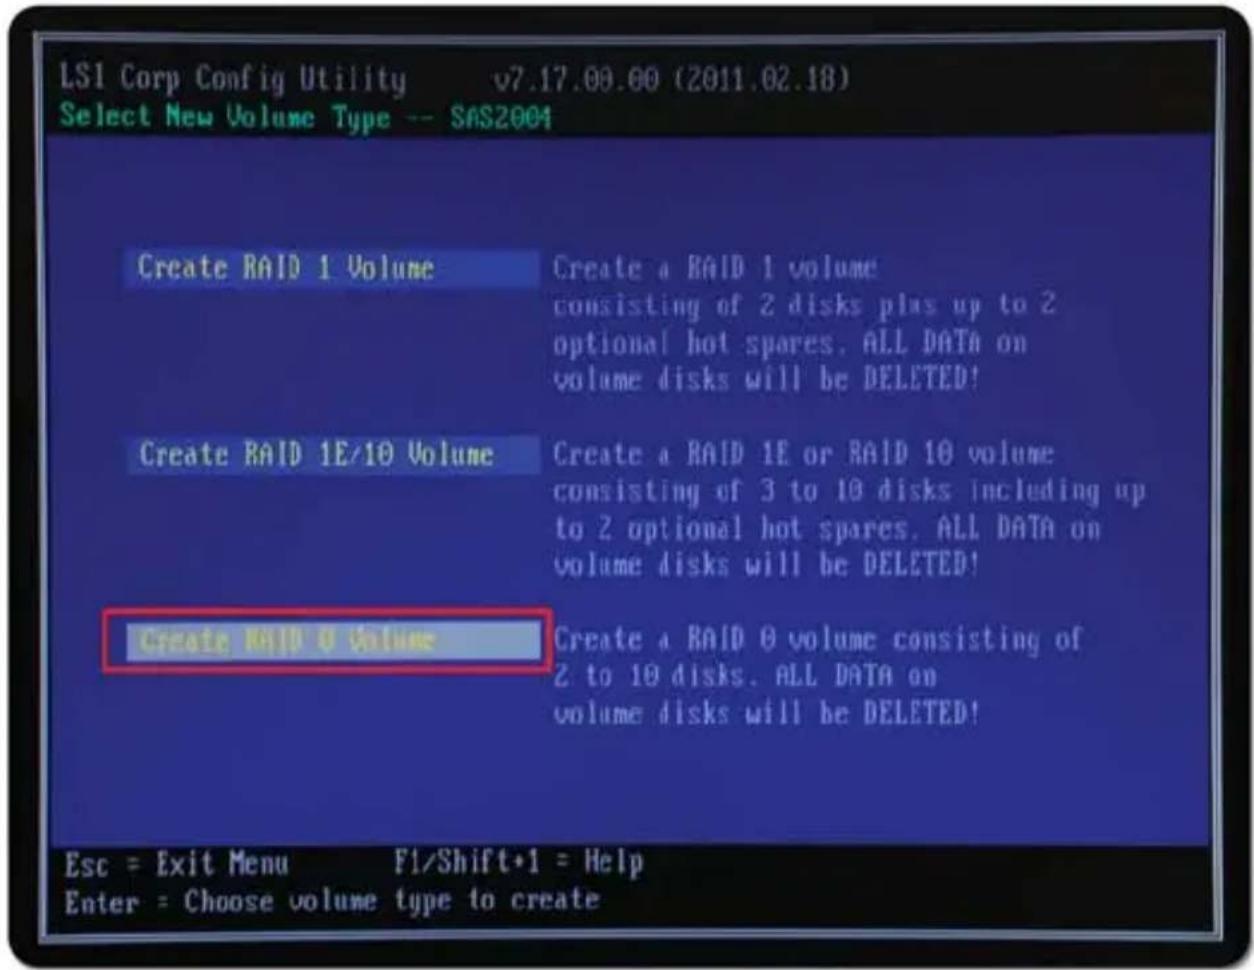
Figure 7: Select "Create RAID 0 Volume"
- Navigate to the "RAID Disk" column where it currently says [No] (See Figure 8).
![LSI Corp Config Utility v7.17.00.00 (2011.02.18) Create New Volume — SAS2004 Volume Type: RAID 0 Volume Size(GB): Slot Device Identifier RAID Drive Pred Size Num Disk Status Fail (GB) 0 ATA OCZ-VELO DRIVE 1.33 [No] No 139 1 ATA OCZ-VELO DRIVE 1.33 [No] No 139 2 ATA OCZ-VELO DRIVE 1.33 [No] No 139 3 ATA OCZ-VELO DRIVE 1.33 [No] No 139 Esc = Exit Menu F1/Shift+1 = Help Space/+/− = Select disk for volume C = Create volume](/content/2026/05/1046122/images/efd7db73e40ad6f089eaab64343abb47ffd5d379287d6dfdcadf2eefe151ffa9.jpg)
Figure 8: All Disks Listed with RAID Disk Column "No"
- By using the space bar, change all the values to [Yes], then press "C" to create the array (See Figure 9).
![LS! Corp Config Utility v7.17.00.00 (2011.02.18) Create New Volume -- SAS2001 Volume Type: RAID 0 Volume Size(GB): 555 Slot Device Identifier RAID Drive Pred Size Num Disk Status Fail (GB) 0 ATA OCZ-VELO DRIVE 1.33 [Yes] ---- No 139 1 ATA OCZ-VELO DRIVE 1.33 [Yes] ---- No 139 2 ATA OCZ-VELO DRIVE 1.33 [Yes] ---- No 139 3 ATA OCZ-VELO DRIVE 1.33 [Yes] ---- No 139 Esc = Exit Menu F1/Shift+1 = Help Space/+/-- = Select disk for volume C = Create volume](/content/2026/05/1046122/images/05cce90525fff962c94ae26eda121e6365853fc9dd24083b109371d4f648fff8.jpg)
Figure 9: Using Spacebar Change RAID Disk Column to "YES"
- Then select "Save changes then exit this menu" (See Figure 10).

Figure 10: Save Changes Before Exiting
- Press "Esc" until the menu seen below. Exit by selecting "Exit the Configuration Utility and Reboot" (See Figure 11).

Figure 11: Exit BIOS
Configuration Procedure to Setup Software RAID 0
- Make sure the VeloDrive is installed on the computer. Follow the "Hardware Installation" section of this guide.
- Boot into Windows 7. Click on the Windows logo button in the lower left hand corner. Then right-click on "Computer" and select "Manage" (See Figure 12).
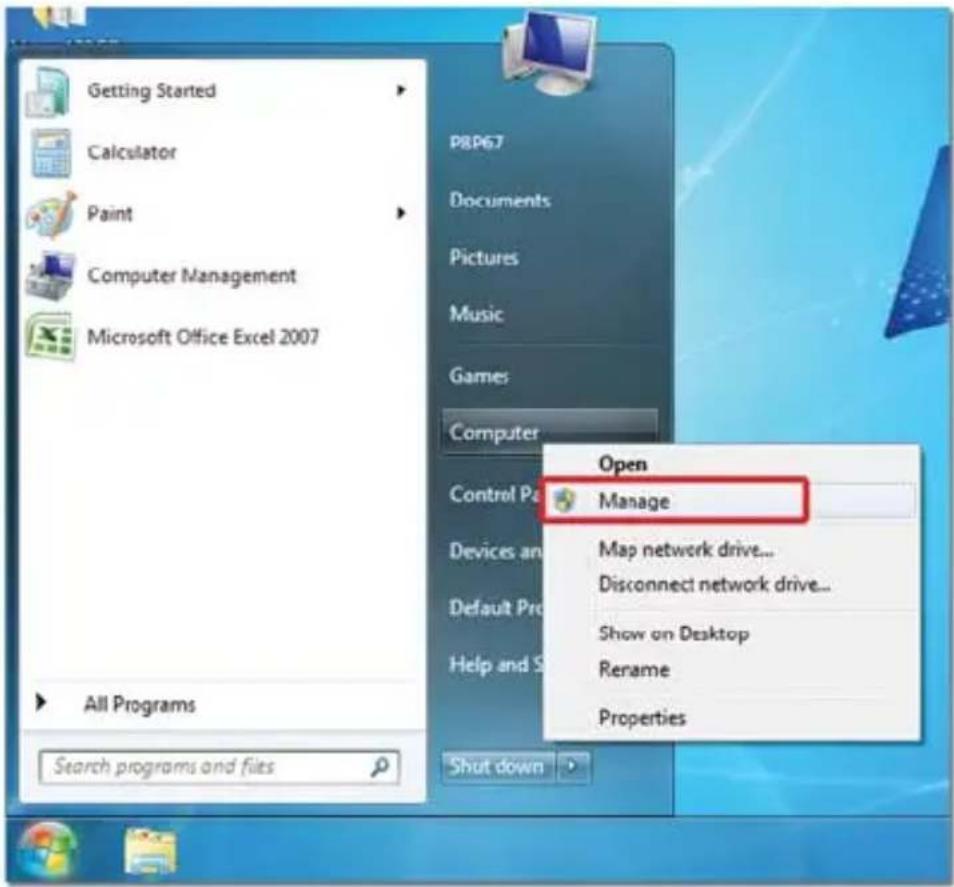
Figure 12: How to enter "Computer Management" Window
- In the "Computer Management" window, click "Disk Management" on the left menu. Wait for the "Initialize Disk" window to load and click the "OK" (See Figure 13).

Figure 13: "Computer Management" Window
- After the disks initialize, right-click one of the unallocated disks (not disk 0) and select "New Striped Volume" (See Figure 14).

Figure 14: Select "New Striped Volume"
- Click "Next" in the New Striped Volume Wizard pop-up window (See Figure 15).
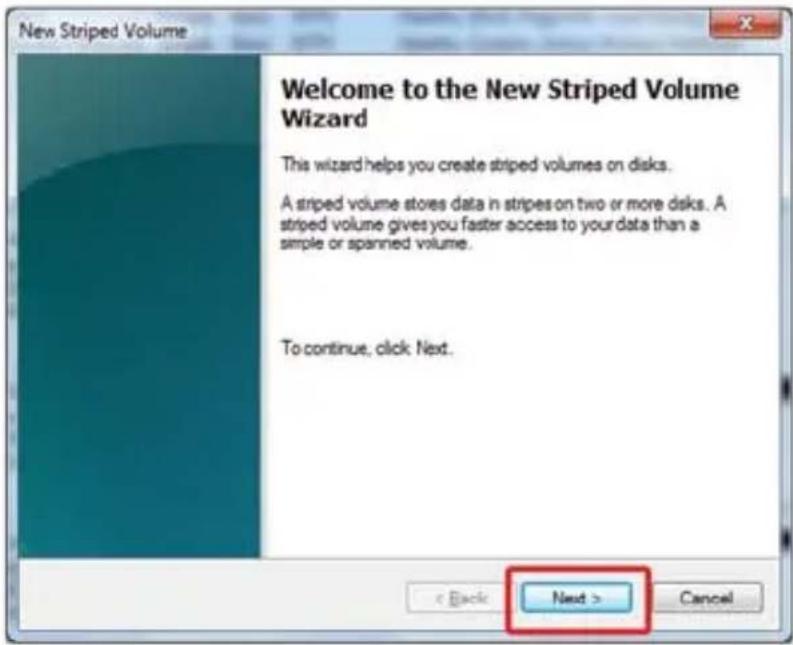
Figure 15: New Striped Volume Wizard
- Move all 4 disks to the selected column by using the "Add >" button (See Figure 16).
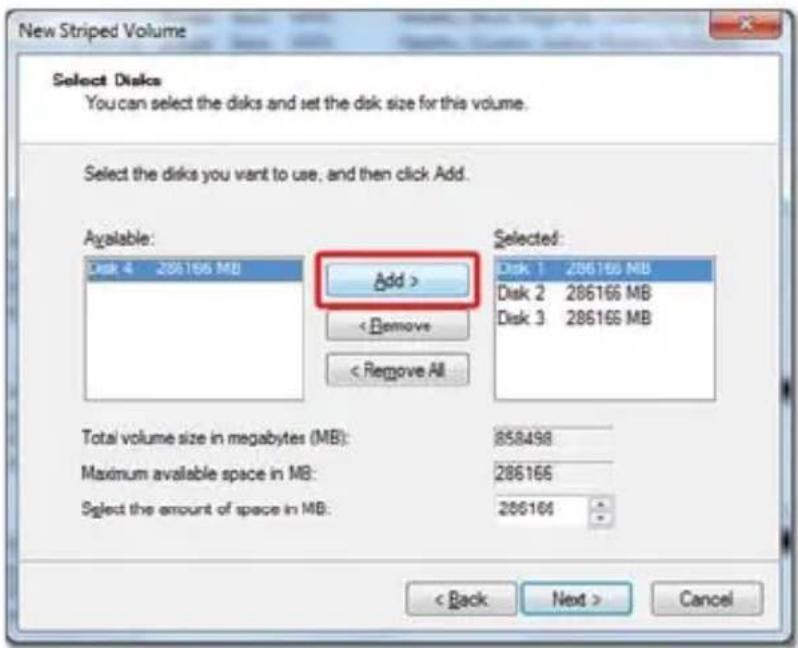
Figure 16: Adding all 4 disks
- Continue to click the "Next" button until the New Striped Volume Wizard is finished. Click "Finish" to complete creating the RAID volumes.

- Click "Yes" on the "Disk Management" pop-up warning (See Figure 17).

Figure 17: Disk Management Warning
- When successful, the "Disk Management" window should resemble this figure:

Figure 18: Disk Management with Striped Disks
- Right-click "New Volume" on top and select "Properties". This should show that the 4 extra drives are aggregated into one volume (See Figure 19).

Figure 19: Striped Volume Properties
Configuration Procedure to Remove Hardware RAID 0
- First, the RAID that is setup in the BIOS must be removed through BIOS. Please follow steps 1-4 in "Configuration Procedure to Setup Hardware RAID 0" section.
- Select "Manage Volume" (See Figure 20).

Figure 20: Select "Manage Volume"
3. Select "Delete Volume" (See Figure 21).
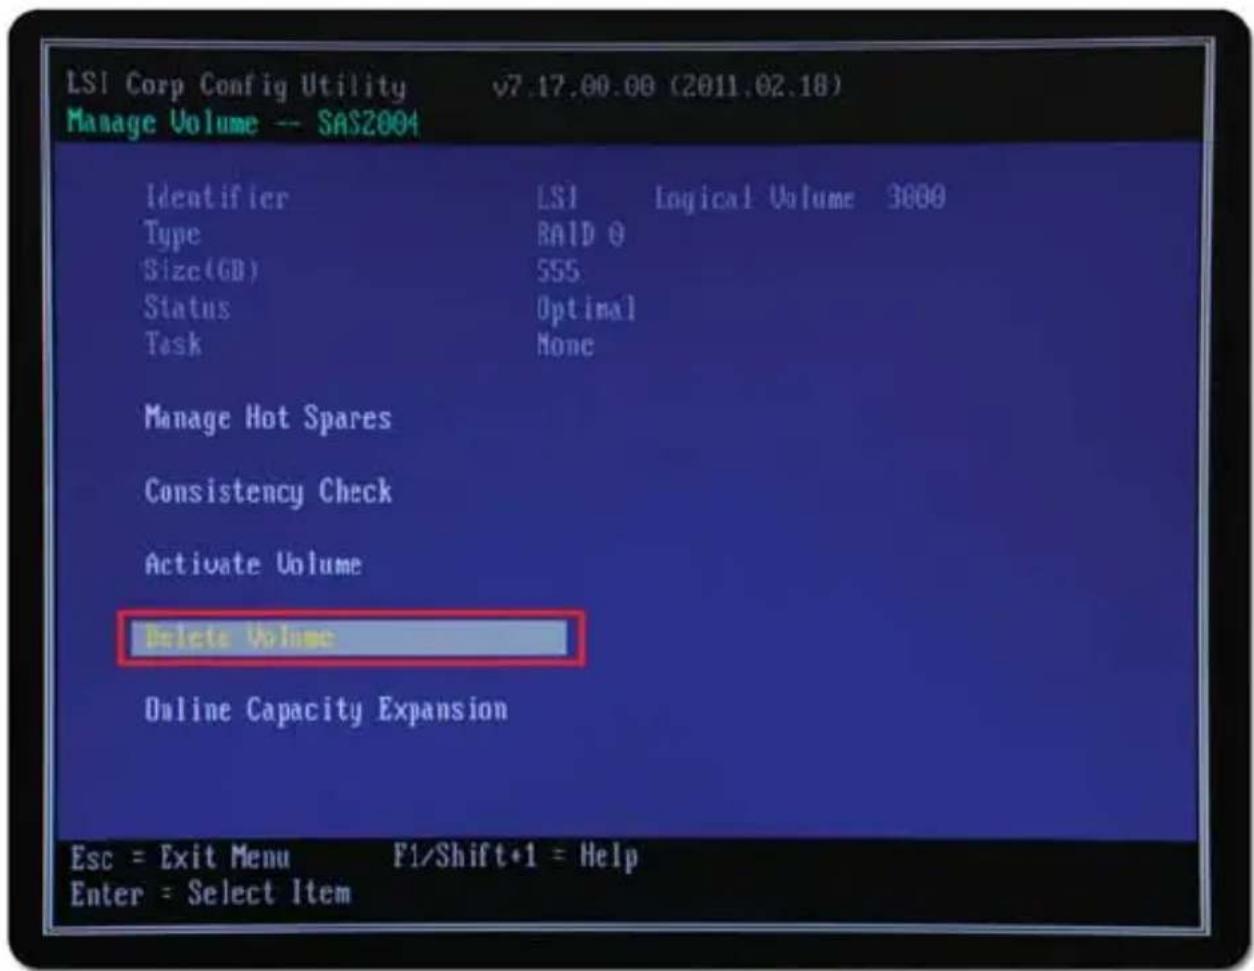
Figure 21: Select "Delete Volume"
4. Press "Y" (See Figure 22).

Figure 22: Press "Y"
Configuration Procedure to Remove Software RAID 0
- Please follow the steps 1-2 in "Configuration Procedure to Setup Software RAID 0" to enter "Computer Management".
- In the "Computer Management" window, click "Disk Management" on the left menu.
- Right-click one of the striped disks (not disk 0) and select "Delete Volume" (See Figure 23).

Figure 23: Select Delete Volume
4. Click "Yes" on the pop-up warning (See Figure 24).

Figure 24: Delete Striped Volume Warning
- The striped drives will become unallocated disks (See Figure 25).

Figure 25: Unallocated Disks
Configuration Procedure to Switch Hardware RAID 0 -> Software RAID 0
- Please follow the instructions in "Configuration Procedure to Remove Hardware RAID" to remove hardware RAID.
- Please follow the instructions in "Configuration Procedure to Setup Software RAID 0" section to switch to software RAID 0.
Configuration Procedure to Switch Software RAID 0 -> Hardware RAID 0
- The RAID 0 that is setup by Windows 7 is removed automatically when RAID 0 is setup in the SSD BIOS. Please follow all instructions in the "Configuration Procedure to Setup Hardware RAID 0" section.
Extending the Life of the VeloDrive
Disable Defragmentation
Defragmentation is a process typically meant for HDDs. Since SSDs are based on flash technology, they must also be maintained differently. SSDs, unlike traditional hard drives, do not gain performance improvements from defragmentation. Defragmentation produces unnecessary writes to the drive, shortening the lifespan of the VeloDrive. Please follow the instructions below to check and disable the Disk Defragmentation Scheduler in Windows 7 (Other versions of Windows should be similar).

Note: Defragmentation is unnecessary on the VeloDrive.
- Click on the Windows logo button, and type in "Disk Defragmenter". Click on "Disk Defragmenter" (See Figure 26).

Figure 26: Find Disk Defragmenter
- Under the "Disk Defragmenter" window, check if defragmentation is scheduled. Click on "Configure Schedule..." (See Figure 27).
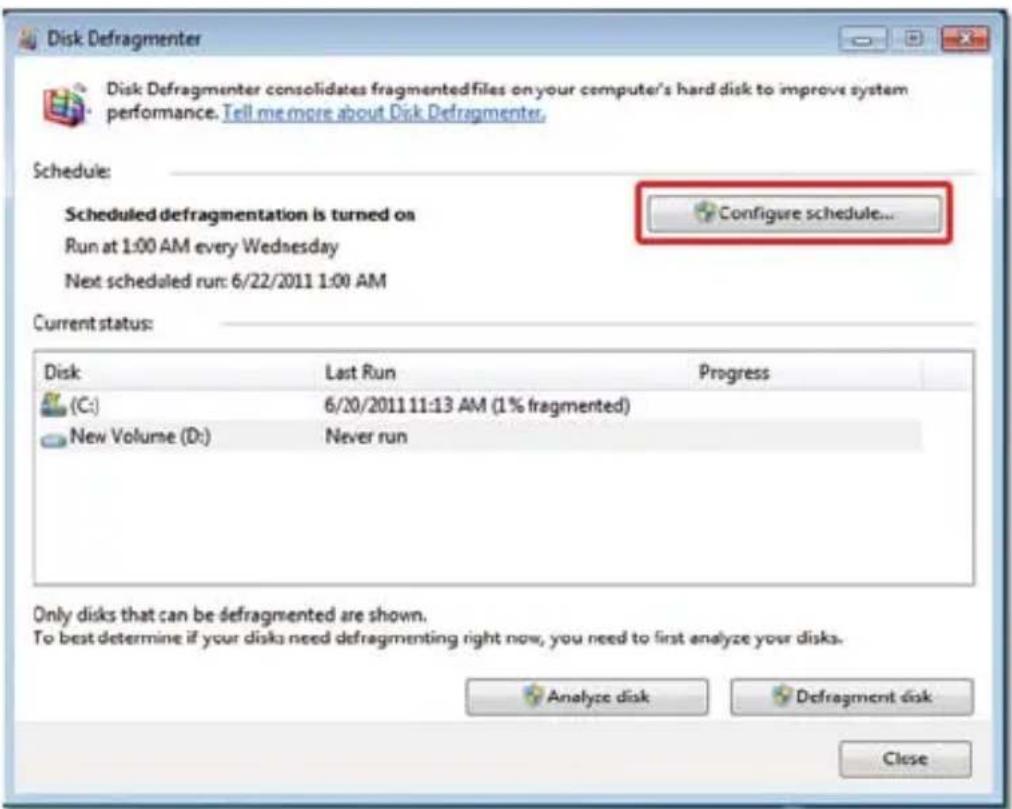
Figure 27: Disk Defragmenter Window with Scheduled Defragmentation
- Un-check the "Run on a schedule" and select the "OK" (See Figure 28).

Figure 28: Disk Defragmenter Modify Schedule
- The "Disk Defragmenter" Window should resemble the following screenshot (See Figure 29).

Figure 29: Disk Defragment Window with no Defragmentation Scheduled
LIMITED WARRANTY
OCZ Technology products epitomize the new vanguard of quality standards as part of our commitment to our customers. All OCZ Technology Group ("OCZ") products are warranted and tested to be free from defects in material and workmanship and to conform to the published specifications. Should your OCZ product fail within the warranty period (under normal use in the recommended environment) due to improper workmanship or materials, OCZ will repair the product or replace it with a comparable or better unit. This warranty is subject to the conditions and limitations set forth herein.
DURATION OF WARRANTY
The OCZ VeloDrive is covered by this warranty for 3 years from the date-of-purchase. Proof-of-purchase including the date-of-purchase is required to collect on the warranty. OCZ will inspect the product and decide whether to repair or replace it. OCZ reserves the right to provide a functional equivalent product, or a refurbished replacement product.
LIMITATIONS
This warranty does not apply to product failure caused by accidents, abuse, mishandling, improper installation, alteration, acts of nature, improper usage, or problems with electrical power. In addition, opening or tampering with the product casing, or any physical damage, abuse or alteration to the product's surface, including all warranty or quality stickers, product serial or electronic numbers will also void the product warranty. OCZ is not responsible for recovering any data lost due to the failure of a Flash memory device. OCZ products must be used with devices that conform to the recommended industry standards. OCZ will not be liable for damages resulting from a third party device that causes the OCZ product to fail. OCZ shall in no event be liable for any consequential, indirect, or incidental damages, lost profits, lost business investments, lost goodwill, or interference with business relationships as a result of lost data. OCZ is also not responsible for damage or failure of any third-party equipment, even if OCZ has been advised of the possibility. This limitation does not apply to the extent making it illegal or unenforceable under applicable law.
ocztechnology.com




- Welcome!
- List of Items in the VeloDrive Box
- System Requirements
- Supported Operating Systems
- Microsoft Windows
- Hardware Requirements
- VeloDrive Minimum Hardware Requirements
- VeloDrive Recommended Hardware Requirements
- Figure 1: Equation for Optimal System Memory
- Hardware Installation
- Switching the Bracket
- VeloDrive Driver
- Usage 1: Installation as a Boot Device
- Installing Windows on VeloDrive
- Setting the VeloDrive as a Boot Device
- Usage 2: Installation as a Storage Drive
- Using the VeloDrive as a Storage Drive
- RAID 0 or Non-RAID VeloDrive
- Setting and Removing RAID 0 with VeloDrive
- Configuration Procedure to Setup Hardware RAID 0
- Select "Create RAID 0 Volume" (See Figure 7).
- Configuration Procedure to Setup Software RAID 0
- Configuration Procedure to Remove Hardware RAID 0
- Select "Delete Volume" (See Figure 21).
- Press "Y" (See Figure 22).
- Configuration Procedure to Remove Software RAID 0
- Click "Yes" on the pop-up warning (See Figure 24).
- Configuration Procedure to Switch Hardware RAID 0 -> Software RAID 0
- Configuration Procedure to Switch Software RAID 0 -> Hardware RAID 0
- Extending the Life of the VeloDrive
- Disable Defragmentation
- Note: Defragmentation is unnecessary on the VeloDrive.
- LIMITED WARRANTY
- DURATION OF WARRANTY
- LIMITATIONS
Brand : OCZ
Model : VeloDrive C
Category : Computer accessory