Dirt eBike - Electric bike SEGWAY - Free user manual and instructions
Find the device manual for free Dirt eBike SEGWAY in PDF.

| Brand | Segway |
| Model | Dirt eBike |
| Product Type | Electric Dirt Bike |
| Frame Material | Aluminum Alloy |
| Motor Type | Brushless Hub Motor |
| Motor Power | 750 W |
| Battery Type | Lithium-ion |
| Battery Voltage | 48 V |
| Battery Capacity | 20 Ah |
| Charging Time | 6-8 hours |
| Max Speed | 32 km/h |
| Range | Up to 80 km (Eco mode) |
| Weight | 35 kg |
| Dimensions (L x W x H) | 1850 x 820 x 1100 mm |
| Tire Size | 20 x 4 inches |
| Brake Type | Hydraulic Disc Brakes |
| Suspension | Front and Rear |
| Display | LCD with Speed, Battery, Odometer |
| Lighting | LED Headlight and Taillight |
| Safety Features | Reflectors, Bell, Brake Light |
| Maintenance | Check tire pressure, brakes, chain; clean with damp cloth; store indoors |
| Spare Parts | Available from Segway authorized dealers |
| Repairability | Modular design; service at authorized centers |
| Warranty | 2 years on frame and motor, 1 year on battery |
Frequently Asked Questions - Dirt eBike SEGWAY
User questions about Dirt eBike SEGWAY
0 question about this device. Answer the ones you know or ask your own.
Ask a new question about this device
Download the instructions for your Electric bike in PDF format for free! Find your manual Dirt eBike - SEGWAY and take your electronic device back in hand. On this page are published all the documents necessary for the use of your device. Dirt eBike by SEGWAY.
USER MANUAL Dirt eBike SEGWAY
Segway Dirt eBike User Manual
The manufacturer reserves the right to make changes to the product, release firmware updates, and update this manual at any time. Visit www.segway.com or check the Segway Ninebot App to download the latest user materials. You must install the App, activate your Segway Dirt eBike and obtain the latest updates and safety instructions.
www.segway.com

SEGWAY
California Proposition 65
WARNING
Operating, servicing and maintaining a passenger vehicle or off-highway motor vehicle can expose you to chemicals including engine exhaust, carbon monoxide, phthalates, and lead, which are known to the State of California to cause cancer and birth defects or other reproductive harm. To minimize exposure, avoid breathing exhaust, do not idle the engine except as necessary, service your vehicle in a well-ventilated area and wear gloves or wash your hands frequently when servicing your vehicle. For more information go to https://www.p65warnings.ca.gov/products/passenger-vehicle.
IMPORTANT INFORMATION
For the purpose of emphasis, the words and symbols of "WARNING" (▲) "CAUTION" (⊗), "NOTICE" and "NOTE (∗)" have special meanings. Pay extra attention to information highlighted by these signals:
WARNING (▲) indicates a potential hazard that could result in death or serious injury. CAUTION (⊗) indicates a potential hazard that could result in minor or moderate injury. NOTICE indicates a potential hazard that could result in vehicle or equipment damage. NOTE (*) indicates information that makes installation and maintenance easier.
NO PASSENGERS
1 person only! This vehicle is designed as an operator-only model. The motorcycle loading limit and seating configuration do not safely allow the carrying of a passenger.
FOR RECREATIONAL OFF-ROAD USE ONLY
Segway Dirt eBike is designed and manufactured for recreational off-road use only. If you need to cross a paved or public road, get off and walk your vehicle across.
\* NOTE
You must thoroughly understand the user manual before riding the Segway Dirt eBike. This manual should be considered as a permanent part of the motorcycle and should remain with the vehicle when it is resold.
\* NOTE
Read the Segway Dirt eBike Limited Warranty and Dispute Resolution thoroughly so you understand the coverages that protect your new motorcycle and know your rights and responsibilities.
WARNING
- Do not ride through flood water, submerge the vehicle or wade in water for a long time. The battery will be damaged and cause serious danger.
- You must wear a helmet and protective gear when riding at all times.
- Improper decorations and modifications can cause a crash in which you could be killed. We strongly advise that you do not modify your Segway Dirt eBike or remove any original equipment. Changing its original design or operation is very dangerous. Segway is unable to accept any liability for parts and accessories which have not been approved.
- Lock the battery case before use.
- Do not apply a high pressure washer directly to the electrical components.
Contents
-
Riding Safety 01
-
Components and Functions 04
-
Package Contents 08
-
Assembly 10
-
Preparation Before Riding 15
-
Learn to Ride 18
-
Notes on Usage and Operation 24
-
How to Charge 26
-
Transporting and Storing Your Vehicle 29
-
Maintenance 30
-
Troubleshooting 36
-
Specifications 38
-
Certifications 40
-
Trademark and Legal Statement 41
-
Contact 41
Appendix: Electric Schematic Diagram of the Vehicle 42
Welcome
Thank you for choosing Segway Dirt eBike ( X160 / X260 )
Segway Dirt eBike is an all-terrain off-road electric motorcycle with high performance. It is eco-friendly and built for all user types, making it possible for more people than ever to participate in exciting off-road adventures. Unlike older models, which are large, heavy, difficult to maintain and operate, Segway Dirt eBike has the advantages of being lightweight, easy to learn and maintain and with a performance guarantee.

Please read the user manual carefully and fully understand the vehicle's usage and maintenance methods. Please note that the pictures shown are for illustration purpose only. Actual product may vary due to continuous vehicle improvement. No legal claims can be made on the basis of data in this manual.
1 Riding Safety
Please follow local laws and traffic rules strictly. Do not ride Segway Dirt eBike on public roads, as this product is for off-road use only. Please understand that you can reduce the risk by following all the instructions and warnings in this manual, but you cannot eliminate all the risks. Remember that whenever you ride the Segway Dirt eBike you risk injury from loss of control, collisions, and falls. RIDE AT YOUR OWN RISK AND USE COMMON SENSE.
- For your safety, please read the manual carefully and familiarize yourself with the vehicle, then find a safe training ground to practice. Ride within your limits. Start with EP mode at a low speed and gradually build up your off-road riding skills. For the best performance and a longer service life, please follow the instructions to assemble the vehicle correctly.
- To avoid damage to the electrical components, do not apply high pressure directly to the vehicle, expose it to rain or submerge in water. When wading in water, the water level should not exceed the wheel center.
- Do not soak the battery in water. Doing so will risk the battery to short circuit or to be permanently damaged. When the battery is wet, charging can cause the battery to burn or explode.
- Be sure to watch the Riding Tutorial on the Segway-Ninebot App before your first ride. Please do not lend Segway Dirt eBike to anyone who does not know how to operate it. People under the following conditions should not ride the vehicle:
- Underage
II. Cannot take on physically challenging activities because of a health condition
II. Pregnant
IV. Beyond the weight range
V. Under the influence of alcohol or drugs - Do not ride in extreme weather like snow, heavy rain and storms. Slow down on uneven, wet and slippery surfaces, steep slopes, sharp turns, mud puddles and loose ground. Always keep a safe distance from other vehicles.
-
Do not modify the vehicle or change parts by yourself. To repair or replace components, please go to a professional repair shop.
-
If you hear any abnormal noises or alarms, stop riding immediately and call after-sales service for help.
- To reduce the risk of injury, you must read and follow all "NOTICE", "CAUTION" (✗), "NOTE" (*) and "WARNING" (⚠) notices in this document.
Before Every Ride
- Dress properly
Please dress in unrestrictive clothing with non-open cuffs and with good flexibility. Wearing bright colors helps others to see you more easily. Wear a helmet, sturdy riding boots, eye protection, gloves, and protective clothing. Do not ride in slippers or high-heels.
- Check all functionalities before every riding session
WARNING
Improperly maintaining the vehicle could lead to problems, causing a crash in which you could be killed. Always follow the inspection and maintenance recommendations and schedules (see chapter 10. Maintenance).
- Wheels should not be shaky. Tire pressure should be 32.6 psi (225 kPa). Check both tires for condition and tread depth. Tires should have no cracks or abnormal wear and tear. Make sure there are no foreign objects like glass, stones and nails stuck in the tires. Spokes should not be loose.
- Chains normally have a 0.4–0.8 inch (10–20 mm) moving range. If there's jamming, please clean and add lubricating oil.
- Check the drive belt tension and condition. Adjust when necessary.
- Check front and rear suspension for proper operation.
- Check whether the front and rear brakes function properly and ensure that the brake cable is not damaged. Brake cable should have the right tension.
- Screws, nuts, bolts and other fasteners must be checked. Make sure there's no loose part. Refer to Torque Index Card to tighten parts of the vehicle.
● The handlebar should be stable and able to turn smoothly. - When the vehicle is turned off, test to see if the accelerator can work smoothly and return correctly.
- Make sure there is enough remaining battery for your planned trip. Check to ensure that the power supply circuit and lighting can work properly.
● The stem and shock absorber tubes should be clean, and without any foreign objects stuck inside.
When Riding
- Always wear a helmet and protective gear. Use an approved motorcycle helmet that meets the local safety standards. Wearing protective gear like knee pads and elbow pads are highly recommended.
- Do not ride under the influence of drugs or alcohol and avoid riding when tired or fatigued.
- Do not exceed the speed limit. Stay alert when riding and avoid using phones, cameras, earplugs, etc.
- Always focus on the road and the riding environment. Take extra care when riding at dawn, at dusk or at night, when visibility is low.
- The rated loading capacity is 1 person. Overloading will cause riding difficulty and risk of injury. Please do not overload or use the vehicle to carry heavy stuff.
- Do not ride through flood water, submerge the vehicle or wade in water for a long time. The electrical components such as the controller and battery will be damaged. Brake performance will be affected when the water level is higher than the wheel center.
- To ensure safety and vehicle performance, please ride smoothly and avoid rapid acceleration and deceleration. DO NOT brake abruptly when riding, otherwise there will be a risk for loss of control.
Safe Use
- Always turn off the electric lock when you are not riding. Accidents can happen when the motorcycle is powered on while the rider is trying to get on/off the vehicle.
- When backing up or pushing the motorcycle while dismounted, be sure to turn off the electric lock.
- When parking, turn off the Segway Dirt eBike and leave it on a flat surface. Do not park your vehicle on a slope or soft ground.
- Do not park the Segway Dirt eBike in no-parking zones, such as an emergency exit or fire escapes.
- Be sure to only use the charger provided in the package. Charger and battery pack must match. The charger input voltage is 100–240 V. If the charger or charging port is wet, do not charge.
- Battery working temperature is 14°F to 122°F (-10 to 50°C), with optimal performance in 50°F to 86°F (10 to 30°C). Only use the battery in working temperatures and do not charge when temperature is lower than 32°F (0°C).
2 Components and Functions
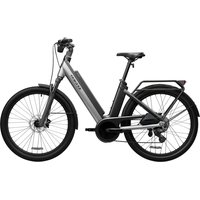
Please identify each part and familiarize yourself with them. The diagrams below use Segway X260 as an example. Actual product may vary.
text_image
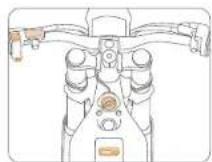
SPORT mode EP mode 20 Speed Brand Combination switch and dashboard Rear brake lever Handlebar Electric lock Turn clockwise to start motor and other vehicle functions Front brake lever Accelerator USB port Battery display Press the button to see remaining battery Left foot peg Right foot peg Seat Horn button The horn can be used to warn other motorists or pedestrians of your presence EP mode (Economy mode): Motor power and maximum speed are limited. Good for beginners and long-distance rides. SPORT mode (Sport mode): Strong motor power. For experienced riders and cross country riding. Dashboard button: ● Default display current speed and total mileage. ● Pass the switch to run max speed and mileage (no current trip.● Long press to delete max speed and mileage for current trip.
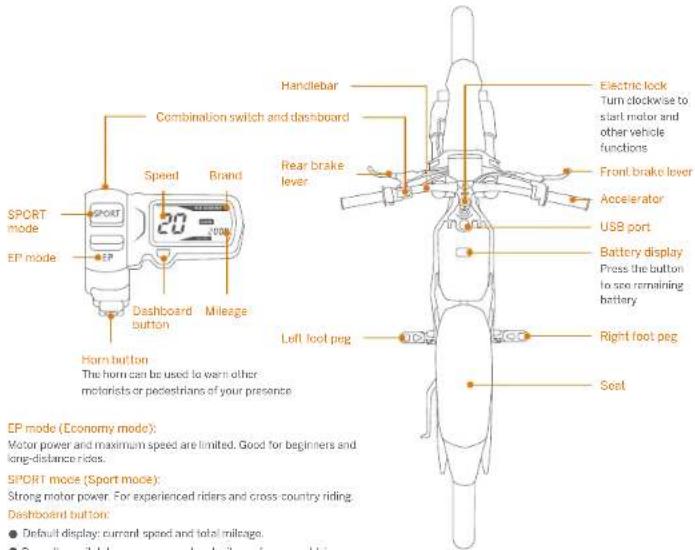
Left Side View Right Side View
text_image
Vehicle charging port Headlight Far X250 only Front number plate Far X250 only Front shock absorber Tail fender Battery compartment cover Vehicle frame Rear fender Front wheel Front disc brake pump Motor controller Kickstand (with built-in sensor) When the kickstand is put down, the motor will not start when you rotate the accelerator Rear disc brake pump Rear wheel
text_image
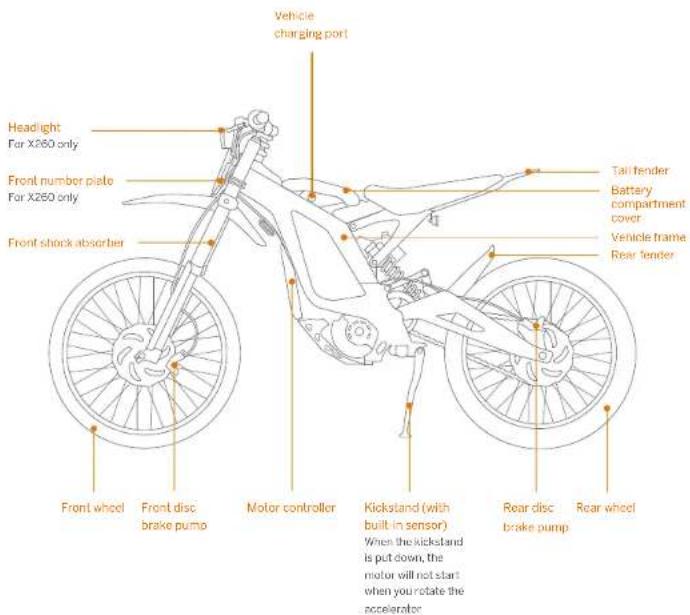
Rear shock absorber Tallight Rear fork MotorChain cover Lower protective plate Battery compartment lock Insert the key and turn counter clockwise to open Front fender Horn Lithium battery pack• NOTE
For convenience of maintenance and better service, please make sure the vehicle frame number is well protected. The number is engraved on the stem.
There's also a unique motor number on each motor.
Location of Important Labels
CAUTION
We have provided important safety notice on labels and in this user manual. For the safety of you and others, please make sure to read labels on the vehicle and packaging materials. Do not remove any labels from the vehicle.

text_image
App activation label Warning label Main switch safety label High Voltage warning label Exposure to high voltage can cause burns, shock, and even death. Do not cut, probe, tamper with, or modify high voltage cables or wiring. Always have a specially trained technician to service the high voltage components when needed. Tire pressure label3 Package Contents

natural_image
Line drawing of a motorcycle with front wheel, rear wheel, and side-mounted components (no text or symbols)When unpacking, please check if all items are in good condition. If there are any missing or defective parts, please contact your dealer or after-sales service.
To avoid damage to vehicle parts or to avoid accidents, please see your dealer for service and vehicle adjustment.

User Manual

Quick-start Guide

Limited Warranty and Dispute Resolution
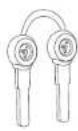
Keys x 2

Torque Index Card (Torque values for tightening screws, nuts and bolts)

Nylon Strip (7.9 inch / 200 mm) x 4
(For X260 only)
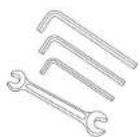
Tool Kit
(4 / 5 / 8 mm Allen wrench;
14 mm open-end wrench)
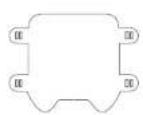
Front Number Plate
(For X260 only)

Right Foot Peg
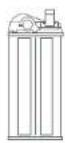
Battery
Charger

Cushioning Foam
4 Assembly
Please follow the instructions to assemble the vehicle. Improper assembly can lead to rider injury or vehicle damage.
Install Handlebar
-
Use a 4 mm Allen wrench to loosen the 4 lock screws (with washers) and take off the handlebar stem cap.
-
Install the front brake lever, then the accelerator on the handlebar. * Do not tighten the nuts.
natural_image
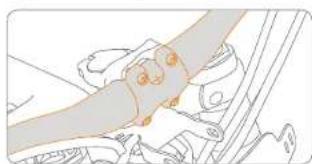
Abstract line drawing with intersecting curved and diagonal lines, no text or symbols present- Insert the handlebar and affix the handlebar stem cap. Align with the marking and fit the handlebar to the right direction and angle.
natural_image
Line drawing of a mechanical tool or tool with a handle and lever, no text or symbols present- Tighten the 4 lock screws. Refer to Torque Index Card for torque specs.
natural_image
Illustration of a hand interacting with a medical device (no text or symbols visible)
natural_image
Illustration of a hand adjusting a mechanical component with no visible text or symbolsInstall Headlight (for X260 only)
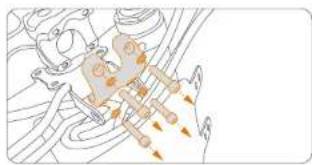
- Affix the headlight to the installation plate on the front fork.
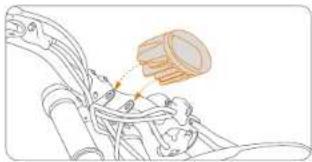
natural_image
Mechanical assembly diagram showing a motor with a gear and pivot point (no text or labels)- Install the headlight, adjust to the right angle and tighten the lock bolts on both sides.
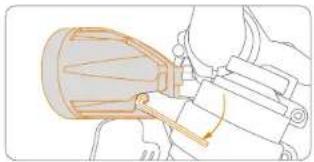
natural_image
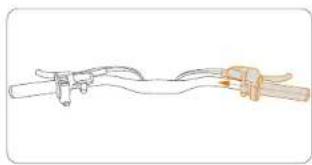
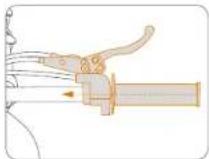
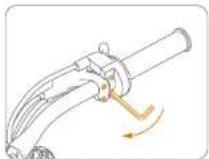
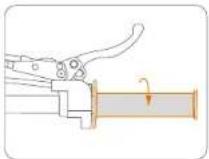
Illustration of a mechanical device with a handle and lever mechanism (no text or symbols)Affix Front Brake Lever and Accelerator
-
Adjust the front brake lever and the accelerator to the correct angle.
-
Use 4 mm / 5 mm Allen wrench to tighten the accelerator and front brake respectively.
-
Check to make sure the accelerator works smoothly. * If there's jamming, adjust the angle and check if the cables are stuck.
Install Front Wheel
-
Use a 4 mm Allen wrench to loosen the 4 bolts on the front fork.
-
Use an 8 mm Allen wrench to take off the 2 nuts on the front wheel axle, then knock gently to take out the front wheel axle.
-
Put the axle plug on both sides of the front wheel. Be careful not to damage the sealing ring.
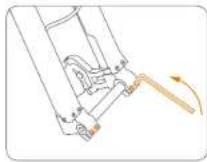
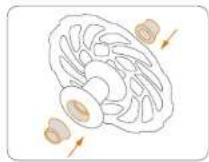
- Take off the clamp from the disc brake clipper, install the front wheel in the front fork (make sure it's well matched with the disc brake's clipper).

natural_image
Pure mechanical assembly diagram without any text, numbers, or symbols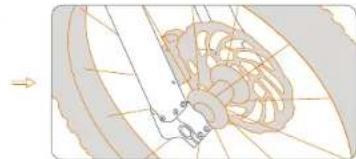
natural_image
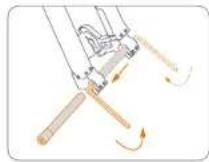
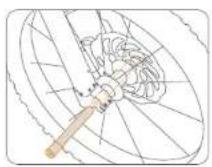
Diagram of a mechanical gear or cam mechanism with labeled parts (no readable text or symbols)-
Insert the front wheel axle and ensure that it goes through the front fork and wheel respectively.
-
Use an 8 mm Allen wrench to lighten the nuts on both sides of the wheel.
-
Use a 4 mm Allen wrench to tighten the 4 bolts on the front fork.
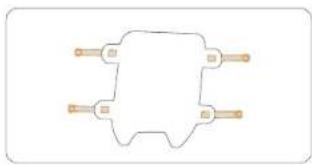
Install Front Number Plate
- As shown below, ensure that the 4 Nylon strips go through the holes on the number plate.
natural_image
Pure electrical circuit lines without any symbols- Tighten the strips and affix the number plate on the front fork.
natural_image
Technical line drawing of a mechanical assembly with no visible text or symbols
Please hide the exposed strips behind the number plate.
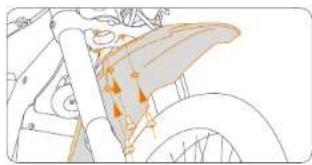
Install Front Fender
Take off the 3 bolts and install the front fender. Use a 4 mm Allen wrench to tighten the bolts and make sure they are securely fastened.
natural_image
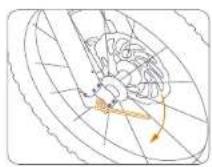
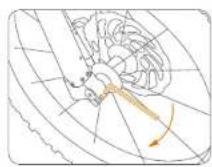
Diagram of a bicycle's front wheel and side arm, showing structural components without any text or labelsInstall Right Foot Peg
- Place the foot peg in the installation position, 2. Use a 14 mm open-end wrench to tighten the nut.

natural_image
Illustration of a chain and chain attachment mechanism (no text or symbols)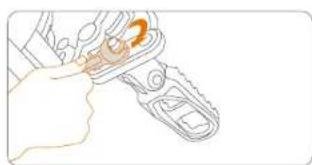
natural_image
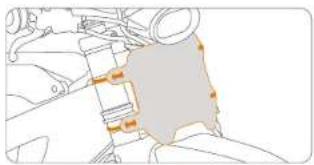
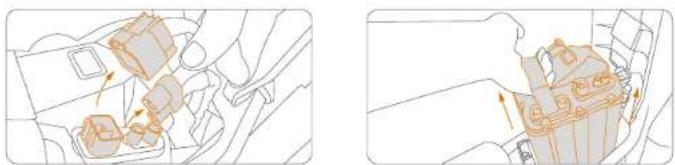
Illustration of a hand holding a chain-link device with a gear handle (no text or symbols)Install Battery
NOTICE
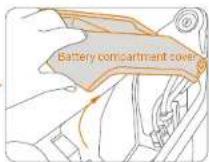
- Before installing the battery, please turn off the electric lock and flip left to turn off the main switch, then cover the charging port sealing cap.
● The communication plug must be connected, otherwise the vehicle cannot identify the battery specifications.
- Take the battery out of the package box. Make sure the electric lock is turned off. Then open the battery compartment and make sure the main switch is off.

-
Insert the battery. Make sure that the battery faces the right direction, with the battery charging port on the left side of the vehicle.
-
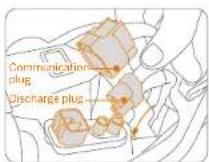
Connect the communication plug and discharge plug.
-
Flip the switch right to turn on the main switch. Close the battery compartment and remove the key.
WARNING
To avoid any damage or danger, it's prohibited to disassemble the battery.
5 Preparation Before Riding
Download App

Before your first ride, you must log in to Segway-Ninebot App to activate your new Segway Dirt eBike. Scan the QR code to download Segway-Ninebot App (iOS version 9.0 and above, Android version 4.3 and above, Bluetooth version 4.0 and above).
Sagree, Nipuzal/ou
Activate the Vehicle
1 After installing the App. please register / log in.
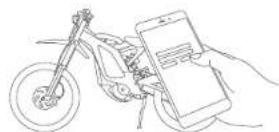
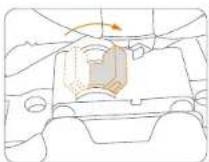
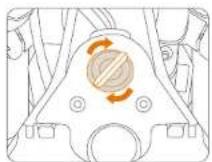
2 Start the vehicle so that you can pair by Bluetooth. Insert the key into the electric lock and turn clockwise. * For your safety, do not kick up the kickstand or touch the accelerator.
Log In to the Segway-Ninebot App→Search vehicle→Bind your vehicle following the instructions. When not activated, the Segway Dirt eBike is limited to 9.3 mph (15 km/h). Please watch the Riding Tutorial before your first ride.

text_image
Segway-Ninshot Segway-Net Singing Segway-NinshotVia the App, you can adjust the torque and max. speed for SPORT mode record and track riding. Set features like energy recovery, power off when braking and interact with fellow riders worldwide. Please check App updates constantly for the latest features and functions.
Please make sure you have checked all items mentioned in Riding Safety, especially:
Tire and tire pressure
Make sure the tires are in good condition and tire pressure remains 32.6 psi (225 kPa). Low tire pressure can cause abnormal wear and poor steering, lower speed and shorter range. High tire pressure can cause abnormal wear, riding discomfort, and even tire blowout.
Check whether the spokes of the wheels are loose.
WARNING
Improperly inflated or excessively worn tires can cause a crash in which you could be killed.
Dashboard, horn and brakes
● Turn on the vehicle and check it all functions work normally.
● The horn should make a distinctively loud and clear sound.
● Hold the left and right brake levers to test if the brakes work well.
Handlebar
Make sure the handlebar is securely fixed and can turn smoothly.
Compression spring and rebound damping adjustment
The shock absorber is set to a default level at the factory. Please adjust based on the actual conditions, like your weight, riding terrain, riding style, etc.
WARNING
Always wear a helmet and protective gear. A full face motorcycle helmet is recommended. The image below is for example only. Please make sure to wear all protective equipment.

natural_image
Line drawing of a person wearing a helmet and a robotic arm with a hand gesture (no text or symbols)WARNING
- When preparing for your ride, make sure you are in a good physical and mental condition.
- Please do not lend your Segway Dirt eBike to anyone who does not know how to ride it
● Overloading or carrying a passenger can cause a crash and even death. - When riding, it is dangerous to remove one or both hands off the handlebar. Do not ride under the influence of alcohol or drugs.
Break-in
During the break-in, the first 18.5 miles (30 km) is the most important duration. Operating your vehicle properly in the break-in period will help to maximize the life and performance of your vehicle. Follow the guidelines;
● Always start with EP mode.
● Avoid rapid acceleration and full-throttle starts.
6 Learn to Ride
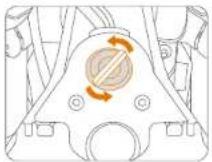
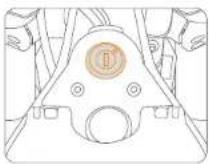
Start the Vehicle
-
Insert the key into the electric lock and turn clockwise to start the vehicle.
-
Check if the horn, brakes, dashboard display, battery display, buttons & switches are normal.
-
After the motor starts, kick up the kickstand and sit on the vehicle steadily. Then gently rotate the accelerator inwards to increase speed.
WARNING
Do not accelerate unless you are well seated. Do not sit on the vehicle when the kickstand is put down.
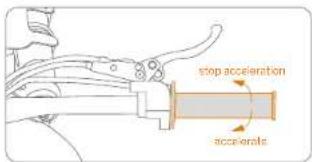
Adjust Speed
Rotate the accelerator inwards to accelerate. Release to stop accelerating.
text_image
stop acceleration accelerals
text_image
SPORT E2WARNING
- Rotate the accelerator gently to avoid accidents or damages to vehicle parts.
- For new riders, it is important to start with EP mode. Only ride in SPORT mode when you are familiar with the vehicle's functions and when you can ride smoothly and confidently.
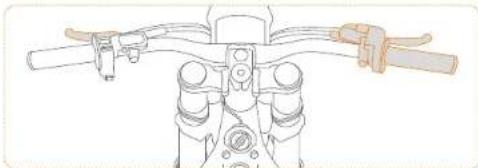
Brake
Release the accelerator, hold both brake levers with an appropriate force.
\* NOTE
When the temperature of the motor and controller is too high, or the remaining battery is too low, the motor will reduce power output automatically. This is not a vehicle malfunction.
natural_image
Line drawing of a bicycle's front wheel and side brackets (no text or symbols)WARNING
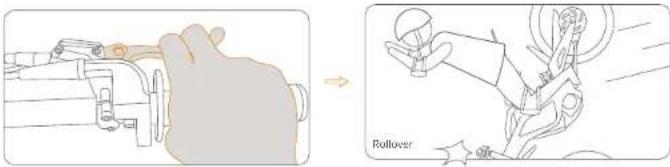
Do not brake abruptly. Using only one brake can cause rollover, skidding and serious danger.
If you squeeze the rear brake suddenly while driving, your vehicle may skid.

text_image
Diagram illustrating a robotic arm tool and its motion capture, showing hand positioning and mechanical assembly.If you squeeze the front brake suddenly while driving, your vehicle may roll over.
text_image
Diagram illustrating a hand turning a mechanical component before and after rollover operation, with labeled components and motion arrows.WARNING
If you crash, the tip-over sensor will be activated and the motorcycle's drive mode will be disabled. Your vehicle can't be charged or driven while in tip-over state.
What you should do: turn off the electric lock and then position your vehicle upright. Your motor power will be restored after the electric lock is turned on again.
Parking
Slow down and find a parking location. When the vehicle has stopped, turn it off and remove the key, then place down the kickstand to support the vehicle.
CAUTION
Park on a flat and stable surface. Do not park the vehicle on slopes or soft ground.

Park with kickstandRemove the keyTurn off the vehic

Safety Warnings
Avoid all dangerous behaviors and do not ride under the influence.
natural_image
Line drawing of a person riding a motorcycle with a diagonal line indicating motion (no text or symbols)Please do not use the Segway Dirt eBike to attach or drag other vehicles, or large/ heavy items. Only carry light and small cargo. Decorations and cargo should not interfere with your riding or get caught in other objects. Do not hang accessories that will affect lean angle and ground clearance, limit suspension travel or steering travel.
WARNING
- When the vehicle has stopped but the rider is still on the vehicle, please be sure to turn off the electric lock, so as
not to accidentally engage the accelerator, which will cause accidents. - Please turn off the electric lock immediately after getting off the vehicle.
Inspection after Your Ride
- When you get home after riding, please clean your motorcycle and remove any mud, dirt, rocks or other objects on the vehicle. Carefully inspect for damages and be sure to lubricate the drive chains to avoid rusting.
- Be sure to charge the power pack after each ride.
natural_image
Line drawing of a person riding a motorcycle with two wheels and a backpack (no text or symbols)Take extra care and slow down on complex terrain.
natural_image
Line drawing of a person riding a motorcycle with two riders on top (no text or symbols)1 person only! Do not overload with heavy objects.
natural_image
Line drawing of a person riding a motorcycle through rain, no text or symbols present△
Do not drive when fatigued or in extreme weather conditions.
Do not ride in deep water. Doing so will cause battery damage or rider injury.
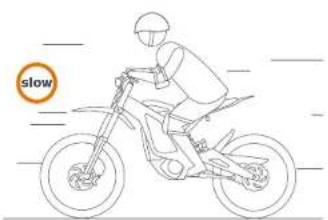
natural_image
Line drawing of a person riding a motorcycle with a circular icon labeled 'slow' (no text or symbols on the diagram itself)△
Please hold the handlebar with both hands and avoid speeding. Always ride within the legal speed limit.
text_image
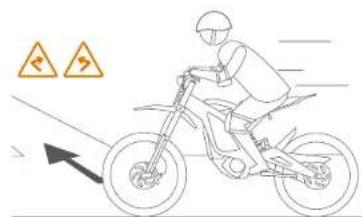
Diagram showing a person riding a bicycle with traffic signs indicating lane rules or hazard zones.△
Slow down before you maneuver a sharp turn.
natural_image
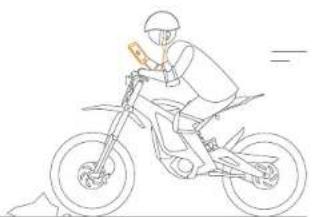
Line drawing of a person riding a motorcycle with a bat, no text or symbols present△
Do not use phones, cameras or other digital devices. Do not wear headphones when riding.
7 Notes on Usage and Operation
You many encounter the following situations when using the Segway Dirt eBike. For a longer service life, please also take note of the points below;
1. Power Cutoff
The motorcycle is turned on but the power output is cutoff in the following conditions:
● Power off when braking (when braking, if you rotate the accelerator, there will not be any power output)
* You can enable and disable power off when braking in Braking via App.
- Kickstand power off (when the kickstand is put down, the motor will not start when you rotate the accelerator)
● Tip-over power off (power output will be cut off after 3-5 seconds when vehicle falls down)
- Motor overheat
● Battery overheat
Dead battery
- Controller overheat
2. Lower Power Output
- The top speed sustains until the battery is down to 15%. Then the controller lowers power output to protect the battery. In this condition, the SPORT mode cannot be activated.
(NOTE: There may be slight differences to remaining power displays. For example, when there's only 15% battery left, the estimated remaining battery life will be different if riding at low speed compared to high speed.) - When the remaining battery is less than 5%, if there is rapid acceleration or you are riding up a steep slope, the controller enters into under-voltage protection and the vehicle will stop. If you don't charge the battery, it could go into over-discharge protection at any time to protect the battery cell. When in over-discharge protection, please reboot with the charger. See details in row 7 in Troubleshooting and follow the instructions.
- Controller overheat. When the controller temperature is over 185°F (85°C), the vehicle will reduce power output and go into EP mode. If the temperature rises up to 212°F (100°C), the power output will be cut off completely.
- Motor overheat. When the motor temperature is over 256°F (130°C), the vehicle will reduce power output and go into EP mode. If the temperature rises up to 302°F (150°C), the power output will be cut off completely.
3. About Riding Environment
When the temperature is lower than 32^ F (O C), the battery will only have 80% of its normal capacity. In this condition, we strongly suggest that you do not use SPORT mode.
When the temperature is above 122^ F (50 C), do not ride at full power for a long period of time or else the Segway Dirt eBike may overheat.
WARNING
Do not ride when the ambient temperature is outside the operation temperature: 14 °F to 113 °F (-10 to 45 °C), because low/ high temperatures will limit the maximum power/torque and damage the battery. Doing so could cause vehicle damage and personal injury due to slips or falls.
4. Riding in Water
You can occasionally ride your Segway Dirl eBike in water depths less than 7.9 inches (20 cm). However, do not soak in water for long periods of time. Especially when the motor has high temperatures. Water could get into the motor and cause damage. The following are the waterproof levels of vehicle components:
● Battery and motor: IP65
- Controller: IP67
● Connective parts: IP55
5. Be Environmentally Conscious
While you enjoy the fun of riding a Segway Dirt eBike, don't forget to protect the environment and help to maintain the trail systems you use.
- Tread lightly
● Protect wildlife and plant life - Do not litter
8 How to Charge
Charge the Vehicle
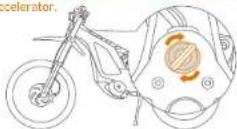
Connect the charger output to the vehicle charging port, then plug the charger into a power socket.

natural_image
Top-down schematic of a motorcycle's side profile with cable and sensor (no text or labels)CAUTION
Do not charge the battery when temperature is lower than 32^ F (0 °C). Doing so will damage the battery. Please only charge after the temperature recovers.
Please remove the battery when washing the vehicle. Do not use a high-pressure water gun to wash the battery or other electrical parts!
CAUTION
Do not charge the battery or keep the charger connected to a power socket for more than 5 hours.
NOTICE
The battery has a self-protecting function to avoid or limit damages caused by overcharge and over-discharge. Long-time over-discharge will affect battery performance. Charge the battery immediately when battery is low. Fully recharge the battery every 2 months. Failing to do so will void your Warranty.
Each battery has a unique number. Please read the label on the battery for important safety information.
Charge the Battery
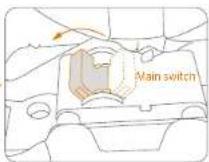
- Make sure the electric lock is turned off. Open the battery compartment and turn off the main switch.
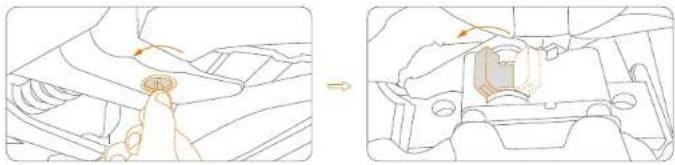
natural_image
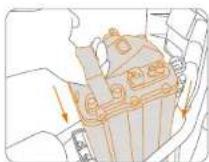
Technical illustration showing a hand pressing a button on a mechanical component, before and after assembly (no text or symbols)- Disconnect the communication plug and discharge plug. 3. Pull out the battery and close the battery compartment cover.
natural_image
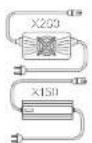
Two technical diagrams showing vehicle components with directional arrows, no text or symbols present- Connect the charger output to the battery charging port and then plug the charger into a power socket.
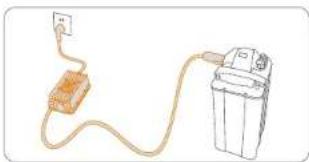
natural_image
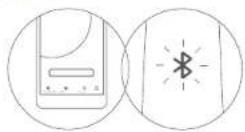
Simple line drawing of a power cord connected to a rectangular component and a cylindrical device (no text or symbols)When charging, the charger indicator flashes red. When the battery is full, the indicator turns green. Please disconnect the charger from the power socket when fully charged, and turn the main switch on after you reinserted the battery into the Segway Dirt eBike.
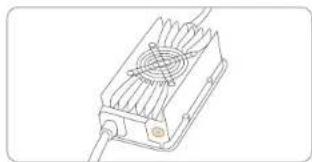
natural_image
Line drawing of a computer fan with heatsink and ventilation slots (no text or symbols)WARNING
- Battery pack must match with charger. Please use the original battery that comes with the package. Damage or malfunction caused by the installation or use of any other charger not approved by Segway will void the warranty of your Segway Dirt eBike.
- The main switch must be turned off before installing or removing the battery, otherwise the life of the battery discharge plug will be reduced. If the main switch is on, there may be sparks when you connect the battery plugs, which may cause damage to the plugs or battery.
Precautions:
● While charging, place in a safe place inaccessible to children.
- When charging, do not cover the charger. Use and store in a dry and well-ventilated place.
- If the charger emits an odor or becomes very hot, or the battery cannot be fully charged, please contact after-sales service.
9 Transporting and Storing Your Vehicle
Transporting
When you need to transport your Segway Dirt eBike, it is recommended to use soft ratchet straps to secure your vehicle. Use two ratchet straps in the front and two in the rear. Place the straps around a frame contact point. Check that the straps do not contact any control cables or electrical wirings. Tighten the straps until the front suspension is compressed about half-way. Too much pressure could damage the fork seals. Follow the manufacturer's instructions of the ratchet straps you use. Avoid using a rope, which can loosen and cause the motorcycle to fall over.
If you use a motorcycle trailer or truck to transport your Segway Dirt eBike, be sure to secure it in an upright position.
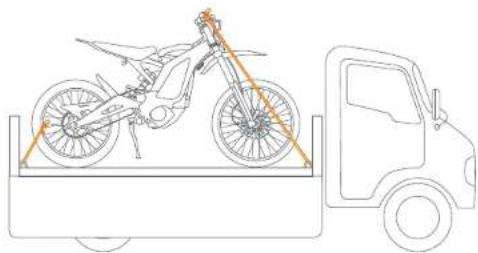
natural_image
Line drawing of a bicycle being loaded onto a flatbed truck (no text or symbols)Storing
Make sure your Segway Dirt elike is all clean and dry to prevent rusting. Store in a dry and well-ventilated place. If you are not going to use the vehicle for more than a month, please make sure the main switch is turned off and disconnect the battery plugs. Also make sure to fully charge the battery to protect the battery life.
10 Maintenance
I. Maintenance Guideline

WARNING
Do not dispose of this product in a landfill, by incineration, or by mixing with household trash. Serious danger/injury can occur because of the electrical components and the battery. Refer to the local laws and regulations regarding recycling and/or disposal.
The first inspection (or first maintenance) should be done in the range of 6.2–18.6 miles (10–30 km) in mild, off-road conditions. In the case of high off-road intensity, it is recommended to conduct the first inspection in the range of 1.2–6.2 miles (2–10 km).
Inspection items
● Spokes - Tightness of the spokes of the front and rear wheels
● Handlebar (headset) - Clearance of the headset at the handlebar
● Chain - Tightness of the chain
- Belt - Tightness of the belt (the belt of a new vehicle may produce some friction sounds, which can be eliminated by applying wax on both sides of the belt or ignored)
- Shock absorber and oil - Adjustment of the shock absorber and a check for oil leakage and proper installation of the compression spring and rebound damping device (Note: don't turn the adjustment knob to the very right or left end.)
● Handlebar (screws) - Tightness of all handlebar screws
Maintenance schedule
Note: The vehicle must not be powered "on" in the maintenance process.
● Before each ride: chain cleaning and lubrication
- Once every six months: front shock absorber maintenance, brake oil replacement, and rear shock absorber maintenance
- Belt replacement: once every 4971 miles (8,000 km) for clean and flat road and 2485 miles (4,000 km) for off-road conditions; cleaning will not be effective in the case of abnormal sounds
● Chain replacement: once every 4971 miles (8,000 km)
- Replacement of front sprocket (large and small pulley and 14-tooth sprocket) in motor: once every 4971 miles (8,000 km), simultaneously with the chain
● Brake pad replacement: when its thickness is less than 0.5 mm
● Brake disc replacement: when the braking surface of the disc is less than 1.5mm thick
● Vehicle bearing replacement: abnormal sound and loosening
● Tire replacement: less than 2/3 of the tread depth of a new tire
Stay safe during inspection
- Park the vehicle in an open and flat location.
- Conduct the inspection in a safe place, and pay attention to the surrounding environment and conditions.
- If any abnormality is found during inspection, troubleshoot before riding the vehicle. If you cannot eliminate the abnormality, contact the after-sales service personnel or authorized service center.
\* NOTE
- Both the front and rear brakes are of disc type. Replace the friction plate of the brake in case of serious wear.
- Always keep the disc brake system clean. Remove any mud, debris, or oil contamination.
Check operating parts
1. Shock absorber inspection for bending, deformation and damage
Check the front shock absorber for damage, loosening, oil leakage and other faults. Shake the handlebar and check for abnormal sounds arising from the failure of the front shock absorber. If the front shock absorber produces an abnormal sound, contact the after-sales service personnel or authorized service center.
2. Brake inspection
Check whether the free play of the brake handle is within the specified range (15–30 mm). If it's not, adjust to the correct range.
3. Braking inspection
Run the vehicle on a dry and flat road. Apply the front and rear brakes separately, and check their braking effectiveness.
4. Tire and wheel inspection
The tires are always exposed to the ground, so they may be damaged by stones, glass, nails, and other foreign objects. Avoid riding in places where the tires may be damaged. In addition, regularly check the tires for damage such as obvious cracks, penetration of foreign objects (e.g. stones and glass) and unreasonably abnormal wear.
1) When the tires are cool, check the tire pressure with a tire pressure gauge.
2) Check the tires for cracks, damage, foreign objects and abnormal wear.
3) Check the rims and spokes for loosening.
4) Check the chain tension. Chains should have a 0.4–0.8 inch (10–20 mm) moving range.
5) Check the tread depth.
Replace the tires if there is less than 2/3 of the original tread depth. In the case of abnormal sound and shaking during running, contact the after-sales service personnel or authorized service center for inspection and repair.
The recommended torque is 30 N·m for the central axle and 40 N·m for the rear axle nut. The tightening torque of the front axle depends on the front fork.
\* NOTE
- The belt tension has been adjusted and tested by the manufacturer before delivery. Do not adjust by yourself.
- Firmly hold the brake lever. If the ideal braking effect cannot be achieved, check the cleanliness of the disc. If this solution still fails, contact the after-sales service personnel or authorized service center.
Battery inspection
- Power inspection
Check the battery as follows: charge it fully and measure the voltage of the anode and cathode of the discharge port via a multimeter. The measured voltage should be 58-58.8 V (X160) and 66.5-67.2 V (X260). - Battery appearance inspection
Check the battery for damage. If the upper and lower seal covers of the battery are damaged, the battery may be exposed to water in the case of seal failure. Contact the after-sales service personnel or authorized service center.
\* NOTE
-
Before removing and installing the battery, turn off the electronic lock and turn off the main switch. Then, cover the rubber seal cap of the charging port.
-
Do not force the battery into the battery compartment.
Tip: It is recommended to store the battery at an indoor temperature of more than 32°F (0°C) and regularly check the battery in winter. Do not store the battery in temperatures above 122°F (50°) or below 14°F (-10°F).
Battery charging and charger use
● Use the original charger only. This prevents the battery from damage or other dangers.
- Check whether the input voltage of the charger is consistent with the power socket voltage.
- The charger will be turned off automatically after the battery is fully charged. However, do not charge the battery or keep the charger connected to a power socket for more than 6 hours.
- Do not dismantle the battery without permission, in order to avoid damage and danger.
- The battery should be reactivated after over-discharge protection. See row 7 of "Troubleshooting" in the user manual.
Maintenance of motor and controller
● Regularly check that motor screws are not loose.
● Regularly check that the connecting wires of the motor and controller are not loose and are properly insulated.
● Regularly check that the fuse is not loose.
- Do not ride in deep water to avoid damaging motor operation.
\* NOTE
The vehicle will automatically run with low power output in the event of excessively high motor or controller temperature or low remaining battery. This does not indicate faulty behavior.
Warning
When operating the vehicle in water or mud, the depth must not exceed the center of the wheel. In other words, no deeper than the height of the axle. Long-time immersion of the motor in water may lead to motor failure.
Fuse replacement
If the dashboard, horn, and light do not work after the main switch and electric lock are enabled; it indicates a blown fuse. If this occurs, please replace the fuse.
Specific operations for fuse replacement are as follows:
- Open the battery compartment cover, pull out the battery, and then open the fuse box in front of the main switch.
- Remove the damaged fuse, take out the spare fuse in the battery compartment cover, and then install the fuse. After you close the fuse box, install the battery, and then close the battery compartment cover.
\* NOTE
- Install the fuse securely. Loosening of the plug in part may lead to fuse heating and other faults and dangers.
- Replace the fuse with that of the specified model and specification (of equal current and voltage rating). Otherwise, the fuse may fail in protection.
- If the fuse is blown, a short time after replacement, identify other possible causes in addition to the fuse itself.
- Protect the fuse from water intrusion or high-pressure water flow.
\* NOTE
In case of an accident or breakdown, please contact an authorized repairer if the product is still under warranty. If not, you can contact any specialized repairer of your choice. You can ask for the list of the authorized repairers from the customer service available at www.segway.com. Efforts have been made to simplify wording in the user manual. When an action appears too complicated, you are advised to contact an authorized or a specialized repairer or customer service.
II. Recommended Maintenance Schedule
- Mandatory maintenance in the "Recommended Maintenance Schedule" below must be performed at an authorized service center.
- Failure to implement mandatory maintenance timely will be regarded as the abandonment of the warranty.
Recommended Maintenance Schedule
| Time/ Range | Maintenance items | Maintenance performed by |
| 185 miles (300 km) / 1 month | Overall inspection of fastener, chain and belt tension (motor / wheel hub / brake / spoke, etc.) | |
| 621 miles (1,000 km) after the first maintenance / 3 months | Overall tightening inspection of safety part, and check of high-current circuit, chain and belt tension (motor / wheel hub / brake / spoke, etc.) | |
| 1243 miles (2,000 km) / 6 months | Check of high-current circuit, brake oil pipeline, brake pad, spoke, chain and belt tension |
Maintenance Record Form
| Maintenance date | Maintenance items | Maintenance performed by |
11 Troubleshooting
All Segway Dirt eBikes are carefully inspected before they are delivered. Even so, some technical issues can occur. The following chart offers a guide to help identify an issue, and if possible, repair by yourself. When you cannot solve the problem, take it to an authorized dealer or reach us. See contact details in Contact.
| Possible CausesProblem | Corresponding Solution | ||
| 1 | Dashboard, horn and lights are unable to work well when both vehicle and main switch are on | Brown fuse | Turn off the main switch and then replace the fuse. The fuse box is located in front of the main switch. Remove the old fuse and install the spare fuse stored in the lid. After installation, close the fuse box, install the battery and close battery compartment.CAUTION: Place the fuse firmly to avoid other faults and dangers. Always use the specified fuse that comes with the vehicle. |
| 2 | The motor does not work after power-on | 1. The battery connecting wire is loose2. The accelerator wiring and cables are loose3. The motor connecting wire falls off4. Brake lever does not return or brake switch failed | 1. Check whether the wires are connected firmly2. Connect the accelerator firmly3. Reconnect the wire firmly4. Check the brake lever and brake switch |
| 3 | The accelerator/ throttle does not work or top speed is low | 1. Battery voltage is too low2. Accelerator/ throttle fault | 1. Fully charge the battery2. Replace the speed adjustment central controller in repair shop |
| 4 | Insufficient range per charge | 1. Under-inflation for tires2. Undercharge or charger failure3. Improper braking adjustment, excessive running resistance4. Battery aging or damage5. Upslope, upwind, frequent acceleration and deceleration, heavy load | 1. Inflate the tire to proper pressure2. Fully charge the battery3. Readjust the brake4. Replace the battery5. Avoid or limit unfavorable riding environment/ habitsNOTE: When the temperature is low, a reduction in range is normal. Battery performance will recover after the temperature rises. |
| Problem | Possible Causes | Corresponding Solution | |
| 5 | Charger does not work | 1. The charger plug falls off or the connection is loose2. The battery connection falls off or is loose | 1. Fix the plug or connector firmly2. Open the battery compartment cover and plug in the communication and discharge plug firmly |
| 6 | Vehicle makes abnormal noise when riding | The chains don't have the right tension | Adjust chains to proper tension |
| 7 | Charger cannot work properly after connecting to power socket; battery display cannot work properly. | Over-discharge protection of battery because of not charging for a long time or improper storage | Follow the instructions to fix:Step 1: Connect the charger output to the battery charging port and then plug the charger into a power socket. The charger indicator will flash red and green light.Step 2: Unplug and then plug into the power socket. The charger indicator will flash red every 0.5 second, lasting 20 seconds. Do not touch the power plugs in the 20 seconds.Step 3: Afterwards, the indicator will remain red for 10 seconds. During the 10 seconds, unplug and plug into power socket again. Now the charger will work normally. |
| 8 | Wobbly handlebar | 1. Deformed front tire or excessive wear of tire2. Incorrect tire pressure3. Loose headset bearings | 1. Balance/ replace the tire supplied by the original factory2. Inflate to the correct tire pressure3. Inspect the headset for damage or wear and replace when necessary. Tighten any loose parts. |
| 9 | Other failures | If you encounter any problem that you cannot pinpoint or solve by yourself, please send the vehicle to a repair center. | Any damages caused by improper operation by the user will not be covered by Sagway eBike Warranty. |
12 Specifications
| X160 X260lcm | |||
| Basic Information | Dimensions: Length × Width × Height | 71.7 × 29.1 × 40.2 inch (1820 × 740 × 1020 mm) | 74.2 × 30.7 × 41.3 inch (1885 × 780 × 1060 mm) |
| Vehicle Weight/ Including Battery | 88.2 / 105.8 lbs (40 / 48 kg) 97.0 / 12 | 3 lbs (44 / 55 kg) | |
| Max. Load | 176.4 lbs (80 kg) 220.5 lbs (100 kg) | ||
| Rider Age | 18–55 yrs. 18–55 yrs. | ||
| Vehicle Parameters | Wheelbase | 49.2 inch (1250 mm) | 49.8 inch (1265 mm) |
| Minimum Clearance | 8.7 inch (220 mm) 10.6 inch (270 mm) | ||
| Max. Climbing | 35° slope 45° slope | ||
| Max. Speed 31.1 mph (50 km/h) 46.6 mph (75 km/h) | |||
| Range ^a | 40.4 mile (60 km) 74.6 mile (120 km) | ||
| Seat Height 29.9 inch (760 mm) 31.9 inch (810 mm) | |||
| Power System High speed brushless DC motor High speed brushless DC motor | |||
| Max. Motor Power | 3 kW | 5 kW | |
| Max. Torque for Drive Wheel | 162.2 ft ^2 lb (220 N·m) | 184.3 ft ^2 lb (250 N·m) | |
| IP Rating | Battery IP60; Controller IP67 | Battery IP65; Controller IP67 | |
| Vehicle Material | Forged Aluminum Alloy | Forged Aluminum Alloy | |
| Battery | Battery Type | Lithium battery | Lithium battery |
| Charging Time | 4–5 h | 3–4 h | |
| Capacity | 20 Ah | 32 Ah | |
| Rated Voltage | 48 V | 60 V | |
| Nominal Power | 2 kW | 3 kW | |
| Overcurrent Protection Value | 70 A | 100 A | |
| Charger | Nominal Power | 280 W | 700 W |
| Charger Input Voltage | 100–240 V 50–60 Hz | 100–240 V 50–60 Hz | |
| Charger Output Voltage/ Power | 58.8 V / 5 A | 67.2 V / 10 A | |
| Charger Model | NB-58D8-5D0 | NB-67D2-10D0 | |
| Other Features | Gear Type | Aluminum alloy 1 ^1 / ^1 1.4 | Aluminum alloy 19 ^1 /1.4 |
| Tire Type | 70/100-17 off-road lineX160 X260 item | 70/100-19 off-road line | |
| Other Features | Wheel Diameter 17 inch 19 inch | ||
| Handlebar Grip Material Silicone rubber | Silicone rubber | ||
| Front Shock Absorber System | Single shoulder inverted front fork (adjustable) | Double shoulder inverted front fork (adjustable) | |
| Rear Shock Absorber System Multi-link hydraulic spring central type Multi-link hydraulic spring central type | |||
| Rear Shock Absorber Range 3.0 inch (75 mm adjustable) 3.3 inch (85 mm adjustable) | |||
| Brake System Disc brake Disc brake | |||
| Primary Drive System HTD 8M belt 220 inch (560 mm) HTD 8M belt 22.0 inch (560 mm) | |||
| Secondary Drive System | 420 chain with 112 sections | 420 chain with 106 sections | |
[1] The range is defined as the distance the vehicle travels on a single full charge of the power pack. It will vary greatly depending on the actual environment. The result shown here is measured with rider weight 165.3 lbs (75 kg), ambient temperature 77 °F (25 °C), and speed 12.4 mph (20 km/h);
Your range results are a direct reflection of your riding habits. The more conservatively you ride, the longer range you can expect from your Segway Dirt eBike. Some of the factors that affect range include speed, number of starts and stops, acceleration, ambient air temperature, changes in elevation, tire pressure and payload.
Due to continuous improvement of the product, the performance parameters are subject to change without prior notice.
13 Certifications
Federal Communications Commission (FCC) Compliance Statement for USA
This device complies with part 15 of the FCC rules. Operation is subject to the following two conditions: (1) This device may not cause harmful interference, and (2) this device must accept any interference received, including interference that may cause undesired operation.
NOTE
This equipment has been tested and found to comply with the limits for a Class B digital device, pursuant to part 15 of the FCC Rules. These limits are designed to provide reasonable protection against harmful interference in a residential installation. This equipment generates, uses and can radiate radio frequency energy and, if not installed and used in accordance with the instructions, may cause harmful interference to radio communications. However, there is no guarantee that interference will not occur in a particular installation. If this equipment does cause harmful interference to radio or television reception, which can be determined by turning the equipment off and on, the user is encouraged to try to correct the interference by one or more of the following measures:
—Reorient or relocate the receiving antenna.
—Increase the separation between the equipment and receiver.
—Connect the equipment into an outlet on a circuit different from that to which the receiver is connected.
—Consult the dealer or an experienced radio/TV technician for help.
This equipment complies with FCC radiation exposure limits set forth for an uncontrolled environment.
Industry Canada (IC) Compliance Statement for Canada
This device complies with Industry Canada license-exempt RSS standard (s). Operation is subject to the following two conditions: (1) this device may not cause interference, and (2) this device must accept any interference, including interference that may cause undesired operation of the device.
Neither Segway Inc. nor Ninebot is responsible for any changes or modifications not expressly approved by Segway Inc. or Ninebot. Such modifications could void the user's authority to operate the equipment.
Segway Dirt eBike (X160, X260)
Contains Transmitter Module
FCC ID: 2AU2Y-NQ2574
IC: 25633-NQ2574
14 Trademark and Legal Statement
Segway and the Rider Design are the registered trademarks of Segway Inc.; Ninebot is the registered trademark of Ninebot (Tianjin) Tech. Co., Ltd; SUR-RON. SURRON are trademarks of Hangzhou Qiulong Technology Co., Ltd; Android and Google player are the trademarks of Google Inc., App Store is a service mark of Apple Inc., The respective owners reserve the rights of their trademarks referred to in this manual.
We have attempted to include description and instructions for all the functions of the Segway Dirt eBike at the time of printing. However, due to constant improvement of product features and changes of design, your Dirt eBike may differ slightly from the one shown in this document. Visit the Apple App Store (IOS) or the Google Play Store (Android) to download and install the Segway Ninebot App in this manual.
Please note that there are multiple Segway models with different functions, and some of the functions mentioned herein may not be applicable to your unit. The manufacturer reserves the right to change the design and functionality of the Dirt eBike product and documentation without prior notice.
©2019 Ninebot (Beijing) Tech Co. Ltd. All rights reserved.
15 Contact
Contact us if you experience issues relating to riding, maintenance and safety, or errors / faults with your Segway Dirt eBike. Americas:
Segway Inc.
14 Technology Drive, Bedford, NH 03110, USA
Toll Free: 888-523-5583
E-mail Service: technicalsupport@segway.com
Website: www.segway.com
Have your Segway Dirt eBike Serial Number on hand when contacting Segway.
You can find the vehicle serial number in Basic info in Segway-Ninebot App.
Appendix: Electric Schematic Diagram of the Vehicle
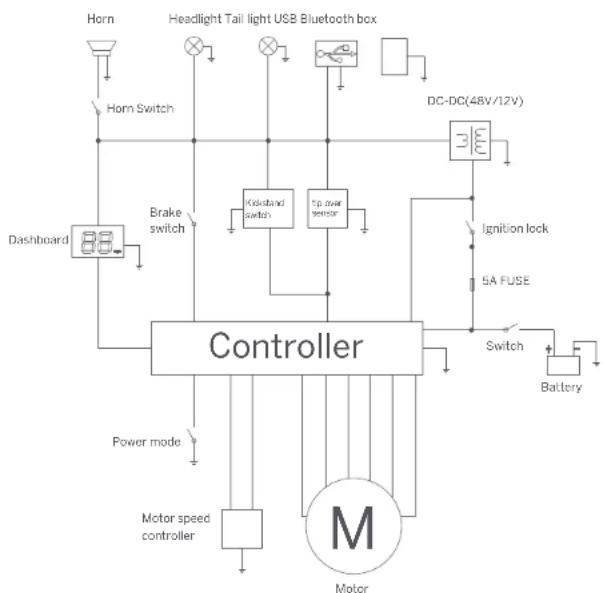
flowchart
graph TD
    A["Motor speed controller"] --> B["Controller"]
    C["Horn"] --> D["Headlight Tail light USB Bluetooth box"]
    D --> E["DC-DC(48V/12V)"]
    E --> F["Ignition lock"]
    F --> G["SA FUSE"]
    G --> H["Switch"]
    H --> I["Battery"]
    J["Brake switch"] --> K["Controller"]
    L["Power mode"] --> M["Controller"]
    N["Horn Switch"] --> O["Controller"]
    P["DC-DC(48V/12V)"] --> Q["Motor"]
    R["Motor"] --> S["M"]
    T["Motor speed controller"] --> U["Controller"]