Halley W1940Z - Lighting Triton Blue - Free user manual and instructions
Find the device manual for free Halley W1940Z Triton Blue in PDF.

| Product Type | LED Ceiling Light |
| Model | Halley W1940Z |
| Brand | Triton Blue |
| Dimensions | 40 cm x 40 cm x 8 cm (approx.) |
| Weight | 1.2 kg (approx.) |
| Power Source | AC 220-240V, 50/60Hz |
| LED Power | 24W (equivalent to 150W incandescent) |
| Color Temperature | 3000K-6500K (adjustable) |
| Luminous Flux | 2400 lm |
| Lifespan | 50,000 hours |
| Dimmable | Yes (with compatible dimmer) |
| Mounting | Ceiling mount, hardwired |
| Material | Aluminum and polycarbonate |
| IP Rating | IP20 (indoor use) |
| Energy Class | A+ |
| Maintenance | Clean with dry cloth; do not use water or solvents |
| Safety | Overheat protection, CE certified |
| Spare Parts | LED module and driver available separately |
| Warranty | 2 years |
Frequently Asked Questions - Halley W1940Z Triton Blue
User questions about Halley W1940Z Triton Blue
0 question about this device. Answer the ones you know or ask your own.
Ask a new question about this device
Download the instructions for your Lighting in PDF format for free! Find your manual Halley W1940Z - Triton Blue and take your electronic device back in hand. On this page are published all the documents necessary for the use of your device. Halley W1940Z by Triton Blue.
USER MANUAL Halley W1940Z Triton Blue
natural_image
Technical line drawing of a mechanical device with spherical components and a control panel (no text or symbols)MANUAL DE USUARIO
USER'S MANUAL
This manual contains important information: read it before operating the device.
TRITON BLUE
INDEX / ÍNDICE
ENGLISH
WELCOME TO TRITON BLUE....1
SAFETY INSTRUCTIONS....1
IMPORTANT INFORMATION......2
PACKAGE CONTENT....3
TECHNICAL SPECIFICATION....3
DESCRIPTION OF THE DEVICE....4
INSTALLATION....5
CONTROL MENU....6
DMX CONNECTION AND DMX PROTOCOL....8
UNIQUE FEATURES....9
USB SOFTWARE UPGRADE....9
MAINTENANCE....10
TROUBLESHOOTING....10
DISPOSAL....10
ESPAÑOL
BIENVENIDOS A TRITON BLUE....11
Thank you very much for choosing Triton Blue. We hope you enjoy your new product.
It has been developed and designed paying attention to the smallest details, with quality control with European standards supervised by our great team of professional technicians, who work every day to offer our customers the best quality.
We make sure that every Triton Blue product is built to last long. All our references are made with long lasting materials and our specialists are dedicated to constantly doing quality controls to guarantee the best result.
Please read carefully this manual in order to use your Triton Blue product in the best way. Do not hesitate to visit our website for further information: www.triton-blue.com
SAFETY INSTRUCTIONS
GENERAL INFORMATION
- It is important to read and follow the instructions carefully.
- Keep all information and instructions in a secure location.
- Always follow the instructions provided.
- Take note of all safety warnings and never remove them from the equipment.
- Use the equipment only as intended and for its intended purpose.
- Ensure that the stands and/or mounts used are sufficiently stable and compatible for fixed installations. Wall mounts should be properly installed and secured, and the equipment should be installed securely to prevent falls.
- When installing the equipment, be sure to observe the relevant safety regulations in your country.
- Do not install or operate the equipment near sources of heat, such as radiators, heat registers, or ovens, and ensure that it is always cooled sufficiently and cannot overheat.
- Do not place sources of ignition, such as burning candles, on the equipment.
- Keep ventilation slits unobstructed.
- For equipment designed for indoor use only should not be used near water, flammable materials, fluids, or gases. Special outdoor equipment should be used in accordance with the manufacturer's instructions.
- Ensure that no dripping or splashed water can enter the equipment and do not place containers filled with liquids on the equipment.
- Prevent objects from falling into the equipment.
- Use the equipment only with recommended accessories intended by the manufacturer.
- Do not attempt to open or modify the equipment.
- Check all cables after connecting the equipment to prevent accidents or damage due to tripping hazards.
- During transport, take steps to prevent the equipment from falling and causing damage or injury.
- If the equipment is not functioning properly, fluids or objects have gotten inside, or is otherwise damaged, switch it off immediately and unplug it from the power outlet (if applicable). Only authorized, qualified personnel should repair the equipment.
- Clean the equipment with a dry cloth.
- Comply with all applicable disposal laws and separate plastic and paper/cardboard during packaging disposal.
- Keep plastic bags out of the reach of children.
TRITGN BLUE
FOR DEVICES DESIGNED TO BE CONNECTED TO THE MAIN POWER SUPPLY:
- ATTENTION: If your equipment has a power cord with a grounding plug, it must be connected to a wall outlet with a ground connection. Never remove the grounding plug from the power cord.
- If your equipment has been exposed to extreme temperature changes, allow it to reach room temperature before turning it on. Otherwise, moisture and condensation may damage the equipment.
- Before plugging in the equipment, make sure that the voltage and frequency of the power outlet match the specifications of the equipment. If the equipment has a voltage selector, only connect it to the power outlet if the values match. If the power cord or adapter does not fit your outlet, contact an electrician.
- Do not step on the power cord. Make sure it is not pinched at the outlet, adapter, or equipment connection.
- Keep the power cord or adapter within reach and disconnect the equipment from the power supply when not in use or when cleaning it. Always unplug the cord or adapter by pulling the plug or adapter, not the cord. Never touch the cord or adapter with wet hands.
- Avoid frequently turning the equipment on and off, as this can reduce its useful life.
- IMPORTANT: Only replace fuses with those of the same type and rating. If a fuse repeatedly blows, contact an authorized service center.
- To completely disconnect the equipment from the power mains, unplug the power cord or adapter from the outlet.
- If your device has a Volex power connector, the mating Volex connector must be unlocked before it can be removed. Be careful when laying cables, as the equipment can slide or fall if the power cord is pulled.
- Unplug the power cord or adapter before an extended period of disuse or in case of lightning strike risk.
- Only install the equipment when it is disconnected from the power source.
- To prevent damage and overheating, qualified personnel should regularly clean and service the equipment depending on ambient conditions like dust, nicotine, and fog.
If the product contains the following symbols, please, read carefully:
CAUTION: To reduce the risk of electric shock, do not remove cover (or back). There are no user serviceable parts inside. Maintenance and repairs should be exclusively carried out by qualified service personnel.
The warning triangle with lightning symbol indicates dangerous uninsulated voltage inside the unit, which may cause an electrical shock.
The warning triangle with exclamation mark indicates important operating and maintenance instructions.
IMPORTANT INFORMATION
WARNING! IMPORTANT INFORMATION REGARDING LIGHTING PRODUCTS
-
This product is specifically designed for use in event technology and is not intended to be used as household lighting.
-
It is important to avoid looking directly at the light beam, even for a short period of time.
-
Optical instruments, such as magnifiers, should not be used to look directly at the beam.
-
If you are sensitive to strobe effects, it is possible that they could cause an epileptic seizure. If you have epilepsy, it is important to avoid places where strobe lights are being used.
PACKAGE CONTENT
1 x Halley W1940Z
1×3m DMX cable
1 x 1.5m power cable with powercon
2 x Omega bracket for hanging installation
1 x Safety chain
1x User's manual
TECHNICAL SPECIFICATIONS
- Power supply: 100-240 V AC, 50/60 Hz \~
- Power consumption: 560W
- LED: 19pcs 40W 4in1 leds
- DMX channels: 18/25/37 ch
- Beam angle: 4^ - 54^
- Luminous flux: 7996 lumen, 110621 lux@3m@4°, 2355 lux@3m@54°
- Fuse: T8A, 250 V
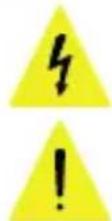
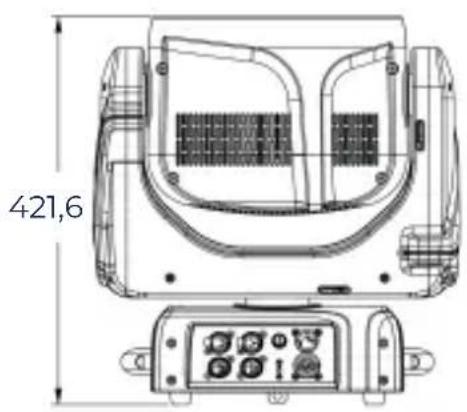
- Device dimensions: 400 x 421 x 280 mm
- Net Weight: 15.86KG
DIMENSIONS
SPECIFICATION
Source
- Light source: 19pcs 40W 4in1 leds, PIXEL control
- Luminous Flux: 7996 lumen, 110621 lux@3m@4°, 2355 lux@3m@54°
- Control: Remote on/off via DMX
Optical System
- Beam angle: 4^ to 54^
X/Y
- Pan: 539°(3.32 sec), Tilt: 233° (1.57 sec)
-16-bit resolution
-Auto repositioning
TRITGN BLUE
Features
- DMX channels: 18/25/37
- Super fast, smooth and silent movement
- Pixel control of every single led on RGBW separately
- Nice mapping effect with dimming and color fading at the same time
- RGBW four colors mixing to create vivid, saturated and uniform color effect
- Pre-set color temperature at 2800K-10000K,
- Zoom from 4° to 54°
- Full range 0-100% dimmer
- Various strobe
- RDM function to change DMX address, display flip, X/Y Reverse and so on
- Software upgrade via DMX
- Hibernation when lost DMX for preset time
- Indicate temperature info of base
- Fan speed auto change according to temperature
- Heat pipe for cooling
- LumenRadio Wireless PCB
Display
-2.4inch super nice LCD display with friendly English/Chinese
-Auto lock and flip
- Back-up communicating IC
- CR 10440-1S1P 320mAh, 3.7V rechargeable lithium battery
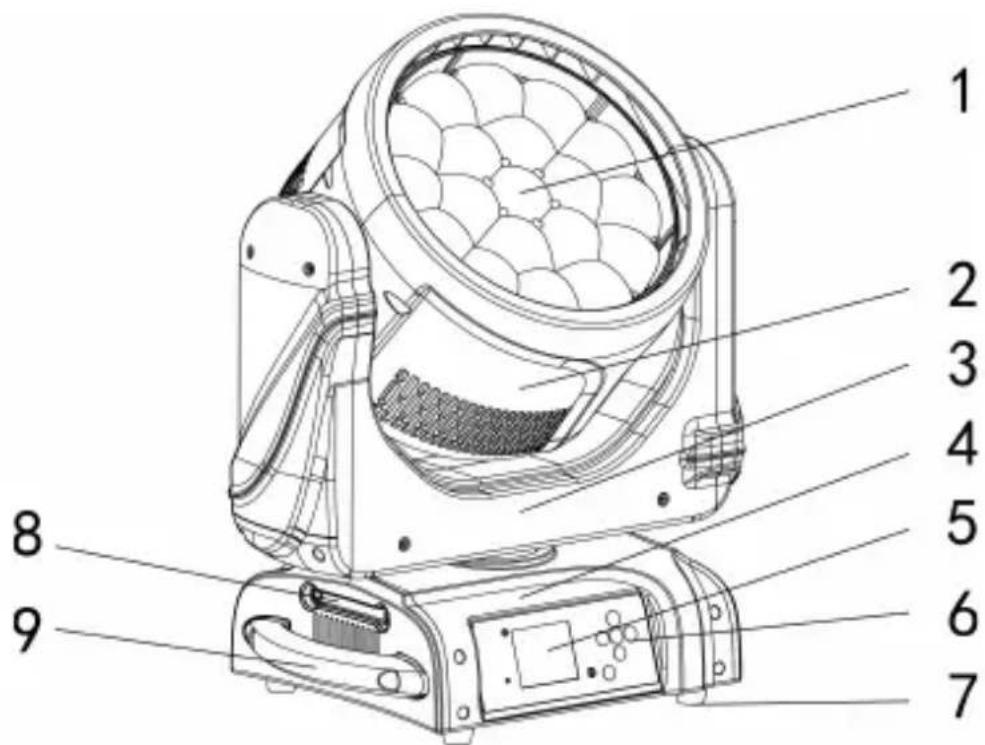
DESCRIPTION OF THE DEVICE
- Project lens
- Head
- Arm
- Base
- Display
- Operation button
- Foot stand
- Antenna
- Handle
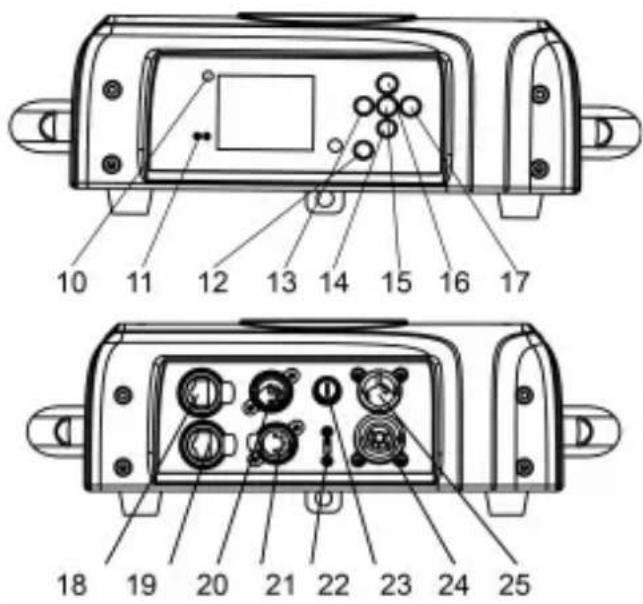
TRITGN BLUE
- Wireless indicator
- Ethernet
- Battery indicator
- Left button
- Down button
- Enter button
- Up button
- Right button
- Ethernet
- Ethernet
- 5-pin DMX in
- 5-pin DMX out
- USB
- Fuse
- Power out
- Power in
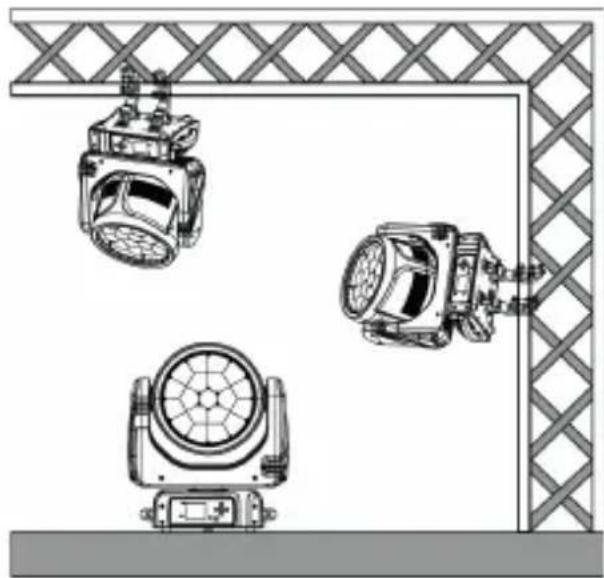
INSTALLATION
The device could be either put on a solid and even Surface, or mounted upside down or sideways like left picture.
The mounting place must be sufficient stable and be able to support a weight of 10 times of the unit's weight. When the fixture is hanged, always additionally secure the device with the safety chain, fasten the safety rope at a suitable position so that the maximum fall of the projector will be 20 cm.
How to do mounting installation
natural_image
Technical line drawing of three mechanical lighting fixtures mounted on a lattice-patterned frame (no text or symbols)Step one: Installation the clamp onto the omega bracket;
Step two: Install the clamp and bracket on the bottom of panel, fasten the quick-locks; Step three: Install the whole device onto appropriate truss and fasten the clamps, tight the safety rope with the truss or other fixing point at a suitable position that drop down distance not exceed 20cm.
Clamp not included.

natural_image
Mechanical assembly diagram showing a clamping device interacting with a housing (no text or symbols)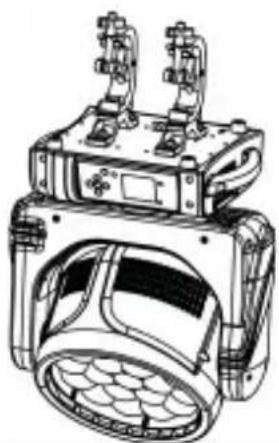
natural_image
Technical line drawing of a mechanical device with two protruding ports and a circular housing (no text or symbols)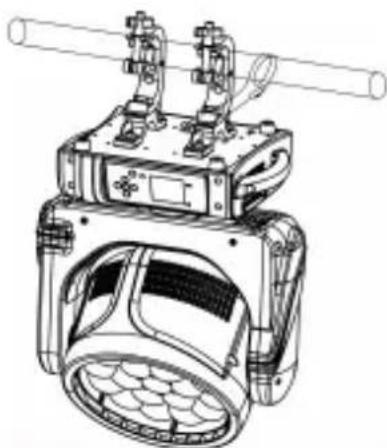
natural_image
Technical line drawing of a mechanical device with no visible text or symbolsCONTROL MENU
Meaning of the icon in menu
| CONNECT LIGHT INFOMATION SET PROGRAM | ||||
 |  |  |  |  |
Menu Tree
Default setting shadowed. mark with ① can be basic reloaded, ② be program reloaded, ③ can be private reloaded.
| CONNECT | ADDRESS | FIXTURE | VALUF(1512)(001) | ||
| PIXELS | VALUE(1-512)(001) | ||||
| CONTROL PROTOCOL | FIXTURE | DMX/W DMX | |||
| PIXELS | FOLLOW FIXTURE/DMX/W-DMX | ||||
| DMX MODE | FIXTURE | BASIC/STANDARD/LXTENDED | |||
| PIXELS | OFF/RINC/PIXELS | ||||
| WIRELESS | WDMX ON/OFF | ON/OFF | |||
| WDMX MODE | TRANSMITTER/REFRIVER | ||||
| TX LINK | ON/OFF | ||||
| IX UNLINK | ON/OFF | ||||
| RX RLSET | ON/OFF | ||||
| INTO WDMX | OFF/FIX TO WDMX/P X TO WDMX | ||||
| WDMX TO DMX | ON/OFF | ||||
| Ethernet Settings | Artnot Settings | IP Address | |||
| Not | |||||
| Subnet | |||||
| Universe | |||||
| sACN Settings | IP Address | ||||
| Universo | |||||
| Merge Mode | OFF/HTP/LTP | ||||
| Ethernet to DMX | Off/On | ||||
| Setup | FIXTURE SETTINGS | DMX FAULT | HOLD/BLACKOUT | ||
| TEMPERATURE UNIT | Fahrenheit/Celsius | ||||
| FAN MODL | AUTO/IGI/SILLN | ||||
| D MMERCURVE | TINFAR/S CURVE/SQUARE/LAW/INVERSE SQUARE LAW | ||||
| DIMMER SPEED | AUTO/FAST/MFD UM/SLOW | ||||
| LED FREQUENCY | 600HZ/1200-FZ/2000HZ/4000HZ/6000HZ/25KHZ/50KHZ | ||||
| TRANSFER CONFIGURATION | WITHOUT DMX ADDRESS | ||||
| WITH DMX ADDRESS | |||||
| WHITE CALIBRATION | OFF/SUDIO | ||||
| Tungston emulation | ON/OFF | ||||
| INVERT MAPPING | ON/OFF | ||||
| MOVEMENT | PAN REVERSE | ON/OFF | |||
| TILT REVERSE | ON/OFF | ||||
| PAN/TILT FEEDBACK | ON/OFF | ||||
| PAN/TILT MODL | SLOW/MLDIUM/FAST | ||||
| TOTFM MODE | OFF/UP/DOWN | ||||
| SCREEN | BACKLIGHT | ON/IOS/2OS/3OS | |||
| P DISPLAY | ON/OFF/AUTO | ||||
| KEY LOCK | ON/OFF |
TRITGN BLUE
| INFORMATION | FIXIURL TIML | FIXTURE HOURS | TOTAL | (ONLY RLAD) | |
| PARTIAL | (READ AND RESET) | ||||
| CURRENT HOURS | TOTAL | (ONLY READ) | |||
| PARTIAL | (READ AND RESET) | ||||
| LLDI TOURS | TOTAL | (ONLY READ) | |||
| PARTIAL | (RLAD AND RESET) | ||||
| POWL-R ON CYCLL | TOTAL | (ONLY RLAD) | |||
| PARTIAL | (RLAD AND RESET) | ||||
| TEMPERATURF | NEAR SOURCE TEMP, DRIVER PCB TEMP, LED PCB TEMP,... | ||||
| TAN SPEDD | NFAIR SOURCE PAN, BASF TAN,... | ||||
| CI ANN LL VALUL | PAN... | ||||
| ERROR MESSAGE | PAN, TI ... | ||||
| FIX URL MODLL | XXXXXXXXX | ||||
| RDM UID | (RLAD AND RLSLI) | ||||
| SOFTWARE VERSION | TU01 V1.0.00... | ||||
| SERVICE | RESFT | ALL | |||
| PAN & TI IT | |||||
| ... | |||||
| CAI I BRATION | PASSWORD | ||||
| PAN | |||||
| ... | |||||
| MANUAL CONTROL | PAN | ||||
| ... | |||||
| RELOAD DEFAULT | BASIC RELOAD | ON/OFF | |||
| PROGRAM RELOAD | ON/OFF | ||||
| Password | |||||
| FACTORY RELOAD | ON/OFF | ||||
| Program | Play1 | DMX Receive | |||
| Slave Receive | Slave Receive 1,2,3 | ||||
| Sequence | Master/Alone | ||||
| Music | Master/Alone | ||||
| Mic Sens | 0%~100% | ||||
| Select Chase2 | Chase Part 1 | Chase 1~8 Chase 1 | |||
| Chase Part 2 | Chase 1~8 Chase 2 | ||||
| Chase Part 3 | Chase 1~8 Chase 3 | ||||
| Edit Chase2 | Chase 1 | Chase Test | |||
| : | Step 01 | -xxx | |||
| Chase 8 | Step 64 | -xxx | |||
| Edit Scenes2 | Edit Scene 001 | Pan,Til,... | -xxx | ||
| ~ Edit Scene 250 | --Fade Time-- | -xxx | |||
| --Secne Time-- | -xxx | ||||
| DMX Input | |||||
| Scenes Record | ScXX->ScXX | ||||
TRITGN BLUE
| ENGLISH | FACTORY | RDM PID CODE | xxx | |||
| LOCK NO | PASSWORD | |||||
| xxxHOURS | ||||||
| unlocking CODE | ||||||
| CALIBRATION | PASSWORD | |||||
| PAN | ||||||
| ... | ||||||
| ZOOM | ||||||
| FOCUS | ||||||
| GOBO 1OCUS | OCUS | |||||
| ... | ||||||
| GOBO 8OCUS | OCUS | |||||
| GOBOTINDTX | INDTX | |||||
| ... | ||||||
| GOBO 8INDEX | INDEX | |||||
| ... | ||||||
| MAX TEMPERATURE | 80~139°C/176~282°C | |||||
| Reset All Date | Yes/No(No) |
DMX CONNECTION AND DMX PROTOCOL
DMX addressing:
The device is controlled by universal DMX 512 protocol, DMX address is the start channel used to receive instructions from the external controller. For independent control, each fixture must be assigned its unique address control channels. For example, this device has four channel modes: 18/25/37, if we set the mode at standard 18 channels mode, and there are several models need to be independently controlled, we just simply address first fixture at 1, and second fixture at 19, third one at 37, etc.
If the devices have the same address, they will behave synchronically.
DMX addressing is limited, don't set the address so high that without enough control channels for the fixtures.
Display is flashing when no DMX signal is received.
This device is equipped with 5 pins+Ethernet DMX in and out sockets only.
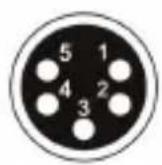
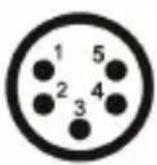
Pin 1= GND Pin 2= SIG(-) Pin= SIG(+)
Pin 4= N.A. Pin 5= N.A.

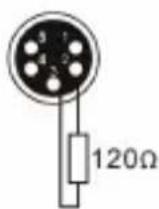
The termination is prepared by soldering a 120Ω resistor between pins 2 and 3.
TRITON BLUE
Connection: use DMX cable with 5 pins+Ethernet XLR-plugs to connect the controller with the fixture or one fixture with another.
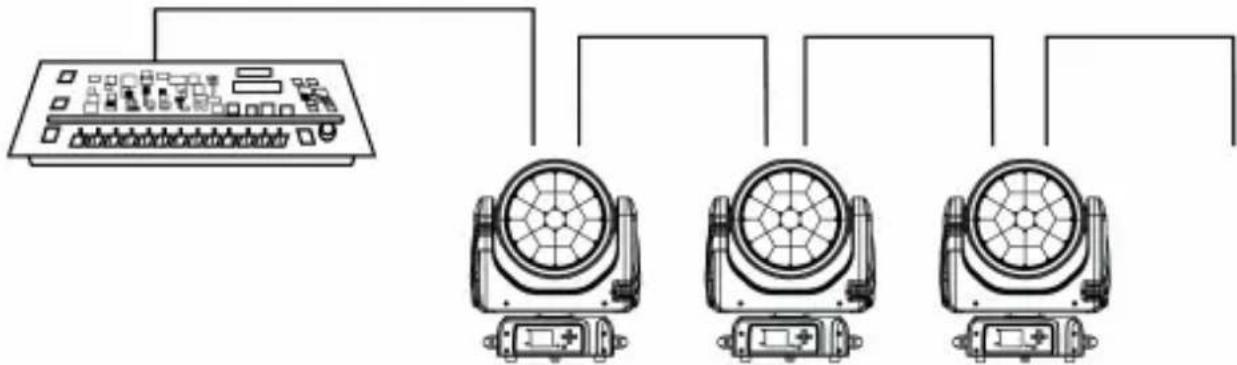
natural_image
Diagram showing a device connected to three identical motors (no text or symbols present)UNIQUE FEATURES
RDM, stand for “Remote Device Management”, with this function, users can realize remote control of the device, such as remotely changing DMX address, reverse pan/tilt setting, check a lot of useful information such as temperature, power consumption, fan speed. Etc. Every single device has a unique RDM code before left factory to distinguish from each other, usually not suggest users change this code freely.
Software upgrade function via DMX cable, if there is any new firmware for this device come out, it can be upgraded simply via a software upgrade box, no need to change any mechanical parts. The upgrade box is not included in the package, if need any further assistance pls just contact authorized dealers.
Hibernation, the device will enter sleeping mode if activated after a period of disconnecting DMX signal to save the power consumption, and will return immediately as soon as the DMX signal is sent again.
Display battery, this function is prepaid in the display PCB, users just need to install a normal 10440 600mAh 3.7V rechargeable lithium battery, then users could power on the display and do setting without connect to main power.
Display flip, by press up and down button for more than 3 seconds, the display will flip automatically, this function is useful to read menu conveniently when device is hanged.
USB SOFTWARE UPGRADE
- Power of the fixture
- Insert the USB into the USB connecting port of socket side.
- Enter the software upgrade menu, select the new software as need.
- Select the software upgrade mode "Start" "Self Upgrade".
"Start means that many fixtures does the software upgrade all together. It will do the upgrade after other fixtures finishes the software upgrade.
"Self Upgrade" means that the fixture does the soft the software upgrade on it own.
Please check whether it shows "USB OK" when it enters the upgrade menu, then it can go ahead. Otherwise, need to disconnect and insert the USB again. This issue is relevant to different USB version.
- When it shows "OK", means that the upgrade has been success.
- After the fixture reboot, the software upgrade has been finished completely.
TRITGN BLUE
MAINTENANCE
Operation only allowed to qualified person, damages due to unprofessional operation or remove of any parts inside will not be considered in warranty service. There are no serviceable parts inside the device or package, service only leaves to authorized dealers.
Never allow the optical components contact with oil, fat or any other liquid.
A regular clearance of the device is needed for long-term usage, this is very helpful to maintain the lifetime and brightness need to use a soft and lint-free cloth to clean the optical system, fan and air flowing tunnel
TROUBLESHOOTING
| Problems | Possible reasons | Checking or solutions |
| Device not power up | Powercon or power cable damagedFaulty power supply | Change a good power cable to cryReplace now power supply |
| Pan/Tilt error or vibrate | Faulty Pan/Tilt PCBFaulty opto sensorCable loosen | Replace PT013A PCBReplace opto sensor OP005Check the cab e connect to OP005 |
| Led off | Temperature protectionFan not workingFaulty LedDimmer and strobe set at 0Faulty power supply | Check the temperature from menuCheck the fan speed info from menuReplace new LeoSet dimmer end strobe channel at 255Replace now power supply |
| Device not response to DMX | Faulty display PCBWrong DMX addressingFaulty DMX cable | Replace new display PCBCheck the address and settingChange to a good DMX cable |
Replacement of the fuse
Need to replace with same type and rating, which originally installed in the device. Step One: Unplug power cable from main power.
Step Two: Unscrew the fuse holder out of the housing with a screwdriver.
Step Three: Remove the broken fuse and replace with an exact same type of new fuse. Step Four: Insert the fuse holder back to the housing and screw tight and reconnect power.
DISPOSAL

Packaging:
- The packaging can be recycled using standard disposal methods and reintroduced into the reusable material cycle.
- Please follow the laws and regulations regarding disposal and recycling of packaging in your country.
Device:
- This device is subject to the Waste Electrical and Electronic Equipment (WEEE) Directive of the European Union. Used appliances should not be disposed of with household waste. Used device must be disposed of through an approved disposal company or a municipal disposal facility. Please comply with the applicable regulations in your country.
- Please follow all the disposal laws and regulations in your country.
- As a customer, you can obtain information on environmentally-friendly disposal options from the product seller or the appropriate regional authorities.
TRITON BLUE
BIENVENIDO A TRITON BLUE
natural_image
Technical line drawing of three mechanical lighting fixtures mounted on a lattice floor (no text or symbols)natural_image
Mechanical assembly diagram showing a clamping device interacting with a housing (no text or symbols)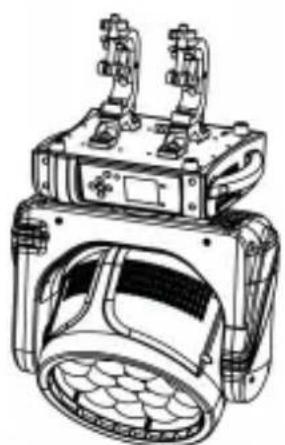
natural_image
Technical line drawing of a mechanical device with two protruding components and a circular housing (no text or symbols)
natural_image
Technical line drawing of a mechanical device with no visible text or symbolsCONTROL MENU
natural_image
Diagram showing three connected electrical modules with fans and switches (no text or labels)CARACTERÍSTICAS UNICAS
natural_image
Abstract blue and white graphic design with curved white shapes (no text or symbols)
TRITON BLUE
- MANUAL DE USUARIO
- USER'S MANUAL
- TRITON BLUE
- INDEX / ÍNDICE
- ENGLISH
- ESPAÑOL
- SAFETY INSTRUCTIONS
- GENERAL INFORMATION
- TRITGN BLUE
- FOR DEVICES DESIGNED TO BE CONNECTED TO THE MAIN POWER SUPPLY:
- IMPORTANT INFORMATION
- PACKAGE CONTENT
- TECHNICAL SPECIFICATIONS
- DIMENSIONS
- SPECIFICATION
- Source
- Optical System
- X/Y
- Features
- Display
- DESCRIPTION OF THE DEVICE
- INSTALLATION
- How to do mounting installation
- CONTROL MENU
- Menu Tree
- DMX CONNECTION AND DMX PROTOCOL
- DMX addressing:
- UNIQUE FEATURES
- USB SOFTWARE UPGRADE
- MAINTENANCE
- Replacement of the fuse
- DISPOSAL
- Packaging:
- Device:
- BIENVENIDO A TRITON BLUE
- CARACTERÍSTICAS UNICAS
Brand : Triton Blue
Model : Halley W1940Z
Category : Lighting