APWHS01F - Digital photo frame Aluratek - Free user manual and instructions
Find the device manual for free APWHS01F Aluratek in PDF.

| Product Type | Digital Photo Frame |
| Brand | Aluratek |
| Model | APWHS01F |
| Display Size | 7 inches |
| Display Resolution | 800 x 480 pixels |
| Aspect Ratio | 16:9 |
| Supported Memory | SD/MMC card (up to 32GB), USB flash drive |
| Internal Memory | 128 MB |
| Photo Formats | JPEG, BMP, PNG |
| Slideshow Modes | All Photos, Random, Single, Transition Effects |
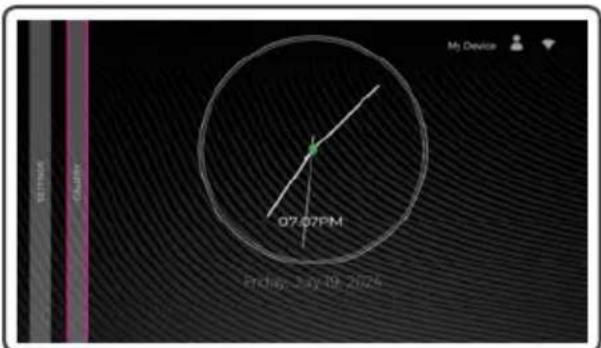
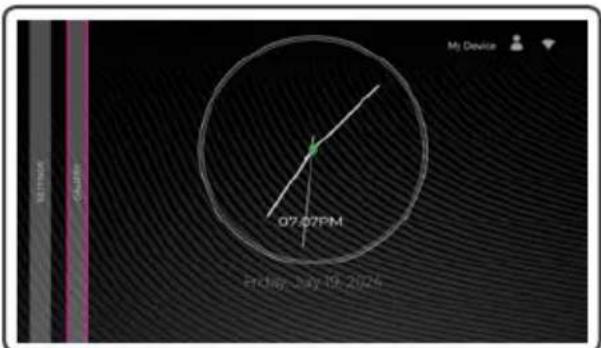
| Clock/Calendar | Yes, with multiple display formats |
| Auto Rotate | Yes (manual and automatic) |
| Remote Control | Included (CR2025 battery) |
| Power Adapter | Input: 100-240V AC, Output: 5V DC, 1A |
| Power Consumption | 5W max |
| Dimensions (with stand) | 7.5 x 4.5 x 0.8 inches |
| Weight | 0.6 lbs (272 g) |
| Frame Material | Plastic with acrylic lens |
| Color | Black |
| Mounting Options | Tabletop stand (built-in), wall-mountable (screw holes, screws not included) |
| Cleaning and Maintenance | Clean with a soft, dry microfiber cloth. Do not use liquid cleaners. |
| Safety Precautions | Avoid exposure to moisture, direct sunlight, and extreme temperatures. |
| Repairability | No user-serviceable parts. Contact Aluratek support for repairs. |
| Warranty | 1-year limited warranty |
| Battery (for remote) | CR2025 (included) |
Frequently Asked Questions - APWHS01F Aluratek
User questions about APWHS01F Aluratek
0 question about this device. Answer the ones you know or ask your own.
Ask a new question about this device
Download the instructions for your Digital photo frame in PDF format for free! Find your manual APWHS01F - Aluratek and take your electronic device back in hand. On this page are published all the documents necessary for the use of your device. APWHS01F by Aluratek.
USER MANUAL APWHS01F Aluratek
natural_image
3D rendering of a black USB device with a metallic connector inserted (no text or symbols visible)PicStick
Wireless HDTV Photo / Video Viewer with Remote Control
Copyright © 2024 Aluratek, Inc. All Rights Reserved.
QSG
APWHS01F
Package Contents
Your order has been carefully packaged and inspected.
The following accessories should be included in your package. Please inspect the contents of the package to ensure that you have received all items and that nothing has been damaged. If you discover a problem, please contact us immediately for assistance.

natural_image
Simple line icon of a battery with two leads, enclosed in a circle (no text or symbols)
natural_image
Simple line drawing of a USB plug inside a circle (no text or symbols)
natural_image
Simple line drawing of a stacked block inside a circle (no text or symbols)Power Adapter HDMI Extender USB Power Cable

natural_image
Simple line drawing of a pipette inside a circle (no text or symbols)
natural_image
Simple line icon of a speaker inside a circle (no text or symbols)Infared Cable Remote Control
Product Highlights
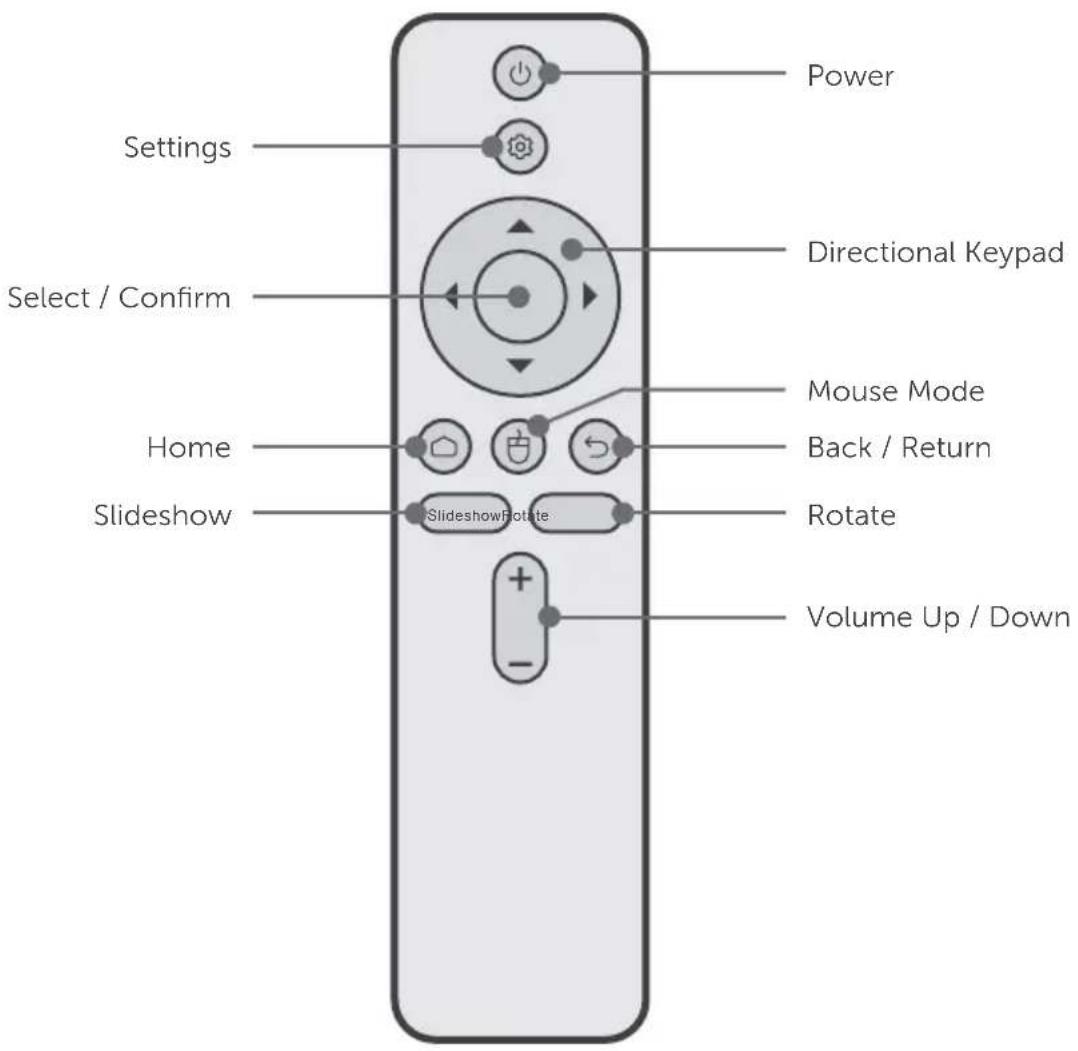
Remote Highlights
Set-Up
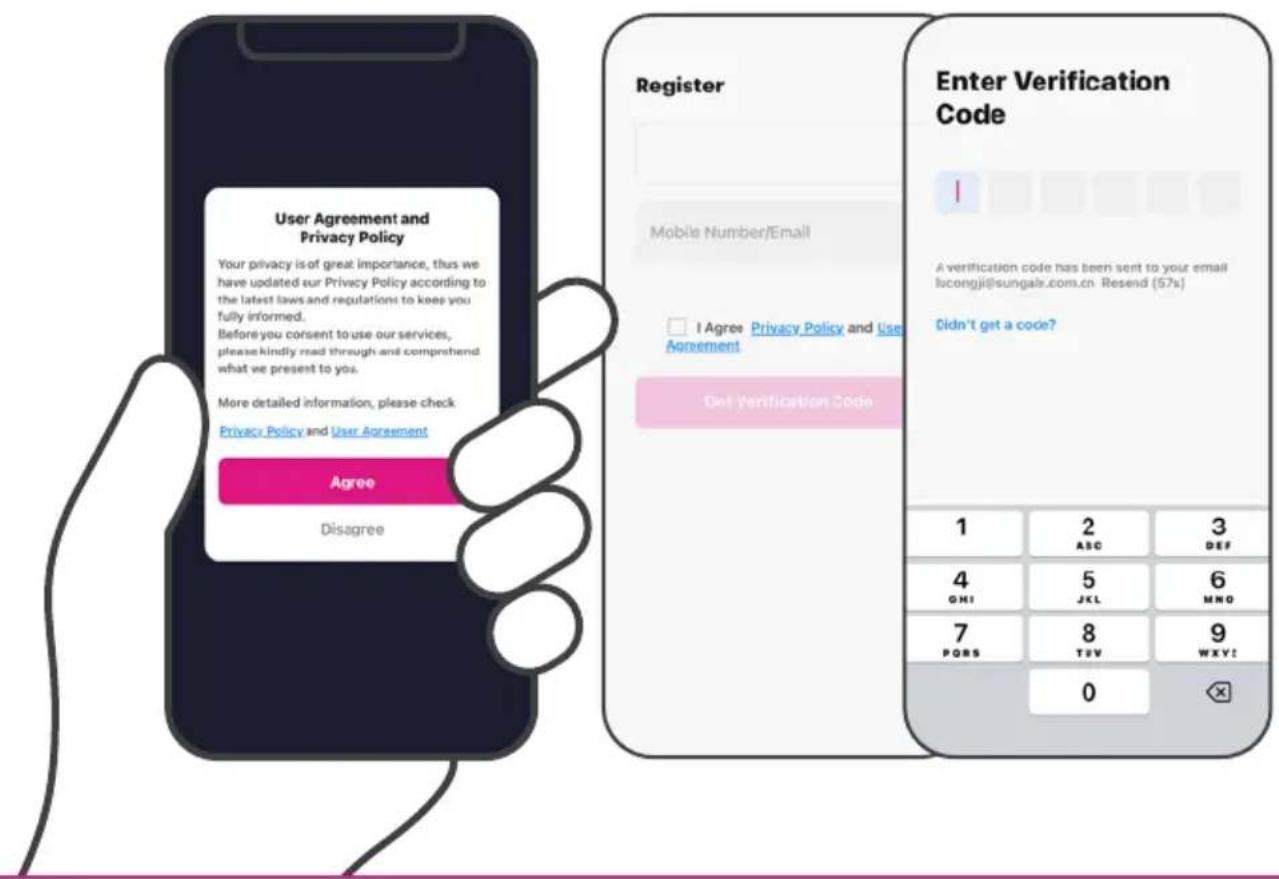
Step 1. Install App
Download the Frametime App on your smartphone from the Apple App Store or the Google Play Store. Once the Frametime app is installed, please follow the on-screen instruction to register an account.


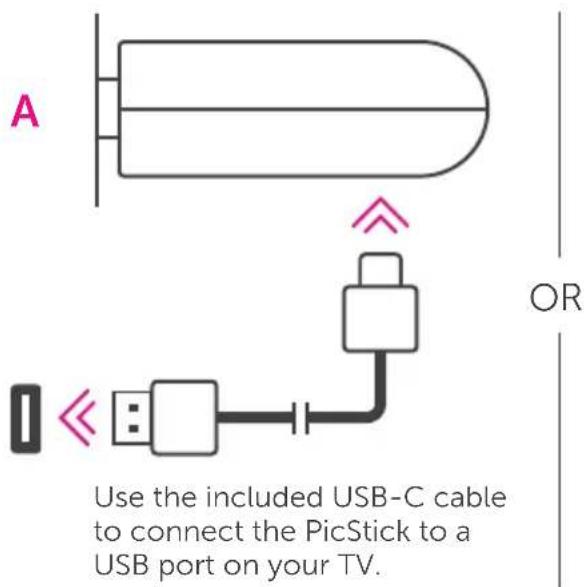
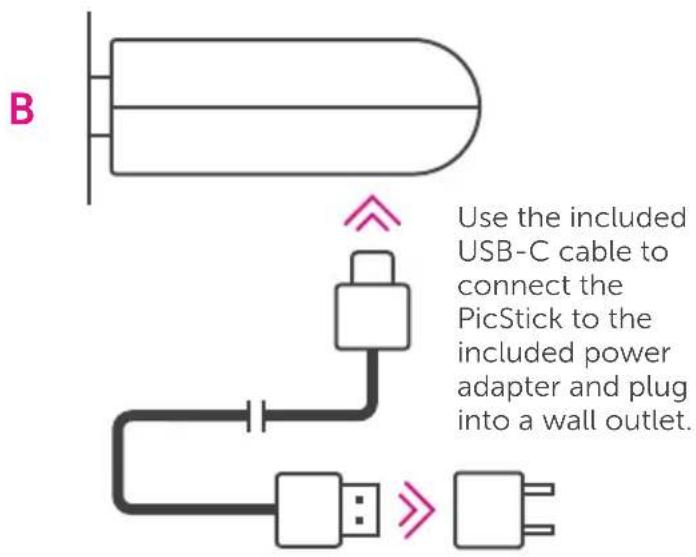
Set-Up
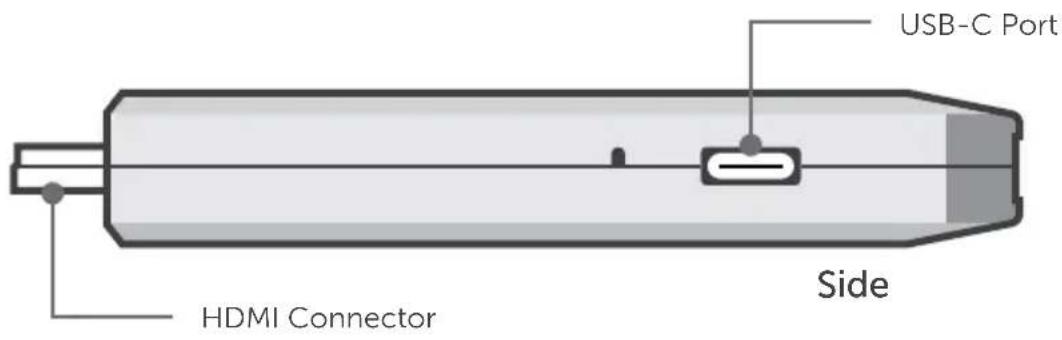
Step 2. Connect to HDMI/Power
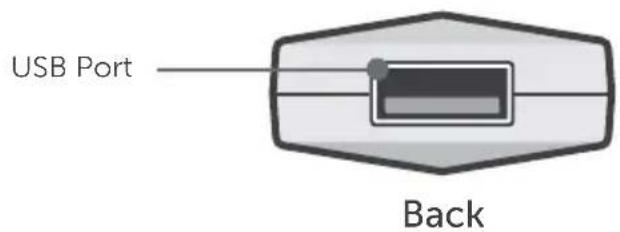
Insert the PicStick into an available HDMI port* on your TV or monitor. *If necessary, use the HDMI extender cable.

natural_image
Simple line drawing of a battery with a switch and battery icon (no text or symbols)Next, connect the PicStick to power. Choose one of the following options:
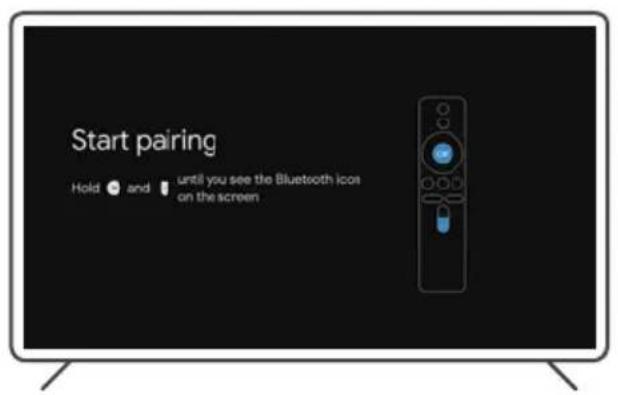
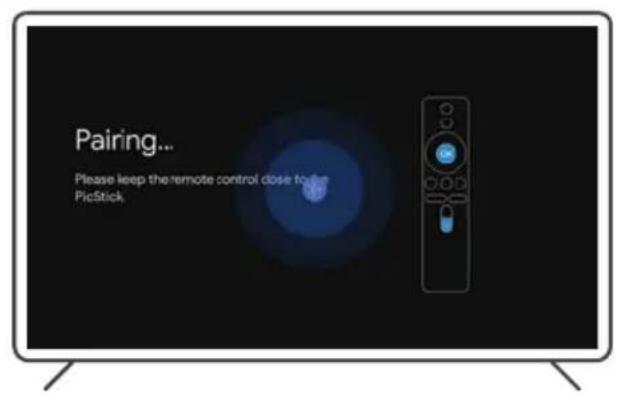
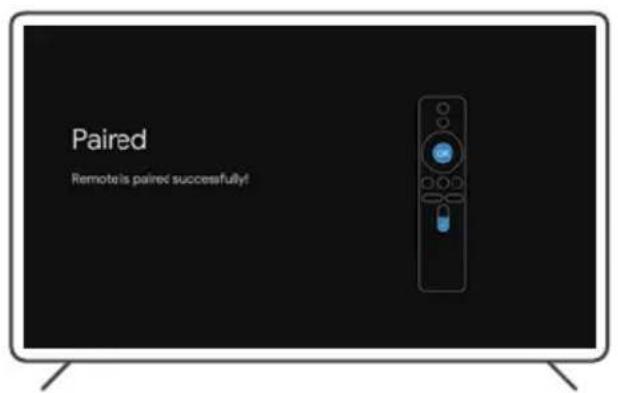
Set-Up
Step 3. Pair Remote
Follow the instructions on your screen to pair the remote control.
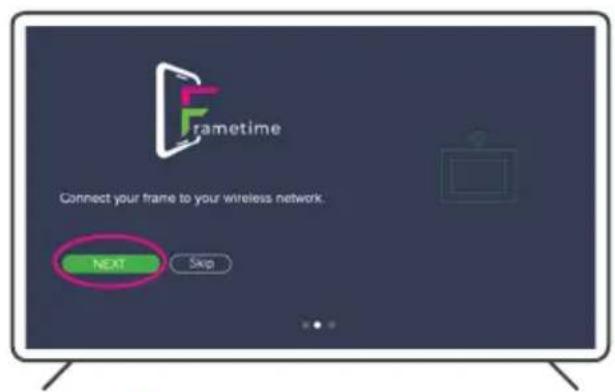
Set-Up
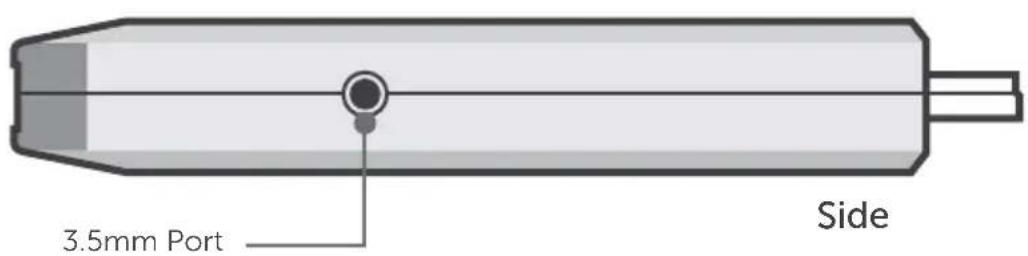
Step 4. Connect to WiFi
Follow the instructions on your screen to connect to a WiFi network.*
*If necessary, connect the infrared cable to the PicStick's 3.5mm port for better remote function.
- Select the Next button
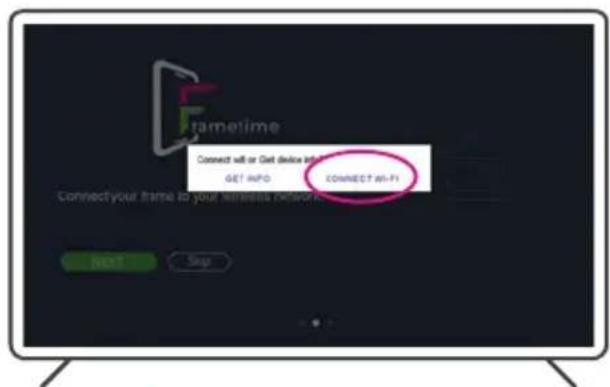
- Select Connect Wi-Fi
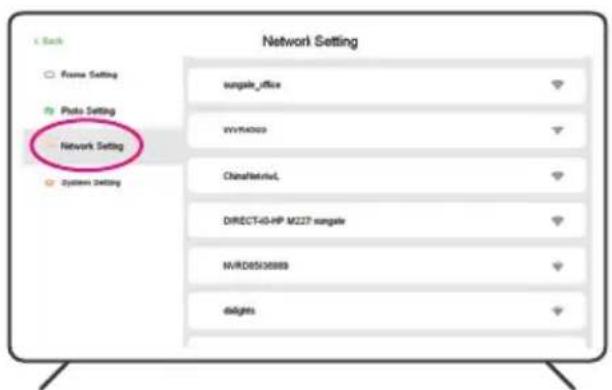
- Select your network name
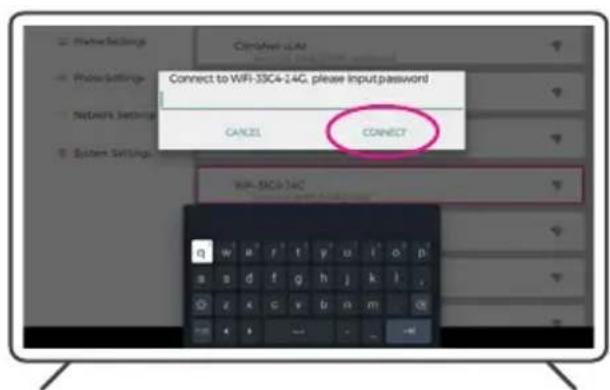
- Enter your password and select Connect
Set-Up
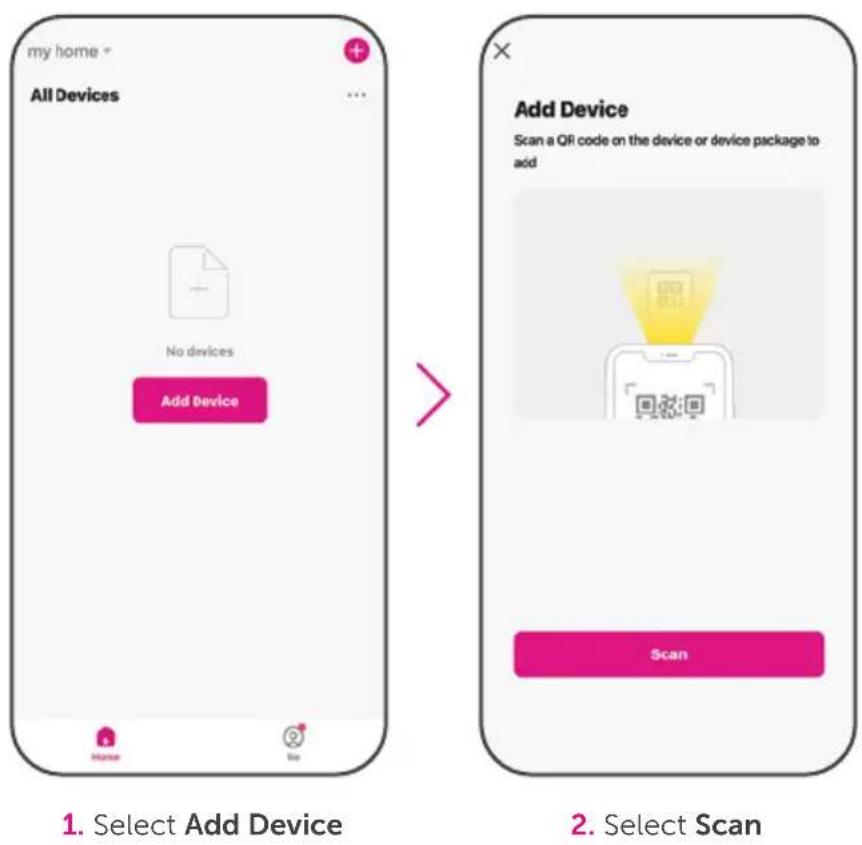
Step 5. Frametime App Set-up
Open the Frametime app if not already open, and follow the instructions below to pair your mobile device to a screen.
Set-Up
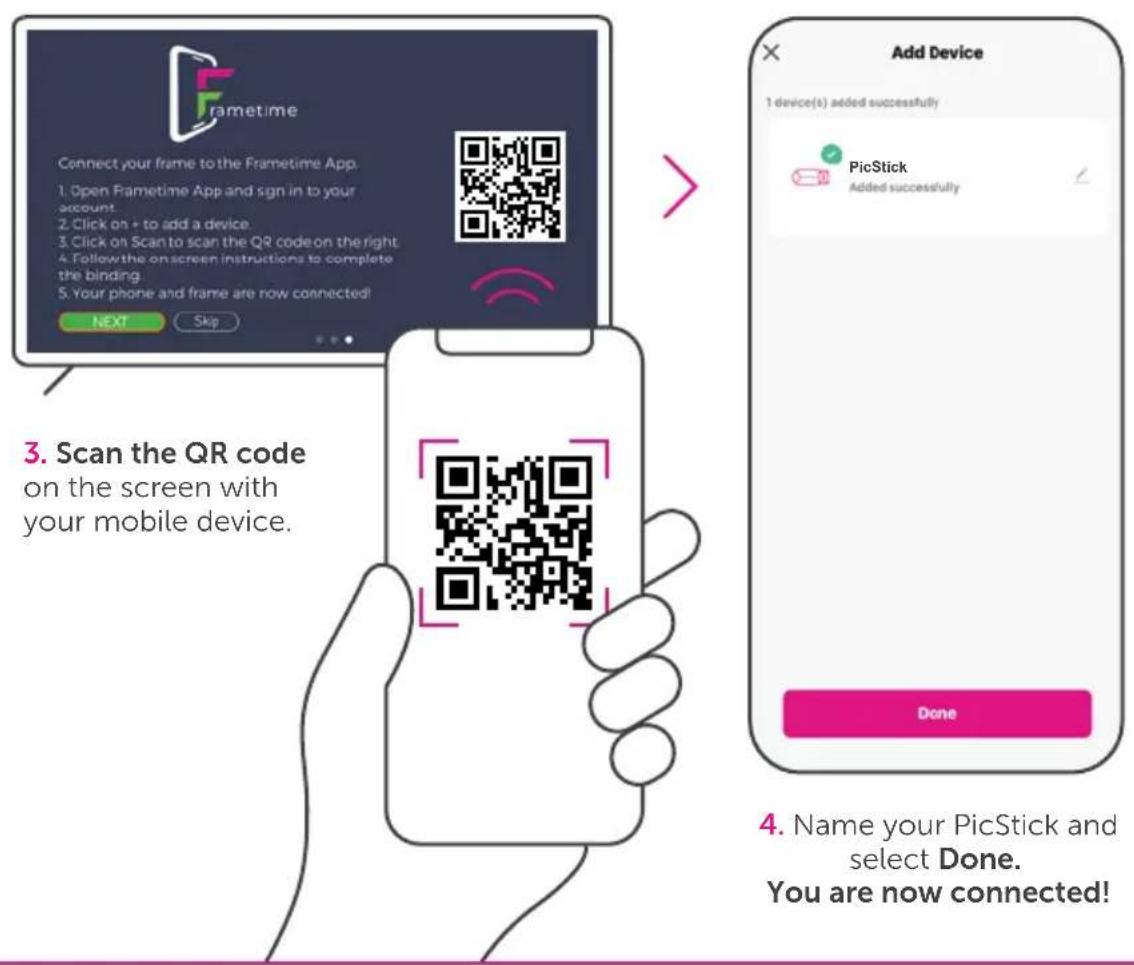
Step 5. Frametime App Set-up cont.
Operation
Send Photos and Videos to the PicStick
Follow the instructions below to start sending your media files from the app on your mobile device to the paired screen within your household.

- Select +

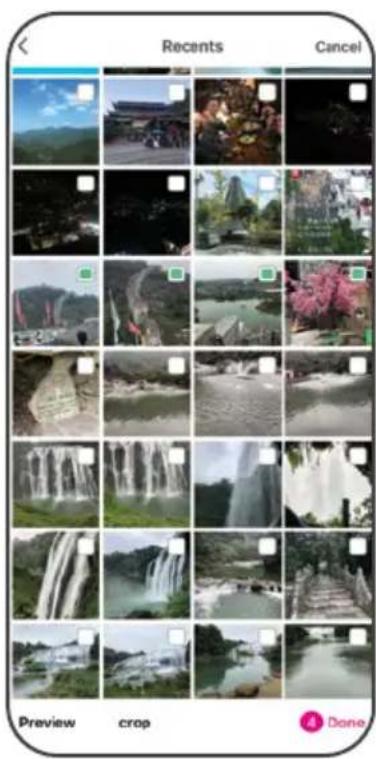
- Select the files you wish to send from your device's photo libray and press Done

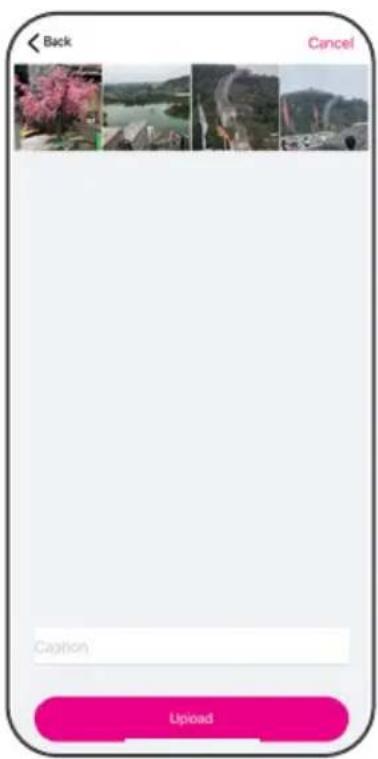
- Once the files are selected, press Upload
Operation
Share the PicStick
Follow the instructions below to allow others to send media files from the app on their mobile device to the paired screen.
Note: Make sure the person you are sharing the PicStick with has already downloaded the Frametime app on their mobile device and created an account.
You will need to have the email address the person you are sharing the PicStick with has used for their account creation.
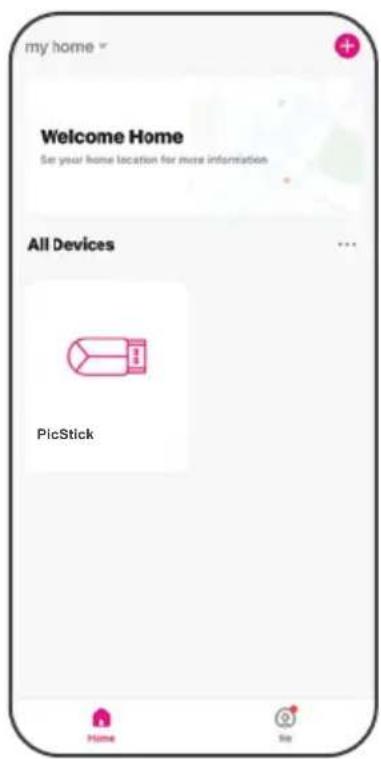
- Open the Frametime app and choose PicStick

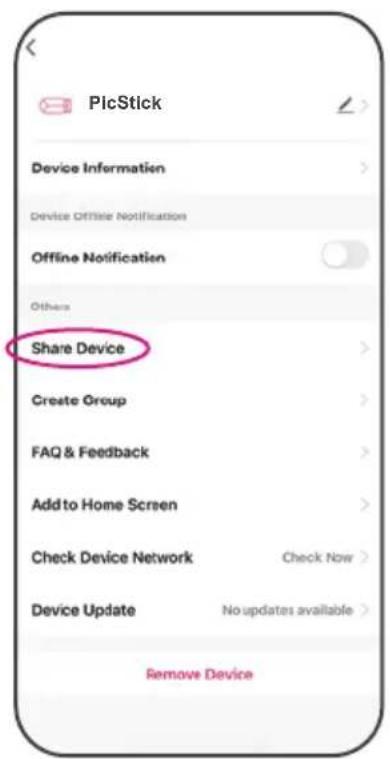
- Select the "∠" in the top right corner and press Share Device
Operation
Share the PicStick cont.
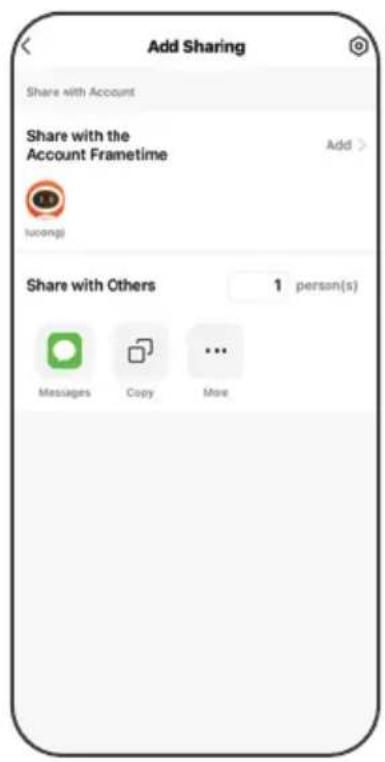
- Select Add Sharing and then Add to input the email address

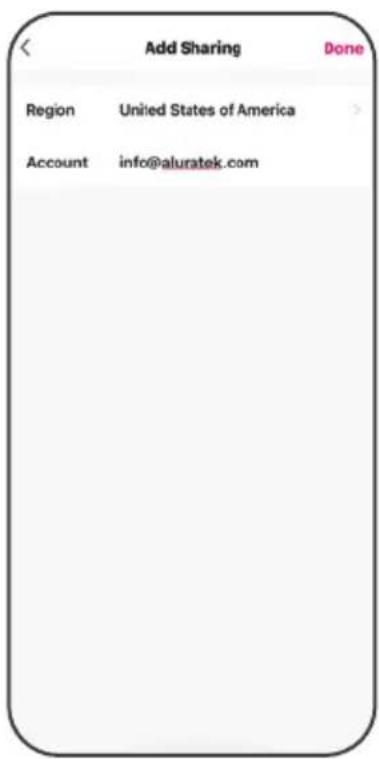
- Select Done in the upper right corner
For the person that you just shared the PicStick with, they will get a notification on their mobile device.
The PicStick name will show up as a shared device on the main screen.
They can start sending pictures to the PicStick by following the instructions on page 12, Send Photo and Videos to the PicStick.
Operation
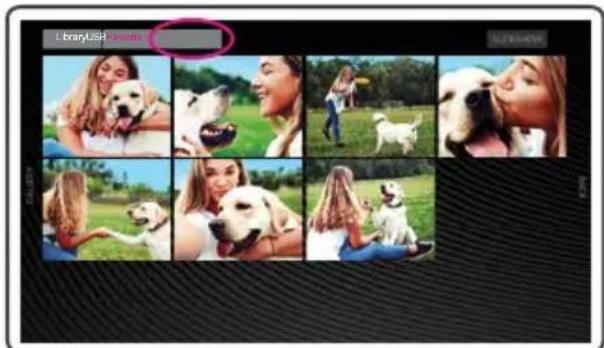
Add Media to Favorites
Follow the steps below to add photos and videos to the favorites folder.
- From the home screen interface, select Gallery
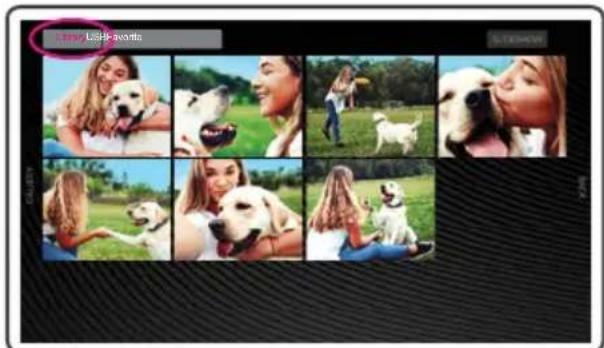
- Select Library or the USB tab

- Scroll to the desired picture(s). Press and hold the OK button on the remote until you see the selected check mark

- Once you have selected all the pictures, select Add on the top of the screen to add the pictures to the Favorites folder
Operation
Delete Media from Favorites
Follow the steps below to delete photos and videos from the favorites folder.
- From the home screen interface, select Gallery
- Select the Favorites tab

- Scroll to the desired picture(s). Press and hold the OK button on the remote until you see the selected check mark
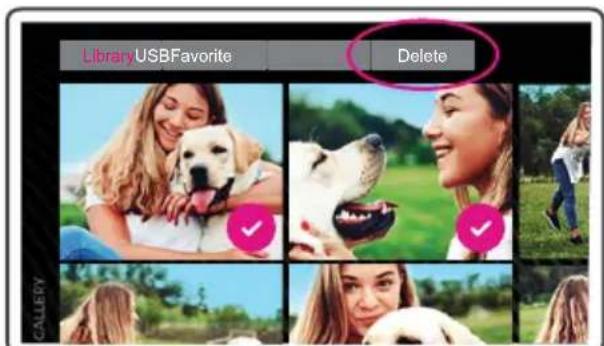
- Once you have selected all the pictures, select Delete on the top of the screen to delete the pictures from the Favorites folder
Technical Support
If you need further assistance, please contact the Aluratek Customer Care department for troubleshooting prior to returning this device.
E-mail: support@aluratek.com
Web: aluratek.com/pages/contact
Local: (Irvine, CA): 714-586-8730
Toll free: 1-866-580-1978
Product Registration
Scan the QR code to register your product. Get promotional offers and faster support help for the term of the warranty.

Warranty
Aluratek warrants this product against defect in material or workmanship for 1 YEAR from the date of purchase. This warranty becomes invalid if the factory-supplied serial number or "warranty void" sticker has been removed or altered on the product.
This warranty does not cover:
A) Cosmetic damage or damage due to acts of God
B) Accident, misuse, abuse, negligence or modification of any part of the product.
C) Damage due to improper operation or maintenance, connection to improper equipment, or attempted repair by anyone other than Aluratek.
D) Products sold AS IS or WITH FAULTS.
IN NO EVENT SHALL ALURATEK'S LIABILITY EXCEED THE PRICE PAID FOR THE PRODUCT FROM DIRECT, INDIRECT, SPECIAL, INCIDENTAL, OR CONSEQUENTIAL DAMAGES RESULTING FROM THE USE OF THE PRODUCT, IT'S ACCOMPANYING SOFTWARE, OR IT'S DOCUMENTATION.
Aluratek makes no warranty or representation, expressed, implied, or statutory, with respect to it's products, contents or use of this documentation and all accompanying software, and specifically disclaims it's quality, performance, merchantability, or fitness for any particular purpose. Aluratek reserves the right to revise or update it's product, software or documentation without obligation to notify any individual or entity.
WARNING!!! This equipment has been tested and found to comply with the limits of a Class B digital device, pursuant to part 15 of the FCC rules. These limits are designed to provide reasonable protection against harmful interference in a residential installation.
This equipment generates, uses and can radiate radio frequency energy and, if not installed and used in accordance with the instruction, may cause harmful interference to radio communications. However, there is no guarantee that interference will not occur in a particular installation. If this equipment does cause harmful interference to radio or television reception, which can be determined by turning the equipment off and on, the user is encouraged to try to correct the interference by whatever measures may be required to correct the interference.
Aluratek

aluratek.com