
ASGK410B - Digital photo frame Aluratek - Free user manual and instructions
Find the device manual for free ASGK410B Aluratek in PDF.


| Product Type | Digital Photo Frame |
| Model | ASGK410B |
| Brand | Aluratek |
| Screen Size | 10.1 inches |
| Display Resolution | 1024 x 600 pixels |
| Supported Image Formats | JPEG, BMP, PNG, GIF |
| Internal Memory | 512 MB |
| Memory Card Slot | SD/SDHC/MMC up to 32 GB |
| USB Port | Micro USB 2.0 for data transfer |
| Power Supply | 5V DC, 1A (USB power adapter included) |
| Power Consumption | 5W (typical) |
| Dimensions (LxHxW) | 10.2 x 7.1 x 1.2 inches |
| Weight | 1.2 lbs (0.54 kg) |
| Slideshow Modes | Multiple transition effects, adjustable interval (5-60 sec) |
| Clock & Calendar | Built-in with alarm function |
| Remote Control | Wireless remote included |
| Wall Mountable | Yes (VESA 75x75 mm compatible) |
| Cleaning Instructions | Wipe with a soft, dry cloth; avoid abrasive cleaners |
| Safety Features | Overheat protection, stable base to prevent tipping |
| Repairability | Spare parts available via Aluratek support; user-replaceable power adapter |
Frequently Asked Questions - ASGK410B Aluratek
User questions about ASGK410B Aluratek
0 question about this device. Answer the ones you know or ask your own.
Ask a new question about this device
Download the instructions for your Digital photo frame in PDF format for free! Find your manual ASGK410B - Aluratek and take your electronic device back in hand. On this page are published all the documents necessary for the use of your device. ASGK410B by Aluratek.
USER MANUAL ASGK410B Aluratek
10" Slim Digital Photo Frame
Instructional Manual

Aluratek
aluratek.com
model ASGK410B
mnl M10447 Copyright © 2017 Aluratek, Inc. All Rights Reserved.
Table of Contents
Frame Features 04
Frame Control Close-up 06
Remote Control Close-up 07
Package Contents 08
Getting Started 08
Operating Instructions
Viewing Photos 09
Transferring Files from your PC / Mac to the Frame's Internal Memory.... 10
Photo Function
Photo Set-up 11
Video Function
Video Set-up 13
Music Function
Music Set-up 14
System Function
System Set-up 15
Calendar Function
Calendar Set-up 16
Table of Contents
Technical Support 17
Radio and TV Interference Statement 18
Warranty 19
Frame Features
1 10" LCD Screen
2 Metal Frame
3 Remote Control Sensor
4 White Matte
5 SD/SDHC Card Slot
6 Headphone Jack
7 Power Adapter Port
8 USB 2.0 Ports
9 Menu Button
10 Directional Keypad
11 Power Button
12 Wall Mount Hole
13 Speakers
14 Security Lock
15 Frame Stand
A Connect a USB hard drive, USB flash drive or SD/SDHC card to easily access and share your favorite pictures, music, or videos.
B Transfer and store files quickly and easily from your personal computer to the frame's 4GB built-in memory with hi-speed USB 2.0.

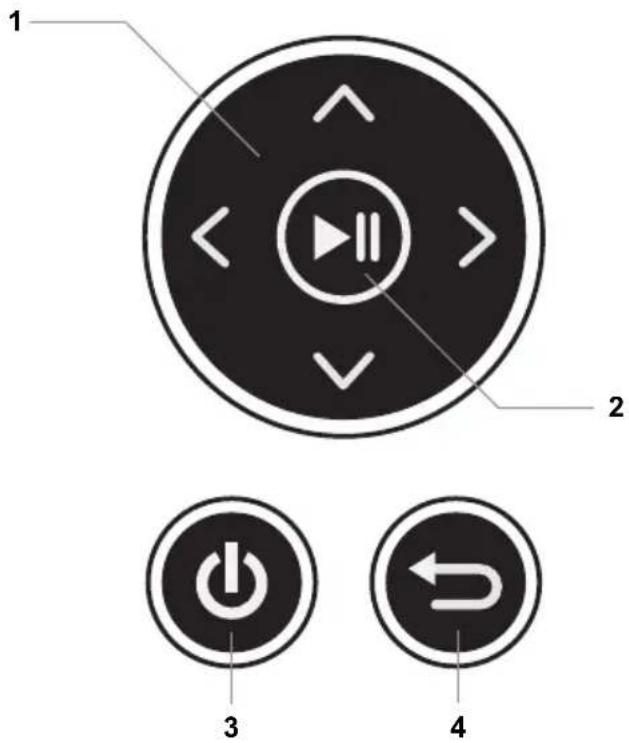
Frame Control Close-Up
1 - Up, Down, Left, Right Arrows -
Use arrow keys to navigate your way through various menus
2 - ▶|| Play / Pause
3 - ⏻ Power On / Off
4 - ← Return Button -
Press to return to previous screen
Remote Control Close-Up
- BGM - Start slideshow with background music (If there are music files on the same memory media)
- Power
- Menu - Takes you to the main menu
- Up, Down, Left, Right Arrows - Use arrow keys to navigate your way through various menus
- OK
- Setup - Takes you to the setup menu
- Volume + / Volume -
- Advance to Previous
- Advance to Next
- Mute
- Return
- Play / Pause
- Zoom
- Rotate

Package Contents
Your order has been carefully packaged and inspected. The following accessories should be included in your package. Please inspect the contents of the package to ensure that you have received all items and that nothing has been damaged. If you discover a problem, please contact us immediately for assistance.
- Power Adapter
- Remote Control
- USB 2.0 Cable
- Registration Card
Getting Started
Plug in the power adapter and press the ⏻ to power on the photo frame.
Operating Instructions
Viewing Photos
- Please insert your memory card (SDHC,SD) at this time.
- The frame will start slideshow automatically when the card is inserted.
- The slideshow can be stopped by pressing the “▶||” button on the frame. You can then press the “◀” or “▶” button to see the next or previous picture.
Operating Instructions
Transferring Files from your PC / Mac to the Frame's Internal Memory
- A USB cable is included with your digital frame to connect it to your PC/ MAC. Connect the small connector to your digital frame and the larger connector to your PC / MAC.
- Once connected, the frame will display a USB connector on the screen. On a PC, the frame's internal memory will appear as a removable drive when viewed in My Computer. On a Mac, the frame will appear as a drive icon on the desktop.
- Copy your photo, video and music files from your PC / MAC into the icon representing the frame's internal memory. When finished disconnect the USB cable from the PC or MAC. (Note: For a Mac, eject the drive icon before disconnecting the USB cable.)
- The frame will return to normal operation once it is disconnected from your PC / MAC.
Photo Function
Photo Setup
From the main menu, press the “◀” or “▶” buttons to select the ✗ and press “▶|| / OK” button to confirm. Press the “▶|| / OK” button again to access the “Photo Setup” menu.
You will see the following options: Display Mode, Music, Display Ratio, Slide Interval, Slideshow Repeat, Slide Effect Transition, Slide Mode and Playback Mode.
Use the “▲” or “▼” button to cursor through the menu. To make any changes to the setup option highlighted, press the “◀” or “▶” button to select the desired option.
Once your selection has been made, press the “▲” or “▼” button to move on to the next menu option.
Press the "Return" button to return to the Setup menu. Press the "Return" button again to return to the Main menu.
Photo Function
To select pictures from either the SD card or the USB drive, press the "Return" button from the Main menu. Use "◀" or "▶" button to select desired media and press "▶|| / OK" button to confirm.
Main Menu:

Video Function
Video Setup
From the main menu, press the “◀” or “▶” buttons to select the ✗ and press “▶|| / OK” button to confirm. Use the “▲” or “▼” button to cursor to “Video Setup” menu. Press the “▶|| / OK” button again to access the “Video Setup” menu.
You will see the following options: Playback Mode, and Display Ratio.
Use the “▲” or “▼” button to cursor through the menu. To make any changes to the setup option highlighted, press the “◀” or “▶” button to select the desired option.
Once your selection has been made, press the “▲” or “▼” button to move on to the next menu option.
Press the “Return” button to return to the Setup menu. Press the “Return” button again to return to the Main menu.
Music Function
Music setup
From the main menu, press the “◀” or “▶” buttons to select the ✗ and press “▶|| / OK” button to confirm. Use the “▲” or “▼” button to cursor to “Music Setup” menu. Press the “▶|| / OK” button again to access the “Music Setup” menu.
You will see the following options: Play Mode.
To change the Play Mode option, press the “▶|| / OK” button to highlight the option, press the “◀” or “▶” button to select the desired option.
Once your selection has been made, press the "Return" button to return to the Setup menu. Press the "Return" button again to return to the Main menu.
System Function
System Setup
From the main menu, press the “◀” or “▶” buttons to select the ✗ and press “▶|| / OK” button to confirm. Use the “▲” or “▼” button to cursor to “System Setup” menu. Press the “▶|| / OK” button again to access the “System Setup” menu.
You will see the following options: Language, GrayScale, Brightness, Contrast, Power Off, Power On, Power Frequency, Start Up Mode, Firmware Version, and Reset Default Settings.
Use the “▲” or “▼” button to cursor through the menu. To make any changes to the setup option highlighted, press the “◀” or “▶” button to select the desired option.
Once your selection has been made, press the “▲” or “▼” button to move on to the next menu option.
To make changes to the Power Off/Power On option, once it is highlighted, press “▶||” button to bring up the submenu to change the time or press the “▲” and “▼” to switch it ON / OFF. Use the “◀” or “▶” to highlight either hour or minutes and use “▲” and “▼” to set the desired time. Once the desired time is shown, press “▶|| / OK” button to confirm or “Return” to cancel.
Press the "Return" button to return to the Setup menu. Press the "Return" button again to return to the Main menu.
Calendar Function
Calendar Setup
From the main menu, press the “◀” or “▶” buttons to select the ✕ and press “▶|| / OK” button to confirm. Use the “▲” or “▼” button to cursor to “Calendar Setup” menu. Press the “▶|| / OK” button again to access the “Calendar Setup” menu.
You will see the following options: Adjust Date, Adjust Time, Time Format, Alarm Status, Alarm Time and Alarm Frequency.
Use the “▲” or “▼” button to cursor through the menu. To make changes to Adjust Date and Adjust Time option, once it is highlighted, press “▶|| / OK” button to bring up the submenu to change the date or time. Use the “◀” or “▶” to highlight and use “▲” and “▼” to set the desired number. Once the desired date or time is shown, press “▶|| / OK” button to confirm or “Return” to cancel
Press the "Return" button to return to the Setup menu. Press the "Return" button again to return to the Main menu.
Technical Support
We are committed to providing the best customer service support. If you need assistance with your Aluratek product, please contact the Aluratek Technical Support department prior to returning this device. Reach out to us in any of the following ways:
E-mail: support@aluratek.com
Web: aluratek.com/helpdesk
Local (Irvine, CA): 714-586-8730
Toll free: 1-866-580-1978
Radio and TV Interference Statement
WARNING!!! This equipment has been tested and found to comply with the limits of a Class B digital device, pursuant to part 15 of the FCC rules. These limits are designed to provide reasonable protection against harmful interference in a residential installation
This equipment generates, uses and can radiate radio frequency energy and, if not installed and used in accordance with the instruction, may cause harmful interference to radio communications. However, there is no guarantee that interference will not occur in a particular installation. If this equipment does cause harmful interference to radio or television reception, which can be determined by turning the equipment off and on, the user is encouraged to try to correct the interference by whatever measures may be required to correct the interference.
Warranty
Aluratek warrants this product against defect in material or workmanship for 1 Year from the date of purchase.
This warranty becomes invalid if the factory-supplied serial number or “warranty void” sticker has been removed or altered on the product.
This warranty does not cover:
A) Cosmetic damage or damage due to acts of God
B) Accident, misuse, abuse, negligence or modification of any part of the product.
C) Damage due to improper operation or maintenance, connection to improper equipment, or attempted repair by anyone other than Aluratek.
D) Products sold AS IS or WITH FAULTS.
IN NO EVENT SHALL ALURATEK'S LIABILITY EXCEED THE PRICE PAID FOR THE PRODUCT FROM DIRECT, INDIRECT, SPECIAL, INCIDENTAL, OR CONSEQUENTIAL DAMAGES RESULTING FROM THE USE OF THE PRODUCT, IT'S ACCOMPANYING SOFTWARE, OR IT'S DOCUMENTATION.
Aluratek makes no warranty or representation, expressed, implied, or statutory, with respect to it's products, contents or use of this documentation and all accompanying software, and specifically disclaims it's quality, performance, merchantability, or fitness for any particular purpose. Aluratek reserves the right to revise or update it's product, software or documentation without obligation to notify any individual or entity.

Aluratek
aluratek.com
Aluratek, Inc. 15241 Barranca Pkwy. Irvine, CA 92618 sales@aluratek.com 714.586.8730 • office 714.586.8792 • fax


- 10" Slim Digital Photo Frame
- Aluratek
- Table of Contents
- Operating Instructions
- Photo Function
- Video Function
- Music Function
- System Function
- Calendar Function
- Frame Features
- Frame Control Close-Up
- Remote Control Close-Up
- Package Contents
- Getting Started
- Viewing Photos
- Transferring Files from your PC / Mac to the Frame's Internal Memory
- Photo Setup
- Video Setup
- Music setup
- System Setup
- Calendar Setup
- Technical Support
- Radio and TV Interference Statement
- Warranty
Brand : Aluratek
Model : ASGK410B
Category : Digital photo frame