
AWS10F - Digital photo frame Aluratek - Free user manual and instructions
Find the device manual for free AWS10F Aluratek in PDF.


| Product Type | WiFi Digital Photo Frame with Touchscreen LCD Display |
| Brand | Aluratek |
| Model | AWS10F |
| Screen Size | 10.1 inches |
| Display Type | IPS LCD |
| Touchscreen | Yes |
| Built-in Storage | 32 GB |
| Memory Card Slot | microSD card (up to 32 GB, not included) |
| USB Ports | 1 x USB-C, 1 x USB 2.0 |
| Connectivity | WiFi 802.11 b/g/n |
| Power Source | AC power adapter (included) |
| Package Contents | Frame, Frame Stand, Power Adapter, USB 2.0 Cable, Quick Start Guide, Instruction Manual |
| Frame Stand | Yes, included and removable |
| Wall Mount | Yes, VESA compatible (mount not included) |
| Motion Sensor | Yes, to detect presence |
| Speakers | Built-in |
| Alarm Clock | Yes, programmable with ringtone |
| Slideshow Features | Adjustable interval, transition effects, random mode, 1-4 multi-picture view |
| Photo Sharing | Via Aluratek Smart Frame app (iOS/Android) or email to frame |
| File Transfer | FTP from computer (Windows), USB, microSD |
| App Compatibility | Aluratek Smart Frame (free) |
| Warranty | 1 year limited |
| Regulatory Compliance | FCC Part 15 Class B |
Frequently Asked Questions - AWS10F Aluratek
User questions about AWS10F Aluratek
0 question about this device. Answer the ones you know or ask your own.
Ask a new question about this device
Download the instructions for your Digital photo frame in PDF format for free! Find your manual AWS10F - Aluratek and take your electronic device back in hand. On this page are published all the documents necessary for the use of your device. AWS10F by Aluratek.
USER MANUAL AWS10F Aluratek
WiFi Digital Photo Frame with Touchscreen LCD Display
Instructional Manual
Aluratek
aluratek.com
Copyright © 2024 Aluratek, Inc. All Rights Reserved.
Table of Contents
Frame Features: 7" Frame 04
Frame Features: 8" / 10" Frame 06
Frame Features: 9" Frame 08
Frame Features: 10.1" Frame 10
Frame Features: 13.5" Frame 12
Frame Features: 15" Frame 14
Frame Features: 15.6" / 17.3" Frame 16
Frame Features: 17" Frame 18
Frame Features: 19" Frame 20
7" / 8" / 10" Frame Control Close-up 22
Package Contents 23
Getting Started 23
Operating Instructions
Configure Aluratek Smart Frame App to Frame.... 24
Create Playlist / Folder 34
Multi Picture Slideshow Display 35
How to Email Photos to the Frame 36
Bind Additional Users to Your Frame Using the App 36
Transfer Pictures Directly From Your Computer To The Frame (Windows) 38
Table of Contents
Main Menu Function
Main Menu 41
Album Function
Album Settings 42
System Function
System Settings 44
Alarm Function
How To Set Alarm 46
Technical Support 47
Radio and TV Interference Statement 48
Warranty 49
Frame Features: 7" Frame
1 7" IPS LCD Touchscreen
2 Frame
3 Power Adapter
4 MicroSD Slot
5 USB 2.0 Ports
6 USB-C Port
7 Wall Mount Hole
8 Power Button
9 Speakers
10 Security Lock
11 Frame Stand
A Connect a USB hard drive, USB flash drive or SD/SDHC card to easily access and share your favorite pictures, music, or videos.
B Transfer and store files quickly and easily to the frame's 8GB built-in memory.

natural_image
Illustration of a tablet device with two labeled buttons (1 and 2) on the screen face, no text or symbols present.
Frame Features: 8" / 10" Frame
1 8" / 10" IPS LCD Touchscreen 6 SD/SDHC Card Slot
2 Frame 7 Power Button
3 USB-C Ports 8 Wall Mount Hole
4 USB 2.0 Ports 9 Speakers
5 Power Adapter Port 10 Frame Stand
A Connect a USB/USB-C hard drive, USB/USB-C flash drive or SD/SDHC card to easily access and share your favorite pictures, music, or videos.
B Transfer and store files quickly and easily to the frame's 32GB built-in memory.
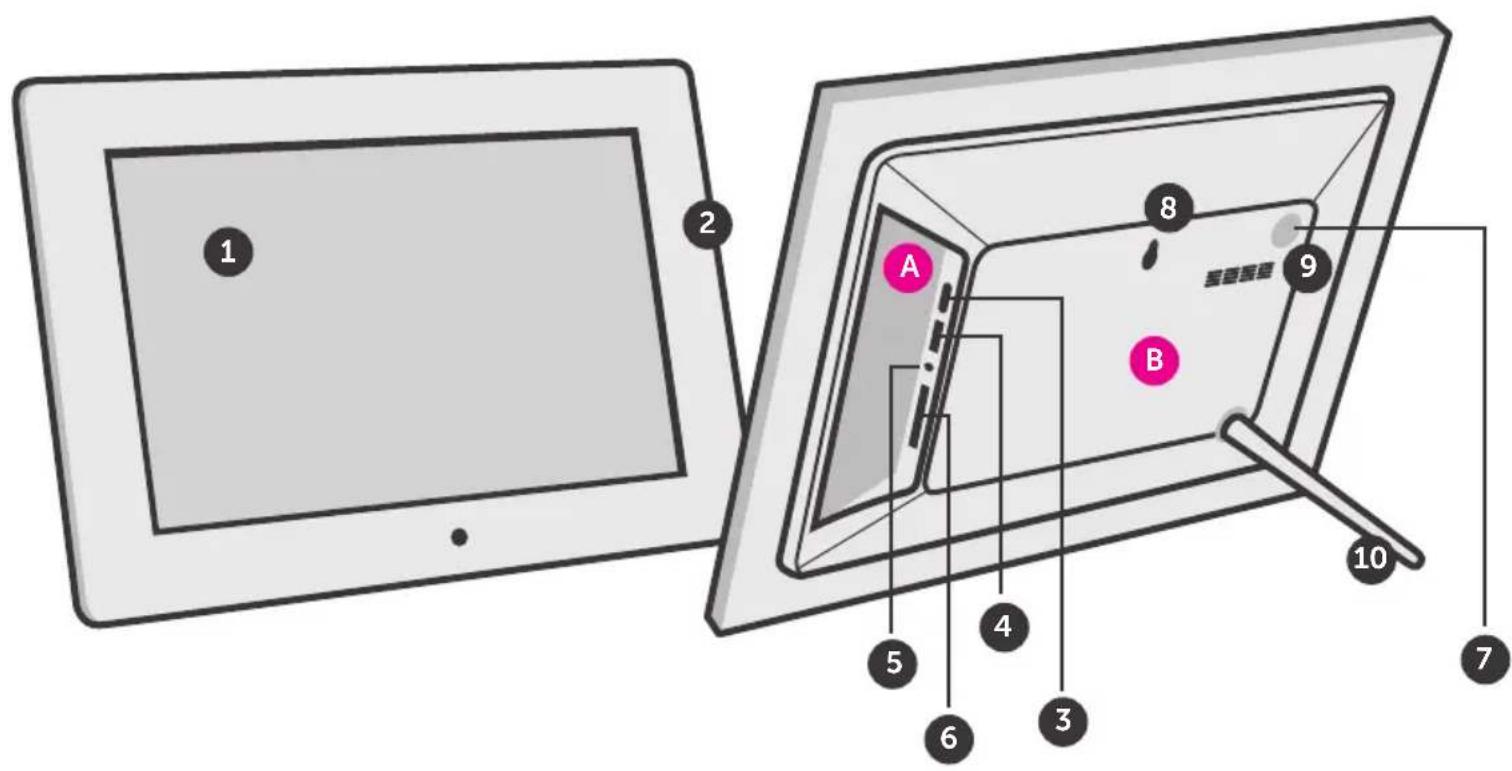
Frame Features: 9" Frame
1 9" IPS LCD Touchscreen
2 Black Matte Frame
3 Motion Sensor
4 microSD Card Slot
5 Power Adapter Port
6 MicroUSB Port
7 Speakers
A Insert a microSD card to easily access and share your favorite pictures, music, or videos.
B Transfer and store files quickly and easily to the frame's 16GB built-in memory.


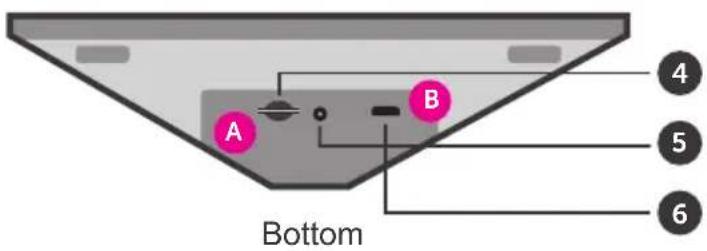
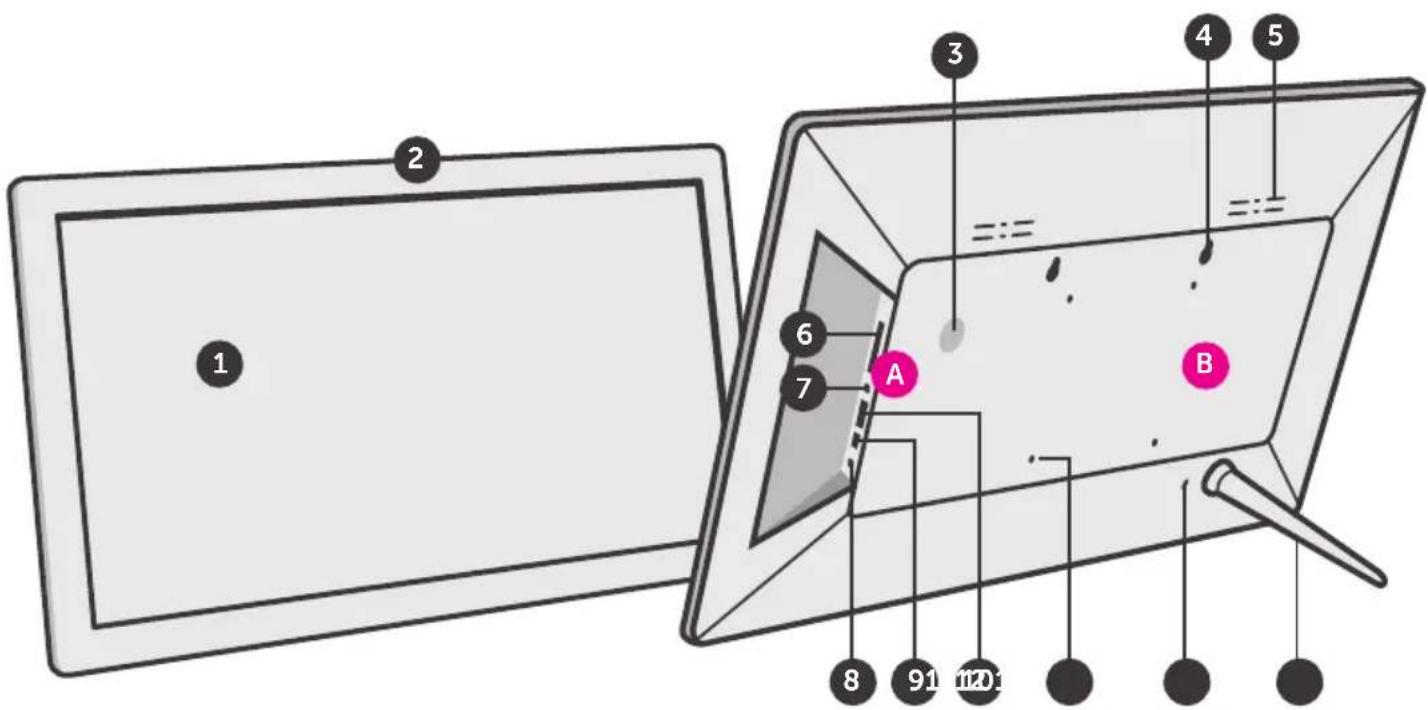
Frame Features: 10.1" Frame
1 10.1" IPS LCD Touchscreen
2 Black Matte Frame
3 Motion Sensor
4 Wall Mount
5 Frame Stand
6 Speakers
7 Power Button
8 USB-C Port
9 USB Port
10 Power Adapter Port
11 microSD Card Slot
A Insert a microSD card to easily access and share your favorite pictures, music, or videos.
B Transfer and store files quickly and easily to the frame's 32GB built-in memory.


flowchart
graph TD
    A["1"] --> B["2"]
    B --> C["3"]
    C --> D["4"]
    D --> E["5"]
    E --> F["6"]
    F --> G["7"]
    G --> H["8"]
    H --> I["9"]
    I --> J["10"]
    J --> K["11"]
    K --> L["12"]
    L --> M["13"]
    M --> N["14"]
    N --> O["15"]
    O --> P["16"]
    P --> Q["17"]
    Q --> R["18"]
    R --> S["19"]
    S --> T["20"]
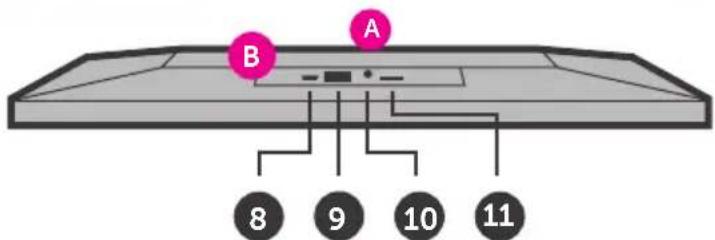
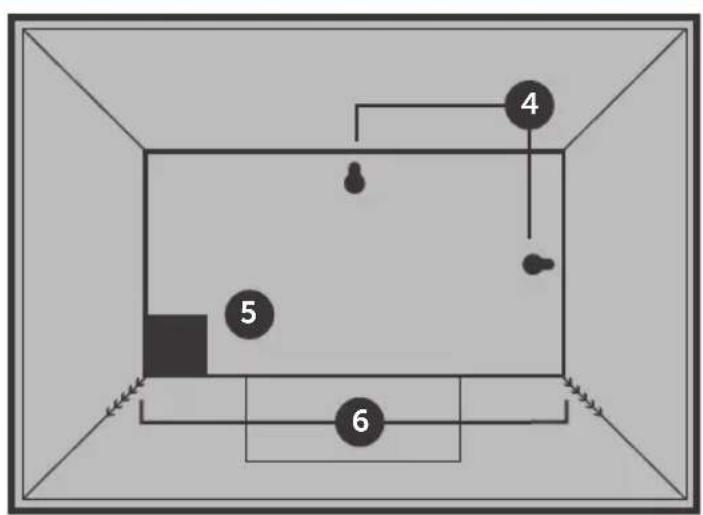
Frame Features: 13.5" Frame
1 13.5" IPS LCD Touchscreen
2 Black Matte Frame
3 Light Sensor
4 Wall Mount
5 Frame Stand
6 Speakers
7 MicroUSB Port
8 USB Port
9 Power Adapter Port
10 microSD Card Slot
A Insert a microSD card to easily access and share your favorite pictures, music, or videos.
B Transfer and store files quickly and easily to the frame's 32GB built-in memory.
flowchart
graph TD
    A["4"] --> B["5"]
    B --> C["6"]
    C --> D["End"]
    style A fill:#000,stroke:#000,color:#fff
    style B fill:#000,stroke:#000,color:#fff
    style C fill:#000,stroke:#000,color:#fff
    style D fill:#000,stroke:#000,color:#fff

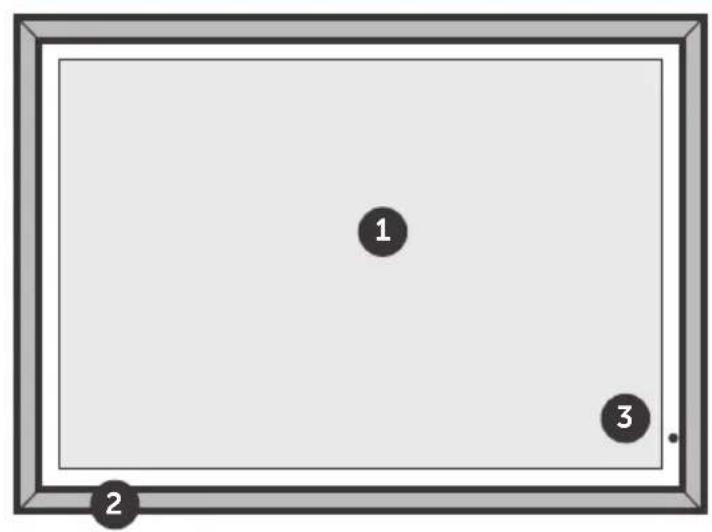
Frame Features: 15" Frame
1 15" LCD Touchscreen
2 Black Matte Frame
3 Motion Sensor
4 Speakers
5 Wall Mount Hole
6 Frame Stand
7 Security Lock
8 microSD Card Slot
9 Power Adapter Port
10 USB Port
11 MicroUSB Port
A Insert a microSD card to easily access and share your favorite pictures, music, or videos.
B Transfer and store files quickly and easily to the frame's 32GB built-in memory.


Frame Features: 15.6" / 17.3" Frame
1 15.6" / 17.3" IPS LCD Touchscreen
2 Frame
3 Power Button
4 Wall Mount
5 Speakers
6 SD/SDHC Card Slot
7 Headphone Jack
8 Power Adapter
9 Mini USB Port
10 USB 2.0 Port
11 Security Lock
12 Frame Stand
13 Wall / VESA Mount
A Connect a USB hard drive, USB flash drive or SD/SDHC card to easily access and share your favorite pictures, music, or videos.
B Transfer and store files quickly and easily to the frame's 16GB built-in memory.
Frame Features: 17" Frame
1 17" IPS LCD Touchscreen
2 Black Matte Frame
3 Motion Sensor
4 Wall Mount
5 Frame Stand
6 Speakers
7 Power Button
8 USB-C Port
9 USB Port
10 Power Adapter Port
11 microSD Card Slot
A Insert a microSD card to easily access and share your favorite pictures, music, or videos.
B Transfer and store files quickly and easily to the frame's 32GB built-in memory.


flowchart
graph TD
    A["Room 5"] --> B["Room 6"]
    B --> C["Room 7"]
    C --> D["Room 4"]
    D --> E["Room 5"]
    style A fill:#000,stroke:#000
    style B fill:#000,stroke:#000
    style C fill:#000,stroke:#000
    style D fill:#000,stroke:#000
    style E fill:#000,stroke:#000

Frame Features: 19" Frame
1 19" LCD Touchscreen
2 Black Matte Frame
3 Light Sensor
4 Wall Mount
5 Frame Stand
6 Speakers
7 USB-C Port
8 Power Adapter Port
A With the included USB-C extension, easily access and share your favorite musics, pictures, or videos on USB-C storage devices or memory cards (card reader is required, not included)
B Transfer and store files quickly and easily to the frame's 64GB built-in memory.


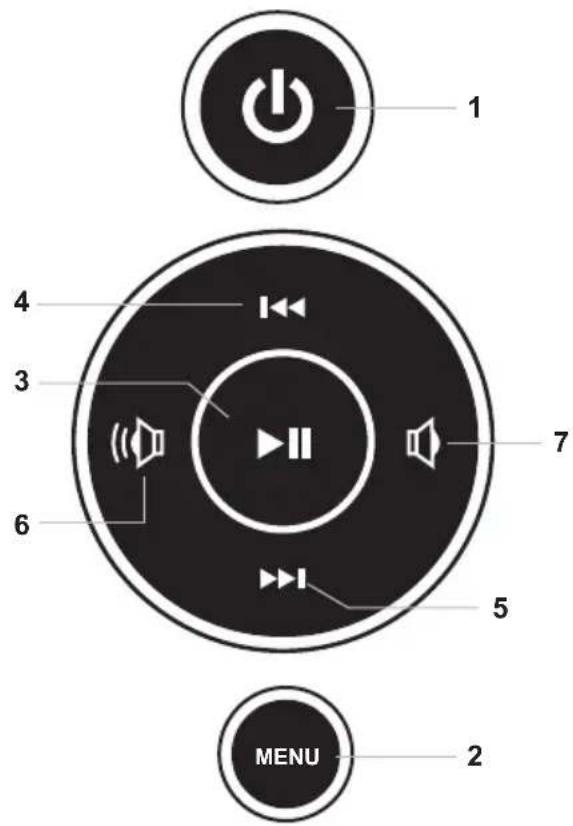
7" / 8" / 10" Frame Control Close-Up
1 - ⏻ Power On / Off
2 - Menu
(a) Press to return to previous screen
(b) Press & hold to return to Main Menu
3 - ▶ || Play / Pause
(a) Press to select option on Main Menu
(b) Press to pause slideshow, music or video
4 - |◀◀ Up Arrow
(a) Press to navigate UP when selecting options
(b) Press to select Previous file (Photo & Music mode)
(c) Press & hold to Fast Forward
5 - ▶▶| Down Arrow
(a) Press to navigate DOWN when selecting options
(b) Press to select Next file (Photo & Music mode)
(c) Press & hold to Scan Backward
6 - Volume Up
(a) Press & hold to increase volume
7 - Volume Down
(a) Press & hold to decrease volume
Package Contents
Your order has been carefully packaged and inspected. The following accessories should be included in your package. Please inspect the contents of the package to ensure that you have received all items and that nothing has been damaged. If you discover a problem, please contact us immediately for assistance.
USB 2.0 Cable, Power Adapter, Frame Stand*, Instructional Manual, Quick Start Guide *Not applicable for 9" frame
Getting Started
- Screw in the frame stand (Not applicable for 9" frame)
- Plug in the power adapter
Power On: Connect your WiFi Frame to an AC outlet. The photo frame will power on
Connect to your WiFi
- Select the WiFi connection utilizing the photo frame touch screen display. (if required, enter the WiFi password)
- "Connected" will appear below your selected WiFi network.
- Press the arrow in the upper right corner to move to the next step
Operating Instructions
Configure Aluratek Smart Frame App to Frame
Step 1: Download the ‘Aluratek Smart Frame” APP to your Smartphone / Tablet
- Go to the App store on your Apple or Anroid device and search for "Aluratek Smart Frame" then install and open. (Image 1 & 2) NOTE: Make certain you download "Aluratek Smart Frame" and not "Aluratek WIFI Frame"
- Tap "Complete" on the device info screen
Operating Instructions

Image 1

Image 2
Operating Instructions
Configure Aluratek Smart Frame App to Frame
Step 2: Creating Your Account in the App
- Open the "Aluratek Smart Frame" APP (Allow notifications if prompted)
- Select "Sign Up" (Image 3)
- Create "Username" "Password" (write this down as you will need it later)
- Enter your email address then press the "Submit" button.
(Image 4 & 5)
Operating Instructions

Image 3

Image 4

Image 5
Configure Aluratek Smart Frame App to Frame
Step 3: Bind Your Frame
- Make sure you are signed in within the APP
- Select "Devices" within the APP
- Click the "+" next to My Devices (Image 6)
- Enter a device Name that will help you identify this particular frame. For example "Kitchen123".
- Create a unique email address name for your frame so you can email pictures / videos. Tip: Make it unique using 6 or more characters including letters, numbers, and symbols. For example, Alexkitchen@wififrame.com (Image 7)
- Enter your frame ID - this is found on your WiFi frame by selecting "Settings" then "Device info". See "Frame ID:" xxxxxx at the top of the screen. (Image 8)
- Enter your unique "Frame ID" into the field on the app. Your frame will notify you that a request has been sent to allow a user to bind to it. Touch "Accept" to bind.
- On your digital frame go to "Settings" > "User Management" to see "Pending User Request" and touch "Accept".
- Your phone and frame are now connected!
Operating Instructions


Image 6 Image 7 Image 8
Configure Aluratek Smart Frame App to Frame
Step 4: Send Pictures from your Smartphone / Tablet to the frame using the Aluratek Smart Frame APP
- Select the photo or video icon within the APP to take a live photo / video. If prompted to access the camera, please "Allow" access.
- Select the "Media/Files" icon to send a photo or video previously saved to your smartphone / tablet. Select the files you would like to send then click done. (Image 9)
- Under "Push Device" Select the frame that you would like to send the files to. (Image 10)
- Select the right arrow (send mail) icon to send. (Image 10) NOTE: You can send up to 9 photos at a time to speed up the photo delivery to the frame.
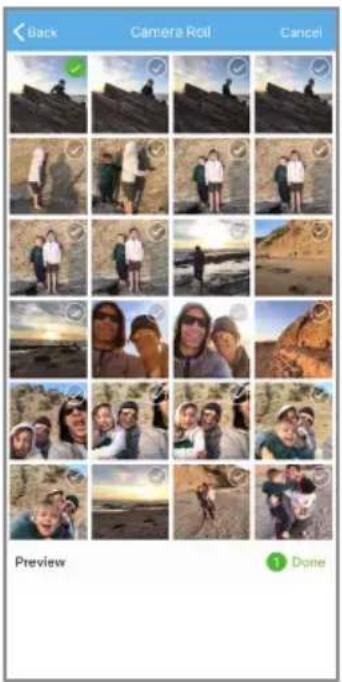
Image 9
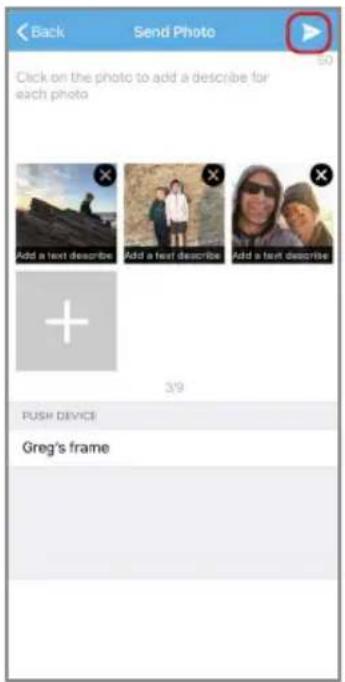
Image 10
Operating Instructions
Configure Aluratek Smart Frame App to Frame
Step 5: Enjoy Your Photos!
- On the main screen on your photo frame - select the photos in the upper left box
- Use the menu on the left to select the source for your photos typically, that is "ALL"
- Tap a photo in the right column to start enjoying your photos.
Operating Instructions
Create Playlist / Folder
- On the main screen on your photo frame - select the photos in the upper left box
- Tap on Folder, then tap "+ New folder" to create a new folder

- Once the folder is created, tap on Internal Storge to show the available pictures.
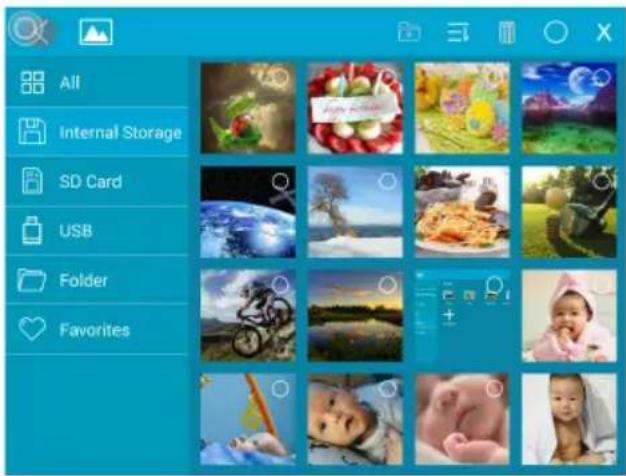
Operating Instructions
Create Playlist / Folder
- Tap on ☐ to enable the selection of the pictures. Tap on the picture to select it.
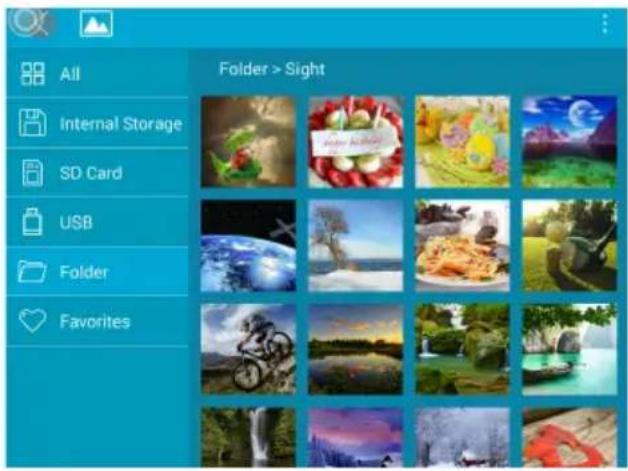
- Once the pictures are selected, tap on the folder icon on the top to add the pictures to the folder/playlist that you want.

To play a slideshow of a particular playlist/folder, tap on Folder, then the folder that you want to display. Start the slideshow by tapping on any of the pictures in the folder.
Operating Instructions
Multi Picture Slideshow Display
During a slideshow, you can change the view to display 1-4 pictures simultaneously by tapping 📁.

Operating Instructions
If you are the owner of the frame, the email address you used to bind the frame is already approved to send photos. You can verify by going to Settings > User Management, your email should be listed under users.
How to Email Photos to the Frame
- Have your family or friend send an email with a subject line of bd123456 (if your frame id was 123456)
Example:
To: alexkitchen@wififrame.com
Subject: bd123456 (if your frame ID was 123456)
(Note: there is no need to add anything in the body of the email)
- You must accept the user request on the frame by going to Settings > User Management.
- Accept the user request by clicking Accept.
- The email sender will receive a confirmation email with the subject line "Your Binding Request was Complete". This confirms they can now email photos to your photo frame.
- To send photos to the frame the sender only needs to send an email to the frame and attach a photo. No subject line is necessary.
Bind Additional Users to Your Frame Using the App
- Download Aluratek Smart Frame app from the app store on the additional user's smart device.
- Create a new user account and login to the app.
- Select "Devices" within the app.
- Click the “+” next to “Bound Devices” (Image 11)
- Enter a device name that will help identify this particular frame. For example: "Kitchen123"
- Enter frame ID - this is found on your WiFi frame by selecting "Settings" then "Device info".
- On your digital frame, go to "Settings" then "User Management" to see "Pending User Request" and touch "Accept".
- Additional user is now connected!

Image 11
Operating Instructions
- You will see the binding message, "Successful Binding!" once the binding is completed
- You can now send pictures to your frame by just attaching a picture and send via message.

Transfer Pictures Directly From Your Computer To The Frame (Windows)
For Mac users, you will need to have an FTP client installed.
To transfer pictures from your computer to the WiFi frame directly, the frame and the computer will need to be on the same network. Follow the steps below to transfer the pictures.
- Go to Settings > PC Control on the frame. Click "Start" to see the ftp address of the frame on the screen.
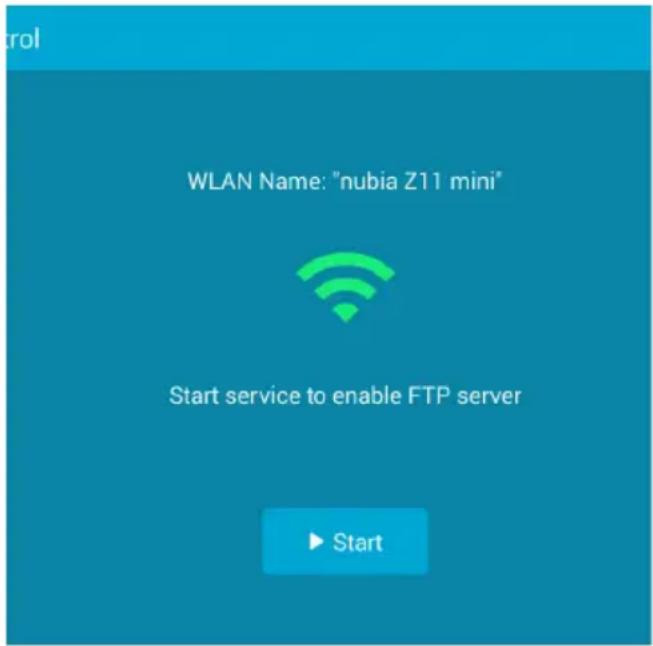
Operating Instructions
- Go to your computer and open "File Explorer". In the File Explorer, type in the exact address in the address bar. In this example, it is ftp://192.168.0.100:2121
- The internal memory of the frame will show up as a folder on your computer. Drag and drop pictures you wish to transfer into this folder.
- Once transferred, please go to Album > Internal memory of the frame to see the pictures.
Note: If the computer and the frame is not on the same network, you can send / transfer the pictures to the frame via Facebook / Twitter or Aluratek Smart Frame app.

Main Menu

Album Function
Album Settings
- From the main menu, tap on "Settings".
- Tap on "Album Settings".

Album Function
Full Screen: Display photo in original size or to full screen.
Slideshow: If enabled, the slideshow will start automatically. based on the time selected.
The slideshow will display pictures from the cloud media folder unless you are in the thumbnail page of the Internal memory or USB/SD Card folder then the slideshow will show pictures in those folders only.
Description: Show/hide caption, date and time on picture
Background Music: Set background music on / off
Slideshow Mode: Enable random pictures in slideshow mode.
Slideshow Transition Effect: Slideshow transition effect
Slideshow Interval: Slideshow time interval.
Delete Photos: Delete all photos from the cloud media and internal memory folders
Reset Default Settings: Reset all settings and disconnect all linked accounts without removing pictures in the cloud media and internal memory folders.
Sort by: Sort the sequential slideshow by name or time
Motion Sensor: Set motion sensor on/off
Auto-rotate screen: Set auto-rotate screen on/off
System Function
System Settings
- From the main menu, tap on "Settings".
- Tap on "System Settings".

System Function
Sound: To adjust the media volume and notification volume, enable the touch sounds.
Display: To adjust the brightness of the display. Enable motion sensor (for 9" frame only)
Date and time: To set the date and time for the frame.
Auto ON / OFF: Enable the auto on / off feature.
Auto OFF: Set the time for the frame to auto power off.
Auto ON: Set the time for the frame to auto power on.
Factory data reset: Reset all data from the device's internal memory and the inserted SD card.
How To Set Alarm
- From the main menu, tap on "Alarm".
- To edit an existing alarm, tap on "Edit alarm" or tap "Add alarm" to create a new alarm.
- Once you have set the days, time and ringtone of the alarm, tap OK to set the alarm.

Technical Support
We are committed to providing the best customer service support. If you need assistance with your Aluratek product, please contact the Aluratek Technical Support department prior to returning this device. Reach out to us in any of the following ways:
E-mail: support@aluratek.com
Web: aluratek.com/helpdesk
Local (Irvine, CA): 714-586-8730
Toll free: 1-866-580-1978
Radio and TV Interference Statement
WARNING!!! This equipment has been tested and found to comply with the limits of a Class B digital device, pursuant to part 15 of the FCC rules. These limits are designed to provide reasonable protection against harmful interference in a residential installation
This equipment generates, uses and can radiate radio frequency energy and, if not installed and used in accordance with the instruction, may cause harmful interference to radio communications. However, there is no guarantee that interference will not occur in a particular installation. If this equipment does cause harmful interference to radio or television reception, which can be determined by turning the equipment off and on, the user is encouraged to try to correct the interference by whatever measures may be required to correct the interference.
Warranty
Aluratek warrants this product against defect in material or workmanship for 1 Year from the date of purchase.
This warranty becomes invalid if the factory-supplied serial number or “warranty void” sticker has been removed or altered on the product.
This warranty does not cover:
A) Cosmetic damage or damage due to acts of God
B) Accident, misuse, abuse, negligence or modification of any part of the product.
C) Damage due to improper operation or maintenance, connection to improper equipment, or attempted repair by anyone other than Aluratek.
D) Products sold AS IS or WITH FAULTS.
IN NO EVENT SHALL ALURATEK'S LIABILITY EXCEED THE PRICE PAID FOR THE PRODUCT FROM DIRECT, INDIRECT, SPECIAL, INCIDENTAL, OR CONSEQUENTIAL DAMAGES RESULTING FROM THE USE OF THE PRODUCT, IT'S ACCOMPANYING SOFTWARE, OR IT'S DOCUMENTATION.
Aluratek makes no warranty or representation, expressed, implied, or statutory, with respect to it's products, contents or use of this documentation and all accompanying software, and specifically disclaims it's quality, performance, merchantability, or fitness for any particular purpose. Aluratek reserves the right to revise or update it's product, software or documentation without obligation to notify any individual or entity.
Aluratek aluratek.com
Aluratek, Inc. 15241 Barranca Pkwy. Irvine, CA 92618 sales@aluratek.com 714.586.8730 • office 714.586.8792 • fax





- WiFi Digital Photo Frame with Touchscreen LCD Display
- Aluratek
- Table of Contents
- Operating Instructions
- Main Menu Function
- Album Function
- System Function
- Alarm Function
- Frame Features: 7" Frame
- Frame Features: 8" / 10" Frame
- Frame Features: 9" Frame
- Frame Features: 10.1" Frame
- Frame Features: 13.5" Frame
- Frame Features: 15" Frame
- Frame Features: 15.6" / 17.3" Frame
- Frame Features: 17" Frame
- Frame Features: 19" Frame
- 7" / 8" / 10" Frame Control Close-Up
- Package Contents
- Getting Started
- Connect to your WiFi
- Configure Aluratek Smart Frame App to Frame
- Step 1: Download the ‘Aluratek Smart Frame” APP to your Smartphone / Tablet
- Step 2: Creating Your Account in the App
- Step 3: Bind Your Frame
- Step 4: Send Pictures from your Smartphone / Tablet to the frame using the Aluratek Smart Frame APP
- Step 5: Enjoy Your Photos!
- Create Playlist / Folder
- Multi Picture Slideshow Display
- How to Email Photos to the Frame
- Bind Additional Users to Your Frame Using the App
- Transfer Pictures Directly From Your Computer To The Frame (Windows)
- Main Menu
- Album Settings
- System Settings
- How To Set Alarm
- Technical Support
- Radio and TV Interference Statement
- Warranty
- Aluratek aluratek.com
Brand : Aluratek
Model : AWS10F
Category : Digital photo frame